The Myth and Reality of Small Sensor Noise

Is noise a real or imagined problem? How well can noise be ‘cleaned up’ whether it’s necessary or not?
As you know, I have ventured into the realm of small sensor photography, having traded in my Nikon full frame system for the OM Systems OM-1 (formerly Olympus) camera body and lenses. With a smaller sensor comes the concern, real or imagined, of greater noise, especially at higher ISO settings. And we all know, more noise translates into poorer quality photographs. So why would I bother with a small sensor camera?
OM-1 w M. Zuiko Digital 100-400mm ƒ5.0-6.3 IS at 400mm; ƒ6.3 @ 1/2000; ISO1600
Small sensor pros. Any cons?
The OM-1 comes packed with 20.2 million pixels on a sensor that is ¼ the size of a full frame sensor. At this pixel density, if it were a full frame camera, the sensor would be about 80mp, something Sony and Canon have yet to achieve. The smaller Micro Four Thirds sensor is why a 100mm lens on an OM-1 gives the same field of view as a 200mm lens on a full frame camera. Small sensor = shorter focal lengths = smaller lenses = less weight in my sling pack, which is why I traded in my Nikon full frame for the OM system.
However, each of those 5184 x 3888 pixels is smaller in size than the pixels on, for example, a 46mp full frame camera like Nikon’s Z9. Each pixel (or photo receptor) on the OM-1 sensor is 3.36 microns in size; for the Nikon Z9, it’s 4.35 microns. Being 2 microns smaller, the photo receptors on the OM-1 cannot gather as much light per exposure. Therefore, the “gain” needed to boost the signal from the sensor to the digital file is higher, resulting in more noise. At least that’s the theory, but does it bear out in actual practice?

OM-1 w/100-400mm ƒ5.0-6.3; ƒ11 @ 1/200; ISO400
As the Grinch complained, “Noise! Noise! Noise!”
In theory – noise! However, the reality is that the noise level of files from the OM-1 is truly impressive. In fact, it is so good, I find myself examining photos at 200% for noise and sharpness, rather than at 100%. And, when printed, any noise visible on screen disappears, even at ISO 1600. Moreover, Mike Lane, a British wildlife photographer, is so impressed with the noise on his OM-1, he uses ISO 1600 as his base ISO. I remember the days (okay, old man) of pushing ISO 400 Tri-X black and white film two stops to ISO 1600 and having to deal with the salt and pepper results of grain on top of grain. Well, not anymore!
The engineers at Olympus, and subsequently OM Systems, have built some advanced electronics into the camera to deal with noise, including 3 analog-to-digital converters (ADCs). These are the electronics that boost the signal from the photo receptors before being written to a file. Each ADC is optimised for a different ISO range: ISO 200 to 800; ISO 1000 to 12800; and ISO 16000 and above.
Incredible. Now, I will admit up front that I have not tested these ranges. Rather, my findings are based on actual usage in the field. Here are my findings using photos shot at ISO 3200.
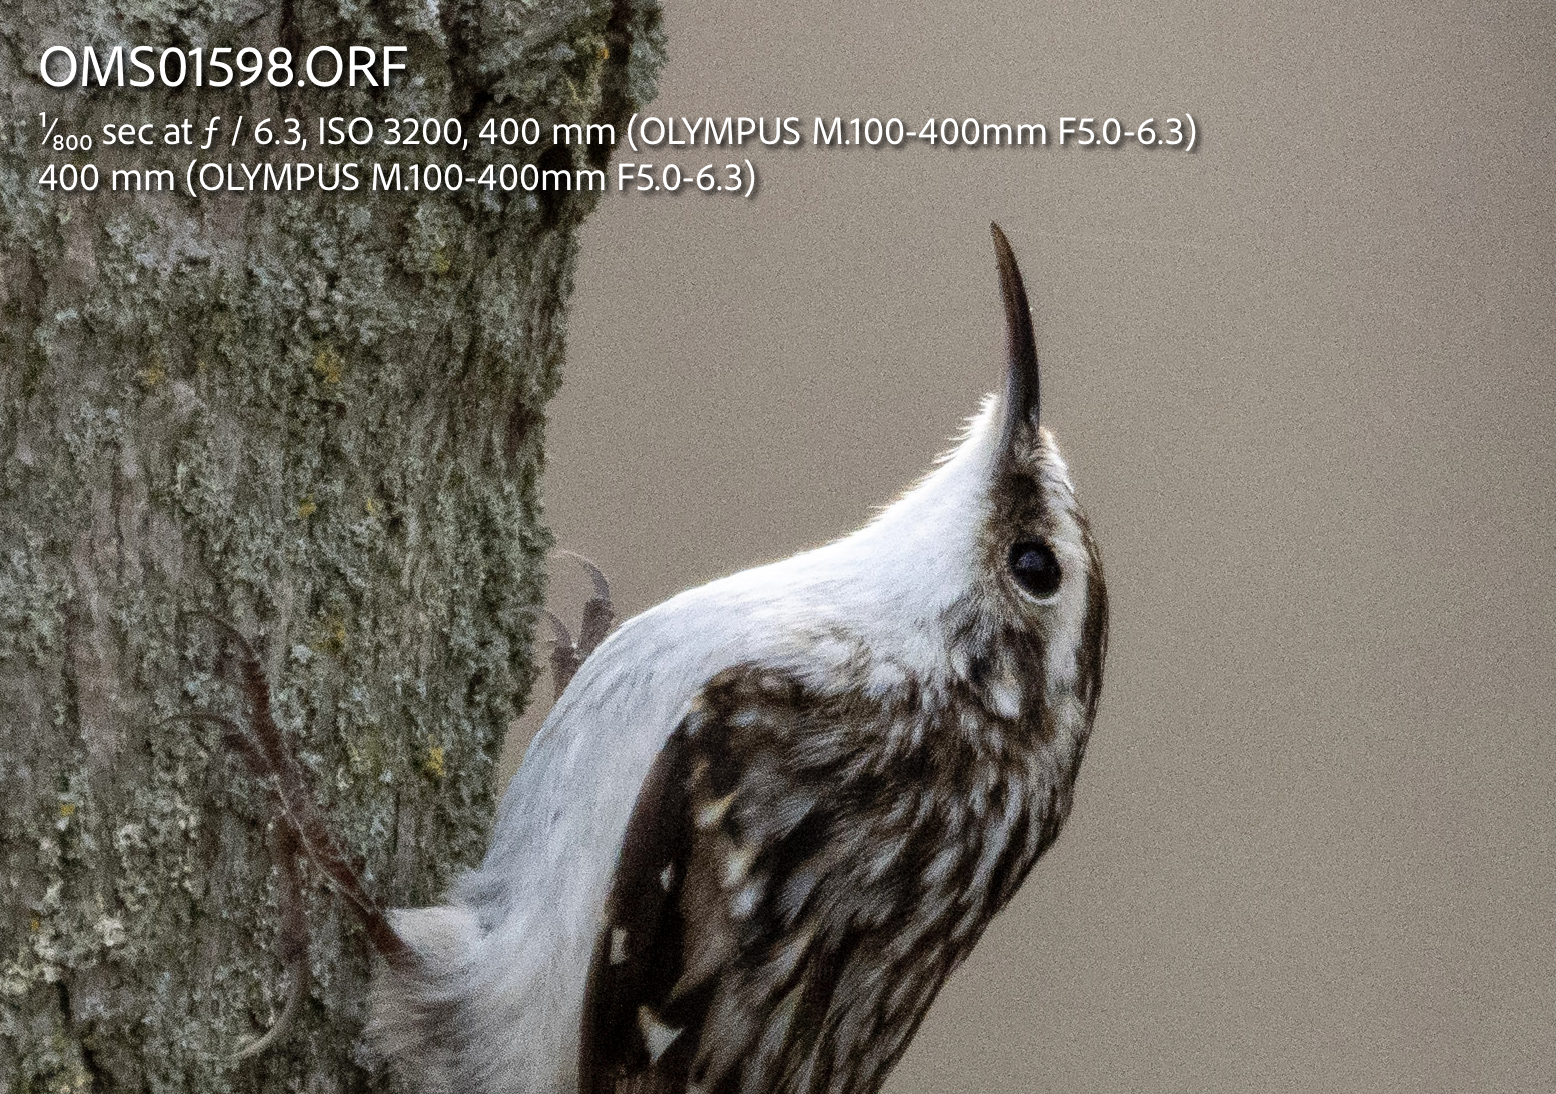
I can honestly report that noise is more visible on files from the OM-1 than files from my D800E, BUT . . . and this is an important but . . . the noise is neither objectionable, nor noticeable, except at 200% viewing on screen – and this is the issue. If it takes pixel peeping at 200% to see noise, then it really is a non-issue. 95% (or more) of photos taken are destined to be viewed on a screen and NOT at 100%. A whole photo online is often at values of 10%, 25% or maybe 50% for the largest screens. As an example, my 16.2″ MacBook Pro has a resolution of 3456 x 2234 pixels or about 7.7mp. A full-sized photo would be viewed at about 38% of its actual size. The photos you see here are downsized to 1200 pixels on the longest dimension. Definitely no noise at that size! So noise is a non-issue.
OM-1 w/100-400mm ƒ5.0-6.3 @ 400mm; ƒ6.3 @ 1/800; ISO3200; EV-⅔
Other than the jpeg artefacts from the conversion and downsizing, the noise visible at 200% is simply not visible in this image. Below is a 100% crop of the same ORF as processed in Lightroom without the new IA Denoise. You can begin to see the grain (it is ISO 3200, after all), but it is completely within the normal parameters of image viewing.
The noise issue, or non-issue
The problem is that noise has been made into an issue by internet pixel peepers who unrealistically view images at 100% and 200%, then make grandiose statements about noise. But what about large prints?
The other 5% (or less) of images are printed either in books or as photographic prints and enlargements. Once again, noise is a non-issue. In any print up to 11×14″ (which would cover all books and about 95% of all wall-hung prints), noise is not a factor. Not in the least. If you absolutely need to, image files can be up-rezzed before printing. For prints larger than 16×20″ noise becomes a factor only amongst the pixel peepers. In fact, wedding and portrait photographer Joseph Ellis makes prints up to 2’x3′ “even without much care or thought to the process”.
Even as far back as 2018, there was no recognisable difference between large prints made with full frame and Micro Four Thirds cameras (see Full Frame vs Micro 4:3 – Where It Matters Most). Why? It’s the content of the photograph that matters, not the noise. It has long been recognized that the only people who really pay any attention to noise on prints or in files are pixel peeping photographers, not clients. Clients are taken in by the emotional response they have with the content of a photograph. So, across the board, professional photographers using Micro Four Thirds sensor cameras are in no way disadvantaged by the pixel dimensions or the noise of their images.

OM-1 w/M. Zuiko Digital 12-100mm ƒ4 IS PRO at 100mm; ƒ8 @ 1/160; ISO200; EV-⅓
Topaz, DxO, OM Workspace – What to do?
Before switching to an OM Systems camera and lenses, I had to think long and hard about the issue of noise and sensor size. Coming from full frame, I had “drunk the Kool-Aid” regarding the limits to small sensors. Furthermore, I like big prints. So, I spent a lot of time reading articles and viewing videos about the use of Topaz DeNoise AI, DxO PureRaw, and DxO PhotoLab, almost to the point of ordering one of them to safeguard my small sensor files against noise.
Upon purchasing my OM-1 I was pleased to learn OM Workspace (OMW) – their proprietary raw editing app – had AI Noise Reduction. Problem solved? Yes. OMW’s AI Noise Reduction and Sharpening modules worked their magic, beautifully eliminating noise while maintaining sharpness.

OM-1 w/100-400mm ƒ5.0-6.3; ƒ6.3 @ 1/125; ISO 200
Initially, my only concern was that my 20mp raw files bloated to 60+mp 16-bit TIFF files, as TIFFs were the only way to export the improvements back to Lightroom for further processing. Then, I began to discover that shadow recovery in TIFF files is very poor compared to what I can do with raw files. And worse, the shadow recovery in OM Workspace, prior to exporting as a TIFF, was rudimentary at best. Combine this with a lack of Auto Black Point and Auto White Point adjustments, and my initial positive impressions of OMW waned, so the hunt for a better process continued.
Both Topaz and DxO were very tempting alternatives, mostly to avoid using large 16-bit TIFF files from OMW, and maintain a raw workflow. But which one should I order? DxO Raw was most tempting simply because I did not need a whole processing suite as I was already using Lightroom. In the end, I’m glad I didn’t place that order, as Lightroom has come through – in spades.
Lightroom does it again!
In the most recent Lightroom update, 12.3 (also for Adobe Camera Raw), Adobe introduced AI DeNoise. Anyone who has even the slightest concern about noise can now sleep easy as the quality of the images using this new technology is stunningly good. Furthermore, there is absolutely no need for any other noise reduction software. Right-click on an image, choose Enhance > DeNoise, and 40 seconds later (at least on my MacBookPro), I have a DNG file that exudes realistic de-noised smoothness while maintaining pinpoint sharpness in all the right places.
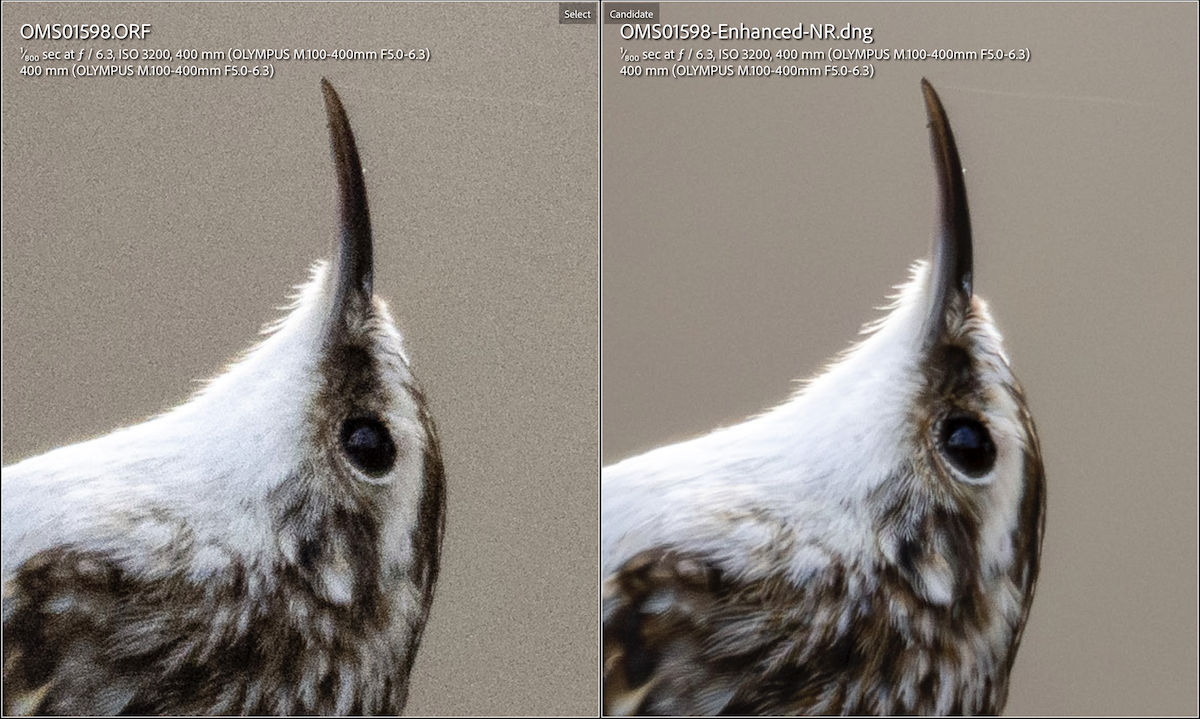
Although ISO 3200 poses no real noise problem in screen viewing and for prints,
it cleans up beautifully, smoothly, and naturally with Lightroom’s new AI Denoise enhancement.
I’ve always believed in Lightroom and have often wondered why photographers used other apps in addition to LR. I realize “different strokes for different folks”, but to often it seems, people think more is better. For my purposes at least, there is no other photo processing app on the market allows me to:
- catalogue my tens of thousands of image and call up any one or group of images so quickly, by keyword, date, camera, lens, location, etc.
- process each image or batch of images, with key adjustments of Auto Black Point and Auto White Point along with highly tailored Shadow and Highlight adjustments, plus Exposure, Contrast, Texture, Clarity, Dehaze, etc. In fact, I have re-processed raw files and jpegs from 20+ years ago using today’s much updated processing engine, and have seen marked improvement to what I had thought was a pretty darn good photograph;
- create beautifully toned black-and-white images, just like I was back in the darkroom, but with much greater precisions and repeatability;
- create highly detailed masks and graduated masks for accurately shaping the lighting of photographs, and adjusting sharpness and colour balance, amongst other edits;
- remove unwanted and unsightly details using spot healing and cloning;
- synchronise my images and setting with both my iPad and iPhone Lightroom Mobile apps;
- export each image or batch of images in virtually any size or dimensions needed. Along with LR/Mogrify 2, it’s easy to add borders, text, additional watermarks, etc. all at the click of a button;
- print each image or batch of images to exacting sizes, dimensions, and standards with or without borders/margins, watermarks and text notes;
- create books from within the app to ensure optimal sizing of photographs;
- save every size, dimension, development process, etc., etc., etc., as a pre-set for repeatable exactness. This has been wonderful for processing, printing and exporting, but also for any repetitive task including managing EXIF and IPTC data.
This really was not meant to be an advertisement for Lightroom Classic or Mobile. After all, this blog started life as an examination of noise in the OM-1. However, with the additional of AI Denoise, it shows Adobe is working behind the scenes to improve their app and stay competitive, even if they are a bit late to the party. Thanks Adobe.

OM-1 w/100-400mm ƒ5.0-6.3; ƒ6.3 @ 1/1250; ISO 800; EV-⅔
With last year’s addition of the incredibly helpful AI Masking features and now the DeNoise function, there really is no reason for me to consider shopping around for something better. It can’t be found! Yes, that means I continue to pay the monthly subscription costs for my Adobe Photography suite, but in balance, I think it is now paying off more than ever before.
Don’t take my word for it. Consider watching these videos or reading the article for more info:
- Tomas Eisl video: OM System OM-1 – Image Noise Expert Guide and In-Depth Knowledge
- Joseph Ellis video: Printing big from Micro Four Thirds
- Eric Chan article (from th Lightroom guru himself): Noise Demystified
Thanks for reading!
If you have any questions or comments about small sensor photography, OM Systems, noise or anything else, please add it to the Comments section below.
If you are not yet a subscriber, then consider adding your email so you are instantly alerted to new blog posts. And I promise not to inundate your inbox.
Have a look at my work by visiting www.luxBorealis.com and consider booking a presentation or workshop for your Photo Club at Workshops.
Discover more from luxBorealis Blog
Subscribe to get the latest posts sent to your email.
