PhotoGeo Trip Down East – Part 1

My friend Dan and I are half way through our photo trip down East. We are taking 10 days to cover what could be done in about 18 hours. When my wife and I were considerably younger we drove straight through, but what’s the fun in that?
Our goal is Mahone Bay just southeast of Halifax. On the way, we will stop near Granby, Baie-Saint-Paul, the Saguenay, Gaspé, in Québec and Kouchibouguac National Park in New Brunswick before arriving in Mahone Bay, Nova Scotia. For each, a shorter day of driving is followed by a full day at each location to explore. Each of the places were carefully chosen, ‘curated’ really, to satisfy our interests as retired geographers, and to suit our needs as outdoor landscape and nature photographers.
Day One: to Granby, Québec
We left southern Ontario on Tuesday and made good time to the Monteregian Hills east of Montreal. The Monteregian Hills are a series of volcanic plugs that begin near the Vermont border and run westwards across the Eastern Townships to just past Montreal. Mont Royal in Montréal is one of them. They were formed about 125 million years ago as the North America plate moved over a hotspot, much like the Galápagos Islands and the Hawaiian Islands, except these were, rather unusually, formed under much thicker continental crust.
My goal was to capture the orchards and or vineyards of the area, with one or more of the hills as a backdrop. I also wanted to get a sense of the ‘Cantons de L’Est’, as they are known in French, with their mix of very English placenames and Québecois culture. As a fan of Louise Penny’s Inspector Gamache series of novels, I also wanted to see some of the places she has used in her novels.
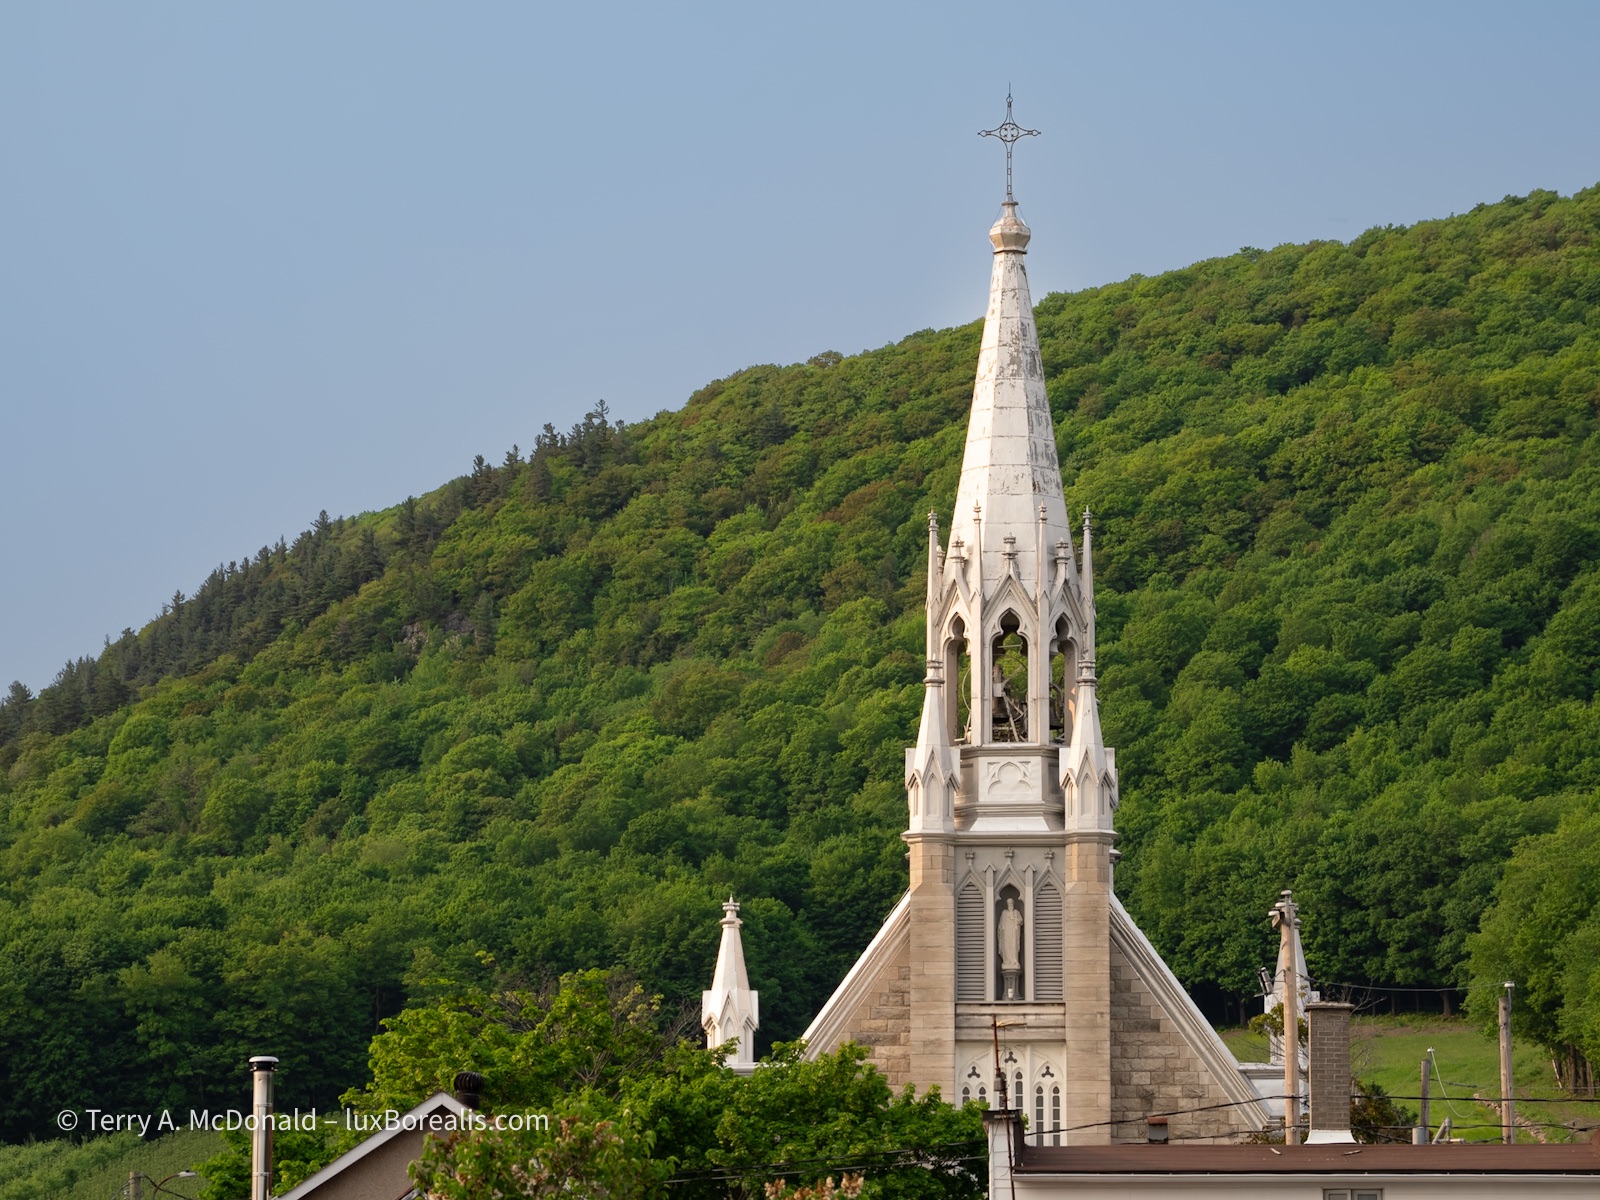
As is typical of so many small communities in Québec, the magnificently tall, gleaming bright steeple of the Catholic church dominates the skyline. In behind is Mount Yamasaka, one of the Monteregian hills. Behind us, kids and parents were assembling for evening soccer at an astonishingly well equipped sports park.
OM-1 w/ M. Zuiko 12-100mm/4 PRO at 66mm (132mm efov); ƒ5.6 @ 1/400, ISO 200, POL, HHHR; raw file processed in Lightroom.
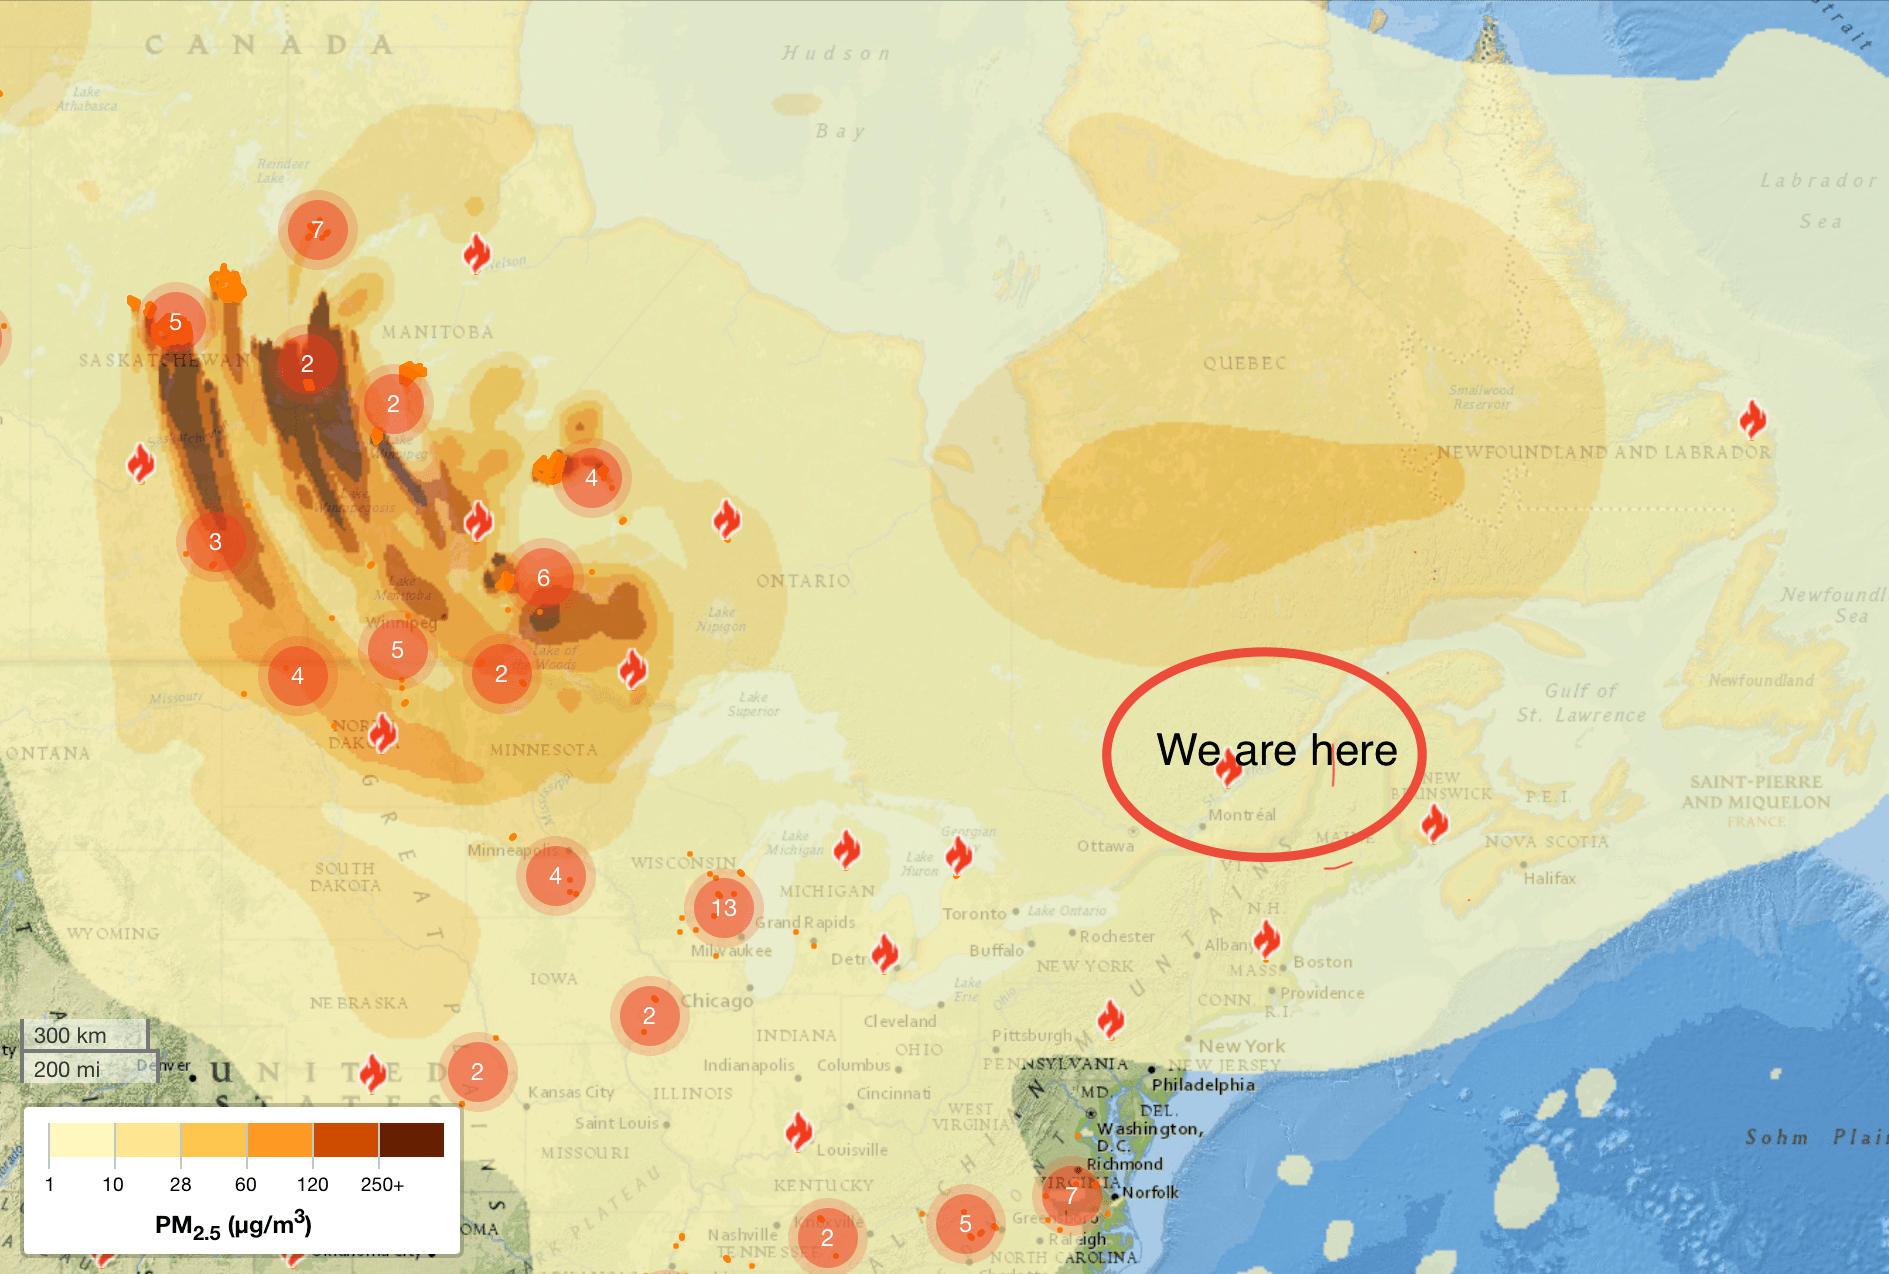
Of course, the best made plans . . . It is wildfire season in Canada and while the fires, some 2000km to the northwest, have not been a problem for us in the east, the smoke has. Many evenings have had an eerie, warm glow caused by smoke high in the atmosphere. We haven’t smelled it, nor has it caused breathing issues, but the slight yellowish tinge to otherwise sunny, blue-sky days has marred our hopes of grand vistas and views. Even Lightroom’s ‘Dehaze’ slider can only do so much.
So we’ve had to adapt. For example, early morning and late evening landscapes have been a bust due to the haze, so we’ve taken to spending more time photographing some of the cultural sites in the region and visiting some natural areas to photograph birds and wildflowers.
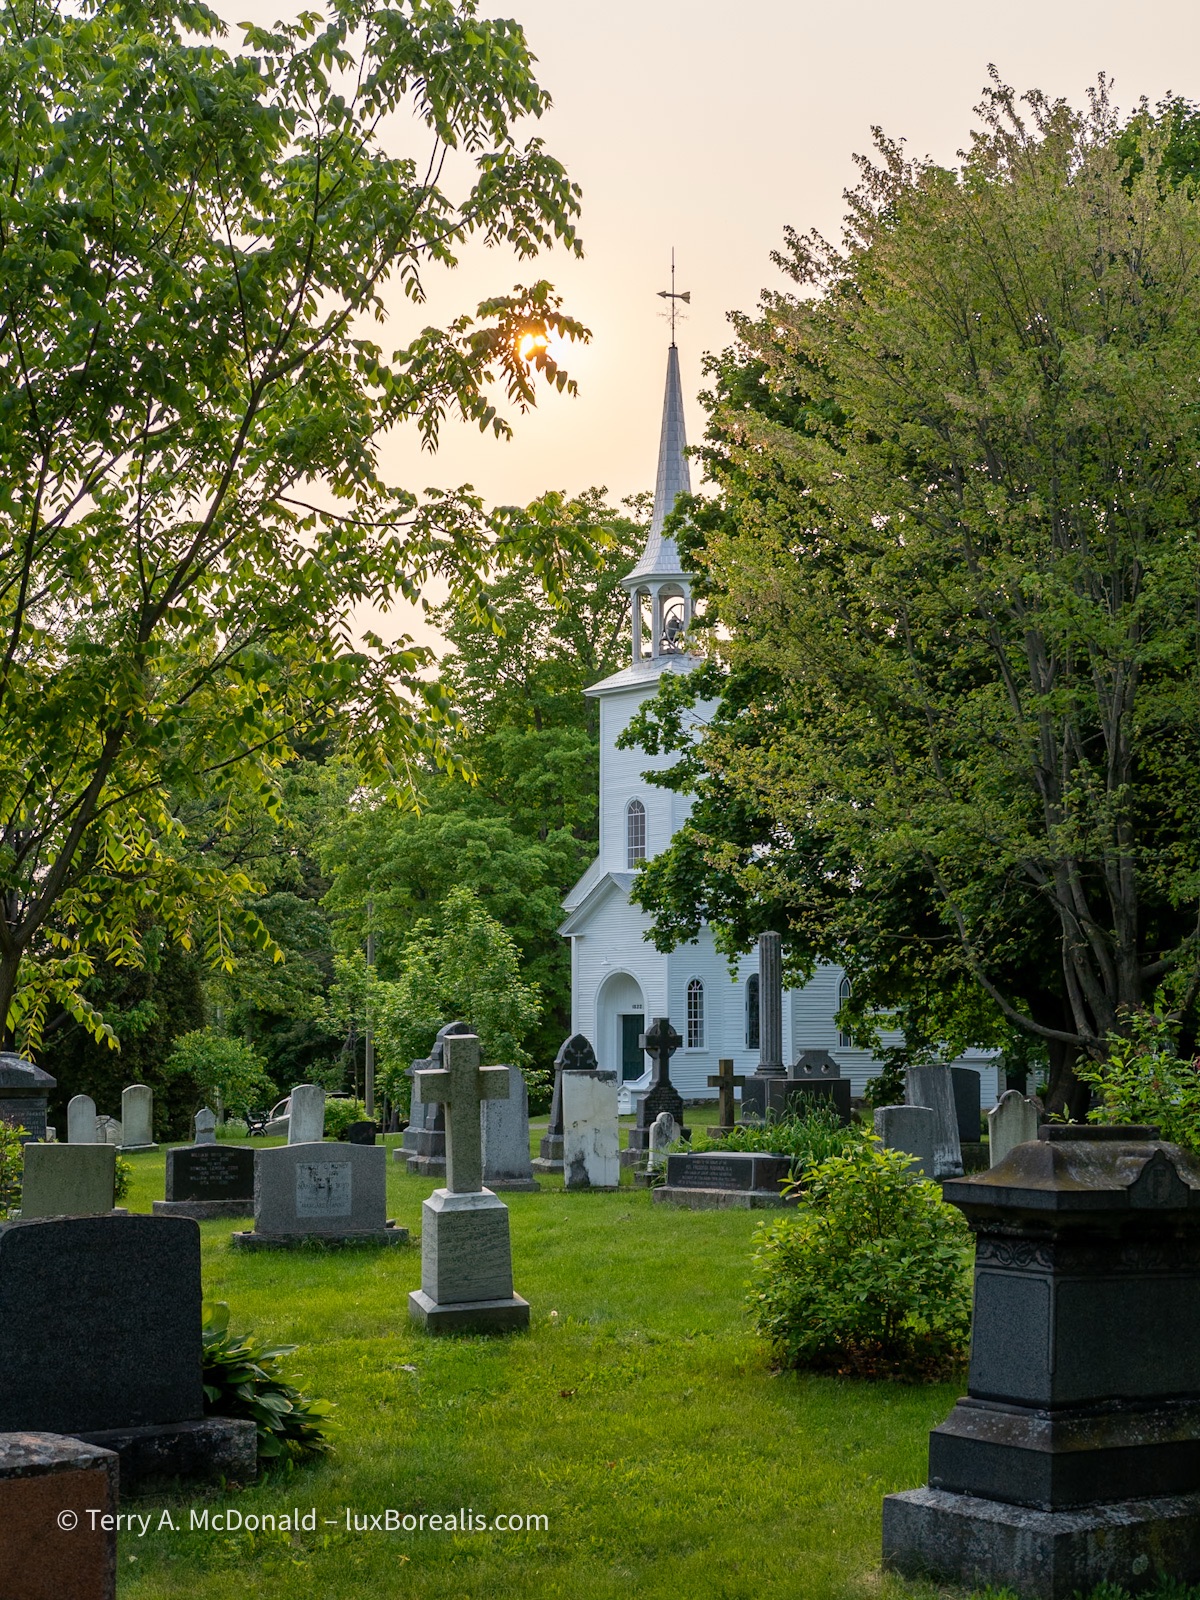
In keeping with the French-English duality of the region, many communities have Anglican churches as well. While this was shot in the evening, the warm sky is compliments of the smokey haze.
OM-1 w/ 12-100/4 at 28mm (56mm efov); ƒ5.6 @ 1/350, ISO 200, POL; raw file processed in Lightroom.
OM-1 w/ 12-100/4 at 21mm (42mm efov); ƒ11 @ 1/100, ISO 3200, POL, HHHR; raw file processed in Lightroom.
I don’t usually shoot at ƒ11 due to slight deterioration of image quality from diffraction, however, on checking the LCD there was some ghosting, so I decided to go with ƒ11.

OM-1 w/ 12-100/4 at 54mm (108mm efov); ƒ8 @ 1/100, ISO 800, POL, HHHR; raw file processed in Lightroom.
Looking for designs in landscapes—diagonals, tree lines— helps create movement through the photograph.
Day 2: Around les Cantons de L’Est
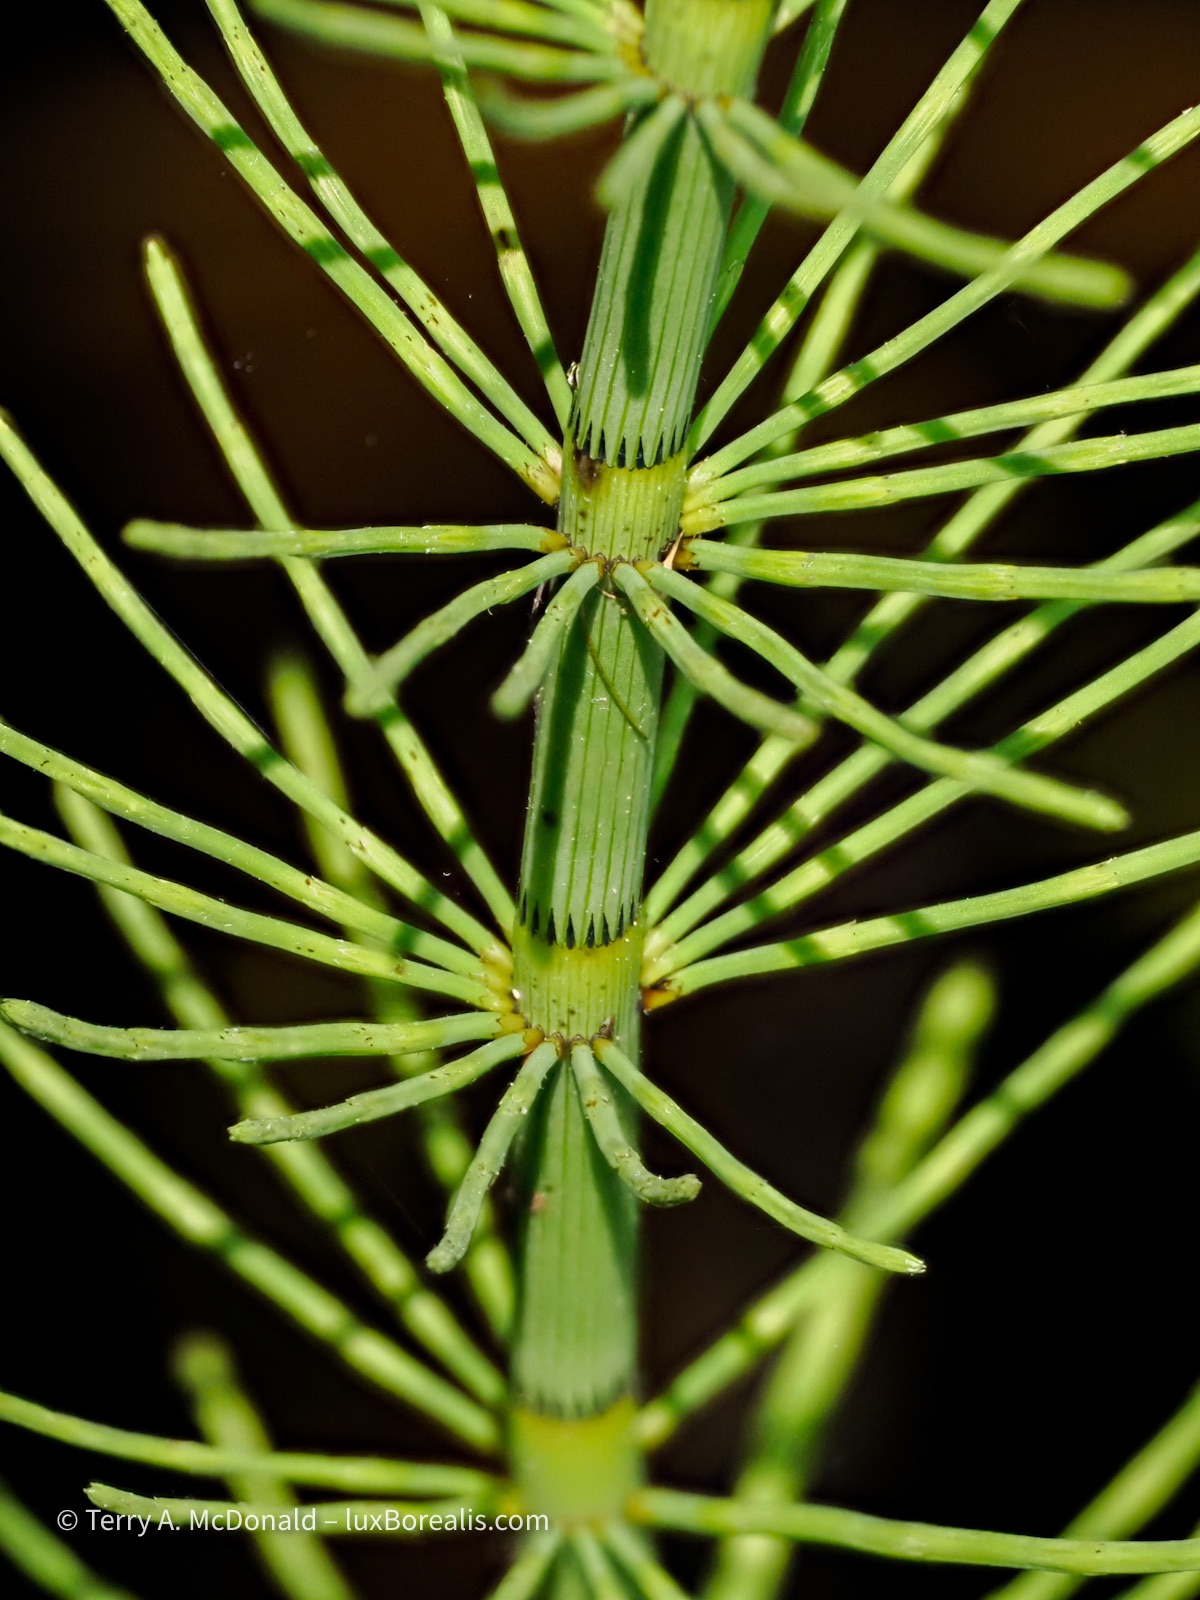
Our day around Granby began at Le Marais de la Rivière aux Cerises at Magog, an extensive alder wetland area with a number of trails and well-developed boardwalks. Frogs, turtles, waterfowl, a variety of passerines, plus wetland plants were our focus here.

OM-1 w/ M.Zuiko 100-400mm/5-6.3 at 285mm (570mm efov); ƒ8 @ 1/320, ISO 3200
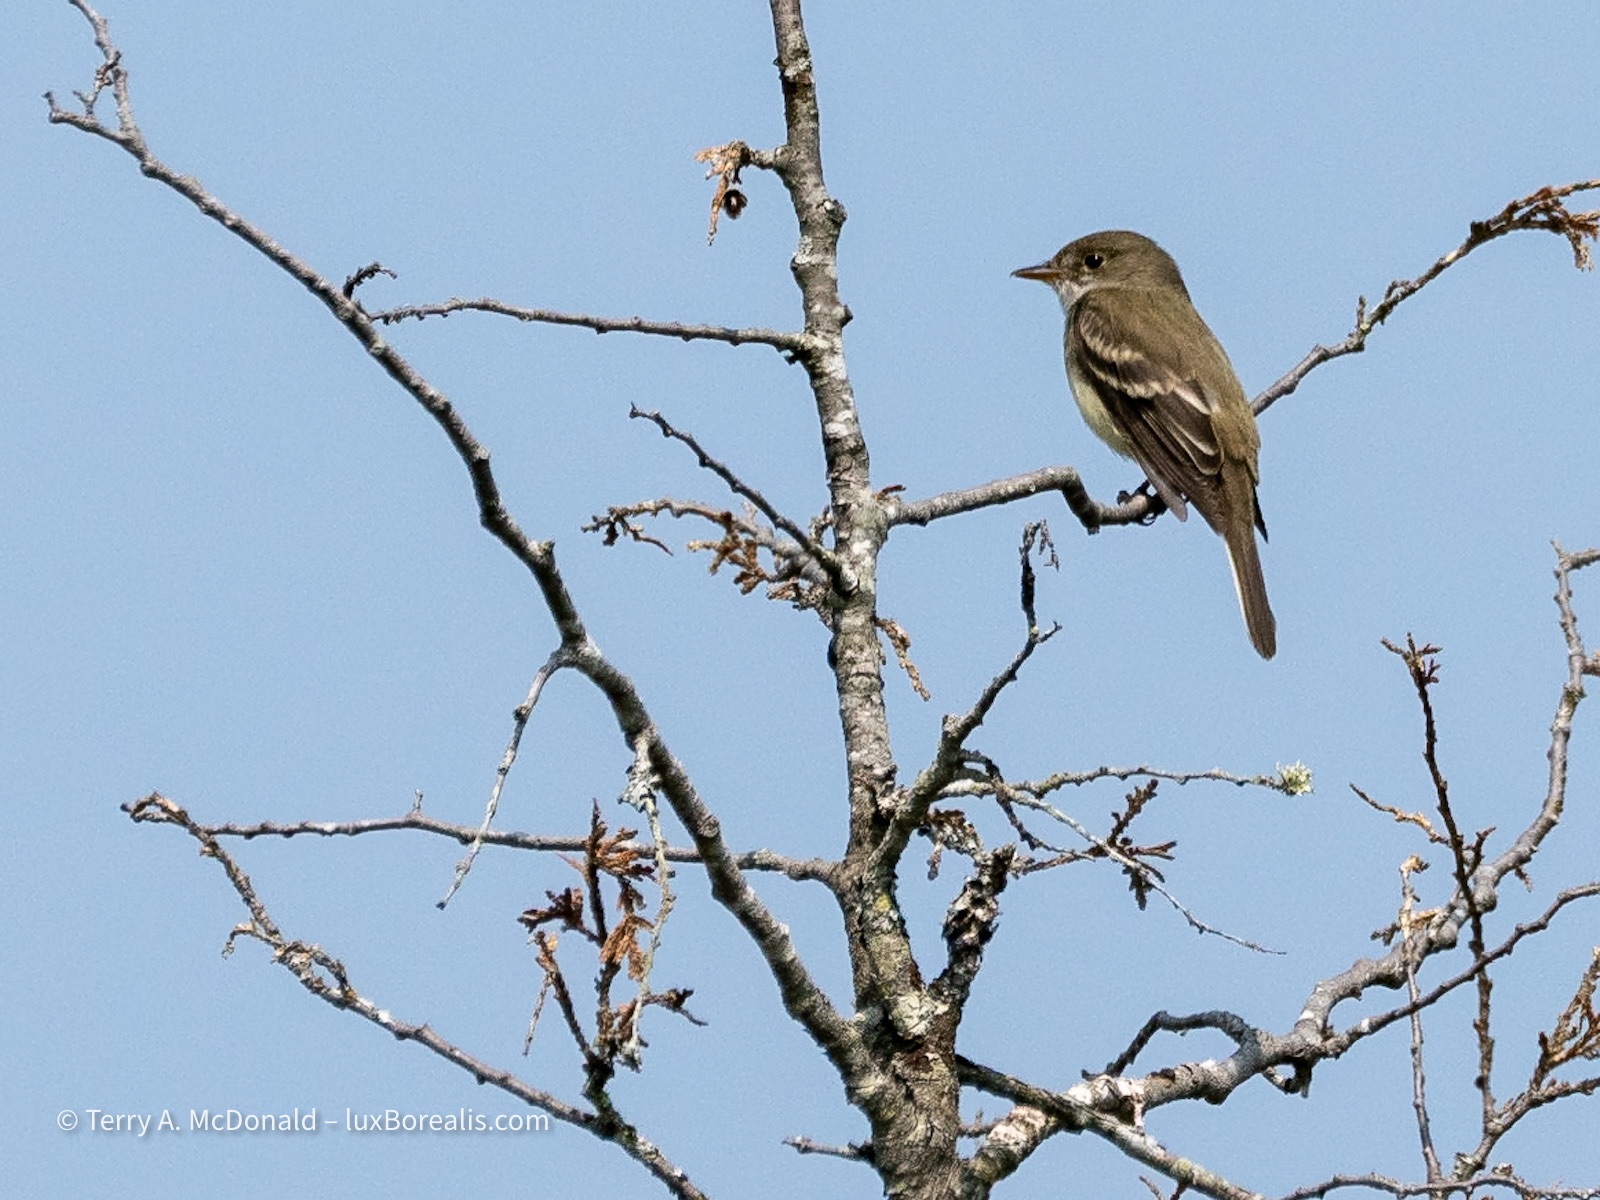
Elusive and distant, it took some patience waiting, and waiting, but finally, it came near enough for a clear photo.
OM-1 w/ 100-400mm at 400mm (800mm efov); ƒ8 @ 1/4000, ISO 800; raw file processed in Lightroom.

OM-1 w/ 12-100/4 at 100mm (200mm efov); ƒ5.6 @ 1/3200, ISO 3200; in-camera 10-frame Focus Stack; JPEG processed in Lightroom.
OM-1 w/ 12-100/4 at 100mm (200mm efov); ƒ6.3 @ 1/4000, ISO 3200; in-camera 10-frame Focus Stack; JPEG processed in Lightroom.
I am taking full advantage of in-camera Focus Stacking mode (8 shots with a differential of 5)—so easy to do, even when handholding the camera. The resulting JPEGs, a necessary evil of in-camera Focus Stacking, are surprisingly good and editable, provided there is no ghosting. For the photos I wish to pursue further, I still have the raw frames to create a higher-quality stack using Affinity Photo.
It was a hot day, so by 11:30am, we were ready to move on. During lunch at North Hatley, Dan mentioned a monastery nearby that was inspiration in a couple of Louis Penny novels, so off we went. On the way, though—how could we not stop for a bright yellow house! The smoke had temporarily cleared, giving us a clear blue sky to work with.

Sometimes we make photographs simply for the colours. No shame in that!
OM-1 w/ 12-100/4 at 25mm (50mm efov); ƒ4 @ 1/2000, ISO 200, POL, HHHR; raw file processed in Lightroom.
Now, for the Abbey. Wow! A beautiful building in a stunning setting, though the interior of the church itself is very austere. The gleaming copper was compelling as were the repeating patterns of windows and stone.

OM-1 w/ 12-100/4 at 13mm (26mm efov); ƒ5.6 @ 1/400, ISO 200, POL, HHHR; raw file processed in Lightroom.
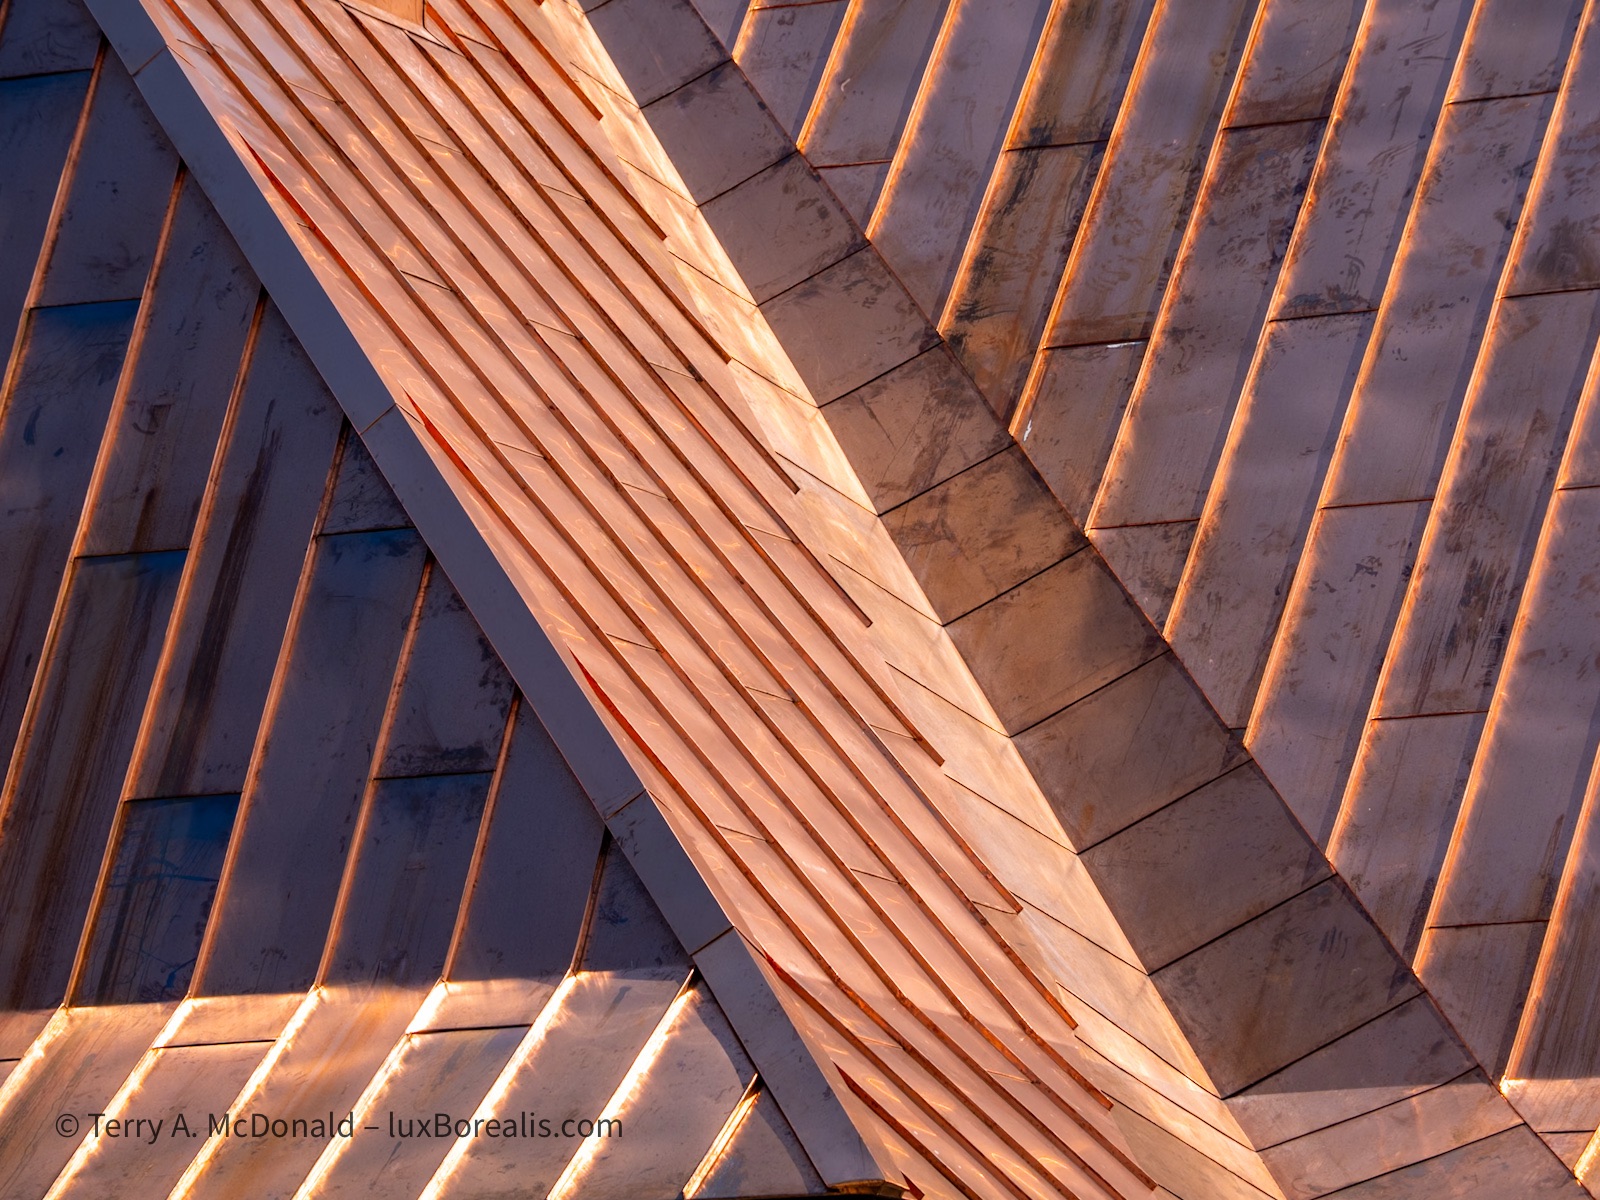
OM-1 w/ 12-100/4 at 100mm (200mm evof); ƒ5.6 @ 1/500, ISO 200, POL, HHHR; raw file processed in Lightroom.
Finally, we were off to Knowlton, of Louise Penny fame. I have to admit to being a bit underwhelmed. Knowlton is a nice enough village, but neither Lac Brome Books nor La Relais Bistro were anything like the bookstore and bistro in her novels. Furthermore, when the bistro is charging $14 for a can of local beer—a can!—, you know it has become a bona fide tourist trap. How unfortunate. Call it the Louise Penny premium, or the price of fame.
Day Three: To the Charlevoix Region
On the way to the beautiful Charlevoix Region, I just couldn’t pass up taking a slight detour to see one of the many covered bridges in the Eastern Townships. And it turned out to be a winner. After many backroads, we were finally within spitting distance when our way was blocked by a downed tree. A few minutes of careful limb-breaking, ensuring the tree didn’t come down on us, and we managed to clear away enough of a hole to drive through, Whew! You just never know what you’ll encounter!
Note only is the covered bridge red, it has only one wire marring the scene and, even better, it is set atop a wonderful little waterfall. To top it off, there is a somewhat bouncy bridge that offered the perfect photo spot, provided neither one us moved (we were the only ones there—talk about a good day!)
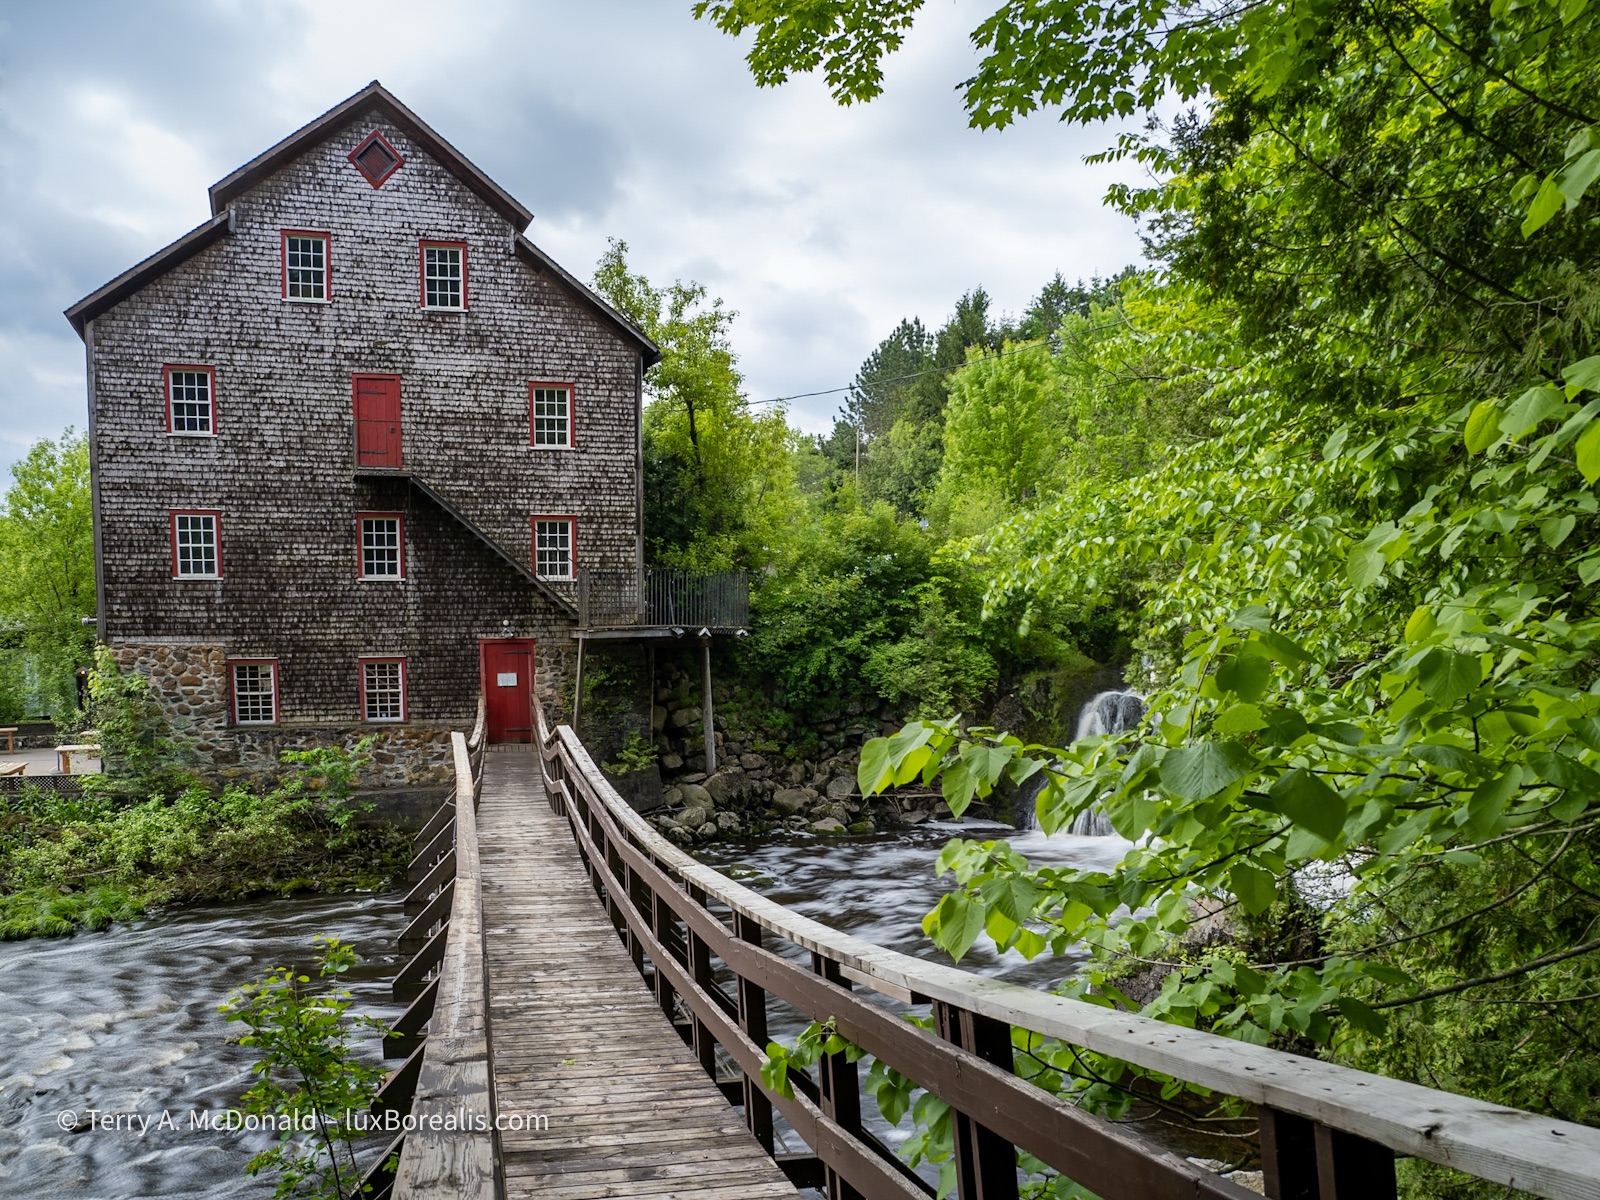
OM-1 w/ 12-100mm/4 at 12mm (24mm efov); ƒ5.6 @ 1/80, ISO 200, POL, HHHR; raw file processed in Lightroom.

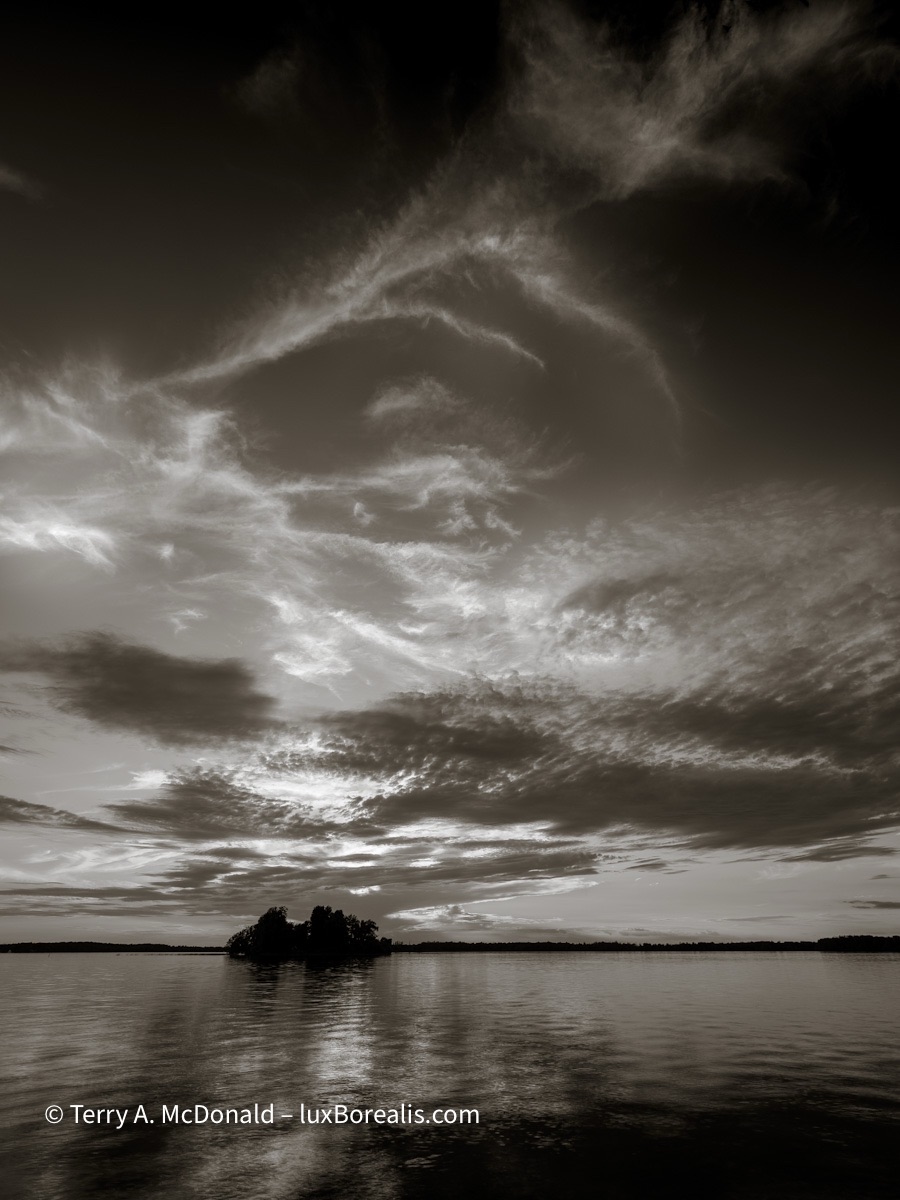
OM-1 w/ M.Zuiko 8-25mm/4 PRO at 13mm (26mm efov); ƒ8 @ 1sec, ISO 200, POL, LiveND 32; raw file processed in Lightroom.
After zipping around Québec City and all the construction going on, we were off towards Baie-Saint-Paul and the The Charlevoix Region. The north shore of the St. Lawrence River is a spectacular coastline of cliffs as the ancient and eroded Laurentian mountains were split by a 1000km-long rift during the formation of the Iapetus Sea some 500 million to 1 billion years ago. It’s one of the reasons why the St. Lawrence, at this point, is a true, brackish to salt water estuary, and one of the world’s longest (655km) and deepest. At Baie-Saint-Paul it’s 25km across!
Even more impressive is the origin of Les Éboulements, where we had booked a room: it is the central uplift of the Charlevoix Astrobleme, a massive impact structure or crater, 50km across, formed by a 4.5km wide meteor that slammed into Earth 450 million years ago. Once you know what you’re looking at, it’s even visible on Google Maps, even though it wasn’t ‘discovered’ until 1965.
Now, how to photograph it, with milky skies from wildfires. Right. Almost impossible.

OM-1 w/12-100mm at 24mm (48mm efov); ƒ5.6 @ 1/500, ISO 200, POL, HHHR; raw file processing in Lightroom.
View of the surrounding hills, the eroded walls of the crater, from a cemetery dominated by Tremblays.
OM-1 w/ 12-100mm at 25mm (50mm); ƒ5.6 at 1/320, ISO 200, POL, HHHR

OM-1 w/ 12-100mm at 28mm (56mm efov); ƒ5.6 @ 1/2000, ISO 200, POL, HHHR; raw file processed in Lightroom.
OM-1 w/ 12-100mm at 100mm; ƒ4 @ 1/500, ISO 200, 10-frame Focus Stack; JPEG processed in Lightroom.

Nothing startling, just a ‘nice’ pastoral scene using layers of vegetation and a gravel road to take us through, with just a hint of hills at either side.
OM-1 w/12-100mm at 41mm (82mm efov); ƒ5.6 @ 1/640, ISO 800, POL, HHHR; raw file processed in Lightroom.
So now, we are off to the Saguenay region and one of the world’s longest fjord. Part 2 is now live!
Thanks for reading. If you have any questions about where we are travelling and the techniques used in the photos, be sure to add a COMMENT.
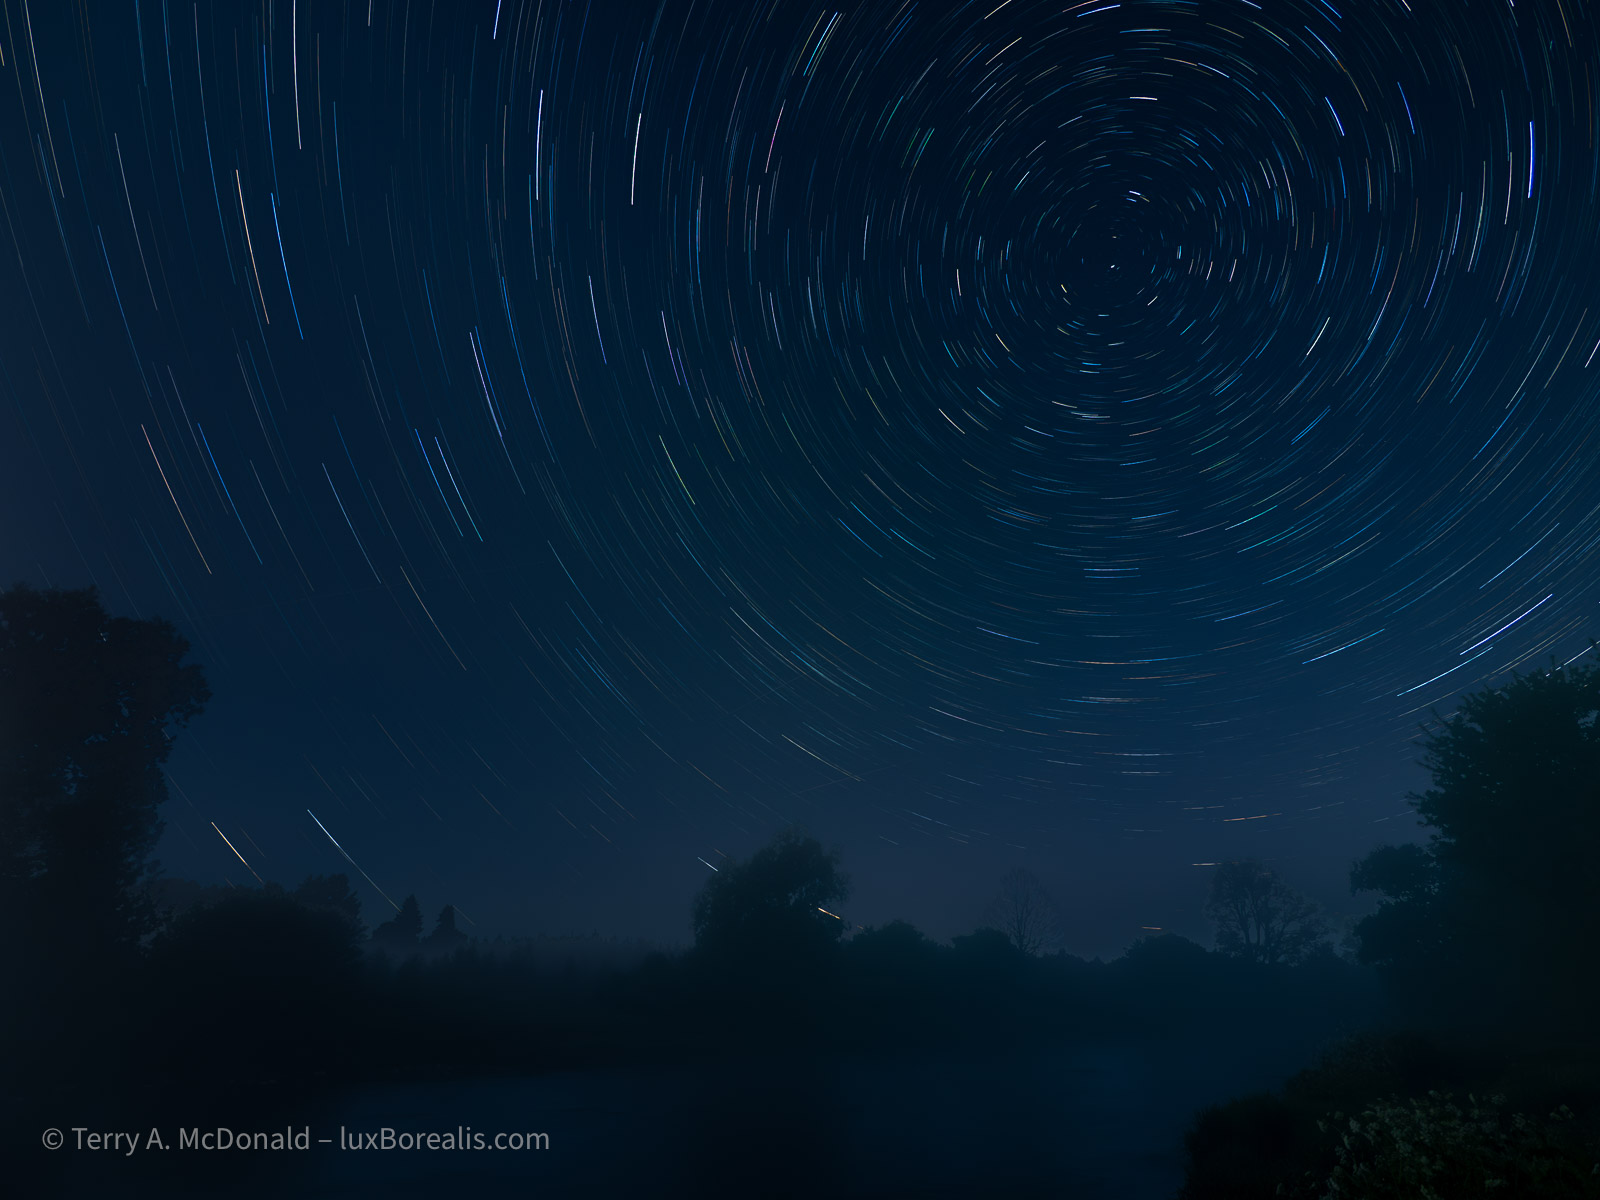
Astrophotography—my first serious attempt with the OM-1
As I write this, it’s a bleary-eyed Monday morning after what I will cautiously say was a successful attempt at Astrophotography.
Earlier in the year, you may remember my post about purchasing a Panasonic-Leica 9mm ƒ1.7 lens, expressly for Astrophotography, followed by my Lunar Eclipse sequence of the Blood Red Moon. So things are progressing. Now, in preparation for a month-long trip ‘down East’ to Québec and our Maritime provinces, I wanted to have at least some practice shooting the stars.
Previous attempts have been half-hearted. My ƒ4 zooms are superb for 95% of my work, but for the stars, ƒ2 would be ideal.
Prep
It just so happened that while researching the weather for this weekend (it has been cold, wet and dreary for much of May, even April), I learned about an upcoming Aurora ‘burst’. Well, that didn’t transpire, at least not down here in southern Ontario, but I still needed to get in some practice for the stars.
To help prepare, I read over and made notes from a few articles and videos, in particular, these:
- Astrophotography 101, by Peter Baumgarten
- OM System Tutorial w/Matt Seuss (YouTube)
- A Complete Guide to Capturing Gorgeous Photos of the Night Sky – PetaPixel article featuring Peter Baumgarten
- More OM System tutorials can be found here.
I also checked various websites for sky conditions, specifically:
- Clear Dark Sky conditions (Link)
- Clear Outside (Link)
- Smoke Forecast Canada & USA (Link): With the increasing frequency and intensity of wildfires, smoke now travels thousands of kilometres which can add an unwanted haze to the an otherwise clear sky.
I also checked the Sky Guide app (iOS / Android), which is not only helpful for naming the stars, but also for listing upcoming events, and noting weather for the night ahead.
So, knowing what to do, at least theoretically, I waited for the dark to set in, grabbed my headlamp and gear, dressed warmly, for June 1st anyway, and headed 25 minutes north to an area I’m familiar with along the Grand River.
Arriving, I was surprised to find half a dozen cars there. Who else would be up at 11pm in this somewhat out-of-the-way place? Of course, other people who were hoping for the Aurora, the one that never materialized.
What to shoot
My goals were stars and star trails around Polaris, the North Star, and, if the sky was dark enough, the Milky Way. I wasn’t too hopeful for the Milky Way as the city I live in is to the south of where I was, and would be giving off tonnes of light—which it was. So no Milky Way. Not tonight. Hopefully down East, along the upper St. Lawrence, the Gaspé, or off the Atlantic shores, will have better dark sky conditions. I’m envious of OM Ambassador Peter Baumgarten who lives on Manitoulin Island and has only the huge stretch of Lake Huron to the south of him and endless tracts of the Canadian Shield to the north.
I knew the area I was photographing in well enough, as I had been there a number of times, most recently for some winter shots featured in my article about HHHR and TripodHR vs Up-scaling.
In fact, as my eyes grew accustomed to the dark, I found I didn’t use my headlamp too often (set to RED to maintain my dark vision). The Moon was still up, a Waxing Gibbous, which ended up giving off far too much light for my liking. However, it is what it is, and I’m here to practice, not to create trophy images.
Settings
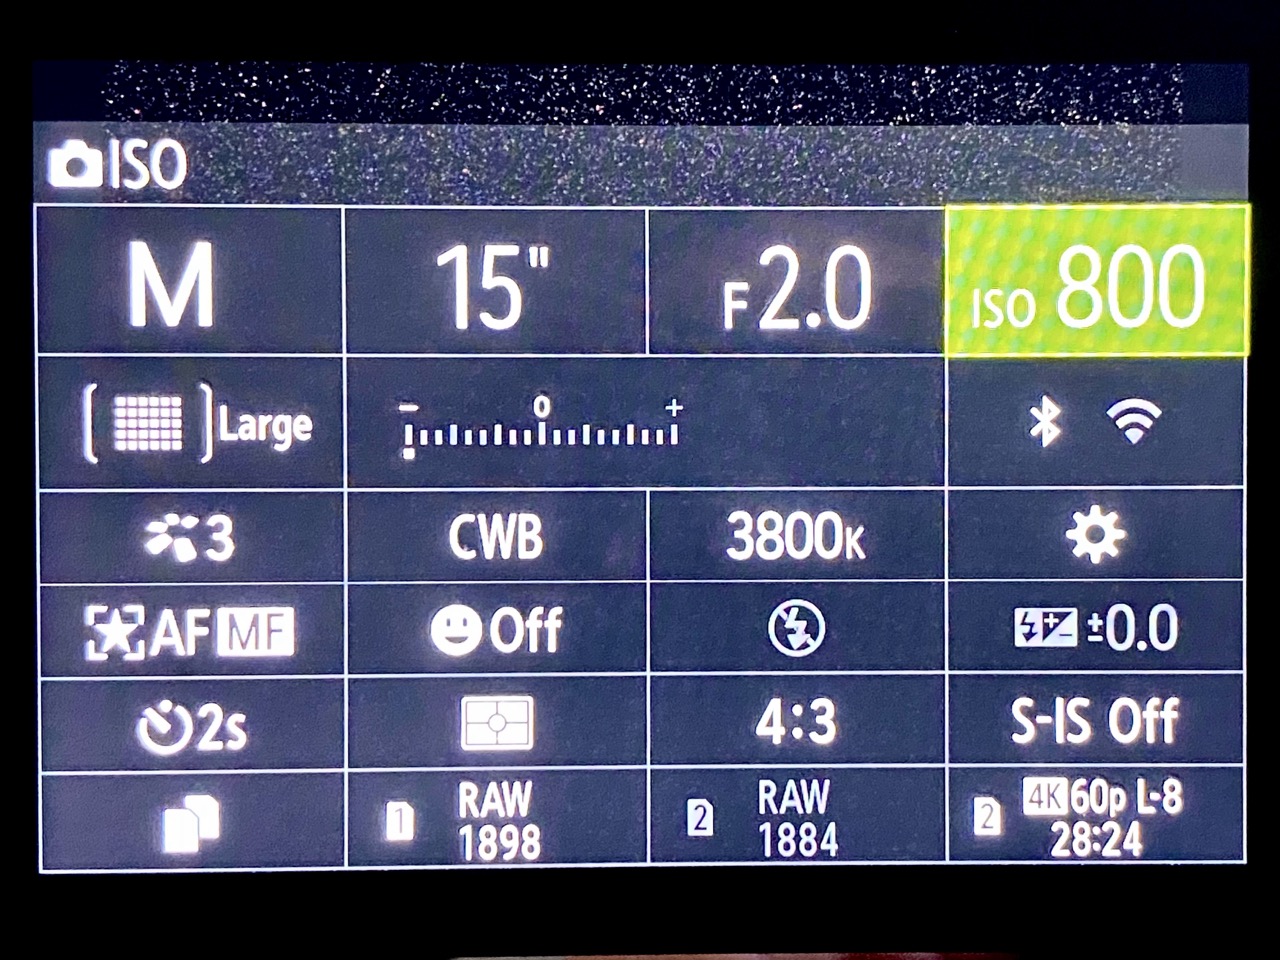
After a brief walk around to kill time until it was darker and to get a better lay of the land, I spent a few minutes in the car, setting up my OM-1. The more I could do now, the less I’ll need to do in the dark or with the headlamp (set to RED).
- Vertical Handgrip: ON (this moves the working battery away from the core of the camera keeping it cooler during long exposures = less sensor noise);
- Image Quality: Raw; my OM-1 is permanently set to raw, but if you need to make this change you’ll find it under; MENU → Camera1 → 1. Basic Settings/Image Quality → below Custom Mode;
- White Balance: 3800°K; MENU → Camera1 → 2. Picture Mode/WB → WB → CWB (Custom); Peter Baumgarten recommends 3800°K; Matt Seuss, 4200°K. As I am shooting in raw, this can be changed in post-processing, but 3800°K seems more realistic. I needed to increase the Magenta in processing by 12 to 15.
- Noise Reduction: ON (this is a ‘dark frame subtractions, so it takes longer, as an additional dark frame is made after exposure); MENU → Camera1 → 3. ISO/Noise Reduction → Noise Reduction
- Drive Mode: 2s delay as I am not using a remote; MENU → Camera1 → 7. Drive Mode → Drive
- S-IS: OFF as the camera will be on a tripod; MENU → Camera1 → 8. Image Stabilizer →
- Focus Mode: set to StarrySkyAF; in the Menu, it is set to Accuracy and is invoked using AEL/AFL button; (MENU → AF → 1. AF → AF Mode
- Viewfinder: set to Night Vision ON; MENU → Gear → 3. Live View
- Level Gauge: ON, essential for straight horizons when the grid lines are black on black. This is set up in MENU → Gear → 4. Information: check LCD Info Settings, EVF Info Settings and Level Gauge;
- Monitor Brightness to -7; MENU → Wrench → 3. Monitor/Sound/Connection → Monitor Adjust
- Shooting Mode: Manual;
- Aperture: ƒ2, which is slightly closed down from the maximum of ƒ1.7, for better corner sharpness;
- Shutter Speed: will vary from 5 to 15 seconds; using the ‘400 Rule’(400 ÷ 35mm focal length), I can go up to 22 seconds (400÷18, which is the 35mm efov of lens I’m using);
- ISO: will vary, but I’ll start at 1600 and go from there, either to 800 or, if needed, 3200.
Note: Many of these settings can also be changed using the Super Panel. With the LCD showing, just select OK, then navigate around the super panel to make the changes.
First set-up
My greatest fear, standing there at the edge of the Grand River in the almost pitch dark was coming across not a raccoon or even a coyote, but a skunk. Luckily there were none around, at least that I saw or smelled.
I did two set-ups. The first overlooked a secondary branch of the Grand that has a nice meander to it. It is a view to the northeast and the image below is the best of the lot. You’ll notice the spill of light coming from Guelph, which is to the south (right). While not objectionable to me, as I’m familiar with the area, I understand that it is not ideal in the eyes of Astrophotography aficionados.
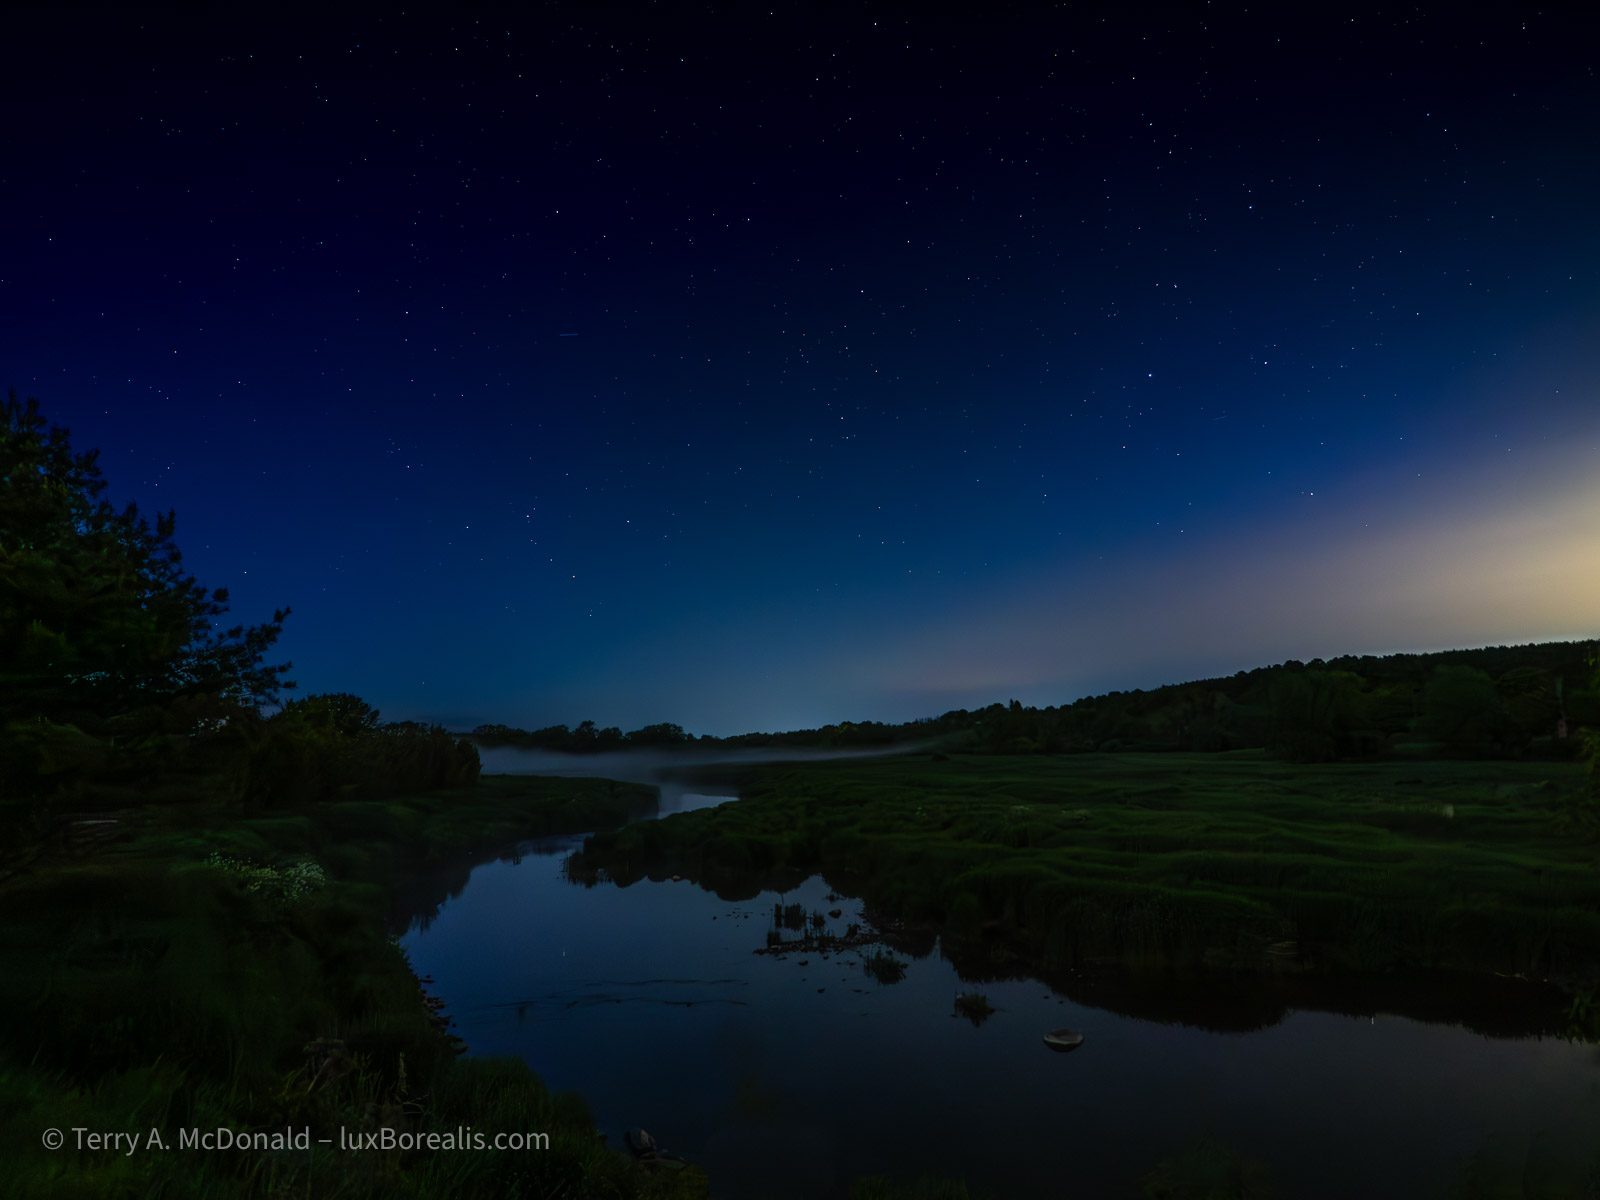
In retrospect, I could have used ISO 800 and 4 seconds or ISO 400 and 8 seconds and achieved the same result.
Second Set-up
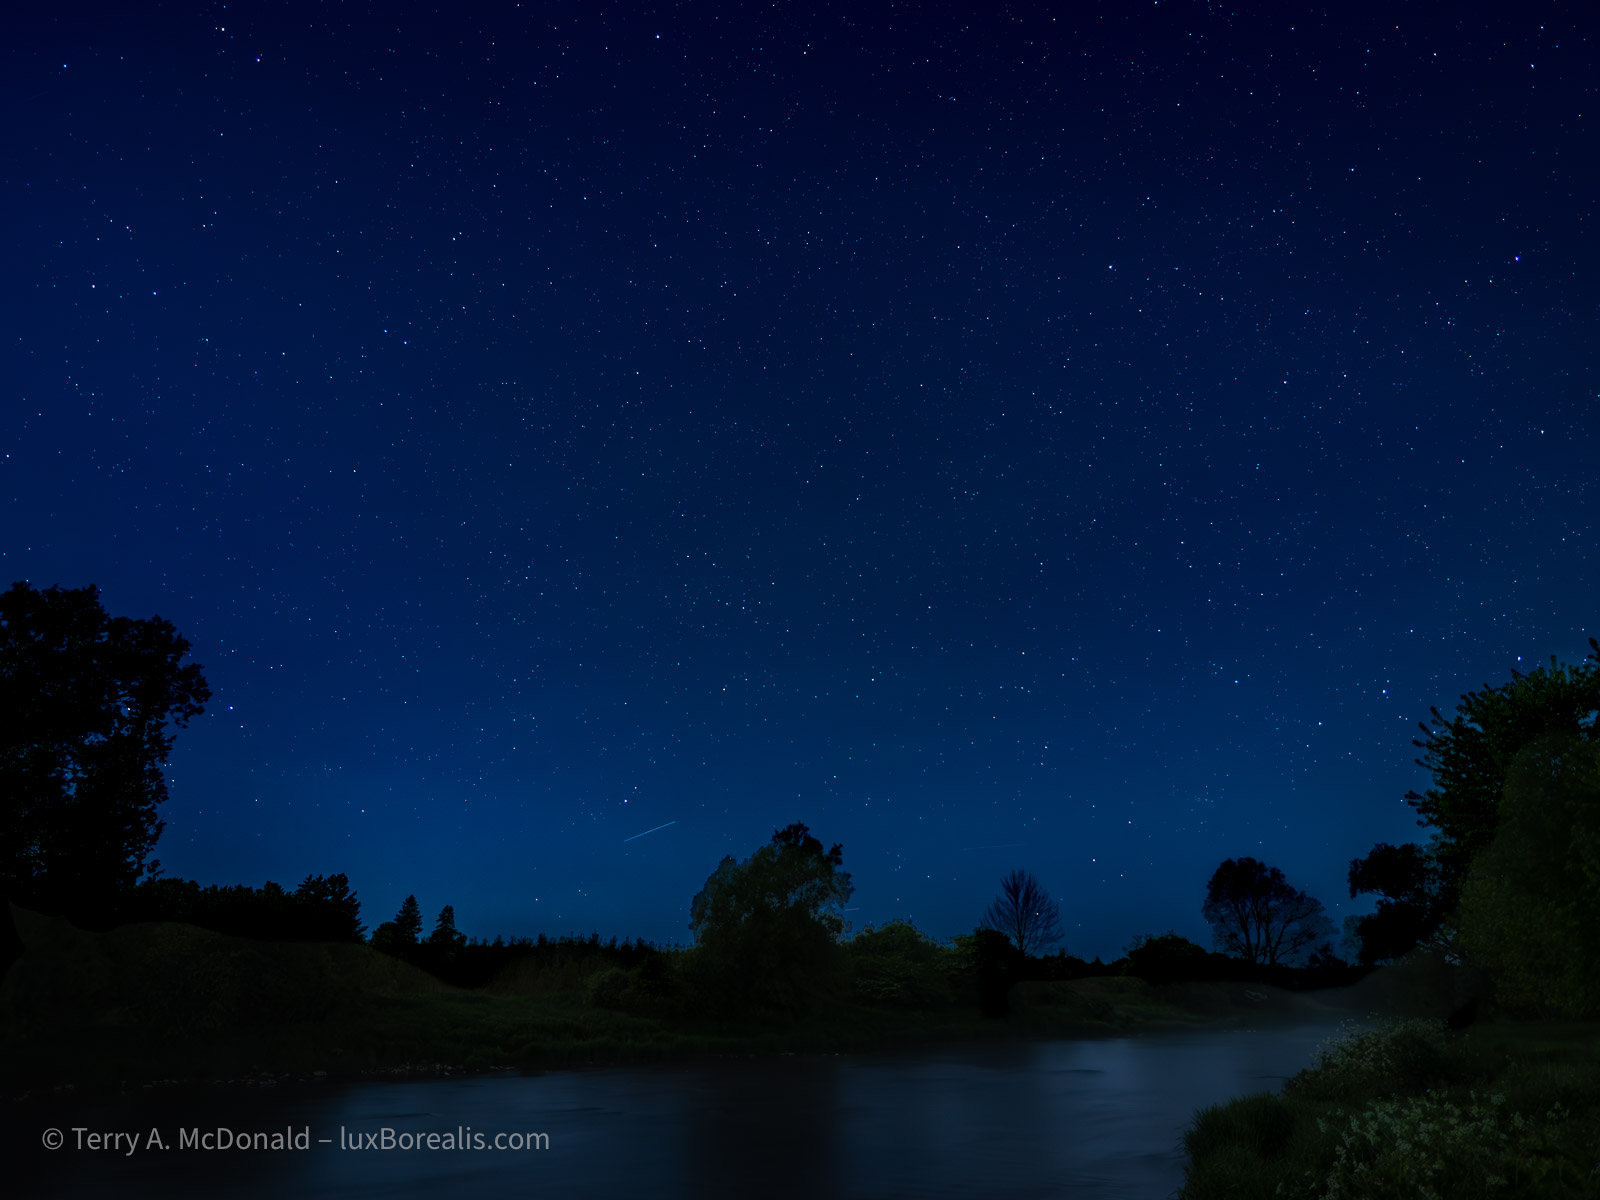
By this point, it had become sufficiently dark to move to my preferred location, along the main branch of the Grand River, looking directly north. I kept hoping the Aurora would put in an appearance, but sadly, not tonight.
However, what I hadn’t planned on was fog. As the temperature dropped, the broad valley began filling with a light fog, centred on, of course, the river. The water had warmed sufficiently during the past couple of warm days which allows this cold air, blown in from the north, to create what every photographer loves—a mysterious-looking misty fog. Unless you are trying to do Astrophotography!!
I had to remind myself that I am practicing tonight. It is what it is. I’ll carry on. Perhaps the fog will add another dimension to the foreground shapes of trees and the river itself.
My first set of shots were straightforward, as I did for my first set-up:
HHHR; Huh?
Now it was time to try something different. Both Peter Baumgarten and Matt Seuss recommended trying Handheld High Res (HHHR), but not TripodHR, even though I was using a tripod. Apparently, it has something to do with the way the set of frames are composited in-camera, that HHHR mode on tripod is an ideal way to reduce noise. You need to make an extra exposure for the foreground and swap it into the 50MP composite. No problem.
So, I tried it and this was the result:
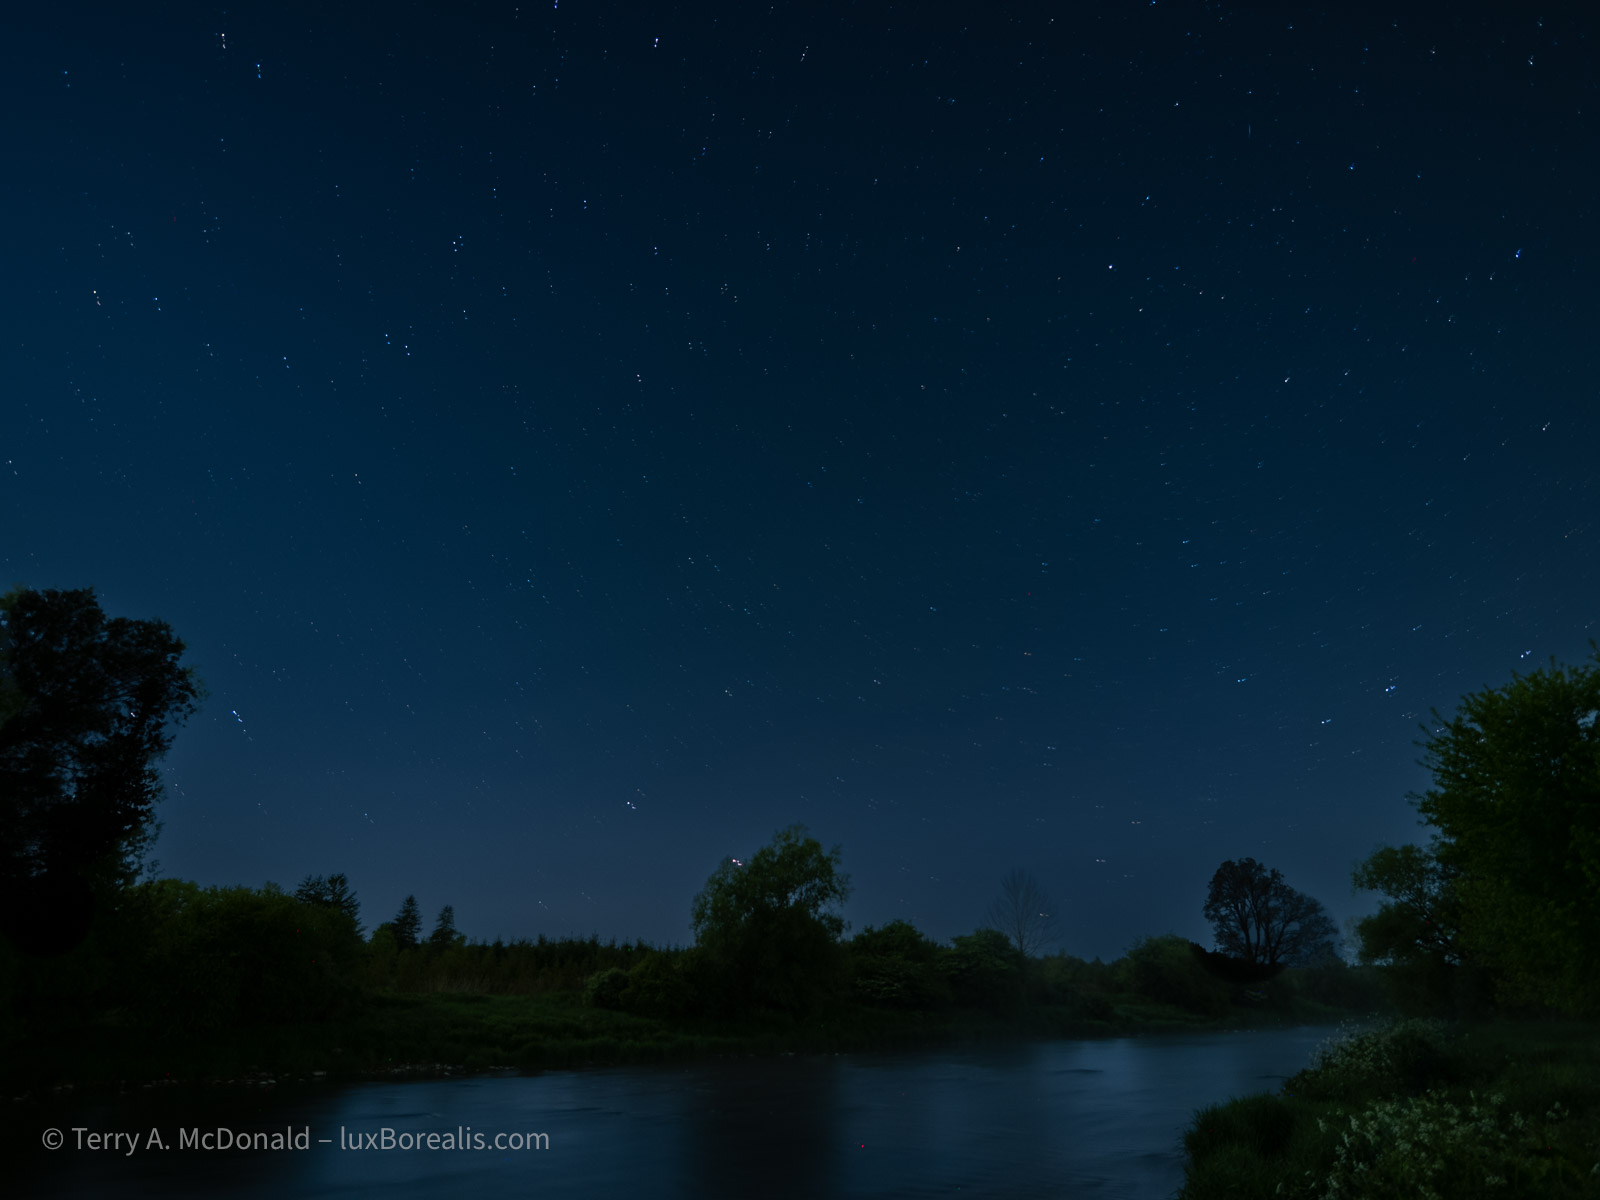
The noise is gone—without additional NR in Lightroom. But, it appears I will need to sort out the composition as the composite definitely shows start movement, telling me the camera did not align the points of light. Perhaps I had too much foreground, as it is perfectly aligned. The instructions from Peter and Matt did say that foreground should be kept to a minimum, so I guessing that was my error. Live and learn, right? That’s why we practice!
Next up: LiveComp mode
I have been so looking forward to trying this. Back in the film days, when camping at Bruce Peninsula National Park (this was decades ago, long before it was ‘discovered’ and now lever-run!) I made a one- or two-exposure using either Kodachrome 25 or 64 and I got these beautiful star trails.
You can’t do star trails easily with digital as the sensor heats up when used for that length of time. However, Olympus (now OM Systems) has made it possible—with Live Comp.
Set the Shooting Mode to B (Bulb), then use the thumb wheel to select LiveComp. It takes one more step, which flummoxed for a few minutes. You need to select the Menu button (not Info or OK, as I learned) then select the exposure time for each image. Peter Baumgarten recommends 60sec, which is what what I chose. A couple of trial for a few minutes set me up to try it for longer.A
t first, I thought I’d give it 20 minutes. I had my folding chair with me. It was cold, but I could tough it out. For the first few minutes I watched the star trails on the LCD, growing in length. Cool!
So I set a timer and pulled out my iPad to read the novel I had on the go. There is something very peaceful about sitting out past midnight in nature, reading a book, with no distractions.
At 20 minutes, I took a look and—whoa! It was beautiful. I couldn’t stop it. So waited another 10 minutes. By now the cold was beginning to creep in. Although it was 20° during the day, it had dropped to now 3°. Basically, I had on what I often wear in winter: flannel shirt, fleece top, GoreTex anorak, head band to cover my ears, gloves and my hood up. And I was still cold!
But at 30 minutes, I still couldn’t bring myself to stop it. At about 35 minutes into the LiveComp, the coyotes began howling and my hair literally stood on end. they must have been directly across the river from me. This went on for a few glorious minutes—it really is a haunting, but totally amazing sound to hear first hand.
At 40 minutes, I decided to end the exposure. Here is the final product.
Needless to say, I’m hooked. Next time I’ll have my merino wool long undies on because I want to see the results after an hour or two.
By the way, you might be wondering what my battery level is at, considering the LCD has been on for the past 2 ½ hours and I made numerous energy intensive exposures. The battery, the one in the vertical grip, was in the 60s out of 100% and the camera battery was still at 100%. Amazing!!
Conclusion
I can’t wait to get out again shooting at night. It is compelling. It’s engaging. And the results are, well, you decide. Are the images worth it?
However, it’s always helpful, after trying a new technique, to debrief—to critically review not just the photos, but also the techniques used. For example, I should have made the same shots as above, but in vertical orientation as well. That’s a missed opportunity. After all, I had my L-bracket on, so it was simply a matter of flipping the camera with very little, if any, re-composition.
I still need to sort out the HHHR system. And, I never did try taking a rapid set of frames, 10 or 12, to used as a composite with Affinity Photo. I’m not sure why I didn’t, but I will definitely be trying that in future. Apparently it is another method to reduce noise, though it also involves swapping out a now mis-aligned foreground for an aligned foreground exposed for the foreground and not the sky.
Another technique that would have been helpful for is light painting. Using my head lamp or phone to add a stop of light would help open up the deep shadow areas of the foreground, giving it a more three-dimensional feel.
More to learn. More to test. And, I still did not get a Milky Way shot. Stay tuned! I’ll try to post something from ‘down East’.
Why are many online photos ‘dull’ and lacking in sparkle?
A quick and easy change will allow your photos to sing!
Funny you should ask, as it’s something I’ve noticed as well. YES, many photos appear dark/dim/dull and NO, it is not ‘artistic’ as some imply. In many cases, it’s simply a mistake by the editor, made innocently and without them realizing it.
Some argue that this a ‘new trend’? Nope! It’s poor craft, born out of not knowing the right way to set things up when editing.
The worst thing is when comments like this are made: “it’s up to you, there are no rules, except those that are made to be broken” as one commenter said.
My response: Please, do not perpetuate this ‘attitude’. Far too many students of photography (and I’ve seen my share over the decades!) use the, ‘I’ll do it my way’ arguement, or ‘That’s the way it was’ as a defence, when really it is down to poor craft.
Yes, there are rules. And, yes, they are made to be broken. But there is also good craft.
And good craft with full tone photos (which are most of the photos we see) is to have at least a few pixels of pure white. These few pixels allow the eye to correctly calibrate the tones in the rest of the photo.
Unconsciously, the first thing our eyes seek out in a photograph tends to be the brightest spot. This allows our brains to calibrate the rest of the tones. If there isn’t at least some pure white—especially when viewed against a white background like online, in photo books, and in prints—then our brains dim the whole photo.
It’s all done subconsciously, but we all do it. So the editor/printer needs to be aware of this tohelp the viewer with that calibration by having at least a few pixels of pure white. But how? Read on . . .
Additionally, highlights and shadows can be much livelier than are often shown in photos online. They are ‘dull’ due to poor set-up of the editing suite. When displayed on a white background, photos should be edited against a white canvas.
My theory (which it has been proven correct in countless workshop and class situations), is that many photos posted, particularly black-and-whites, lack highlights and have blocked up shadows because photographers are editing using the default BLACK canvas/background. This makes photos appear brighter during editing, but end up being dull against a white background.
Unfortunately, most editing suites default to black. ‘Dark mode’ is a trend, but it’s not helping photographers. Change the canvas (the area surrounding the photo when viewed in the editing suite) to white and you will see greater success in calibrating your photos (colour and B&W) for viewing on a white background.
The problem is our eyes are easily fooled.
Photos—both B&W and colour—should be edited against a WHITE canvas when they are to be displayed on a white background, as they are in most viewing situations: here online, in photo books, and as prints. BUT, many editing suites—Lightroom, PS, CaptureOne, etc.—default to ‘dark mode’ which is not the ideal. With Lightroom (on laptop, though not on iPad), and Affinity Photo, CaptureOne and Photoshop, the canvas can be changed to white and I urge photographers to do so. Simply right-click on the canvas just outside the photo and select ‘White’. Done.
The difference is subtle at best and, therefore, difficult to ‘prove’ except by observation, trial and error. Having seen it countless times, you’ll just have to take my word for it. Or, better yet, try it out yourself.
I’m from the wet darkroom era. Back then, good printing practice encouraged us to routinely curl the back of a print (pure white) next to the brightest white in the photo, just to ensure that the tones were bright enough without losing too much to pure white. This is just as important today with digital as it was back then. And having a white canvas helps.

I have contacted Adobe a number of times encouraging them to allow iPad users to set the canvas to white—and I’m not the only one! It’s just a a simple line of code that has been included for the laptop/desktop version, but for some reason they don’t see the need for iPad users, possibly because they are targeting Lr for iPad to people who may not realize the difference. Hello! There are plenty of us out there who know what they’re doing and are using an iPad for digital editing!!
Whenever I finish editing on my iPad, I export the photo to check it against a white background. Sure enough, 9 times out of 10, I need to brighten the photo before posting it to Facebook or Instagram or here—and I’m one who is aware of the problem! So, for those who are unaware, they end up publishing photos that are a bit on the dim or dull side.
So, keep this in mind when you are editing full tone photos—both colour and black-and-white. Check the histogram; export and check your photo against a white background. Or change your editing canvas to white—and pay attention to those few pure white pixels. It’s a subtle, but instant improvement.
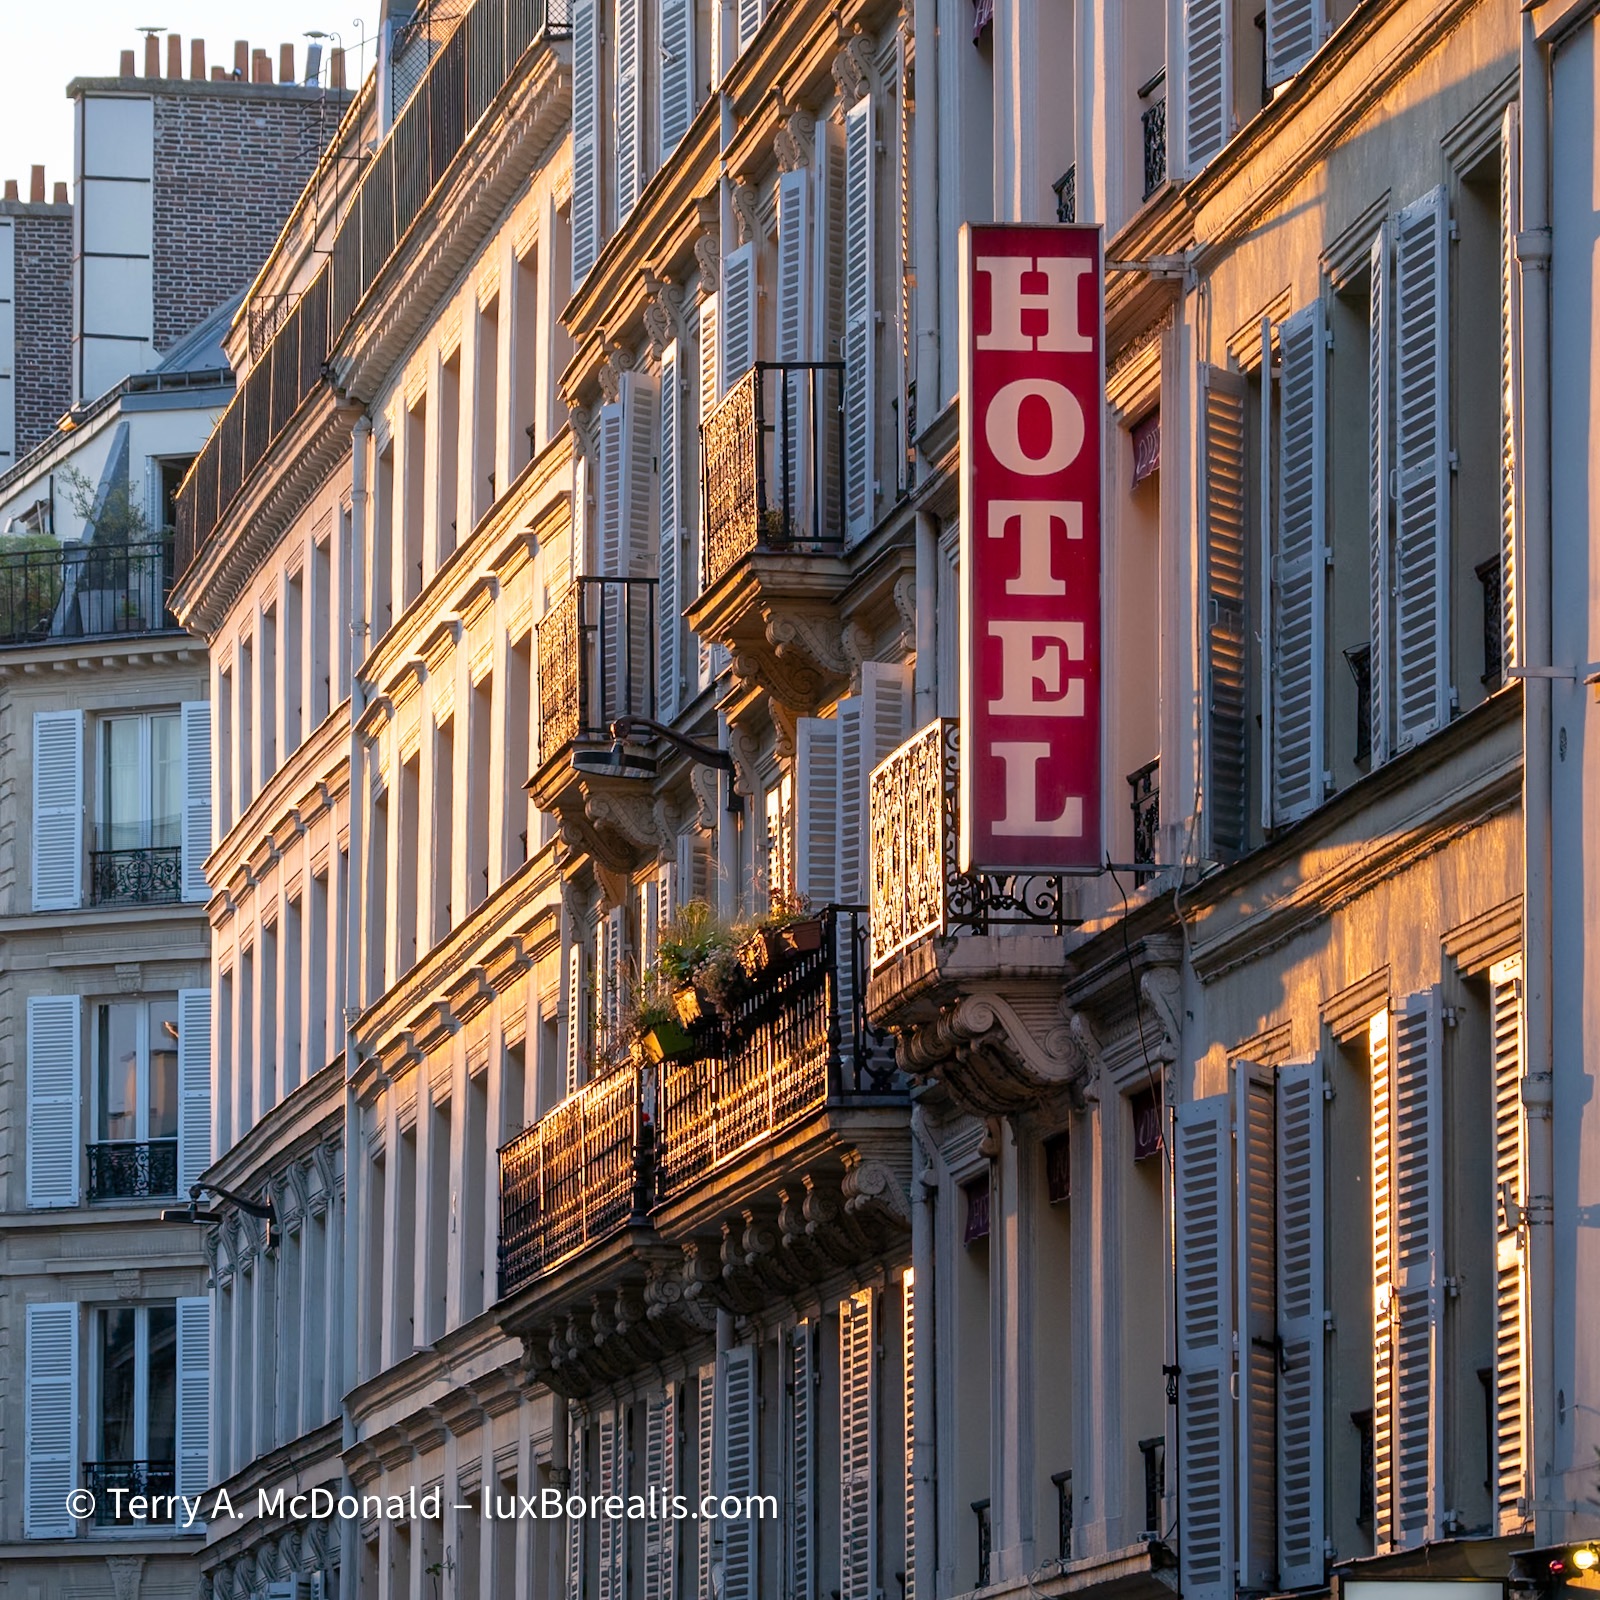
Travel Photography: Capturing ‘the Essence of Place’
We’ve just arrived home from 10 days in Paris, so I thought it would be helpful to illustrate what I mean by ‘the essence of place’. To me, this is the epitome of Travel Photography, when a single photo or series of photos reveal the true character of a place. Back in the 70s, Joni Mitchell captured the essence of Paris with:
I was a free man in Paris,
I felt unfettered and alive.
Nobody was calling me up for favours,
No one’s future to decide.

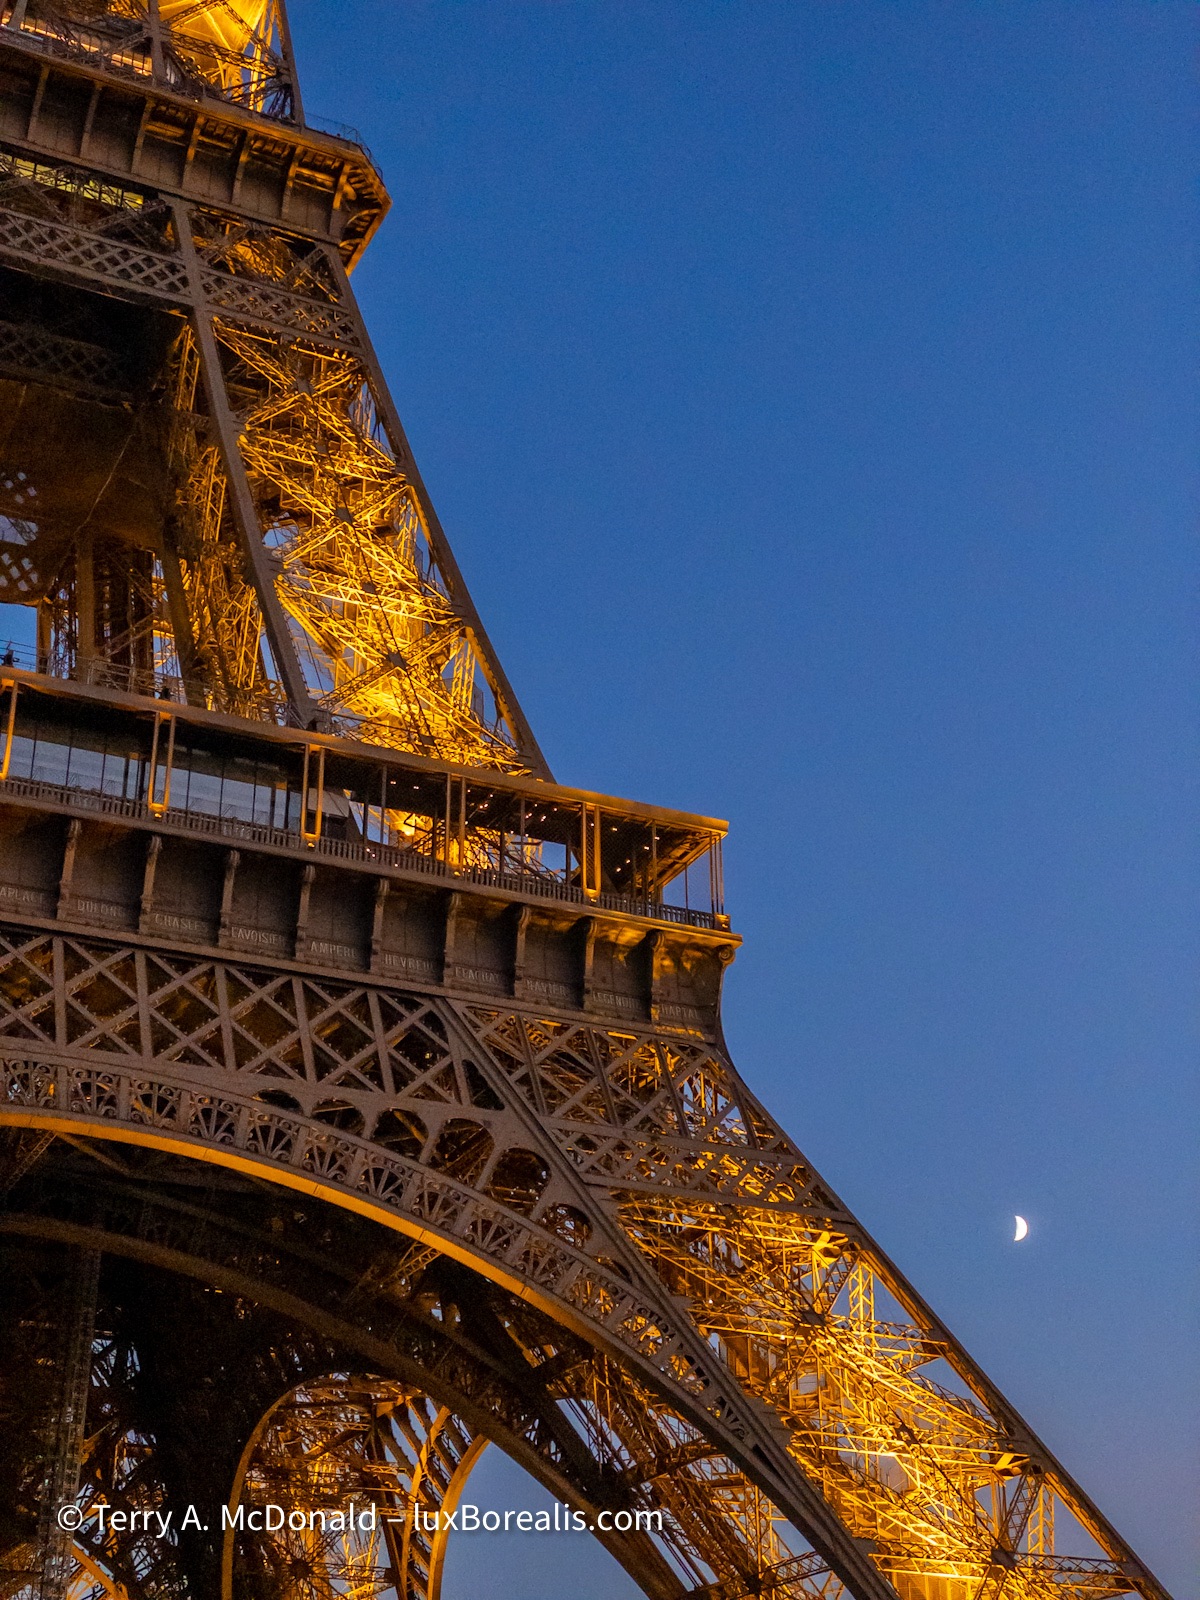
The best view of the Eiffel Tower is from the top of the Arc de Triomphe, especially later in the afternoon and in autumn with the trees leaves changing colour.
iPhone 11 Pro; Lightroom camera app; raw file processed in Lightroom
Travel photography is exhilarating. You are discovering new places or re-discovering old favourites. Either way, the places are different from home, making them more exotic. While creating memories is one of the driving forces for Travel Photography, the novelty of different places has a way of stimulating the creative juices, compelling us to see things differently, then photograph them.
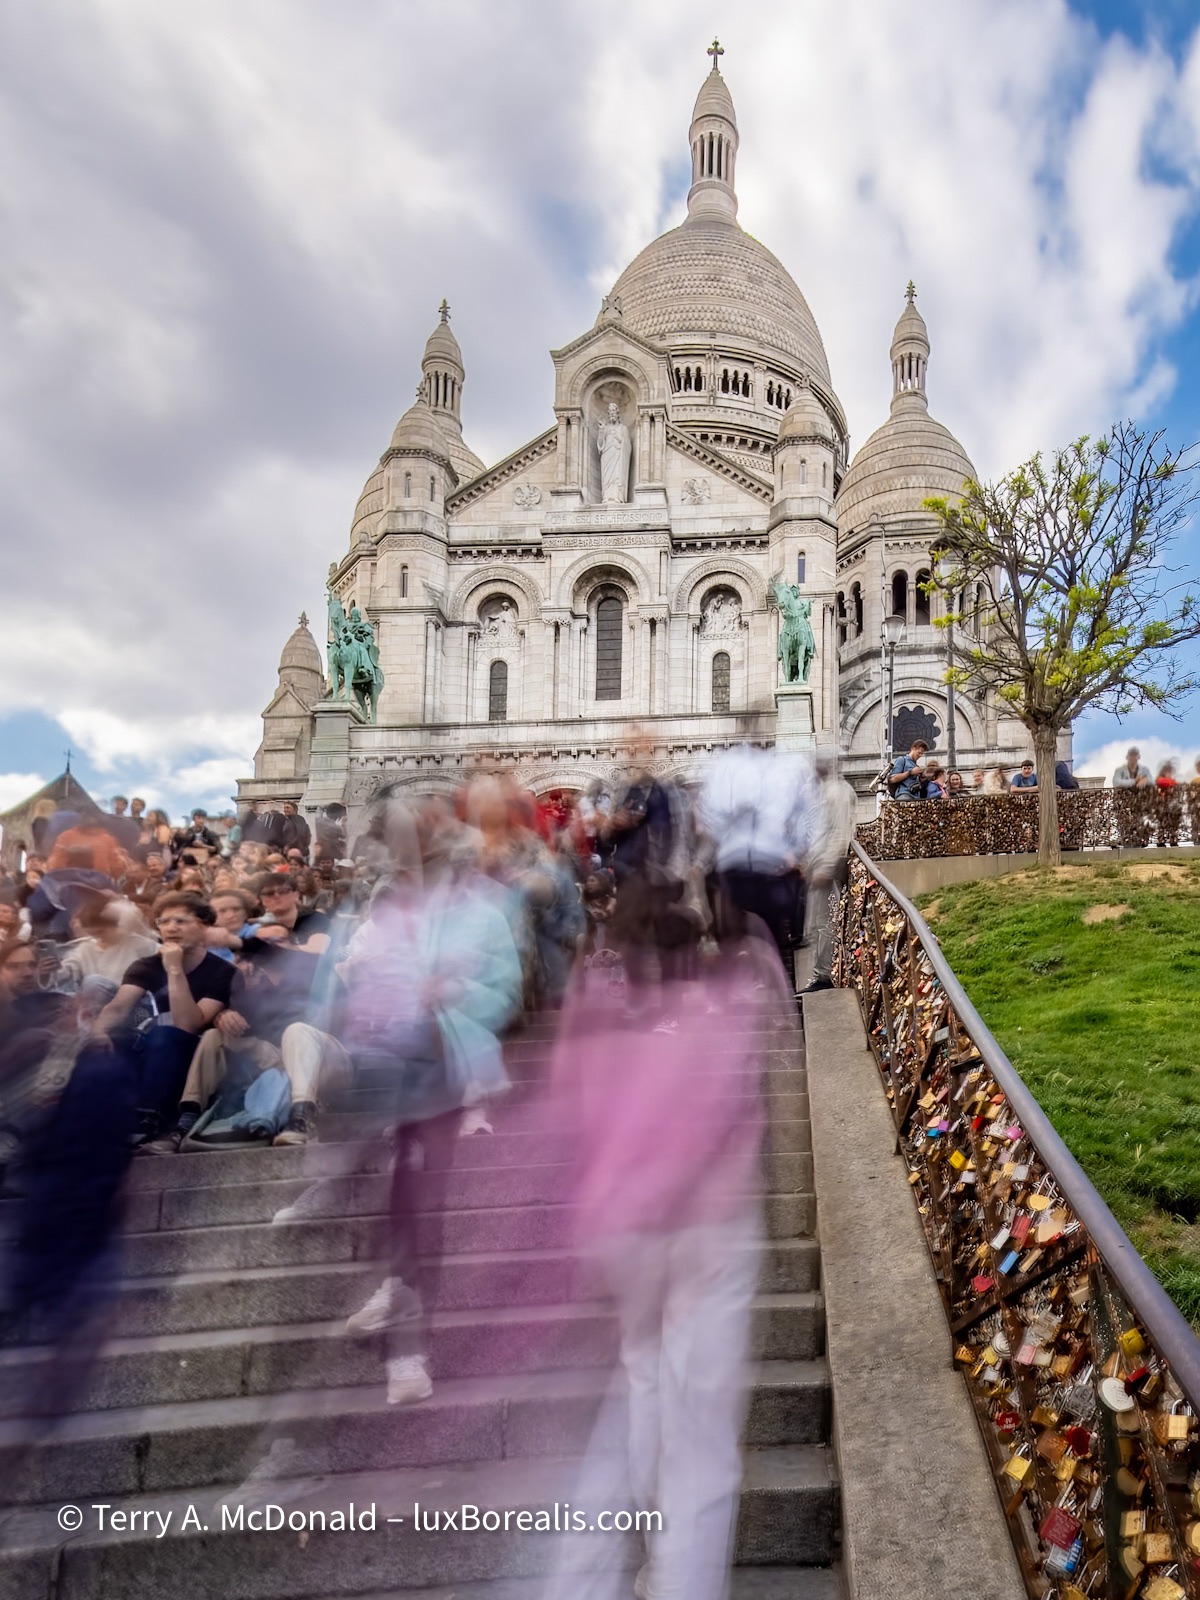
There is no avoiding the throngs of people at Sacré Cœur except in the dead of night. OM-1 w/ M.Zuiko 12-100mm ƒ4 PRO at 12mm (24mm efov); ƒ22 @ 2.5 seconds, ISO 200; LIveND mode; raw file processed in Lightroom and Topaz PhotoAI.
Making the most of limited time
Like London, Berlin, Prague, Rome and other great European cities, Paris is dynamic and diverse, touristy, but also a working city. Capturing the experience of being there is difficult at best. It’s taken me a few visits to really get to know the city, so what do you do when you’re only there once and for only a few days? I have a some suggestions that apply to really anywhere you travel:
Don’t book a tour—book a flat. Use Booking.com or AirBnB to find a place near one of the main Metro stations. This gets you away from the higher cost, touristy areas and into the real city. It also allows you the flexibility of making your own plans and meals. Getting out into grocery stores, bakeries and green grocers, connects you with the neighbourhood around your flat. You get to know the street, the shops, the cafés, the terraces—the places people live in.
If I had my way, I’d just walk through those doors
And wander down the Champs-Élysées
Going café to cabaret
Thinking how I’ll feel when I find
That very good friend of mine
—Joni Mitchell, ‘A Free Man in Paris’
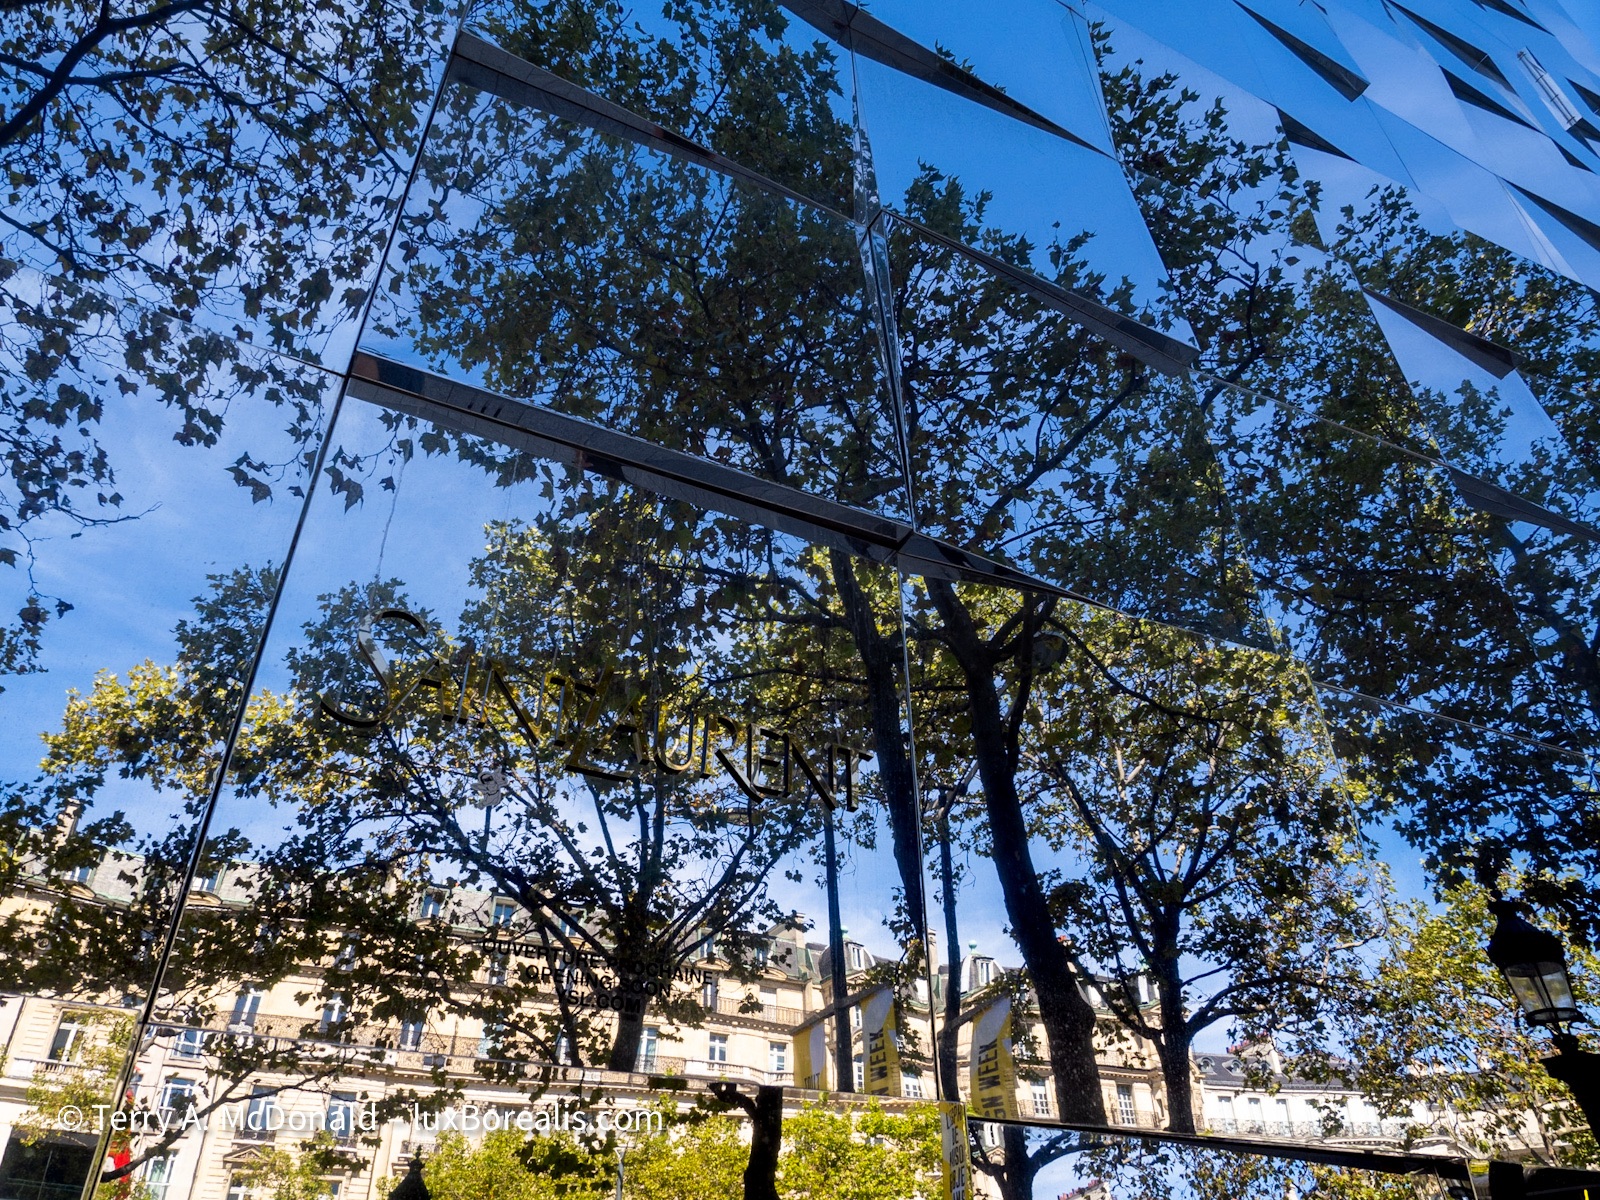
Over the decades, how many millions have walked the Champs Élysées? As a traveller, how do you even begin to capture it in some unique way? Remember what I said about patterns and designs? Thank you Yves Saint Laurent!
OM-1 w/12-100/4 at 12mm (24mm efov); ƒ8 @ 1/250, ISO 200; processed in Lightroom.
If it’s your first time in a city, get a ticket to one of the Hop-On-Hop-Off tourist buses and spend a day getting to know the layout. This gets the touristy places checked off and helps you develop a feel for the city. Then, you can return to and spend more time in places you found most engaging. But beware, you still need to be in the streets around your flat to really get to know the city.
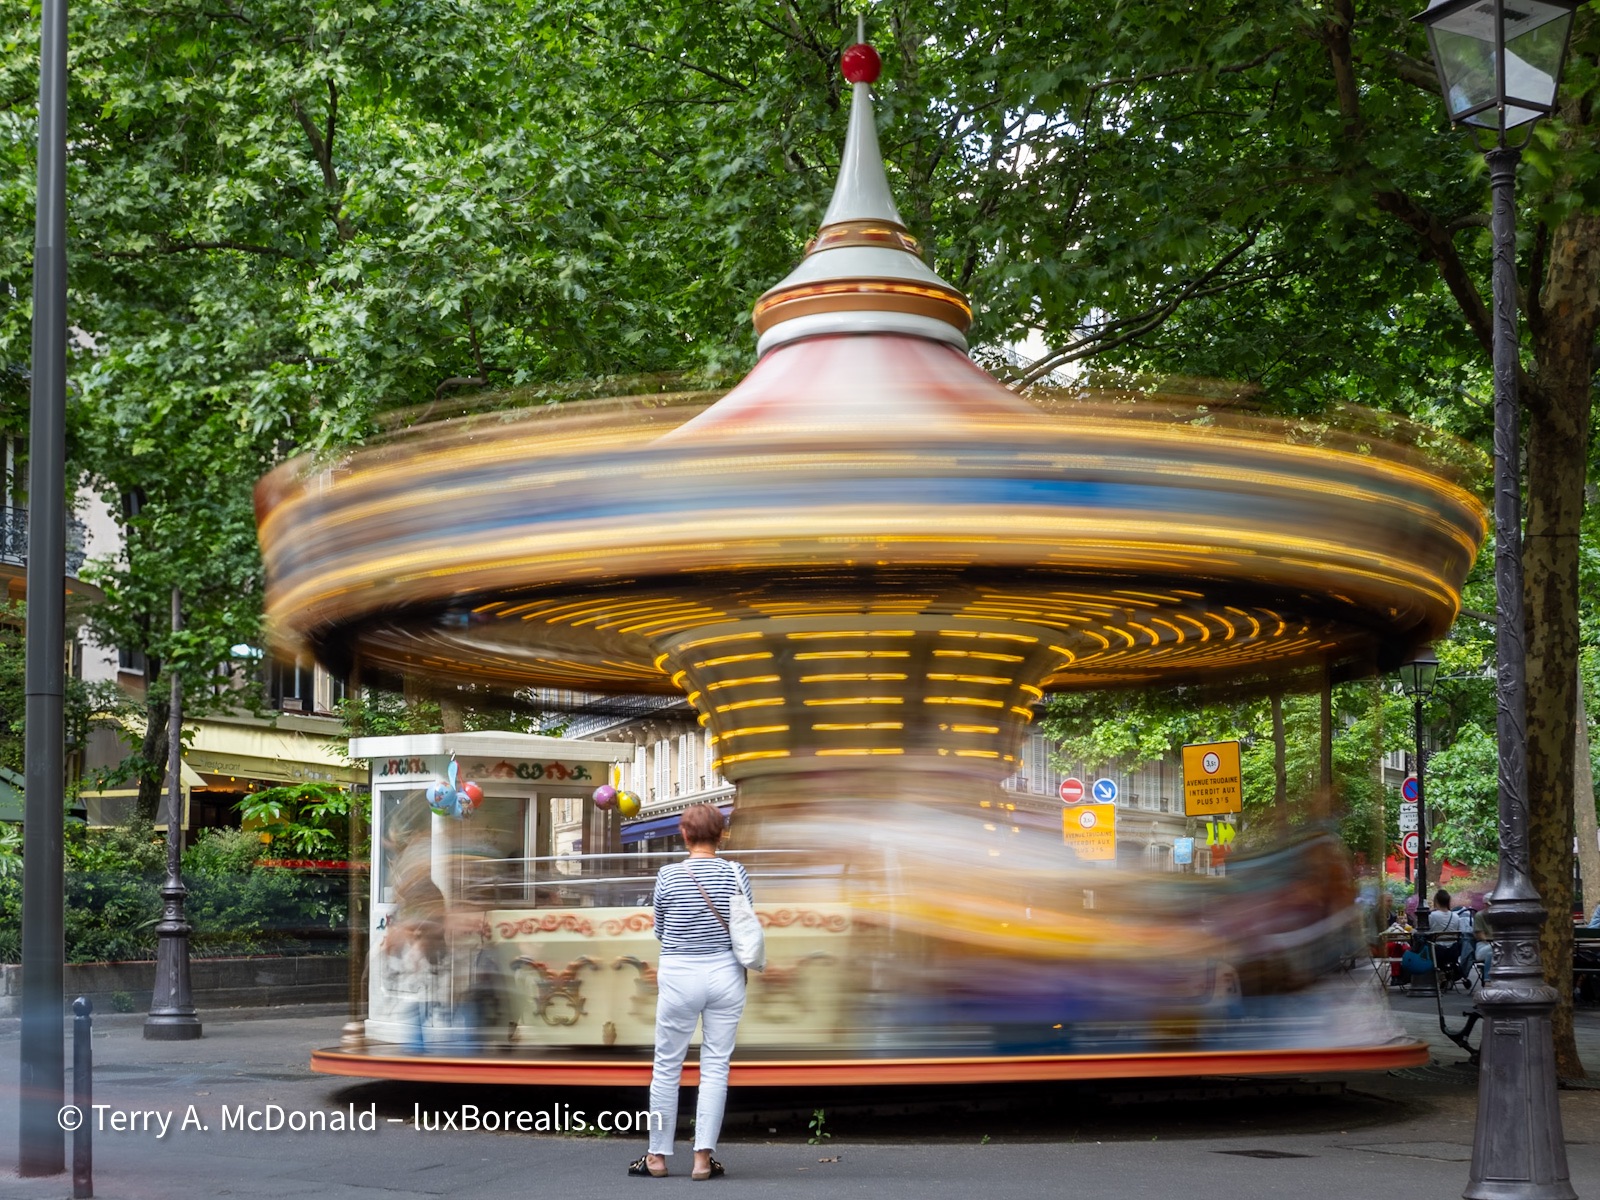
Carousels are part of the street life in a number of neighbourhoods of Paris. Apparently there are more than 20 scattered around the city.
OM-1 w/12-100mm at 25mm (50mm efov); ƒ11 @ 2sec, ISO 200; Live ND mode; raw file processed in Lightroom.
Save the museum visits for the 10am to 4pm time slots so you can get out onto the streets in the morning and evening. (Aside: Also, book your tickets ahead of time to save time in the queues.) For outdoor street photography and views of iconic places, you want to be there when the low-angle, warmer light is on your side. And, consider staying out after sunset to capture night scenes.
Shoot the obvious, but try doing it in way different from the run-of-the-mill shots. Night photography offers a new way of seeing.
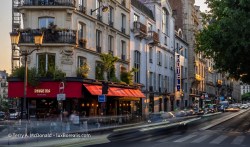
Spend time wandering the streets. Look for different views of the standard places and, more importantly, be open to seeing the unexpected. Getting out to buy groceries or patisseries or to enjoy a coffee or glass of wine at a terrace allows you to see the city and the changing light.
As with most European cities, Paris streets do not follow any kind of grid pattern. So, anticipating exactly how the evening sun will hit a certain street is impossible. You have to be out walking the streets, looking for the light.
OM-1 w/12-100mm at 75mm (150mm efov); ƒ5.6 @ 1/125, ISO 200; raw file processed in Lightroom.
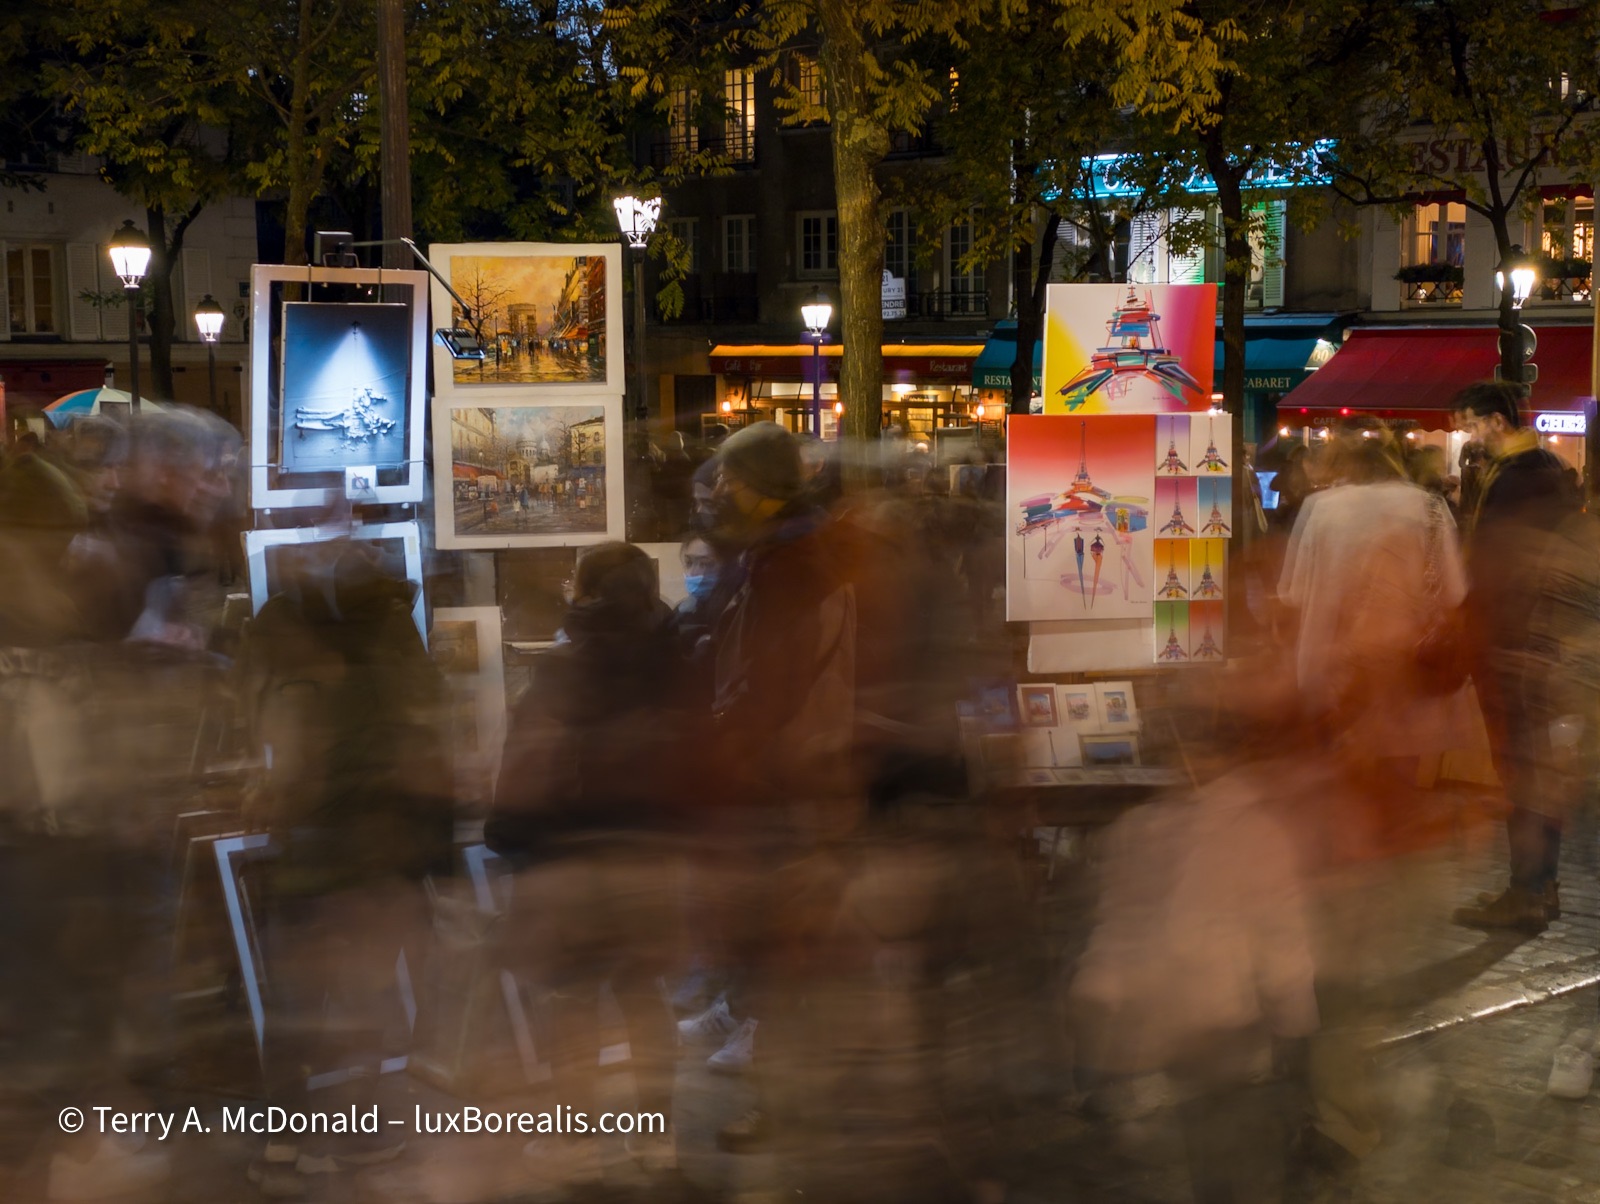
Whimsical Works. Keep an eye out for patterns, designs, shadows, street art, and street performers.
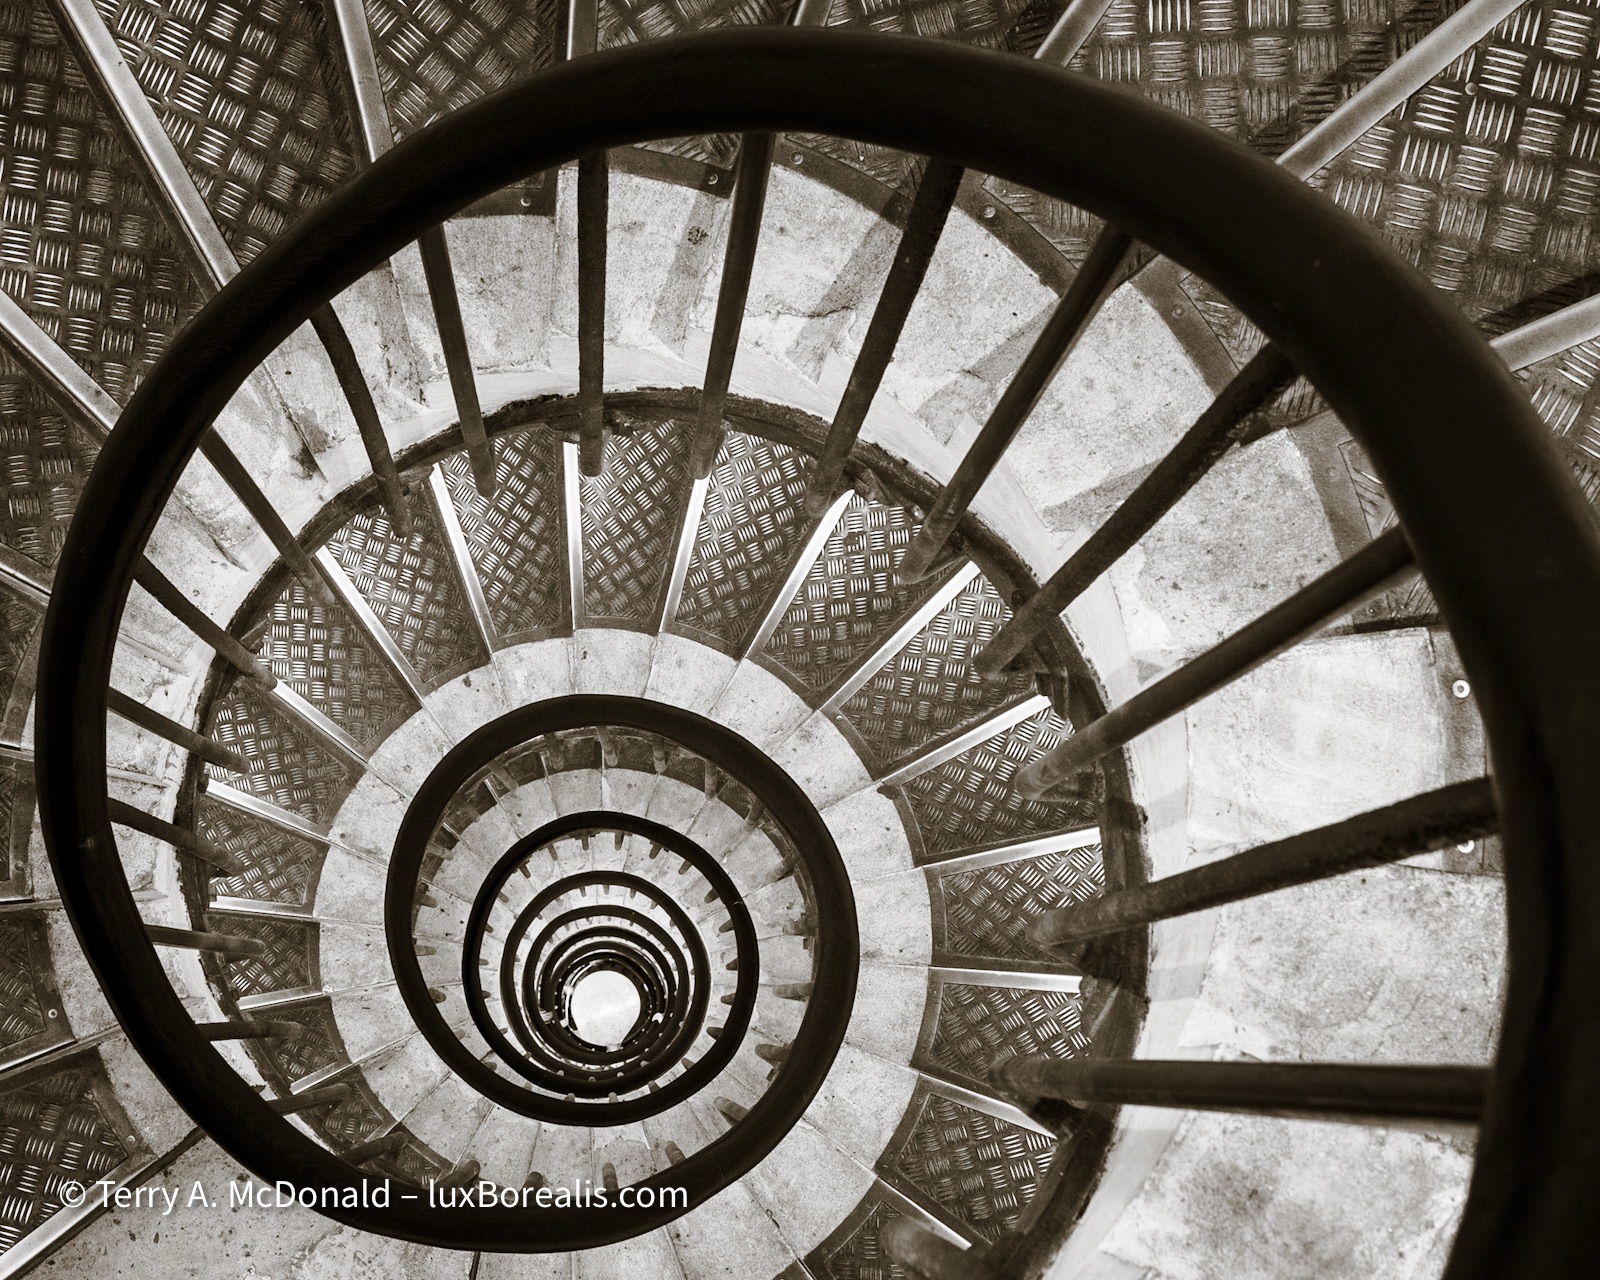
Look past the obvious tourist icons—designs and patterns are everywhere once you attune your eye to them. These are the stairs down from the viewing platform atop the Arc de Triomphe. A few moments of waiting cleared the many hands from the rail.
Olympus OM-1 with 12-100mm at 25mm (50mm efov); ƒ8 @ ⅓, ISO 200; raw file processed in Lightroom.
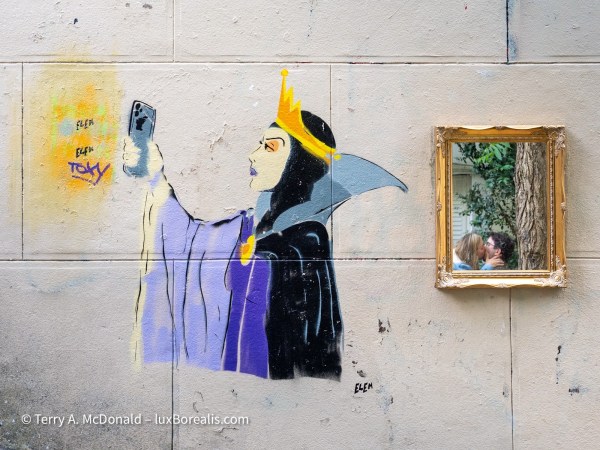
I enjoy street art and Paris is full of it—tags, graffiti, and pieces like this—true street art. I take no credit for the art itself: the evil stepmother looking not into a mirror, but today’s alternative—a phone. But check out the real mirror. Just as I was shooting the street art—voilà—what should be in the mirror but a classic French scene reminiscent of Joni Mitchell’s In France They Kiss on Main Street. Pure serendipity.
OM-1 w/12-100mm at 29mm (58mm efov); ƒ5.6 @ 1/50, ISO 640; raw file processed in Lightroom.
Try something different. Museums are museums, and can be inspiring. They display the masters of art and craft, grounding us in what the giants of before have done, and perhaps providing inspiration for the next generation. Taking a lesson from the Impressionists, I used a slow shutter speed to transform scenes, making them fluid, dynamic, even ethereal, as you saw in the Sacré Coeur and Carousel photos above.

Pictures of the works of the masters are helpful for study purposes, but I wanted something a bit different, photos that showed the nature of the place—the heaving masses of people.
OM-1 w/12-100mm at 18mm (36mm efov); ƒ5.6 @ 2 seconds, ISO 800; Live ND mode; raw file processed in Lightroom.
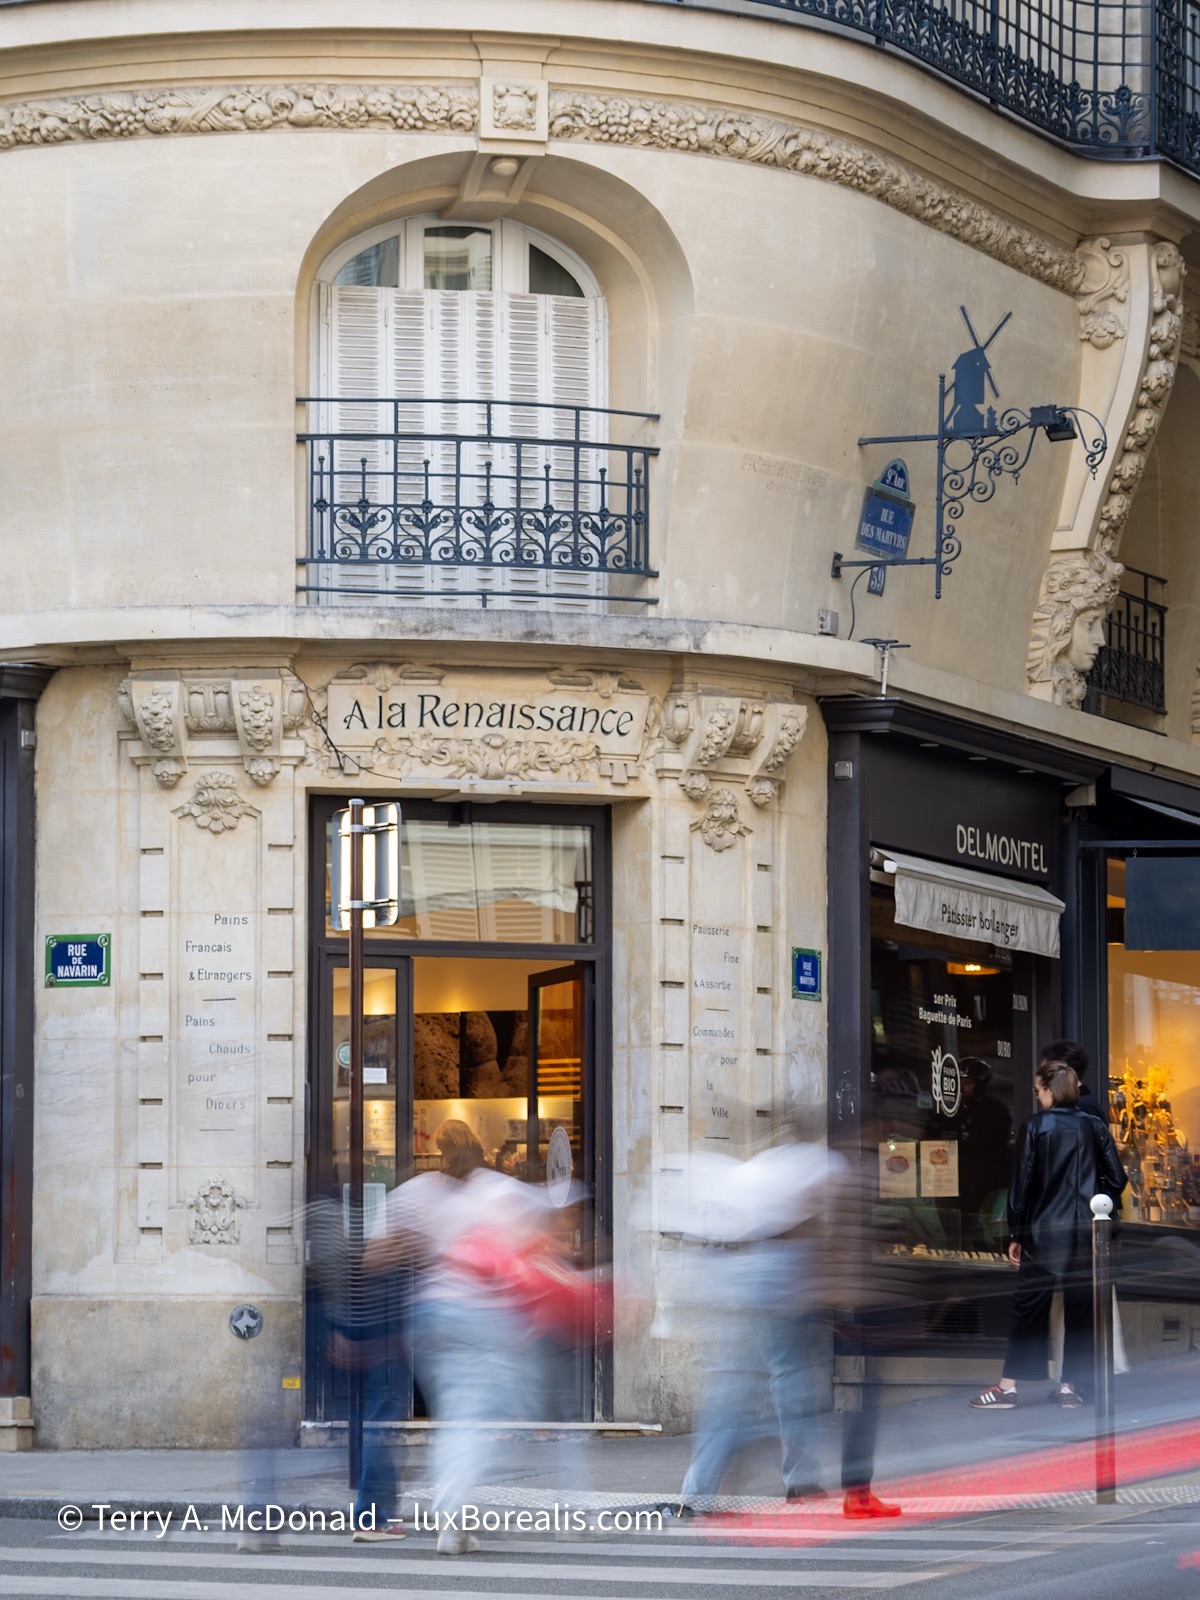
One of our favourite patisseries along the Rue des Martyrs near Montmartre. The building façade is beautiful in itself, but an otherwise static scene is transformed by the addition of movement.
OM-1 w/ 12-100mm at 54mm (108mm efov); ƒ4 @ 0.6sec, ISO 250; handheld, Live ND mode; raw file processed in Lightroom.
The camera with you
You’ll notice that some of the shots in this article are made with an iPhone. Why? ‘Cause that’s what I had with me at the time. How many times has it been said, the best camera is the one that’s with you.
No need to tell anyone this is Eiffel Tower, but in the evening it looks very different. iPhone 11 Pro; Lightroom camera app; raw file processed in Lightroom.
Am I distraught that these photos were ‘only’ made with an iPhone. Not really. The quality is good, plenty good enough for a small print, a calendar photo, even a page in a photo book. Could I make 16x20s from them? It would be a stretch and I would need to use an up-scaling app such as Topaz PhotoAI, but, yes, 16x20s are possible. What more do you need?
For some reason, Adobe removed the long exposure option in its Lightroom camera app—Argh! Since moving to Olympus/OM System, LiveND mode has filled the niche.
iPhone 11 Pro, Lightroom camera app on Long exposure; ƒ2 @ 5 seconds, ISO 320; raw file processed in Lightroom.
Could I win a photo competition with phone photos? Possibly. The images are unique, to a degree, but they are not earth-shattering. But what’s the goal with Travel Photography? Some of the photos you take will be competition-level shots, but not all of them, nor do they need to be. Now, if you’re a working pro, you will have a more-capable camera with you everywhere, all the time. But if you’re not, don’t sweat it, as you’ll always have your phone.
So what do you take with you? For city trips, my suggestion is yo go light and go versatile. I always have my trusted M.Zuiko 12-100mm ƒ4 Pro lens (24-200mm efov). It is sharp from end to end and, most importantly, wide open. With it on my OM-1, attached to an over the shoulder harness, I can walk around all day with it under my arm, but always at the ready. And, with the excellent weather sealing (IP-53), I’m never worried about rain damage.
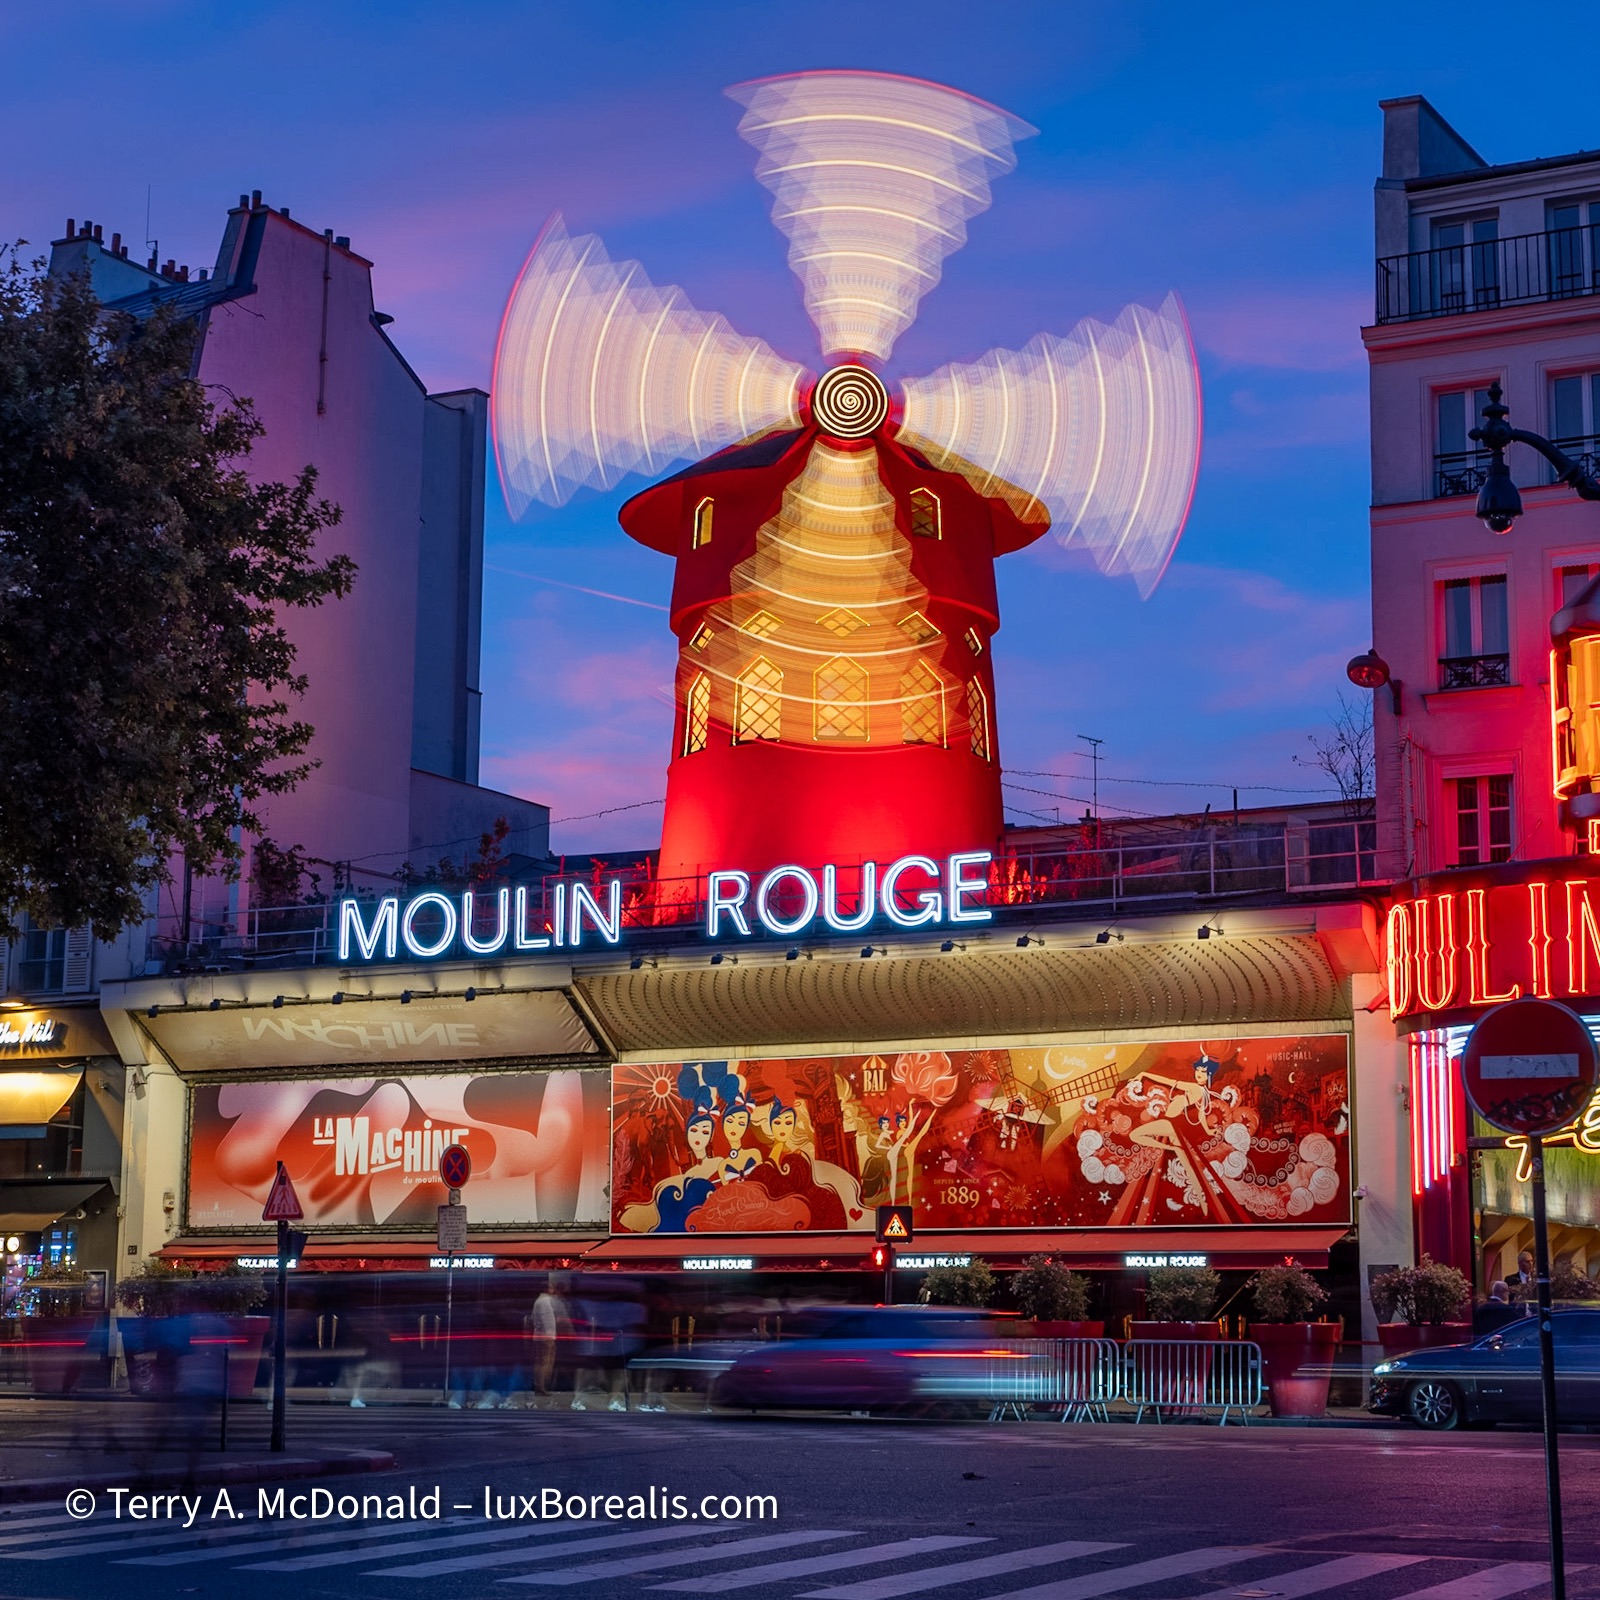
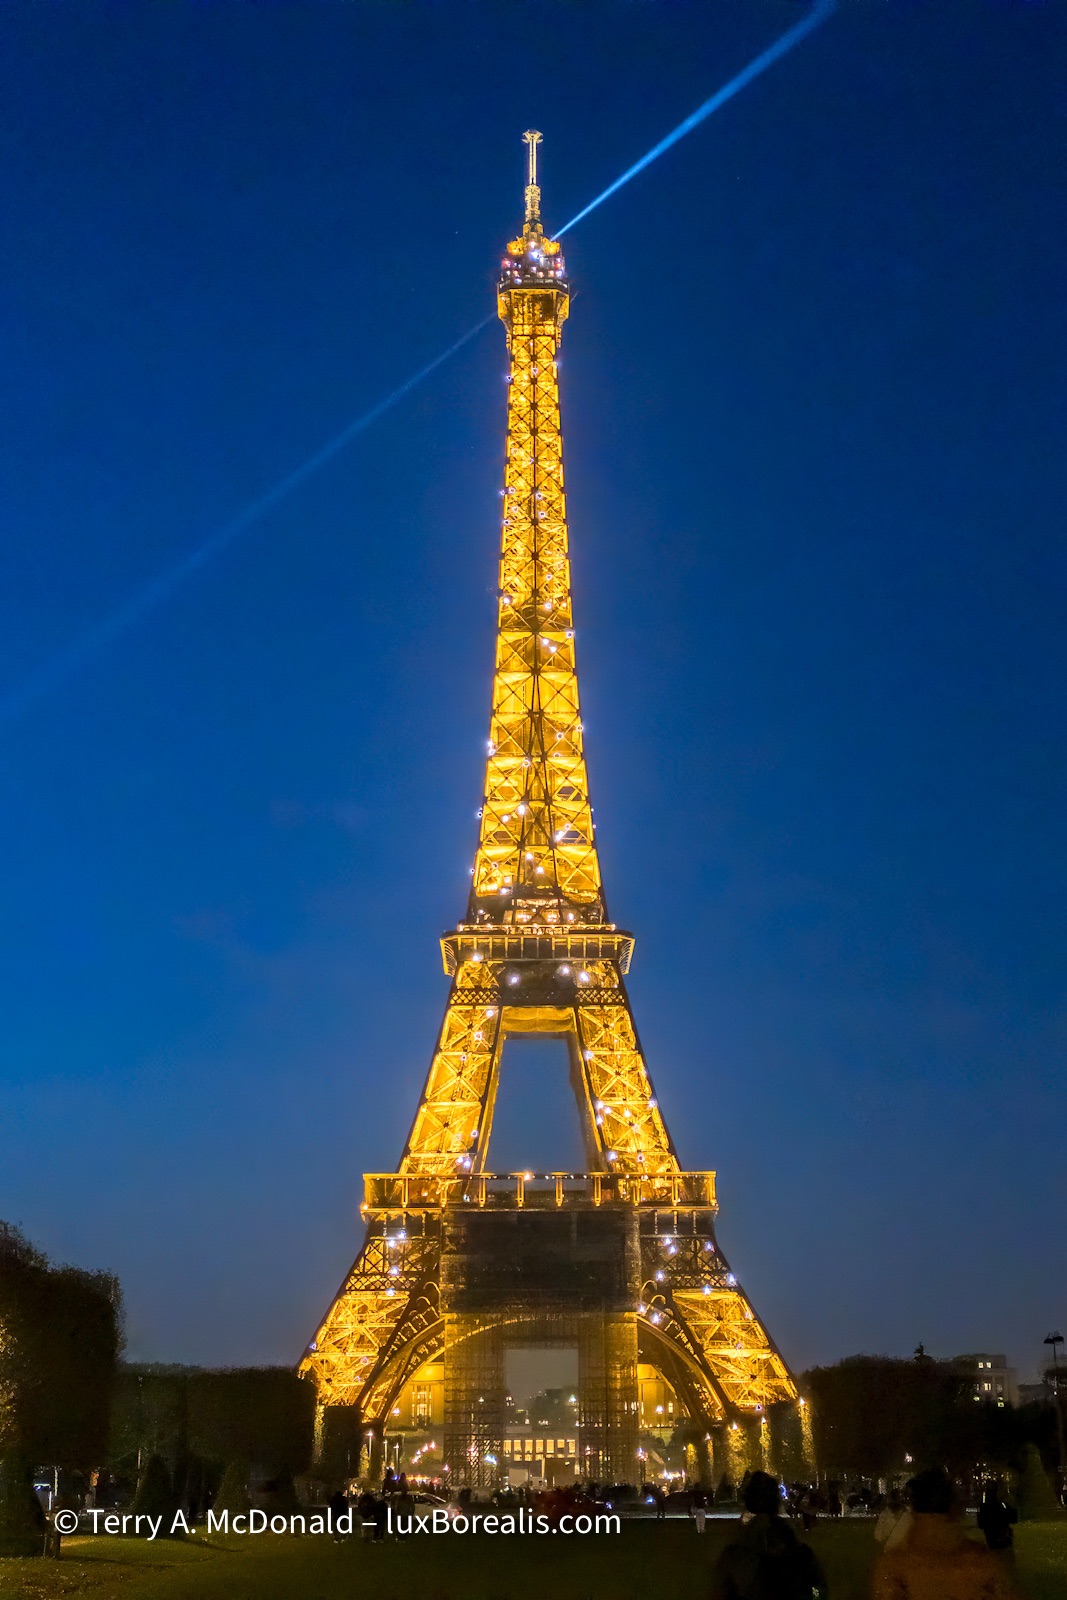
One of the icons of Paris, lifeless by day, but alive at night!
OM-1 w/ 12-100mm at 24mm (48mm efov); ƒ5.6 @ 2sec, ISO 200; raw file processed in Lightroom.
When I’m out for a day touring around, I sometimes bring my M.Zuiko 8-25mm ƒ4 Pro (16-50mm efov), but I rarely use it. Yes, there’s some overlap and I could reduce the weight and bulk by choosing my Panasonic-Leica 10mm ƒ1.7, but I like the versatility of a zoom when I may not have the time to create tight compositions with a prime lens.
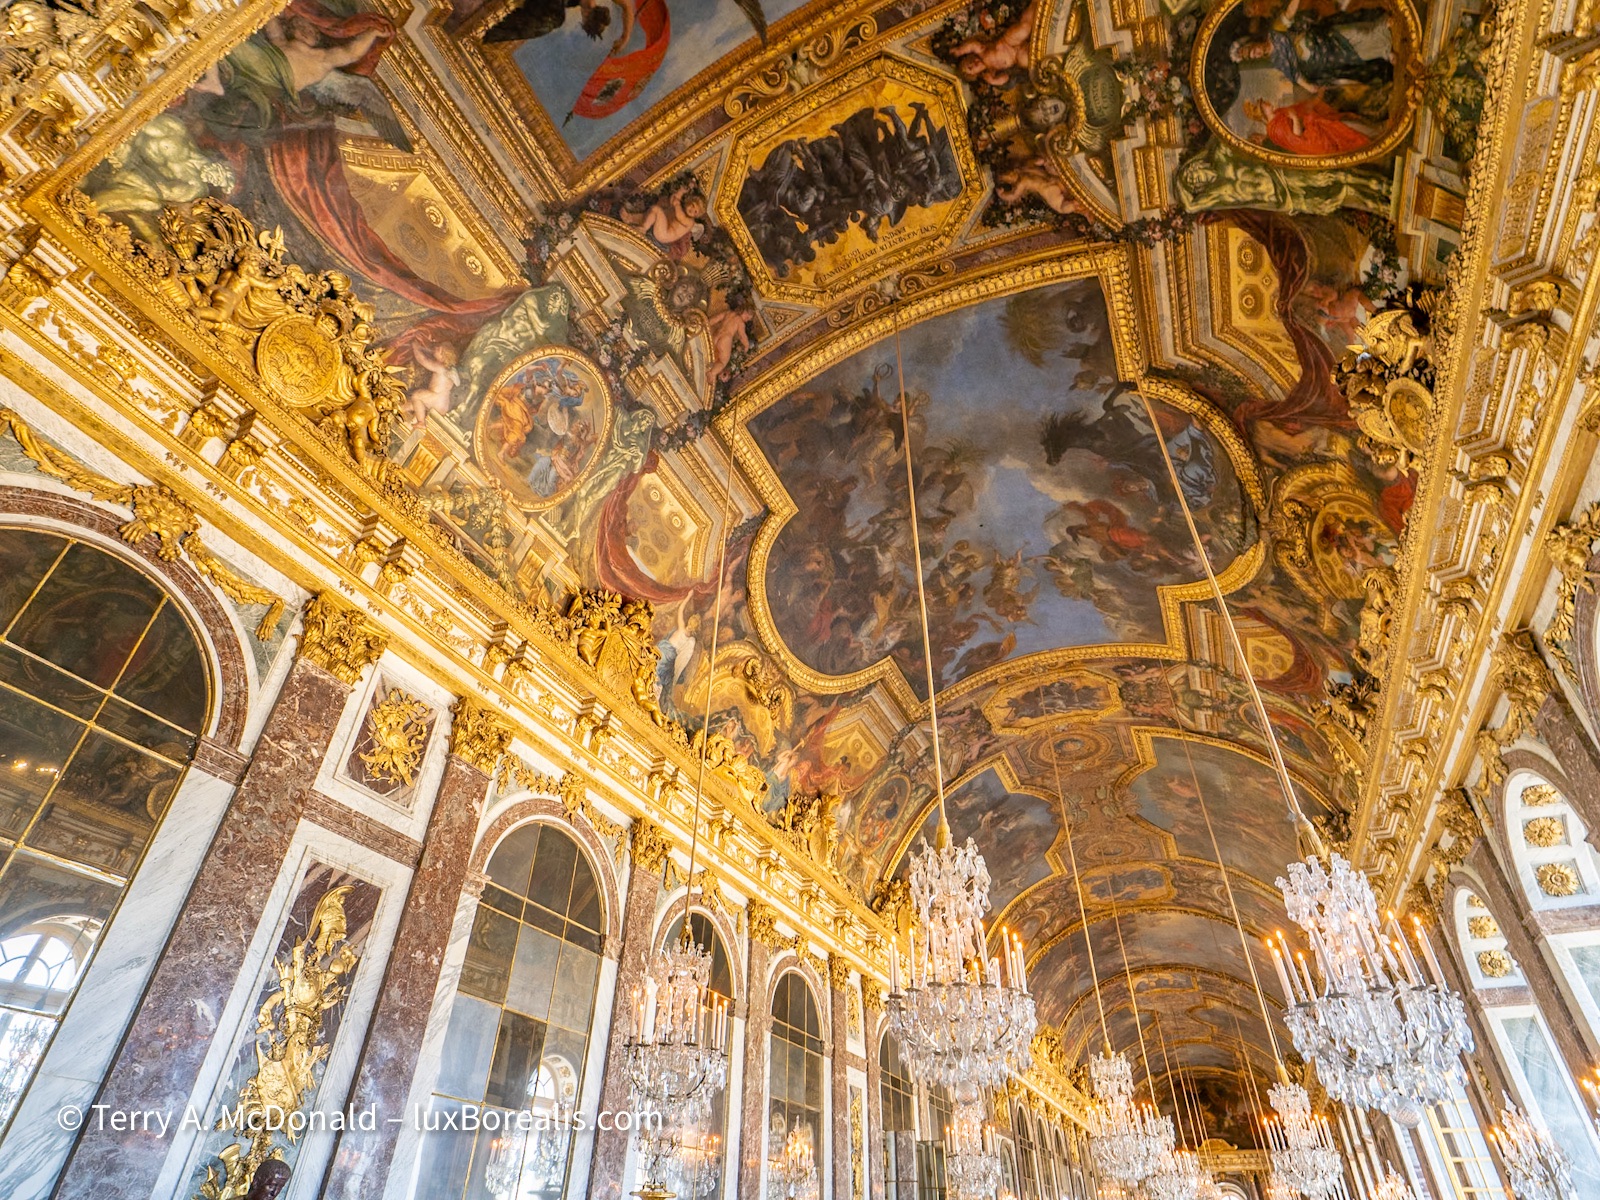
8mm comes in handy with grand ceilings in even grander palaces. Not much interpretation here, just a photo of the affluence and excess of past monarchs celebrating the talents of the many labourers and craftsmen and women who are rarely credited for their work.
OM-1 w/ M.Zuiko 8-25mm ƒ4 PRO at 8mm (16mm efov);
For details, such as gargoyles on cathedrals and when there might be birds or wildlife, I have my M.Zuiko 100-400 ƒ5-6.3 lens with me—but it’s not a lens I’ll lug around a city too often unless there is significant chance of a payoff.
One question I am often asked is, “Are ƒ4 lenses fast enough for dark interiors?” Ƒ4 has never slowed me down, probably because at ƒ4, the M.Zuiko lenses are still sharp. The two alternatives are (1) faster primes, which lack the versatility of zoom lenses; and (2) ƒ2.8 zooms. To me, the extra size and weight of them is not worth the gain of only 1 EV, which is the equivalent of choosing ISO 800 instead of ISO 1600. Any ISO now cleans up beautifully with the noise reduction modules in Lightroom, DxO or Topaz.
Entering a rebuilt and cleaned Notre Dame Cathedral was an overwhelming experience. Having watched it burn 6 years ago, and to see it today is a testament to the thousands of first responders, craftsmen and women and artisans who restored this icon of Paris.
OM-1 w/12-100mm at 92mm (184mm efov); ƒ5.6 @ ⅛, ISO 200; raw file processed in Lightroom.
The Essence of Place
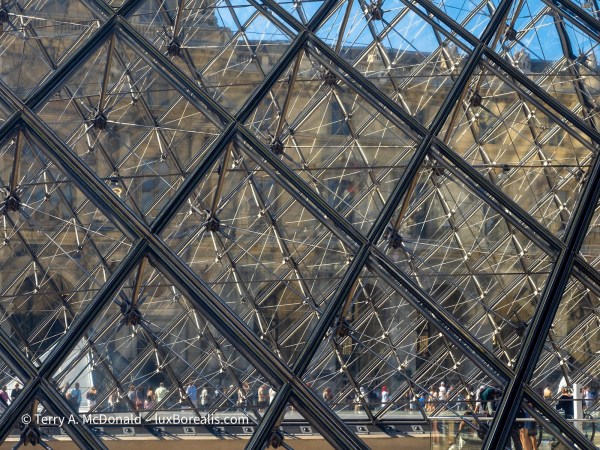
Amidst the jumble of diamonds and triangles created by the Louvre Pyramid, a long line of people queue for tickets.
OM-1 w/12-100mm at 38mm (76mm efov); ƒ8 @ 1/400, ISO 200; raw file processed in Lightroom.
When travelling, crowds and queues are difficult to avoid. Too often, it’s a matter of ‘if you can’t beat ‘em, then join ‘em’. I know it’s trite to say, but what else can you do? Try making the most of the time you have. Get the ‘tourist’ shots, but also spend time walking the streets, looking for the different, the unique—a new way of looking at places millions have visited and made photos of, or a different view of a place people think they know. Try capturing the essence of place where ever you go, taking time to enjoy the flavours and experiences that come with travel.
Thanks for reading! Be sure to COMMENT — SHARE — SUBSCRIBE!
Terry McDonald is fine art landscape, nature and travel photographer based in southern Ontario. View his work at luxBorealis.com; select Workshops to enquire about Field & Screen learning and PhotoTalks for you and your camera club.
This work is copyright ©2025 Terry A. McDonald and may not be reproduced in whole or in part without the written consent of the author.
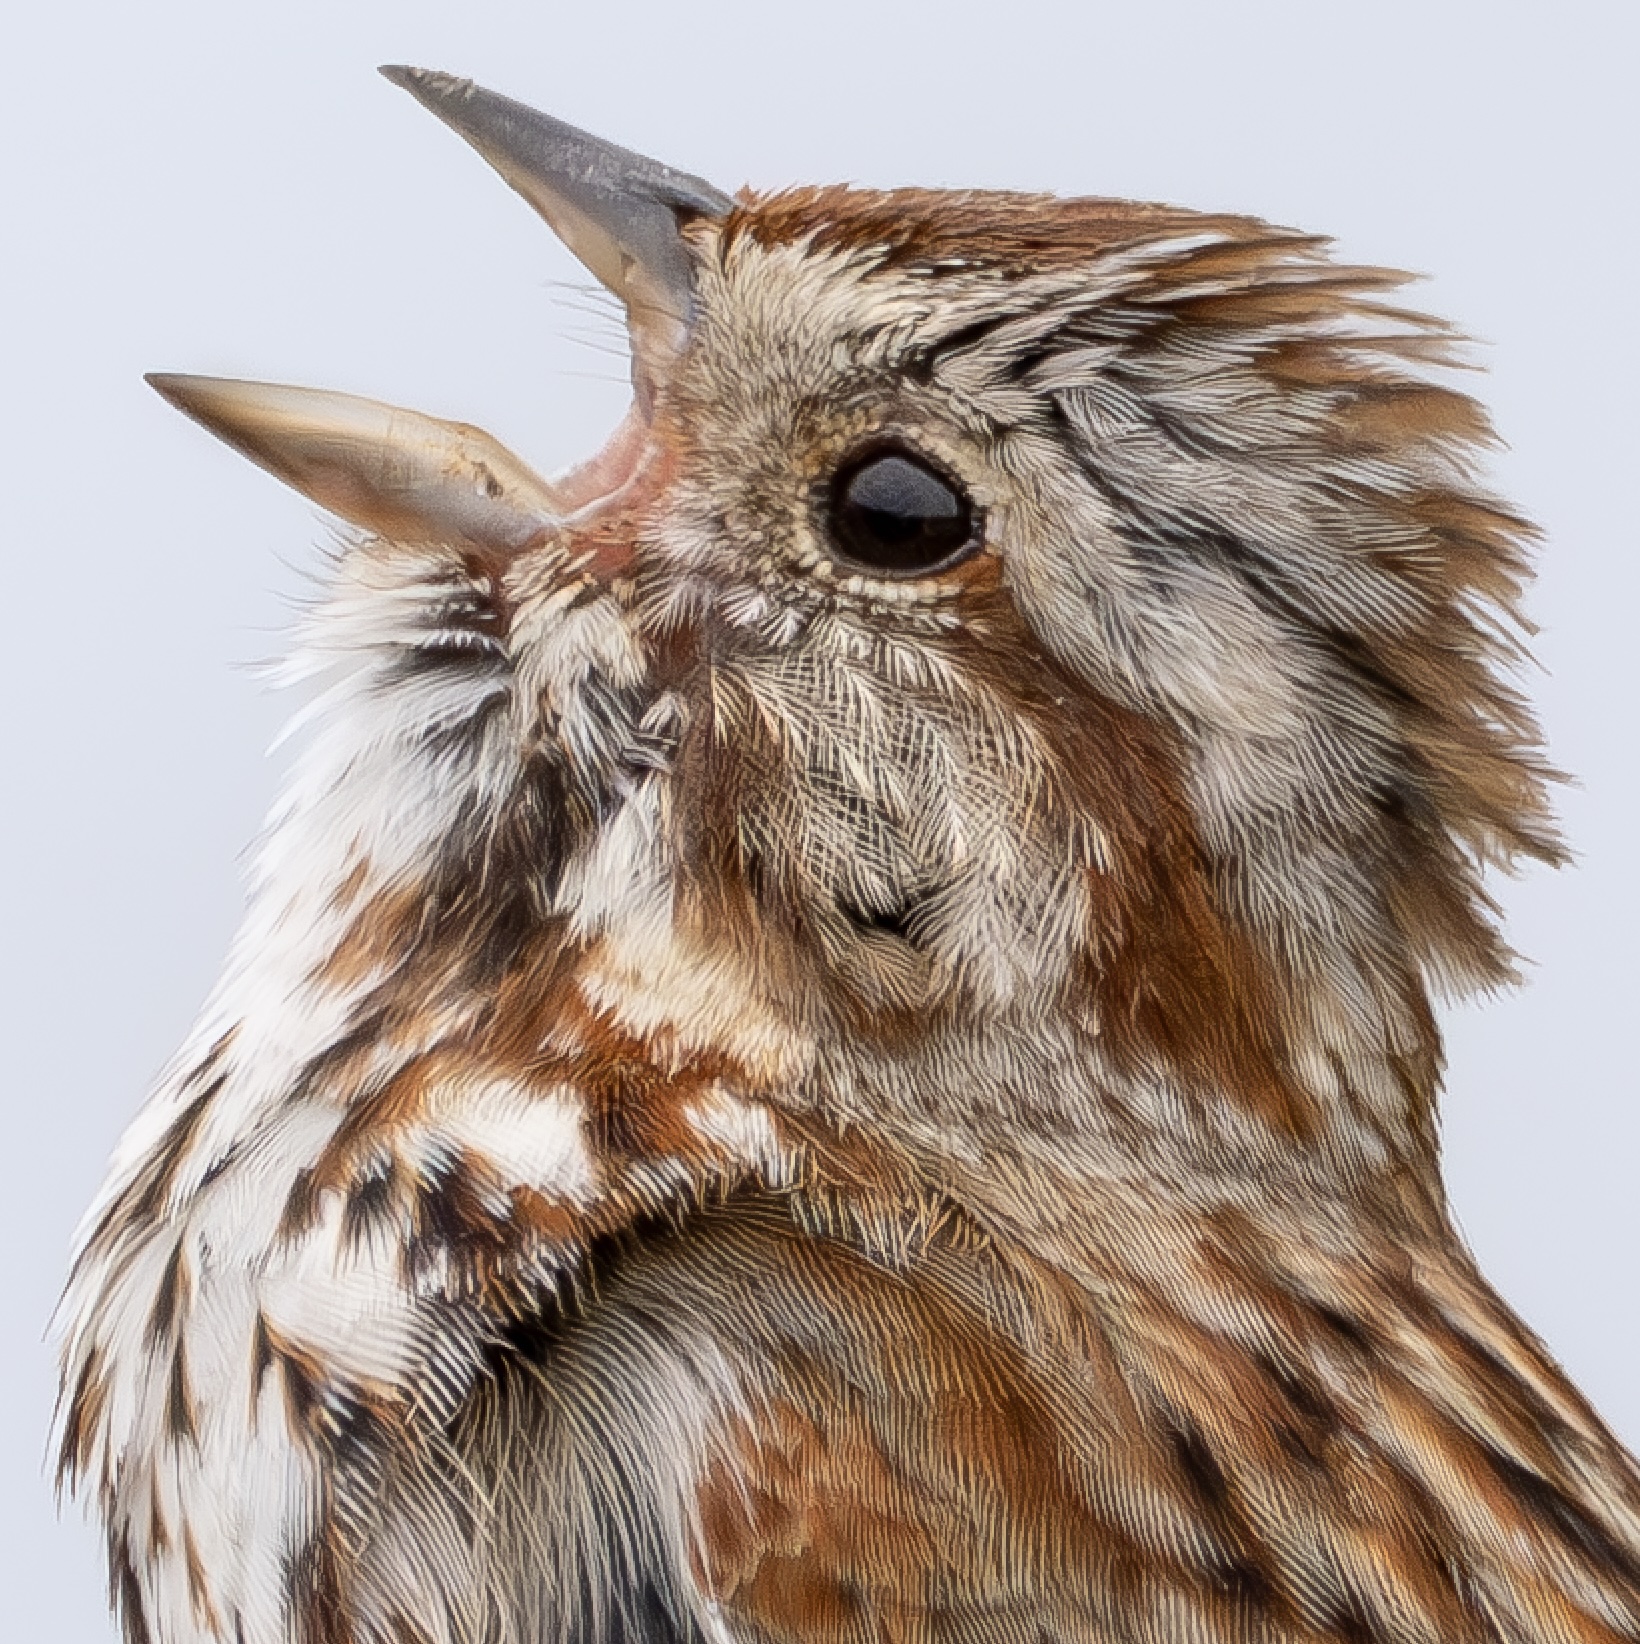
A Birding Day Out: Tom Stirr, ProCapture and the M.Zuiko 150-600mm lens
This week, I met up with Tom Stirr of SmallSensorPhotography.com to spend a few hours photographing in two locations around Burlington, Ontario. It gave Tom and I an opportunity to catch up, while we worked towards capturing some bird photos. Tom is the resident expert on ProCapture, so that was one of my goals. The other was to try out his M.Zuiko 150-600mm ƒ5-6.3 IS zoom lens.
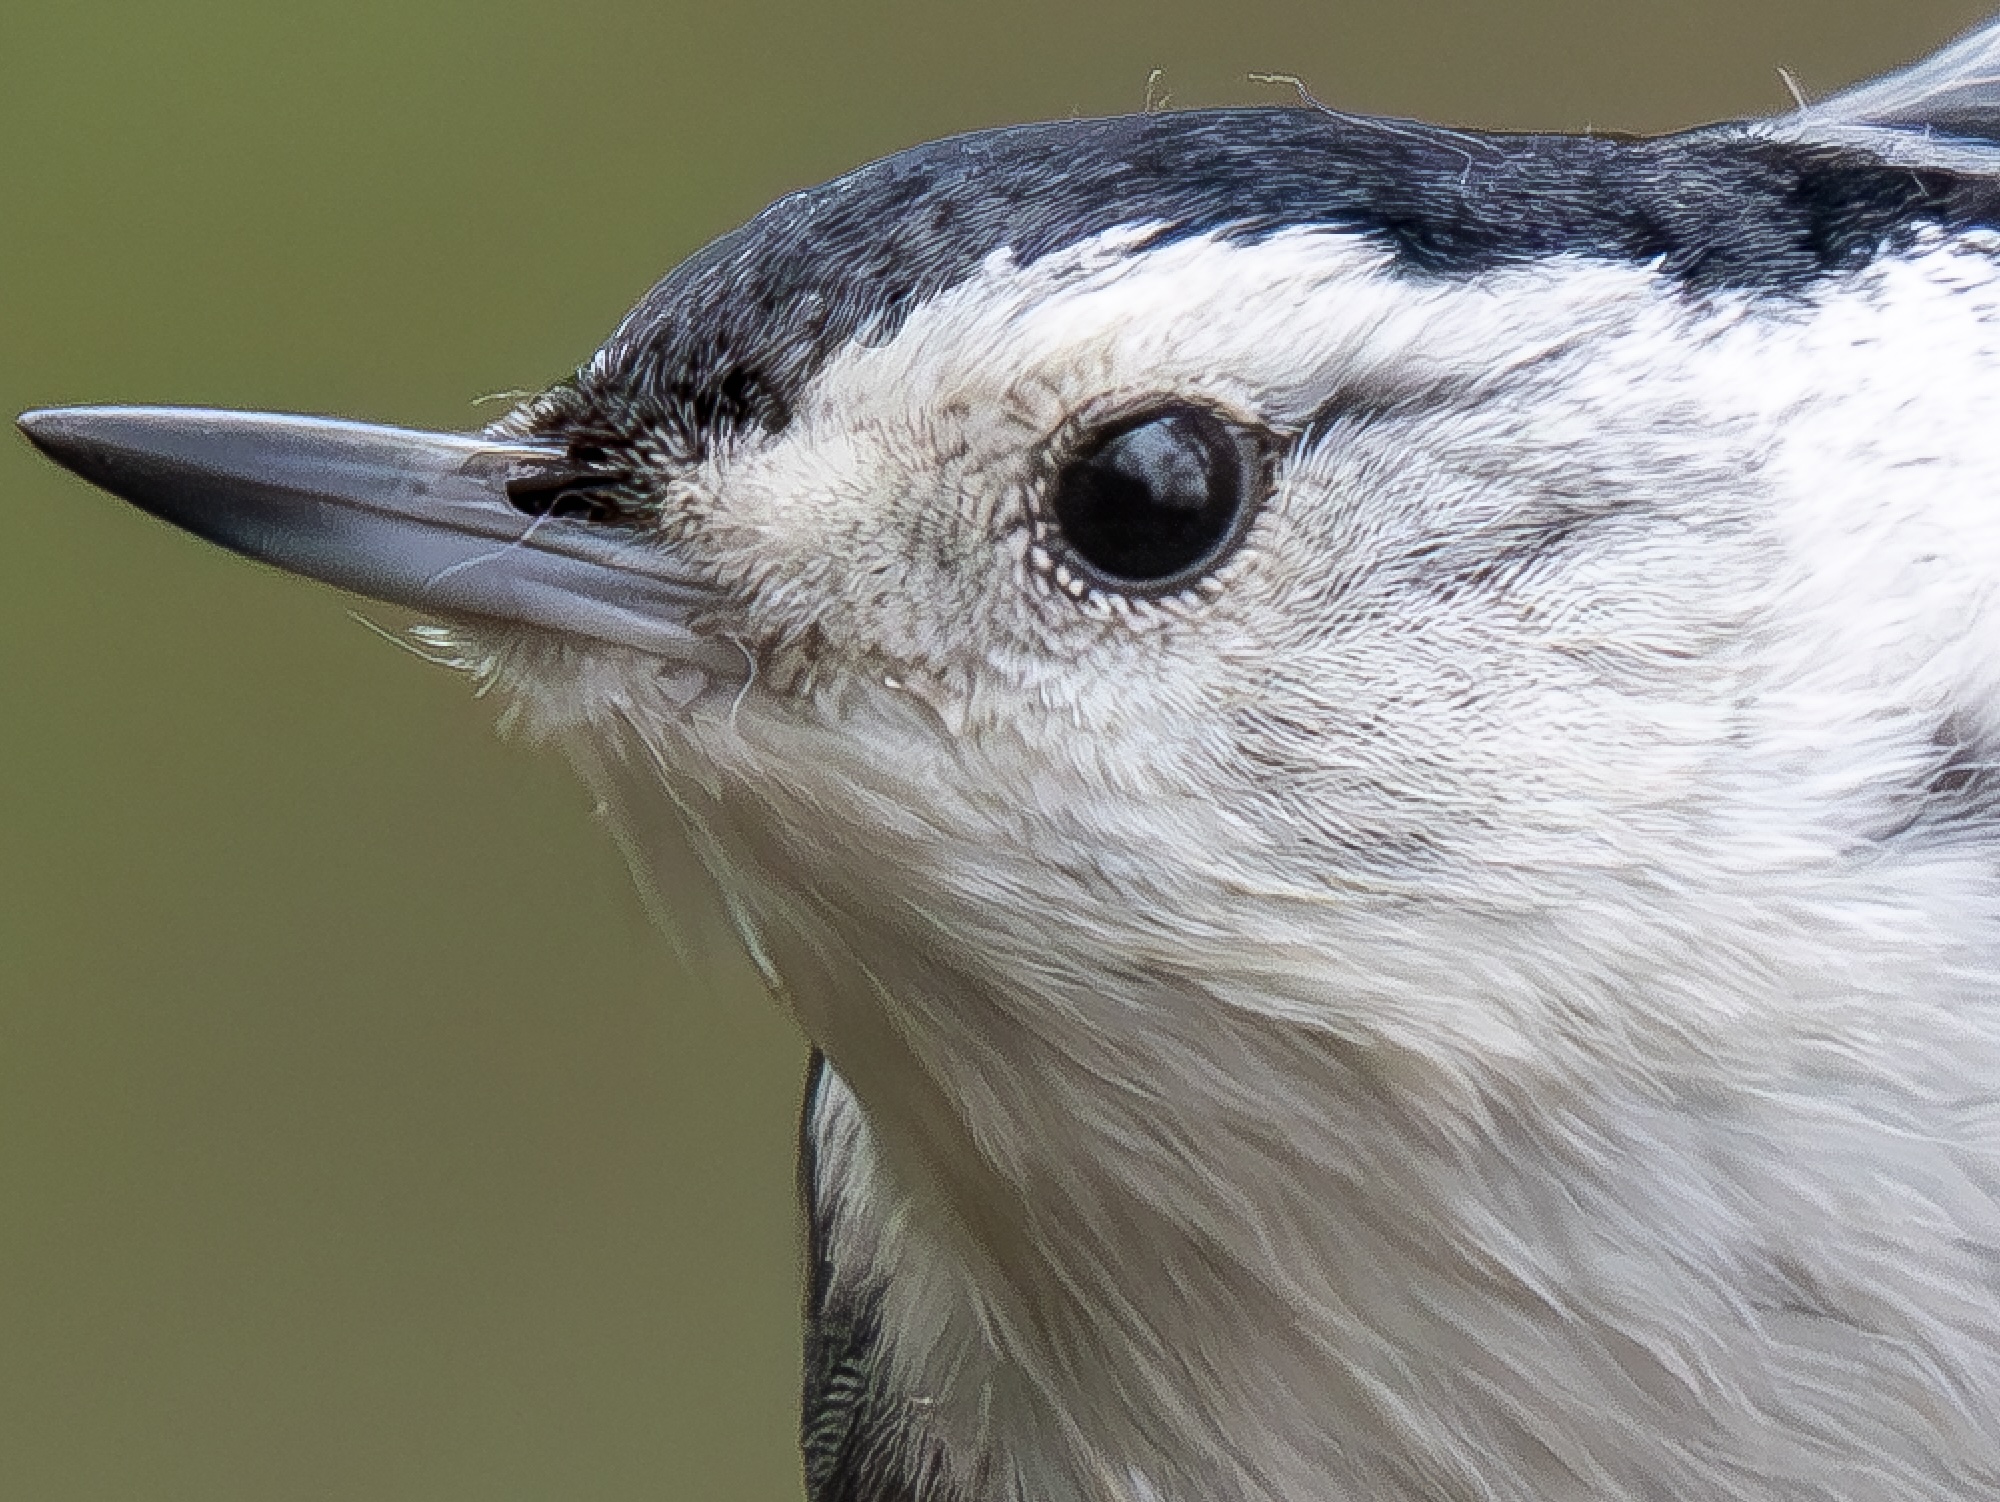
OM-1 w/M.Zuiko 100-400mm ƒ5-6.3 IS lens at 400mm (800 efov); ƒ/8 @ 1/1600, ISO1600; raw file processed in Lightroom. Even at this distance, where a small bird fills only a quarter of the frame, the sharpness of this lens is remarkable as shown in the screen capture below.
The light was terrible—flat without direction and seemingly colourless with no hint of warmth or sparkle. Both of us remarked that we wouldn’t normally be going out in weather like this, but to be shooting together was worth it. The day was cool for May (10°C) with a cool breeze off Lake Ontario, complete with the threat of rain. About an hour in, there was a brief shower, but we kept shooting, remarking on the advantage of the excellent IP rating of our OM gear. Tom, who has been to this same location regularly, recounted watching the SoNiCan crowd disperse with the first bit of rain.
OM-1 w/100-400 at 210mm (420mm efov); ƒ8 @ 1/1600; ISO 3200; raw file processed in Lightroom.
OM-1 w/100-400 at 400mm (800 efov); ƒ8 @ 1/1250, ISO 3200; raw file processed in Lightroom.
OM-1 w/100-400 at 400mm (800mm efov); ƒ8 @ 1/640, ISO 3200; raw file processed in Lightroom.
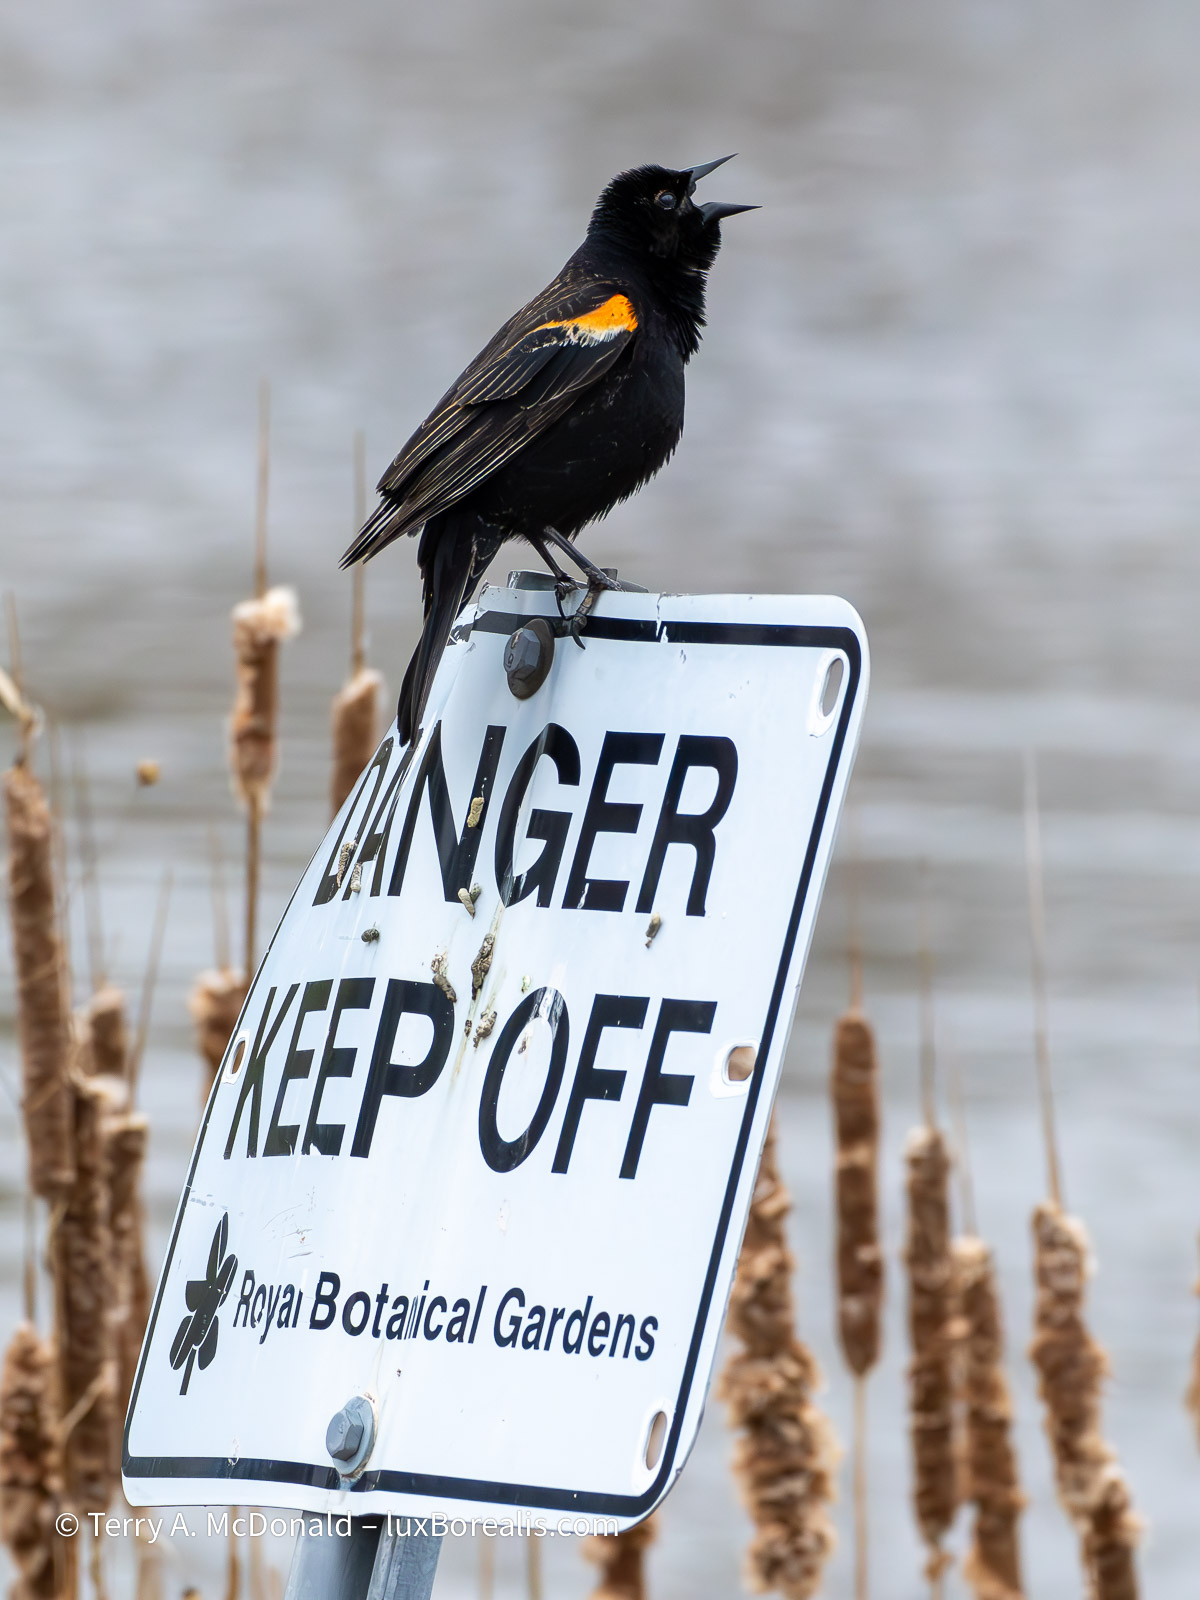
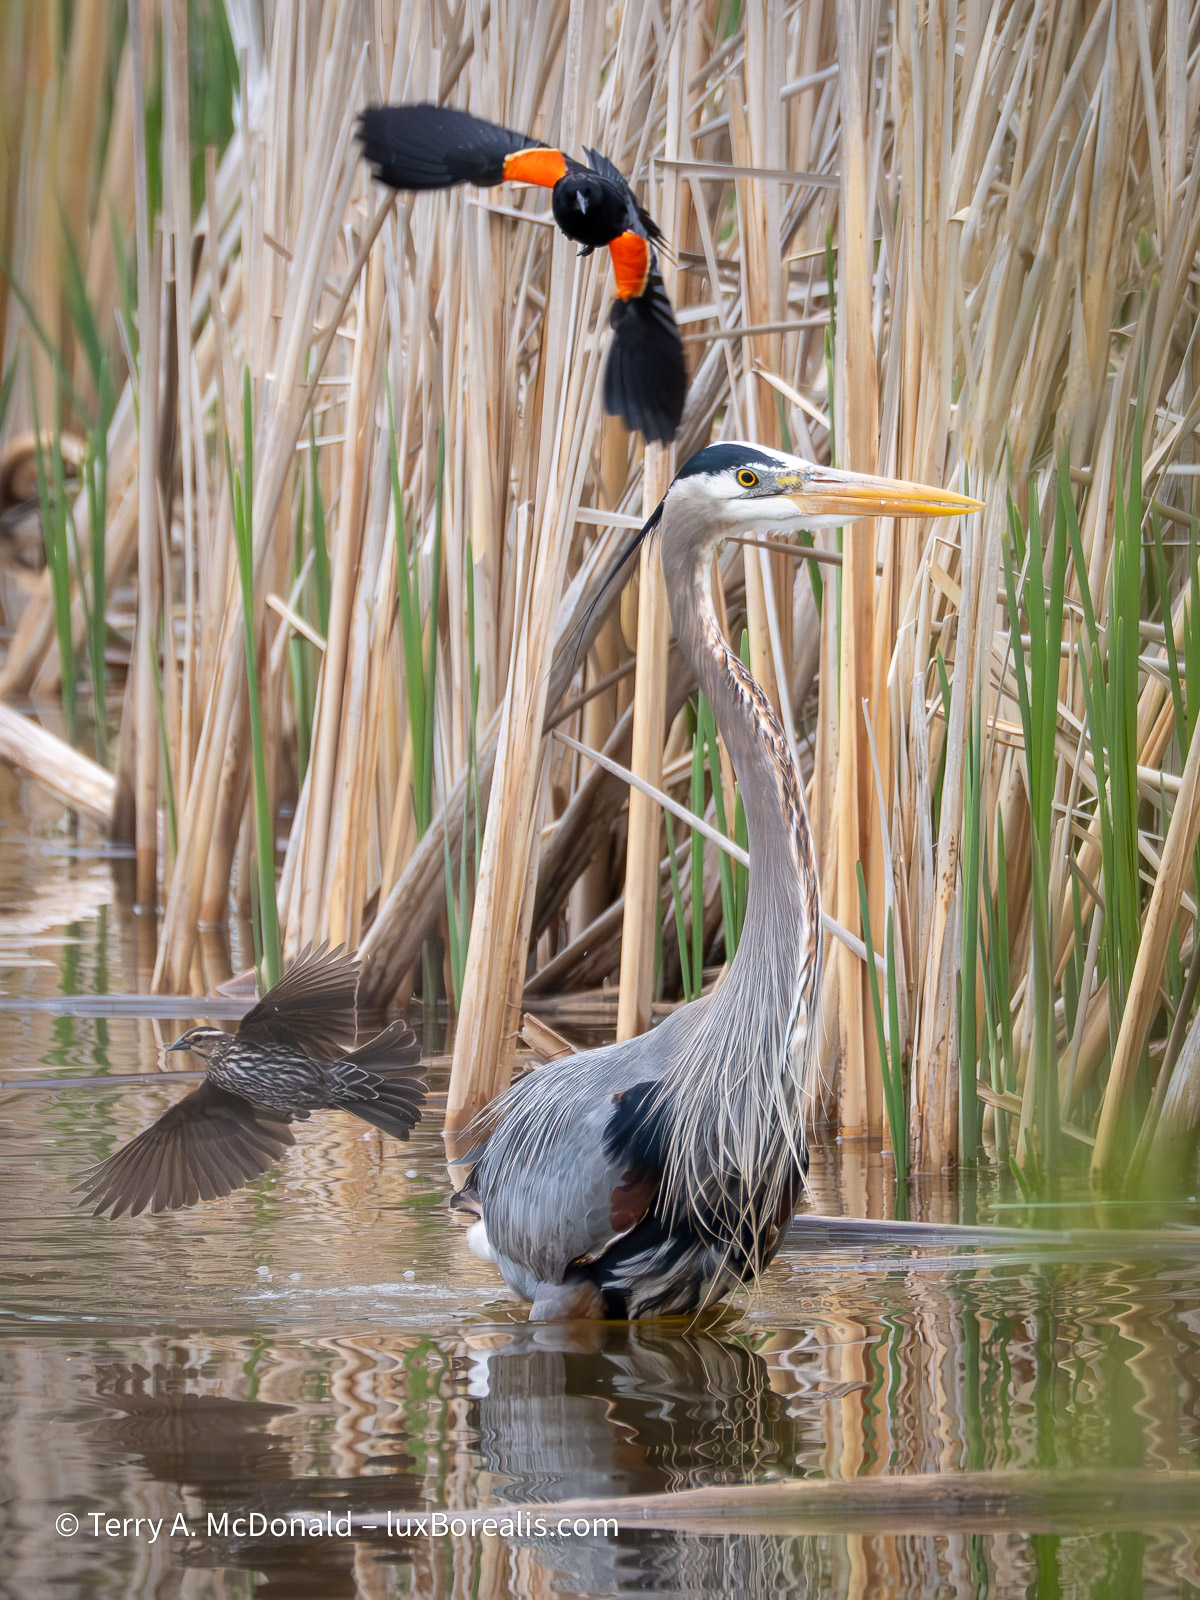
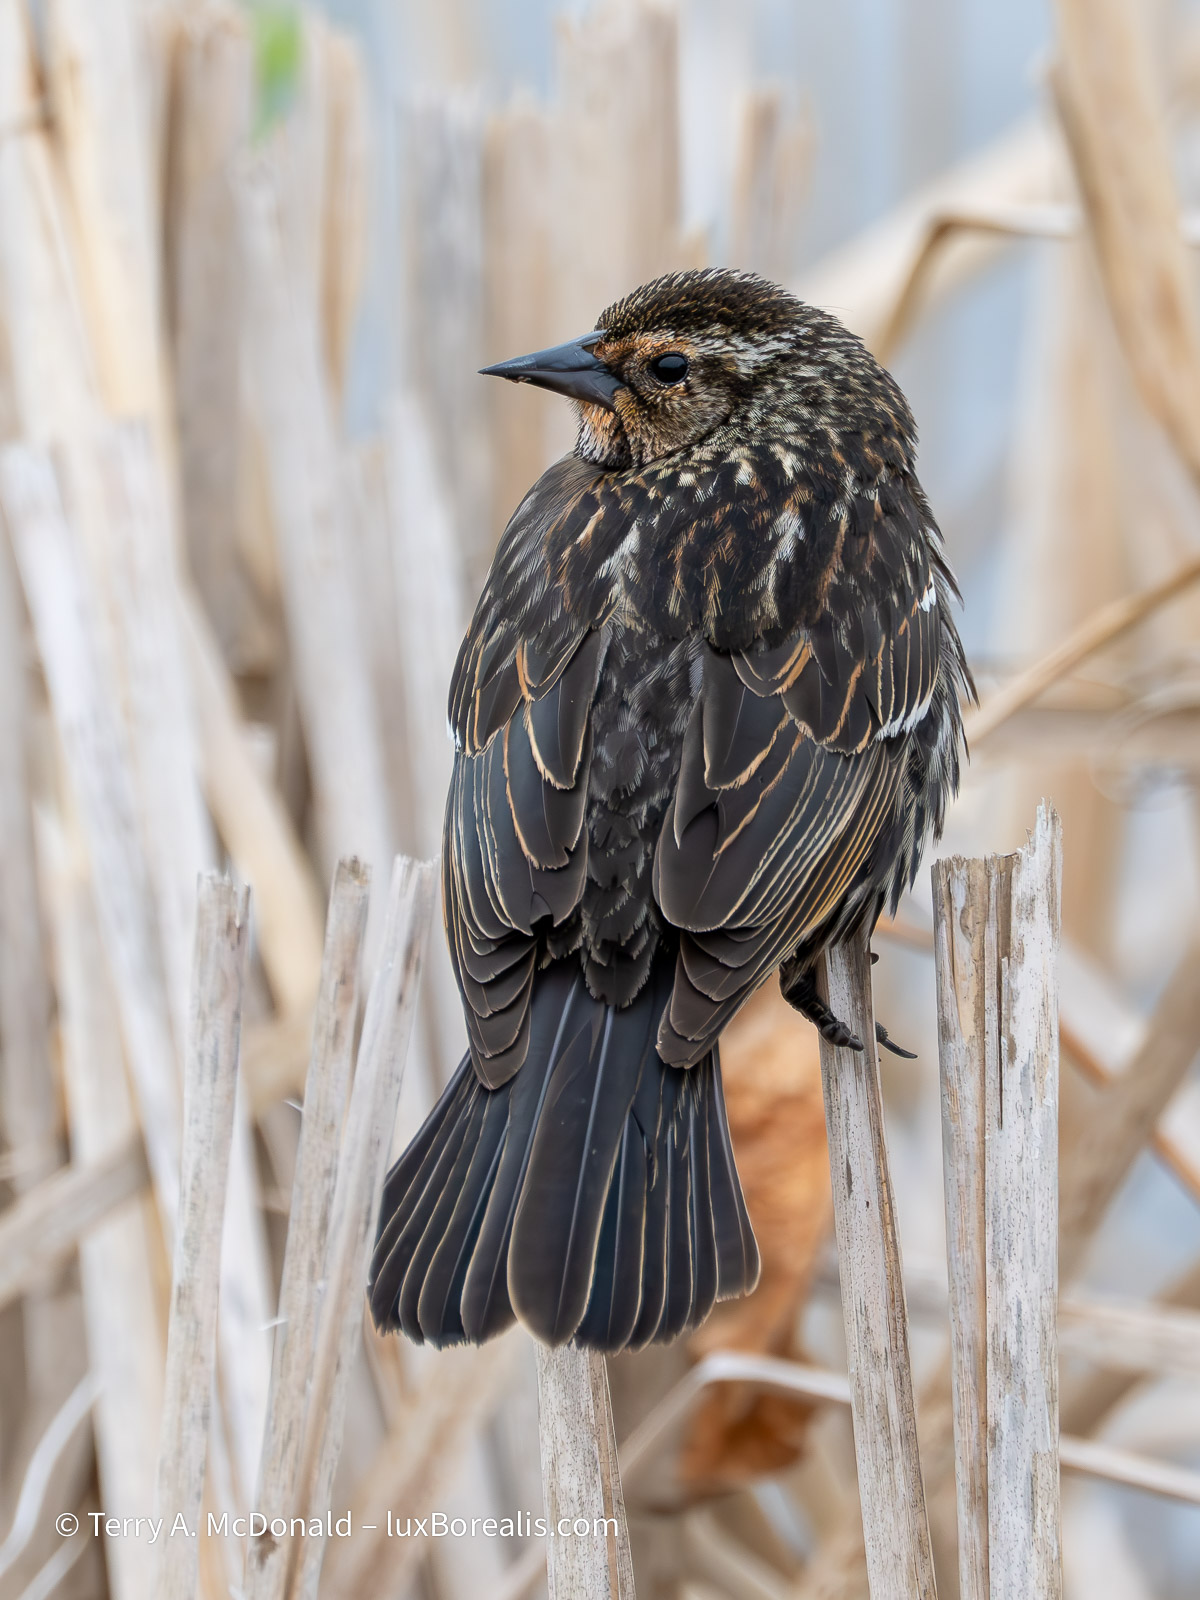
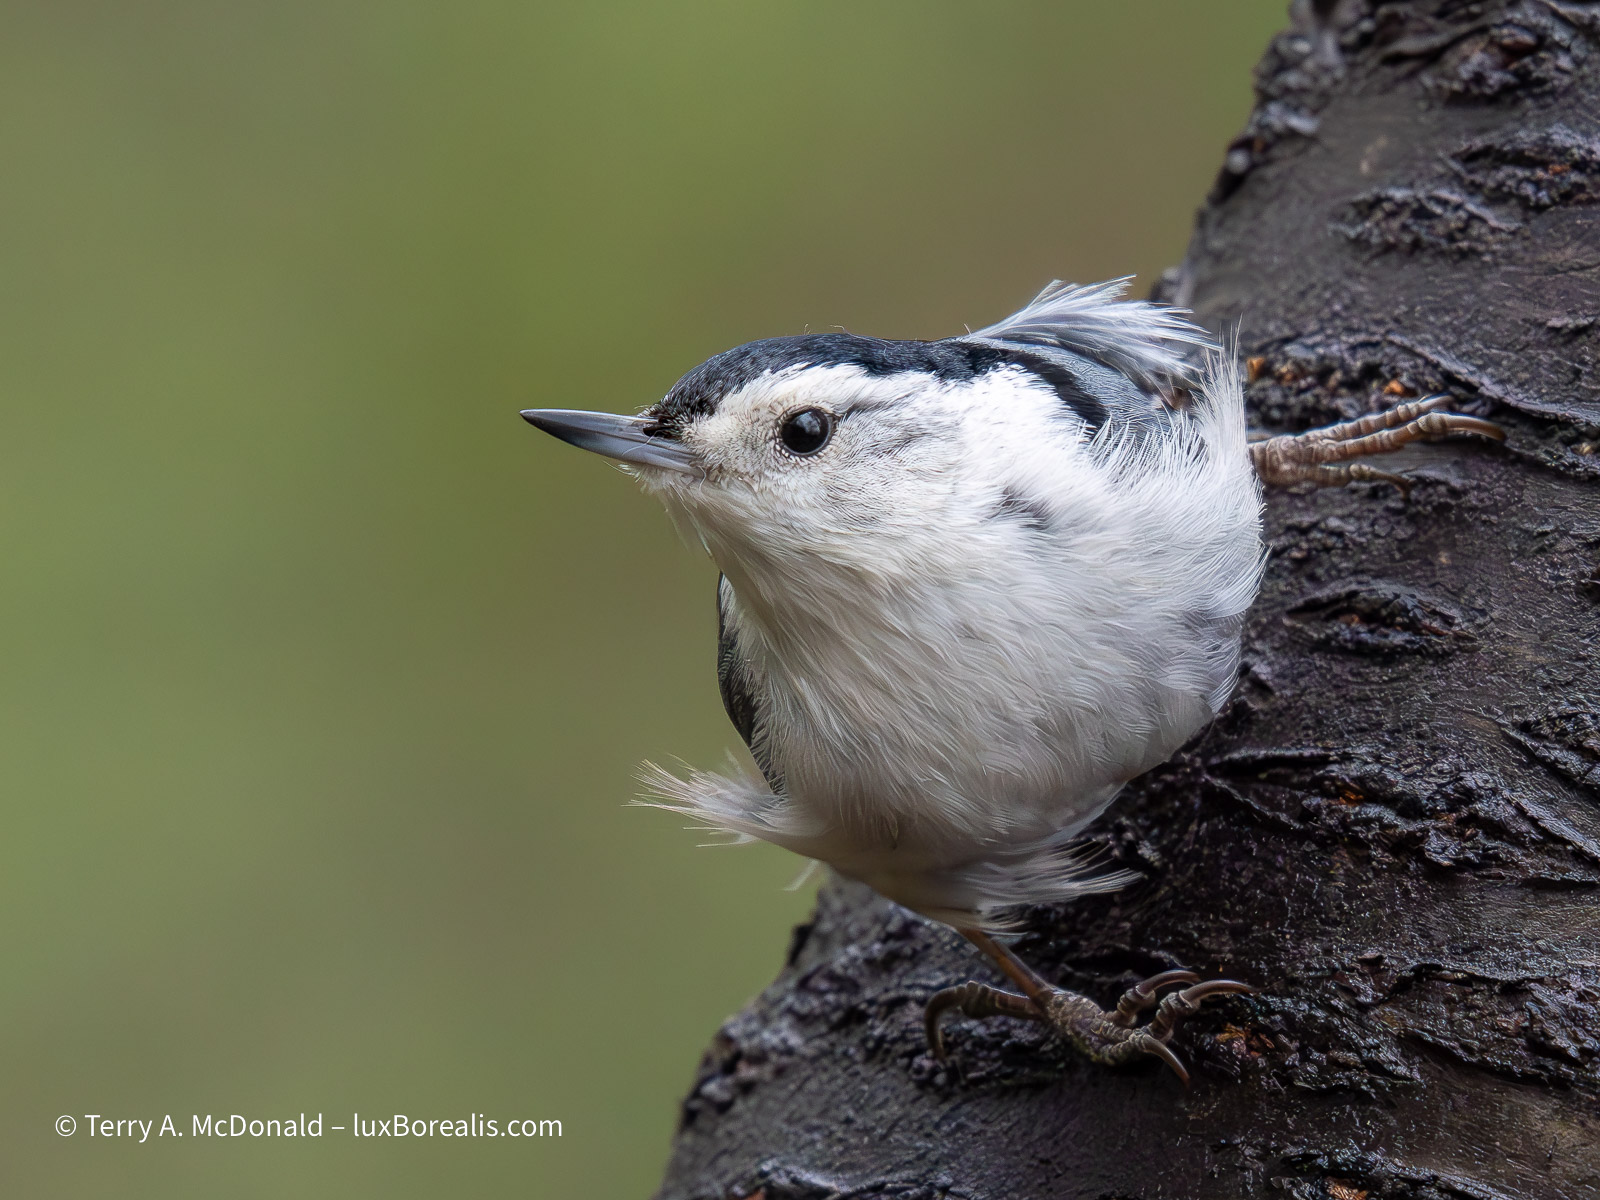
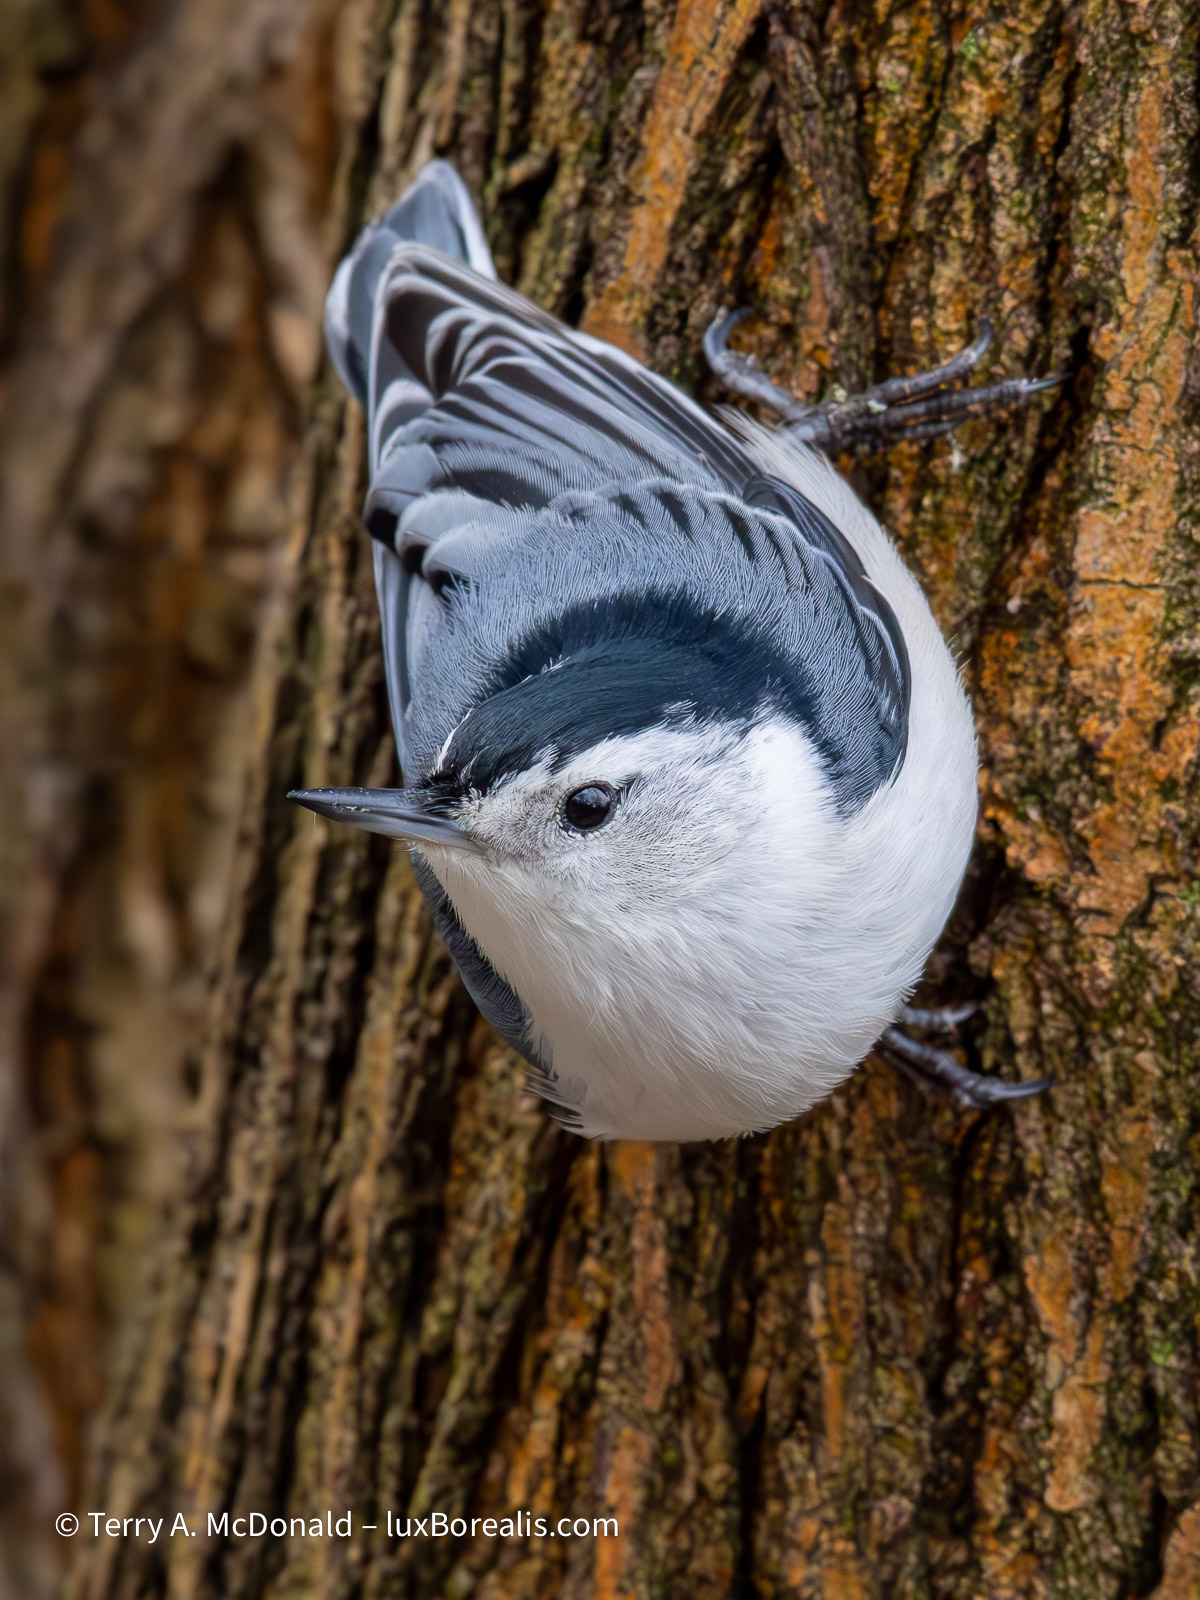
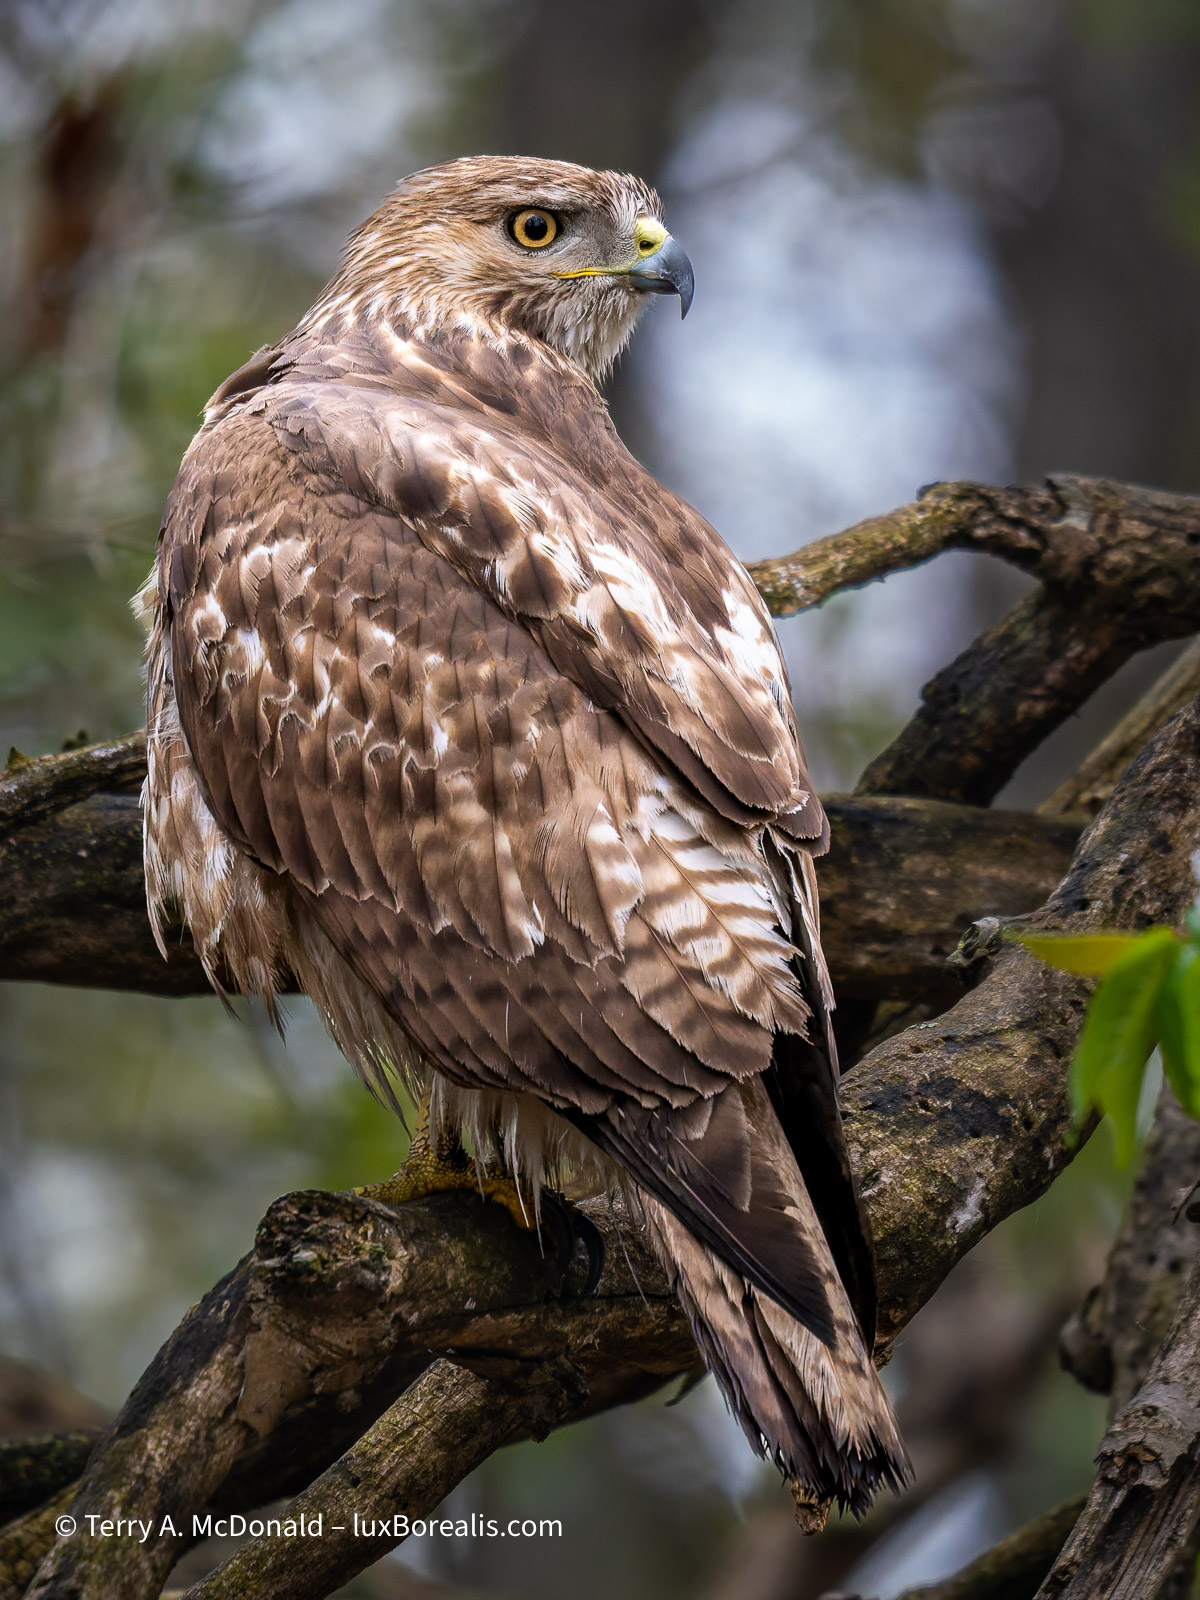
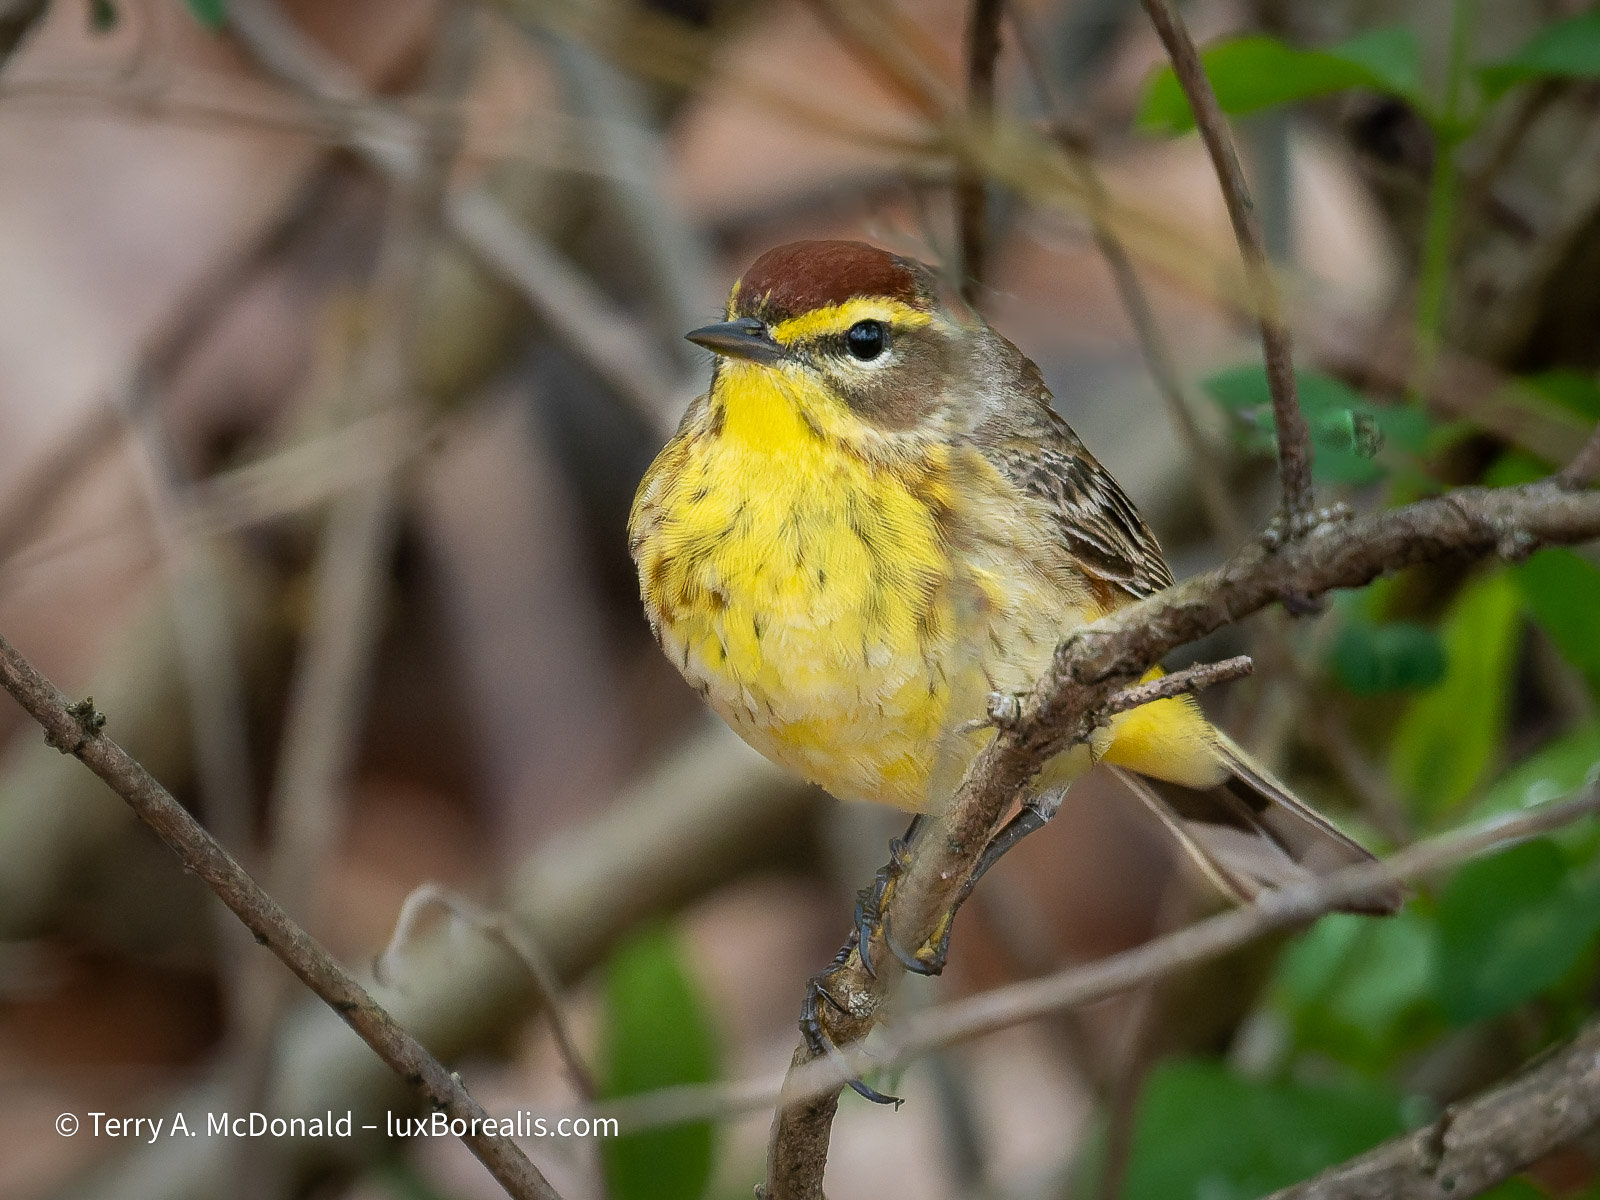
One thing that surprised me about the day was how approachable the birds were in both locations: Grindstone Marsh and the La Salle Trail along Burlington Bay. At Grindstone, the Tree Swallows and Red-winged Blackbirds were all around us and the Great Blue Heron did not fly off at our first movement, like they do around where I live. At La Salle, it wasn’t just that the chickadees and nuthatches, who are accustomed to being hand-fed, but also the cardinals, wrens, even a Red-tailed Hawk that seemed to lack the skittishness found almost anywhere else. The warblers were more evasive, but that’s to be expected as they are just passing through.
Grindstone Marsh is a fairly small area, but with pathways that allow photographers to move around the marsh to capture different angles. The diversity is good, with many of the common waterbirds moving in an outl: Common Terns, Canada Geese, Mute Swans, Cormorants, plus a number of tree birds and, on better days, Ospreys feeding. Tom told me how this is quite a draw for the long lens crowd, with up to four osprey feeding at once, particularly when teaching the youngsters how to feed. Even under the dreadful conditions we had, we were both surprised at how quickly two hours passed, especially as we patiently waited for tree swallows to do something more than just perch.
ProCapture is a fascinating, if not slightly frustrating computational mode. It is ingenious in taking and spooling images prior to releasing the shutter, then saving the last 25 or so (how ever many are programmed) plus the number programmed after release. Given our naturally slow reaction times, it allows users to capture the moment a bird takes flight. Mid-air shots are far more interesting than static perching. For me, however, it will take some getting used to.
OM-1 w/100-400 at 400mm (800mm efov); ƒ6.3 @ 1/10000, ISO 3200; raw file processed in Lightroom. This is one of a series made using ProCapture SH2, which focusses between each of the 25fps captured prior to the shutter release.
OM-1 w/100-400 at 236mm (472mm efov); ƒ8 @ 1/1000, ISO 3200; raw file processed in Lightroom.
The theory of ProCapture is brilliant; it’s my practice, or lack of it, that generates the frustration. I end up taking a gazillion frames which I must then wade through, checking the sharpness of each. I’m also very poor at throwing frames in the bin, which I’ve had to learn to do en masse. My biggest faux pas is forgetting ProCapture is set, then wondering why dozens of frames are being saved to my card. As I become more proficient with ProCapture, I’m sure these teething problems will diminish. ProCapture is a technique Tom has mastered, so if you want to see how it is really done or have any questions about it, I direct you to the various articles he’s written at SmallSensorPhotography.com.
OM-1 w/ M.Zuiko ED 150-600mm ƒ5-6.3 IS at 500mm (1000mm efov); ƒ8 @ 1/1000, ISO 3200; raw file processed in Lightroom
OM-1 w/ M.Zuiko ED 150-600mm ƒ5-6.3 IS at 240mm (4800mm efov); ƒ8 @ 1/1000, ISO 3200; raw file processed in Lightroom
As far as the 150-600mm lens goes . . . I’ve been following the various online discussions around it and can now confidently say, what you read about the 150-600 simply being a re-branded Sigma lens is mostly hogwash. Yes, it’s made by Sigma, but to OM System’s specs. I noticed the additional weight right away, and though it is at the upper end of what I’m willing to carry around, it truly is an M.Zuiko lens through and through, given its excellent sharpness, its IPX1 water resistance and 5-axis IS that works with the camera’s own IBIS system for unparalleled stability.
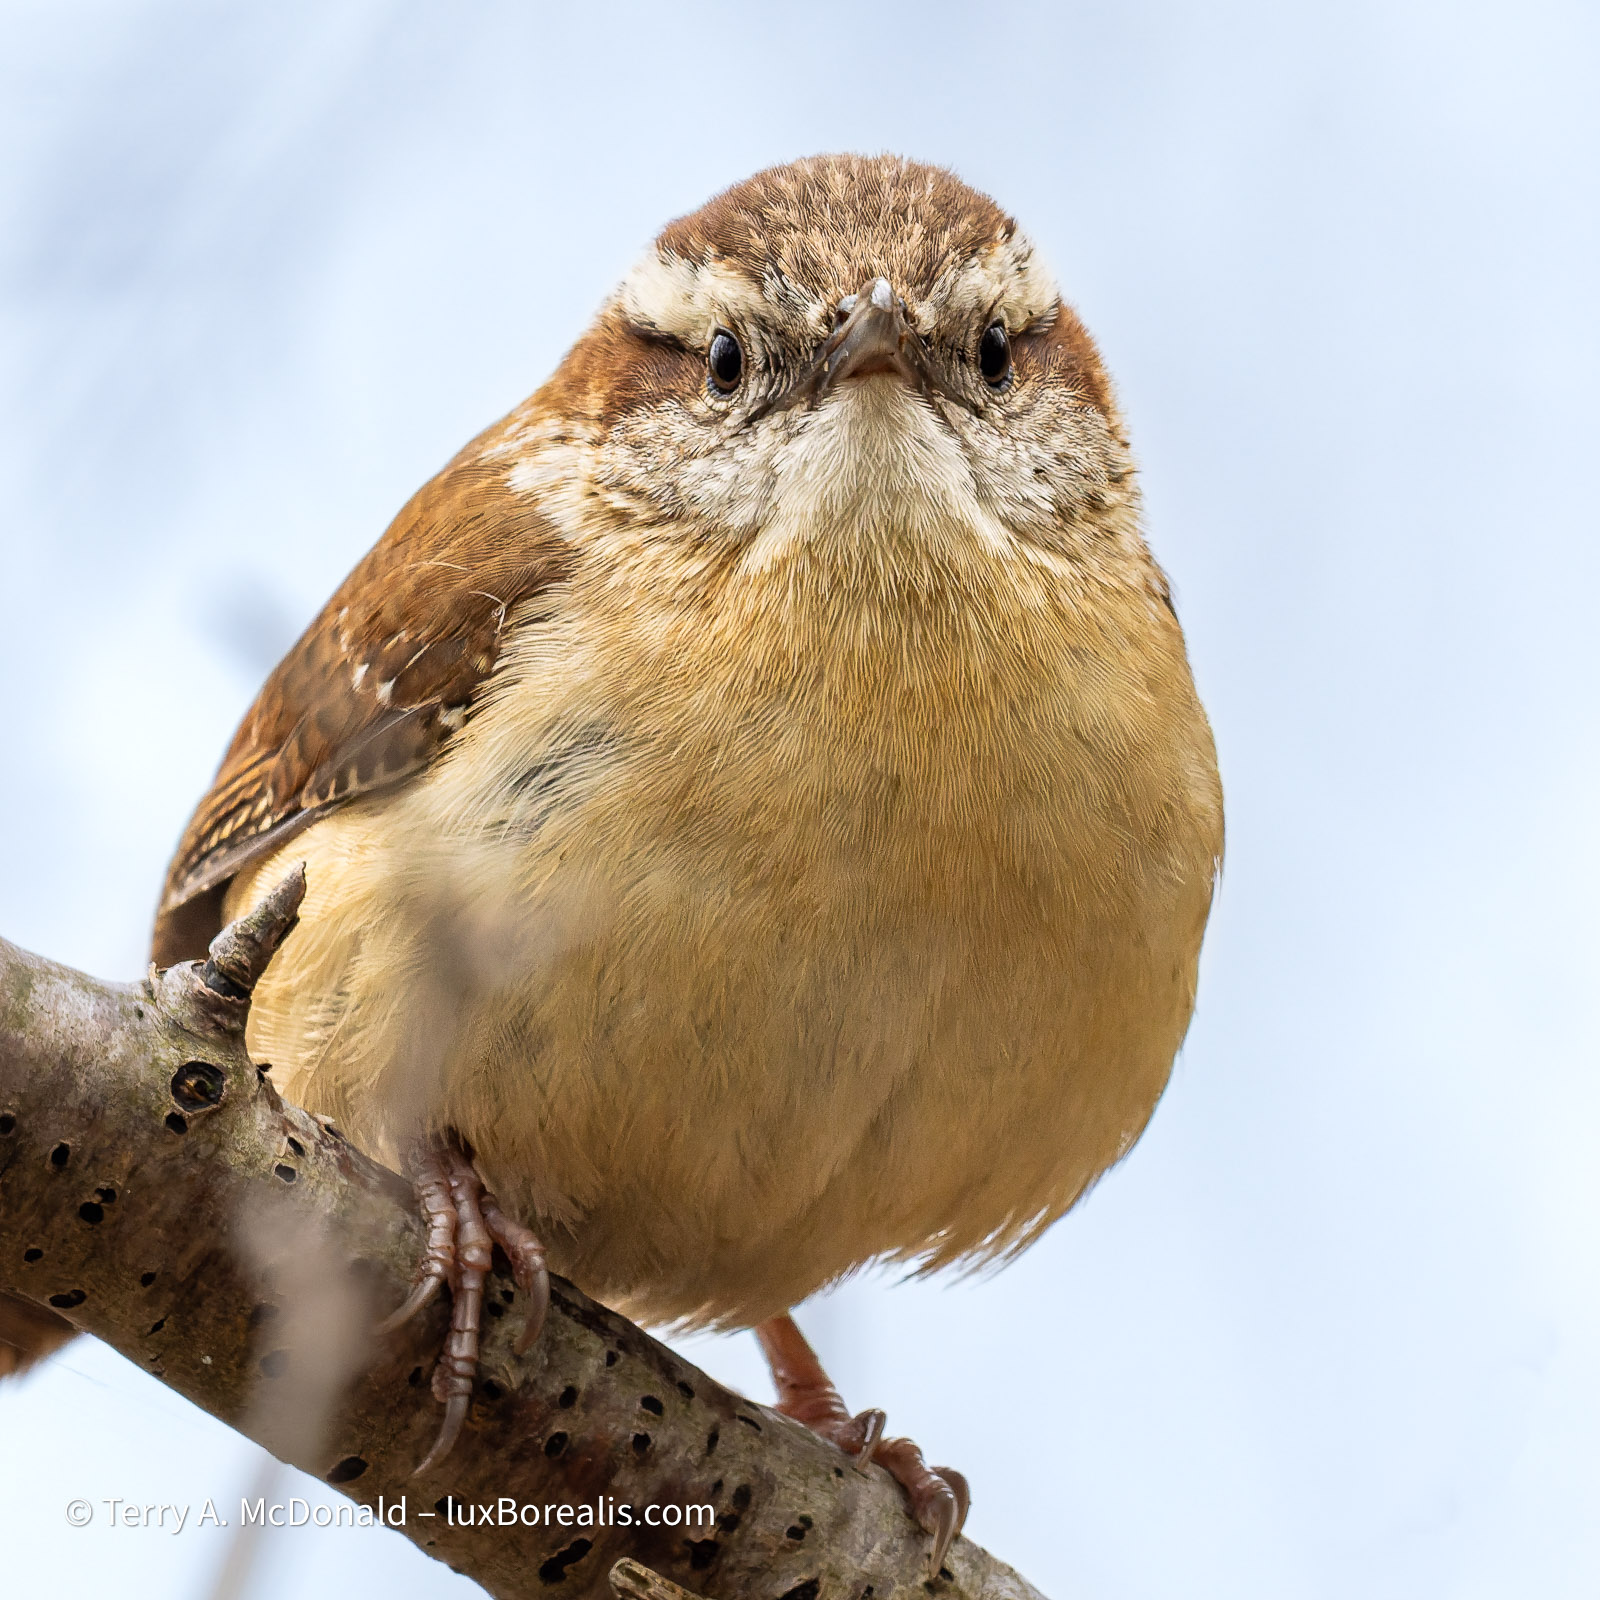
The Wren below was photographed at 1/100th at 600mm (1200mm efov), which is unheard of. Tom has shots as low at 1/13. And the higher quality glass throughout means not only sharper photos, but snappy contrast as well. It is definitely a step up from my M.Zuiko 100-400mm. Having the extra reach of 600mm (more than adding a 1.4x teleconverter) at the same ƒ5-6.3 aperture, makes it a compelling lens, and is plenty fast enough with the OM’s excellent high ISO performance.
OM-1 w/150-600 at 473mm (946mm efov); ƒ8 @ 1/200, ISO 3200; raw file processed in Lightroom and DxO PureRAW
OM-1 w/150-600mm at 600mm (1200mm efov); ƒ11 @ 1/100, ISO 3200; raw file processed in Lightroom and DxO PureRAW
Ergonomically, the lens feels good in hand. It is solid and well-balanced. One very helpful feature is the push-pull zoom. While it has a rotating zoom collar, a switch on the side converts the lens to push-pull zooming, ideal for following birds and acquiring focus at lower magnifications, then zooming in to full magnification. The magnification level is high enough that this becomes the preferred shooting method, at least until one becomes more precise at raising the lens to the exact position of the bird—something which definitely requires practice.
OM-1 w/150-600 at 600mm (1200mm efov); ƒ8 @ 1/320, ISO 3200; raw file processed in Lightroom and DxOPureRAW.
To assist with the extra weight of the lens, Tom uses a Cotton Carrier Hyker Slingbag which integrates the Cotton Carrier slide holster for hands-free carrying. It also keeps the camera and lens ready-to-go. Without the Cotton Carrier, the lens itself has a strap and attachments which makes for much easier carrying than using an on-camera strap. Having now been bitten by the bug, it becomes difficult to argue against purchasing this lens, though the CAD $3600 price tag is nothing to sneeze at (currently on sale from OM System for CAD $2900 until 1 June 2025). I switched away from my Nikkor 200-500mm zoom specifically because it was a heavy lens—do I really want to be using a lens nearly that heavy again? Hmmm. Food for thought.
What are your thoughts? Do you have experience using ProCapture and/or the M.Zuiko 150-600mm zoom? Engage in the conversation by adding a COMMENT or a question below.
