Update: Bird Photography in Costa Rica
2113 words; 17 photos; 11-minute read
Clicking on images will enlarge them.
Although it’s the rainy season, we’ve had more than our fair share of sunny weather. Up in the Central Valley and highlands, it was actually pleasant, with just enough cloud to soften shadows. But down here on the southeast Caribbean coast, just a few kilometres north of Panama, the sunny skies bring heat and humidity. The past two days have been scorchers!

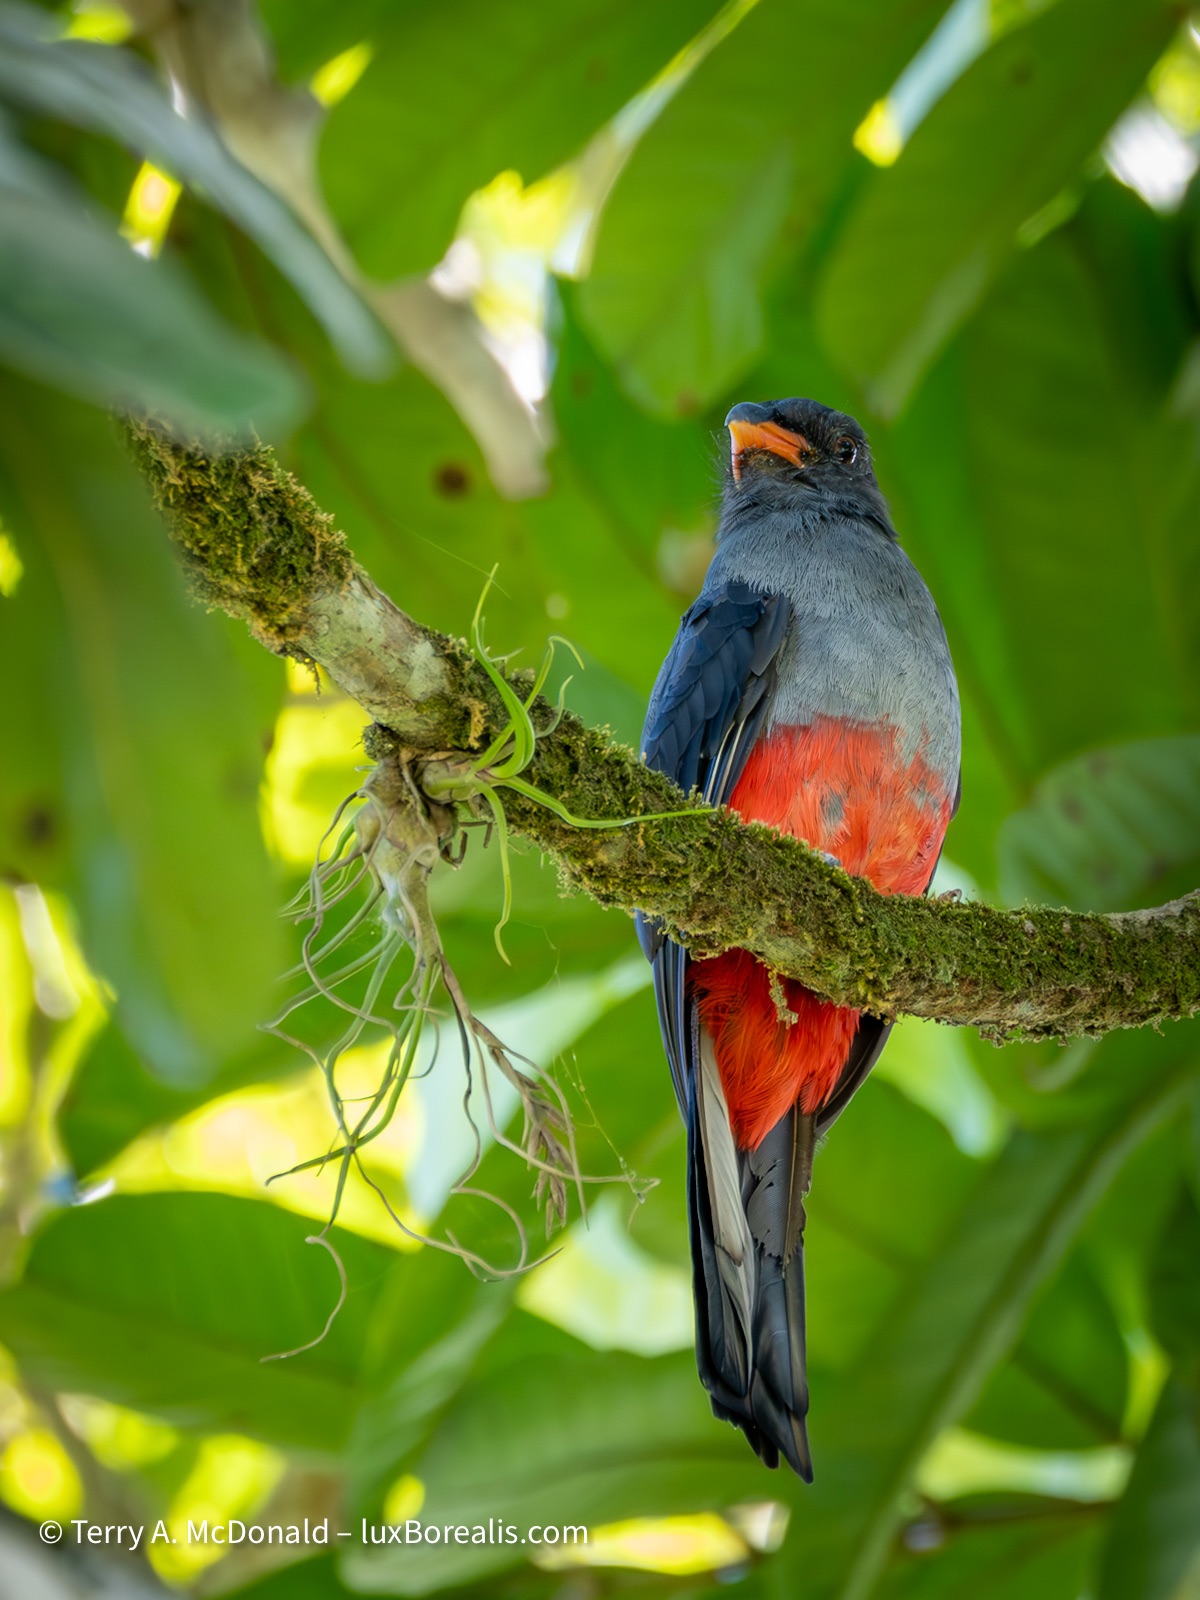
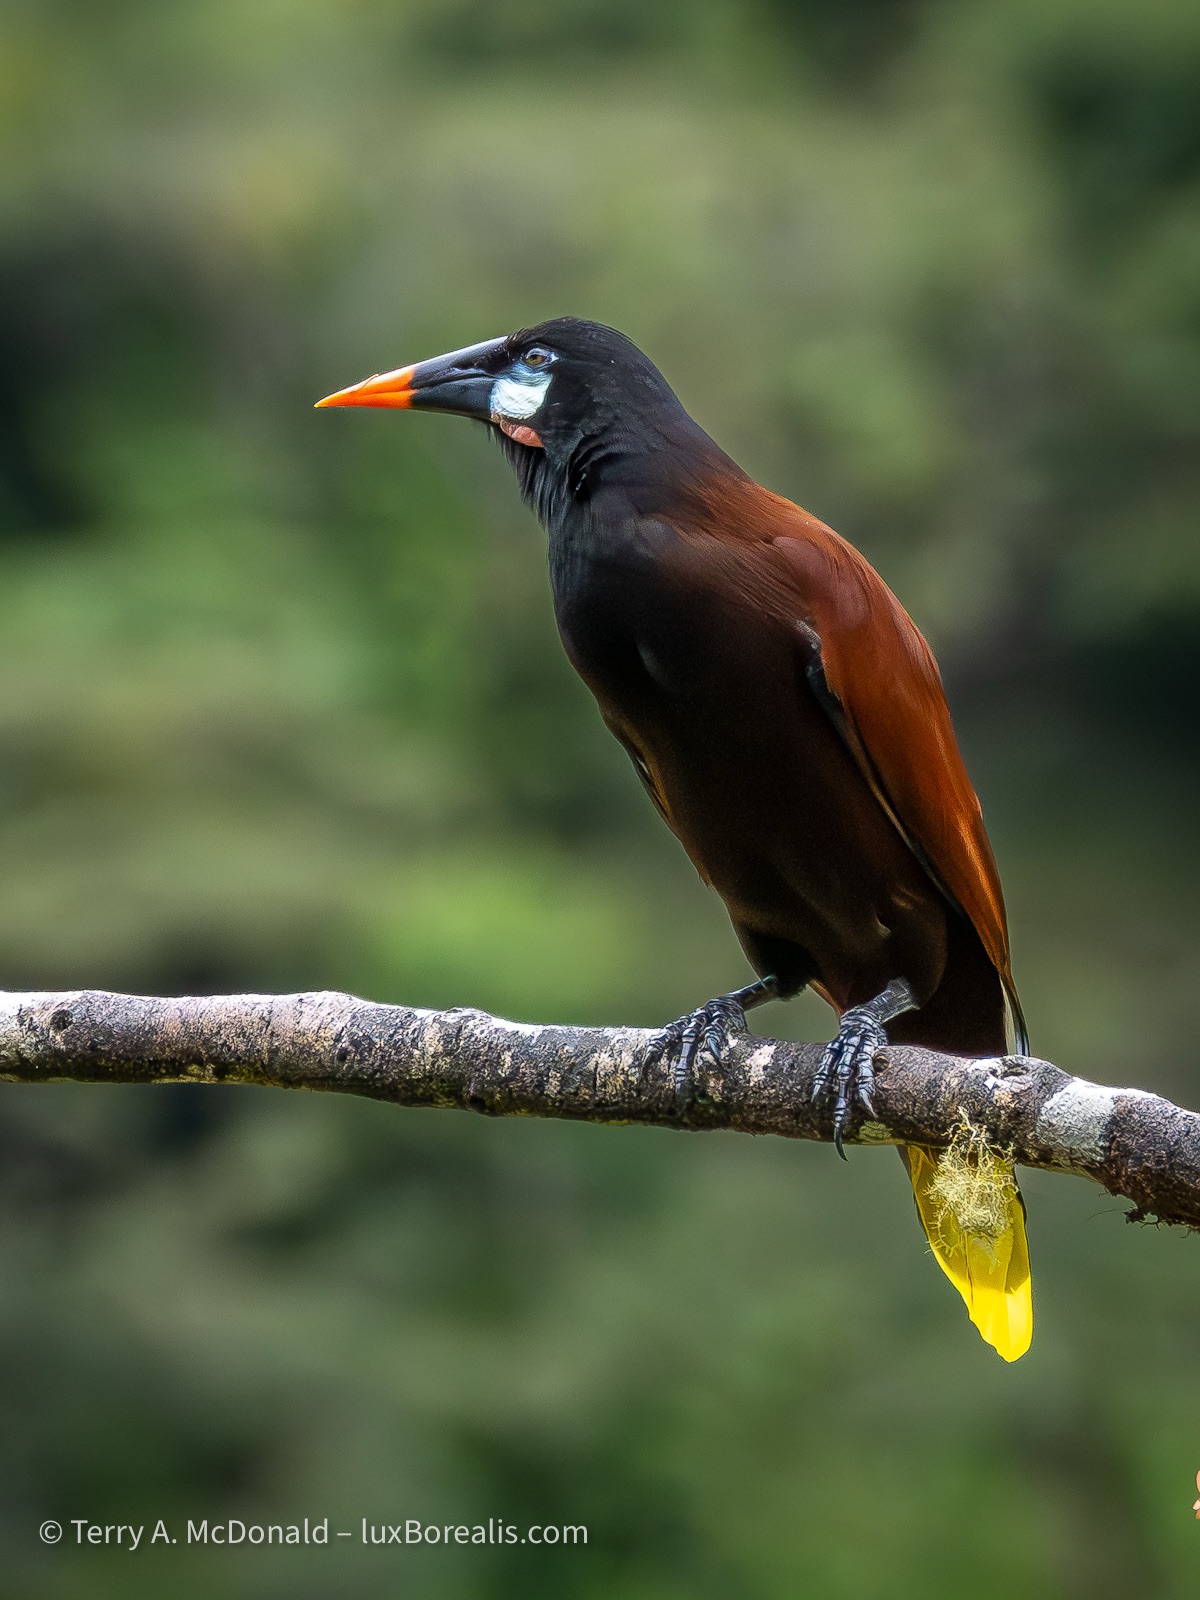
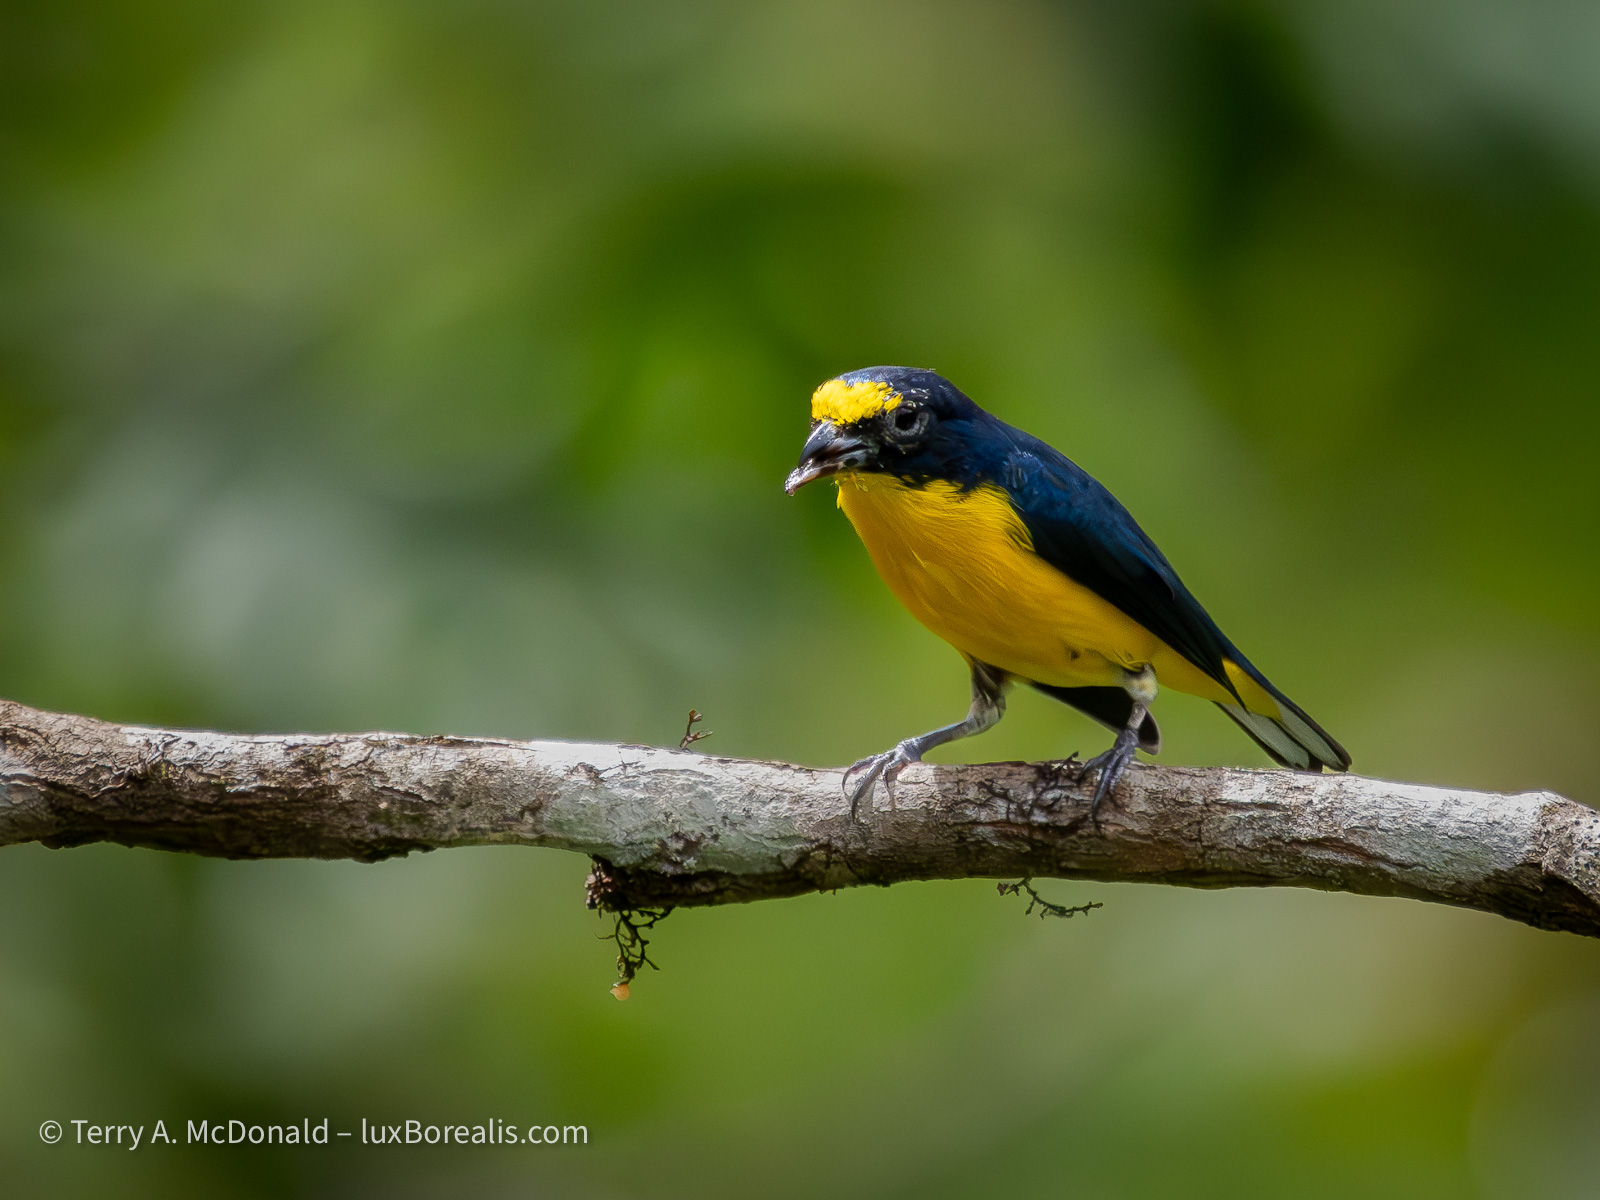
OM-1 | M.Zuiko 100-400mm at 400mm (800mm efov) | ƒ11 @ 1/200 |ISO 6400 | Lightroom
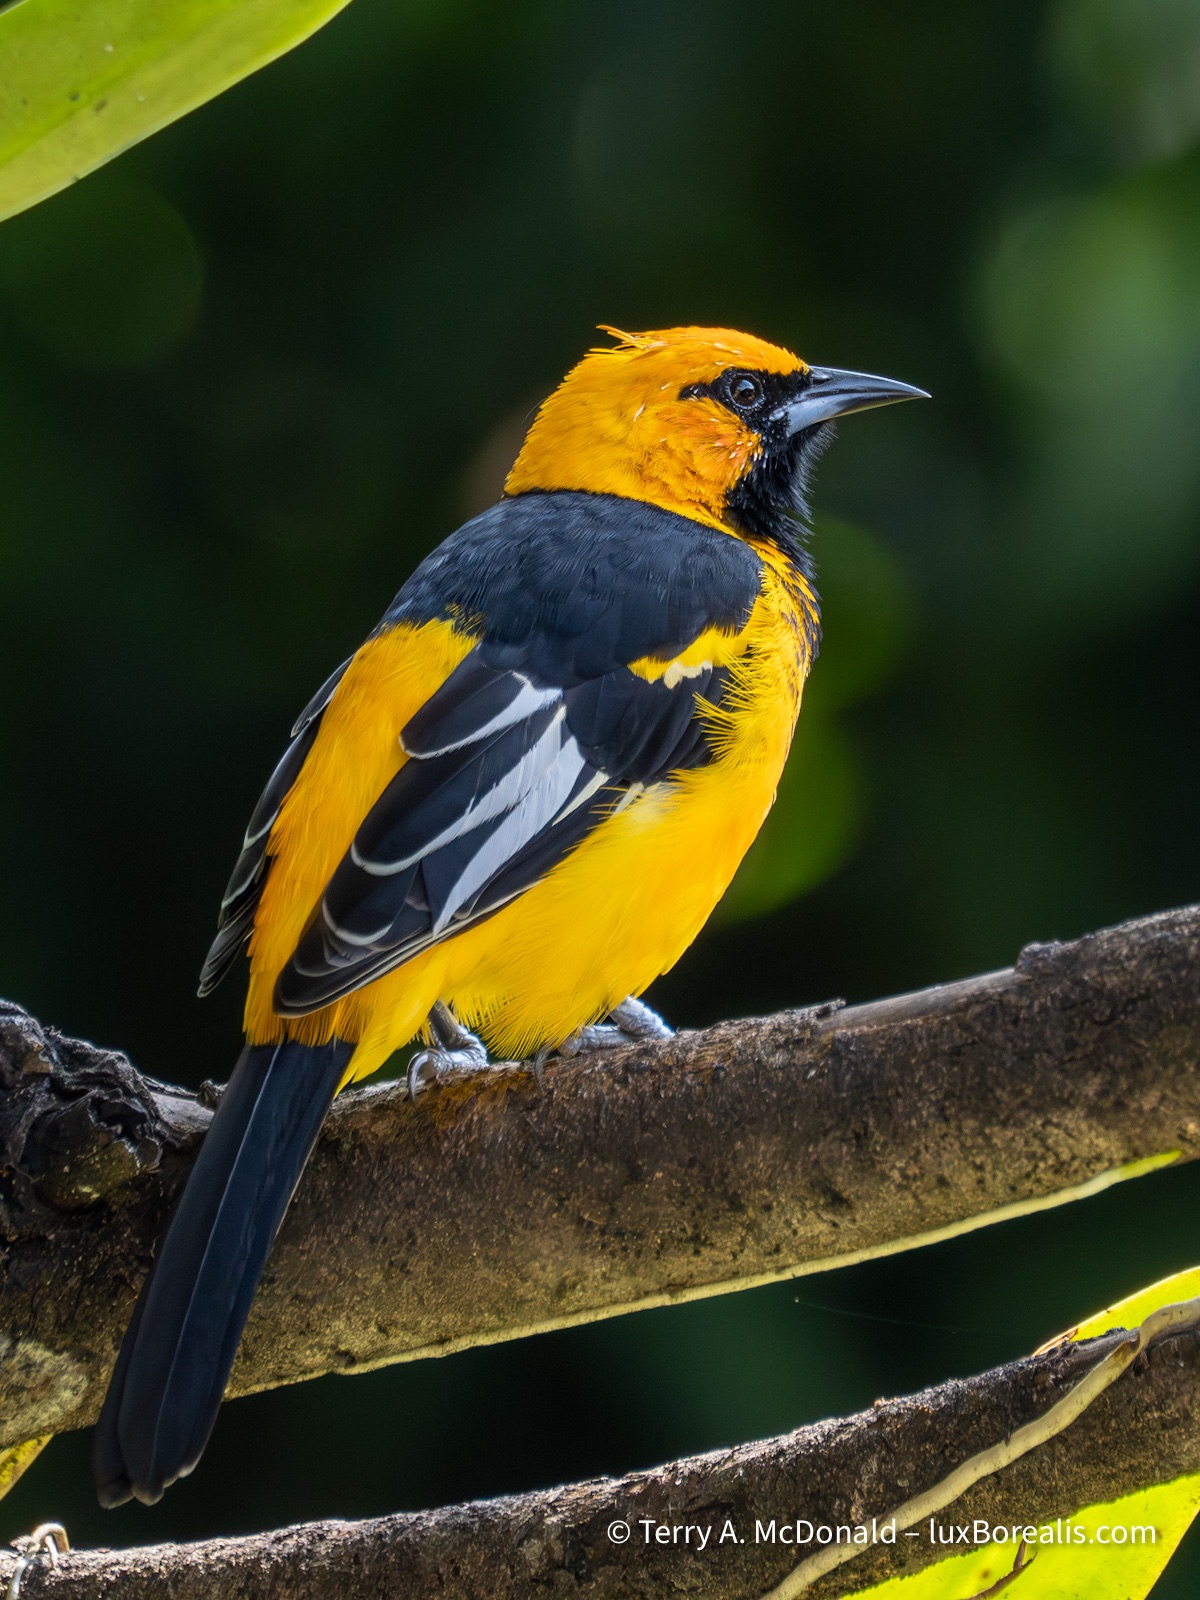
This beauty is arguably the most sought-after bird in Central America. It feeds on wild avocados, swallowing the plum-sized fruit whole, then regurgitating the pit before retreating back into the canopy.
The birds here in Costa Rica are simply stunning. Our guides from Eagle-Eye Tours are on top of everything that moves or calls, with instant identifications. Ernesto Carman is from Costa Rica and knows not just the birds but is an encyclopaedia of natural and cultural history. Jody Allair, from Birds Canada, is amazing with the IDs, and both are quick on the scopes, providing us with clear views of distant birds. Even our driver Ricardo is a birder with a keen eye.
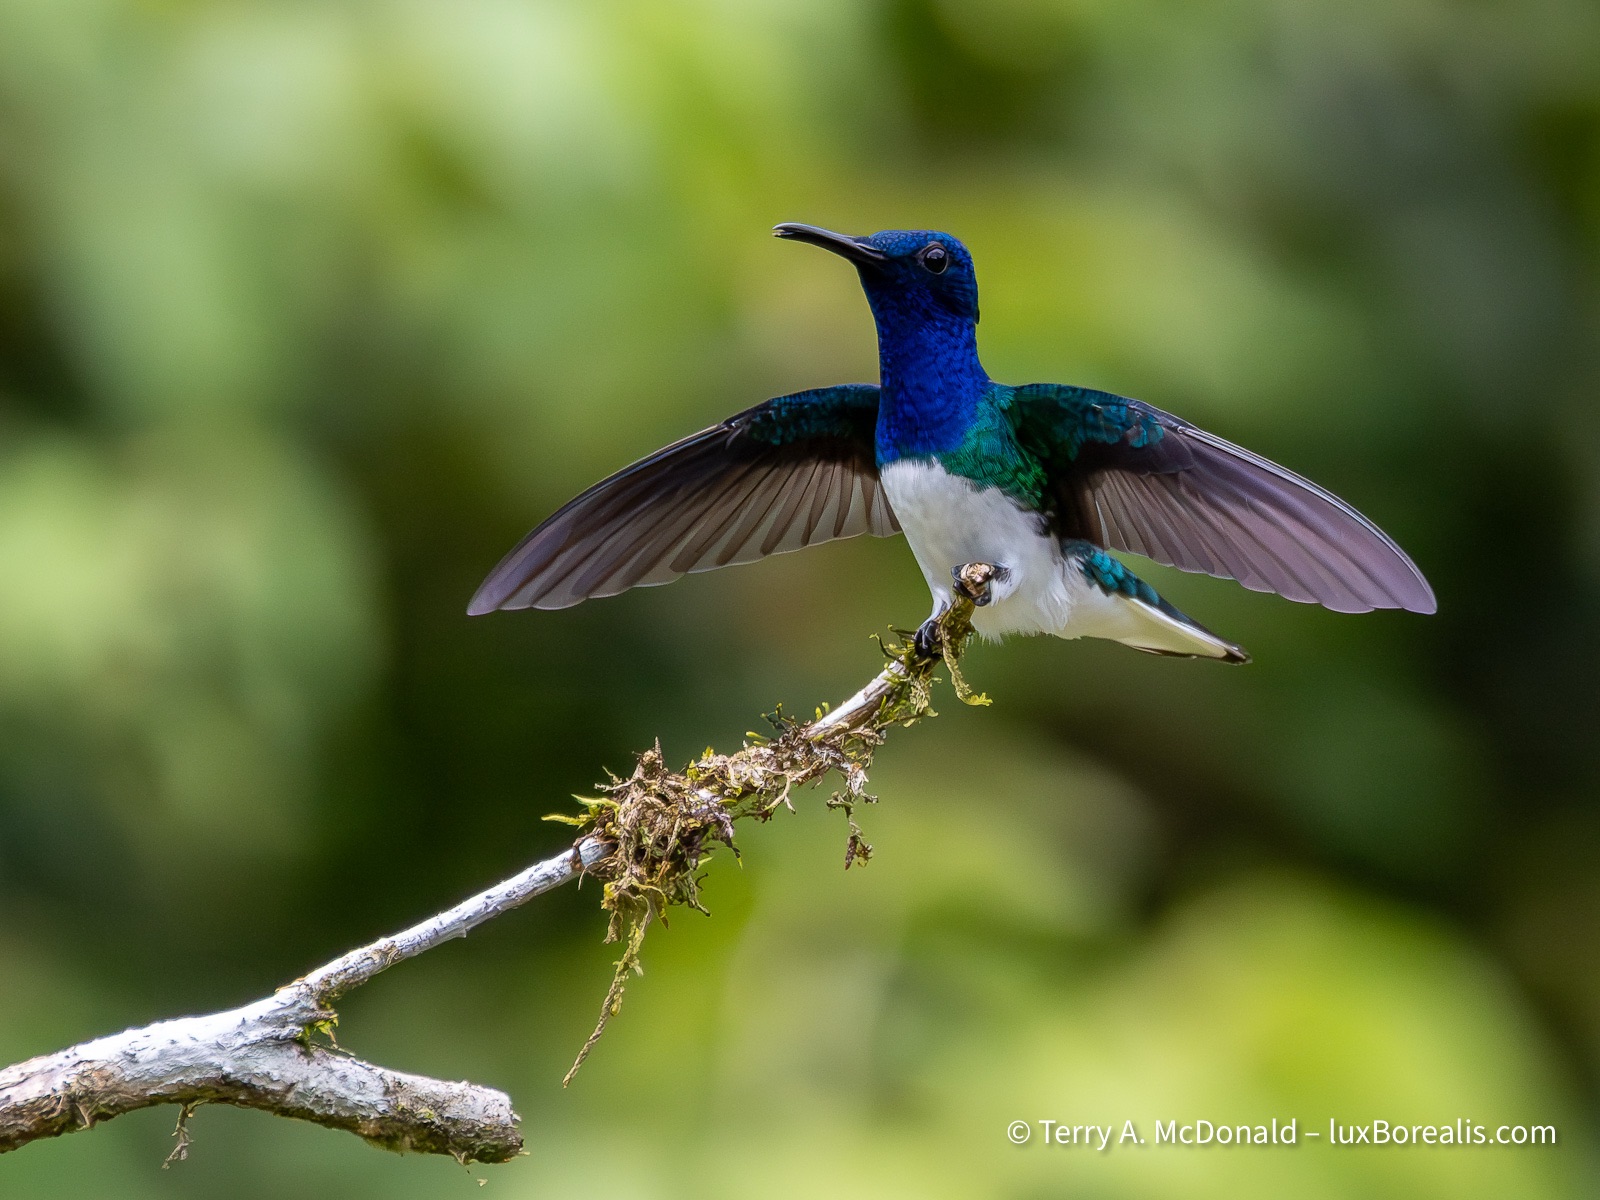
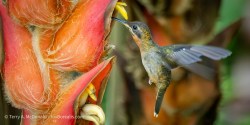
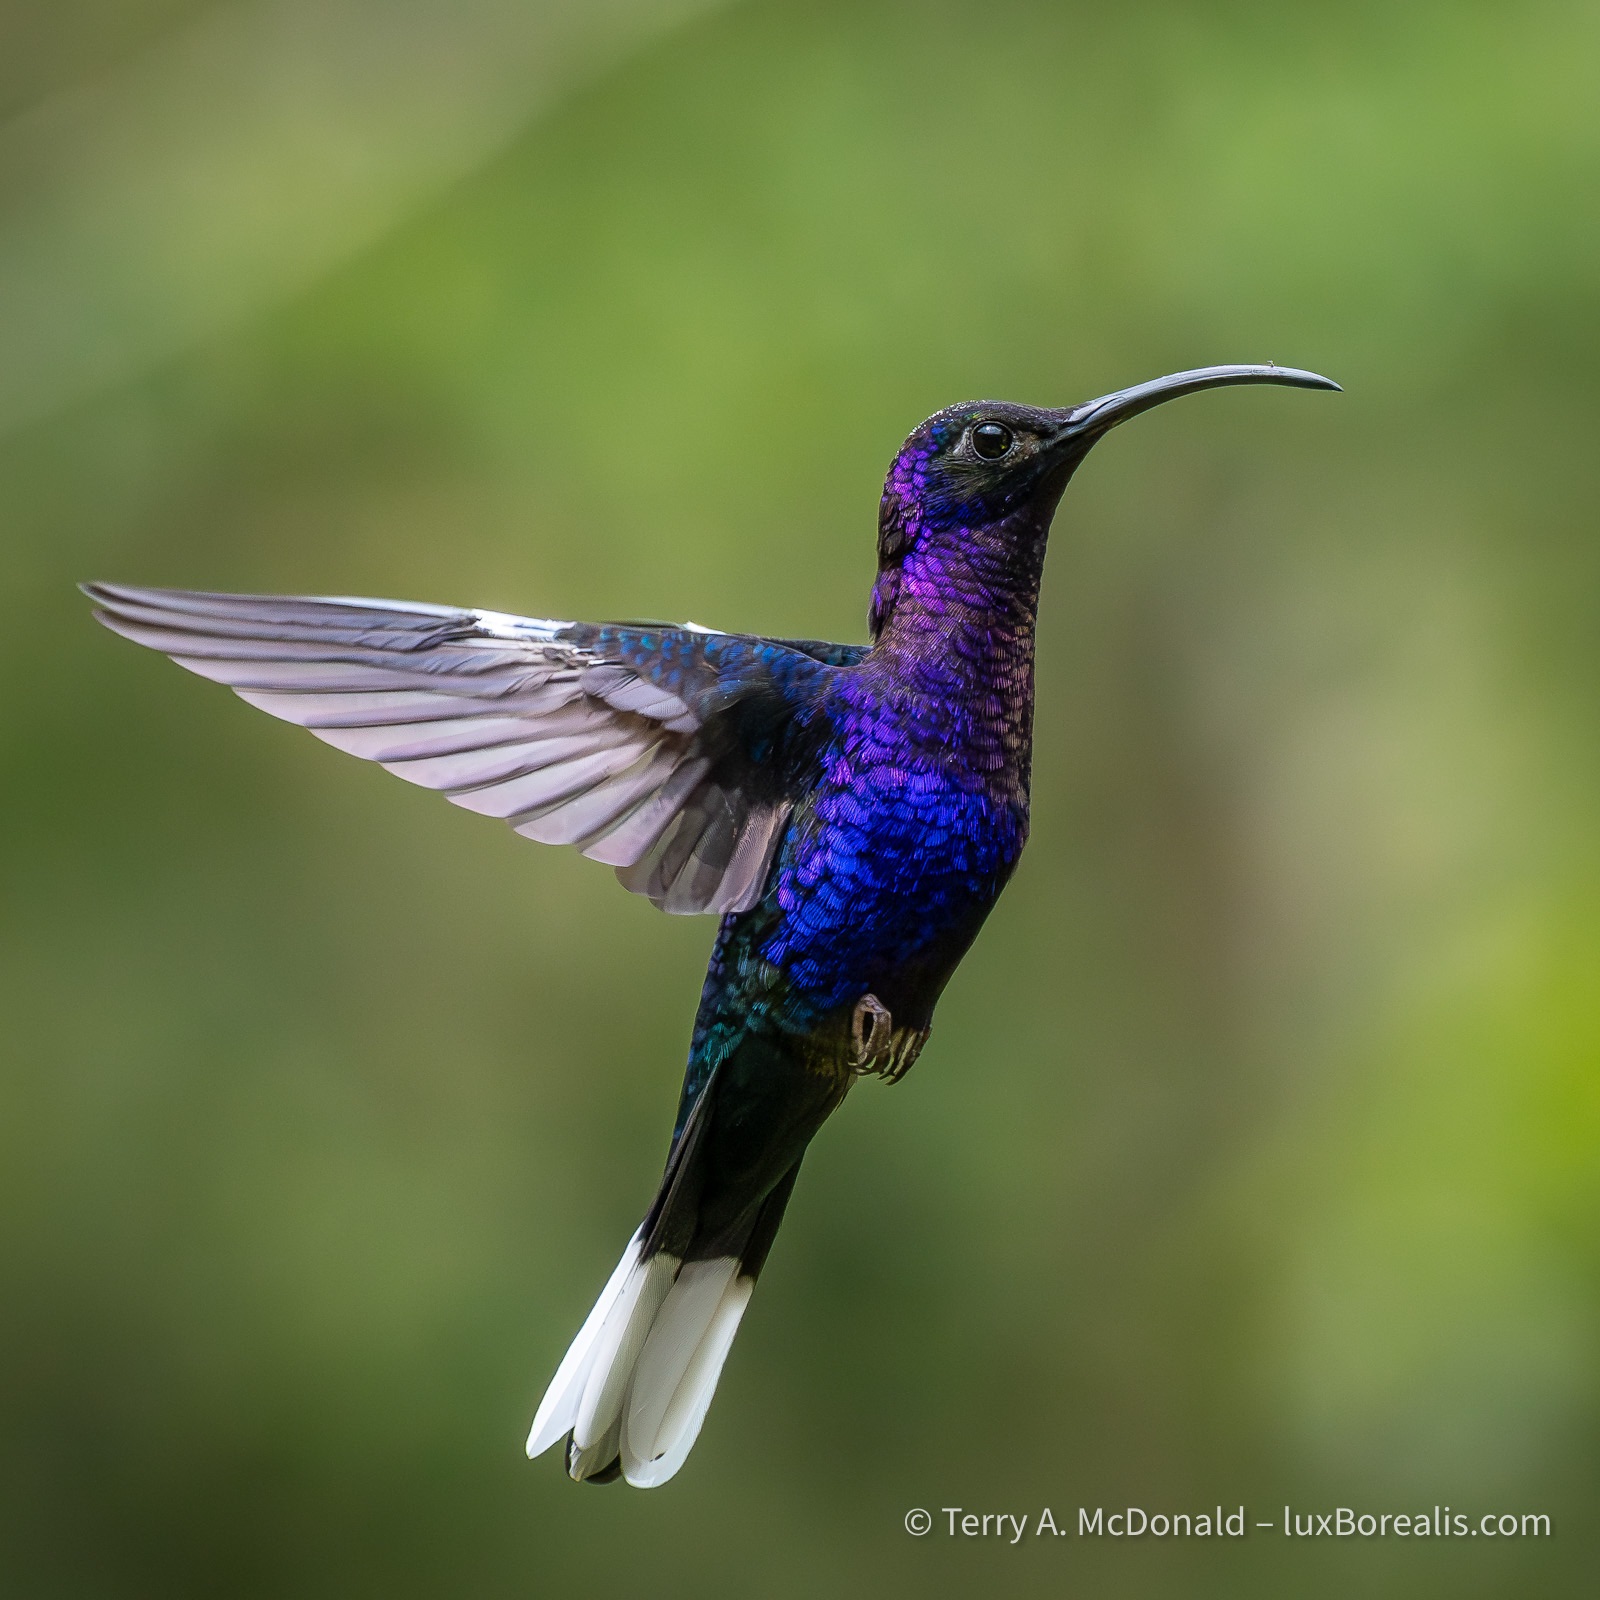
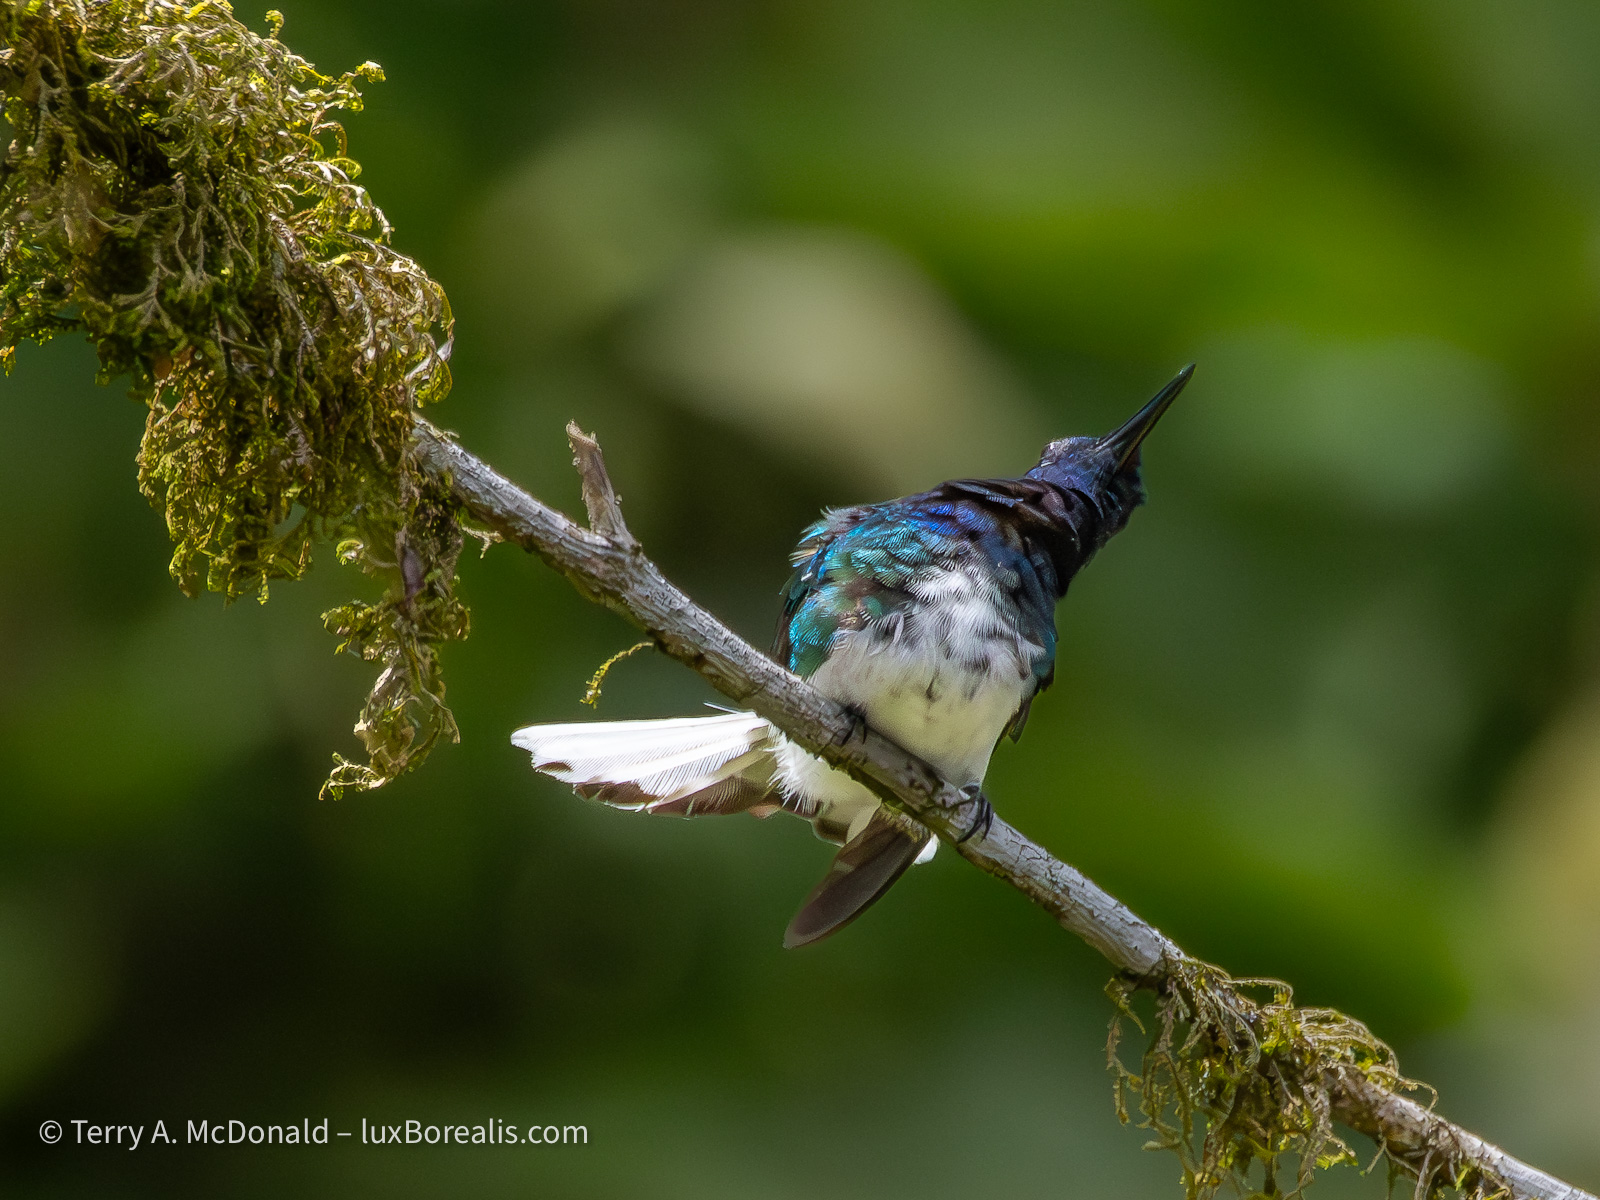
400mm | ƒ8 @ 1/5000 | ISO 6400 | Lightroom
The hummingbirds are nothing short of magnificent and most of the time, predictable. They either have perches they return to, like this Jacobin, or like the Violet Sabrewing below, they hover away from the feeder for a brief second before and after feeding.
The folks we’re travelling with—a total of 12 —are also excellent birders. They are from across the continent from Vancouver Island to Toronto to south Texas and Arizona and bring with them a world of birding. It’s been great to share travel stories and experiences.
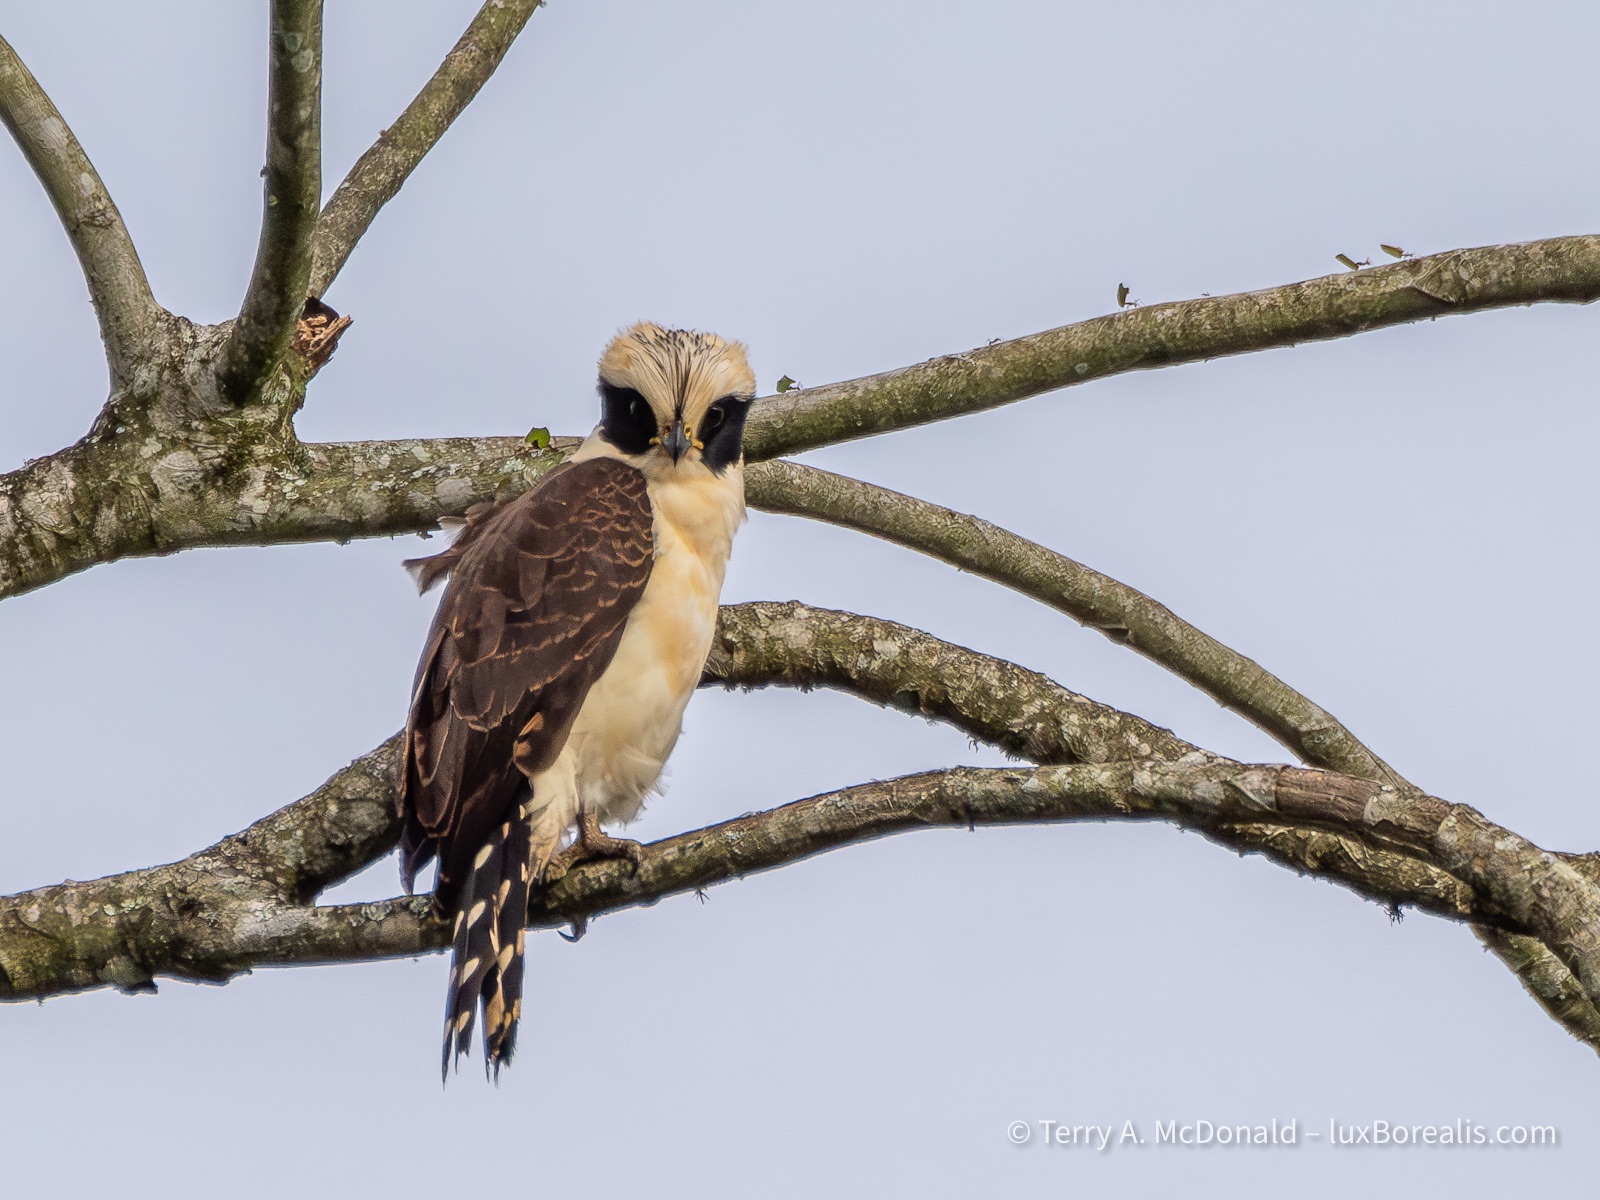
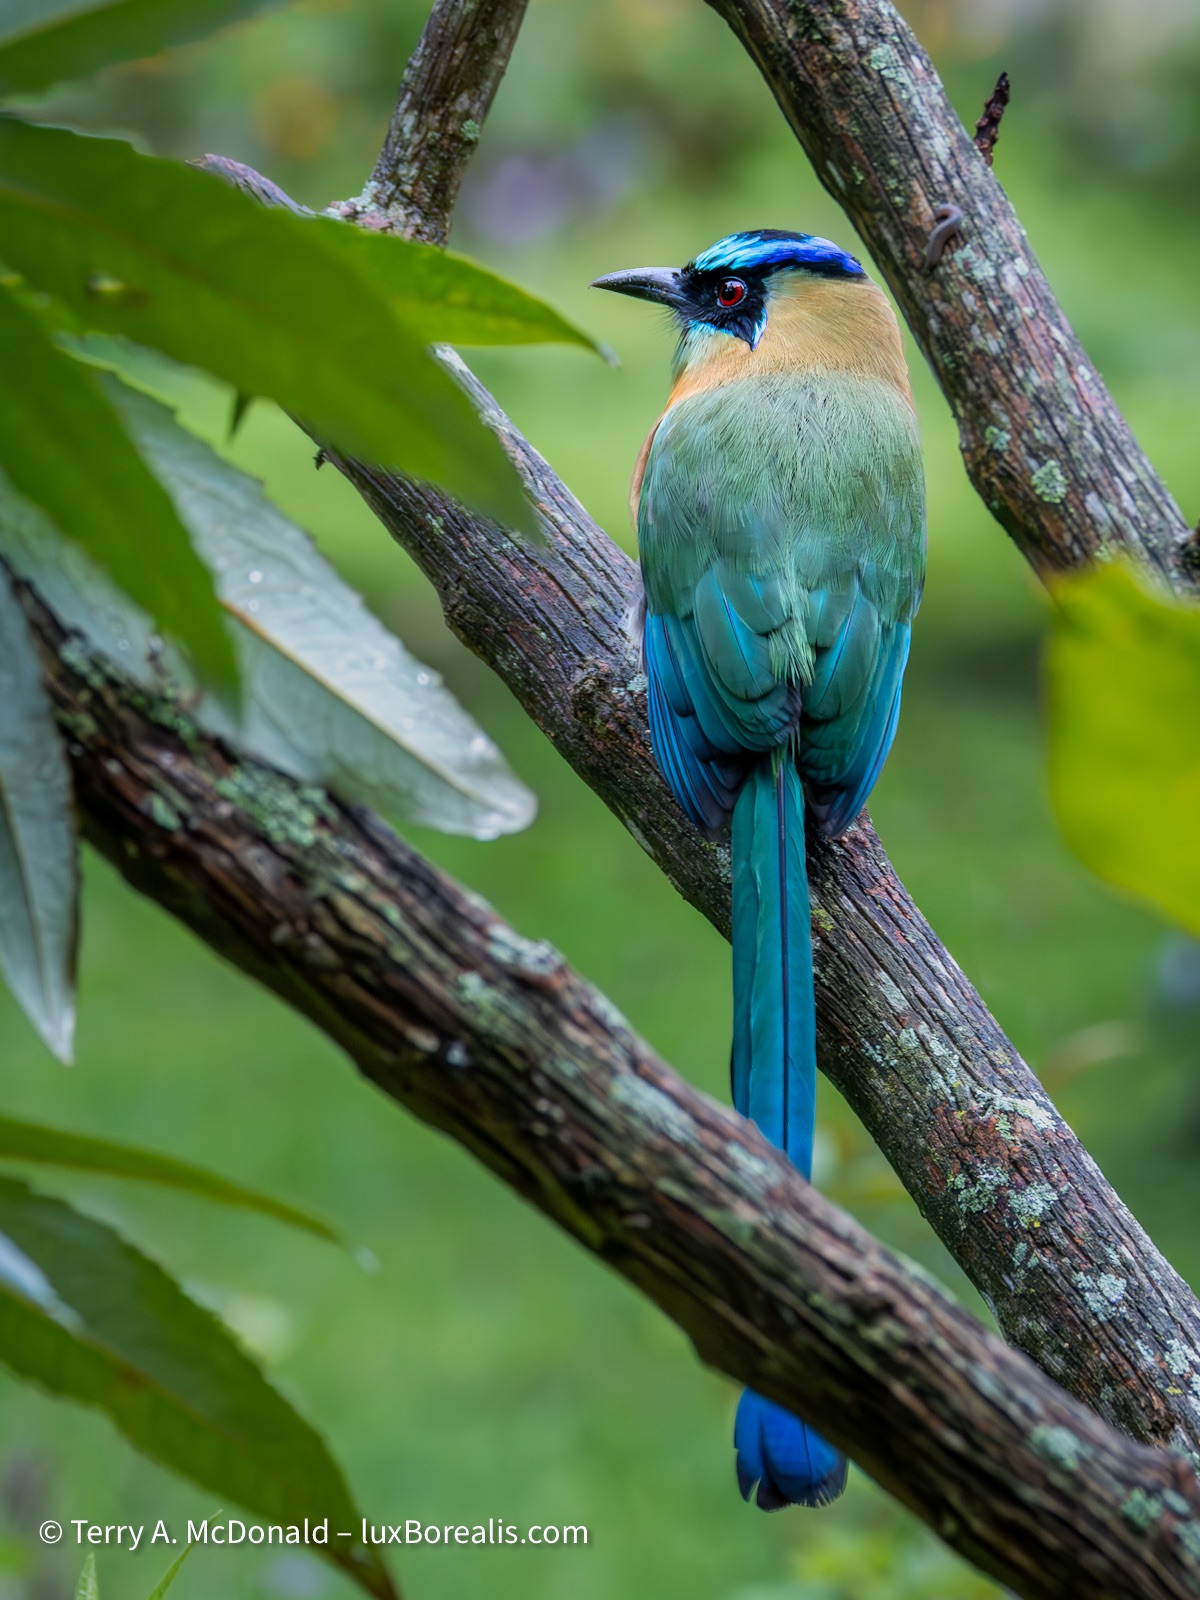
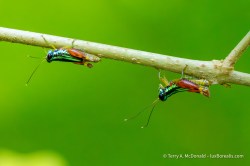
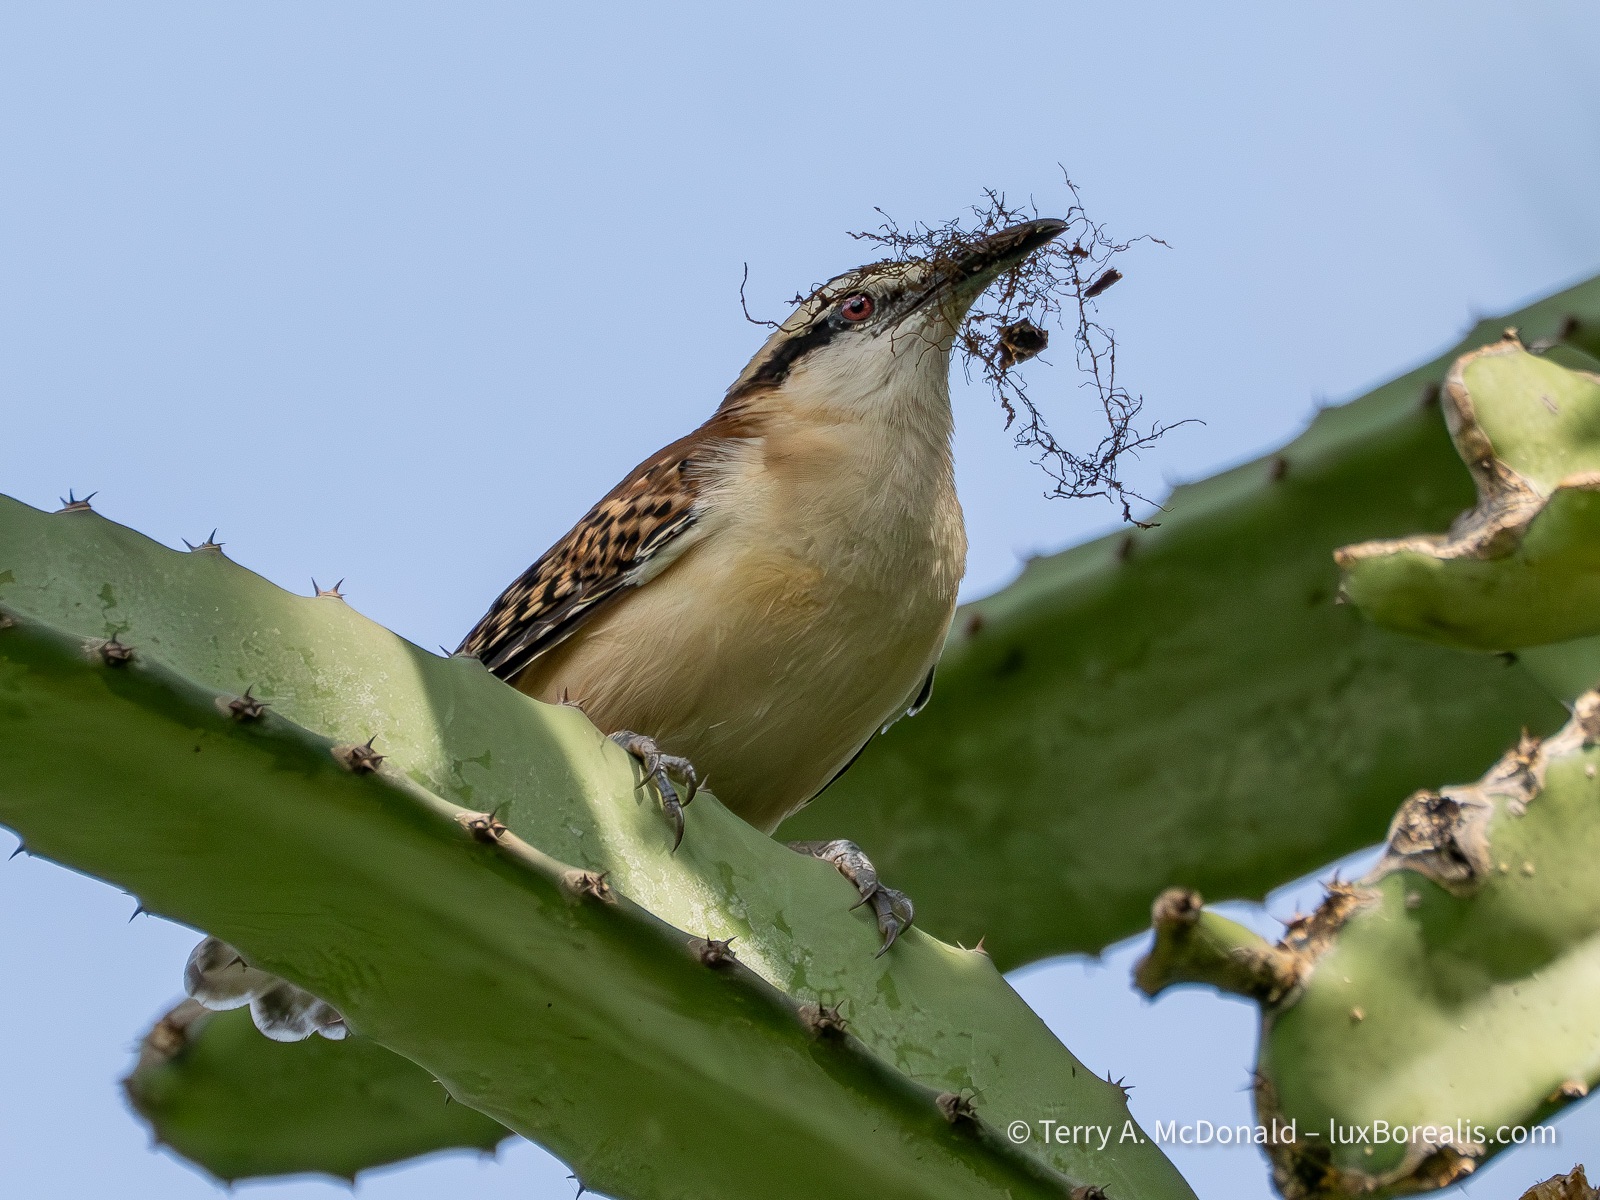
400mm | ƒ8 @ 1/2500 | ISO 1600 | Lightroom
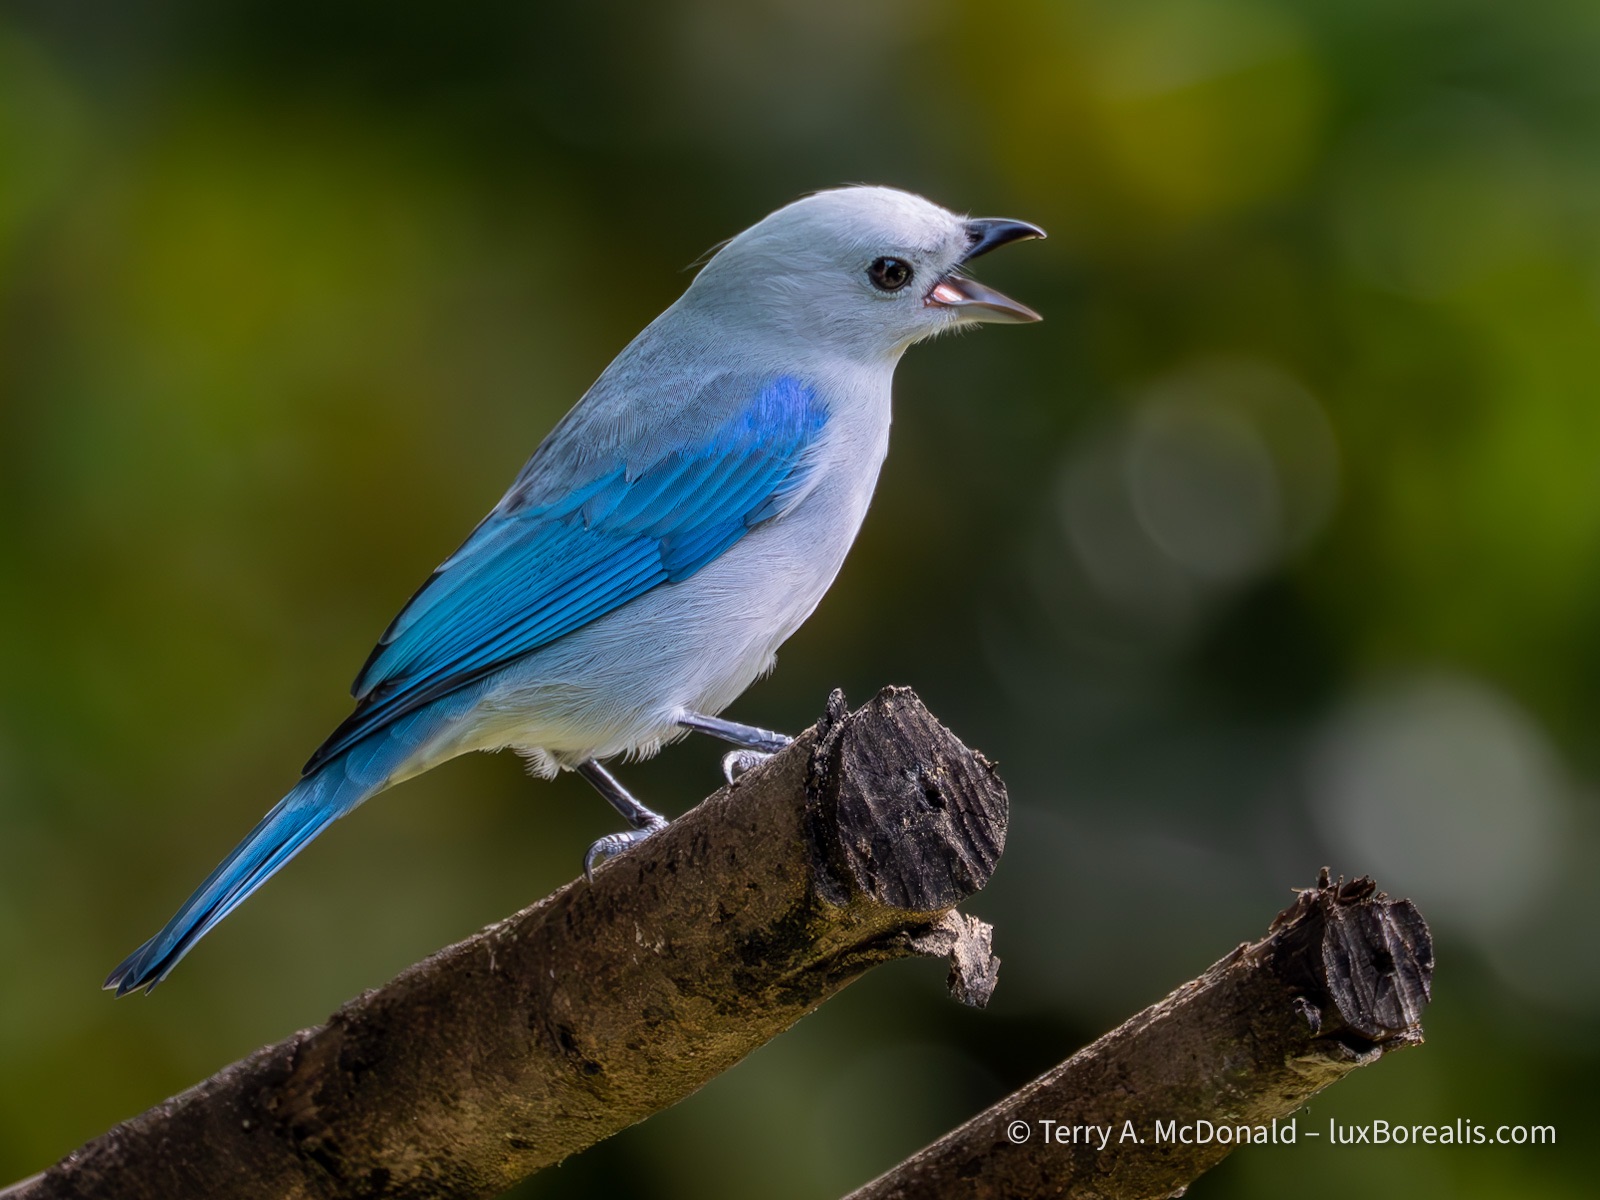
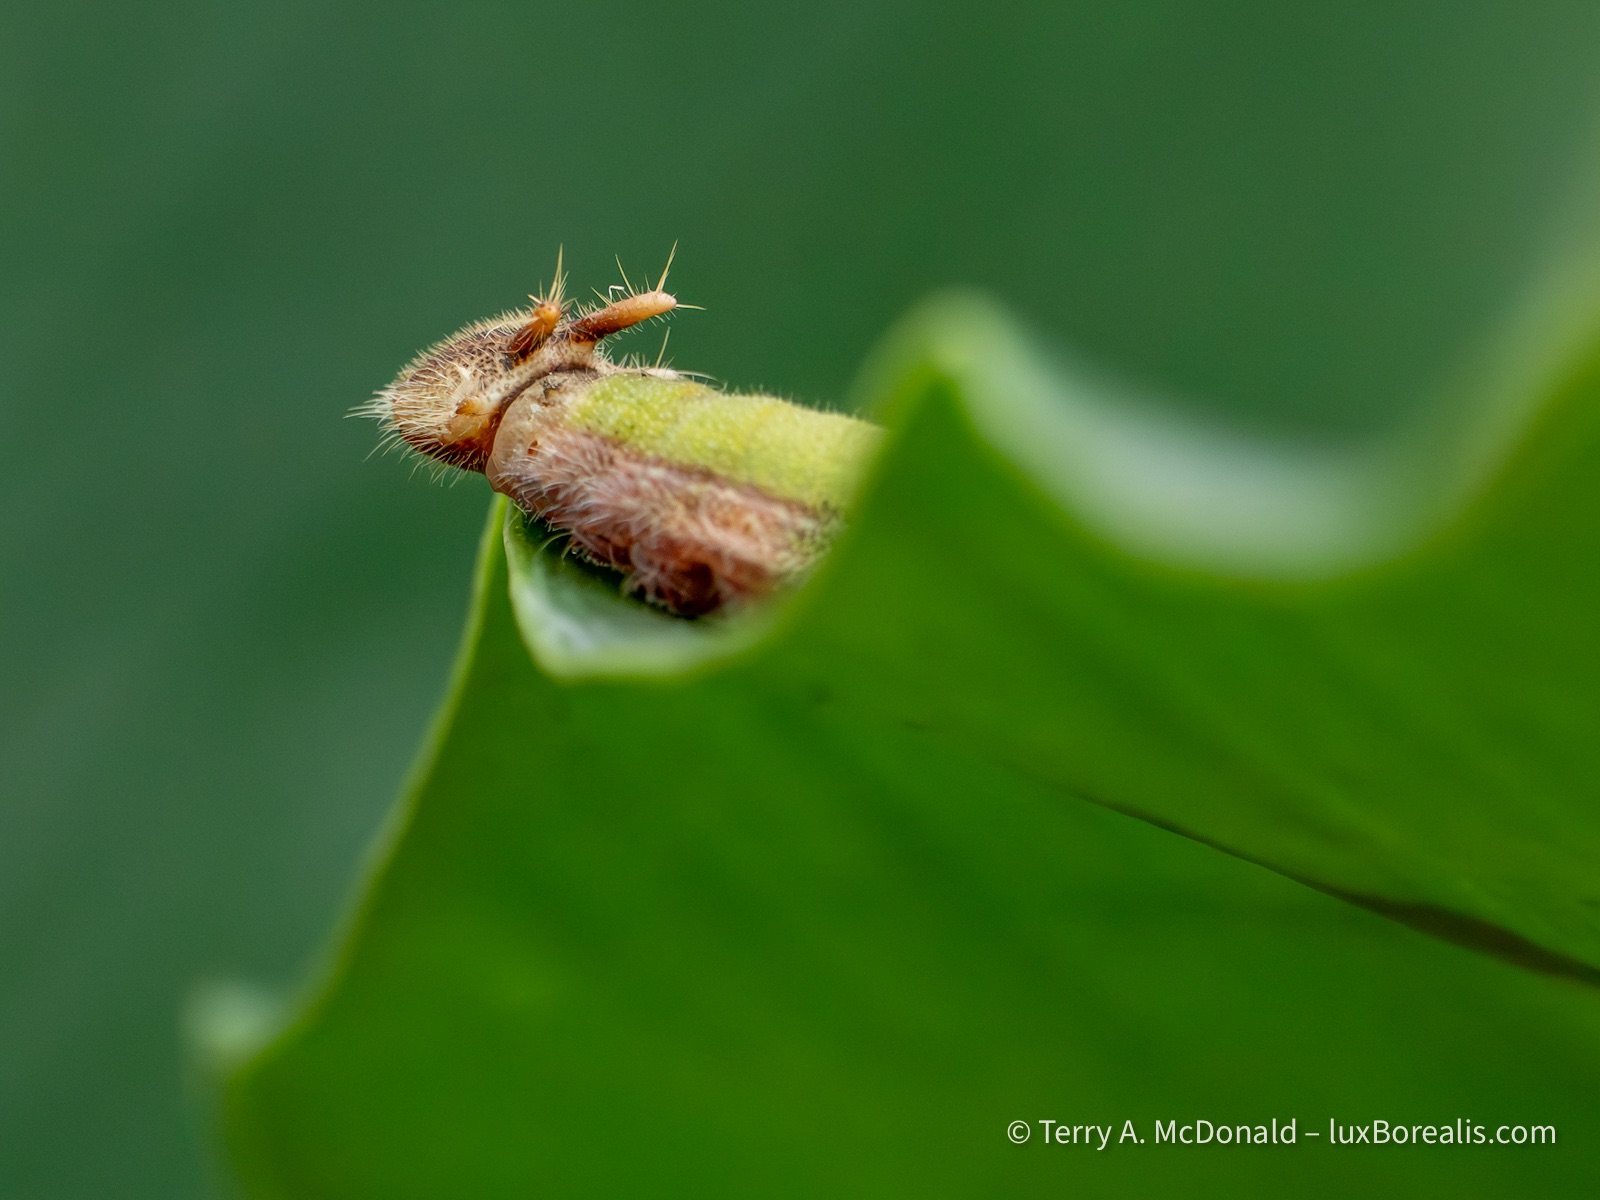
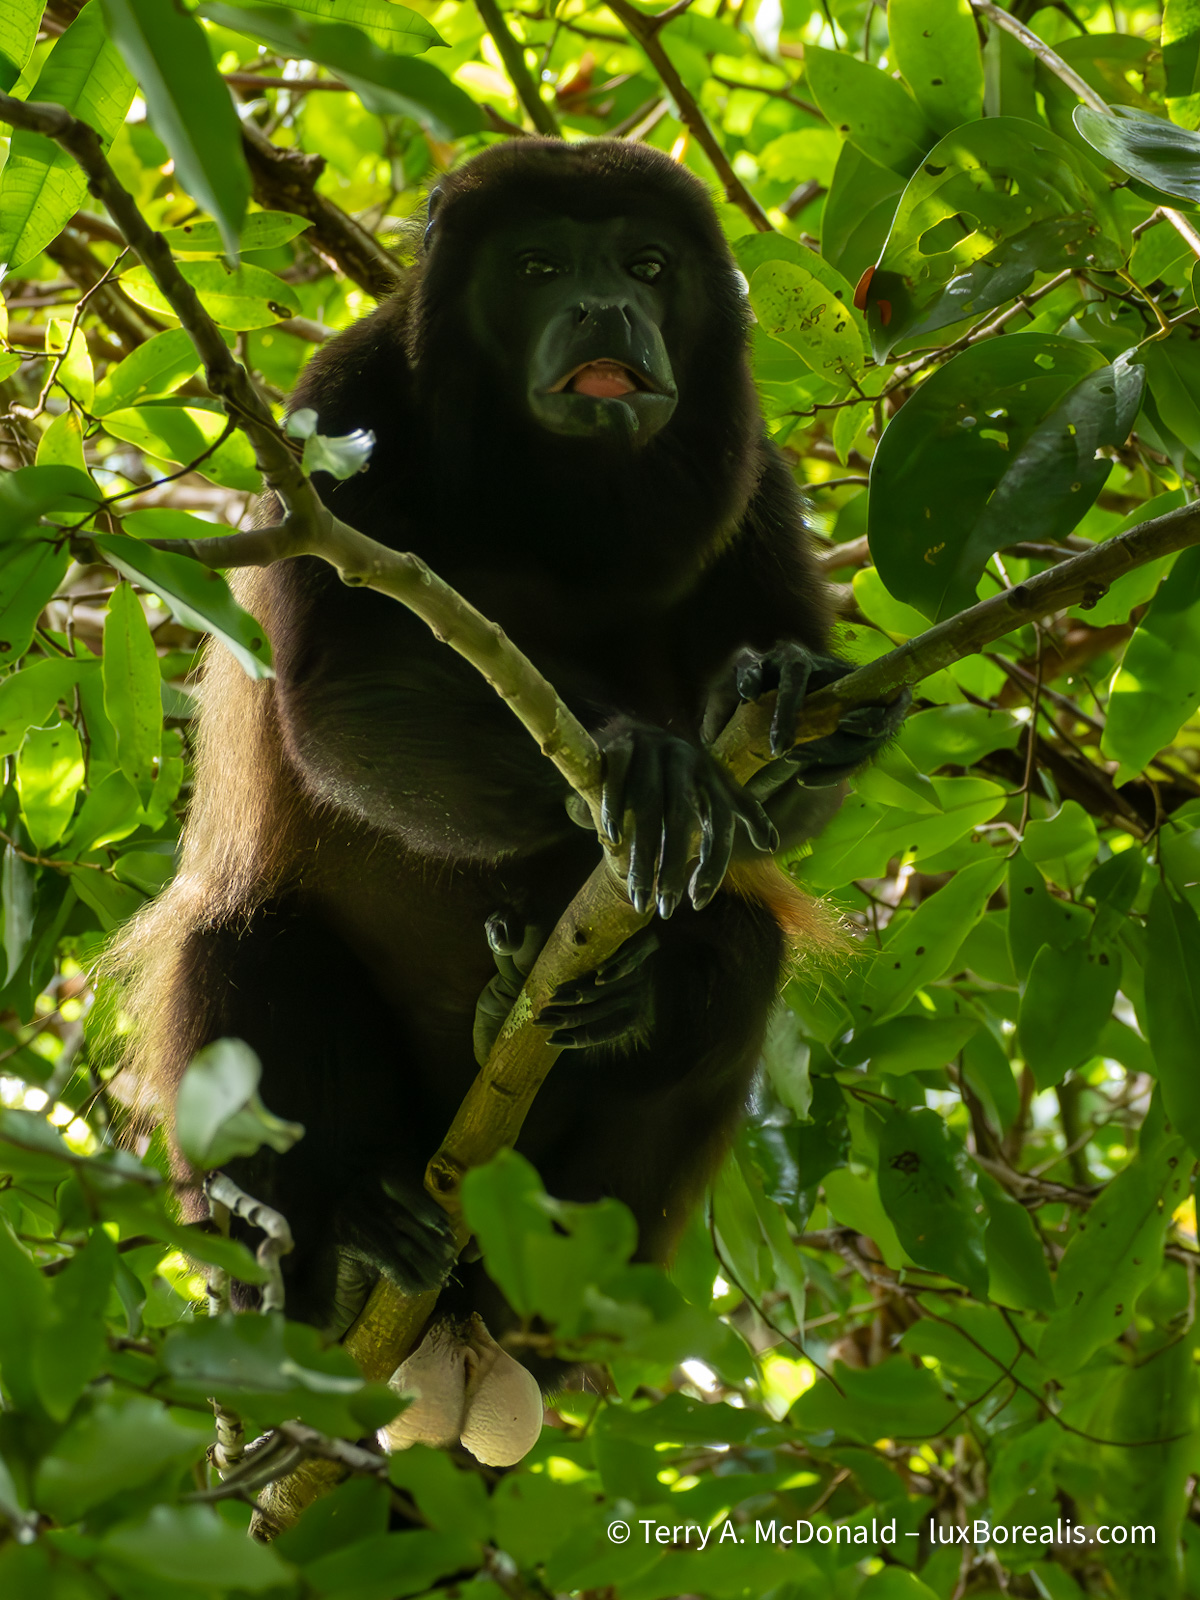
And guess what? It really does make a laughing-like call. Note leaf cutter ants carrying pieces of leaves along the top edge of the branch.
From a photography perspective, I really can’t complain. I’ve had some excellent photo ops, most of which I’ve been able to take advantage of. However, I’ve also noticed that birders are satisfied with seeing a bird half a kilometre away, provided they can ID it. How they can see the leg-colour or a flash of whatever at that distance is beyond me!
400mm | ƒ8 @ 1/5000 | ISO 6400 | Lightroom
400mm | ƒ8 @ 1/200 | ISO 3200 | Lightroom
Field Equipment
On my OM-1, I’m using the M.Zuiko 100-400/5-6.3 (200-800mm efov). For me, even with an 800mm equivalent lens, I need the bird within 20m for what I would consider a successful photo. The Olympus Big White or the 150-600mm would have allowed a greater number of successes, though the added weight would have its own consequences. For ease of vertical shooting and near limitless battery power, I’ve added the HLD-10 vertical grip.
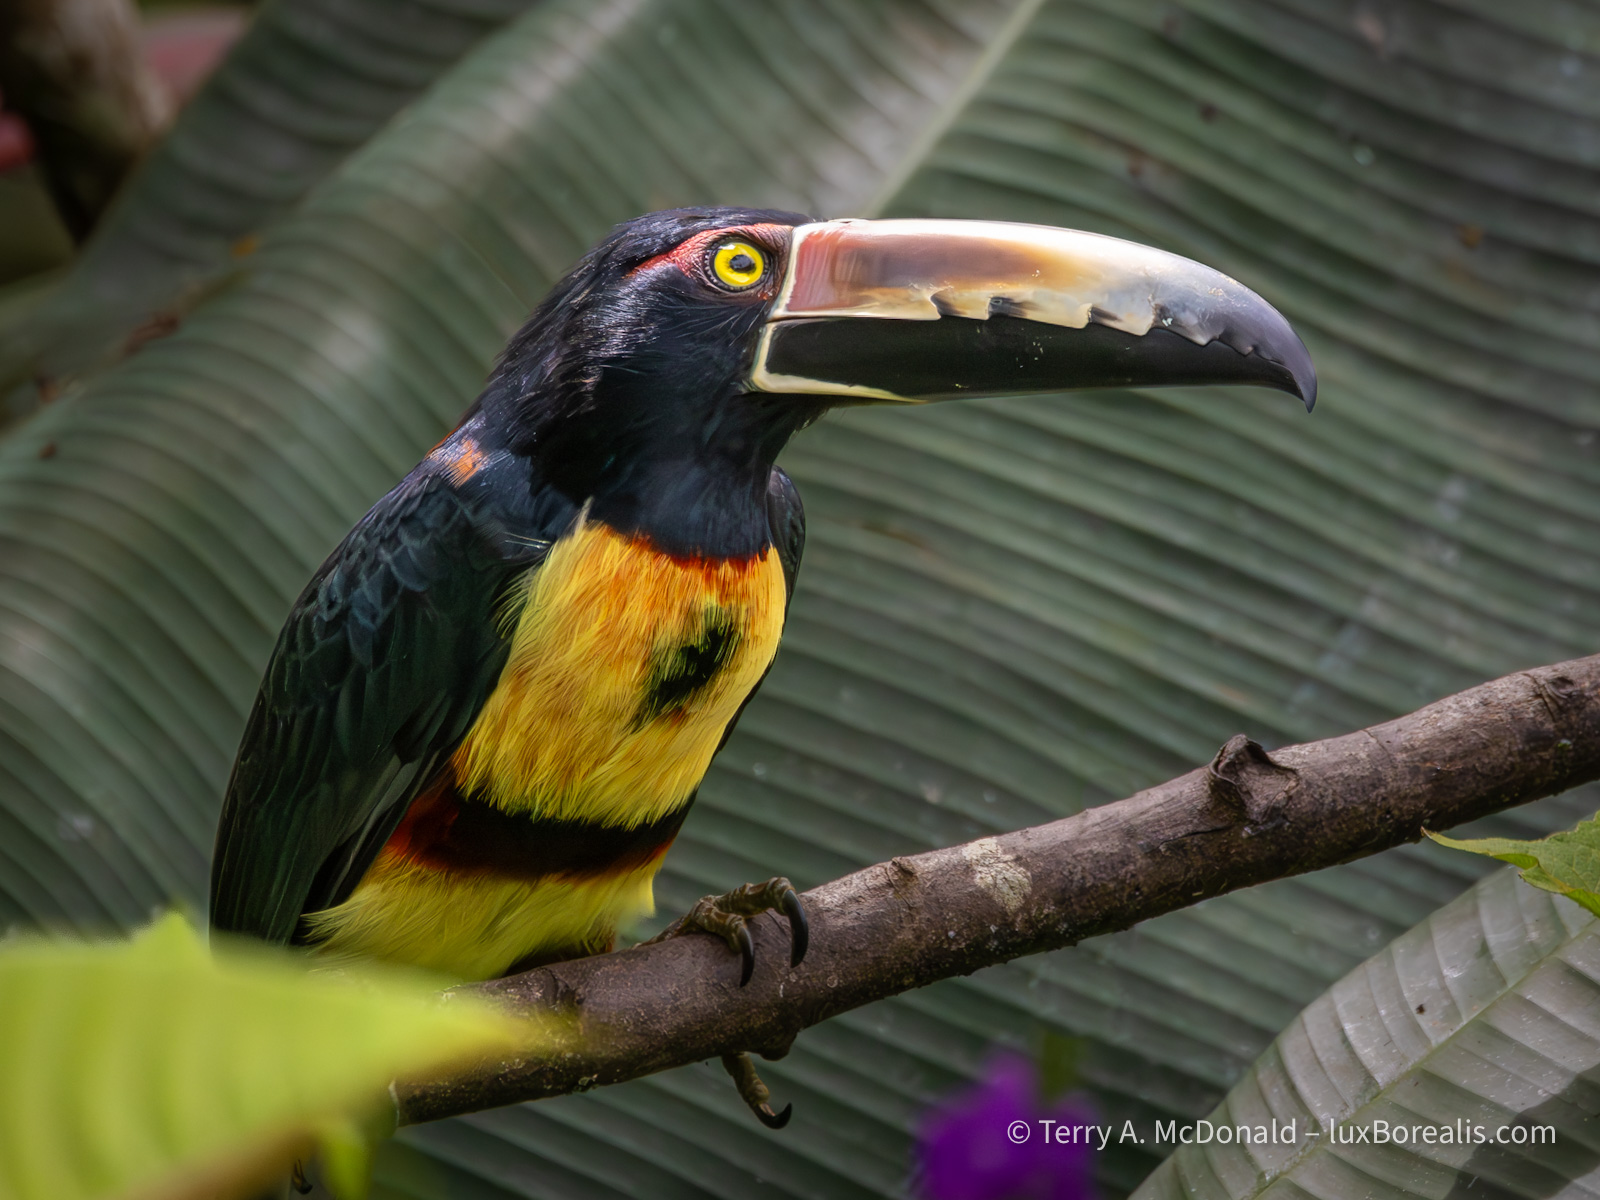
400mm | ƒ8 @ 1/5000 | ISO 6400 |Lightroom
The massive bill on this toucan is actually quite light as it is constructed with a thin skin of keratin over internal structural supports, like an airplane.
Another addition I’ve made to my set-up is a monopod. I know how Olympus/OM System users love to boast about handholding such light equipment with great stabilization, almost as a badge of honour, to the point where even on the OM System website, you’ll rarely see a tripod and never a monopod.
Holding a 2+kg system of body and lens for minutes on end while watching a hummingbird or scanning the canopy for a tell-tale flash of colour simply became uncomfortable when repeated over the course of the day, in 30° heat at 100% humidity. I’m used to a monopod from my years of shooting sports, so using one in these conditions was a no-brainer.
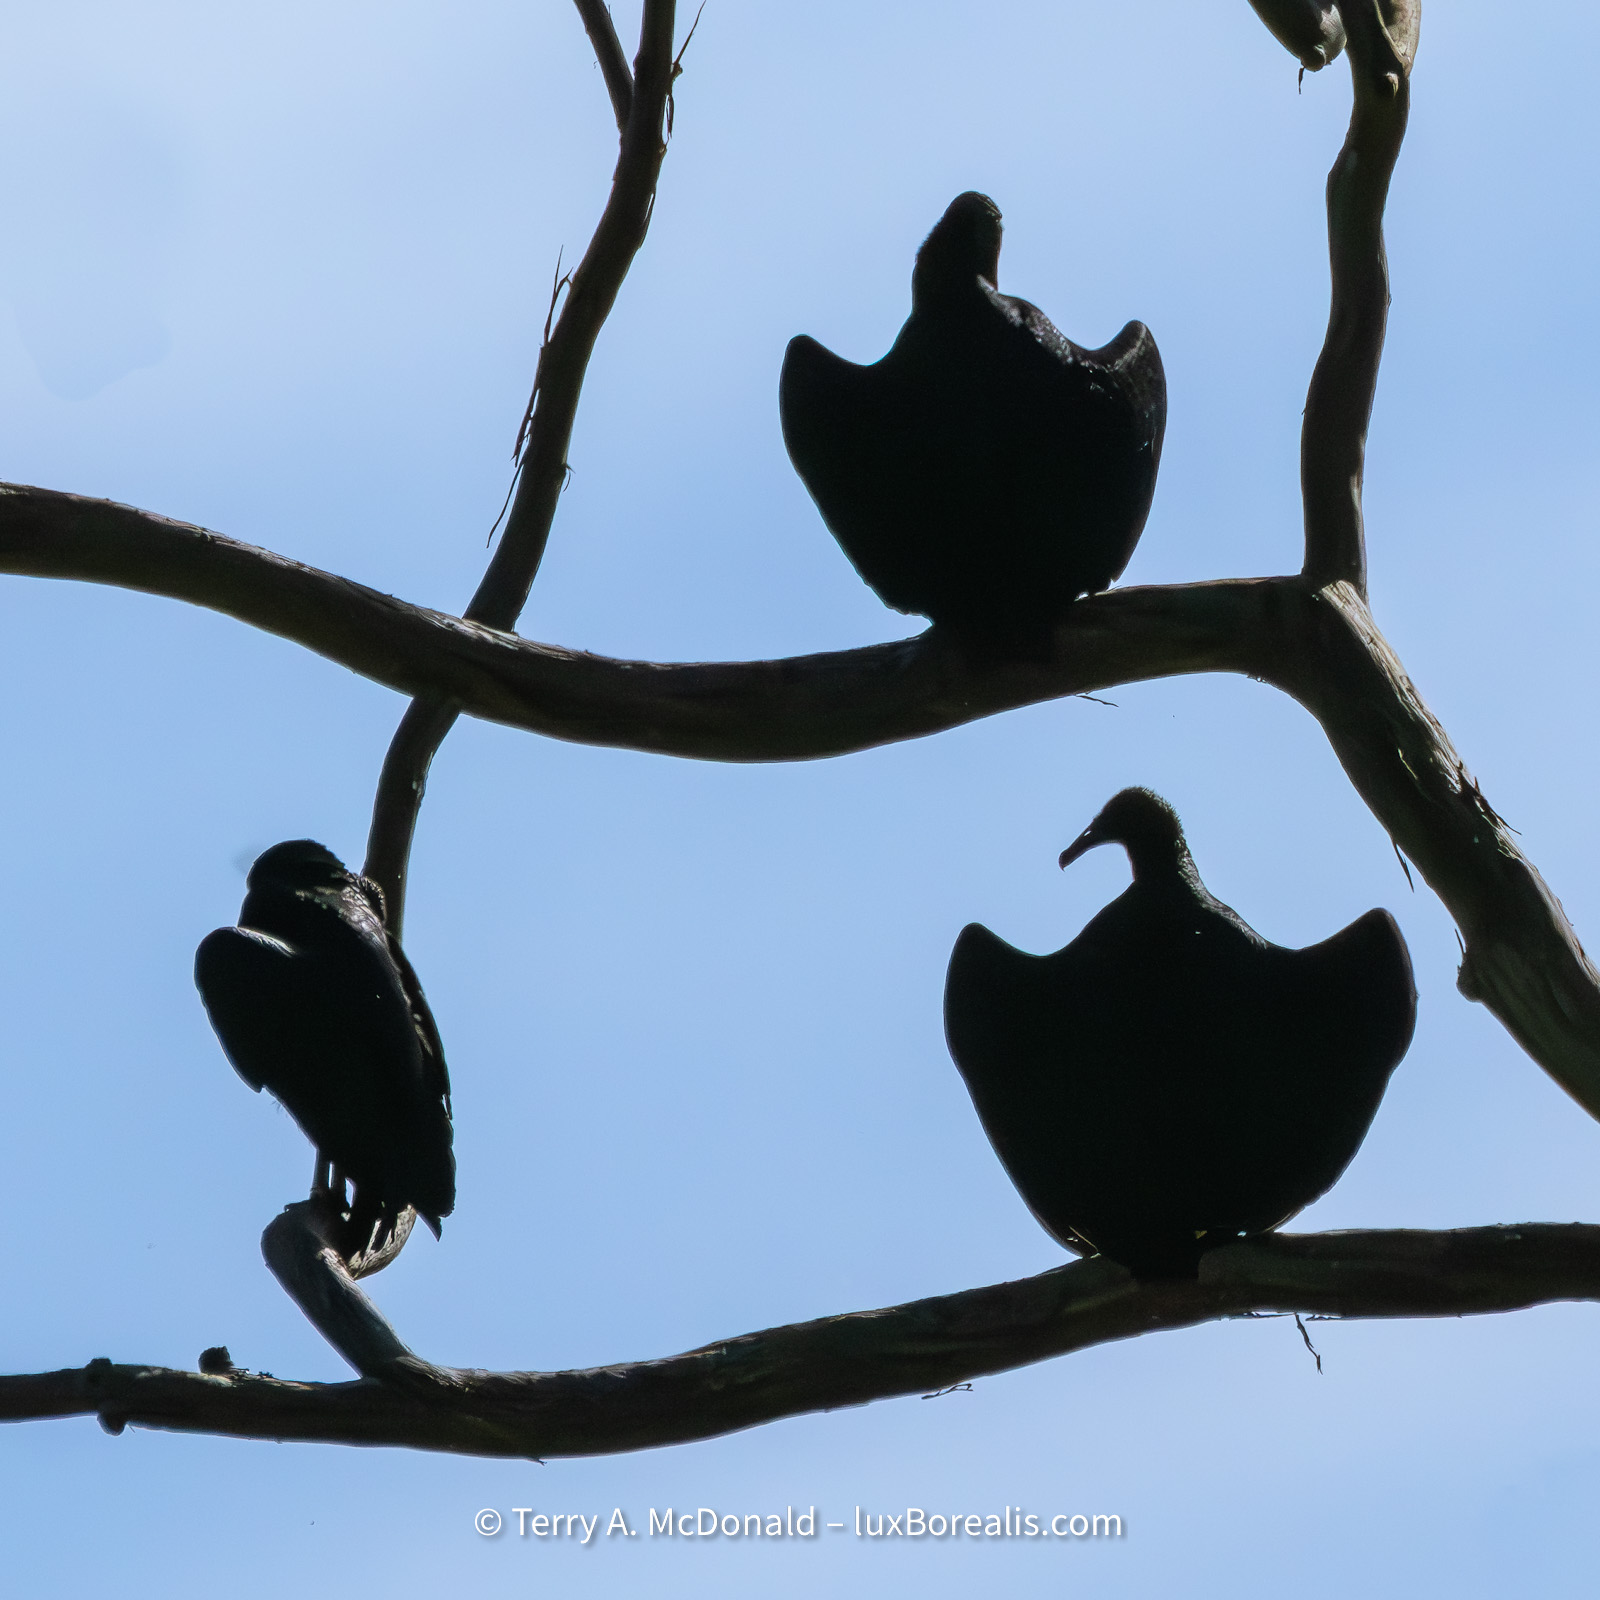
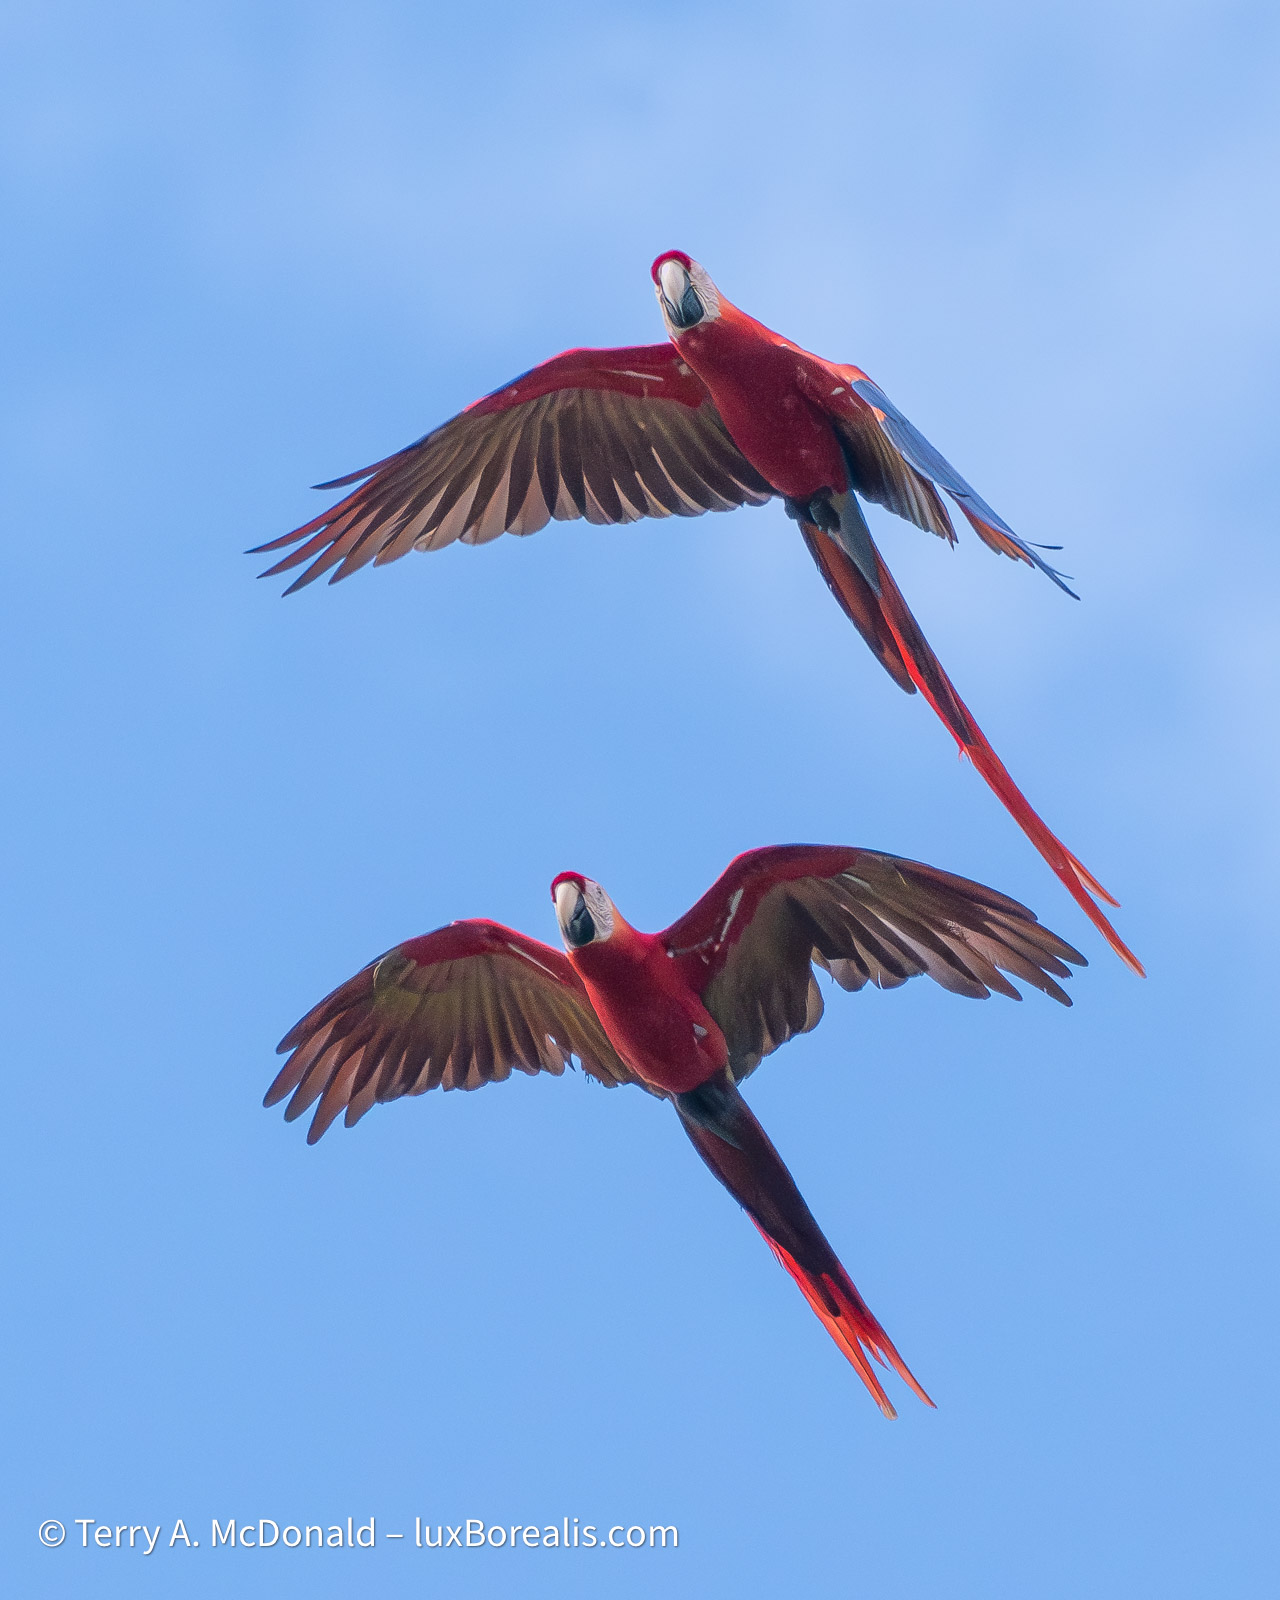
400mm (800mm efov) | ƒ8 @ 1/32000 | ISO 3200 | Lightroom
Silly settings for a static, sunlit silhouette. Just before this, I had been photographing birds in the shaded, dim forest canopy and failed to switch on the fly.
Two of our trip-mates are getting some great results from the Nikon P950, considered to be one of the best birding cameras within financial reach. It’s a super-zoom bridge camera that sports a 2000mm lens (efov), which is great for most sunny and bright conditions. Having a smaller sensor, it is limited to ISO 1600 and even that’s a stretch.
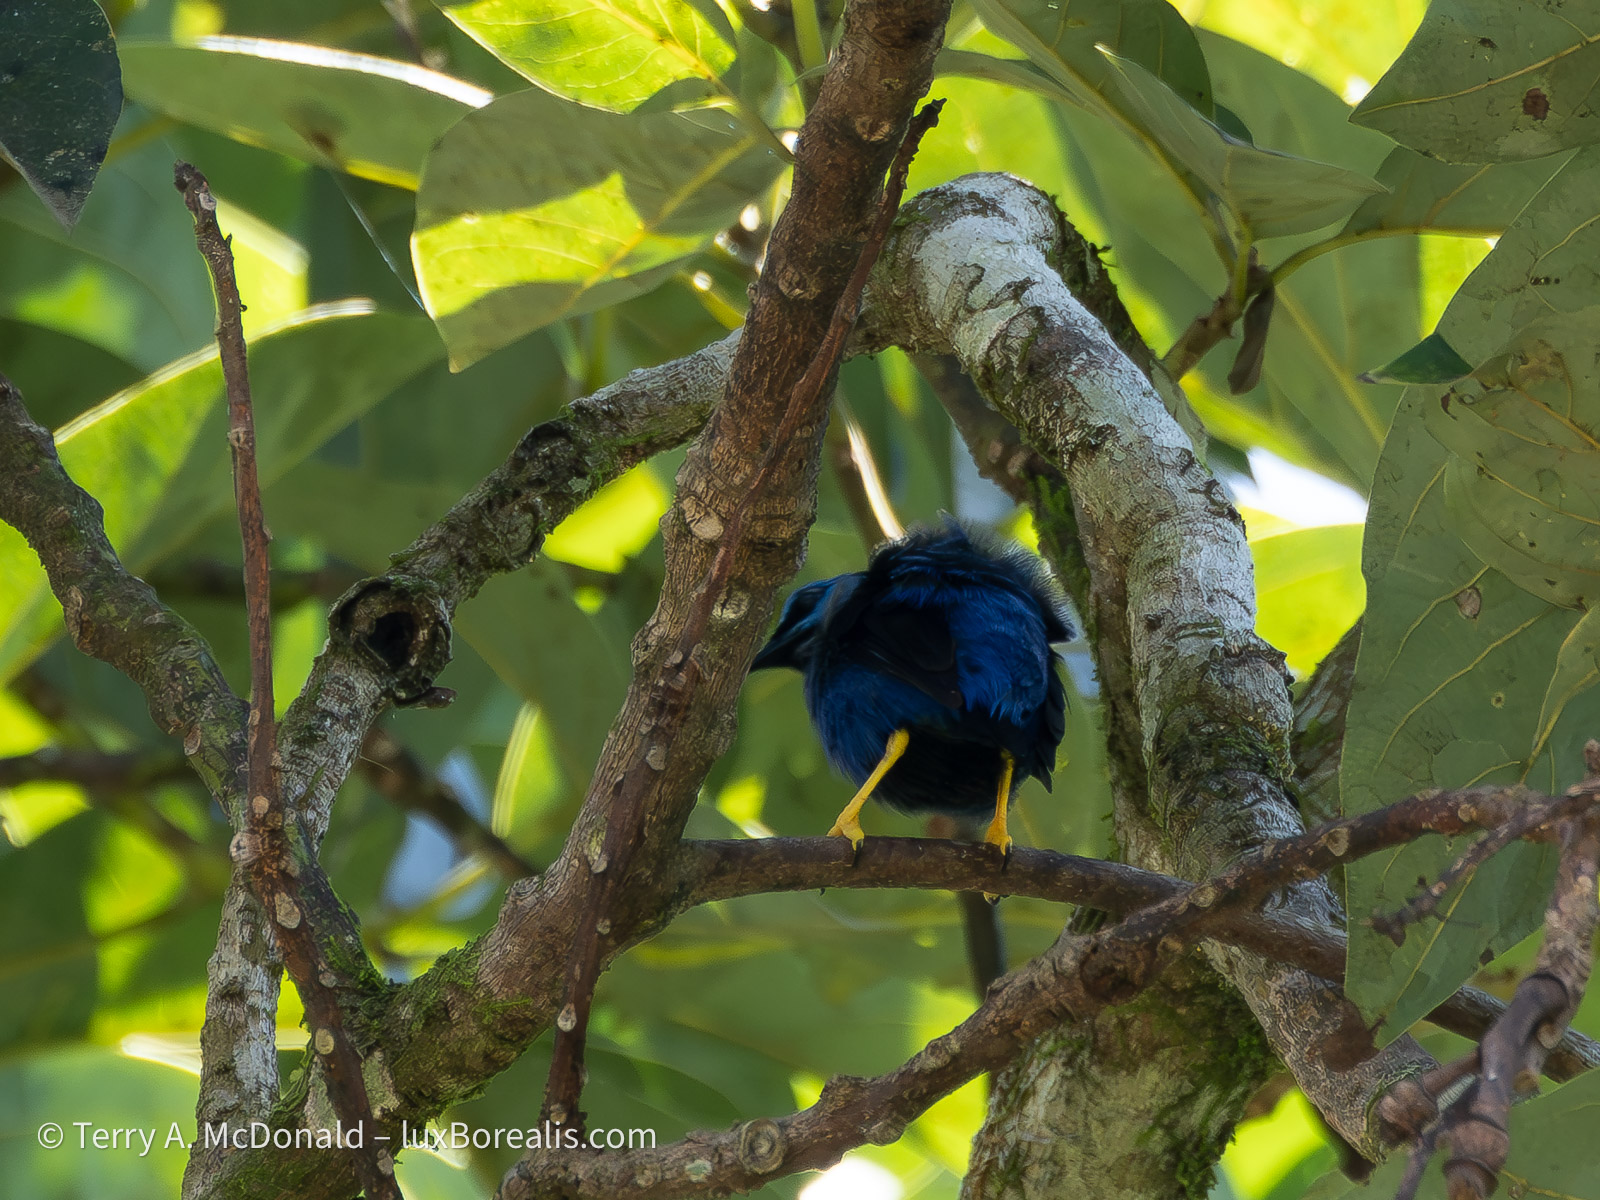
Another thing I’ve learned about birders is that they are happy if they can ID a bird through the leaves or branches of tree. This doesn’t really work for photographs. I have lots of photos of parts of birds seen through the leaves (mostly the butt end) that have now seen the trash bin. They ask me, “Did you get that Shining Honeycreeper?” Well, I did, but only the yellow legs!
Most of our birding has been along road sides, places Ernesto has flagged as being productive. A few great successes have resulted from patiently waiting around feeders and flower gardens set up to attract birds, especially hummingbirds. It’s fine to see the hummers on the feeder, but catching them on the wing or on flowers is a great deal more difficult, again with plenty of misses. The OM-1’s subject tracking allows me to focus on the bird while on the feeder, then track it when it backs off.
One of the most significant features of a good wildlife photo is having a clear background, free from distractions. This has been difficult in the chaotic jumble of a rainforest and tropical plants. With vines, glossy leaves and spots of sunlight through the canopy, it has been especially important to find shooting positions that provide as neutral a background as possible.
300mm (600mm efov) | ƒ8 @ 1/4000 | ISO 6400 | Lightroom
Culling & Processing
At the end of each day, I’ve had between 200 and 500 image files to wade through—the most I’ve 3ver had to deal with on a daily basis. I’m glad I brought my MacBook Air with me. Not only does it make culling faster, it provides full processing capability with Lightroom, with noise reduction and batch processing. On our Tanzania trip last year, I had only my iPad, on which Lightroom is still a bit limiting.
Using the MBA has sped things up, but with hundreds of files each day, it is still a bit of trial keeping up. I enjoy the editing side almost as much as the field work, so it’s doable. What I don’t enjoy is wading through countless rather similar photos of the same subject. But duplicates are unavoidable.
227mm (454mm efov) | ƒ8 @ 1/15 | ISO 6400 | Lightroom
The slow shutter speed and high ISO indicate that this photo was made at 6:11pm almost 45 minutes after sunset. At this point, I hadn’t started using the monopod, so it’s a good example of how good the stabilization is.
I prefer shooting in single-shot mode, but with birds in near constant motion, I find that continuous AF and burst shooting allows me to capture subtle movements resulting in better facial expressions and body position. It also means multiple near duplicates which require scrutiny.
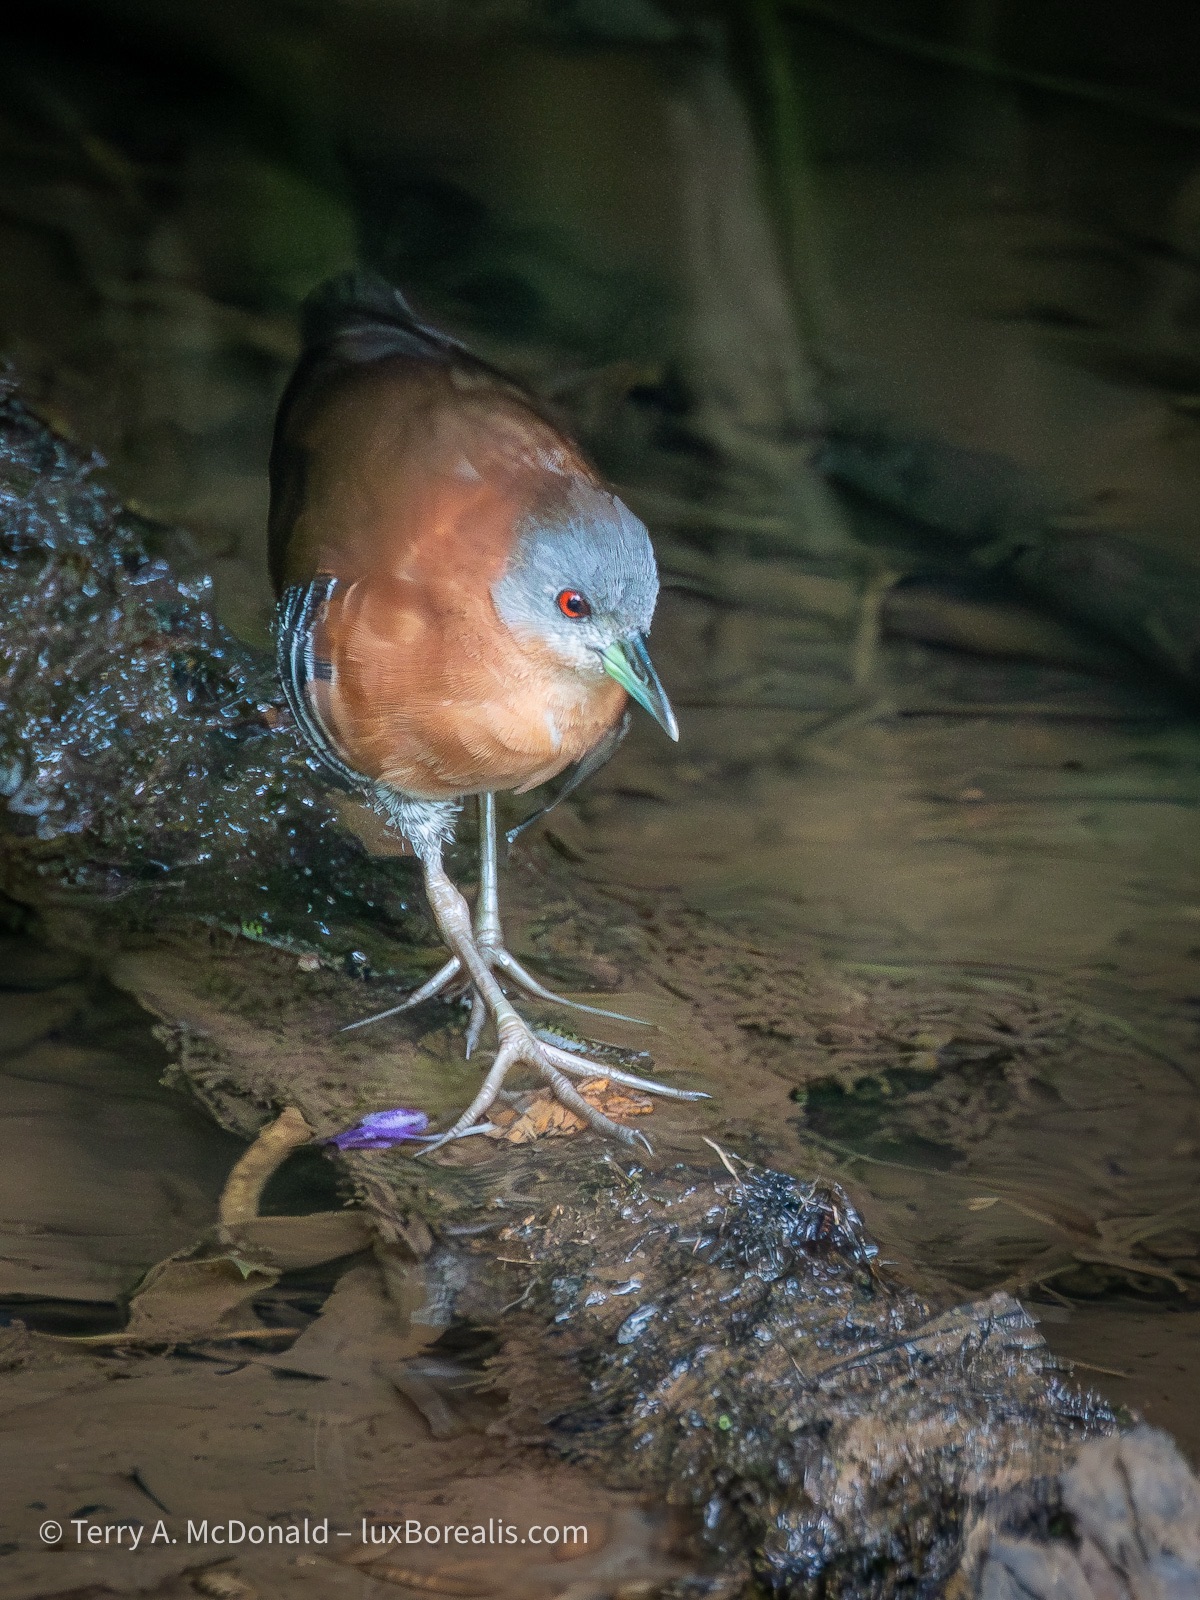
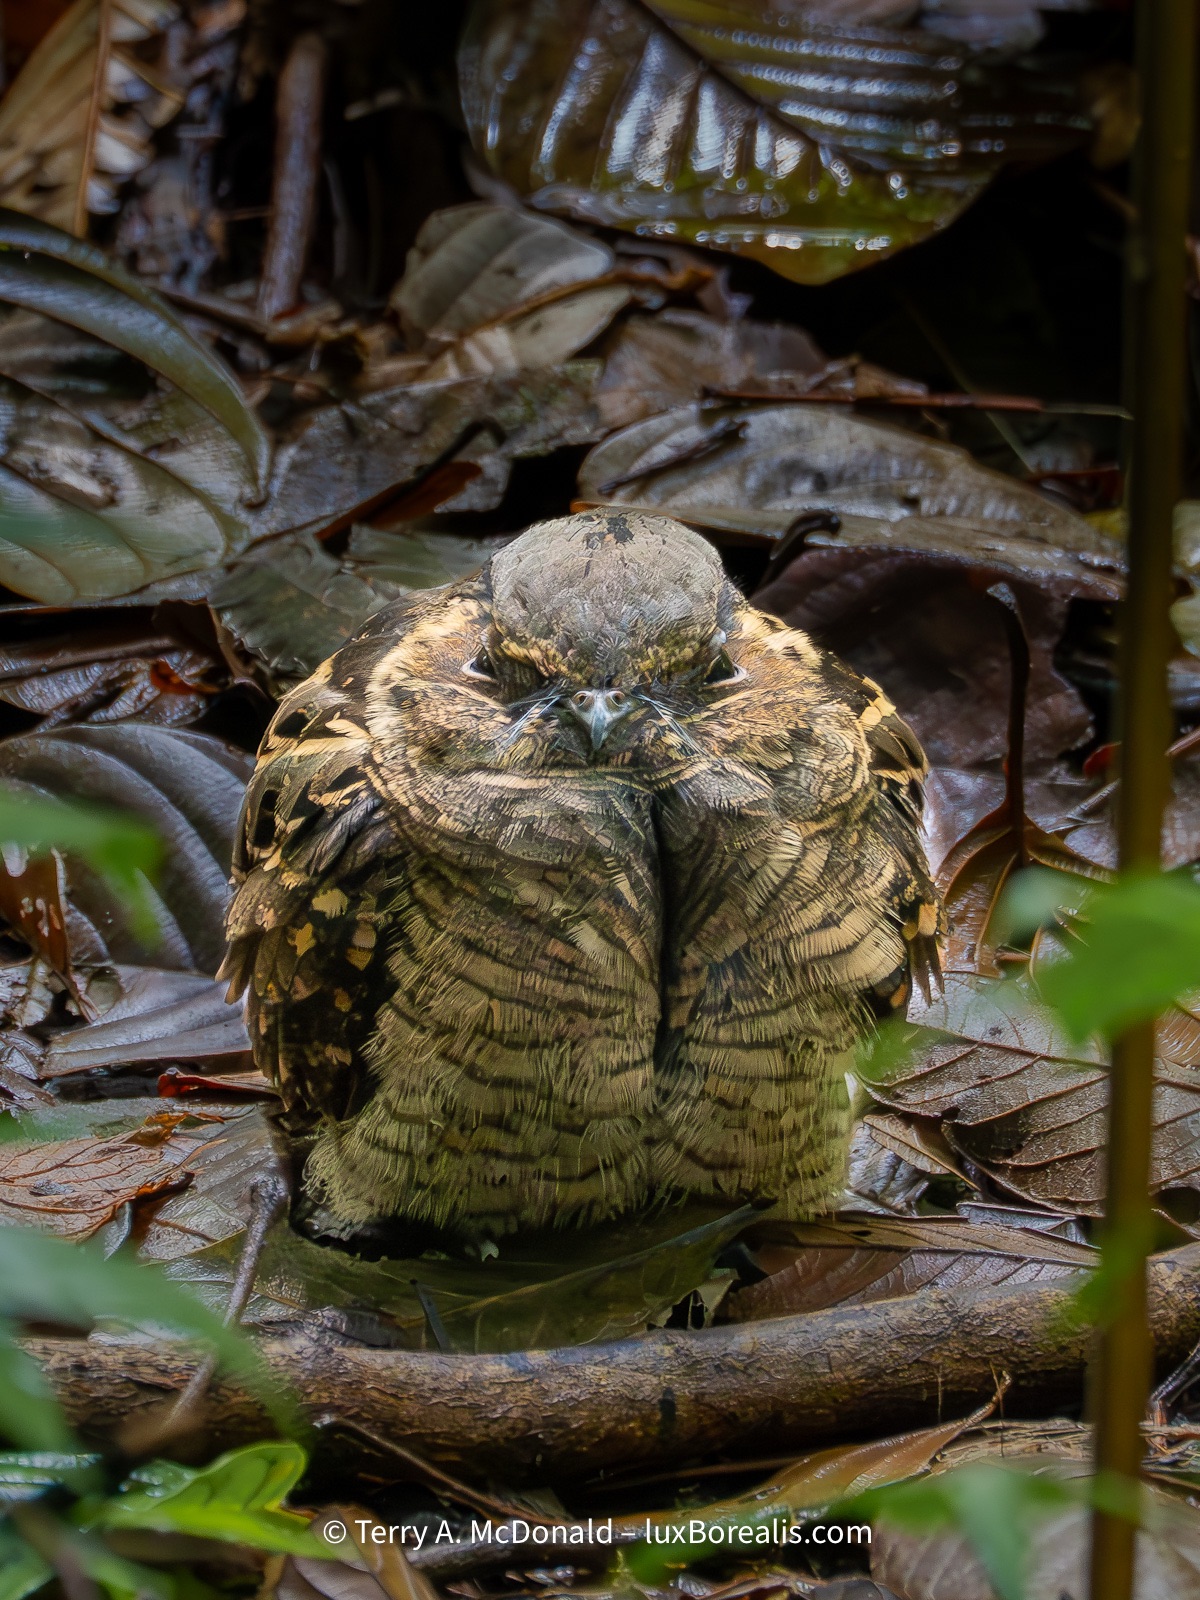
400mm (800mm efov) | ƒ8 @ 1/1000 | ISO 12800 | Lightroom
This elusive and rarely-seen marsh bird skulks amongst the overgrown vegetation, coming out only to feed.
307mm (614mm efov) | ƒ8 @ 1/2500 | ISO 6400 | Lightroom
I start by flagging the best of the lot. As I scroll through I quickly flag potentials, X the definite out-takes and leave the duplicates of something I’ve flagged. As I’m working, I’m paying close attention to sharpness, body position, duplicates and overall design.
With over 50% of files culled in the first pass, I then check and double-check focus and facial expressions. I find the 100-400 great up to about 20m, but beyond that it noticeably softens, even at ƒ8. Some of the photos I was hoping would be production quality, simply don’t make the cut. This is disappointing. Other than investing in a different lens, I’m not sure what to do, except to be aware of the shortcomings and work within them.
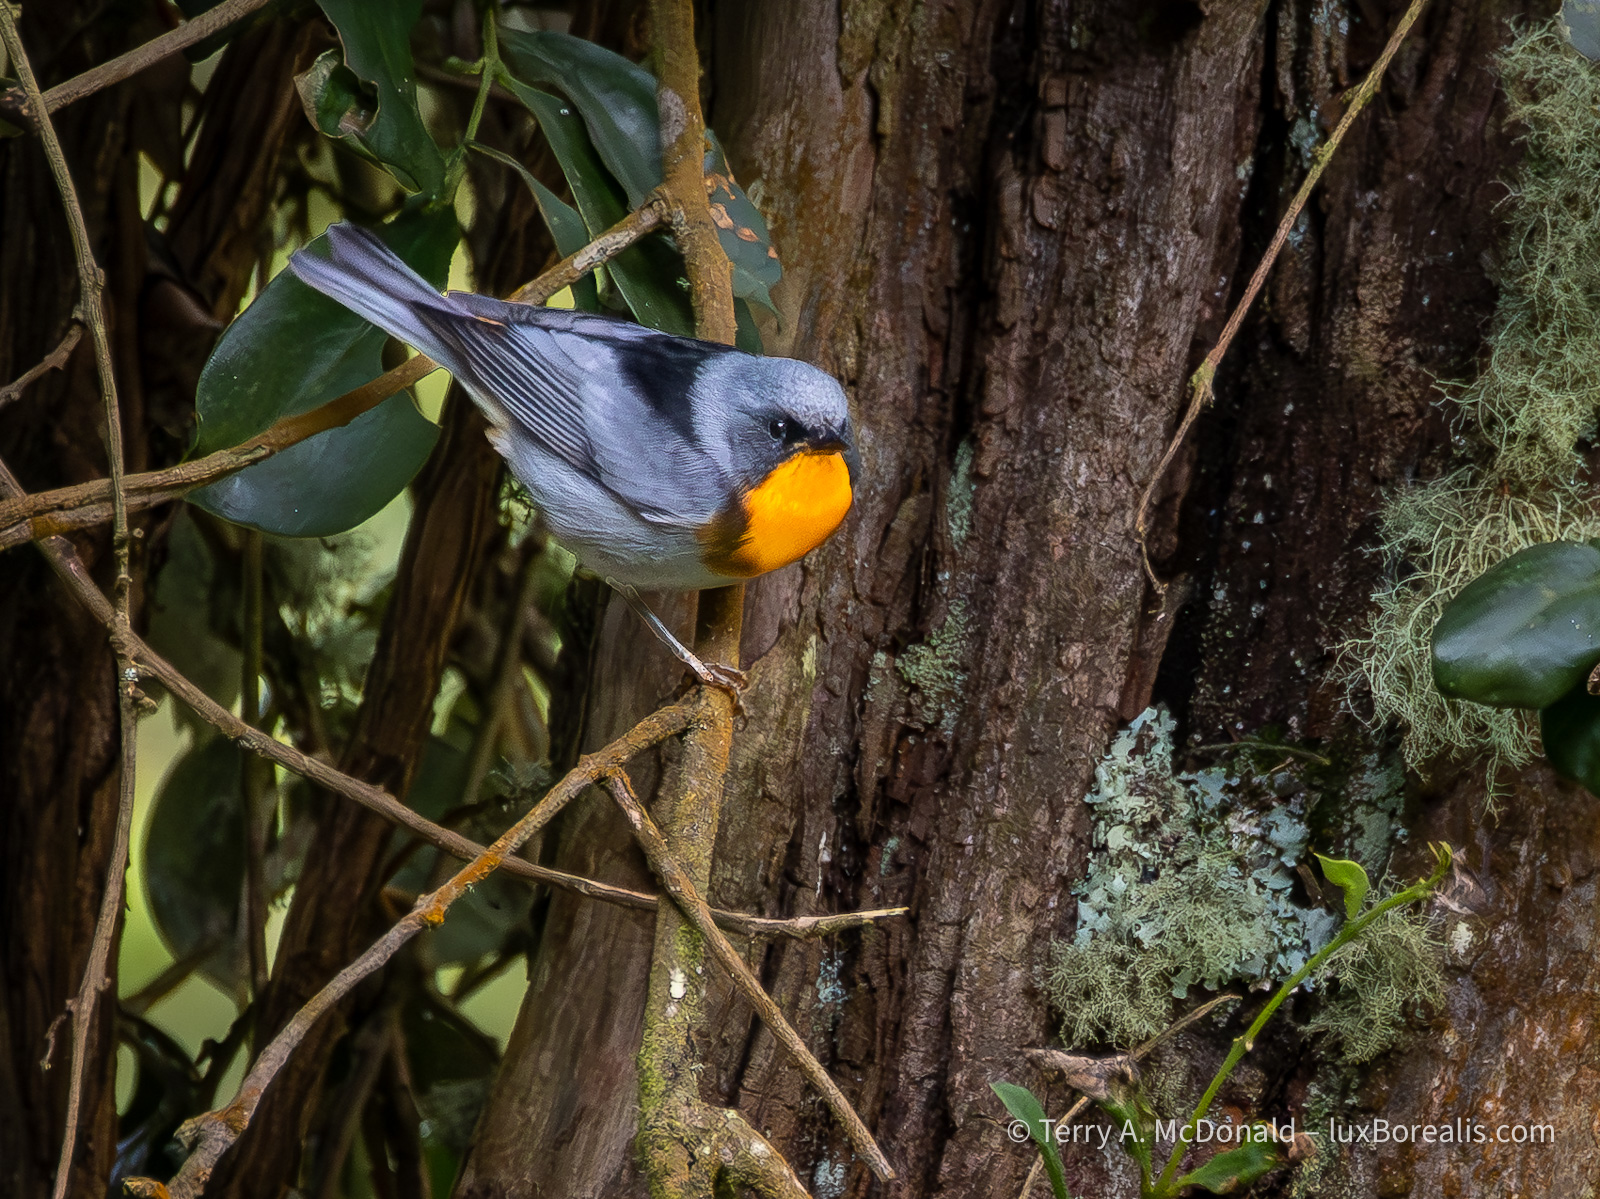
400mm (800mm efov) | ƒ8 @ 1/400 | ISO 6400 | Lightroom
We must have spent 30 minutes on a grey, slightly drizzly day up in the highlands, trying to track this fellow. With its distinctive orange chest, the birders had immediately ID’d the bird, but getting a clear photograph of it was a challenge/
With flagged images identifies, I then concentrate on finding the best of them. I don’t want to waste time processing sub-standard images, so I’m really critical at this stage. If it has great potential, I give it three stars.
Initial processing includes denoising as ISO is often in the 3200 to 12800 range. I find that a Denoise value of 50 to 65 works well with 80 to 100 in Detail Sharpening, plus 30 in Masking. I built these into a preset which also includes +10 in Clarity. If I had time, I might consider running some of the troublesome files through DxO PureRAW or, to correct slight camera movement, Topaz Photo AI. I might still do so once I’m home and have the t8me, but not here.
Next, the file is off to cropping and the various Exposure adjustments. Raising shadows is always important, as well as having an accurate value for ‘White’s to lift the overall colour and presence.
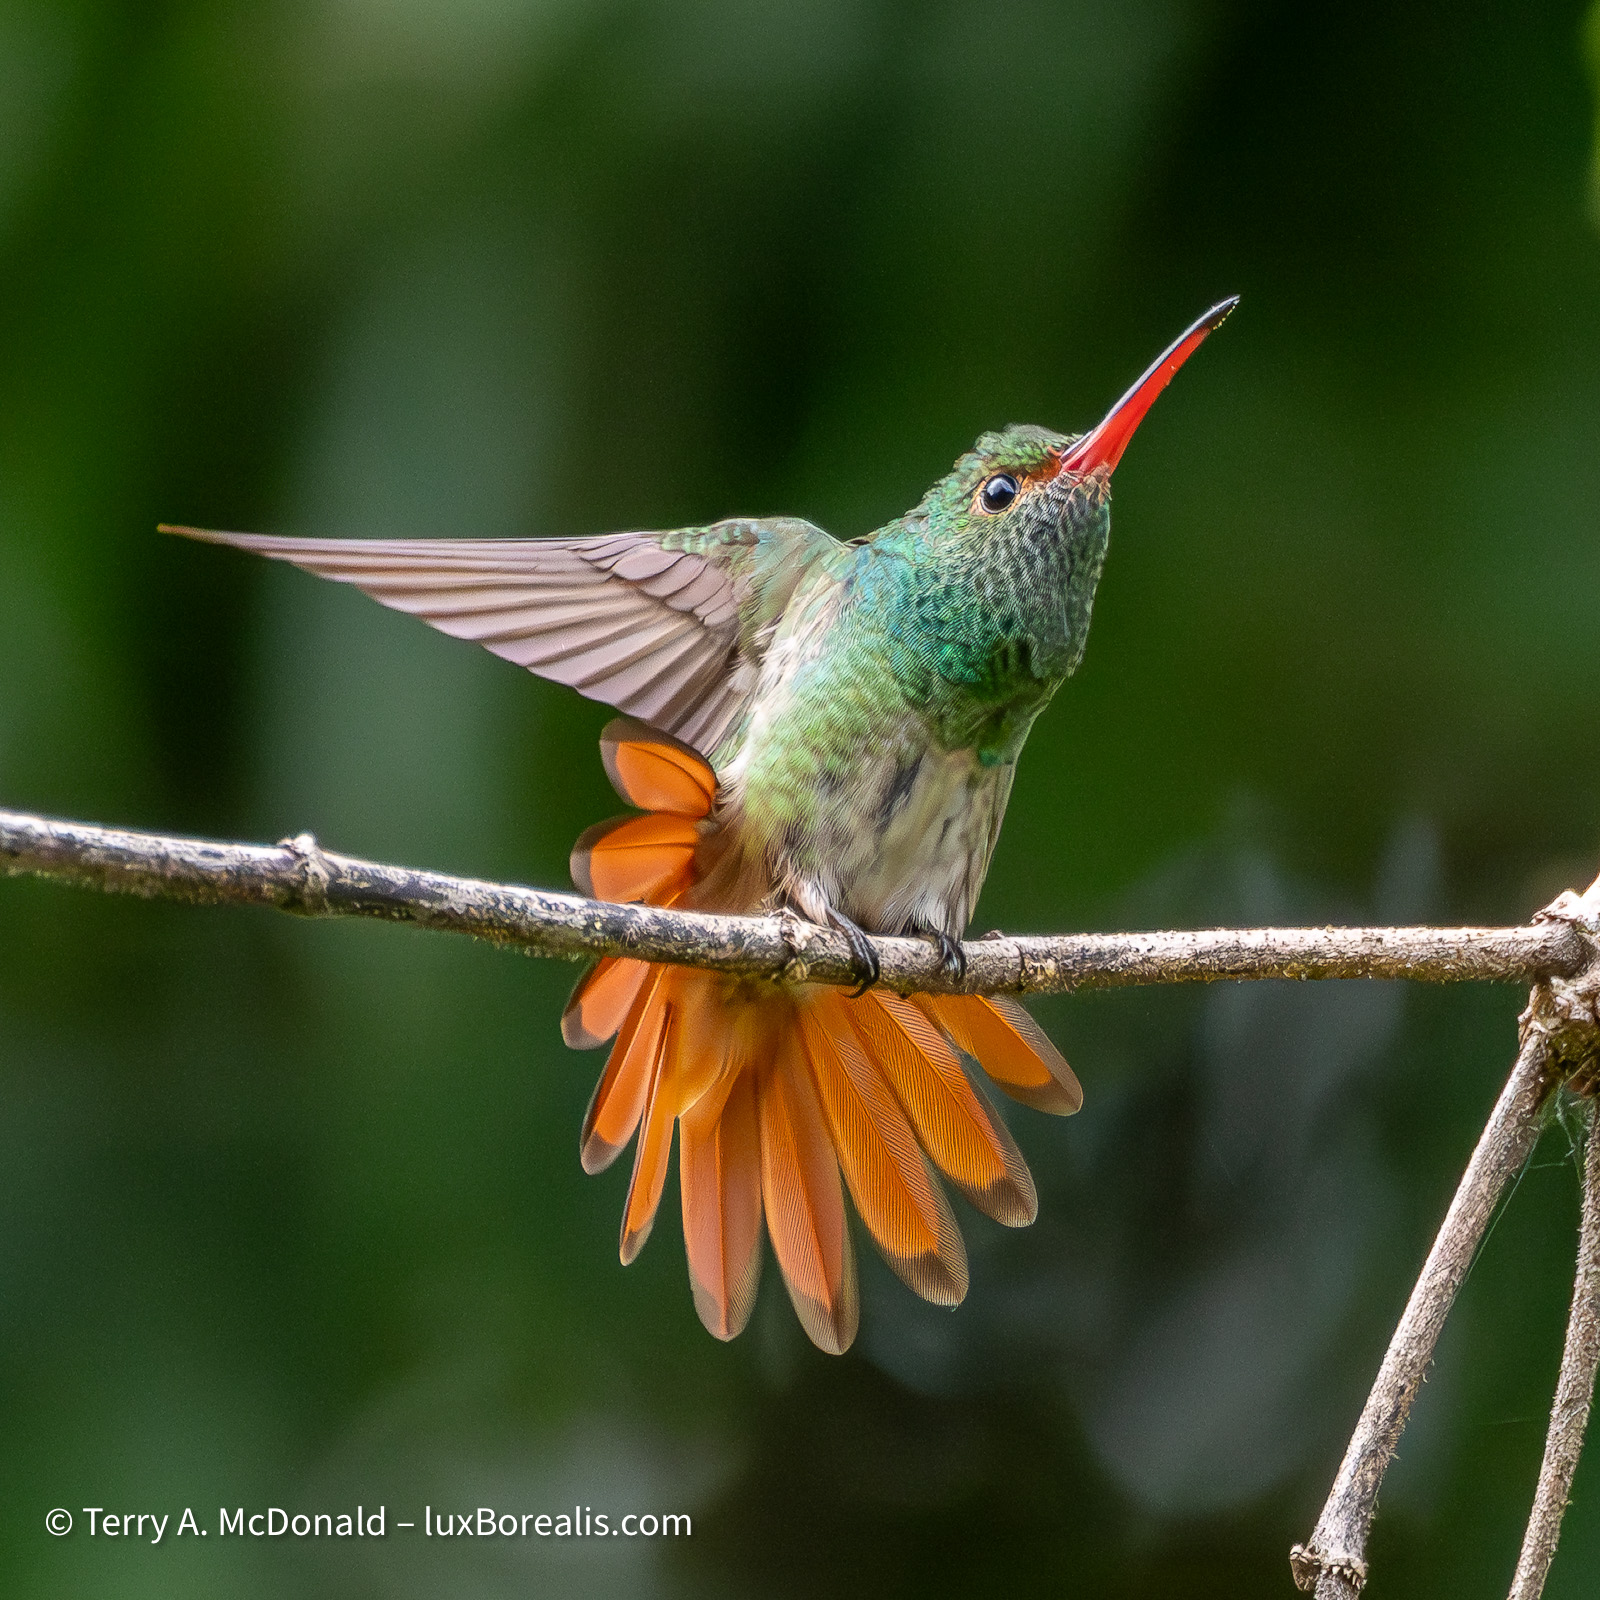
400mm (800mm efov) | ƒ8 @ 1/12800 | ISO 6400 | Lightroom
Watching the behaviours of these hummingbirds—some skittish, some bold, others downright aggressive to each other—was entertaining, especially when they were displaying like this..
At this stage, I begin masking. With birds, I use two masks: Subject and Background. Once the subject mask is tweaked to include just the subject (or anything else I want lit equally, such as the branch they are on), I ‘Duplicate and Invert’ to create a background mask.
The background mask is important for reducing the visual distraction of background elements. I also find that when the exposure of the background is slightly reduced, the subject itself stands out more clearly. Again, this is done in a way that maintains the natural look of the scene. Typically, I will decrease Exposure by 0.3 to 0.5, and reduce Contrast, Highlights and Whites by 30 to 50.
400mm (800mm efov) | ƒ8 @ 1/8000 | ISO 6400 | Lightroom
300mm (800mm efov) | ƒ8 @ 1/400 | ISO 6400 | Lightroom
At this point, the file will earn an additional star, the fourth star indicating it has been processed, but is an image with high visual quality. ‘5 stars’ is reserved for only the best of the best.
So this is how I spend my downtime. Culling and editing takes time and I’m always conscious of finding the balance between being ‘in the moment’ with the group and finding that personal space I need. Laura and I just aren’t used to travelling in a group so, for me, the downtime is essential. Everyone is very understanding. Some are also doing some selecting and editing, others are leaving it all to when they get home. There’s no right way to approach it; I just find that if I’m faced with a couple thousand images at home, all of birds that are totally new to me, I would feel completely overwhelmed. So I continue to chip away at it.
400mm (800mm efov) | ƒ8 @ 1/6400 | ISO 6400 | Lightroom
Identifying the birds is the most difficult part for me. Our guides are great at calling out the names in the field as we see each bird, but my brain just. cannot retain all that new data. Once I have decided a photo is worth editing, I use the Cornell Labs Merlin Bird ID app to identify the bird and Wikipedia to look up and copy the Latin or scientific name. It is an essential tool, not just for IDing brids after the fact, but for use in the field. The Identify by Sound feature is game-changer, alerting you to what’s out there that you can’t yet see.
Stay tuned from more! Now that we’ve been down to the southeast the country and visited Cahuita National Park, I’ll be sure to post at least once more from Costa Rica.
Thanks for reading. Be sure to SHARE this with other birders and photographers and feel free to SUBSCRIBE and COMMENT. Note, this is not a commercial blog. The links are not afflicate links and I earn no kickbacks from having you read and share.
Photographing in the rainforest is bloody difficult, but oh so satisfying!!
1795 words; 28 photographs; 9-minute read
My wife Laura and I have travelled to Costa Rica to join a ’12-day’ bird-watching tour offered by Birds Canada through a Canadian company called Eagle-Eye Tours. Laura’s the birder (though not a ’ticker’!!), and I just try to keep up with her idents with photographs. However, we’re more interested in the complete spectrum of species found in various habitats, hoping to experience all that nature has to offer, so Costa Rica seemed like a good fit. We decided to come early to check out more of Costa Rica.
And guess what? It’s the rainy season, and we’re in a rainforest!
OM-1 | 400mm | ƒ8 @ 1/1000 | ISO 3200 | Lightroom
These settings are the basic ’formula’ used for many of the shots below, so I’ll not repeat it, except to say shutter speeds varied widely depending on light, as did the ISOs, going as high at ISO 25600.
Rainforests are somewhat new to us. Despite our time in Tanzania and Southeast Asia, we haven’t spent more than a few hours in an actual rainforest. You see, we melt in the heat, preferring the cooler climes of Iceland and Ontario in the Fall, Winter and Spring. However, we’re also game to try most things.
1/320 at ISO 6400
So why did we come to the rainforest in the rainy season? Well, that’s when the tour was scheduled. Eagle-Eye Tours and Birds Canada are not fly-by-night organizations, so I’m putting my trust in their knowledge. Apparently, the Caribbean side is not as rainy as the Pacific side, where we are currently located. It’s rained everyday, but mornings to mid-afternoon have been spectacular, though hot!
Of all the travelling we’ve done to across Canada, to Africa, Asia and Europe, aside from the school trips we’ve organized, this is our first ‘organized tour’. Typically, we like to book a rental car and our own accommodations, usually with kitchen facilities, so we can experience a place more like the local people by shopping in grocery stores and driving ourselves around. ‘Hotelling it” is just not in our culture. But this trip is different.
1/50 at ISO 12800
Costa Rica itself is well-known as a place of nature. Yes, they have logging and vast plantations of oil palm, bananas, mangoes and pineapples, but they seem to have convinced the world that they are ’green’ or at least greener than other places. And they are. In fact, Costa Rica is one of the greenest countries on the planet.
The country comes across as a developing nation with some of the classic tells: a spaghetti plate of telecom wires up on poles; cement construction; tin roofs; and a number of ’fixer-up specials’. So I was surprised to learn that as of 2025, the World Bank declared Costa Rica a high-income country—and the prices show it! Although the car rental wasn’t too pricey, we’re paying Canadian prices for almost everything else such as accommodations and drinks. Dinners are easily more expensive here than in Paris! My seafood fettuccini was $50 and here we are beside the ocean! Our guess is the higher prices are due to the number of American tourists here.
We began in the capital San José, at the Hotel Robledal, and are now in the village of Manual Antonio, just outside the National Park of the same name, at the Hotel Playa Espadilla. But I know, you’re more interested in the photography.
Hotel Robledal
I’m referencing the name of the hotel as it is a favourite for birding tours due to the nearly three hundred bird species identified on the property. The hotel has also made a commitment to maintaining and expanding biodiversity which includes a successful owl box programme. Although hotel-based tourism and biodiversity are at polar opposites, at least the hotel is making an attempt.
1/1000 at ISO 3200
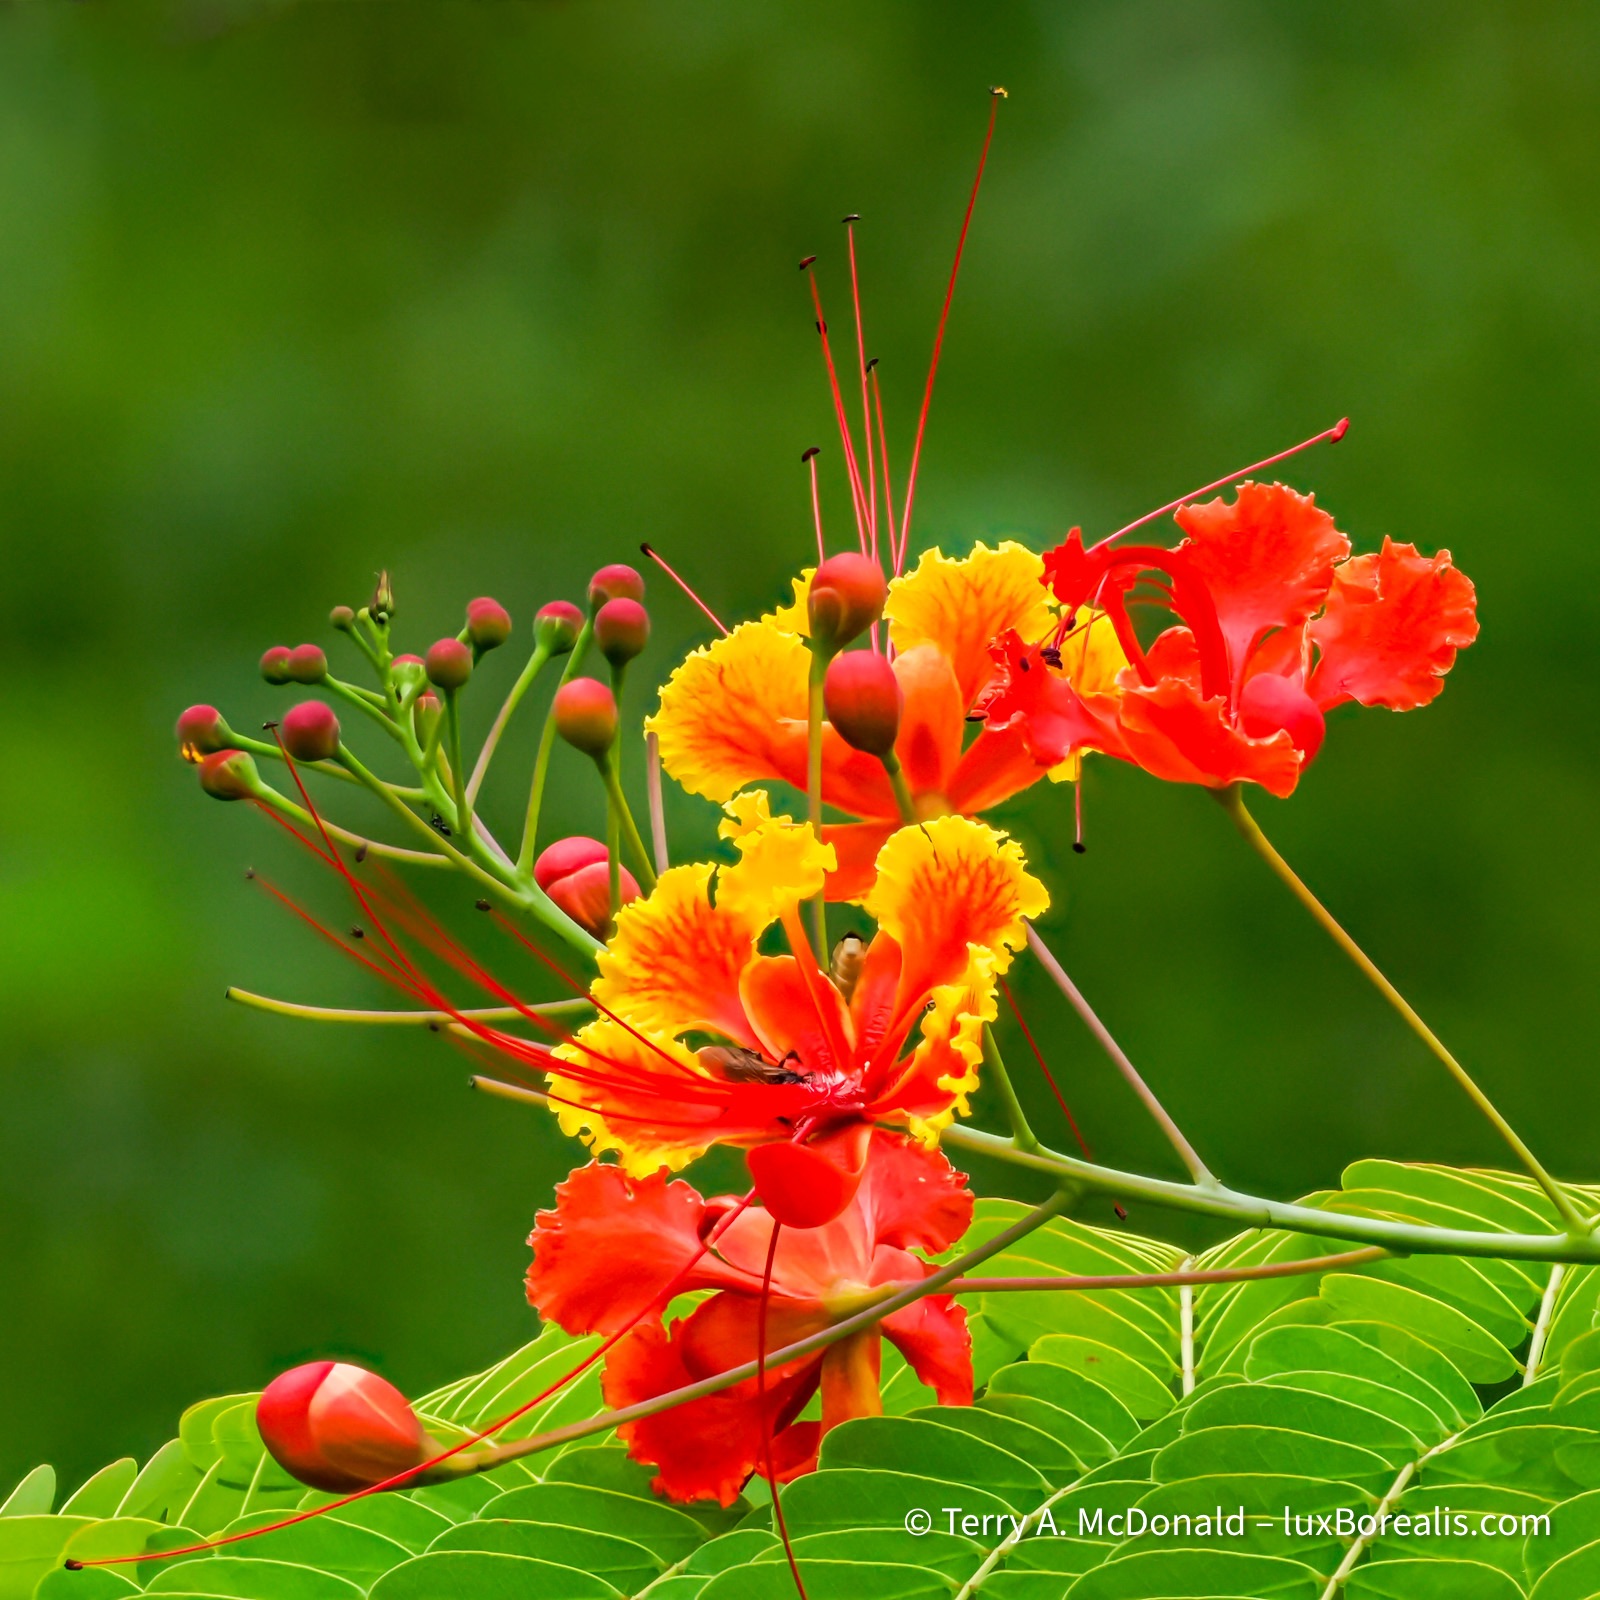
It’s the gardens that attract the birds and butterflies, and with plants blooming all year around, there is always a source of nectar and fruits. Add in some pieces of old banana around a feeding station and voià, there are birds.
Royal Butterflies
Just off the Highway 34, about two-thirds of the way to Quepos and Manuel Antonio National Park is Royal Butterflies. Started 10 years ago by American expat ’Dan’, it’s a small, quirky place with a few butterfly species in a large outdoor net enclosure and whole pile of enthusiasm for raising butterflies.
In its typically generous way, Trip Advisor gives it a 4.9; I think a 3 is more appropriate. Dan was fantastic with his more-than-thorough explanations and stories, but with dogs underfoot and only a few species, it was only okay.
10-image focus stack
Manuel Antonio National Park
We arrived during the afternoon rain to our place just outside of the Park, chosen so that the next morning we had only a 5-minute walk to the trailhead. Being cheap and being pretty astute and observant naturalists, we balked at spending USD $80 each for a guide for two hours. But, it’s the slow season, so they offered a private guide for two us for $40 each. Evan that is more than we would typically spend, but for once we thought, ”What the heck?” Our guide Hans had a birding scope with him, so he must be legit. And he was.


1/60 @ ISO 6400
Our experience to date has been with driver-guides in Tanzania. They are equally astounding in their ability to spot details, but once we had been out on safari a few times, we felt we were pretty much on par with them. A rainforest is a very different scenario, so the $80 was well-spent. We were positively astounded at what Hans saw and we how much we would have missed—completely. An African safari is easily a magnitude greater in diversity than a hike through Algonquin; a rainforest is at least another order of magnitude greater than the savanna. On top of that is the vastly greater number of places wildlife can hide. The wall of vegetation just a metre from the trail can hide just about anything.

1/320 @ ISO 12800
1/640 @ ISO 6400
Cardinal Rule: Never Leave the Trail
We learned very quickly why you never—EVER—leave the trail. In an open spot, just a metre off the trail, Hans excitedly pointed out a highly venomous Fer-de-Lance viper. And that was the one we could see! Imagine the ones that are just under the leaf litter or so well blended in to be invisible until it’s too late. And, unlike our local Massassauga rattler, there is no warning buzz! According to TicoTravel.com, the Fer-de-Lance (’spearhead’ en englais), “accounts for 46% of snakebites and 30% of hospitalizations” in Costa Rica. At first, I wondered if the guides placed a rubber snake alongside the trail, just to make their point about staying on trail, but no. It was the real deal.
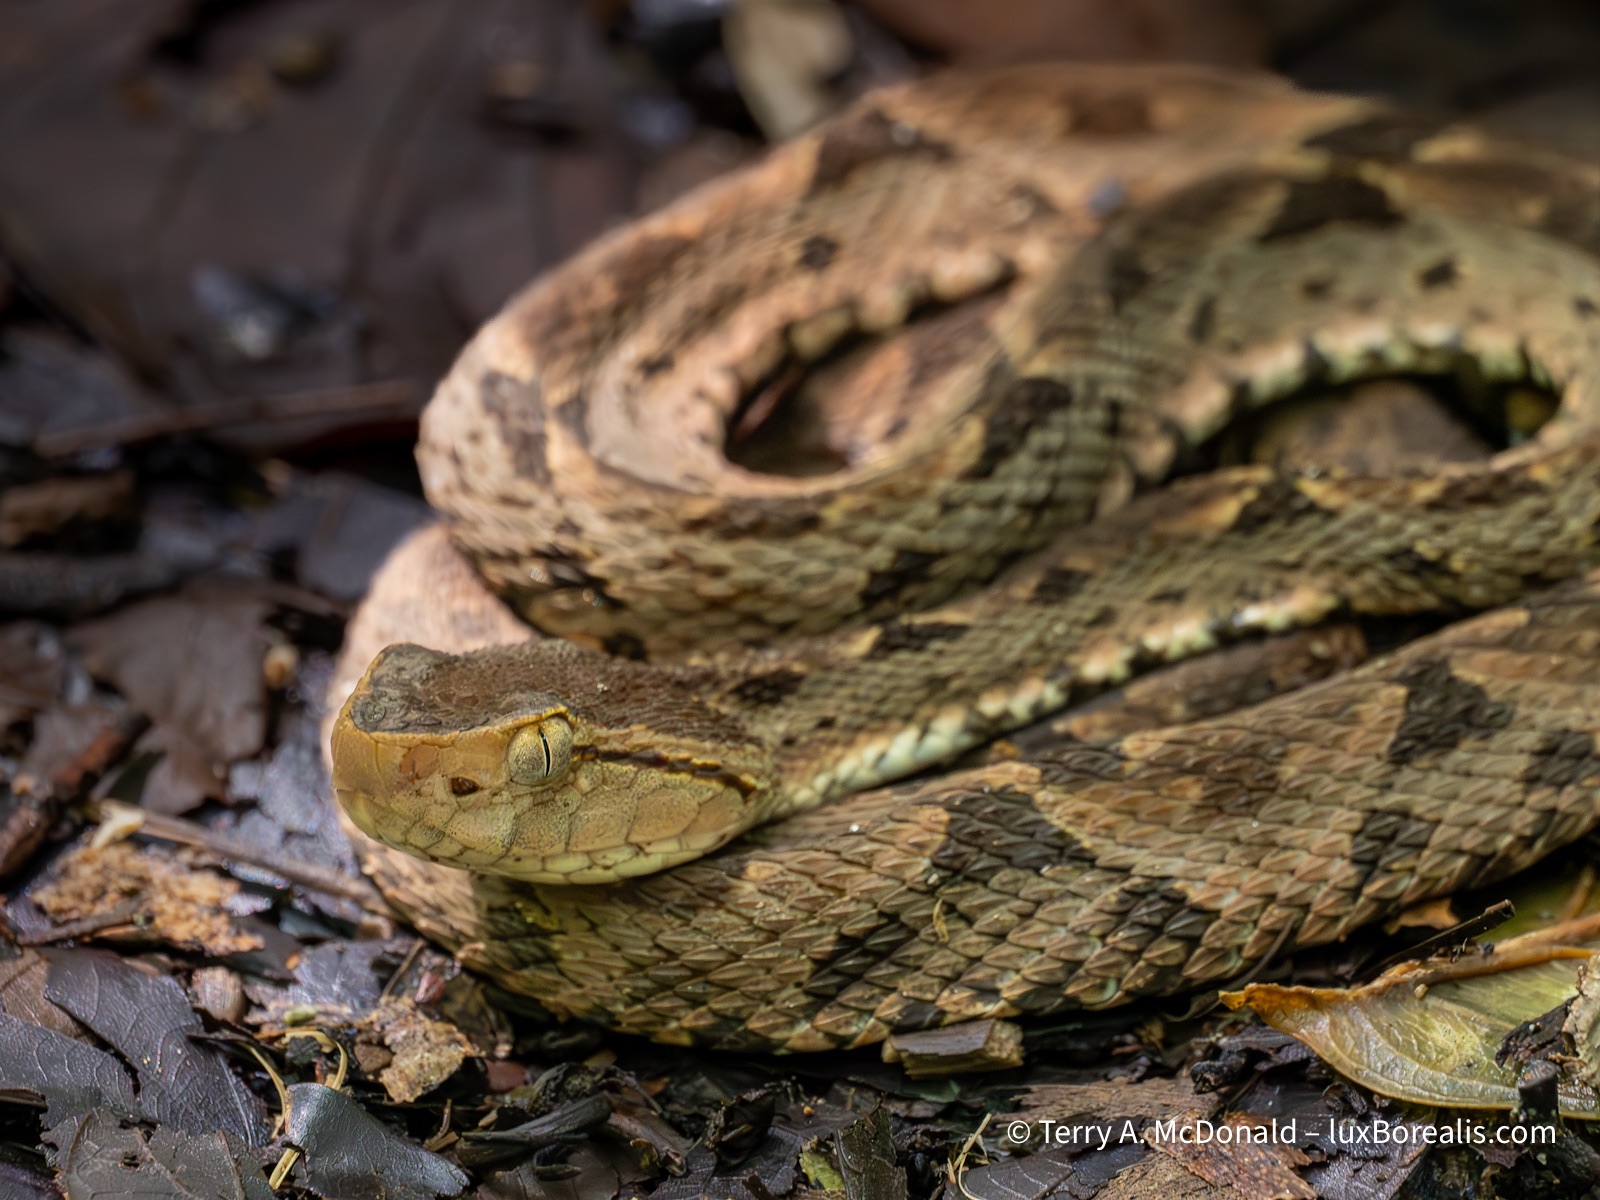
1/50 at ISO 12800 — Despite the dappled light filtering through the canopy, it was still dark!
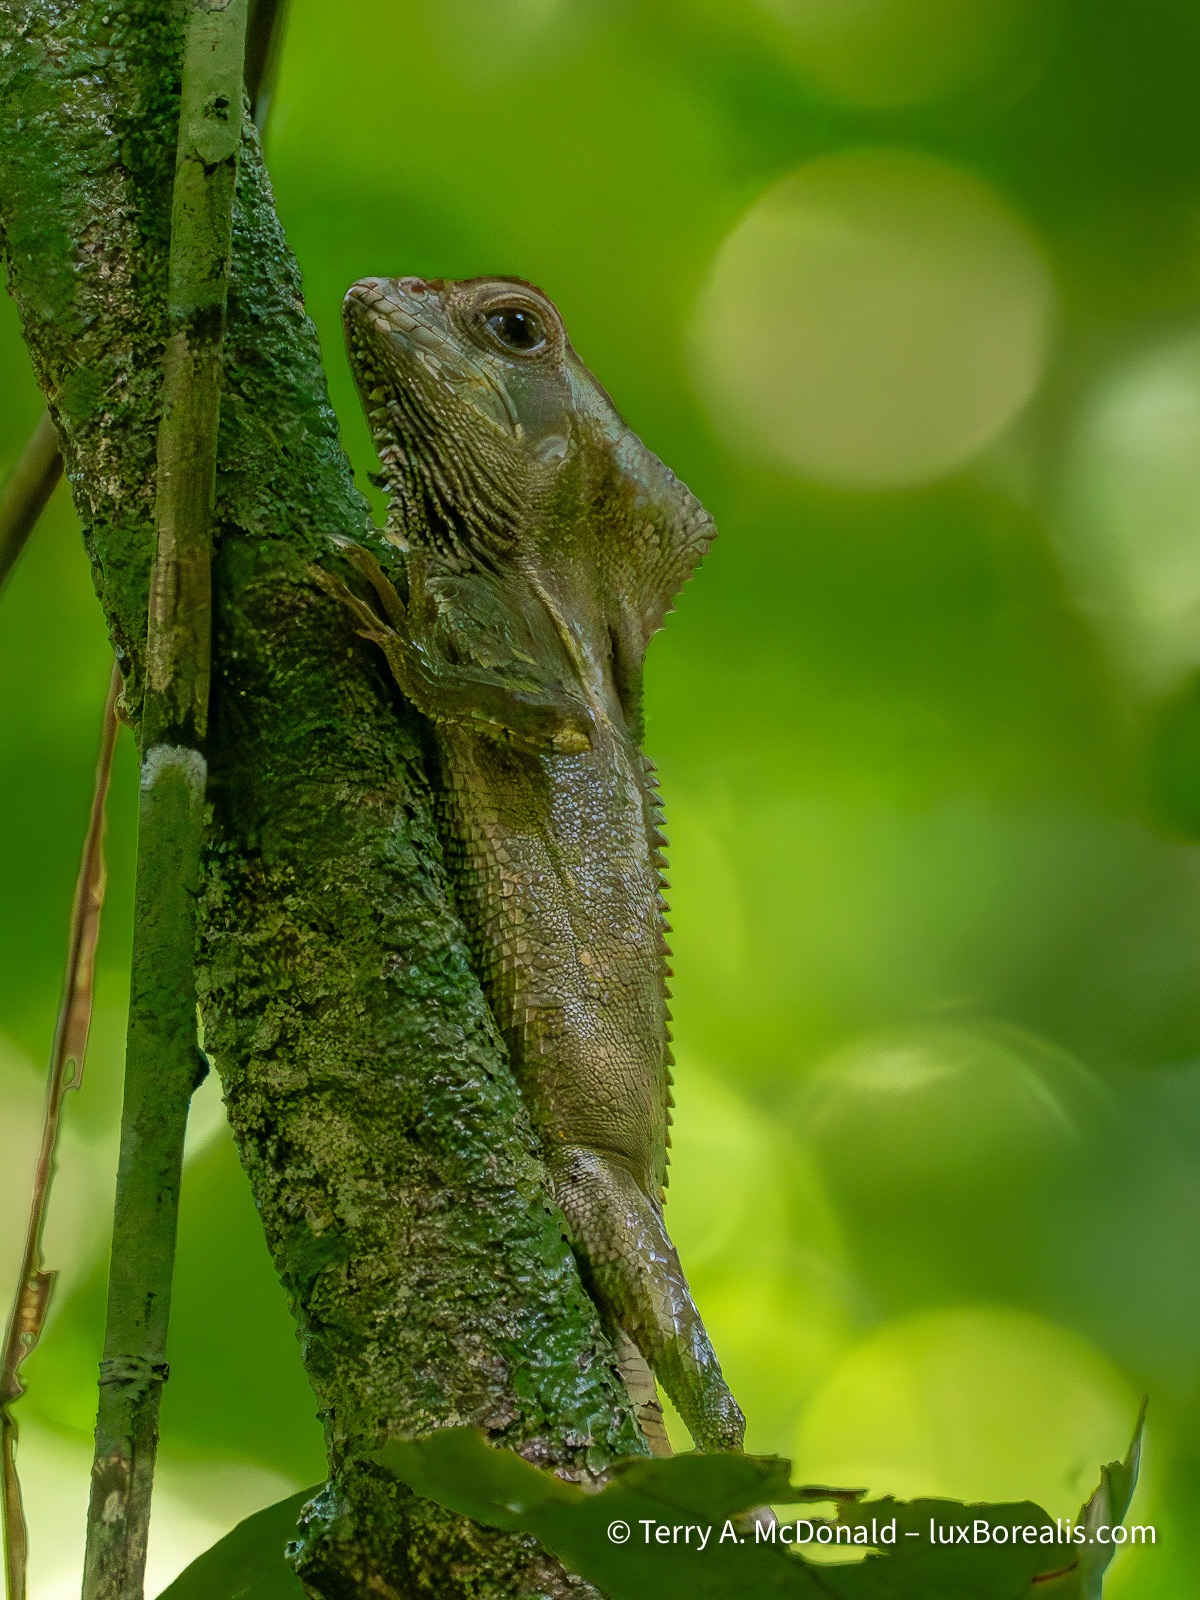
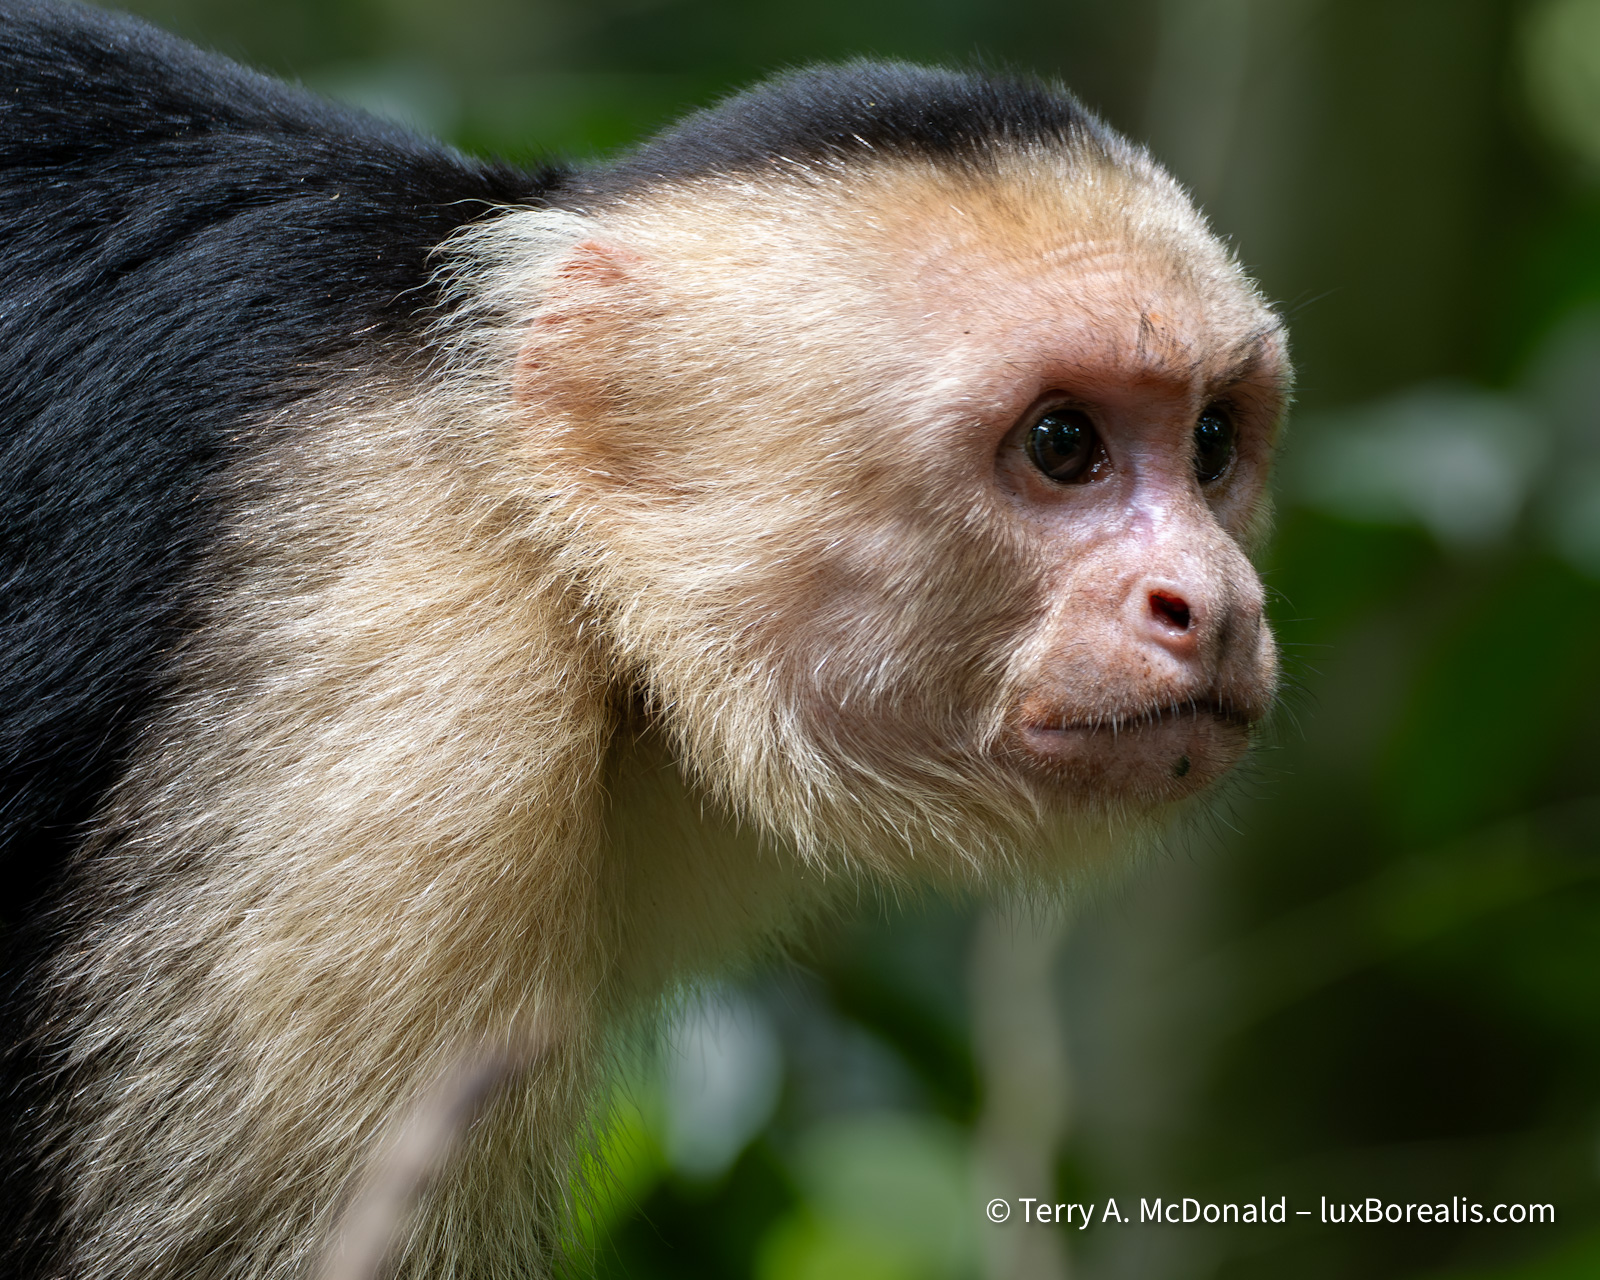
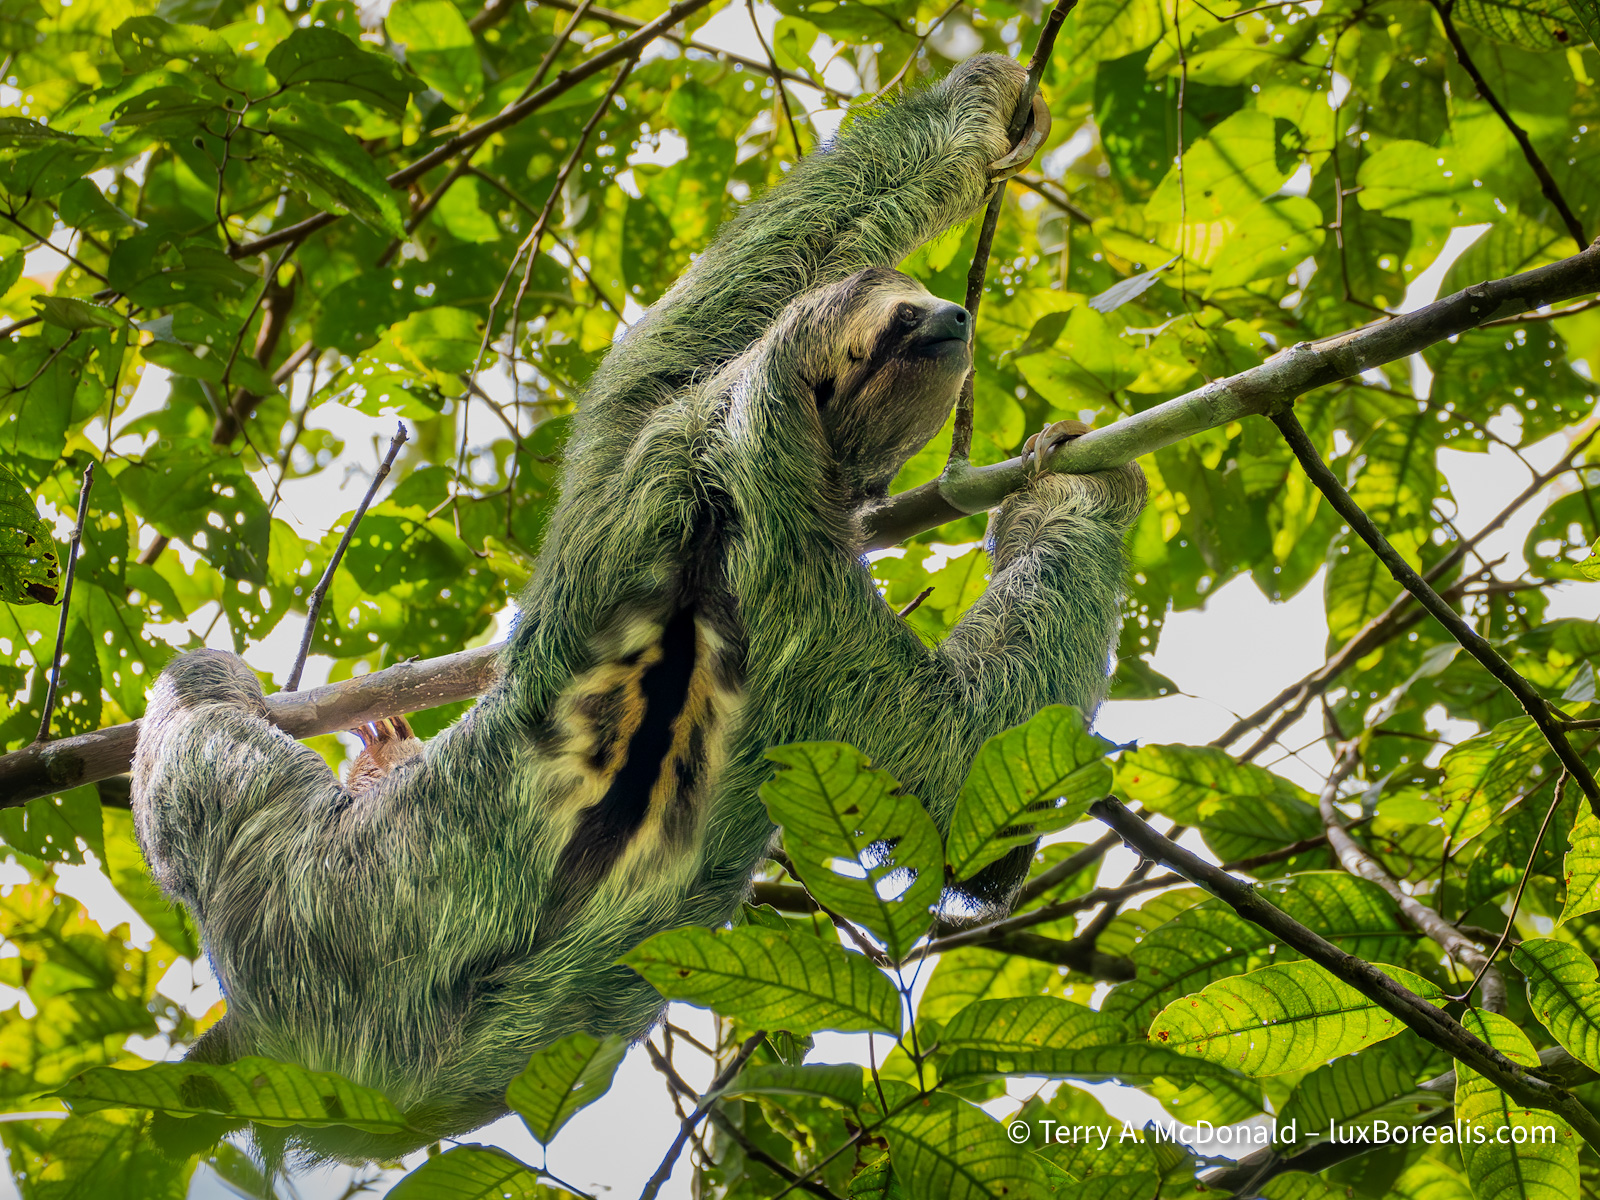
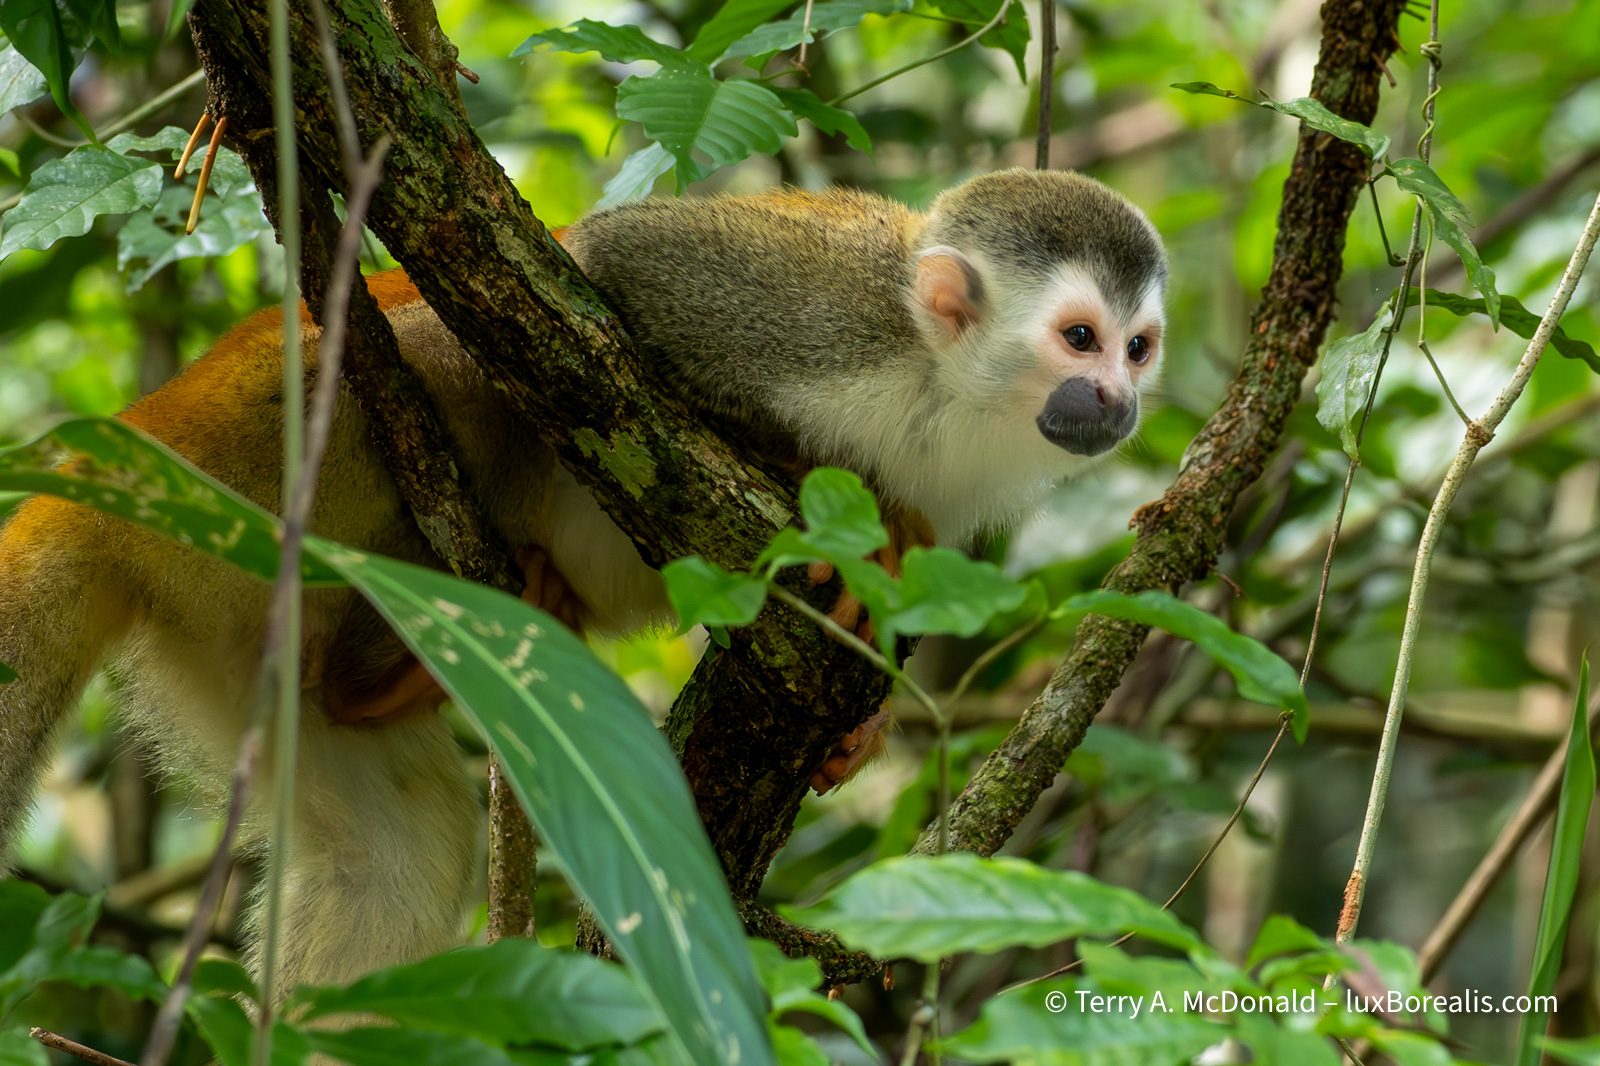
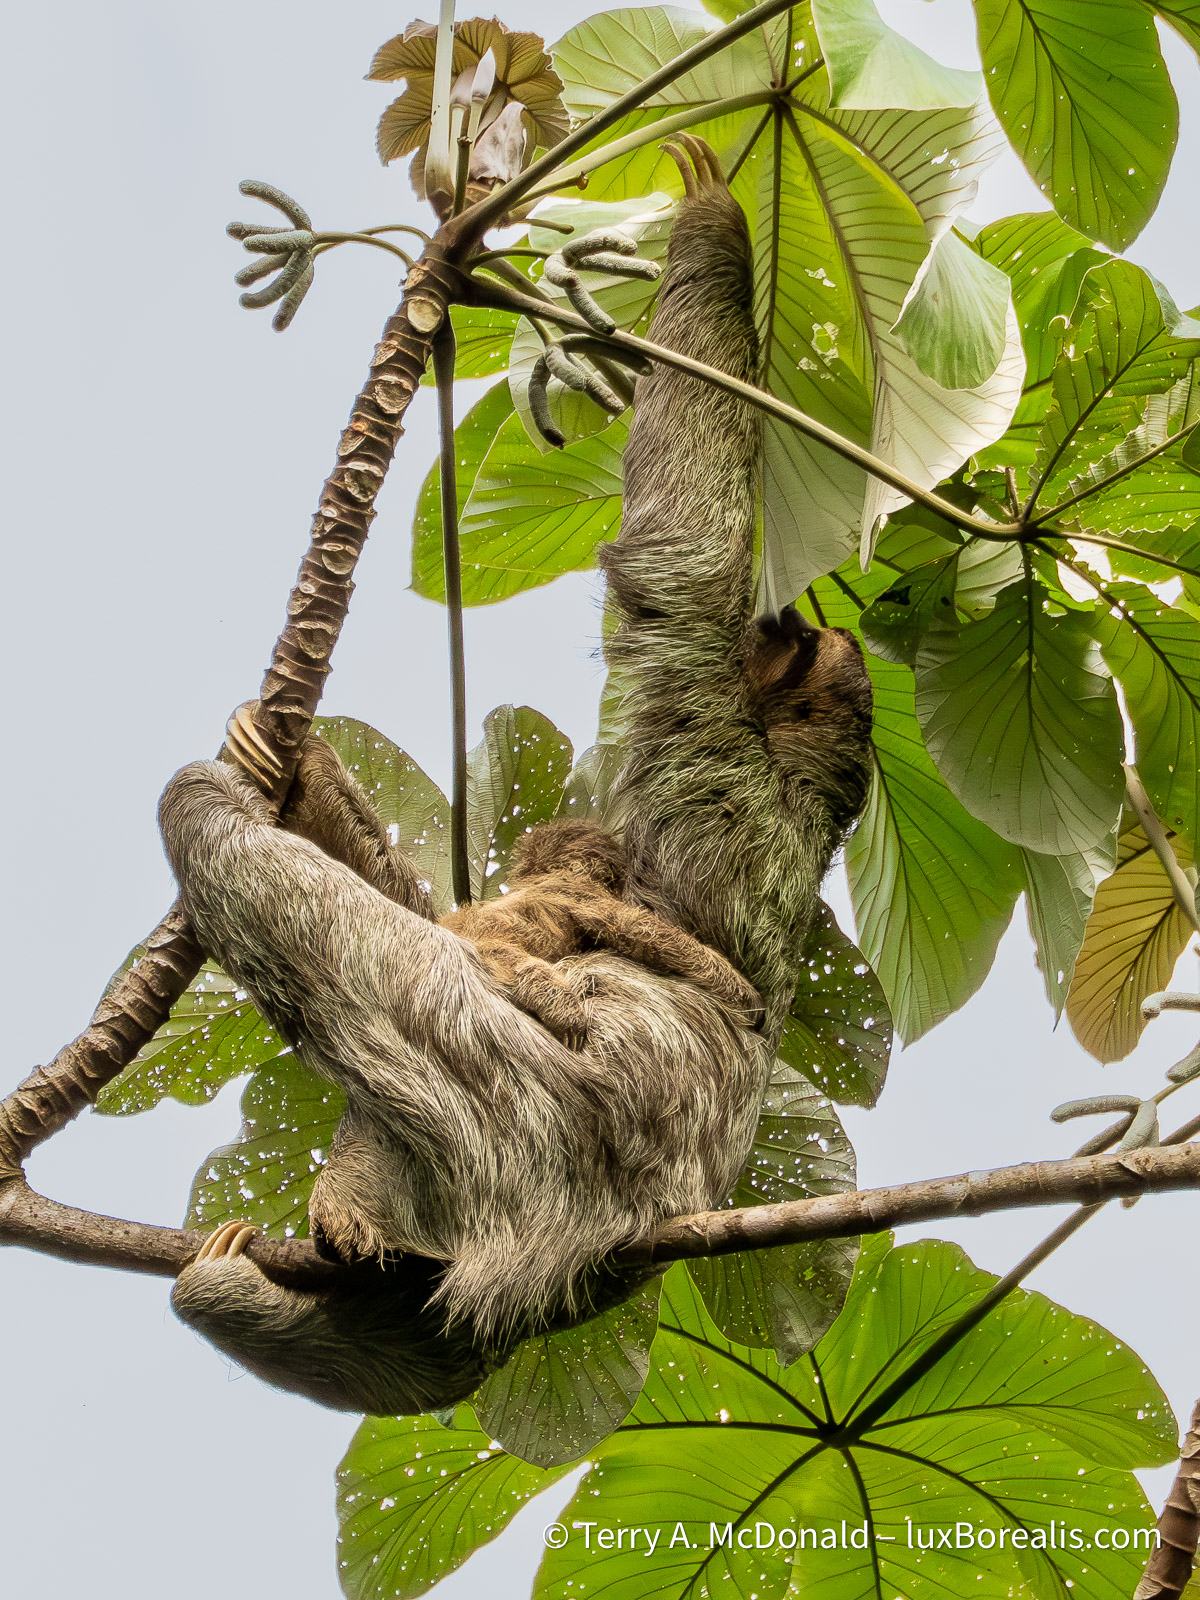
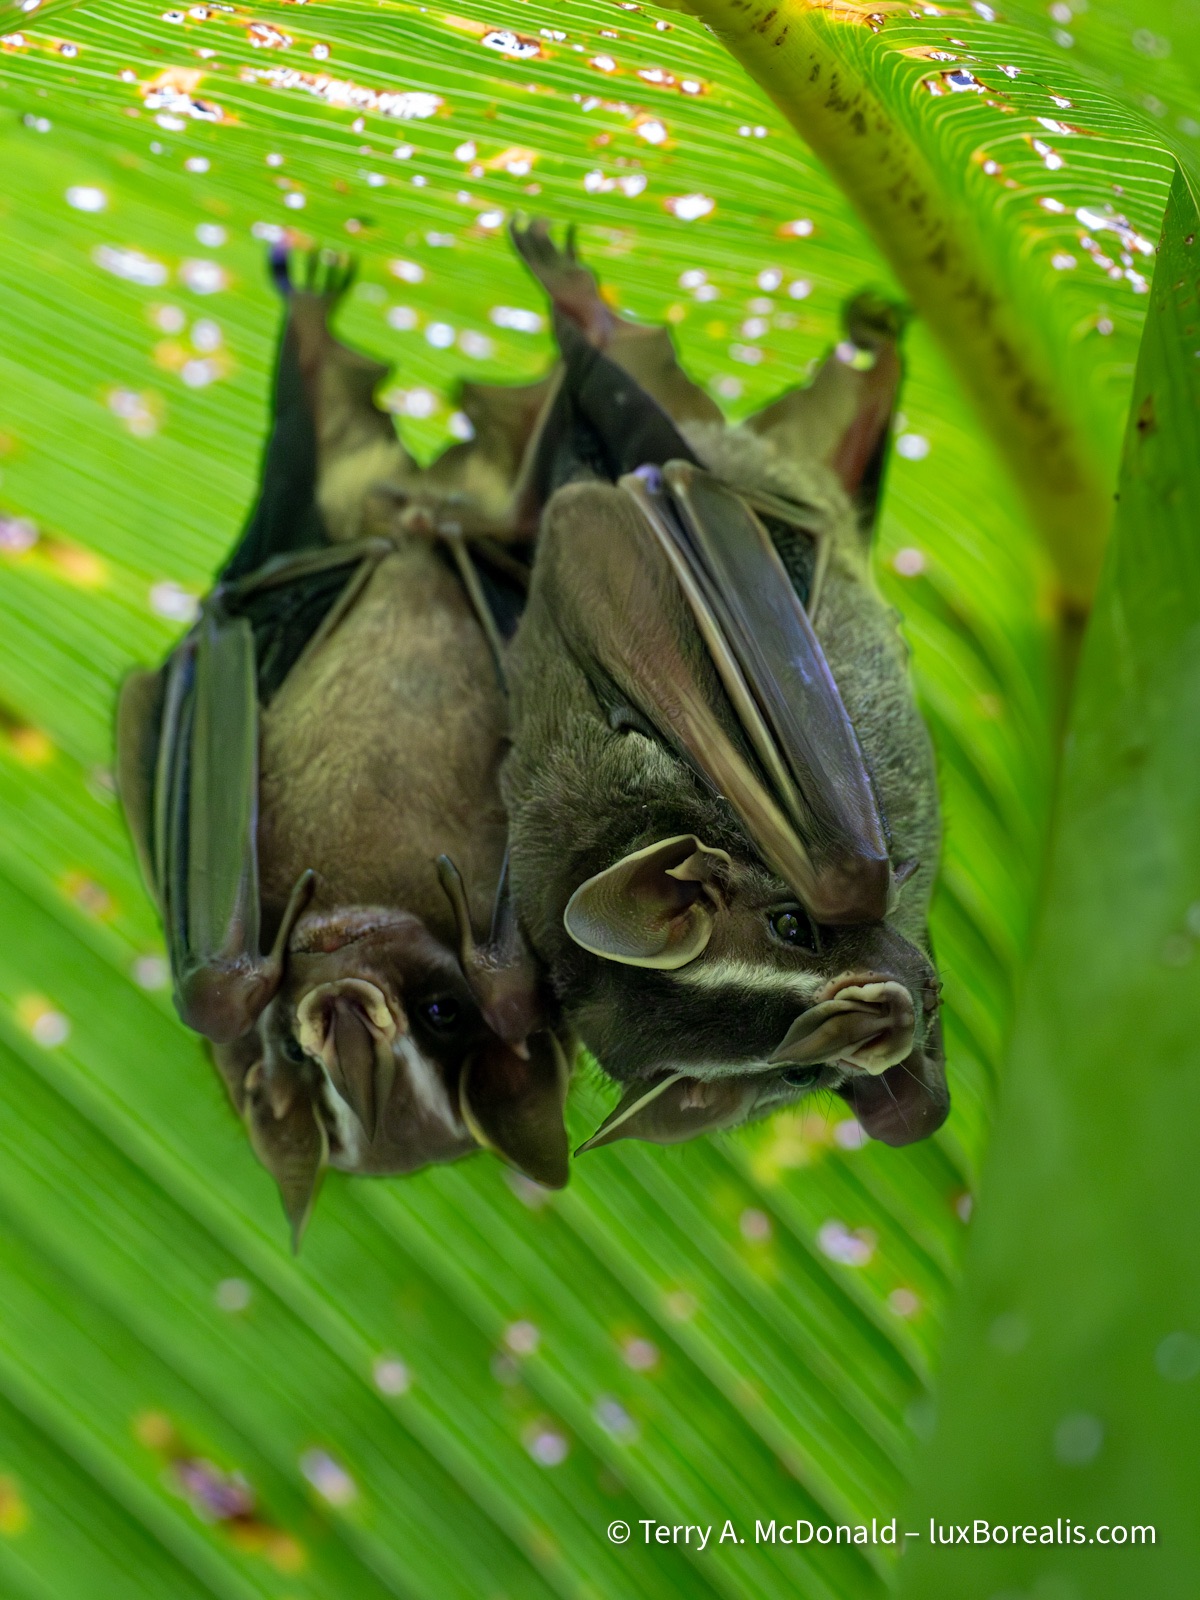
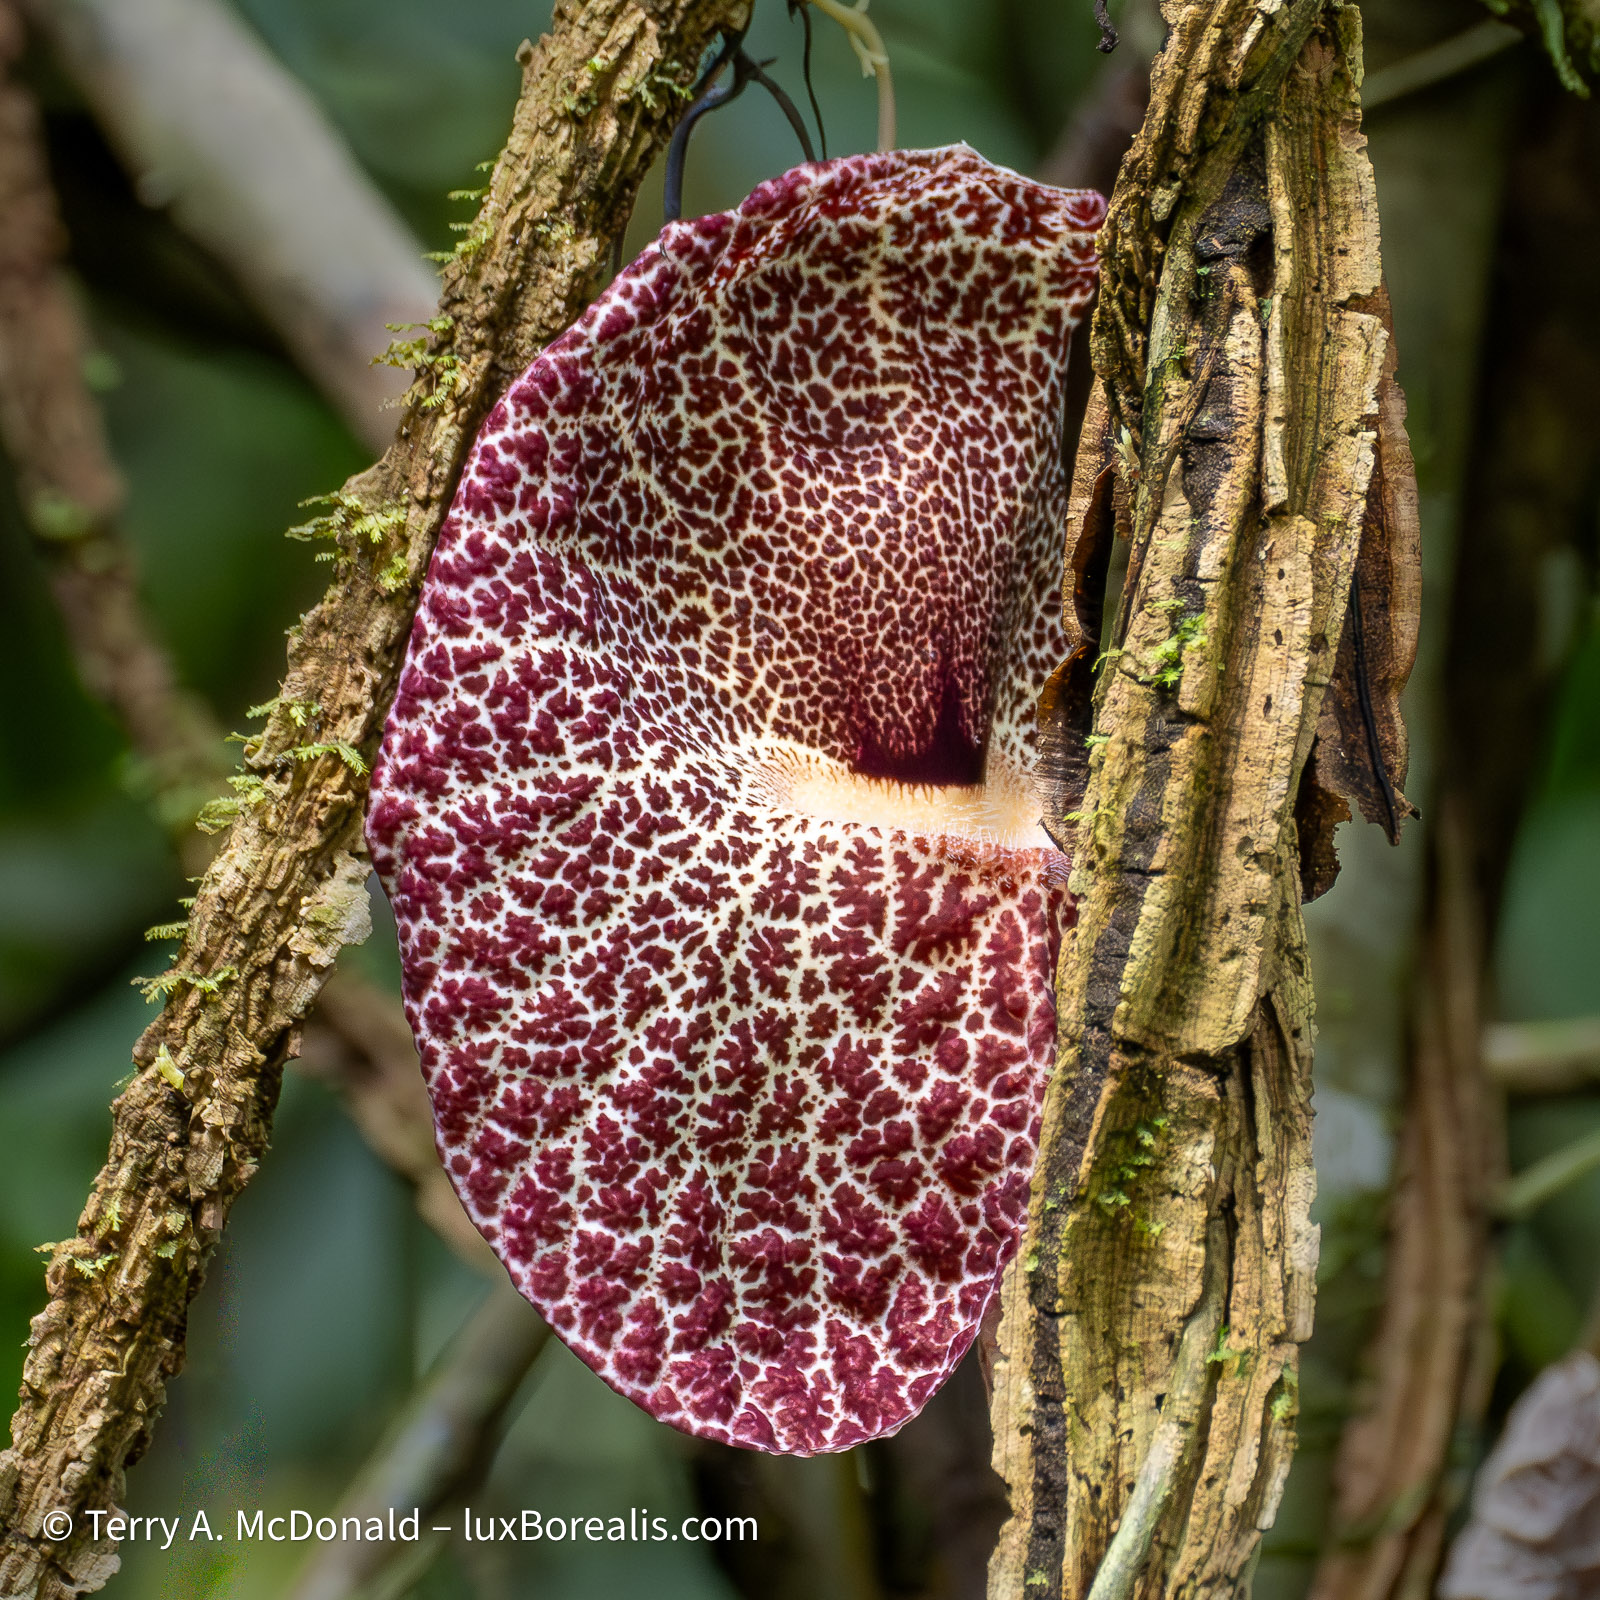
Hans continued to point out a multitude of wildlife including both two-toed and three-toed sloths, three species of monkeys, juvenile iguanas, terrestrial crabs, not to mention the species we would never have seen without him: a tent-making bat, rainbow grasshoppers, two species of tree frog, two species of basilisk lizard, plus the innumerable interesting tid-bits he related to us about the astounding diversity of foliage, including the Giant Pelican flower.
Rainforest Photography
To put it simply, photographing in the rainforest is a completely different experience than anywhere else. Out on the East African savanna, there is no shortage of light. Even in Iceland, under cloudy skies, there is plenty of light. The forests of eastern North America can be dark, but they are nothing compared to the dimness of the rainforest. Before breakfast, we decided to do a short hike along a trail through a nature reserve created by the owners of the hotel we’re in. Being adjacent to Manuel Antonio National Park, it shares all the same wildlife. But at 7am, almost 90 minutes after sunrise, it was like someone had turned out the lights. Walking into the forest was like entering a cave.
1/80 @ ISO 12800
Trying to bend myself under the fronds of this palm which the bats had nipped to form a tent was an exercise in limbo dancing.
Even a simple shot of the rather medieval-looking Desmoncus orthacanthos required an ISO of 25600, and that only gave me ƒ/8 @ 1/60!! To capture the deer, I waited until it was stalk-still and even then I needed a very steady hand, shooting at 1/100 despite using ISO 25600. Unreal! I’m very thankful for the engineers at Adobe who have created the denoising algorithms in Lightroom.

1/60 at ISO 25800
This is the stem of a climbing palm that appears to have more in common with a mediaeval weapon, then a rainforest plant!
And then there is the dampness, the humidity, the sweat, seeping out of every pore. Even without the rain (which held off for a few days!!), with temperatures approaching 30°C at 100% humidity, we were soaked within minutes. Glasses became fogged or smeared with sunscreen and sweat and it wasn’t long before my arms and neck were tired from always looking up—way up—and hoisting the camera and lens up to follow whatever was travelling or flying through the canopy.
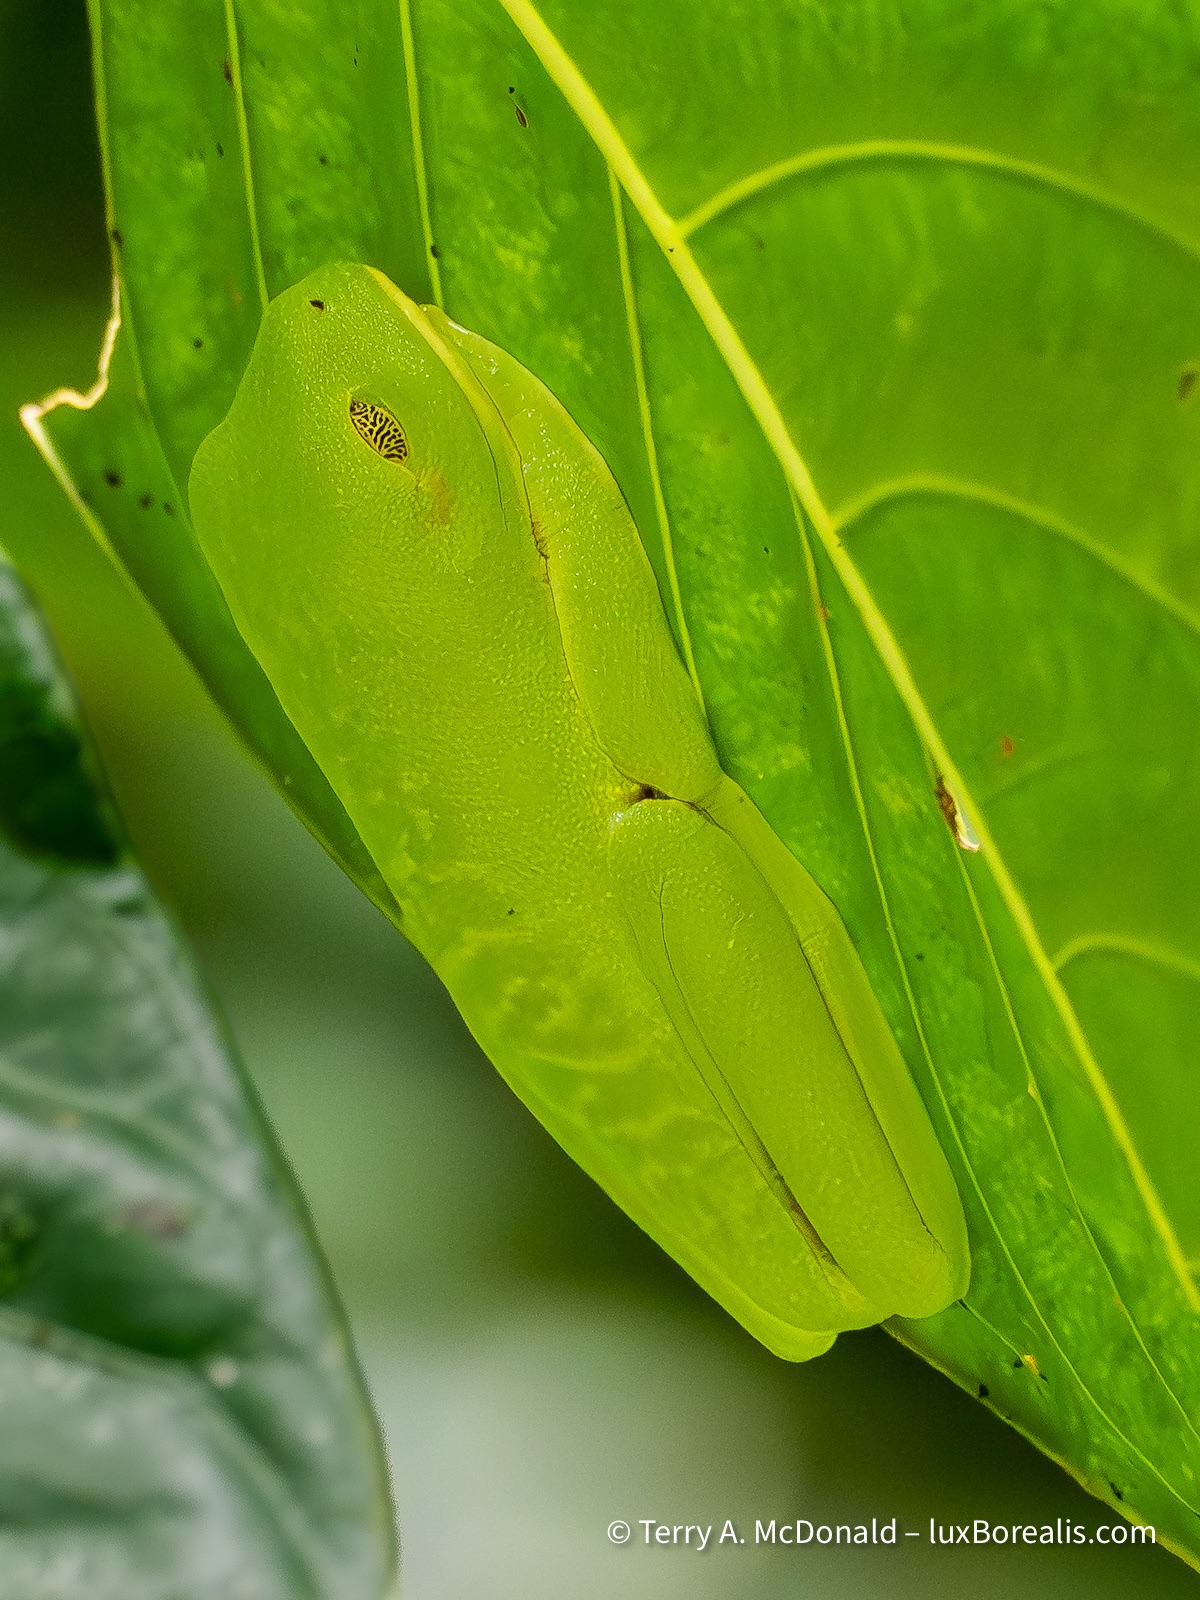
1/125 at ISO 6400
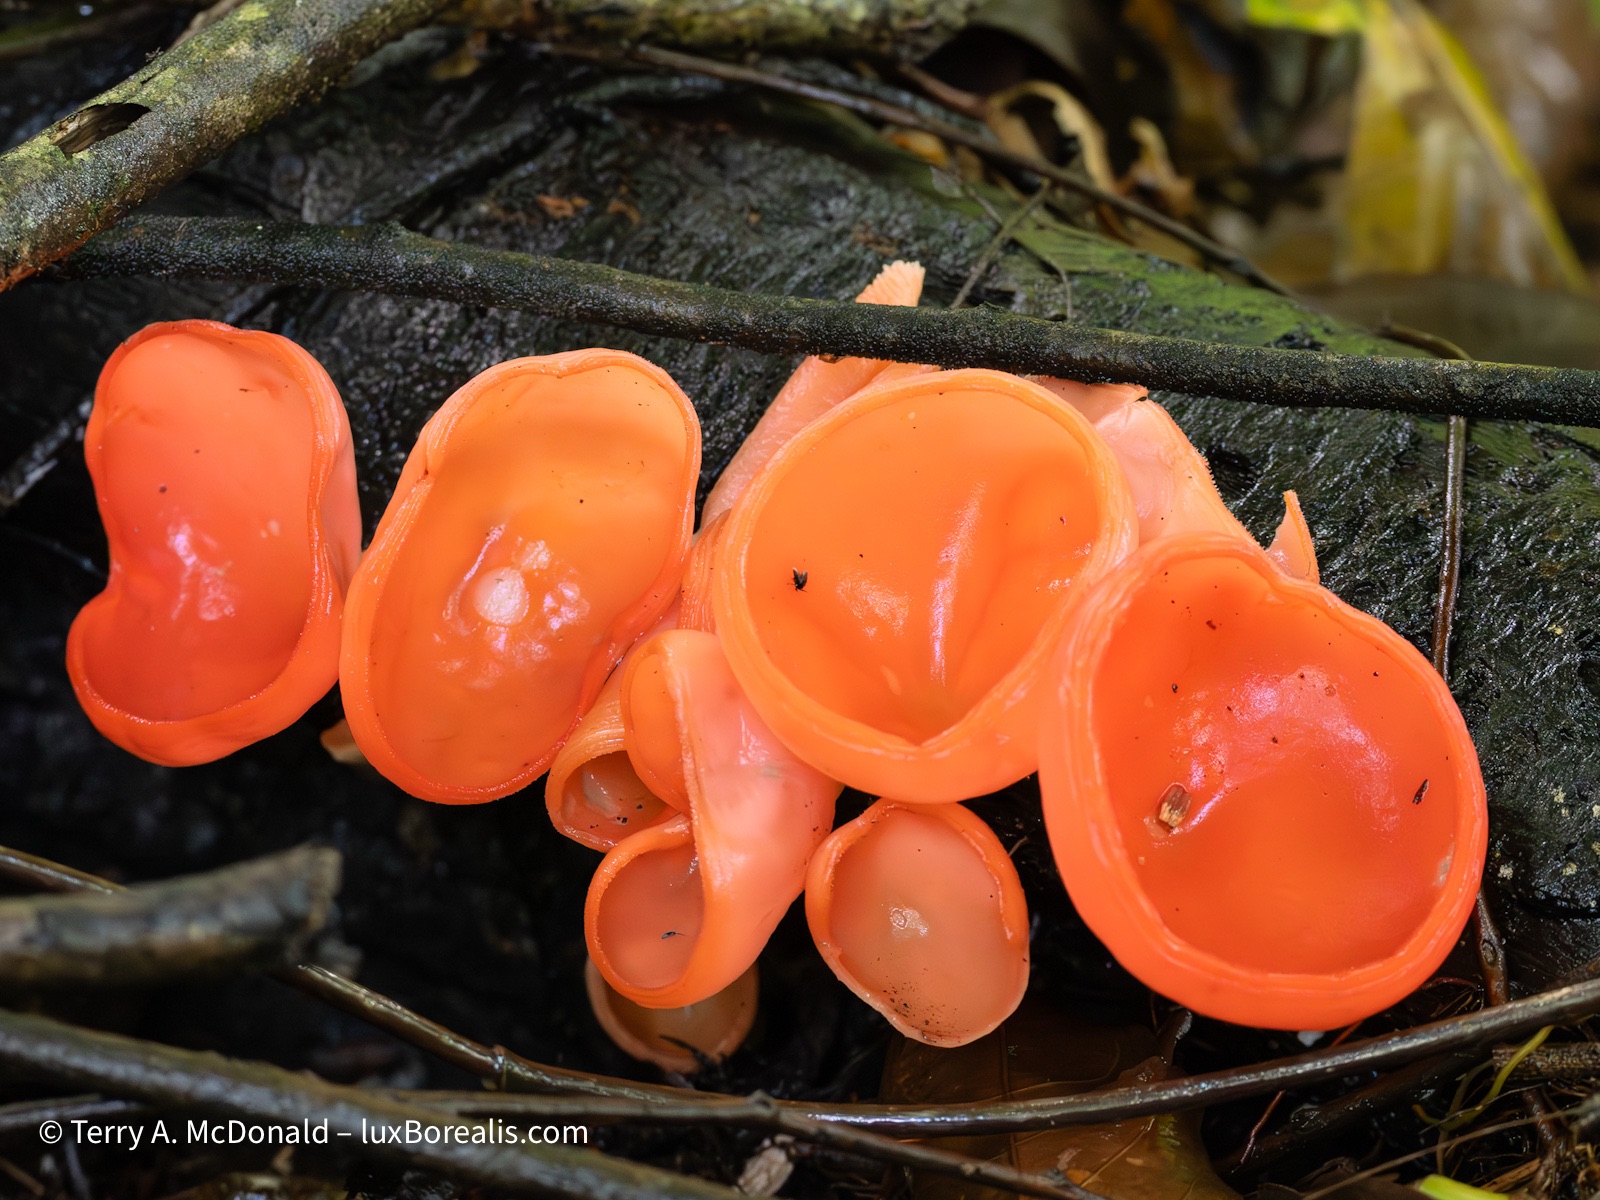
This one was small, about the size of two open hands.
It’s said, ‘the most important piece of photo equipment is the garbage bin’ which is where many near misses ended up, often due to a shutter speed that was too slow, my worn out muscles, and moving creatures, especially birds. Hundreds of photos have been reduced to the few I’ve posted today.
Tomorrow we head back to San José to meet up with the rest of our tour group. With only 12 of us, and with many different habitats and locations ahead of us, I think we’re in for a real treat.
Stay tuned!
Need an online photo service for books, calendars, canvases and prints?
199 words; 1-minute read
Whenever I’m presenting an evening PhotoTalk, I bring along with me prints I’ve made and some photo books I’ve had printed.
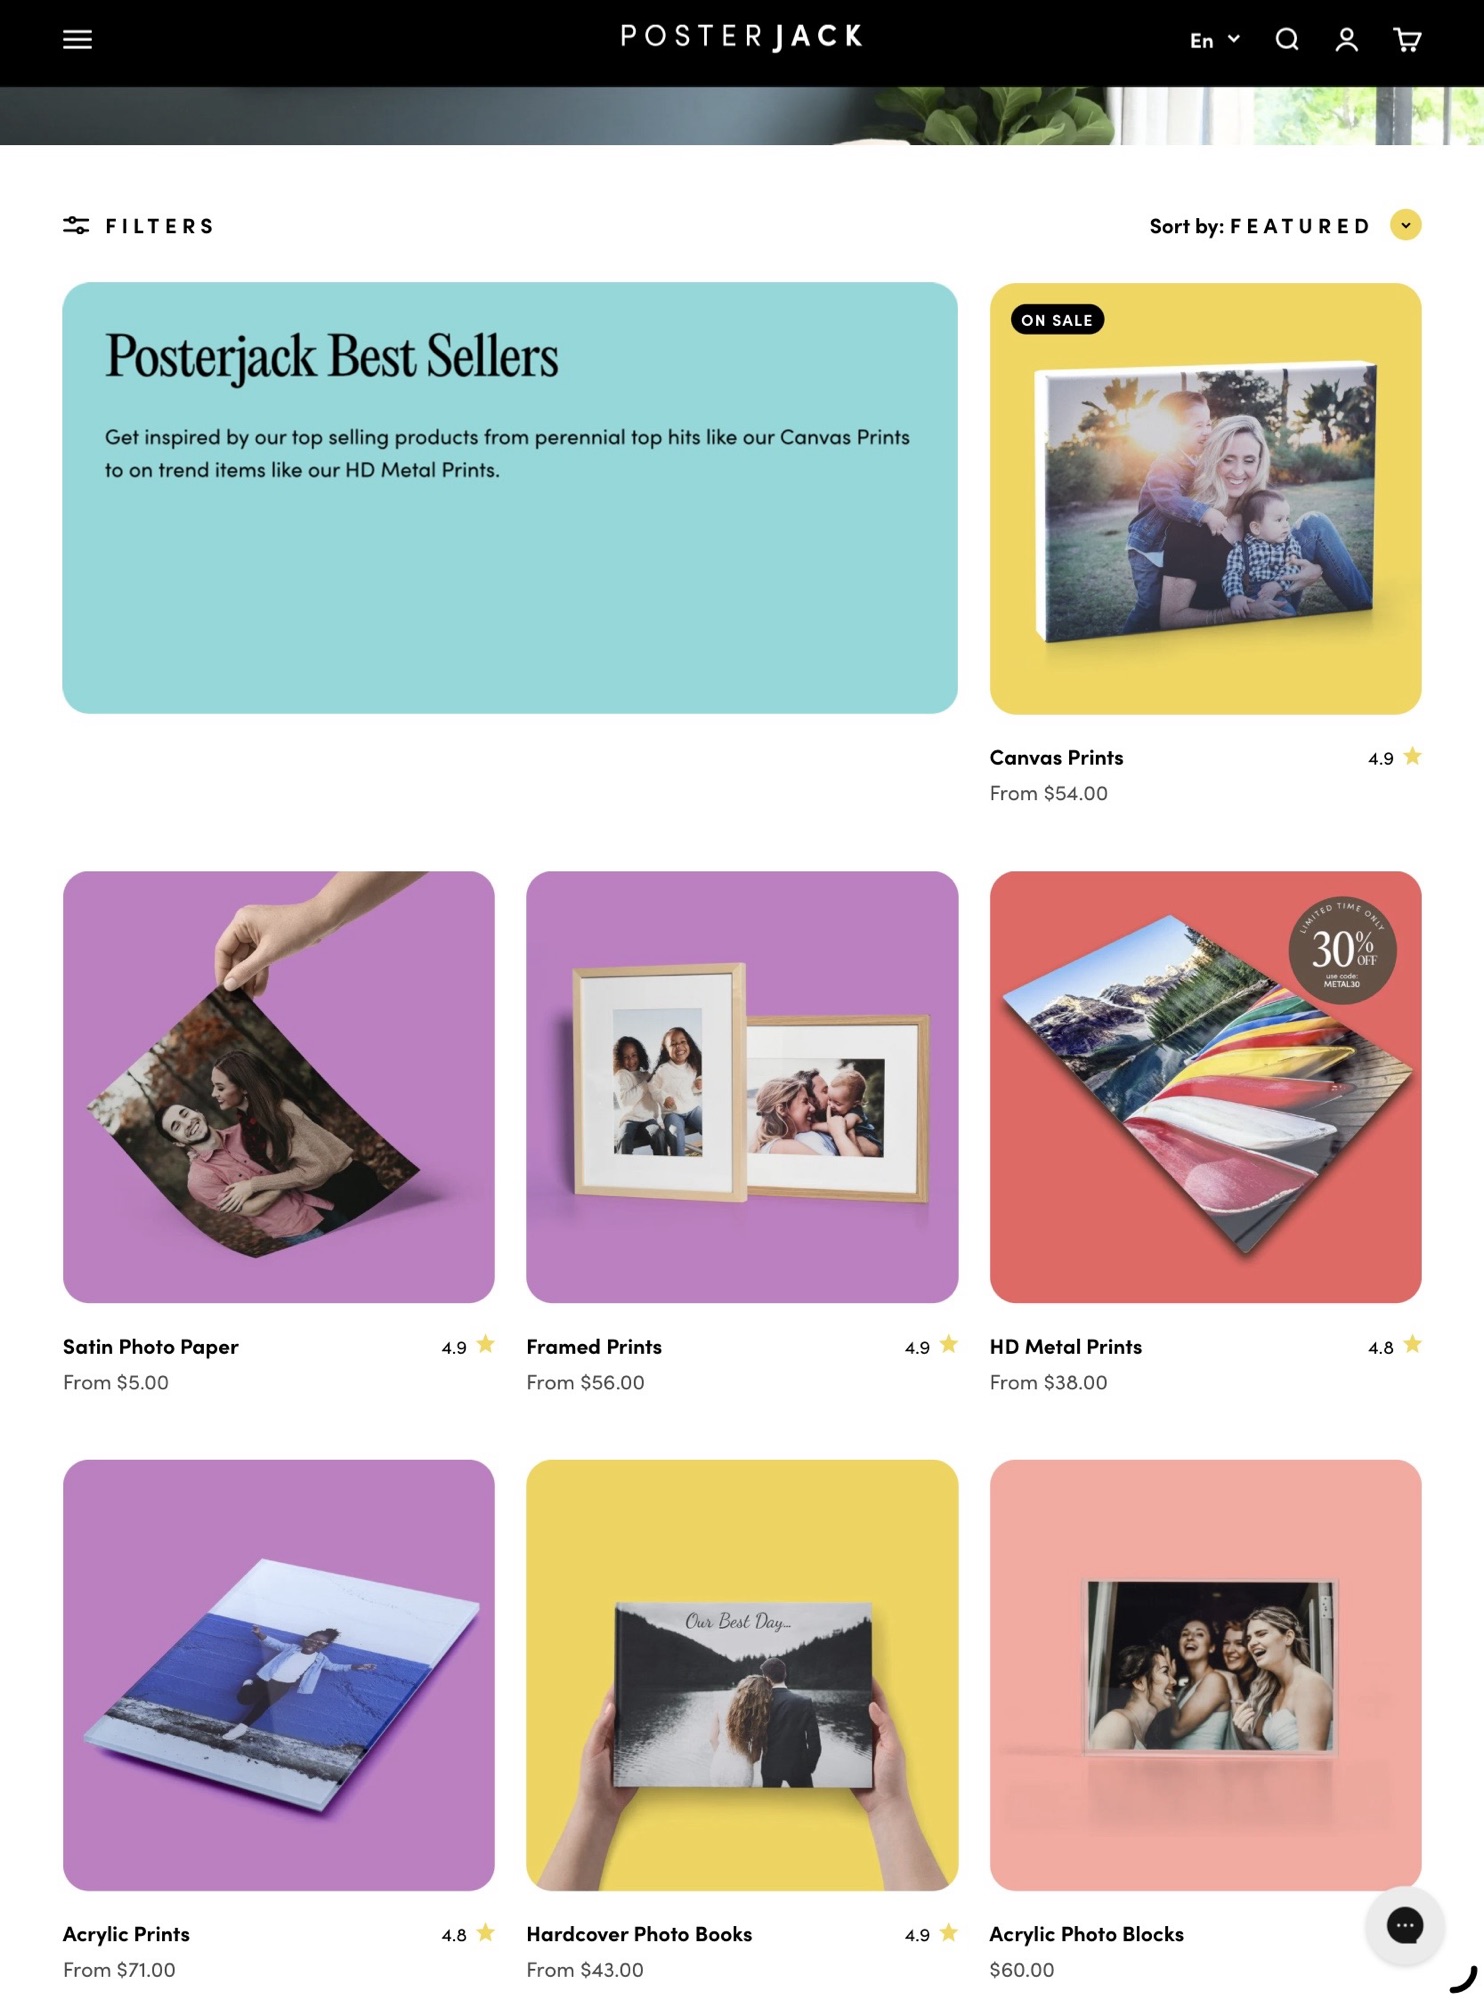
I’m always asked about which online photo service I use to make my photo books and calendars and can highly recommend PosterJack.ca. If you’re in the States, then go to PosterJack.com. I am NOT an affiliate of PosterJack, nor do I receive a commission from sales. This is me, myself, making the recommendations.
Not only is PosterJack.ca based in Toronto, they are 100% Canadian, and will ship Canada-wide for a flat rate of $10/order. If your order is over $150, shipping is free.

I’ve had great success with PosterJack. Not only have I used them for photo books and calendars, they have produced two large canvases for me—both were exceptional. Shipping was prompt and the canvases were very well packaged against damage. The books were also promptly printed and shipped and look great! I have PosterJack.ca print photo calendars each year at Christmas—family pics or nature scenes on a calendar makes for a great gift!
The best part of using PosterJack is that they frequently have sales on of 20%, 25% or even 30% off.
They offer a host of other services as well, including regular prints, posters, fine art print on Hahnemühle paper, metal and acrylic prints—just about anything you might want your photos printed on.
Check them out: PosterJack.ca!
DxO PhotoLab 9 vs Lightroom – Part 2: Processing and Masks
Can standalone DxO PhotoLab 9 dethrone Lightroom as the one-stop photo editing suite?
4417 words; 4 images; 23-minute read
This article was first published on Luminous-Landscape.com.
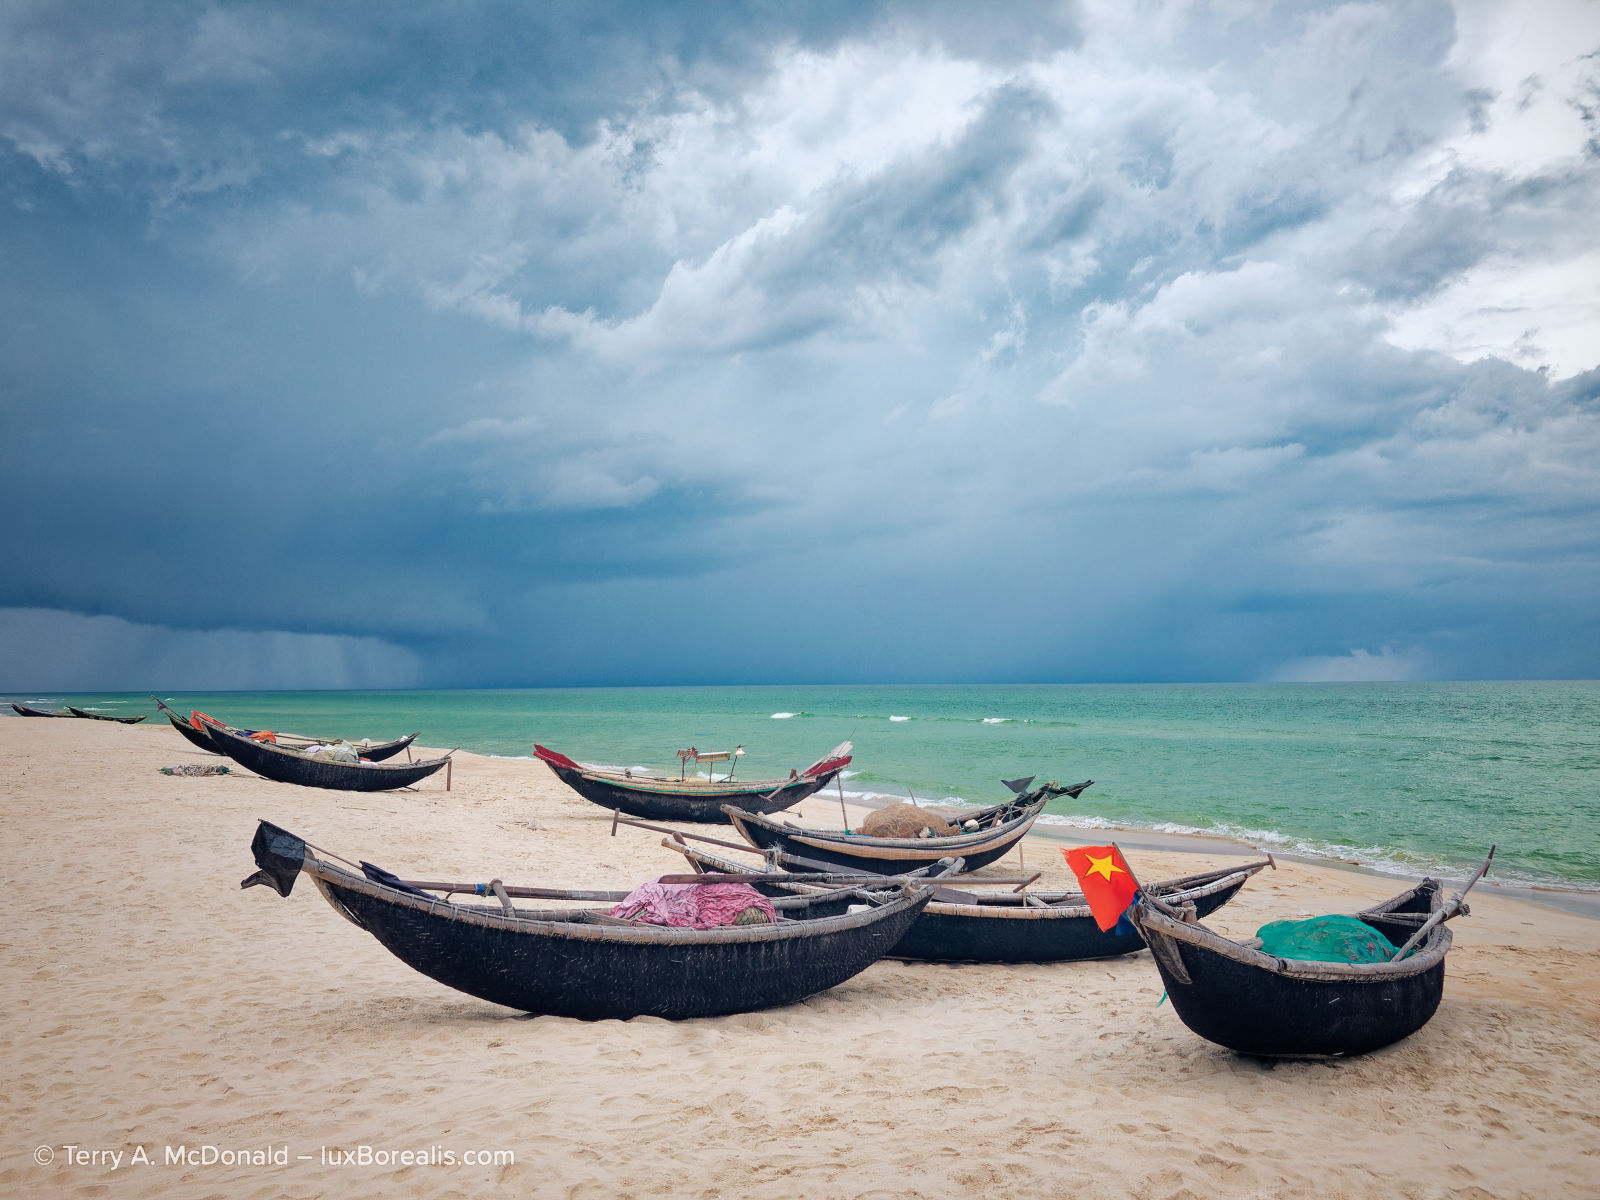
Terry A. McDonald | luxBorealis.com
Customize (= Processing)
Let’s dive in with some processing, step-by-step. Upon opening a file in Customize (as easy as double clicking the thumbnail in Photo Library), PL9 automatically does whatever it’s told to do by the Preset selected by the user under Settings > General. I prefer to start with something as neutral as possible, which appears to be “DxO Optical Corrections only”. DxO knows their lens corrections, so I don’t mind leaving that up to them.
From a processing perspective, I treat each raw file as a digital negative, a processing blank slate. Choosing any of the other Presets in the drop down list will apply differing amounts of a variety of edits. I would rather build the processing myself to match the vision I had for the scene or subject, but the option is there for whatever users prefer.
Once the photo is open in Customize, it is easy enough for users to change the preset by selecting the Presets button in the top right.
- Note 1: Selecting a new Preset wipes out any edits done up to that point and applies the values in the Preset.
- Note 2: If (when) you become mired in edits and feel you’re going around in circles, there is a Reset button up beside the Presets button. I’ve made good use of it over the past few weeks of learning the app. Another alternative is to make a Virtual Copy (Yes! PL9 has VCs!!) before starting over.
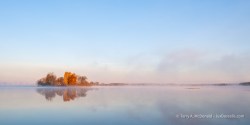
OM-1 | 15mm (30mm efov) | ƒ5.6 @ 1/800 | ISO 800 | HHHR | PhotoLab 9
Once again I was able to successfully match the image to the editing achieved in Lr.
OoO
There appears to be an on-going debate regarding the order of operations (OoO) for processing images: there IS an optimal order versus there IS NOT an optimal order. This is perhaps the biggest divide between Adobe and DxO. I’ll begin with some history . . .
Years ago, Lr was re-designed with a specific order in mind, as indicated by the order of operations as they appeared in the Basic palette of the Develop module: Exposure-Contrast-Highlights-Shadows-Whites-Blacks, each being pegged to a specific section of the tonal scale, as represented by the histogram. Adobe also recommended moving from top to bottom in LrC Develop panel. In fact, this order cannot be changed.
With the number of recent new functions within Lr, as of 2025 Adobe has published this list for Lightroom Desktop and Adobe Camera Raw stating:
“The best order of Develop operations to avoid unexpected results and achieve the best output is as follows:
- Denoise, Raw Details, Super Resolution
- Reflections Removal
- Distracting People Removal
- Generative Expand (Currently available only in Adobe Camera Raw as Tech Preview)
- Generative Remove, Content-Aware Remove, Heal, and Clone
- Lens Blur
- Lens Profile
- Crop and Transform
- Adaptive Profiles
- Global Adjustments
- Masking”
Adobe then offers this ‘Tip’:
“Note: The recommended workflow is to avoid applying Clarity, Highlights, Shadows, Dehaze, Whites, and Blacks, until after healing. Other tools that can be used initially, if desired (before healing) without adverse effects are Exposure, Contrast, Parametric, and point curves.”
What they are saying is that there is an optimal OoO: do the heavy-lifting first, the denoise, healing, and blurring, all the AI intensive edits. This is interesting for two reasons: (1) it shows there is also some latitude in the process order; and (2) the recommended order is opposite to PhotoLab9.
PL9 leans towards leaving the resource-intense operations to later in the workflow. At least, that’s the suggestion, based on button arrangement from left to right at the top of the Customize panel, with the less intense processes to the left. As I began processing, the reasons for this order became apparent: with lower-resource-intensity edits first (Light and Colour), there is less lag before the high-intensity processes of denoising and masks.
Given the ability to drag-and-drop palettes in any order, it seems DxO supports the idea of complete freedom for a user to adopt any order of operations. But is this the case? So far, despite scouring the Help Centre, searching ’best order of processing’ and ’processing order of operations’ plus checking various forums, I’ve not found anything official from DxO about OoO. The general consensus is the same as what I found and is supported by a couple of blog posts from 2022 by BeforeAfterAndOtheStuff.com and ChrisWright.photography, who place Local Adjustments (masks) towards the end (though they differ on Detail).
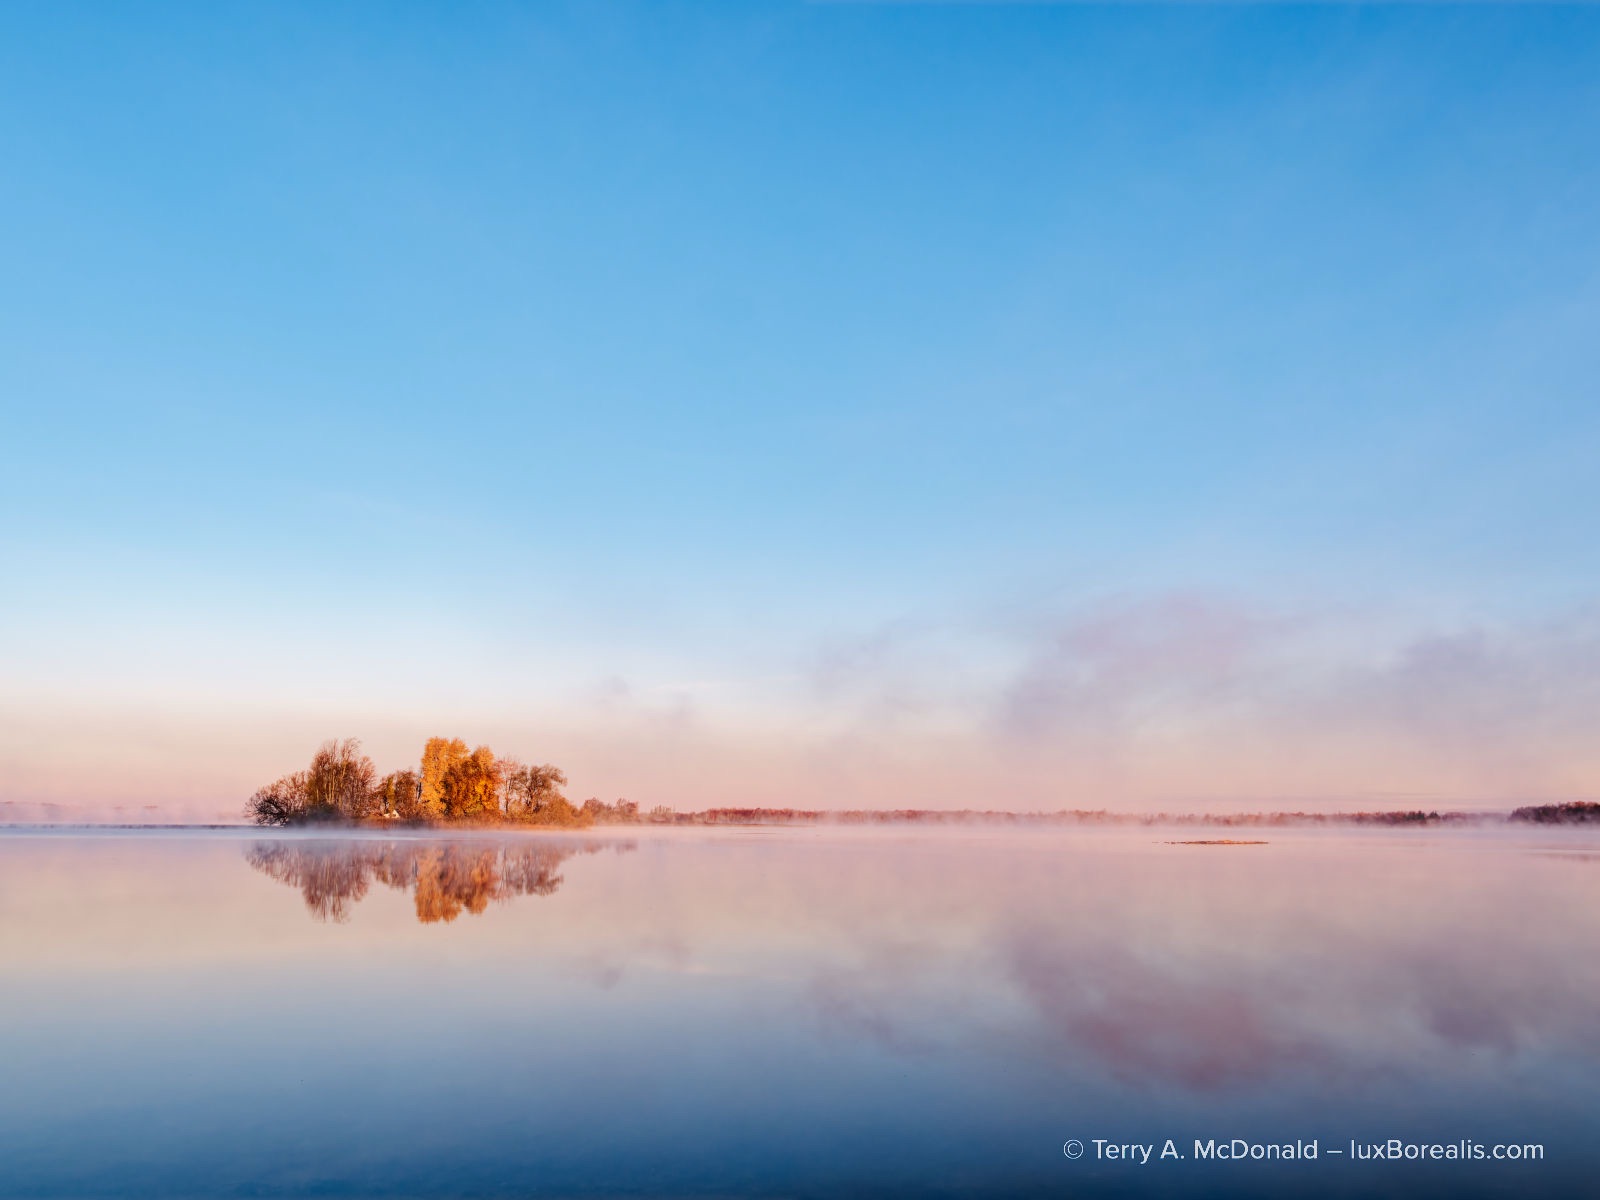
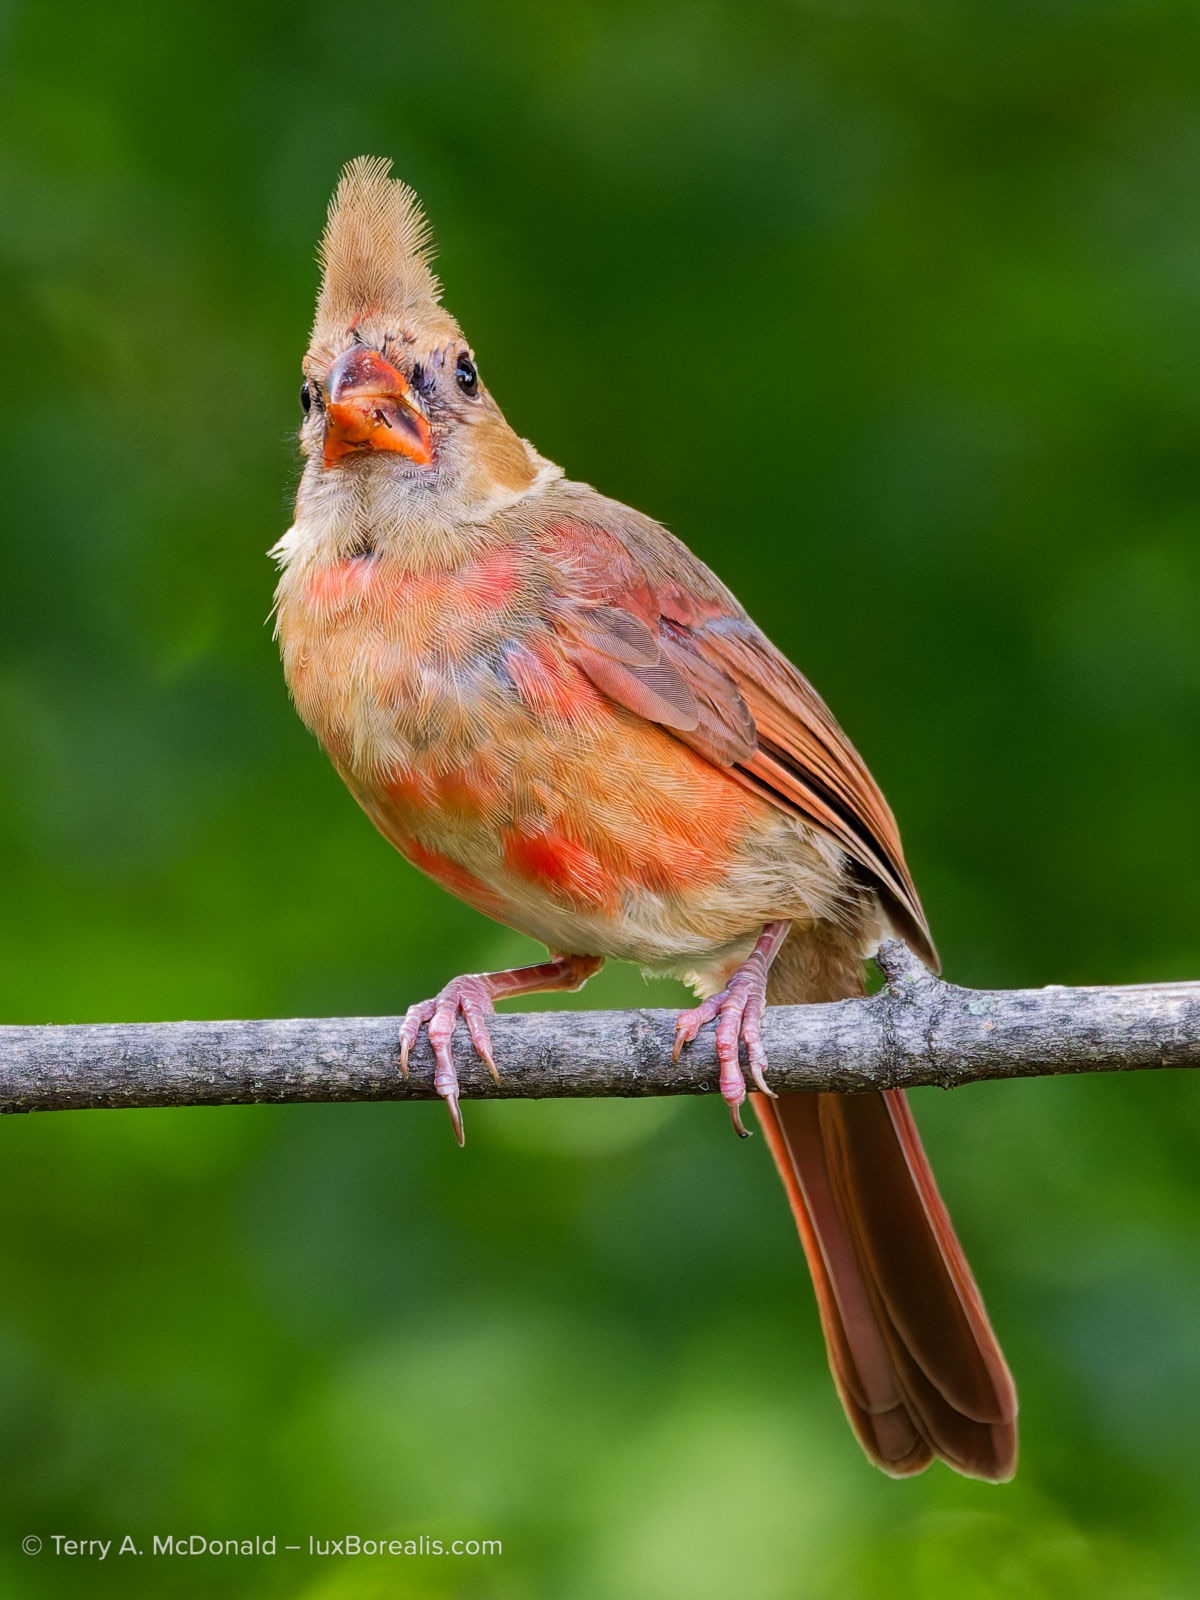
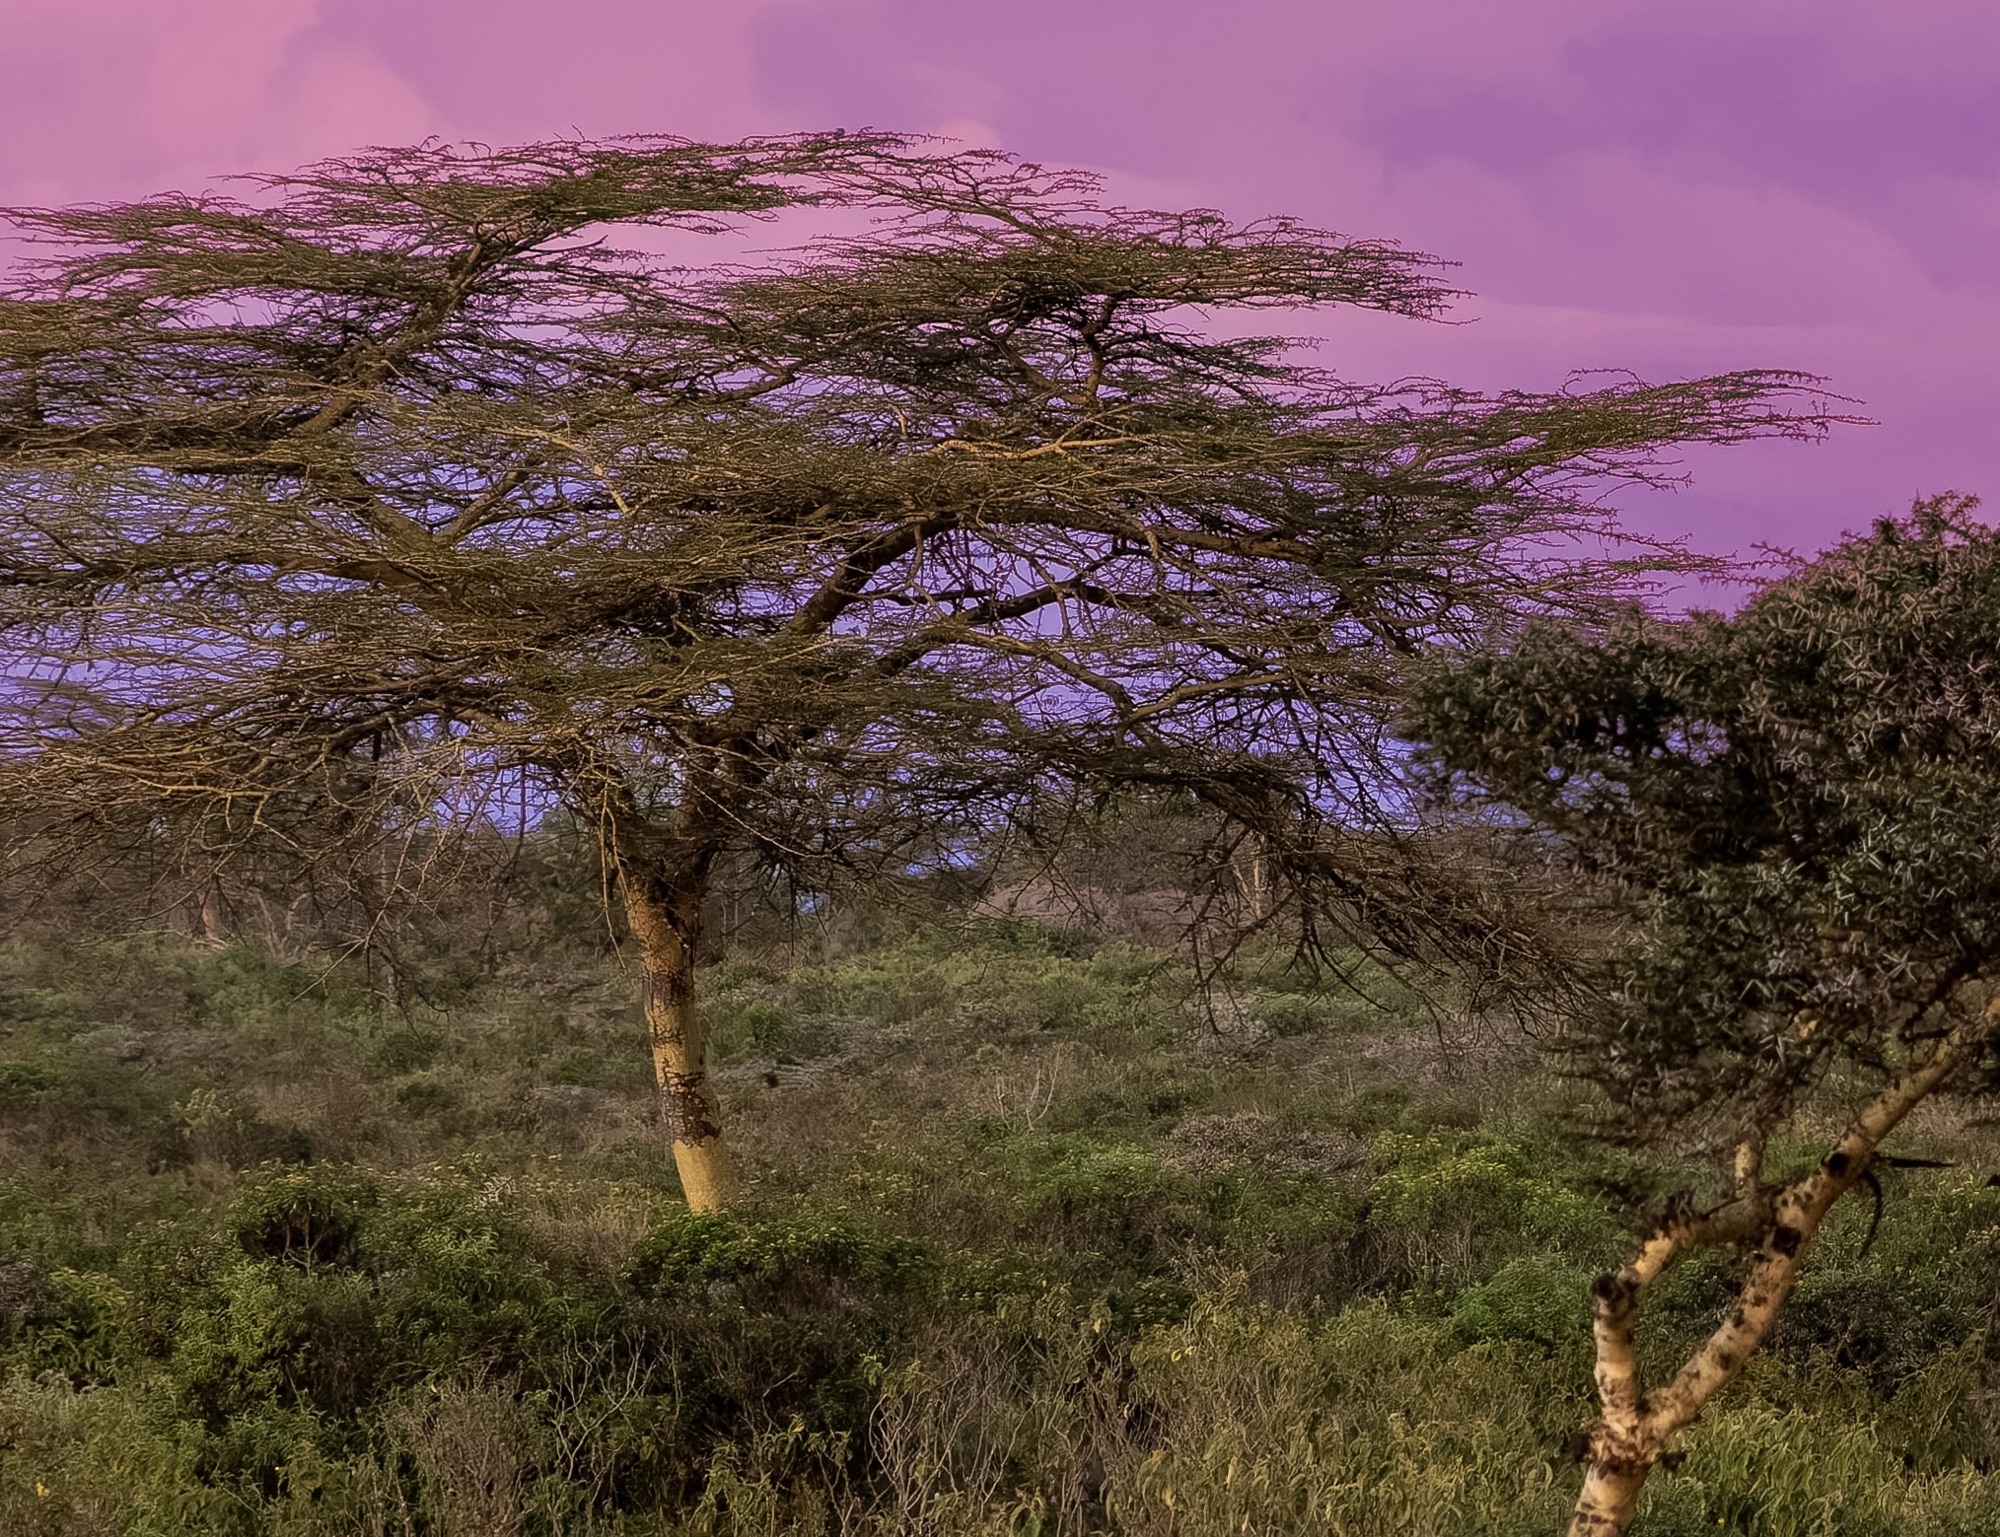
OM-1 | 381mm (762mm efov) | ƒ11 @ 1/250 | ISO1600 | PhotoLab 9
The precision of the Subject AI mask amazed me. It accurately picked up every stray hair and was almost perfect at ignoring any twigs. Furthermore, the blur tool for part of the background is very natural-looking. The only additional mask I would have used is the Radial Gradient mask, which is not available in PL9.
Lag Time
Unfortunately, I didn’t pay attention to the PL9 left-to-right OoO and followed my Lightroom instincts by diving right into Detail, using DeepPRIME-XD/XDs. I was greeted with a ’Correction Preview’ lag of a couple of seconds. From that point on, every time I changed a value and hit return, I needed to wait for rendering. It was like waiting for test strips to develop in a darkroom; I thought we were past that!
No need to tell you how alarming this was, as there was no lag with either version of Lightroom when performing the same edits under identical conditions on laptop or iPad.
Am I just nitpicking here, belly-aching because I can’t have things my way? No. Should I just pony up for a new laptop and stop complaining? No. With both versions of Lr, all changes, small and large, are live as I make them. Intuitive, seamless editing without waiting to view results is not too much to ask for in 2025. And according to the DxO Forums, I’m not the only one. There is significant chatter about the lagginess, especially when denoise and AI masks are used. Funny how this does not come up in any of the many promotional reviews circulating around the web.
So I got looking and researching. Under Detail, I changed Denoise back to Standard hoping things might speed up. They did. Slightly. There was still a Correction Preview lag before the changes were live again. As suggested online, one way of decreasing lag is to open Settings and toggle off both ”Enable high quality previews” and ”Enable DeepPRIME rendering”. The lag was cut to only a second or so, but there is still a lag and now I’m looking at a rough image, not a finished one.
For processing, I’m using a 16” M1 MacBookPro with 16 GB of RAM. I have no issues with LrD or LrC keeping up with me. Even LrM on the iPad has no lag. Every change I make is immediate and, as I adjust sliders, I can watch the changes in real time. They are live, happening right in front of me. This is how digital editing should be, but it was not the case with PL9. I also experienced delays when switching zoom levels,.
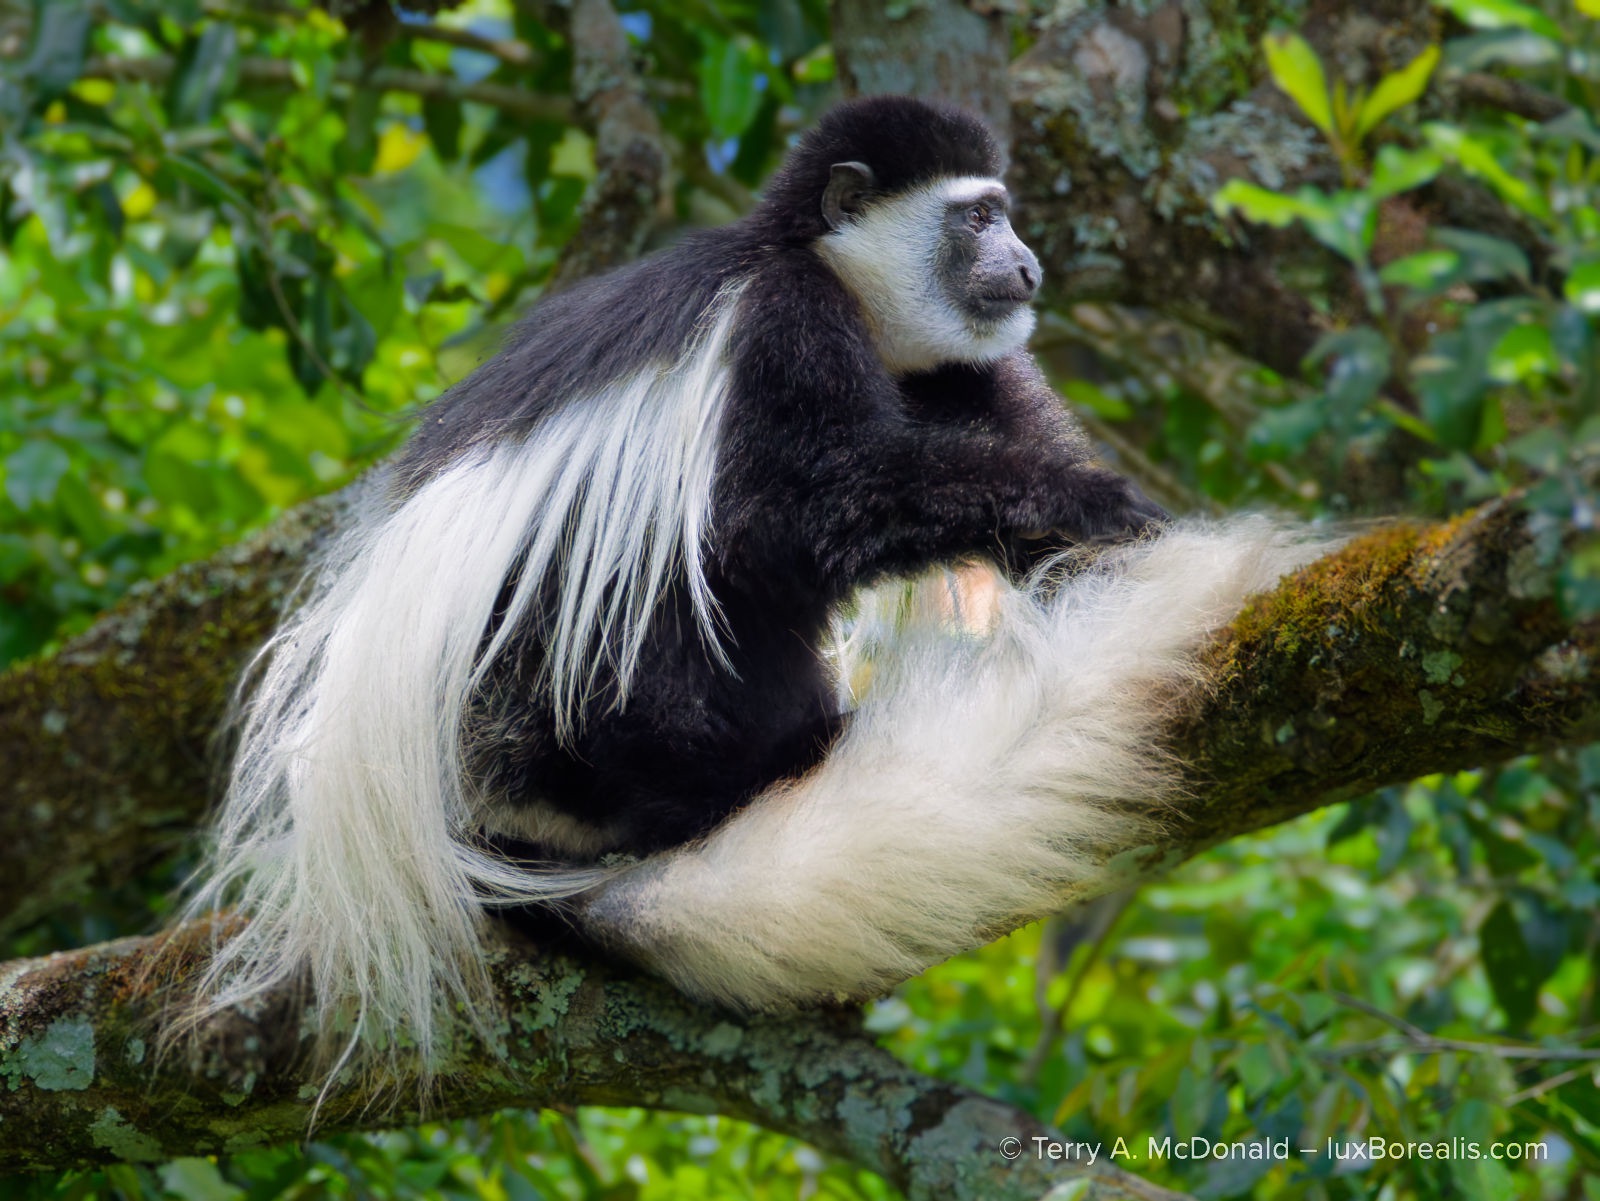
An M1 MBP is no slouch and before you suggest my MBP is ’underpowered’ or I’m ’only’ using 16 GB of RAM, it’s important to note that I am running LrC, LrD, PL9, two web browsers, Notes, Preview and mirroring my phone—all at the same time—and lag times are only an issue with PL9, not with either version of Lr. I’m not sure if the sluggishness is due to a lack of resources or if it is the way the app was designed. According to Activity Monitor, DxO PL9 does not appear to be a resource hog. Either way, it is an impediment to smooth and intuitive editing.
Lag Solutions
PL9 lag times have been reduced (but not eliminated) by: (1) restarting my computer; (2) keeping PL9 ‘fresh’ by closing it periodically and re-opening it; and (3) minimizing other open apps. I could push the cache limit up past 1000MB, but even it isn’t maxed out. Despite the refreshing and minimizing, there is still a “Correction Preview” lag of a few seconds when opening a photo processed previously. It seems PL9 needs time to apply the various adjustments I made. This does not happen with Lr. The photo is live the moment it is opened, even after Denoising. I’m guessing, but the extra speed may come from Lr creating and using screen-sized Previews, rather than opening the original file every time and applying the processing steps from the XMP sidecar file. I can’t be certain, but perhaps this is another advantage of employing a closed database versus an open file browser.
In the end, users will adopt a specific workflow based on what works for them, whether they use PL or Lr. It’s not wrong to dive into Denoise first, but be aware that you may encounter increased issues of lag time.

OM-1 | 400mm (800mm efov) | ƒ8 @ 1/20000 | ISO3200 | PhotoLab 9
PhotoLab 9 handled this difficult shot superbly, though not without significant lag with every change—even when re-naming masks! It was a difficult grab shot with the osprey heavily under-exposed against a very bright morning sky. I treated it as two photos, masking the osprey and the sky separately, the performing edits for tone and colour on each.
Light: Exposure and Tone Control
Exposure and Selective Tone controls are the heart of creating lively tones in an image. With Lr, each of Exposure, Highlights, Shadows, Whites and Blacks operate somewhat independently on different parts of the histogram/tonal range. A change in Shadows will alter the mid-tones and blacks, but only slightly, with the bulk of the changes happening between the two and virtually no change happening in the highlights. I remember when this was introduced in Lightroom years ago—it revolutionized how we balanced tones. The Shadows adjustment, for example, allowed us to pull out details that were otherwise muddy, leaving the Black Point untouched.
I am also seeing this with PL9, though perhaps not to the same extent. There appears to be more overlap of the tones each slider is changing. Also, without a dedicated Whites adjustment, as there is in Lr, I’m finding it more difficult to control highlights. There doesn’t appear to be the same nuanced ability to create more highlight separation, without having to resort to masks.
Furthermore, PL9 does not have the Auto White Point and Auto Black Point feature found in Lr. When working with full-tone images (those that include everything from pure white through to pure black), it is helpful to have the app automatically find the brightest pixel(s) and make it pure white, then do the same for the darkest pixel(s), making ittiitt pure black. This sets each end of the tonal spectrum and allows me to work with the tones between those two points, taking the guess-work out of a fairly routine requirement when editing full-tone images, landscape photos in particular. I’m sorry to see this is not available in PL9.
SmartLighting and ClearView Plus
DxO’s proprietary SmartLighting and ClearView Plus adjustments are an interesting addition. They seem to act similarly to Clarity and DeHaze and can be quite effective in separating the muddy mid-tones and shadows. SmartLighting can be further enhanced by using the Spot-Weighted tool. I know Tom Stirr over at SmallSensorPhotography.com swears by SmartLighting, in particular the Spot-Weighted feature.
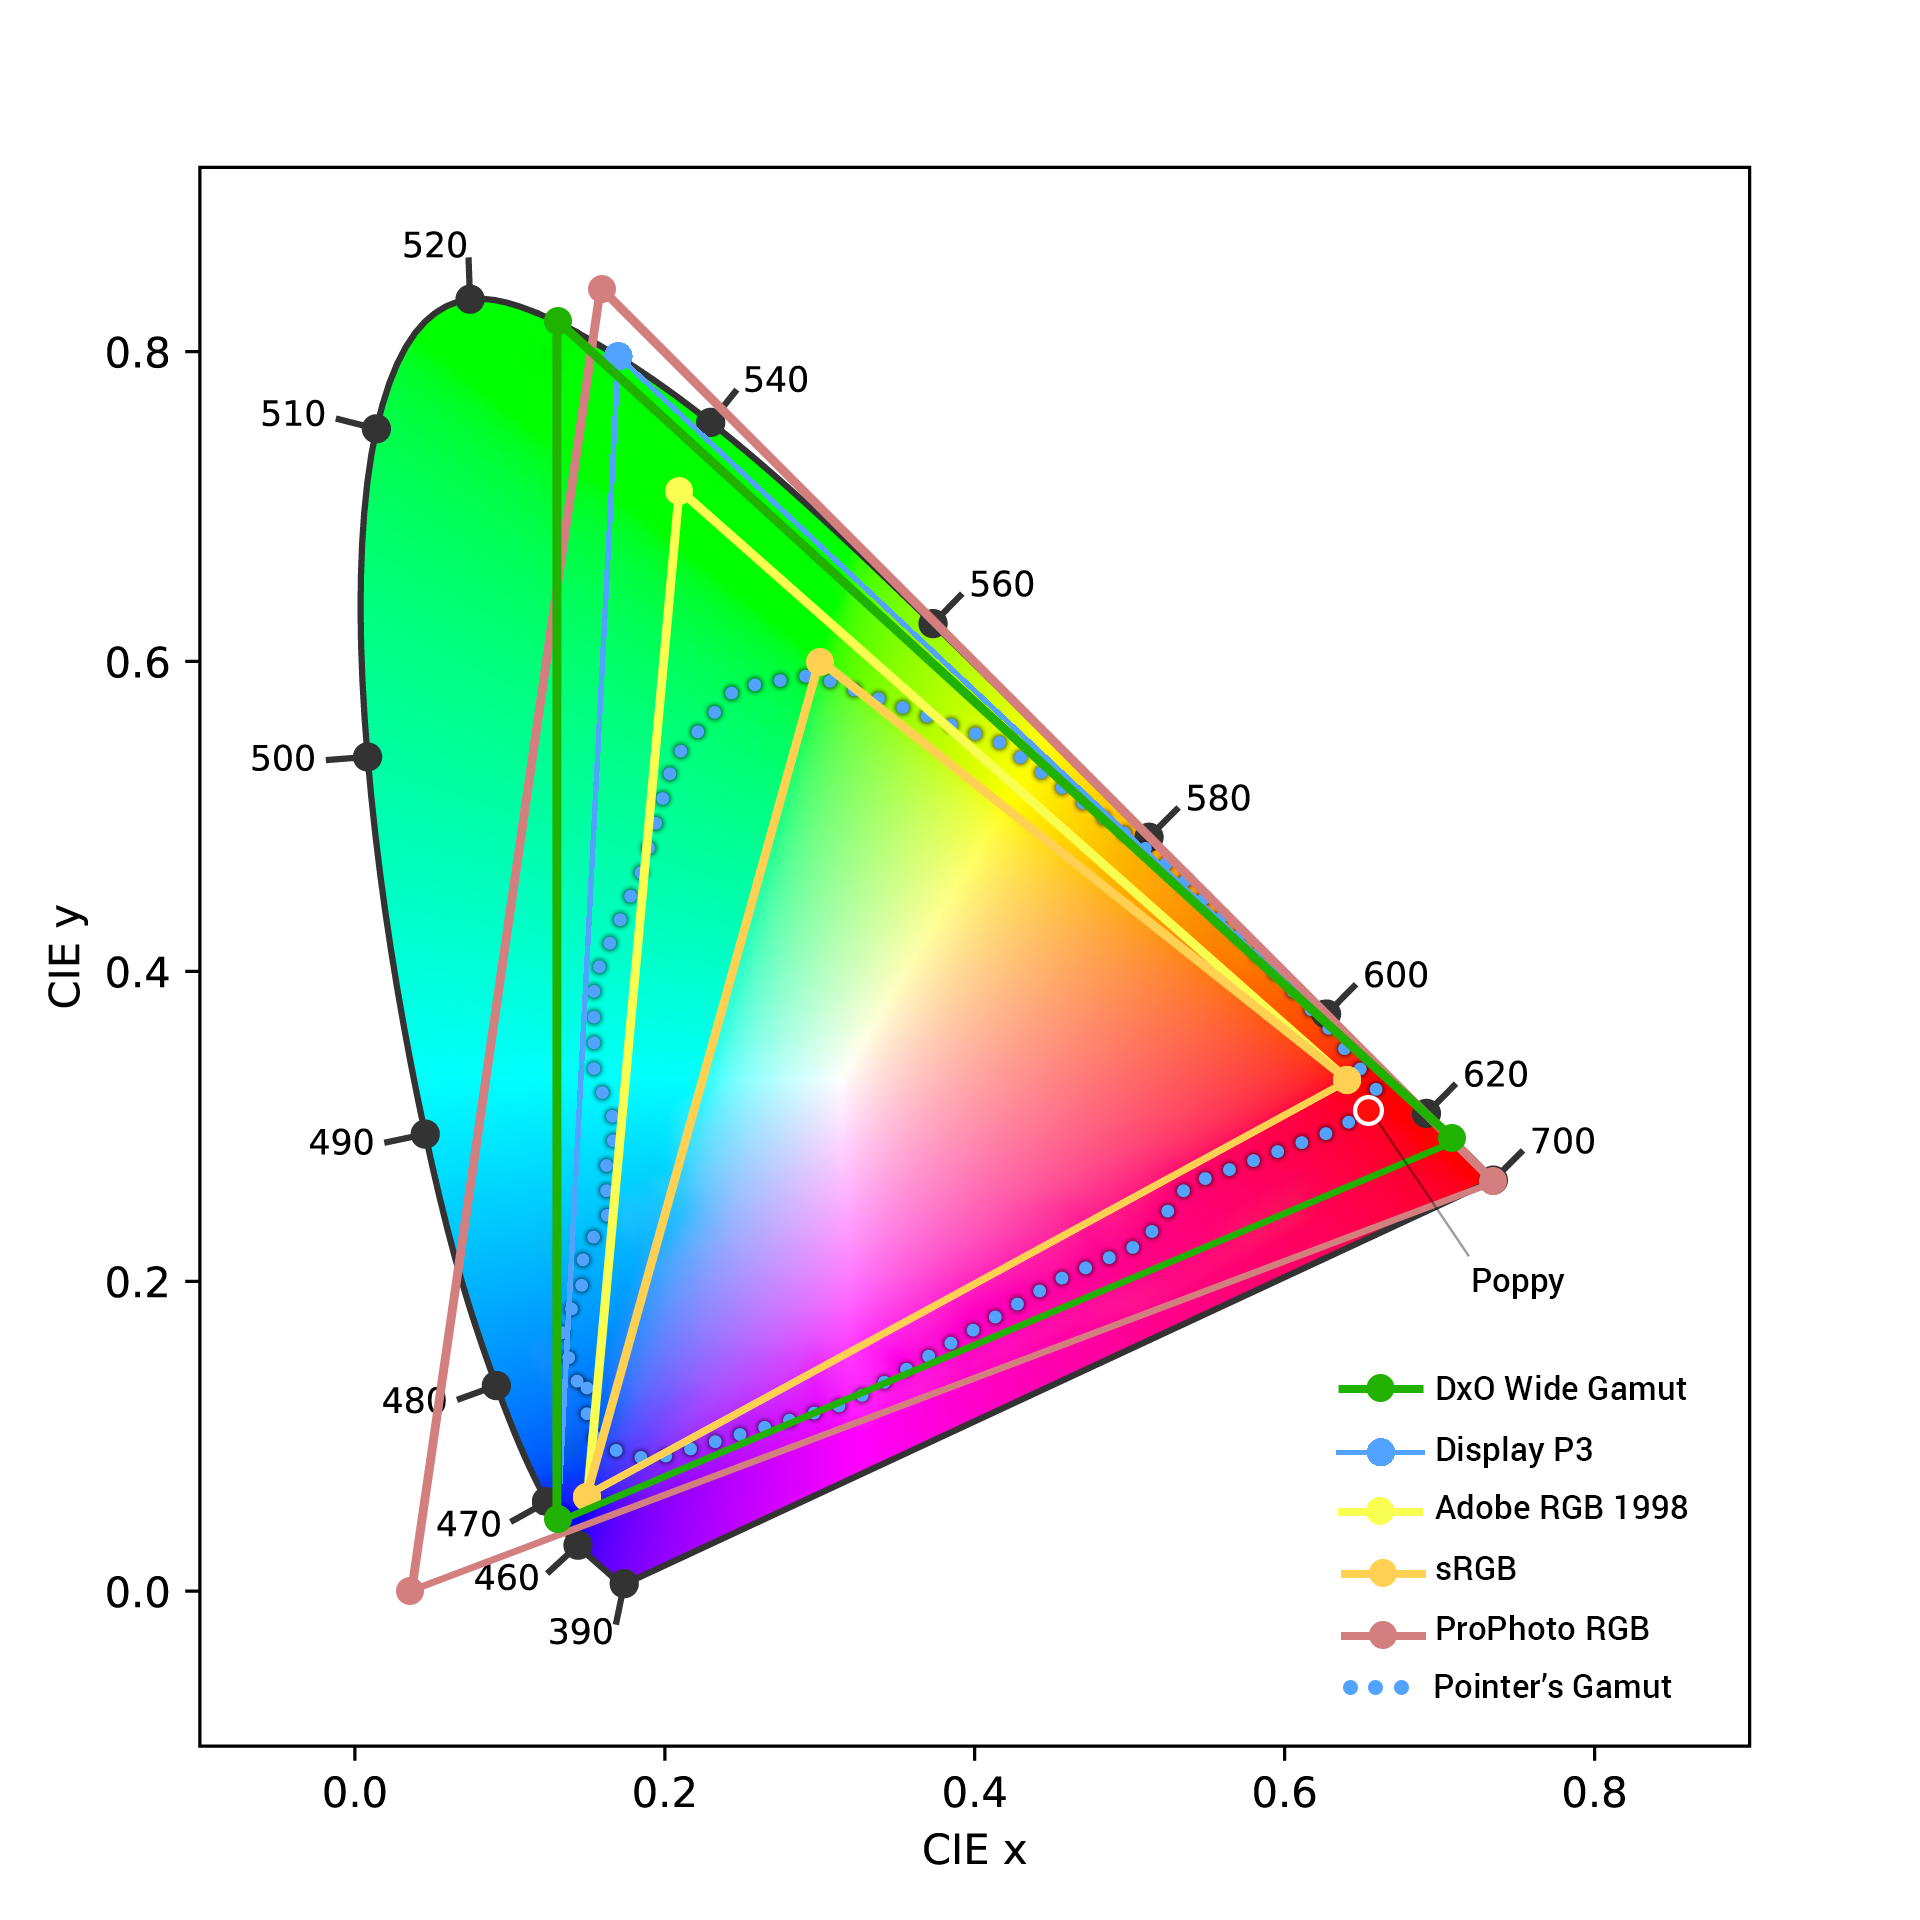
Colour
The first difference I noticed is that I could not select ProPhotoRGB as my colour space for processing. PL9 uses DxO Wide Gamut for colour space—one I wasn’t familiar with until I did a bit of research. Though different from what Adobe users are familiar with, it turns out to be a thoughtful choice. DxO knows what they are doing and say it’s ”An intelligent compromise”. DxO Wide Gamut is wider than AdobeRGB, covers the visual spectrum of what we see, but is not as large as ProPhotoRGB. Thanks to ChrisWhite.photography for shedding some light on this.
Denoise-Demosaic-Sharpen
This is where PL9 should shine. And it does—once the user figures out that ”DeepPRIME rendering” must be toggled ON in the Settings. Silly me, until I did this, I couldn’t figure out why the rendering looked like crap. There was even a “Correction Preview” lag, so I thought it was rendering. Nope. Newbie mistake. But in my defence, DxO PureRAW, which I’ve used for a year now, does not have the same requirement. Rendering is live from the moment you open the app. Oh well; lesson learned. But remember, live rendering = lag time.
It’s an interesting model and, for comparison sake, it’s one that is the opposite of Lightroom. Lr does the rendering when Denoise is selected, taking about the same time as PL9, but once it’s done, it’s done. No further lags due to rendering. Adjustments can then be made with the slider and, of course, with Detail Sharpening, but when scrolling around the photo, to check out different parts of it, there is no lag in Lr as there is, at times, with PL9. If DxO could sort out this lag, then they would truly have a winner with PL9.
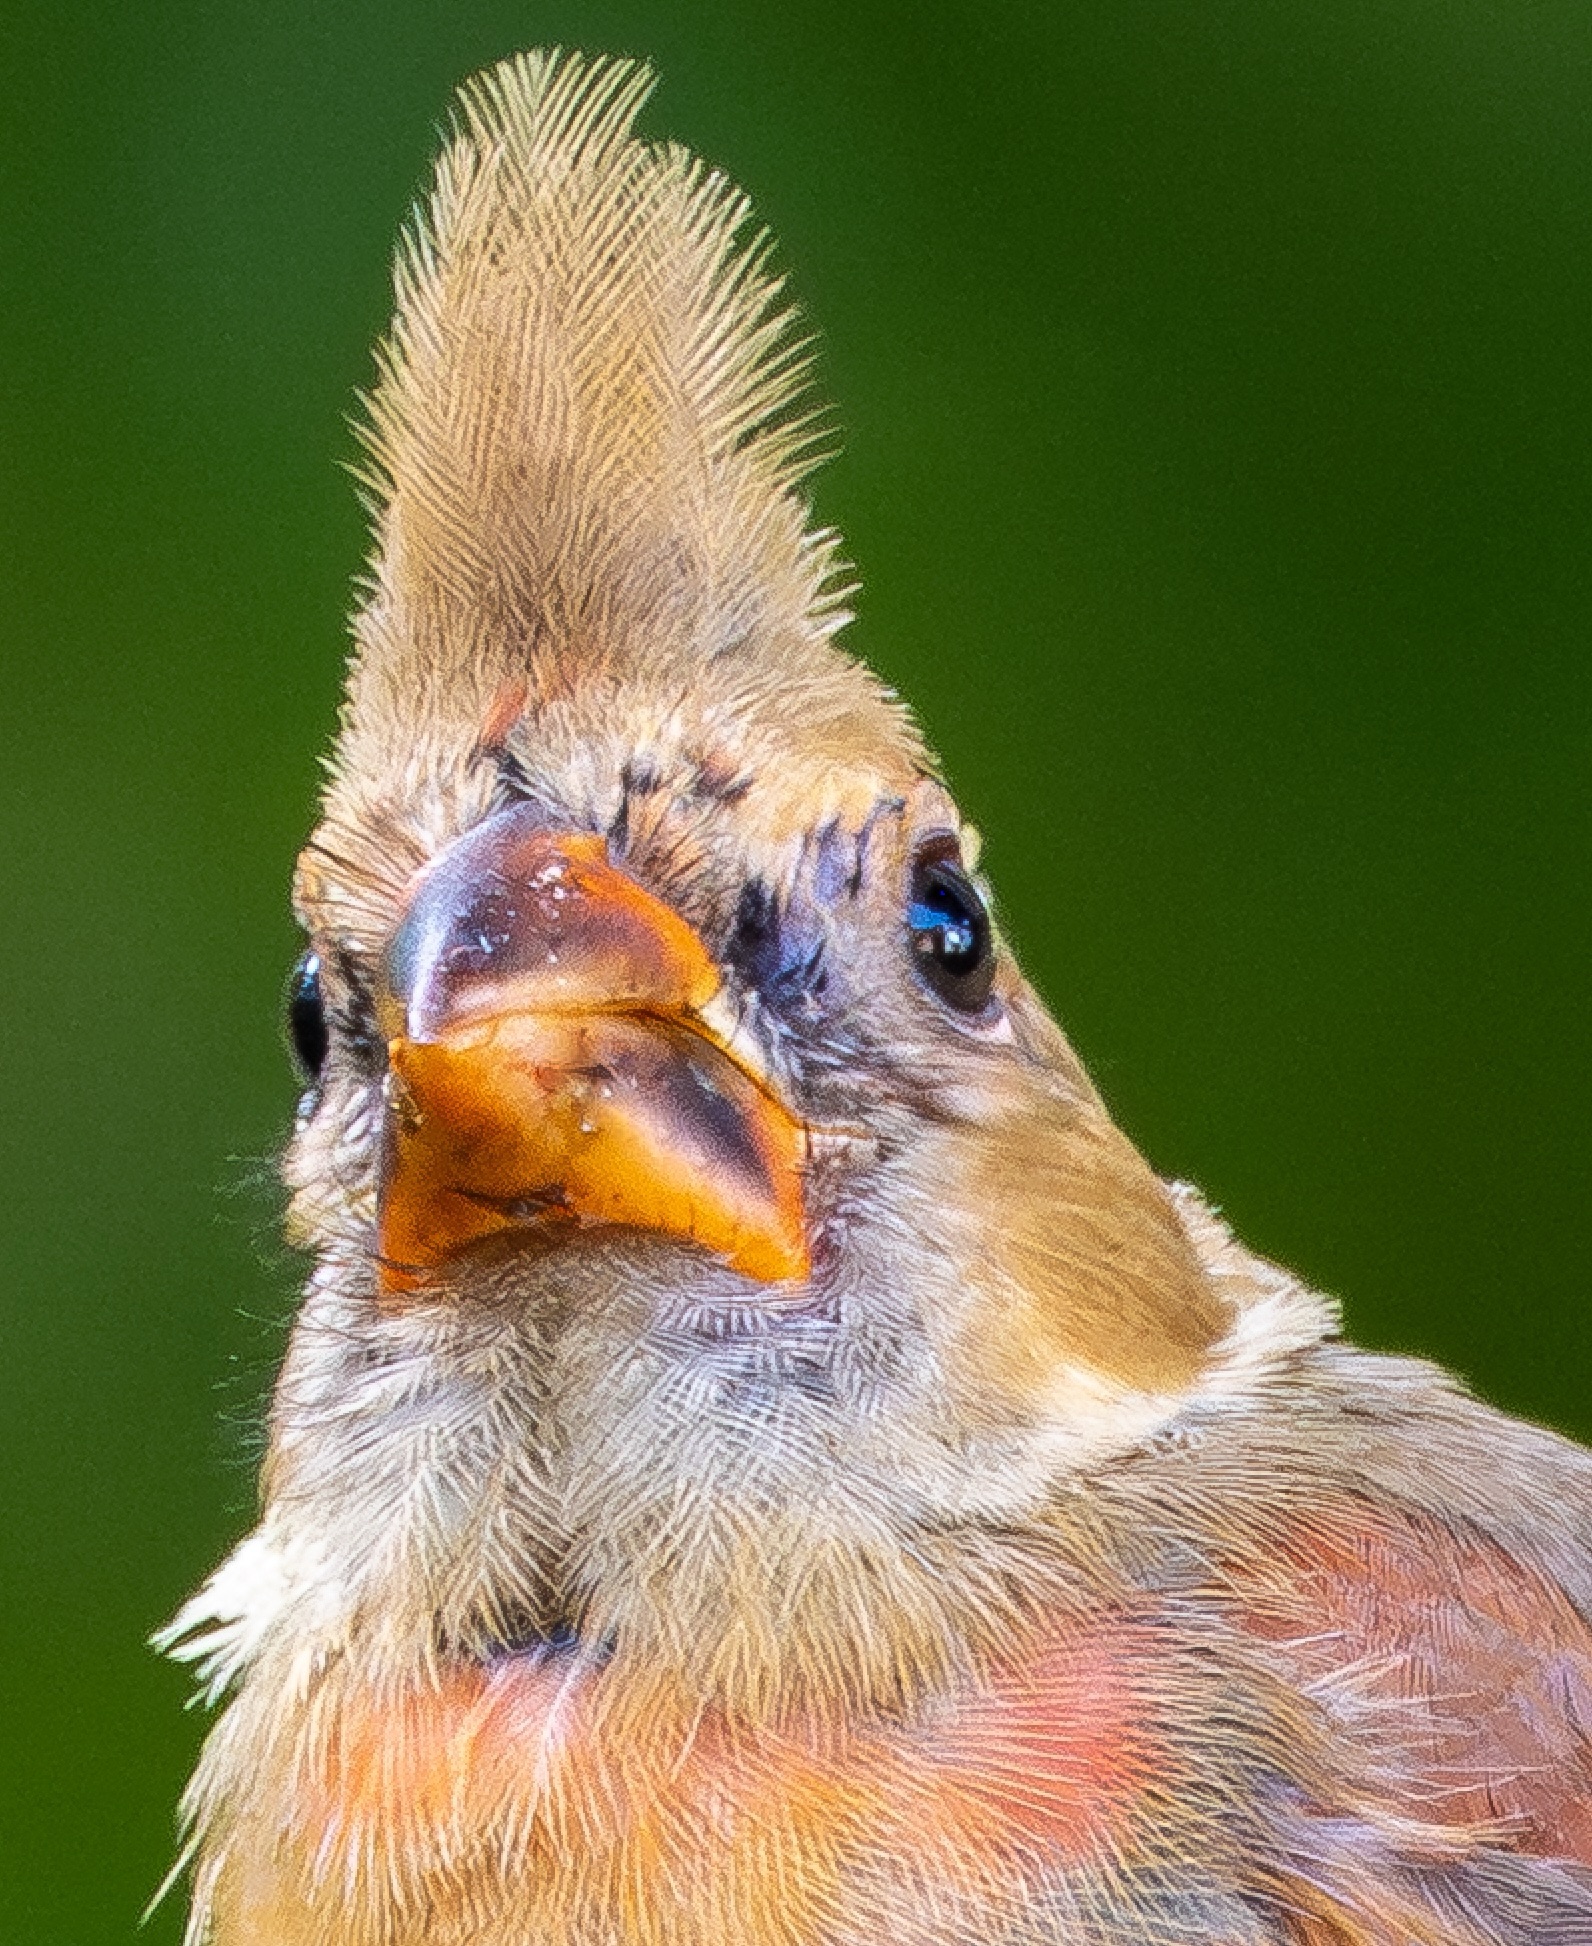
OM-1 | 400mm (800mm efov) | ƒ8 @ 1/320 | ISO 6400 | PhotoLab 9
This is a 2400×3212 vertical crop of the original ORF, and it is absolutely clean and absolutely sharp. There is no indication this was made by a M43 camera, a testament to the excellence of DxO’s demosaic, denoise and sharpening algorithms.

PL9 has accounted for this with their Loupe tool (S on the keyboard). First, turn off denoise in Settings. Then, in the Detail palette, select the type of denoise you want. The Loupe tool can then be used to provide a 100% view of what the denoising will do when the file is exported without adding lag time with every adjustment.
With that behind me, I could begin my comparisons. As I said above, this is where PhotoLab really shines. DxO has superb rendering engines and algorithms producing smooth where smooth should be and detail where detail should be. The default rendering is excellent. Tweaking the balance of smoothness and detail is done with the Luminance and Force Details adjustments; higher Luminance = smoother tones; more Force Details—well, you get the picture. Further sharpening is applied via the Lens Correction tool.
Interestingly, and something that demands pointing out, is the artefact that was introduced on ‘Junior’s’ bill. It looks like an insect or a seed husk, and it is clearly not there in the original. It’s easy enough to retouch out, but it seems like an odd thing to be added, especially when denoise is supposed to use internal generative AI, using only pixels from the actual image, not third-party pixels. Where did the artifact originate?
ReTouch Tool (N) (Detail palette)
PL9’s ReTouch tool is very straightforward to use and very accurate. It chooses appropriate source areas and is just the click of a button away (or tap the N key). As well, with the stroke selected, it can be switched between Repair and Clone. Even better, it will ‘borrow’ from pixels outside the cropped area; something Lr does not do. Perhaps its best feature, and another not found in Lr, is the ability to Transform the source area by changing its shape and rotation–very helpful, especially for difficult-to-retouch areas.
A nice addition would be seeing live views of how ReTouch changes as the user drags the source area to a new location. It would mean not having to wait for the render to occur only to discover it needs to nudge further. Lr provides this live view of the source area and how it affects the destination.
Changing the size of the brush (Cmd+Touchpad Up/Down) and the feathering using Shift+Touchpad Up or Down is also very helpful, a feature PL9 shares with Lr, though with Lr, it is a matter of pinching the touchpad to make the brush larger or smaller; i.e. no keys are involved.
Despite the excellent options available in PL9, I note two options missing compared to Lr:
- The PL9 ReTouch brush has only two options: Repair and Clone. There is no Healing brush equivalent. Healing is helpful for softening edges, particularly around areas that have been cloned when there is no perfect source to draw from.
- With Lr, users can Cmd/Ctrl-click-and-hold to choose the source area for cloning. This is a significant time-saver from having to wait for PL9 to make its choice then changing it to a more appropriate set of pixels, and the associated lag time for both.
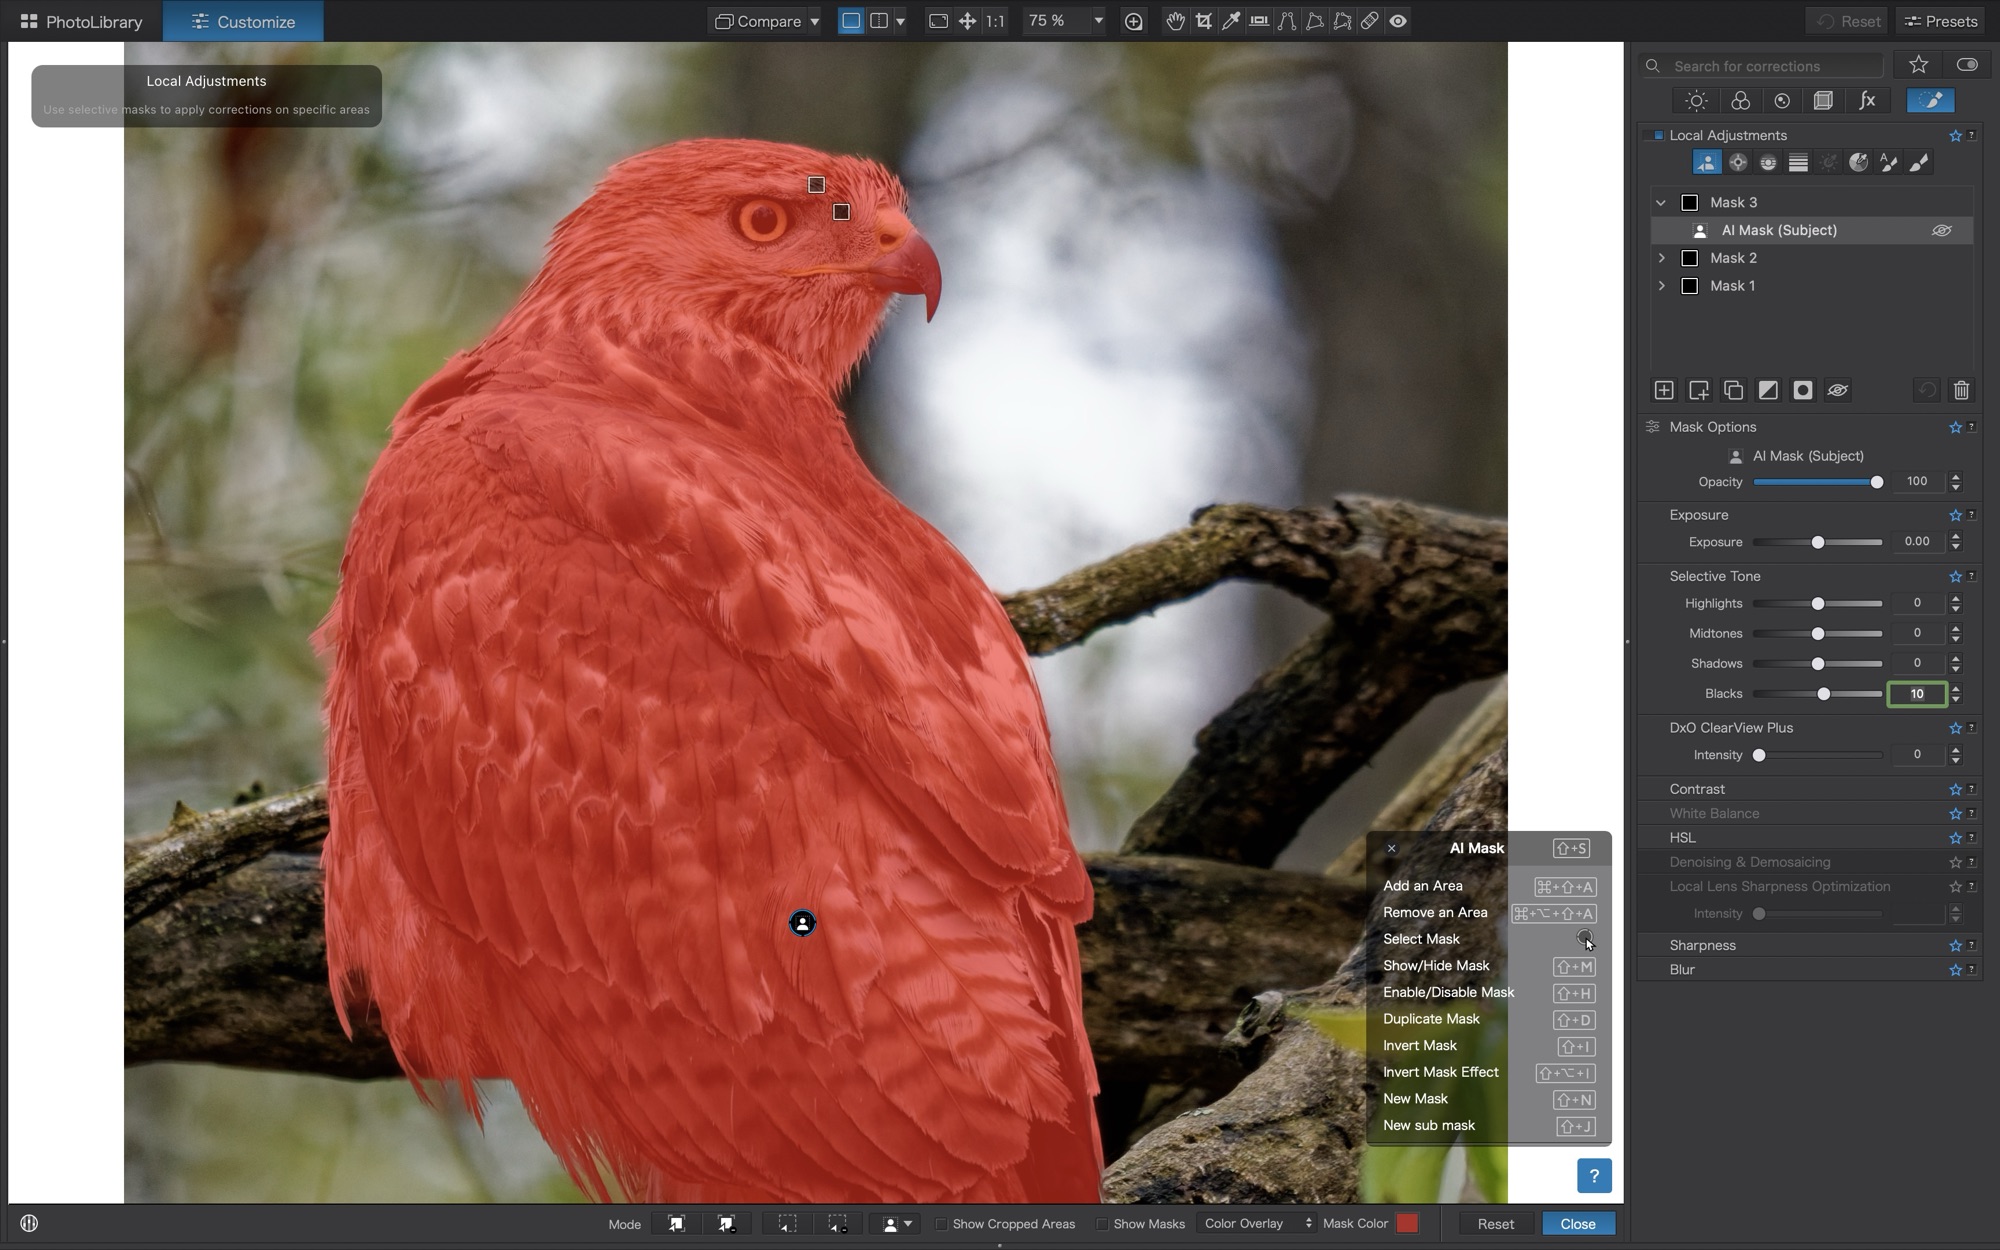
Local Adjustments: Masks
I live by masks. They are essential tools for balancing and shaping the light in any image. So, masks need to be intuitive. Masking in PhotoLab 9 is excellent, and is almost on par with Lightroom. PL9’s AI Masks are accurate at picking out well-defined objects with edges. No surprise there. I also like the semi-transparent menu that pops up in the bottom right corner of the image viewer, which provides keyboard shortcuts. Note: If the palette’s in the way, it can be closed and easily opened again.
One thing I noticed when working on a landscape image is that the AI Sky mask has some trouble with tree branches, choosing to ignore them and go around them rather than recognising the similar hue within the branches. Perhaps it’s looking for contiguous pixels. I tried using the Auto Brush tool to fill in the sky pixels between the branches, but as the size of the brush is increased, so too is the size of the inner circle, which causes too many of the wrong pixels to be included.
Determined to make this work, I made a virtual copy in PL9 and experimented with different masking techniques. The workaround I found was to use a Grad ND filter that covered down past the tree line then subtracted out the trees (and branches) using the ’Remove a selection’ tool. The result was a much more realistic-looking sky-treelike separation. To many, this might be of little consequence. But, for someone who does a lot of landscape photography and is frequently masking the sky, it is additional work.
It’s nice to see that both Duplicate Mask and Invert Mask are offered, but it would be helpful to also add ‘Duplicate & Invert’. I use this frequently in landscape photography to generate a mask for the foreground after generating a sky mask, and with wildlife, to generate a background mask after masking the subject.
Sadly, a mask I routinely use is not part of the PL9 repertoire: Radial Gradient. I frequently use this to subtly focus the viewers attention, especially with wildlife. Perhaps PL9’s Control Points can be used in the same way. As well, I see that the Luminosity Mask, which is part of the masking routine in Lr, is only available by purchasing the DxO FilmPack for USD $150. To me, this is a blatant up-sell, within an app that already costs USD$240.
Control Points are a masking technique unique to PL9 and, at first, I was a bit stumped about what they actually do. After doing a deep dive to learn all the ins and outs of them (thanks, in part, to TakeBetterPictures), I’ve decided that (a) Control Points do not take the place of a Radial Gradient mask in Lr, as I had hoped; and (b) advanced users appear to use them in the same way I might apply an Auto Brush mask in Lr. I can certainly see the benefit and versatility of Control Points for shaping light, refining colour, raising shadows, and reducing highlights, but building an Auto Brush mask in Lr achieves what I perceive to be a similar result.
Note: Auto Brush in PL9 is different from the Auto Brush in Lr. In PL9, it assumes/predicts what I might want. I don’t like it when technology does this as it rarely matches my vision. I would prefer to do a little extra work in selecting the hue of pixels for masking.
Lastly, something else I’ve noticed is that as more masks are added, the overall refresh rate seems to slow down. The lag occurs every time a photo is opened, every time it is adjusted, and every time it is exported. Even if each lag is only a second or two, those seconds add up and interrupt the overall fluidity of the workflow. Suggestion: do all masking with denoise turned off!
History
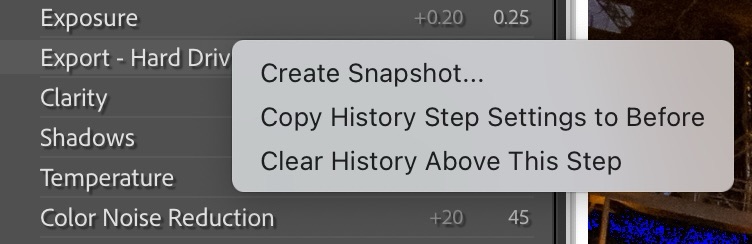
Having a History palette is one of those essential functions that LrC has, but not LrCC, and I miss it. PL9’s History palette is very functional. While it resides in the left panel and could be moved to the right panel, I like that it can be set to ‘Float’ over the image as I go back and re-examine edits.
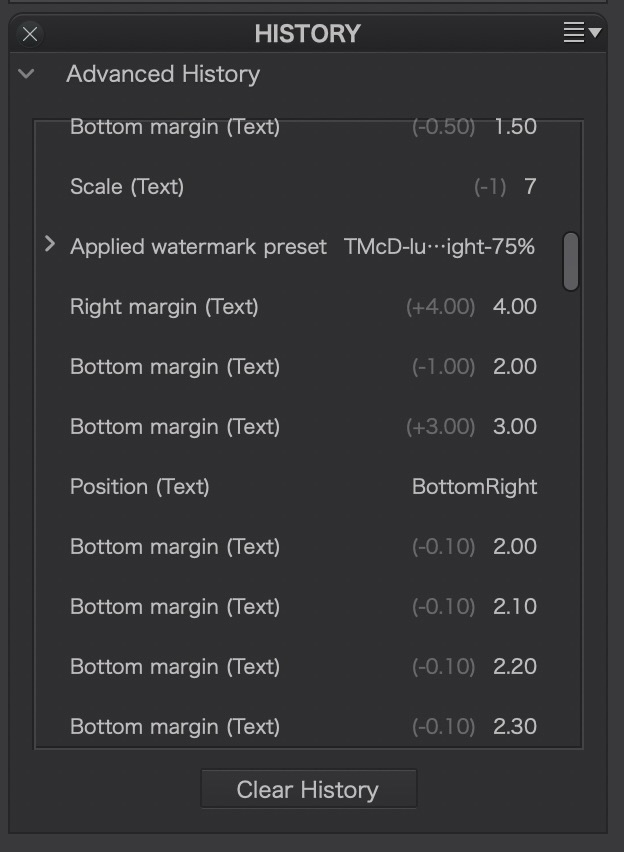
It would be even more helpful if it had a few of the functions from LrC such as ‘Create Snapshot’ or, one I use most frequently, ‘Copy History Step Settings to Before’, which allows before/after comparisons over more than just one step in History. As well, the PL9 History does not show when a file was exported as LrC does. Showing each Export is very helpful as Exports are our visual confirmation of the processing to that point. The closest I could see in PL9 was when it showed ‘Applied Watermark’, which may indicate an Export, though not always.
Compare
Being able to compare two images side-by-side or the same image before and after is essential to image selection and processing workflows. With Lr, it’s easy—simply select two images and choose Compare (Opt-C). With PL9 the workflow requires a few extra clicks but is easy to do.
To compare two different images, users select the reference image then choose ‘Use current image as reference’ from the compare menu. This command can also be done by right-clicking on the image. Then, simply select the image you wish to compare with it. As a further refinement, both images can be zoomed in and out to check details and the right-hand image can also be processed while next to the Reference image. As with Lr, the comparison can also be top and bottom and split views, both left and right and top and bottom. Excellent! This is a huge step forward for PL9 compared to previous versions. Next steps would be to align the navigation around a zoomed in comparison so that both images click-and-drag to the same location/view.
To compare before and after is even more straightforward: simply selecte the image, choose how you want to compare it (with or without Geometry applied) and select the orientation: L-R; T-B; or either in split view.
Cropping and Geometry
There is a Crop tool along the top (or simply R) for straightforward changes, but there is also a Cropping and Geometry palette in the right panel. It would be helpful if, when selecting R or the Crop button, the Crop palette opened in the right panel. Also, some tools are found above, and others below, which means additional cursoring around. What’s missing from these immediate tools (it’s in the palette) is the vertical crop tool, although, as in Lr, a vertical crop can be forced by pulling one of the bottom handles across towards the other.
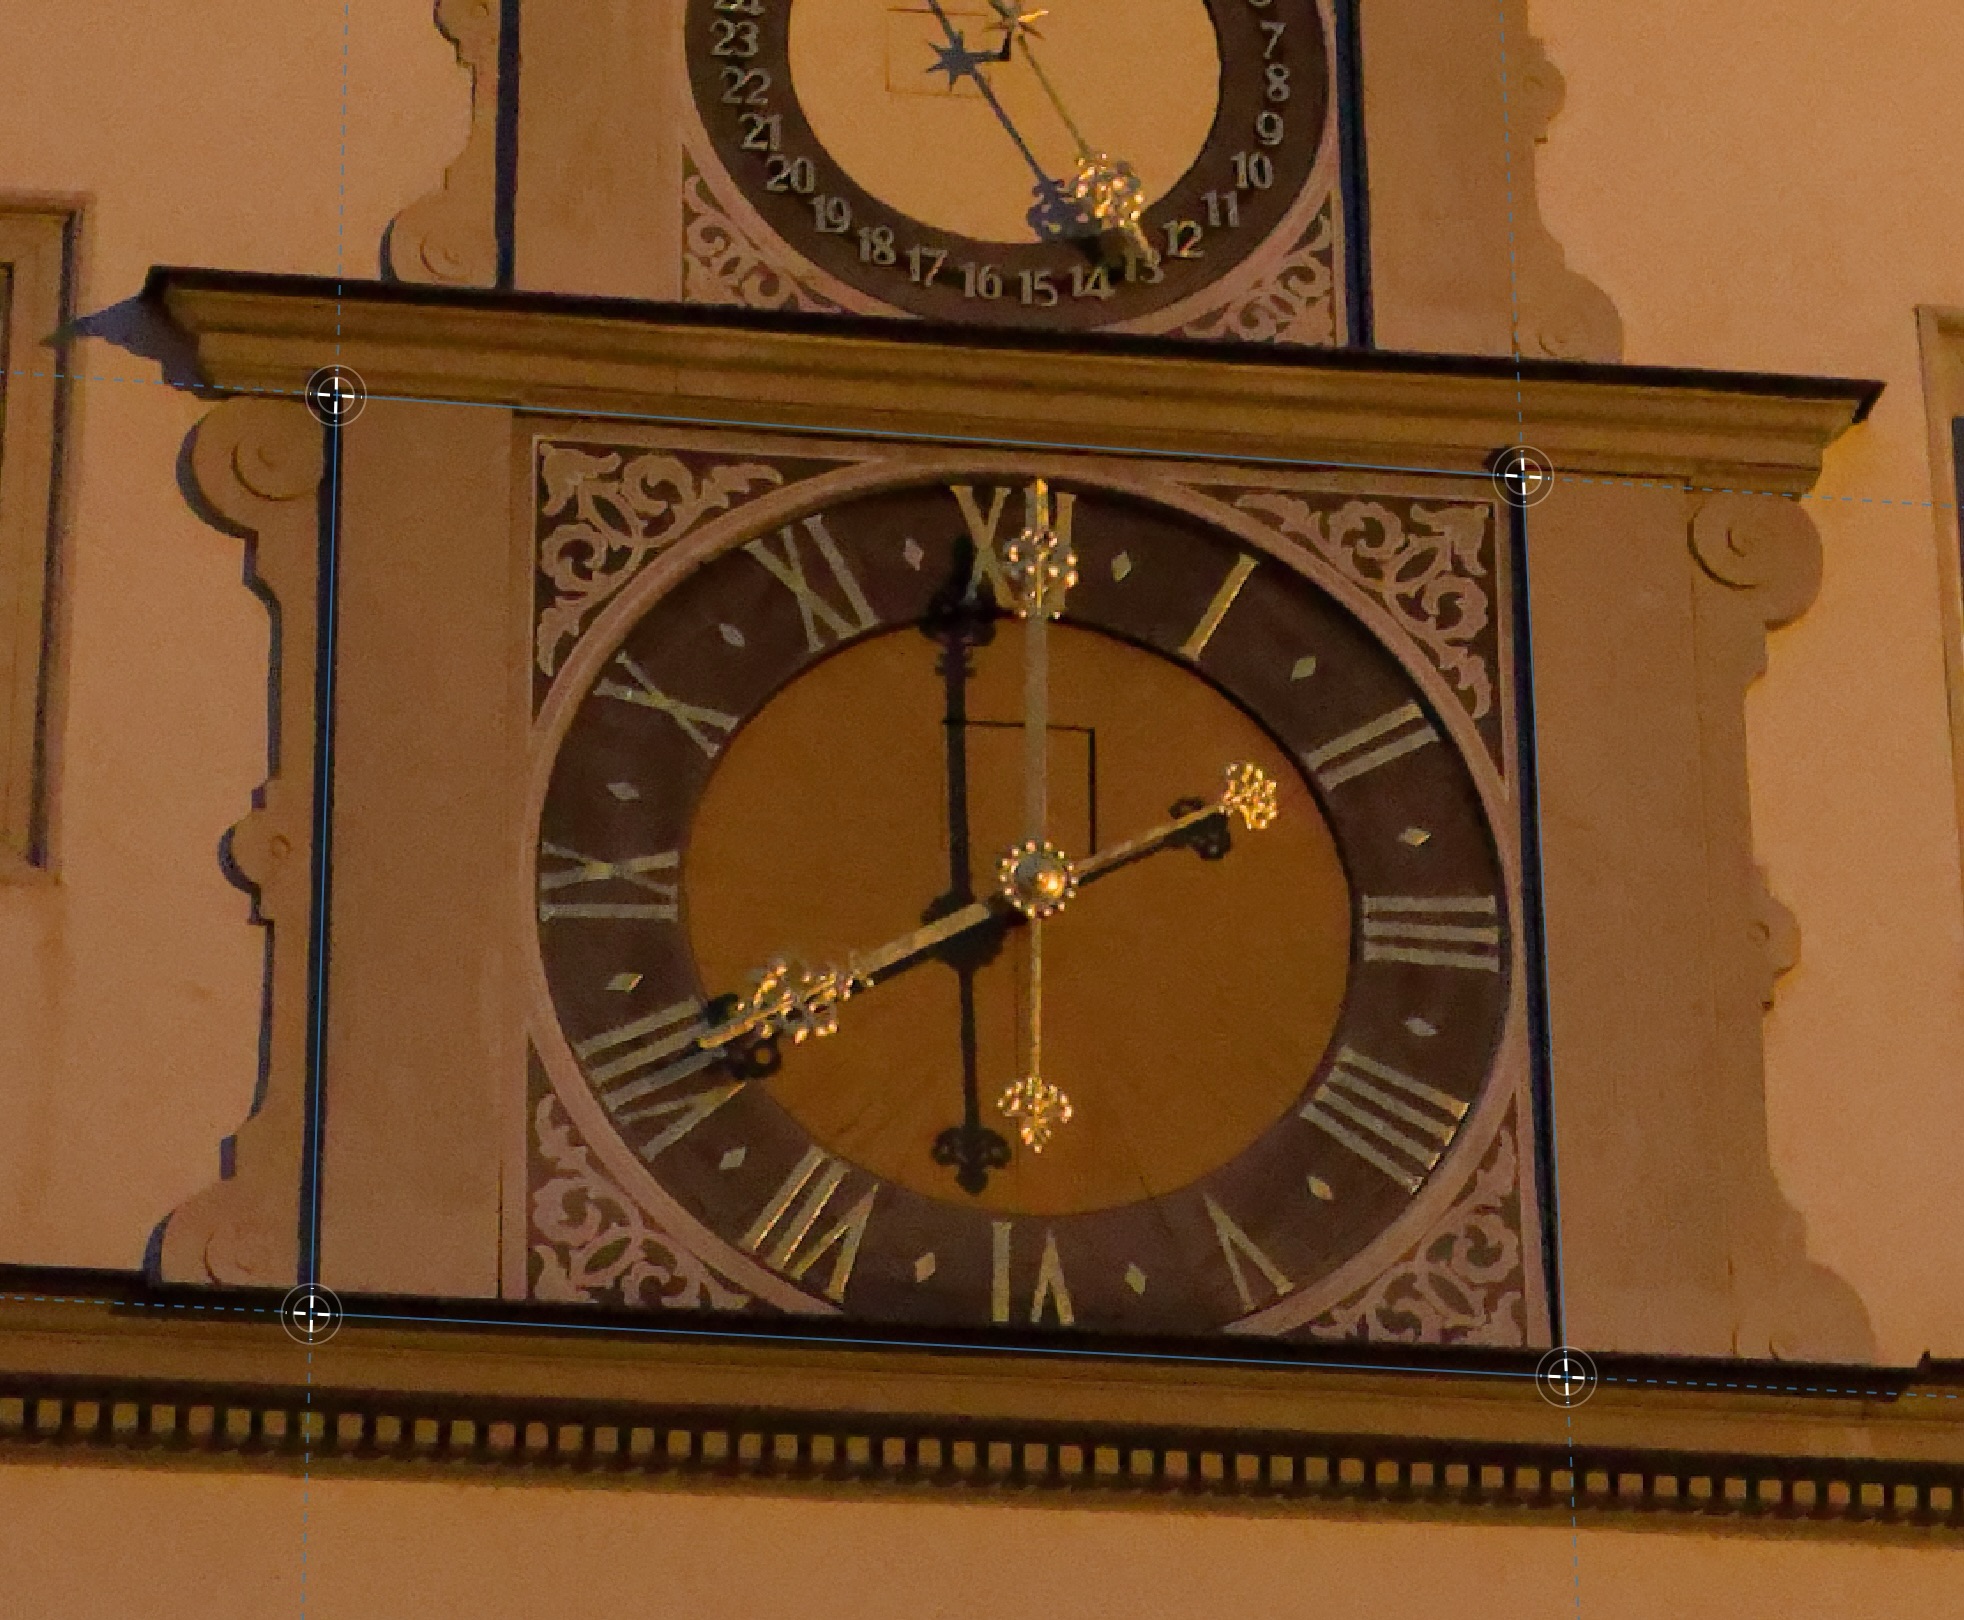
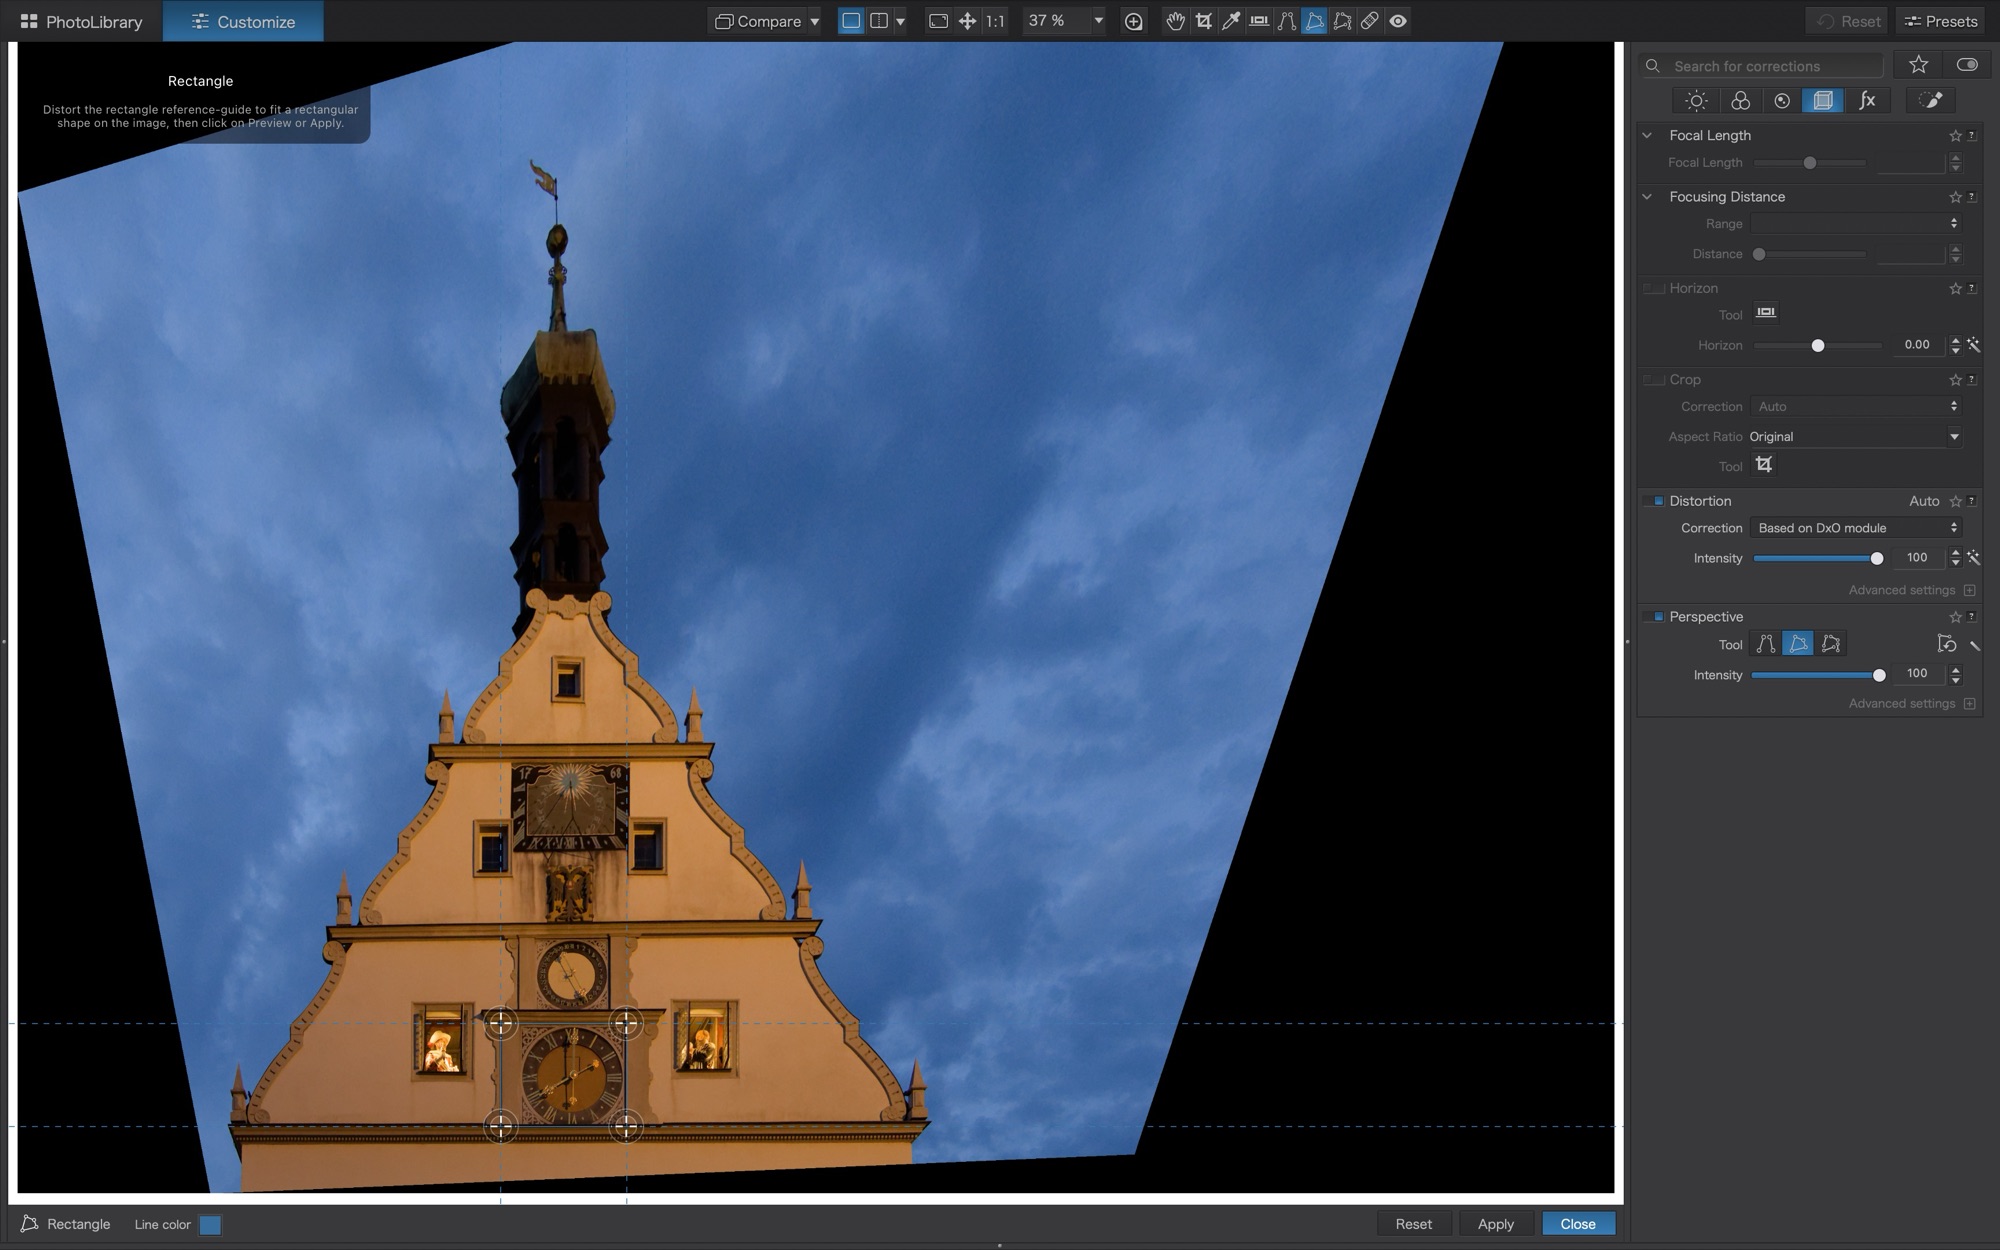
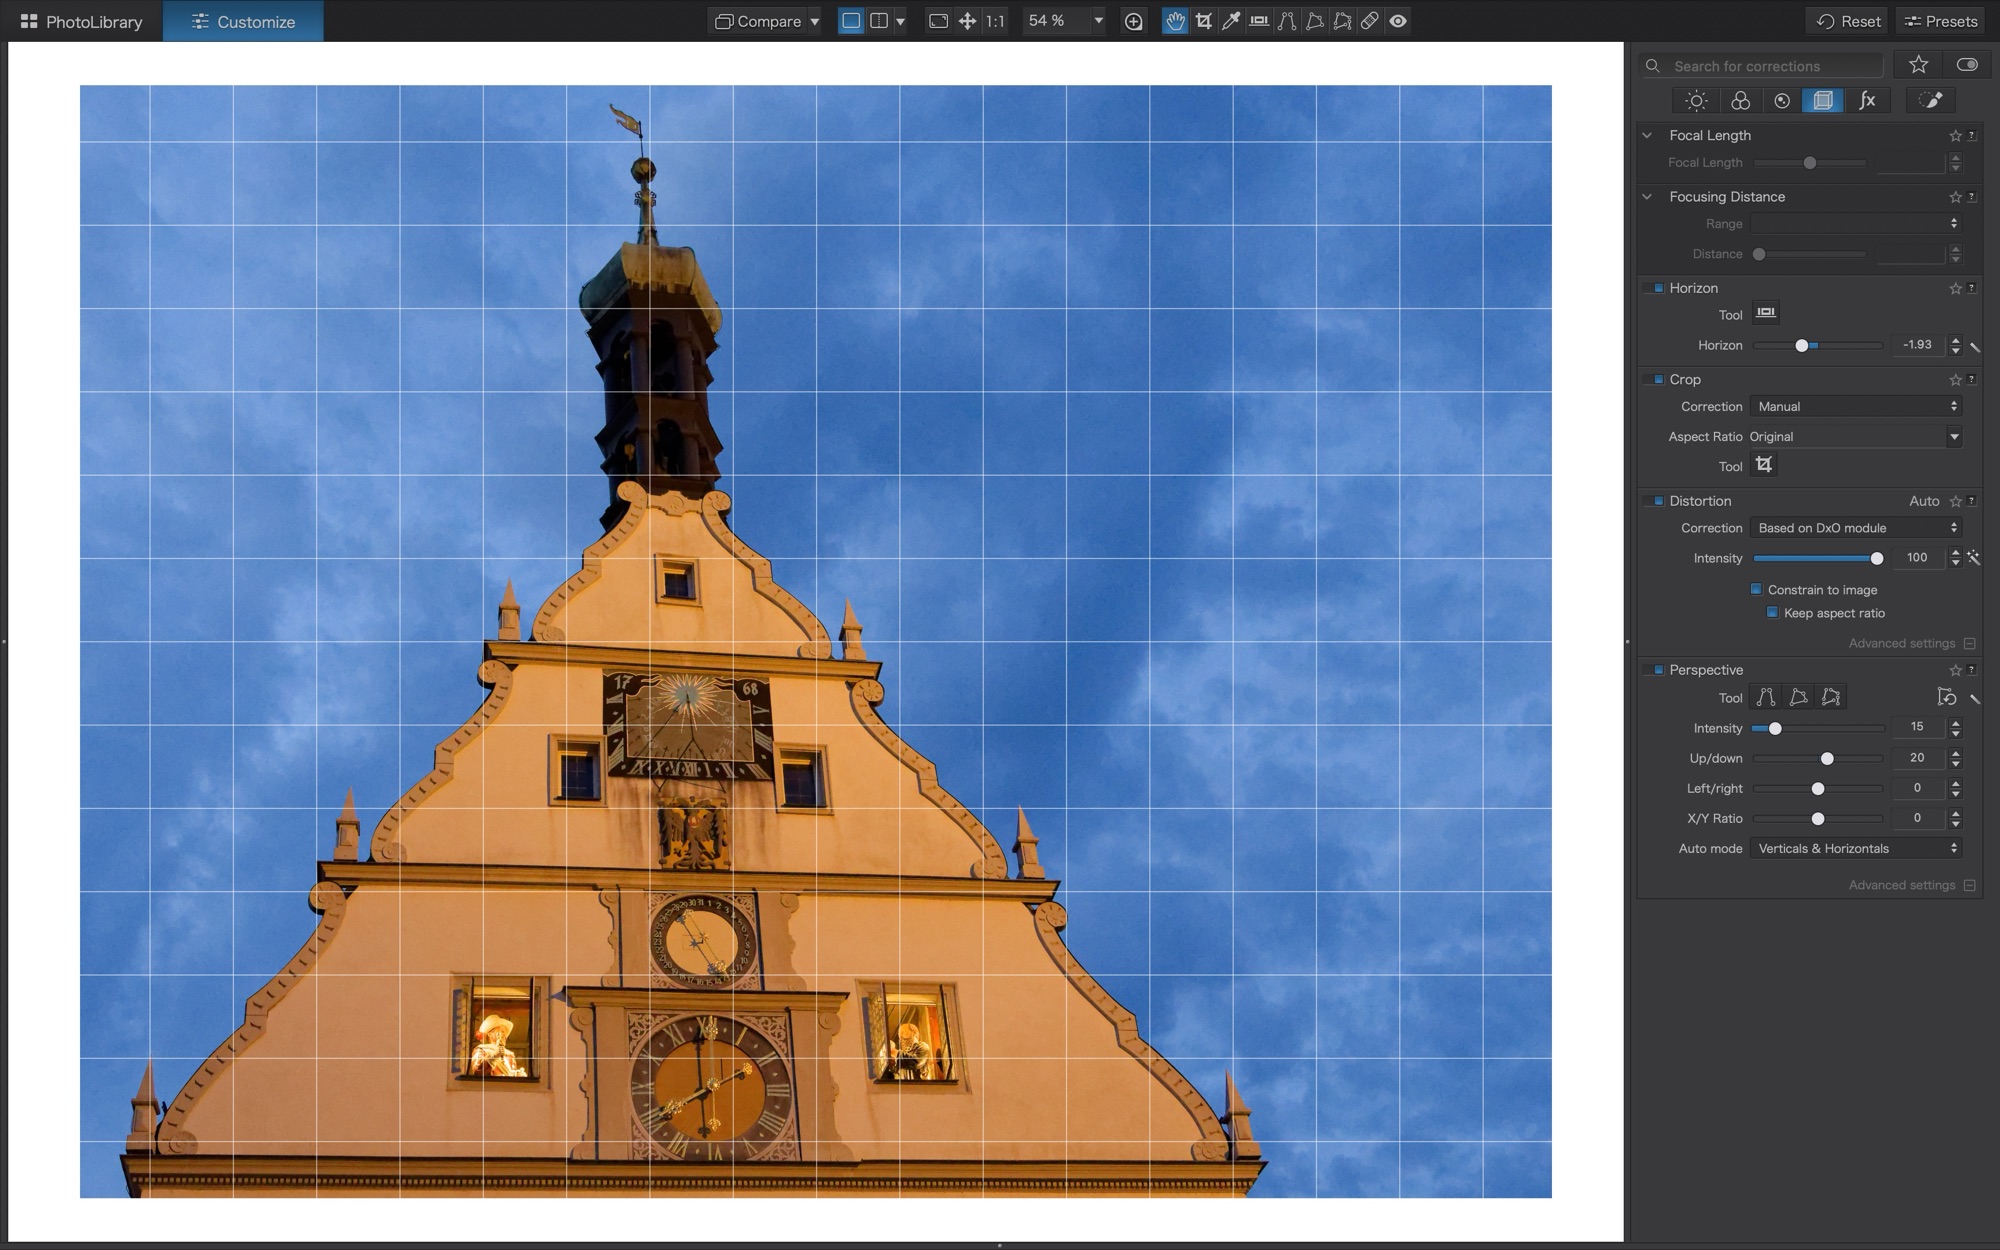
I must admit to being cosy with tools such as Straighten and the Transform functions of Vertical, Horizontal, Rotate, Scale, etc. of Lightroom. This is perhaps the greatest challenge I faced with PL9. Horizon (and Auto Horizon) is an easy switch for Straighten, but the Force Parallel, Rectangle and 8 Points tools took some getting used to. They are powerful—particularly when using Intensity to nudge the changes, as well as the Advanced settings under Distortion and Perspective—and may well be better than what I’m used to with Lightroom.
I love setting myself a challenge, in this case straightening an oblique view of the Rothenburg Ratstrinkstübe Clock Tower. This was a throw-away image as, at the time, I moved to capture it straight-on, but it provided me with a way of comparing PL9 and Lr, in this case, LrD. I’m happy with both results, though PL9 seems to edge out Lightroom in this regard.
There is so much to unravel with this comparison of PhotoLab 9 with Lightroom. We’ll take a break here and return with a look at monochrome, export, printing, and cost–and an overall conclusion.
Thanks for reading. Let’s turn this into a discussion—add a COMMENT or ask questions in the comments. Be sure to SUBSCRIBE and SHARE this with others who might be interested.
DxO PhotoLab 9 vs Lightroom – Part 1: Interface and Library
Can standalone DxO PhotoLab 9 dethrone Lightroom as the one-stop photo editing suite?
Part 1 of 3: 4543 words; 24-minute read; 4 photographs
This Review first appeared on Luminous-Landscape.com 6 Oct 2025
Background
Last month, DxO HQ in France asked me to review the newest iteration of PhotoLab, PL9, for Luminous Landscape. I must admit to being a bit surprised as I hadn’t found their PureRAW product (v.4 or 5) to be significantly better than Lightroom to denoise, demosaic, and sharpen raw files. However, with the amount of online chatter around Lightroom performance, the cost and value of Adobe’s subscription service, and other alternatives out there, I thought, why not? Let’s give it a whirl.
Just two days after DxO contacted me, I received an email from Topaz Labs informing me, as a ‘founding customer’, that Topaz is moving to a subscription service—Yikes! That announcement has put this review of PL9 into a stronger light for me, as PL9 is just about the ‘last man standing’ in the standalone field of full editing suites.
I applaud DxO for continuing a non-subscription-based software platform. When I asked directly, I was told by the official at DxO, “we have no plans to move to a subscription model”. Good to hear! Frankly, Adobe needs the competition, not just to keep them competitive on pricing, but also to urge them to innovate and improve.
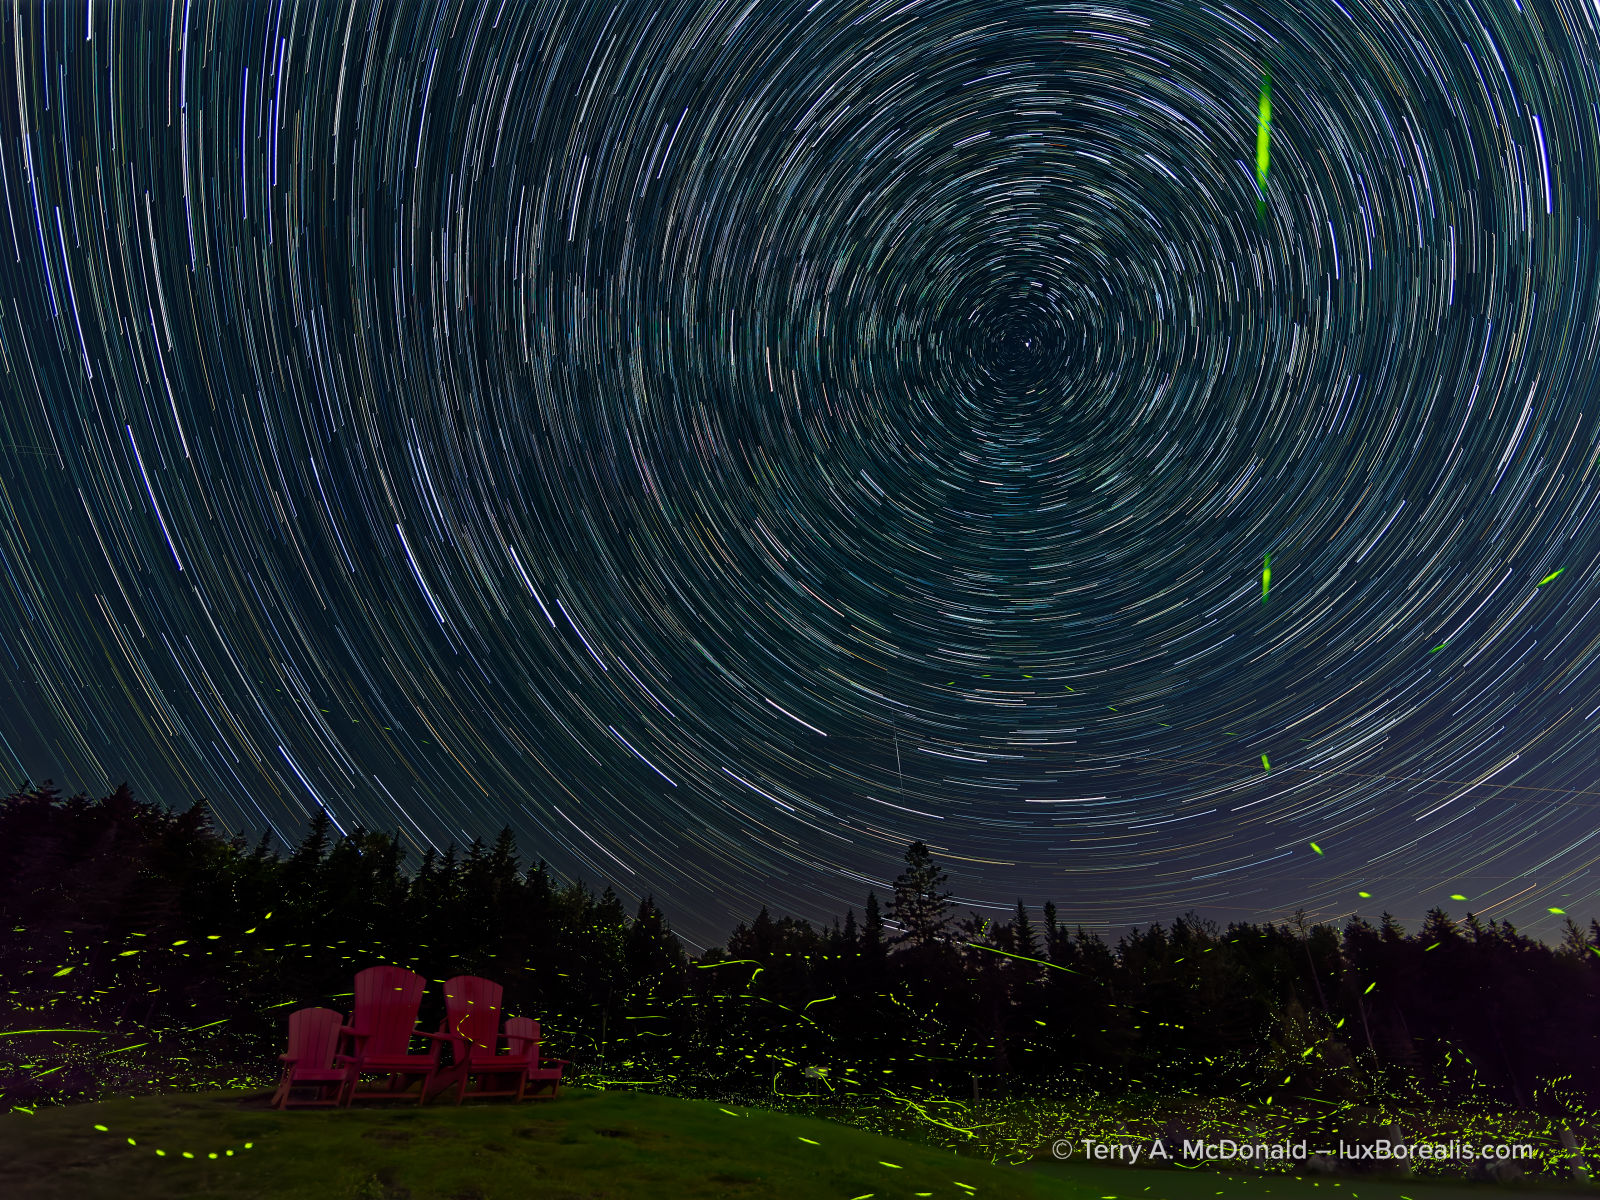
OM-1 | 9mm (18mm efov) | ƒ2 @ 40x1min. | LiveComp | ISO 400 | PhotoLab 9
I am very pleased with how well PL9 handled this image file, especially the tweaks to the green lights of the fireflies, and the sky mask and the masks needed for the grass and chairs in the foreground.
DxO has industry-leading demosaicing, denoising, and sharpening—that’s not in question here. It’s all the other aspects of photo management and editing that will be examined. To me a ‘full editing suite’ is one that allows users to:
- input images, organize them in a library, and manage them, numbering in the tens of thousands, to create custom albums/collections/projects, with a robust search function;
- add metadata such as copyright, geo-tagging and keywords;
- process with nuanced exposure, colour and monochrome control using retouching and adjustment masks; then
- export files for a variety of uses including printing;
—all with efficiency and speed through each stage. These are the functions I am used to with Lightroom; I would expect nothing less from PhotoLab 9.
Before we get too far, let’s clear up a few abbreviations and references; Lightroom (Lr), itself, creates the confusion:
- PL9: DxO PhotoLab 9 Elite – the complete version of the app;
- LrC: Lightroom Classic – the original, full-featured version of Adobe Photoshop Lightroom (its full name), useable only on a desktop or laptop;
- LrCC: typically called just Lightroom, this version uses Adobe’s Creative Cloud to store images and refers to BOTH the MacOS/Windows version (commonly called the ‘desktop’ version, though it’s also compatible with laptops), the online version, AND the mobile version for tablets (iPad and Android);
- LrD: I’ll use this only when referring to the MacOS/Windows ‘desktop’ version of LrCC; the desktop version is close enough to the web version that I won’t make a distinction between the two;
- LrM: I’ll use this only when referring to the tablet version of LrCC for iPads and Android tablets, which is a paired down (some would say ‘handcuffed’) version of LrD.
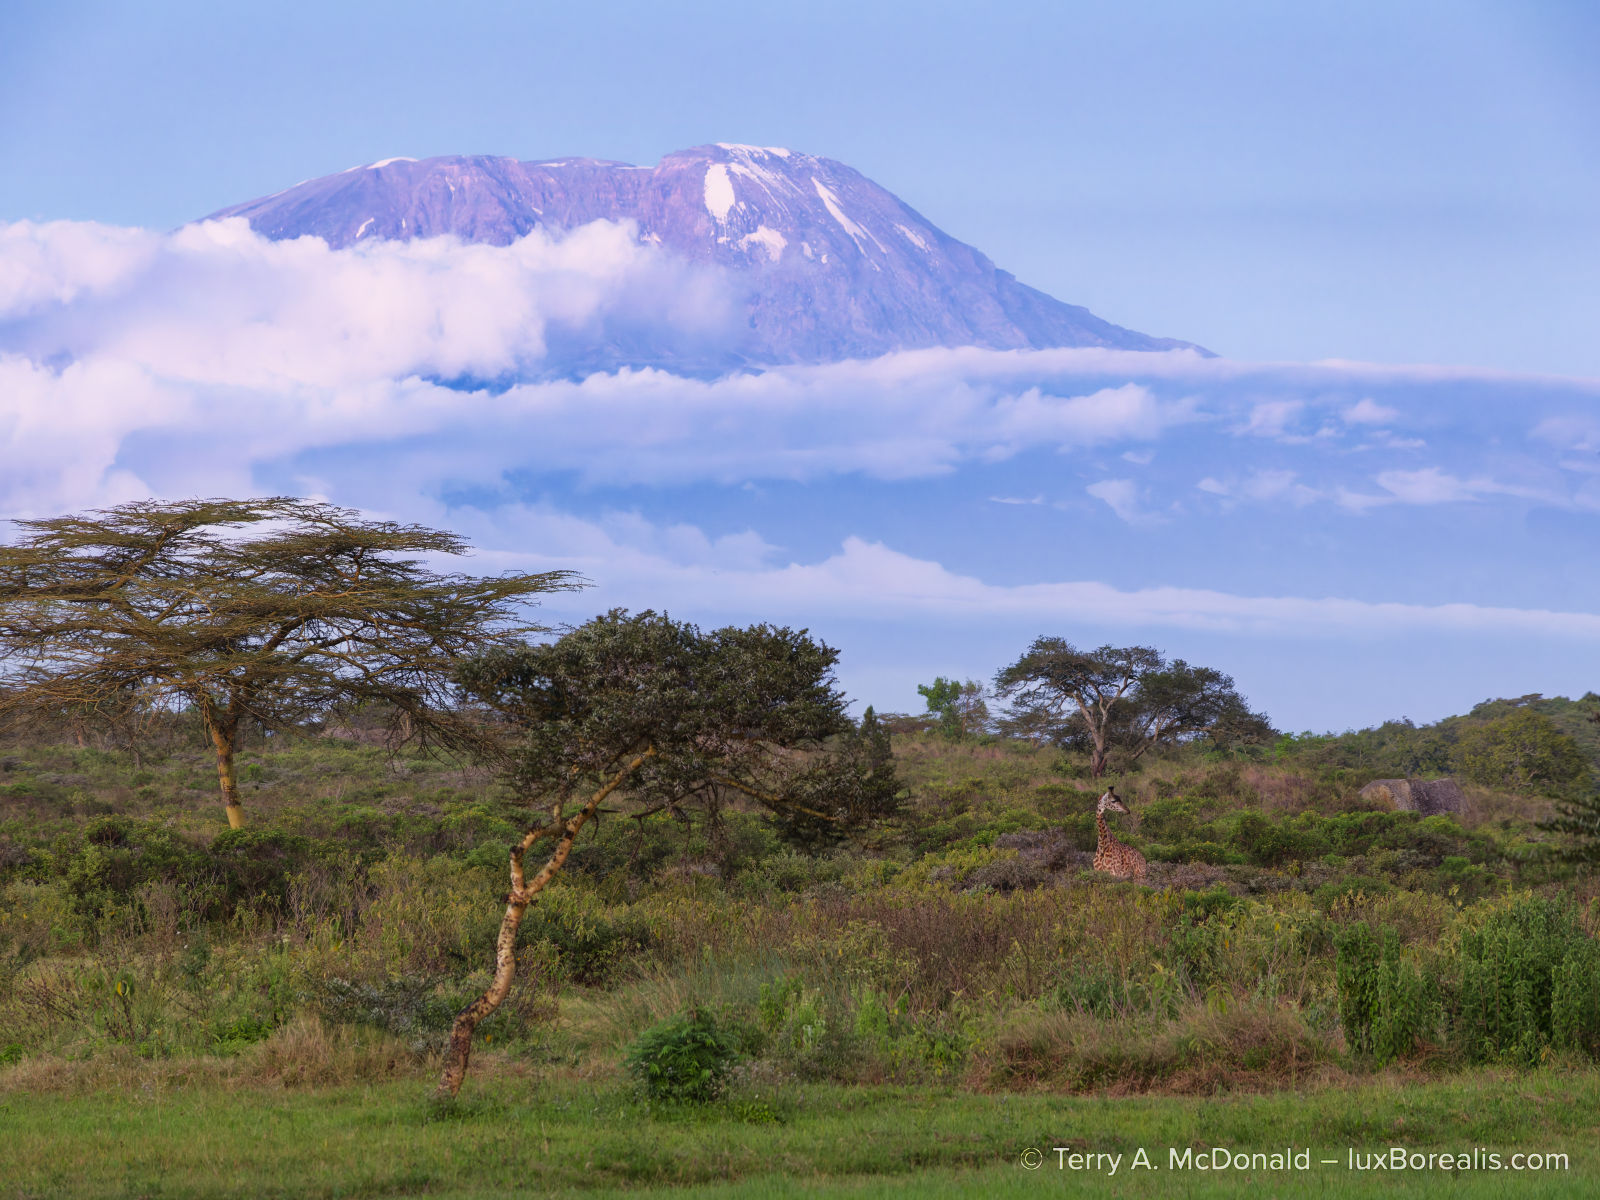
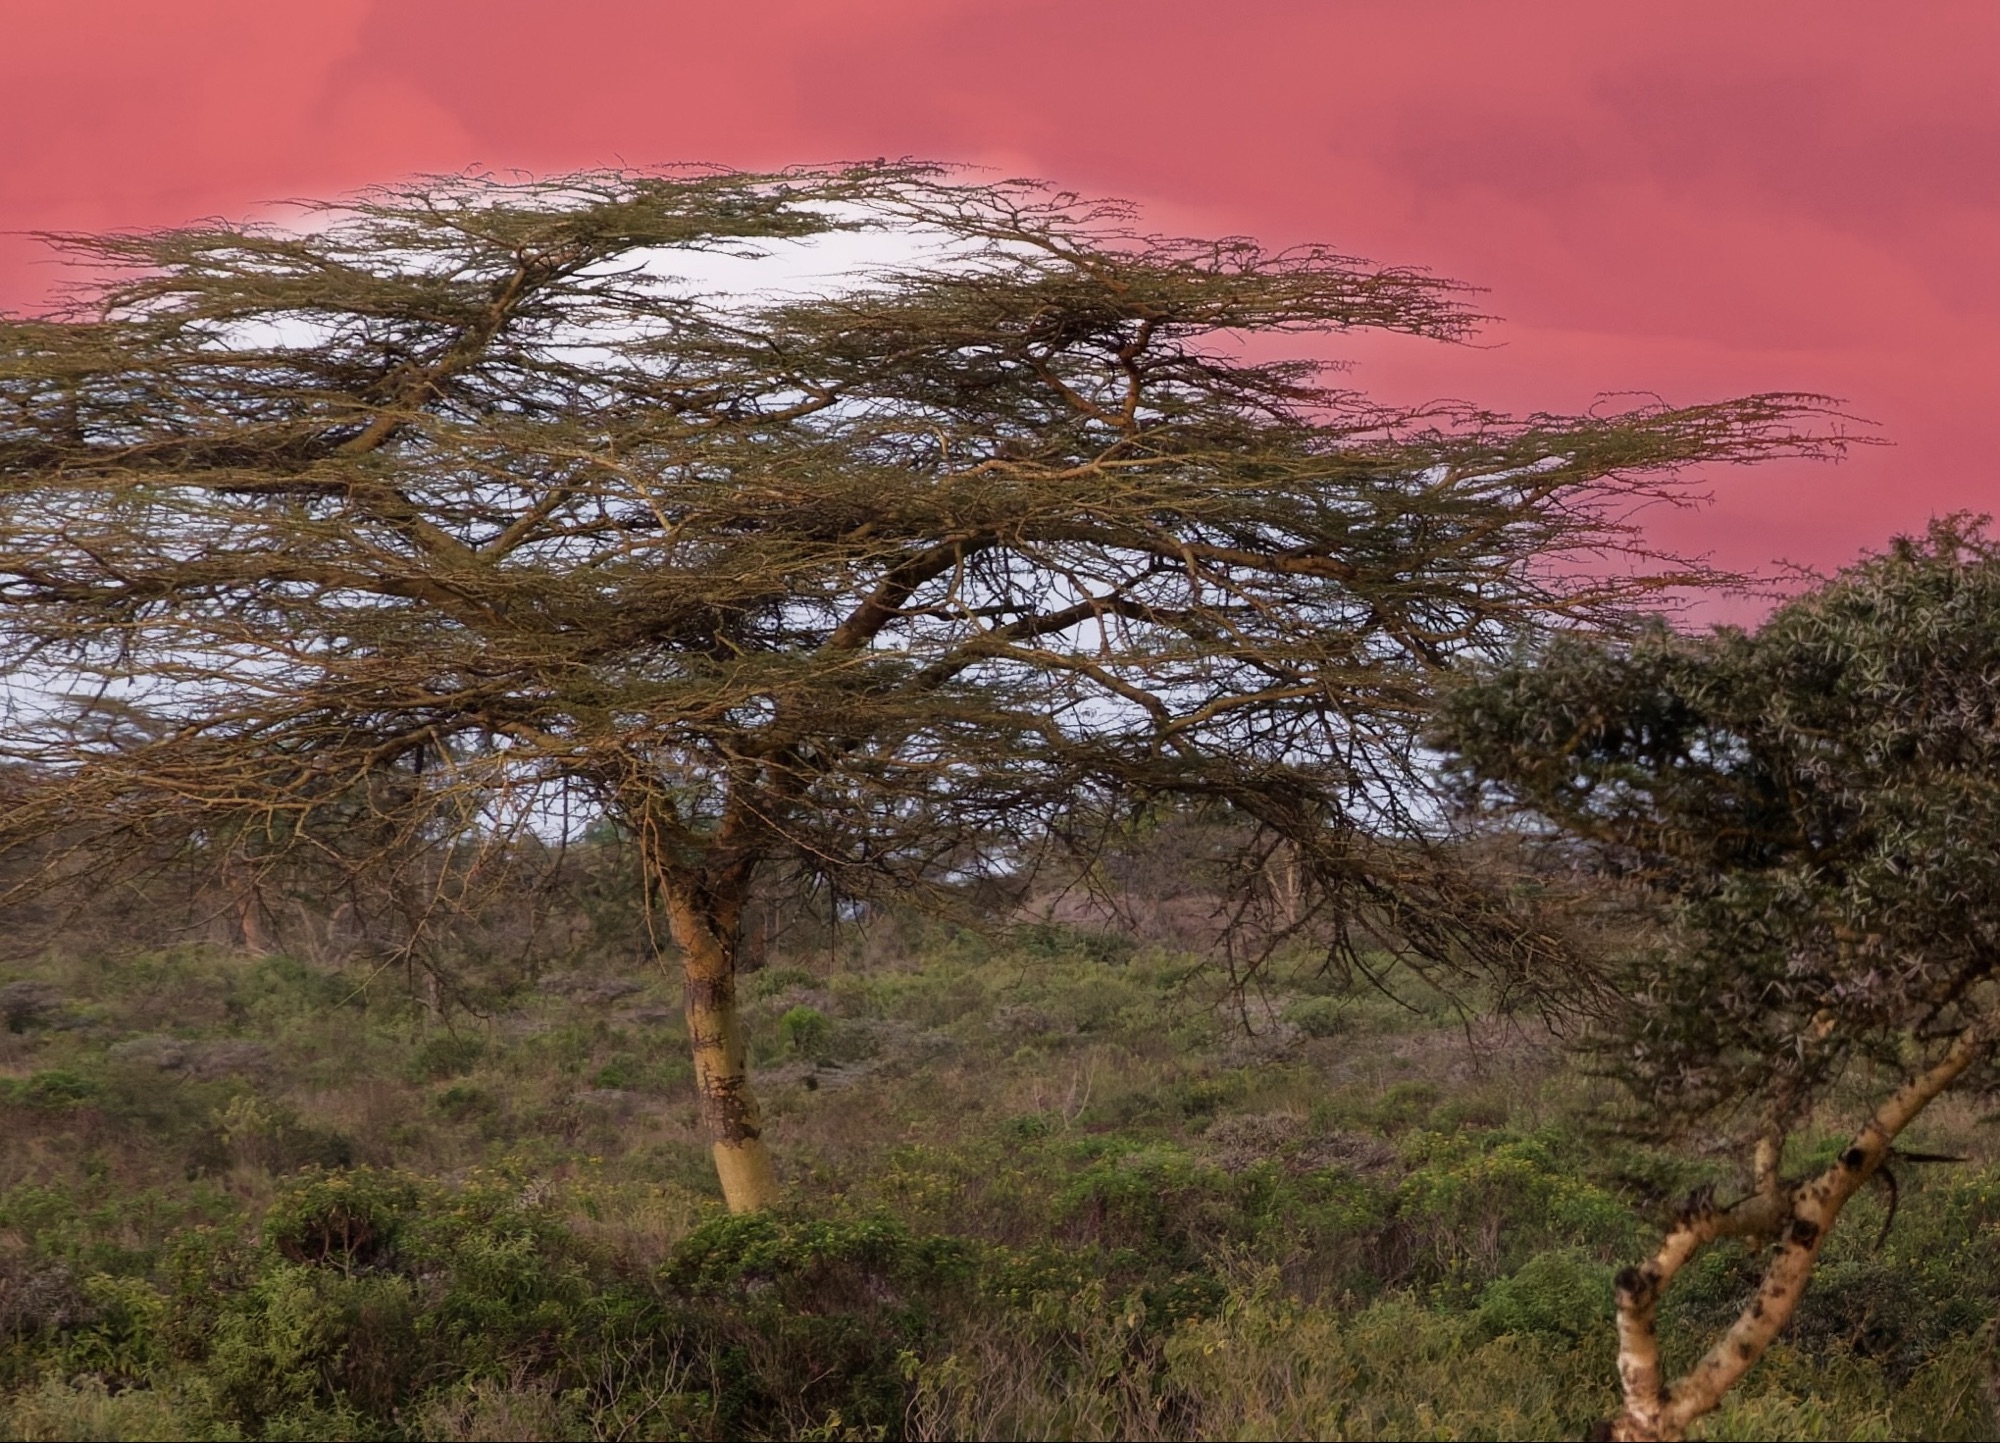
OM-1 | 100mm (200mm efov) | POL | ƒ5.6 @ ⅓ | ISO 800 | DxO PhotoLab 9
DxO’s excellent DeepPRIME XD/XD2s was supported by masking using a Grad ND sky mask with the foreground trees removed using the AI mask removal tool. I notice that lens vignetting in the top left and right was not corrected despite using the correct lens module. They were subsequently removed with Grad ND masks.
As you may have guessed, this is not some promotional glimpse at all the wonderful features available in PL9. This is a deep dive into the app, and I’m approaching the review as a longtime user of Lightroom, both Classic and CC, since each was introduced. I want to know if PL9 can replace Lr as my go-to editing suite. My goal is get under the hood and down to specifics of how the app works, really pushing PL9 to do what has long since become intuitive to me with Lr.
Challenging me to do all of this with an app new to me may sound unfair, even unrealistic. How can I possibly know all subtle and nuanced ins and outs of PL9 compared to Lr? And, what about my Lr-bias?
Regarding Lr-bias, I’ll be upfront: I recognize my bias, but I would love to find a standalone app that would replace the Adobe subscription model I’m shackled to. So, I’m going to be thorough and nit-picky. Any aspect that is better than Lr, I will herald; anything that’s not, I will point out, then go back to work to find a seamless solution within PL9. I really want PL9 to work for me. I want PL9 to shine.
As for my limited experience with PL9, I’m well used to working with a variety of editing apps—Topaz Photo AI, ON PhotoRAW, OM Workspace, Affinity Photo and Photoshop. I also use and have reviewed DxO PureRAW 4 and 5, so I’m not completely in the dark. But, editing a photograph is far more complex and nuanced than simply applying denoise, demosaic and sharpening, so I have dug down to really learn the app over the last month. I have put to the test all aspects of editing: exposure and tone control, colour balance, retouching, making monochromes with toning, masks—the works—as well as the complete experience of using PL9: the GUI, the Photo Library, its speed, and the overall feel of the app experience.
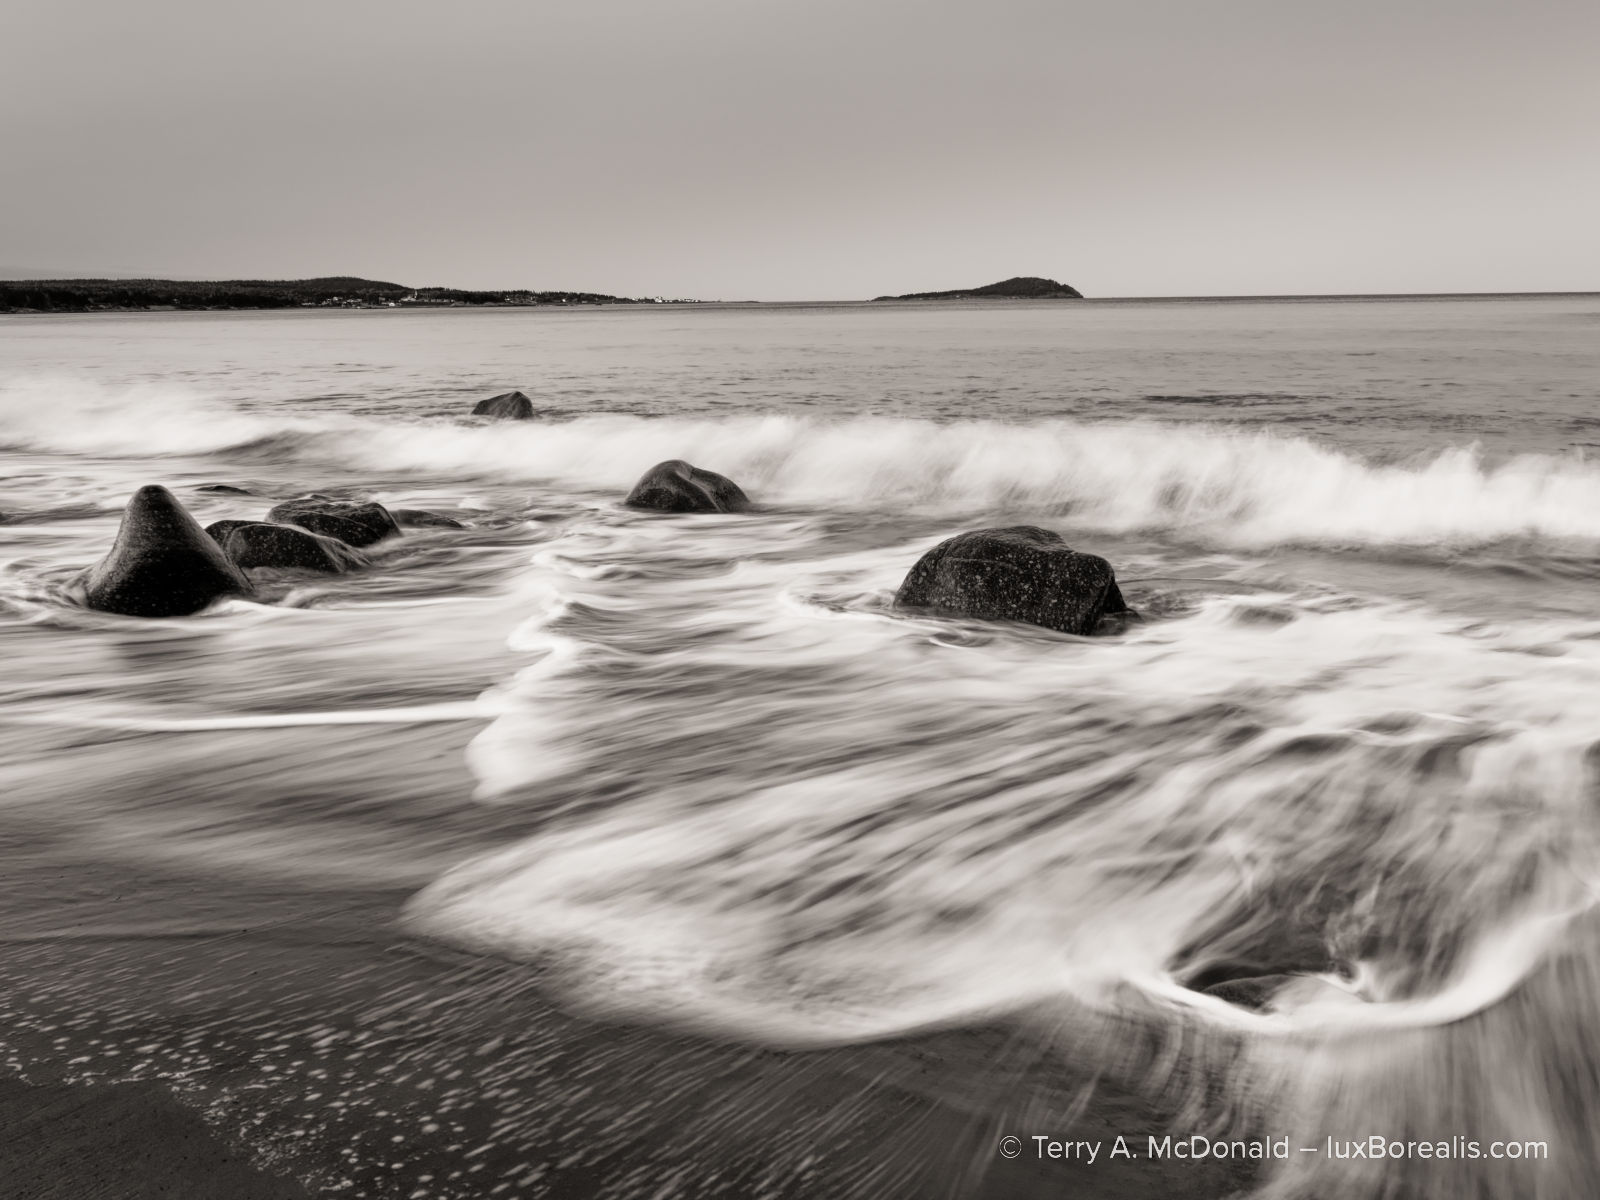
OM-1 | 16mm (32mm efov) | ƒ5.6 @ ⅗ | ISO 800 | LiveND 64 | PhotoLab 9
Although PL9’s black-and-white options are minimal, they are effective. Unfortunately, PL9 relies on purchasing add-on software (FilmPack and/or NIK Collection) to fully realize the potential of monochrome images.
Full Disclosure: Although I received DxO PhotoLab 9 at no cost, I have reached my own conclusions by testing my own images, ones chosen for both my familiarity with them and for their complexity either with high ISO noise, masking needs, and/or tone/exposure balancing. While DxO requested the review, they have had no further input into the results of my review.
I’ll be honest. I have always been impressed with DxO, beginning with DxO Mark. Their testing of sensors and lenses over the years have always been refreshingly scientific in approach, creating confidence in the results. I hope I can do the same here. Another reason I’m interested in DxO PhotoLab 9 is because of the Library attached to it, its Photo Library.
Having access to all my photos at my fingertips is an essential efficiency. Any editing suite that does not have a Library feature is useless to me. With tens of thousands of images, I don’t have time to be flipping through folders and sub-folders. I must be able to find specific images within seconds. I can do this in both versions of Lr; can it be done in PL9?
Let’s set up PhotoLab 9 and the Photo Library . . .
Start up
Install was completely straightforward, with no issues. Before opening PL9, I selected a set of images from Lightroom and exported them as unmanipulated original raw files. They are a mix of 1” sensor, M43s, 35mm sensor, and camera phone photos. They may be familiar, but they are not without their complications as I chose both low and high ISO files and photos that demand the use of Local Adjustments (Masks). I want to confirm PL9’s top-rated raw file optimization, but more importantly, I need to test how capable and nuanced the library and editing are.
iPhone 8 Plus | 4mm (28mm efov) | ƒ1.8 @ 1/640 | ISO 20 | DxO PhotoLab 9
DeepPRIME XD/XD2s cleaned up the sensor noise. A Grad ND mask was used over the upper right of the sky plus an auto brush mask over the water.
Sadly, the first thing I learned was that PL9 cannot process my iPhone 11 Pro DNG (raw) files made with the Lightroom camera. While they are not ’true raw’ photos (even ProRAW files are processed in-camera before you see them) (DxO), it shouldn’t matter, especially since PL9 will process JPEGs. Interestingly, although PL9 can process DNGs from my older iPhone 8 Plus, it won’t play with HDR-raw DNGs. This is unfortunate, as serious iPhoneography is more common than many realize.
According to DxO, “DxO PhotoLab 9 now supports Apple’s HEIC/HEIF and ProRAW formats, letting you bring DxO’s processing power to images captured on your [newer] iOS devices.” which is a good thing. However, according to this DxO Forum post “There is no support for single-frame RAW DNGs from third-party apps like ProCamera or CameraPixels. Same for the DNGs produced by the Adobe Indigo Project camera app.” Too bad, as ProCamera is one of the leading professional phone camera apps.
GUI
An app’s interface is like your kitchen or workshop. To build a workflow that works for you, the tools you need most must be close to hand. PL9’s interface does this incredibly well, and has the added bonus of significant customization. But first . . .
Background Canvas
The first thing I changed was the background/canvas of the image view panel, from dark grey to white (Settings > Display). When making tonal adjustments to photos that will appear against a white background, which includes most online photos and prints—in books, calendars and as framed photographs—a white background calibrates both the image and your eye to the complete tonal spectrum, enabling more accurate tones and hues. Adjusting tones when an image is against a dark background often results in photos that appear slightly dim when presented against a white background.
Back to the GUI . . . Beginning in the top left, there are buttons to switch between the Photo Library and Customize, the processing/editing side of PL9. Thankfully, there are also keyboard shortcuts for each of these commands. I hate the seek-and-find scrolling and clicking of buttons; using keyboard shortcuts keeps my eyes on what I’m doing—typically, the image I’m working on.
Along the top of the Photo Library view are various buttons to compare images and zoom. The pre-set zoom percentages are restricted to 50%, 75%,100% and 200%, with no 25% or 300% or 400%. Of course, the user can pinch to zoom using a touchpad. One niggly is that when ’Fit’ is chosen, the image is zoomed until two sides of the image are right against the black frame, leaving no white space. Having a margin of a half centimetre/quarter inch of white (as Lr does with Fit) would be helpful for maintaining the aesthetic of the view and, more importantly, the eye-image tonal balance, the whole reason for having a white background to begin with.
In Customize, (just double-click on the preview image) a variety of buttons are added to this array, including Crop (R), Horizon (H), and Retouch (N), amongst others. I like the addition of a Loupe tool (S) to check details at 100% (or 200%) while viewing the whole image in Fit view. To reduce, even eliminate any processing lag, the Loupe can be used to preview DeepPRIME and DeepPRIME XD/XD2s denoise when they turned off in Settings. More on this later.


Shifting Palettes
The most significant customization is the ability to shift palettes between the left and right panel, or set palettes to float over the image. This is handy is just like with Affinity Photo and Photoshop. Palettes can also be removed from a panel, yet are still retrievable via the Palettes menu in the menu bar. Lightroom allows similar customization of the Develop panel, shifting palettes upa nd down the order and toggling off those not used. But more on this in OoO under Customize.
It’s important to note that both PL9 and Lr suggest an order of operations through the default order of the palettes. While there is no right or wrong order with PL9, the more high-intensity processes, such as denoise and masks, should be done towards the end to avoid unnecessary lag times.
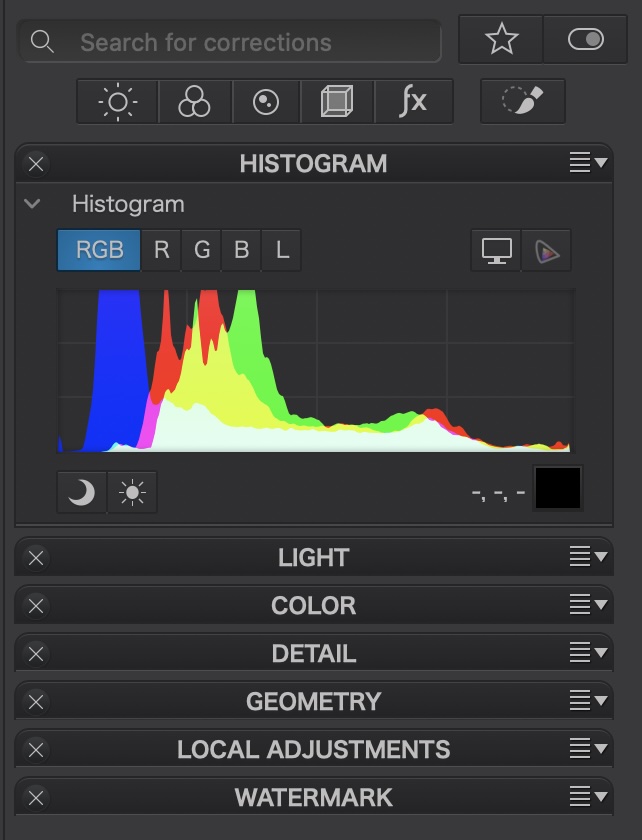
However, one palette I moved was the all-important Histogram. I prefer to edit with only the right panel open. This provides more screen real estate for the image being edited. Yet, upon opening, PL9 had the histogram in the left panel. Not any more. It’s now lives in the top right, above Light where I can see it as I adjust exposure and tone.
An advantage of the PL9 Histogram over Lr is its detail. Not only does it show Luminance and RGB values, the user can turn on the gamut warnings, then select each colour channel to, for example, determine more precisely which colour is triggering the warning. This can also be seen in RGB mode as well. The out-of-gamut warnings appear in a hue opposite of the colour going out-of-gamut. For example, when yellow is out of gamut, a cyan colour appears. How very helpful.
Unfortunately, the histogram is not ‘sticky’; it disappears when the ’Light’ icon is selected and when the Favourites are selected. Solution: I drag it out as a floating window then drag it back in when finished. I’m liking this!


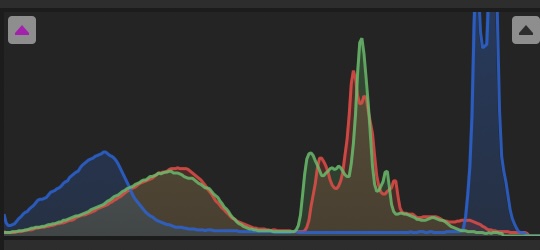
Histogram palettes from left to right: PL9, Lr Classic; LrCC Desktop
Two additional improvement DxO can make to the Histogram are (1) allow it to be favourited with the blue star to keep it always visible, if the user chooses; and (2) tone down the bright, saturated colours of the histogram as I find them distractingly enthusiastic.
I also removed the Tone Curves palette, as I did with Lr. I know, shocking, but despite many years of using Curves in Photoshop, since Lightroom adopted its White-Highlights-Exposure-Shadows-Blacks system of discrete tone controls, I’ve found little use for Curves. Frequently during workshops and courses I’ve conducted, I’ve seen users using Curves at cross-purposes with the various exposure sliders.
Taming the Palettes
One area I would like to see improved is the overall ‘elegance’ of the app. Without some ‘tidying’, the right panel can look like an overstuffed toolbox or kitchen drawer, with dozens of lines of narrow processing functions close together. Within each palette, there are several options users need to click open/close as they make their way down the panel. Users can reduce the clutter by opening one palette at a time, making adjustments, then closing it. Adopting Lr’s ‘Solo Mode’ could further improve this by automatically closing an open panel when the next palette is selected.
Alternatively, users can simply use the buttons at the top to select which palette to work with. Just beware that the Histogram disappears when individual buttons are used. It would be helpful if DxO finds a way to keep the histogram visible if a user so chooses.
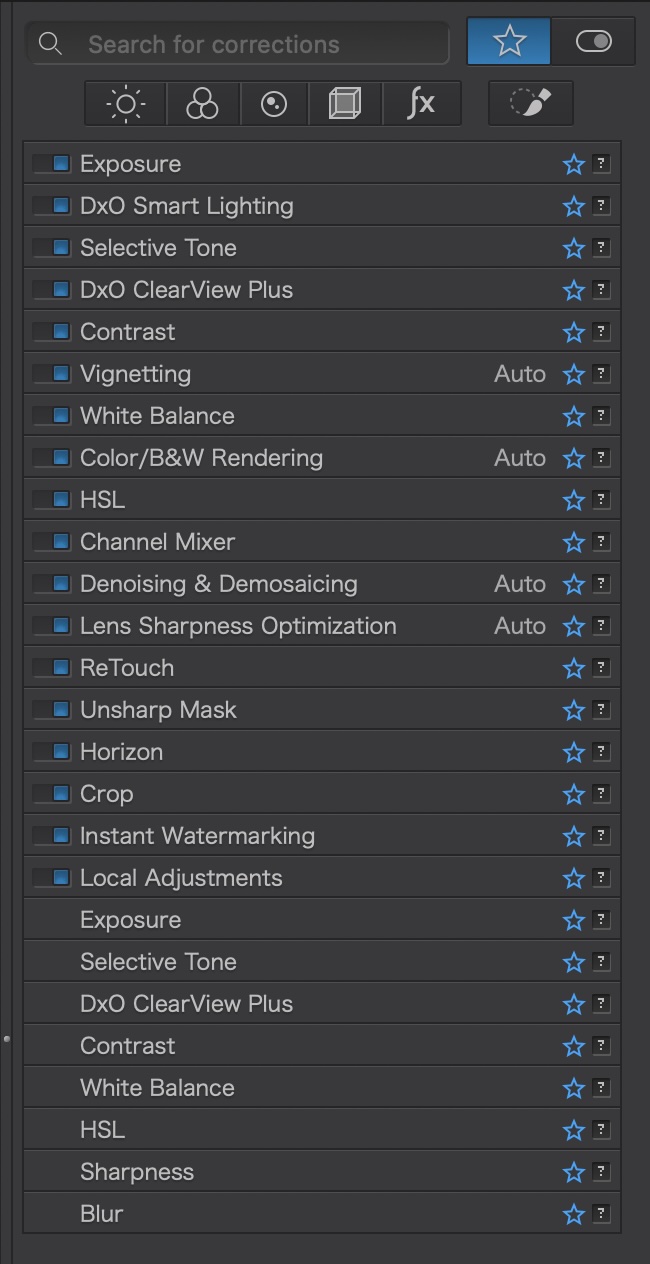
Another method of organization is with Favourites by selecting the blue star to the right of a process. Selecting the large star in the top right will reduce the toolbox to just those that have been favourited. With so many processing options, this is an ideal way of prioritizing the ones used most frequently. To clean up my workbench, I selected only those processes I regularly use, leaving out things like Working Colour Space (it’s always set to DxO Wide Gamut), LUT Grading, Style-Toning, and Soft Proofing, amongst others. It’s still quite full, but it helps.
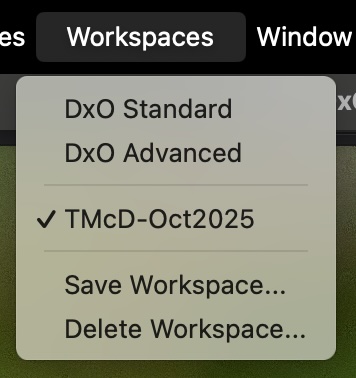
The best part of this customization is that once I have dragged and dropped palettes into a framework that is efficient for me and favourited chosen processes, I can Save my Workspace. Fantastic!
I must admit that, overall, I find LrCC to be the most elegant. The font and spacing between lines of text (the leading) in LrCC makes for easier reading. Sounds nit-picky, but when working with an app for hours on end, it becomes significant.
Adjustment slider behaviour
One hurdle I’ve found to distraction-free editing with PL9, is the behaviour of the adjustment sliders. I’m not one to drags sliders up and down looking for the right ’look’. For one thing, you can’t always do this with PL9 as there is often a lag time after every change (more on lag time below). But I also find slider-dragging too imprecise.
Typically, I use the cursor/arrow keys to increase and decrease values. With PL9, the cursor only changes values in small increments of 1 or 0.1. With Lr, I have the choice of holding Shift+Cursor up/down to make larger-increment jumps of 10 or 0.33. Typically, I increase/decrease a setting in jumps of 10 until I go past the ideal. Then, I’ll creep back to it using just the up/down cursor key. This is not possible with PL9. I find myself looking away from the image to the slider to make changes or I rapidly tap the cursor in burst of 10 for larger-increment changes. This is not what I would call a smooth action.
Photo Library
You’re likely wondering, why I’m writing about ”library” features when we’re talking about editing and processing?
A Photo Library is the organizational hub of your editing system and a highly under-rated key component. But when you have tens of thousands of image files spread over many years, it becomes your lifeline. When I have a call for photos, I don’t have time to flip through folders like shoeboxes of negatives; I need to access them without having to wonder where they are. And PL9 does it, mostly.
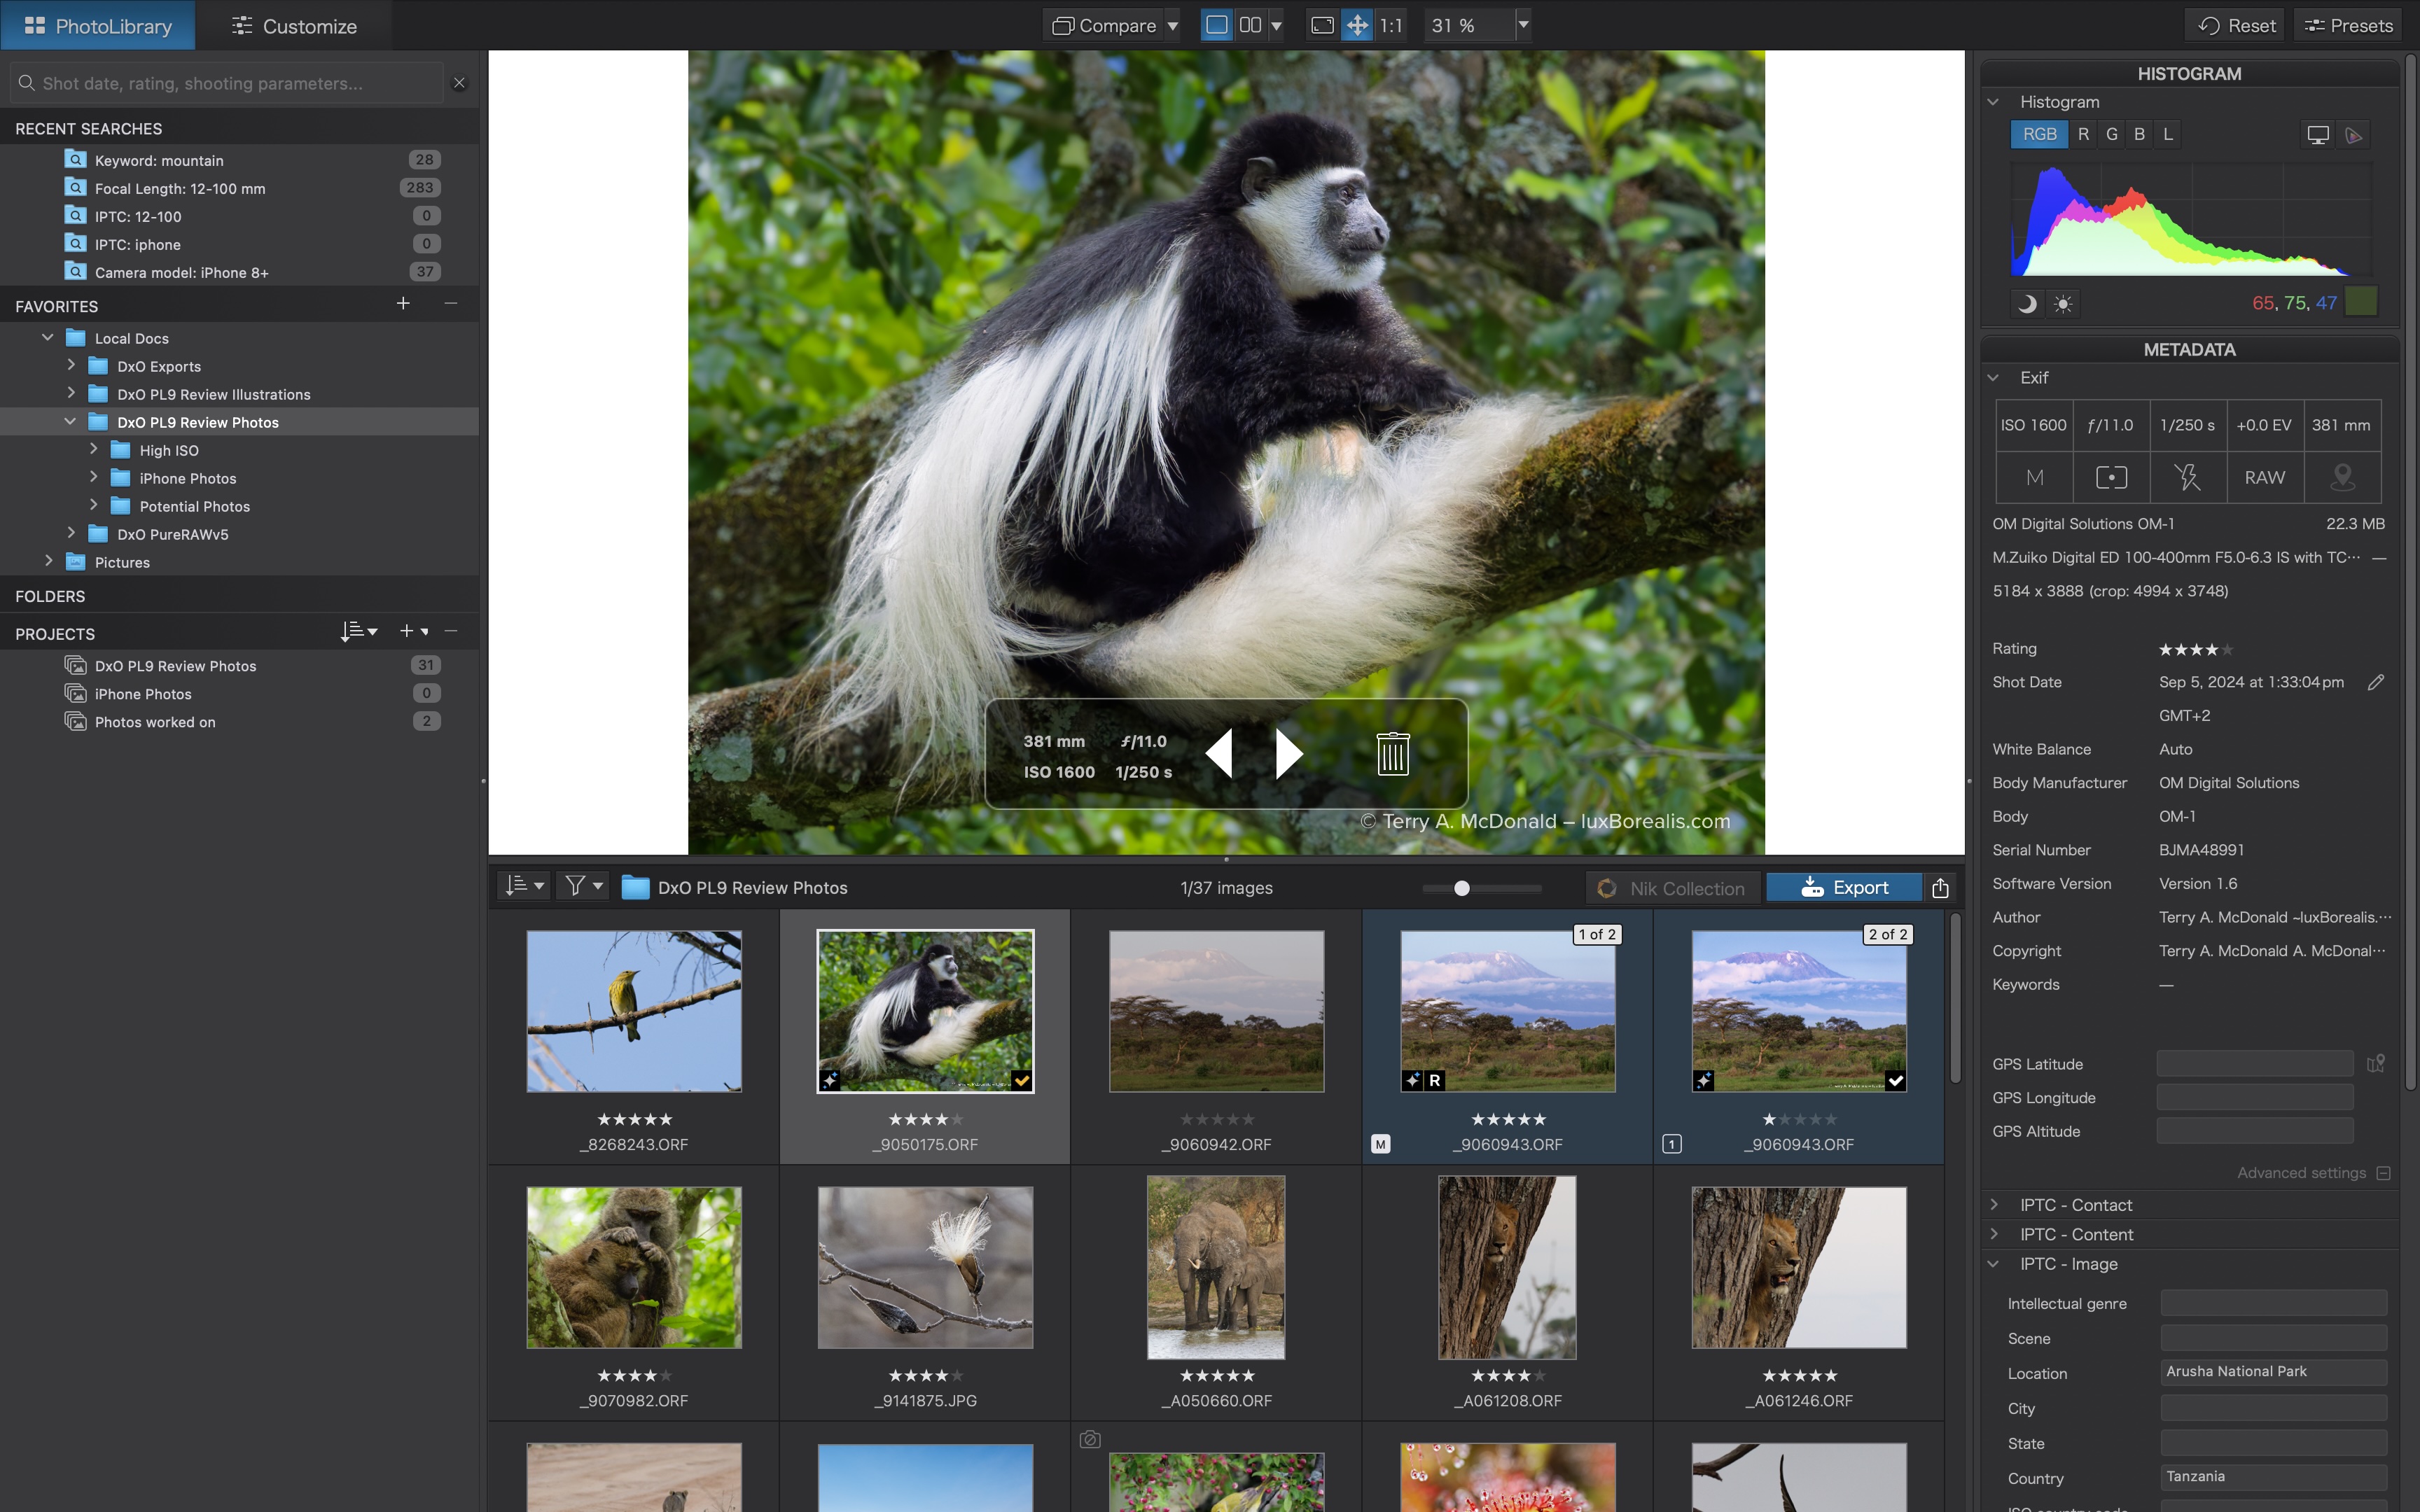
Photo Library has a left panel for navigation, a right panel for metadata, and a very helpful split screen in the middle, showing a selected image and a contact-sheet-like display of the images in the folder. This image browser section can be re-sized for multiple rows of images—how very helpful! Any image in the browser can be viewed in the viewer with a single-click or, with a double-click, can be opened directly in Customize. Brilliant! LrCC has only a single-row filmstrip at the bottom; LrC has neither, so PL9 is definitely ahead in this regard.
File System
PhotoLab 9 uses an open file system, mirroring the computer’s file structure. This is unlike Lightroom, which is a self-contained photo database (photos are imported into the app and managed from within it). Basically, PL9’s Photo Library is a file browser, hierarchically listing folders and files as they appear on your drive, either internal or external. Unfortunately it lists every forced in the hierarchy, starting with the root of whatever device you are accessing. Many of the folders listed are irrelevant to processing photos, so it is helpful that PL9 has a Favourites section. With Favourites showing the user-selected folders, the FOLDERS section can be left closed.

I’m fine with either an open or closed file structure, provided it is efficient and I can import images to folders and give them names significant to me; e.g. YYYYMMDD-DescriptiveTitle. Within the PL9 Photo Library, users can rename folders, but folders cannot be moved, as they can in a closed system. Moving folders must be done using the computer’s file structure; e.g. the Finder or File Browser. Easy enough. In a closed system (e.g. Lr), any changes made to folders or images in the Finder/File Browser breaks the link within Lr, which must be re-established within the app. So, there are pros and cons of each; it comes down to what you are used to.
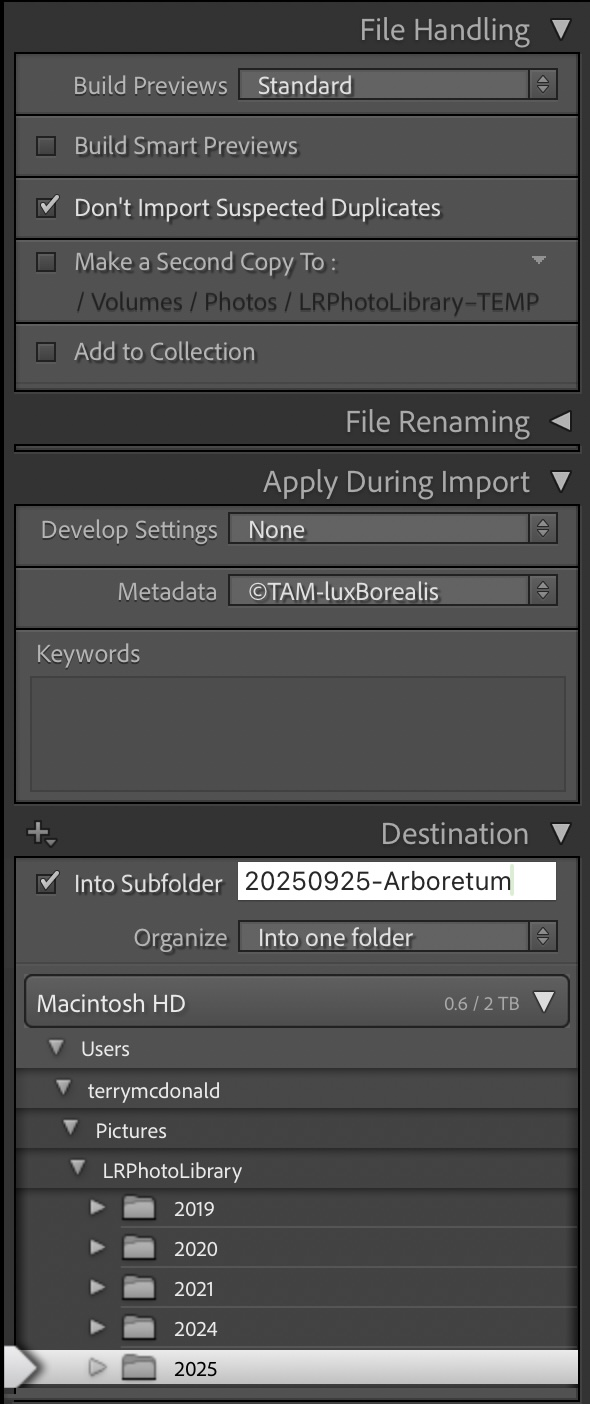
However, one of the advantages of a closed system is the ability to apply a anumber of customizations during import including metadata and Develop presets. LrC allows this; PL9 does not. In PL, I must input metadata to an image then copy and paste the metadata to others. It’s an extra step. However, PL9 applies the Preset selected in Settings > General where you can save your own preset, once the nuances of imported images are known, based on lens and/or camera and/or genre of photography.
On the plus side, PL9 allows images to be moved from one folder to another as easily as dragging and dropping. Interestingly, in the DxO User Guide, which I now know inside-outside-upside-downside, it states that moving images on a Mac duplicates them (https://userguides.dxo.com/photolab/en/managing-images/). I’m pleased to see this is not the case.
Projects within PL9 are like LrCCs Albums and LrC’s Collections. Organization using Projects (or Albums / Collections) is an invaluable tool for making collections of photos drawn from across different folders; e.g. Bird Portraits; 2025-Best; or Tanzania Trip-Best. This can speed up the sometimes endless searching for specific sets of photos. Projects narrow down the starting point for selecting photos for a specific use.
Metadata
Managing the metadata associated with each image file is an essential component of any photo library/catalogue. For professionals and many serious photographers, metadata is critical for finding, keeping track of, and using images. When photos number in the tens of thousands, finding one or a small group within seconds is much easier with up-to-date metadata: keywords, star ratings, perhaps titles and captions, and GPS data.
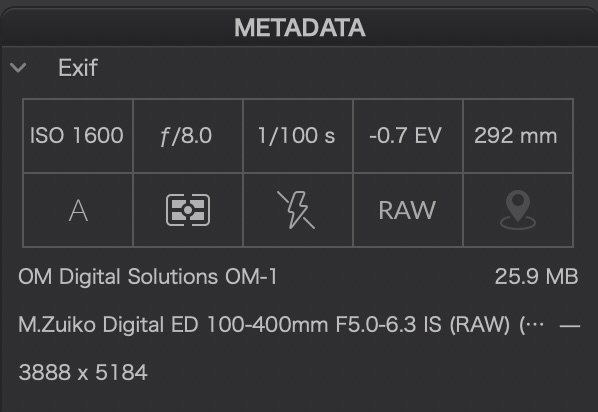
I like the clean layout of the EXIF data found in the top right of the default panel. Using a combination of numbers and easy-to-understand icons, I can quickly glimpse the camera controls used to capture an image, which then drive some of my editing decisions.
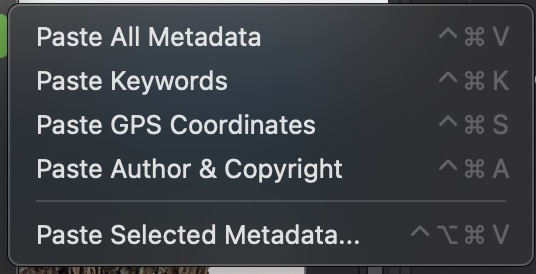
Furthermore, metadata is easily edited, copied and pasted to other photos and to batches of photos. Batch processing of metadata is an essential efficiency and DP9 handles it well, though not completely seamlessly. It’s easy enough to right-click on an image and select Copy Metadata then, select the batch of images you want it copied to, right-click and select the option you wish:
As with a number of PL9’s functions, metadata sits between the robust batch editing of Lr Classic and the clunkiness of LrCC.
Adding location and GPS data is very helpful, especially for travel, nature and landscape photography. I don’t always publish the data, but it is also helpful for remembering locations. In PL9, holding the cursor over the map pin shows the lat & long, if entered for the file. Unless your camera writes GPS data to each file, you will need to input it. One way is to use Google Maps to pinpoint the location then copy and paste the lat & long. I do this with LrCC for individual and batch images. From there, LrCC populates other relevant locational data: city, province/state, and country.
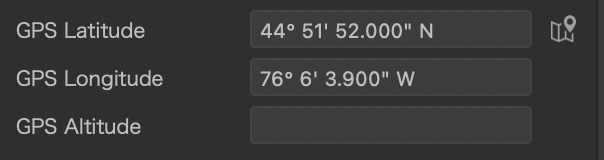
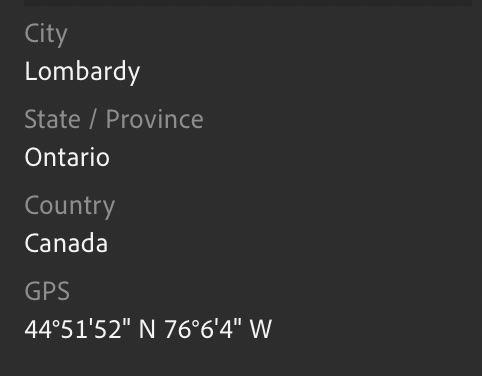
With PL9, it’s not as straightforward. Since latitude and longitude are two separate fields, each must be copied and pasted separately. Huh? In Lr, it is one field, one copy and one paste. With Lr Classic, it’s even simpler. I use the powerful and under-utilised Map module and drag and drop batches of images to the precise location: voilà, they are geo-tagged.
Adding Keywords is another essential function of metadata. With PL9, one keyword at a time is entered, followed by a Return. To me, this is inefficient. With Lightroom, I can enter (type or paste) a string of comma-separated keywords, then tap Return. Lr converts the string to individual keywords. Definitely more efficient. Other than this, PL9 has a powerful keywording system that also accepts hierarchical keyword lists.
Search
I’m loving PL9’s Search. A solid search function is indispensable for efficiently wading through thousands of photos to gather a set of similar images or to help create a Project. I like the way PL9 creates a pre-search list using a combination of terms and easily-recognised icons: IPTC metadata, pictures, folders, keywords, date, lenses and camera bodies, even by phone type.
If I search ’10/2024’, I get all the images from 1 Oct. 2024 to 31 Oct. 2024. Brilliant! It just seems so much more intuitive, providing the user with choices as they work.
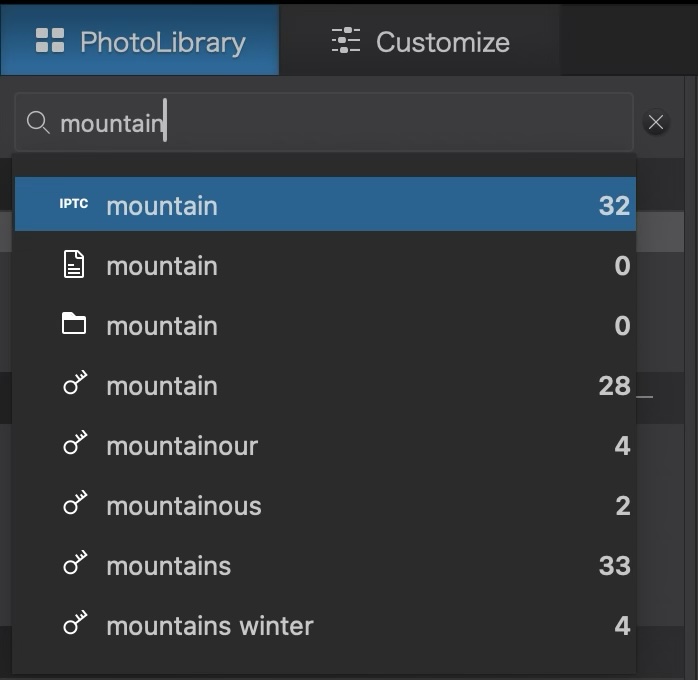

Caption: PL9: The incredibly helpful search previews of two different types of searches.
Even with Adobe Sensei in LrCC, results are often hit-and-miss; e.g. for 10/2024, I get images from the 10th day of any month plus those for October. The ’pre-search’ list is not as complete as the one provided by PL9’s search, unless you use the often hidden operative words such as ’lens’ or ’keyword’. Have a look at what ’12-100’ shows—what a great seelction! Plus, if anything comes up in the search for which the specific camera body or lens module is missing and needs to be downloaded, PL9 provides an alert. Now that’s proactive.
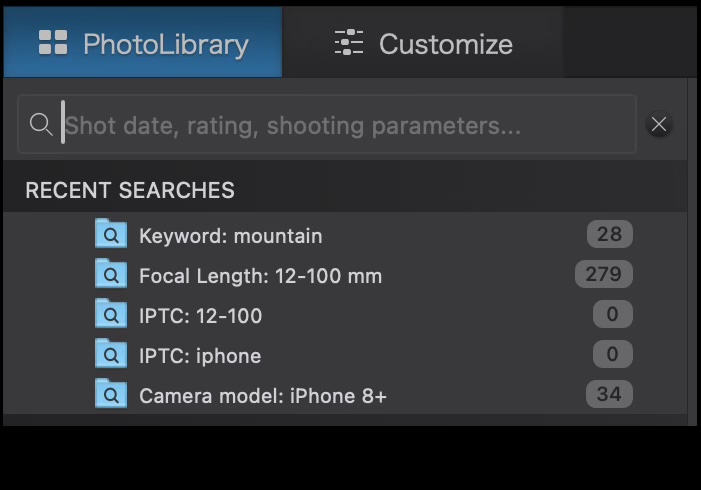
I’ll be honest, though. Lr Classic’s Library Filter takes the cake, with discrete sections for Text and/or Attribute and/or any number of Metadata entries. It’s the mark of a truly integrated database, rather than a file browser. That being said, PL9’s search is really no slouch and is made even better by keeping Recent Searches. Accruing a set of searches while building a Project of images is very helpful.
Sadly, PL9’s Search function does not work within a Project or within the Projects section like the Search/Filter does with LrC with its Collections Search. For instance, the group of photos I chose for the PL9 review included a mix of 35mm sensor, M43, iPhone, and 1” sensor photos. I wanted to select out just the iPhone photos, but the search function in the Photo Library only works on the folder hierarchy of the active drive. It can’t be directed to Projects or a Project within Projects. So, I had to go through the images manually and select them. Is this a deal-breaker? Probably not as the Search function is already excellent. Might there be a workaround? Perhaps, but, it points to another inefficiency of using an open system file browser method as opposed to a photo management database.
Photo Library Conclusion
In summary, the PhotoLab in PL9 is truly a file browser, rather than an image management system like Lr. There are pros and cons of both open and closed systems of file organization. In some ways, it’s whatever method you get used to. However, with Lr being a database, with user-customized import presets, a more powerful search function acting both within folders and within Collections, as well as easier batch metadata and geo-tagging, I’d say that PhotoLab’s Photo Library has come a long way, but is not yet as efficient or complete a tool as we have with either version of Lightroom.
Next up, I’ll take a look at processing order and masks.
Thanks for reading. Your feedback, comments and questions are welcome! Be sure to SHARE with those contemplating the same decisions in photo editing.
