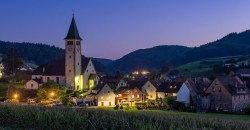
OM System launches a new, more ‘urban’, creative creative camera body
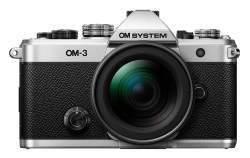
The OM System OM-3–it’s the talk of the town today! A OM-3 reminiscent of the OM-3 from the 1980s and 90s, yet oh so much more capable! Reading through the tech data, I’m impressed at how OM is no longer hiding computational photography, art filters and video settings in the menus—they have put them front and centre in this cutting edge camera. An excellent move!
I’m not going to write anything more about this beyond stating my pleasant surprise. I recommend you read Peter Baumgarten’s excellent overview. He’s had it in his hands and has been shooting with it for some weeks now. He knows the OM System inside and outside, so he can give a much more informed judgement of the camera. You can see his post at Creative Island Photography. He is a very creatively-minded photographer—always thinking outside the box. He is an Olympus Ambassador who lives up on Manitoulin Island. The photos included in his review are worth the visit to his blog.
Raw File Optimization
What’s the best app to demosaic, denoise and sharpen your raw files?
NOTE: This article first appeared on the Luminous-Landscape.com. It is reproduced below in its entirety.
We are in the Golden Age of Photography, with sensors fine tuned for low and high ISOs producing pro quality images for printing and publication. I’m always pleasantly surprised—and, thinking back to my film days, a little shocked!—by the quality that we can extract from raw files. When combined with software algorithms for demosaicing, denoising and sharpening, well, as I said, it’s the Golden Age of Photography.
We shoot raw files to extract as much information from a scene as is technically possible. Photographers choose raw capture because they place a higher value on quality, legacy, and individual vision than on having ’ready-made’ machine JPEGs, compressed and sharpened. Over the decades I’ve been working in digital, I have yet to meet an image file that didn’t benefit from editing, and raw is the place to start. But are we getting the most from our raw files?
I’ve been using Lightroom for as long as it has existed, and Photoshop before that. Naturally, I’m curious—is Lightroom extracting all the data it can and optimizing it to provide the highest image quality possible from my sensor? I’ve spent a lot of time, effort and money to get that raw file, I want to ensure I’m getting the most bang for my buck. The only guarantee of that is through testing.
This is the first in a series of investigations examining how to extract the highest quality possible from a M43 20.1 megapixel OM-1 sensor. At 5184x3888pixels, the sensor is ideal for any and every use of photos right up to making two-page spreads in photo books and magazine and fine art prints as large as you need (see Finding the Sweet Spot in Photography).
Method
I’ve subjected the same six images to six different treatments. Each result is output to three commonly-used sizes: (1) for web use; (2) for 4K TV use and smaller prints; and (3) for larger prints and publication. The images were selected to push the sensor while representing different styles of my photography: landscapes shot during the day and evening; travel photography, and birds and wildlife.
Photos
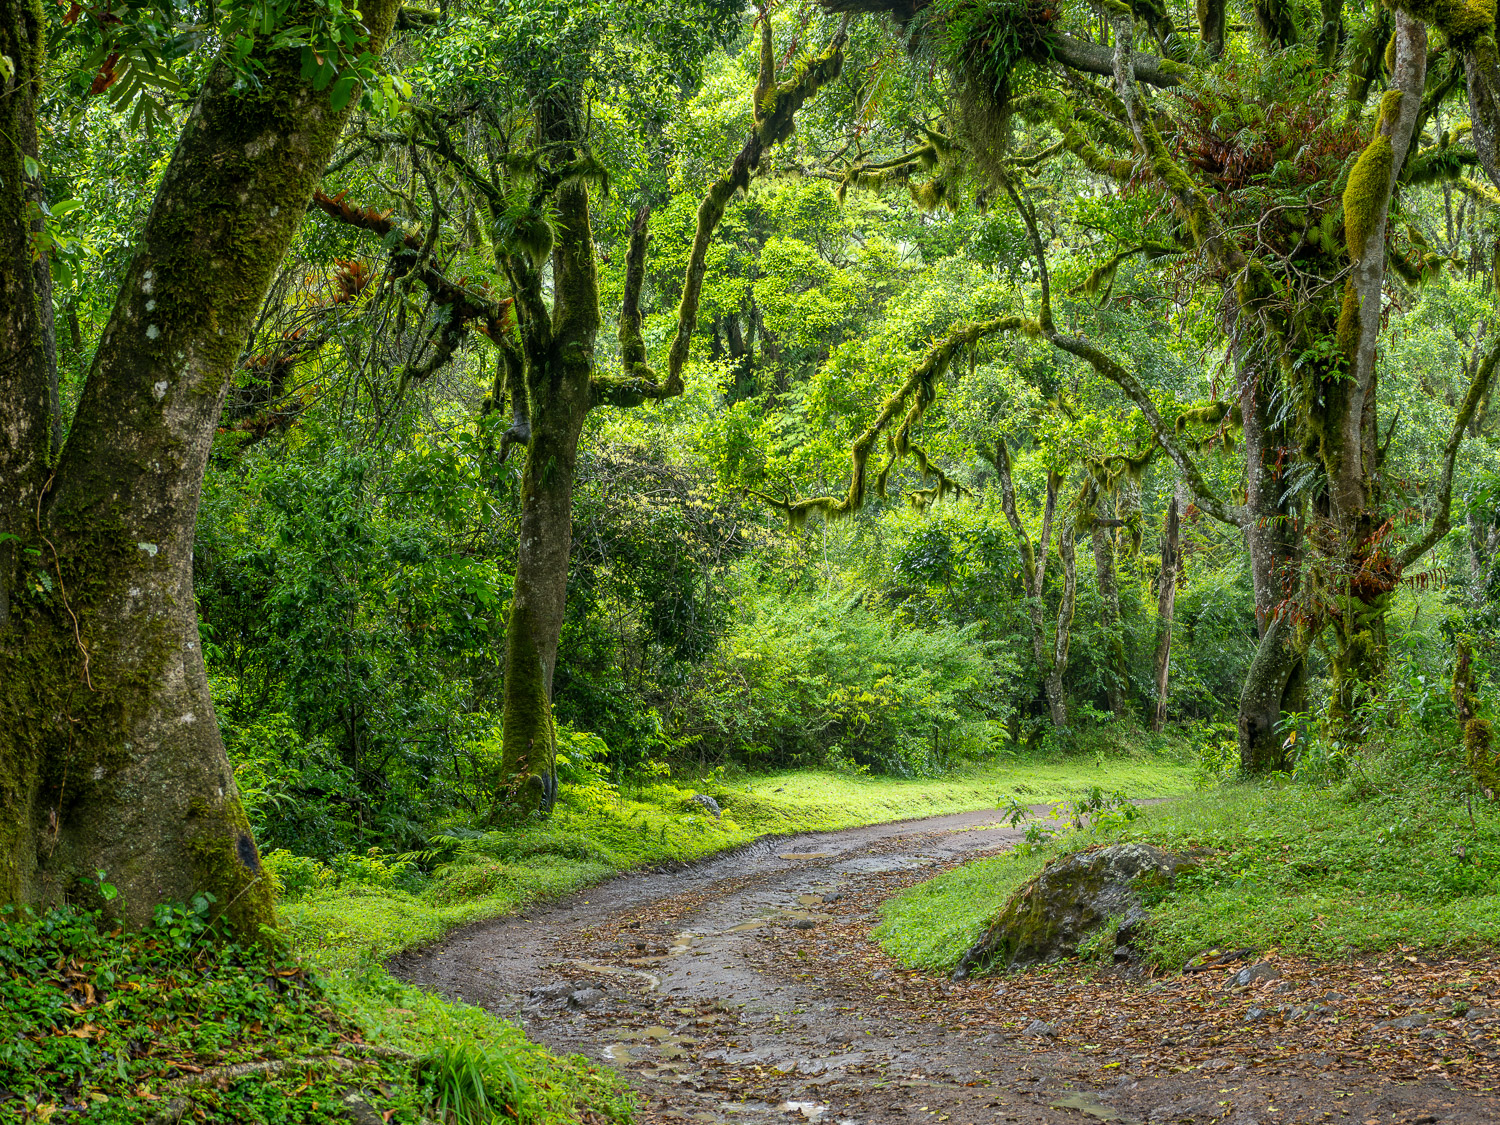
1. Meru Forest is a highly detailed landscape, using the full 5184x3888px frame, made in the deep shade of the cloud forest on the slopes of Mount Meru, Tanzania. I used an M.Zuiko 12-100mm ƒ4 PRO IS lens at 35mm (70mm efov), handheld at ƒ5.6 @ ⅓ sec. at ISO 200. Due to the OM-1’s excellent integrated IBIS plus the IS of the lens, the slow shutter speed has not resulted in any loss of detail from camera, nor is there any foliage movement.
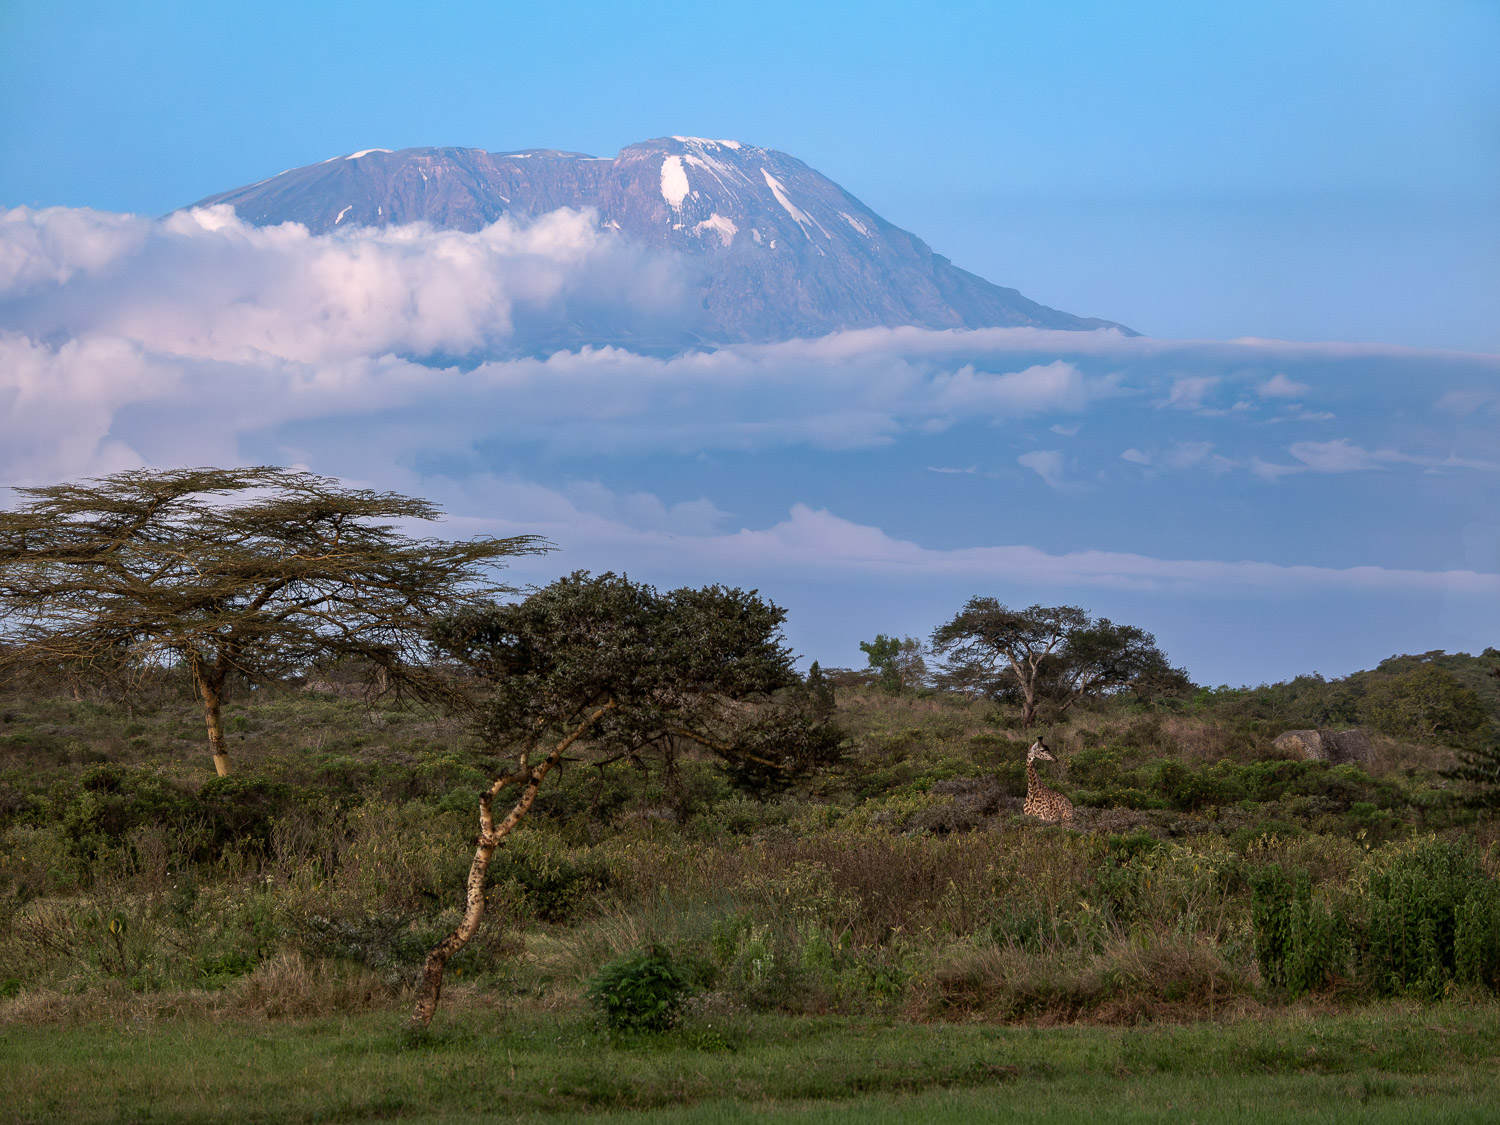
2. Kilimanjaro Blues is a blue-hour landscape using the full 5184x3888px frame. It was made using the same 12-100 zoom, handheld at 100mm (200mm efov), ƒ5.6 @ ⅓ sec., ISO 800. Note: the same ƒ5.6 @ ⅓ exposure as above is not a typo; it just worked out that way! You might scoff at using a photo taken at ⅓ sec. but I rarely shoot landscapes in ’perfect’ light. Secondly, the photo is sharp, edge to edge. This and the Meru Forest photo are also two of the few landscapes I made where I did not use Handheld High Res mode.
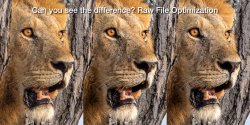
3. Sunset Vigil, Lion, Tarangire National Park, Tanzania is a highly detailed shot with an M.Zuiko 100-400mm ƒ5-6.3 IS at 292mm (584mm efov), handheld at ƒ8 @ 1/80, ISO 3200. The fur, whiskers, eye and teeth are tack sharp, despite it being a centre crop of 2741x3655px from a horizontal frame. ISO 3200 should put the apps to the test to smooth out noise without losing fine detail.

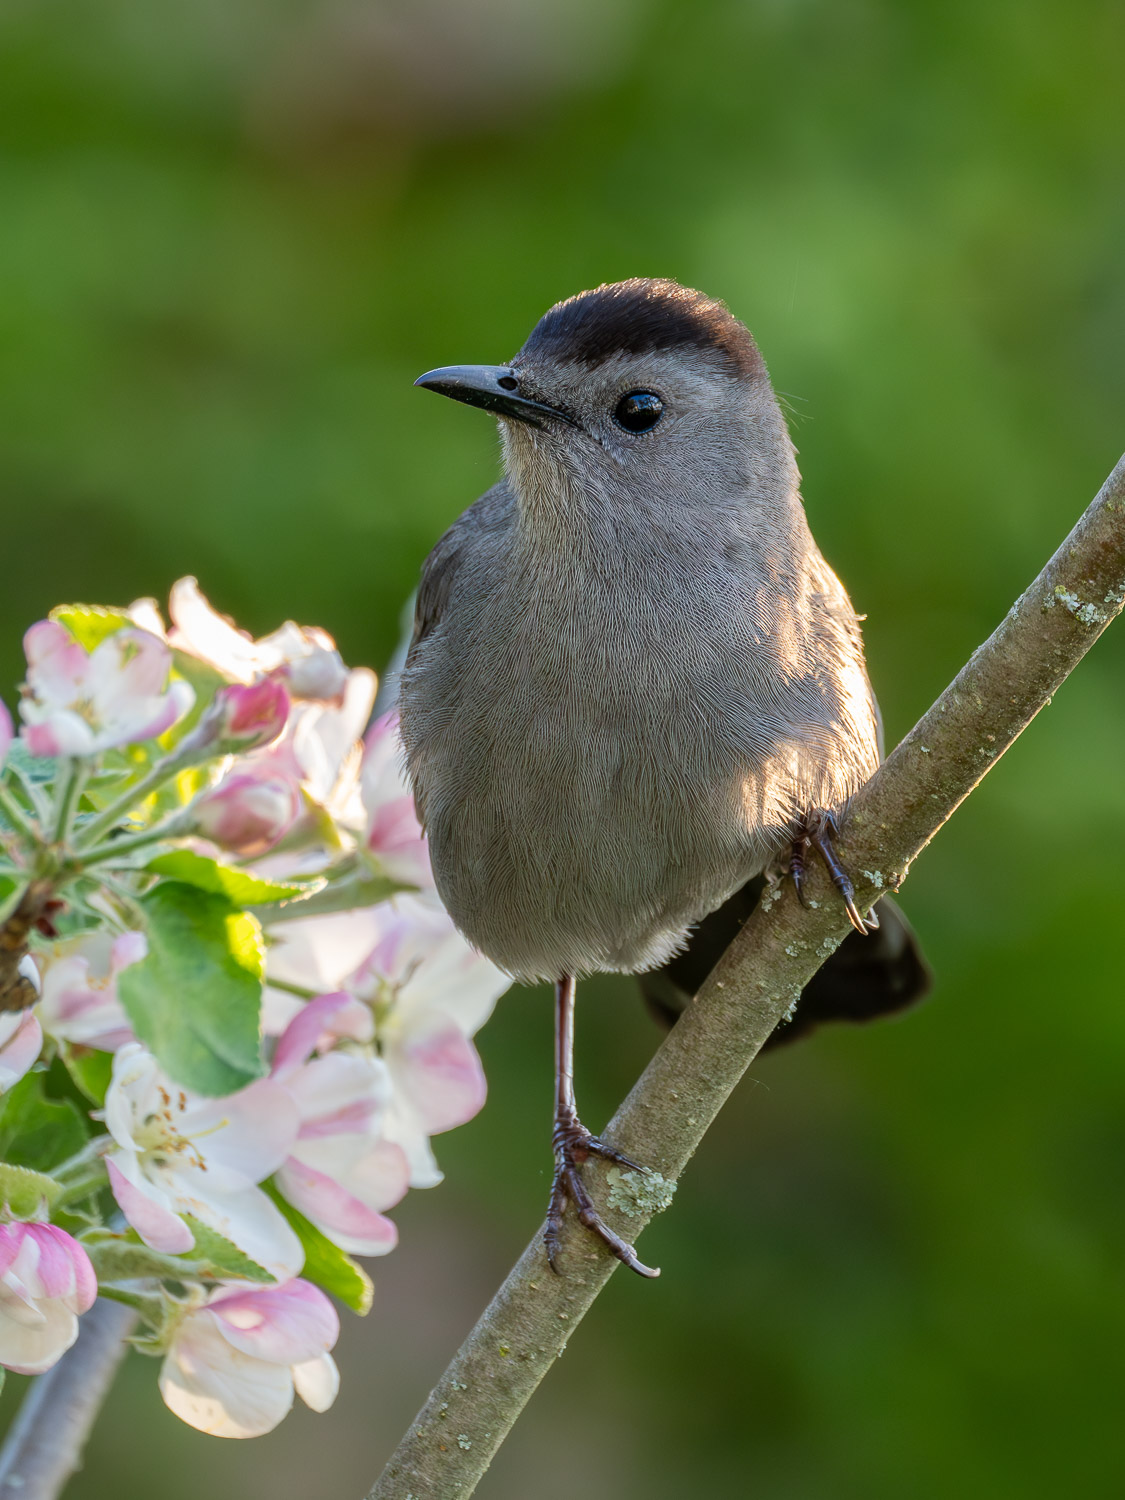
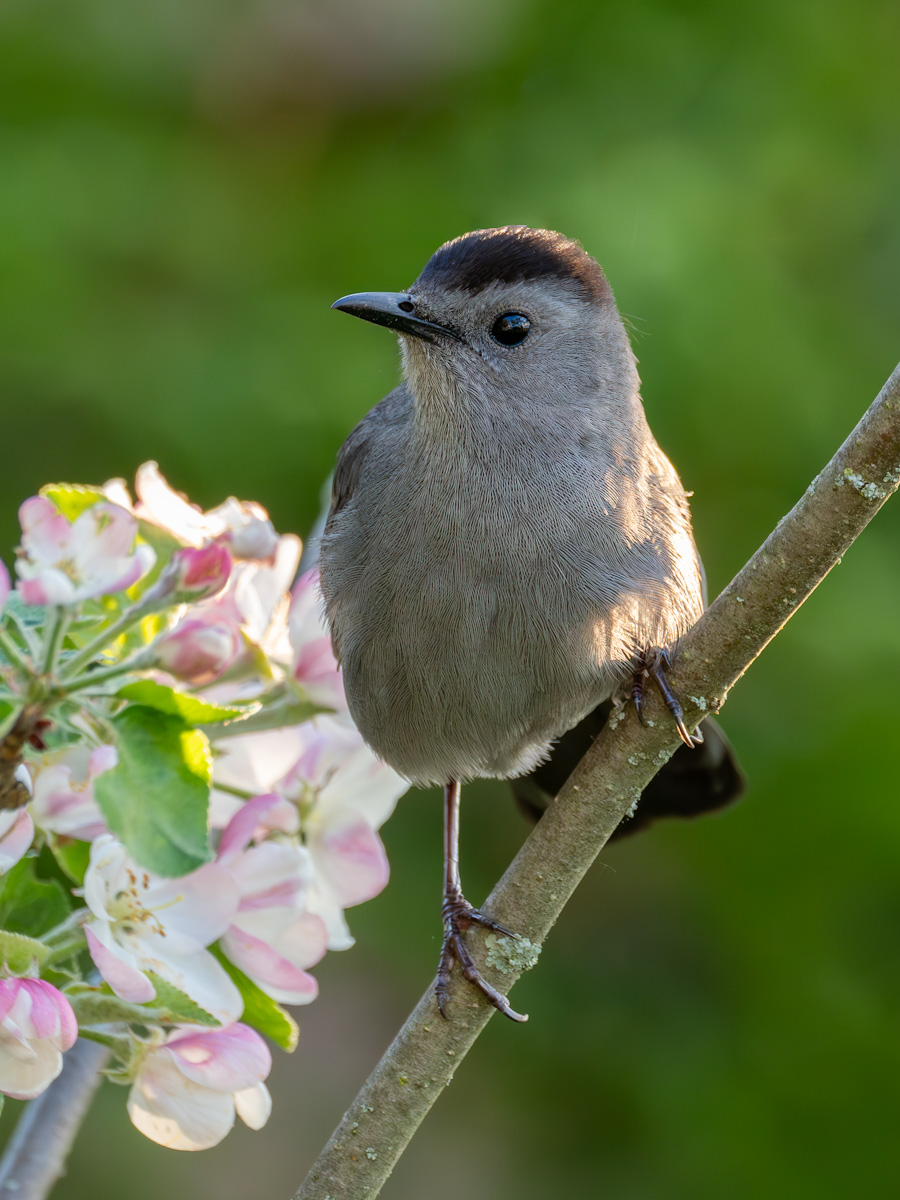
4. Grey Catbird, Ontario. Feather detail has always been mission-critical with wildlife photographers. This was made with the same 100-400 at 400mm (800mm efov), ƒ8 @ 1/200, ISO 3200 and is a 3152×4203 crop from a vertical frame. According to the internet pundits, the ones who disregard M43, these two ISO 3200 images should suffer from dreadful noise and loss of detail.
Additional Comparisons:
I hadn’t intended to test higher ISOs as I rarely shoot above 3200. But, given the results from the ISO 3200 photos, I felt I should give high-ISO a shot, if only for a sense of completion. I will discuss the results of these two shots separately, after discussing the other 4 together.
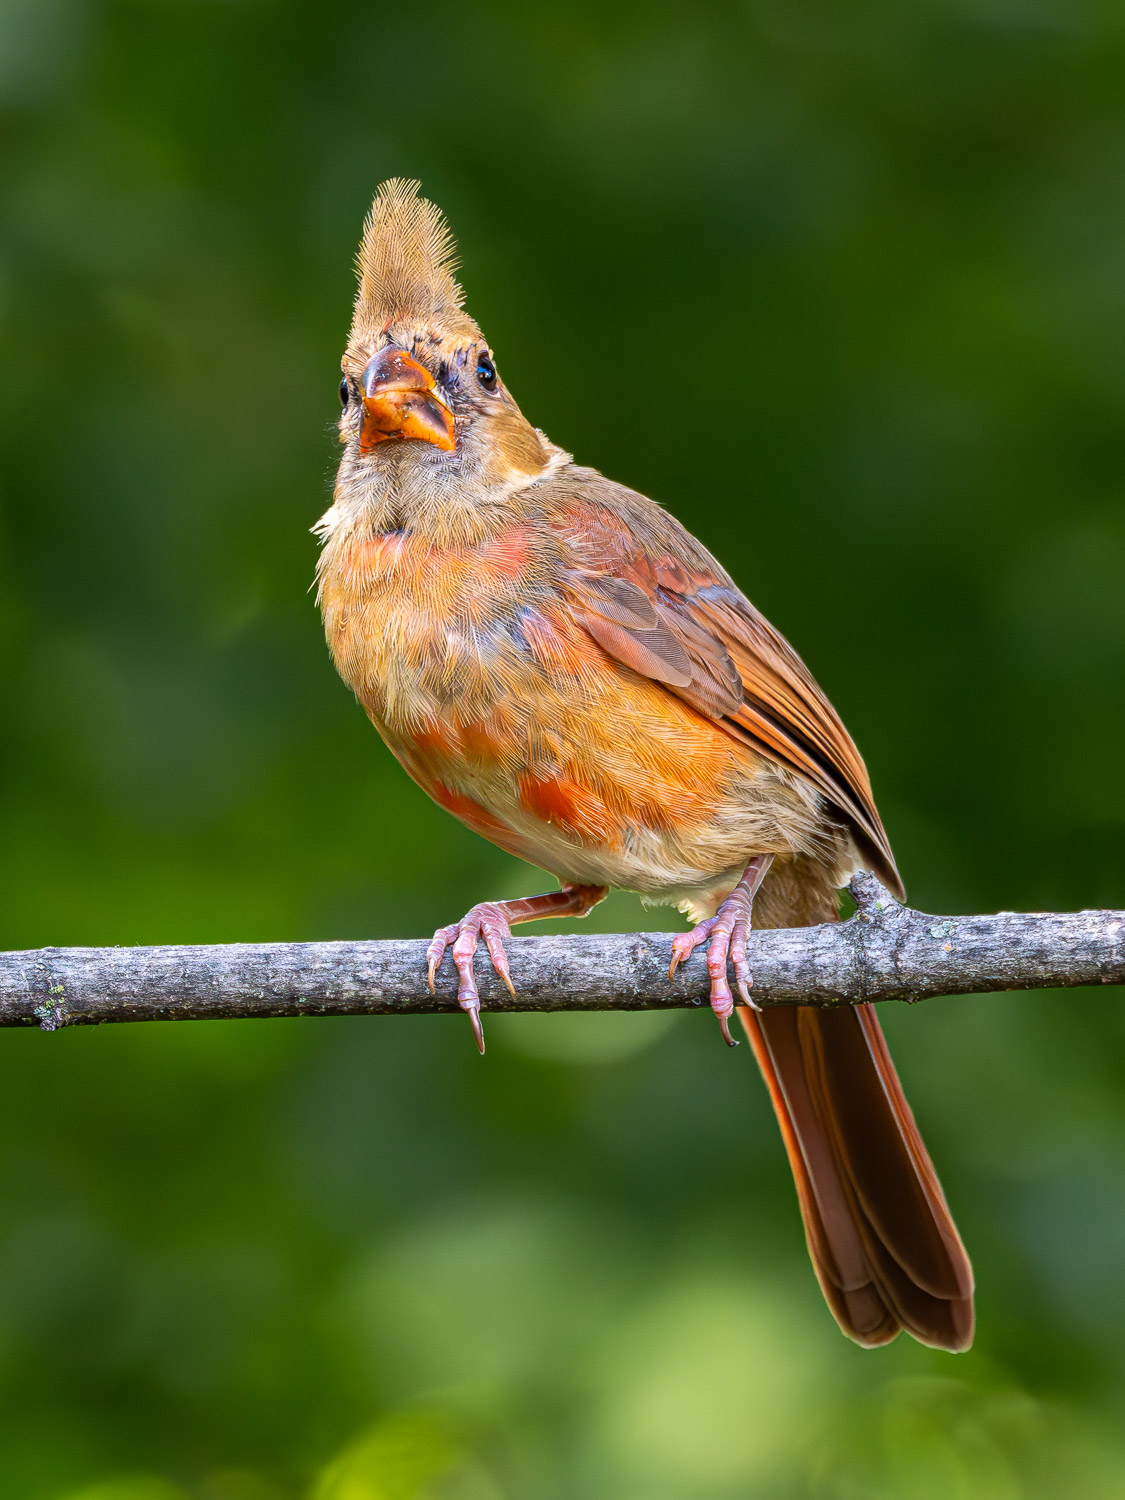
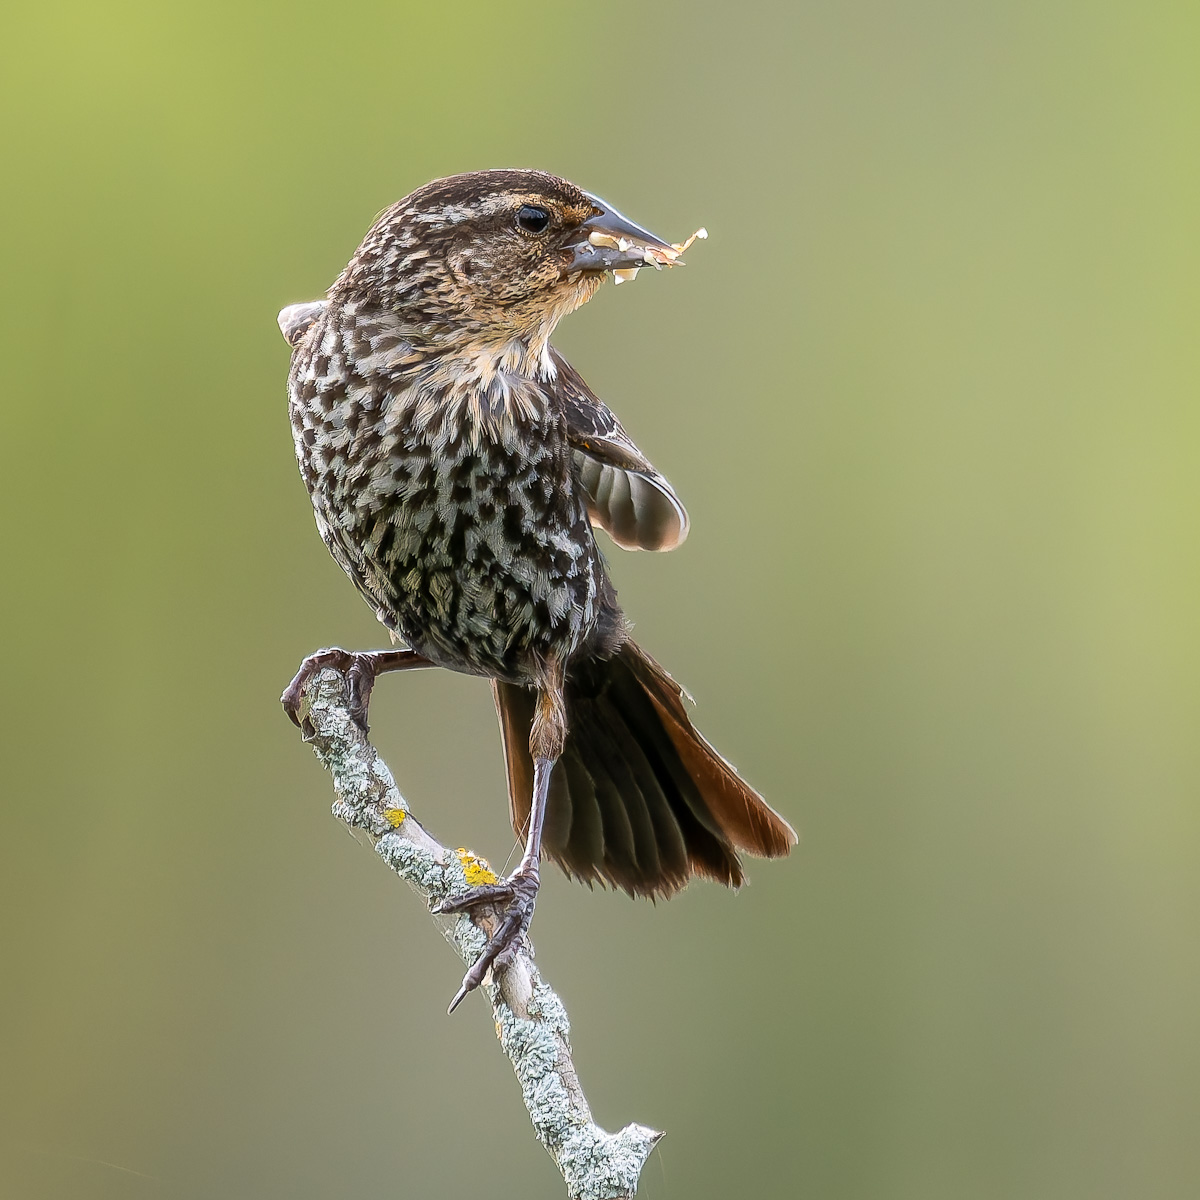
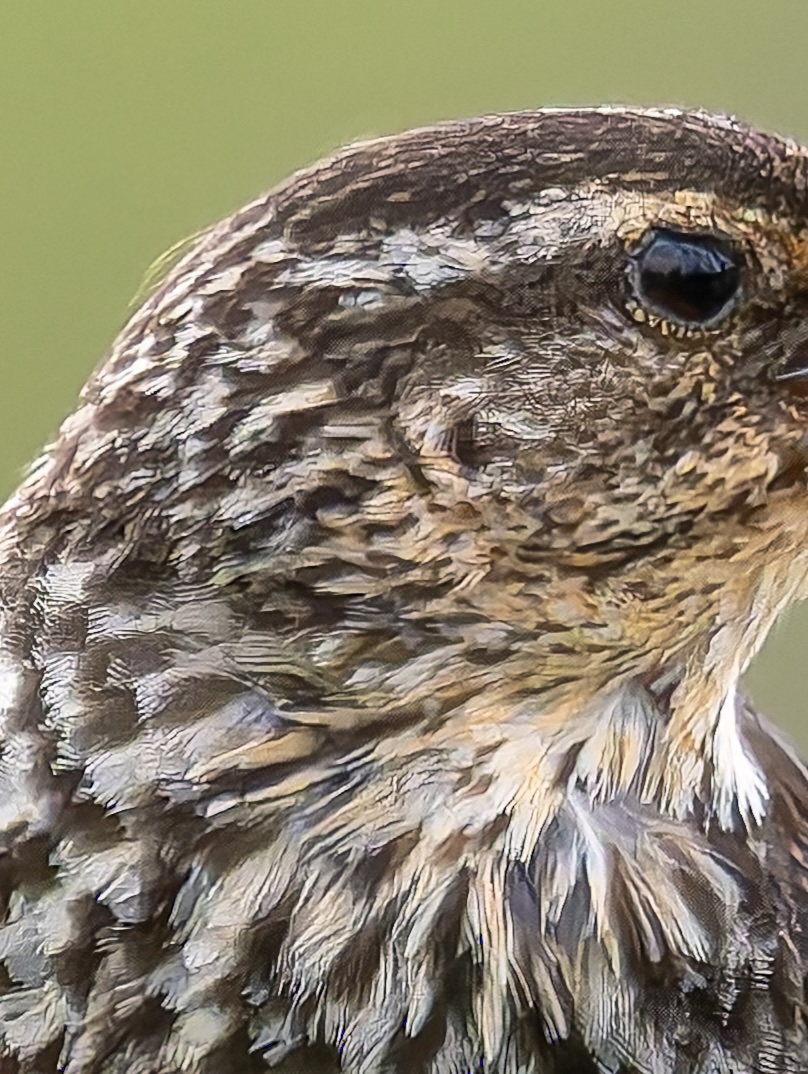
5. Junior (Immature Northern Cardinal) is an ISO 6400 file with lots of feather detail. It is one of the few shots I’ve made with an ISO that high, simply because I rarely need it and, being on old film guy, I was sceptical of the quality of high ISOs. This is a 2538x3384px vertical crop, made with the 100-400 at 400mm (800 efov), ƒ8 @ 1/320.
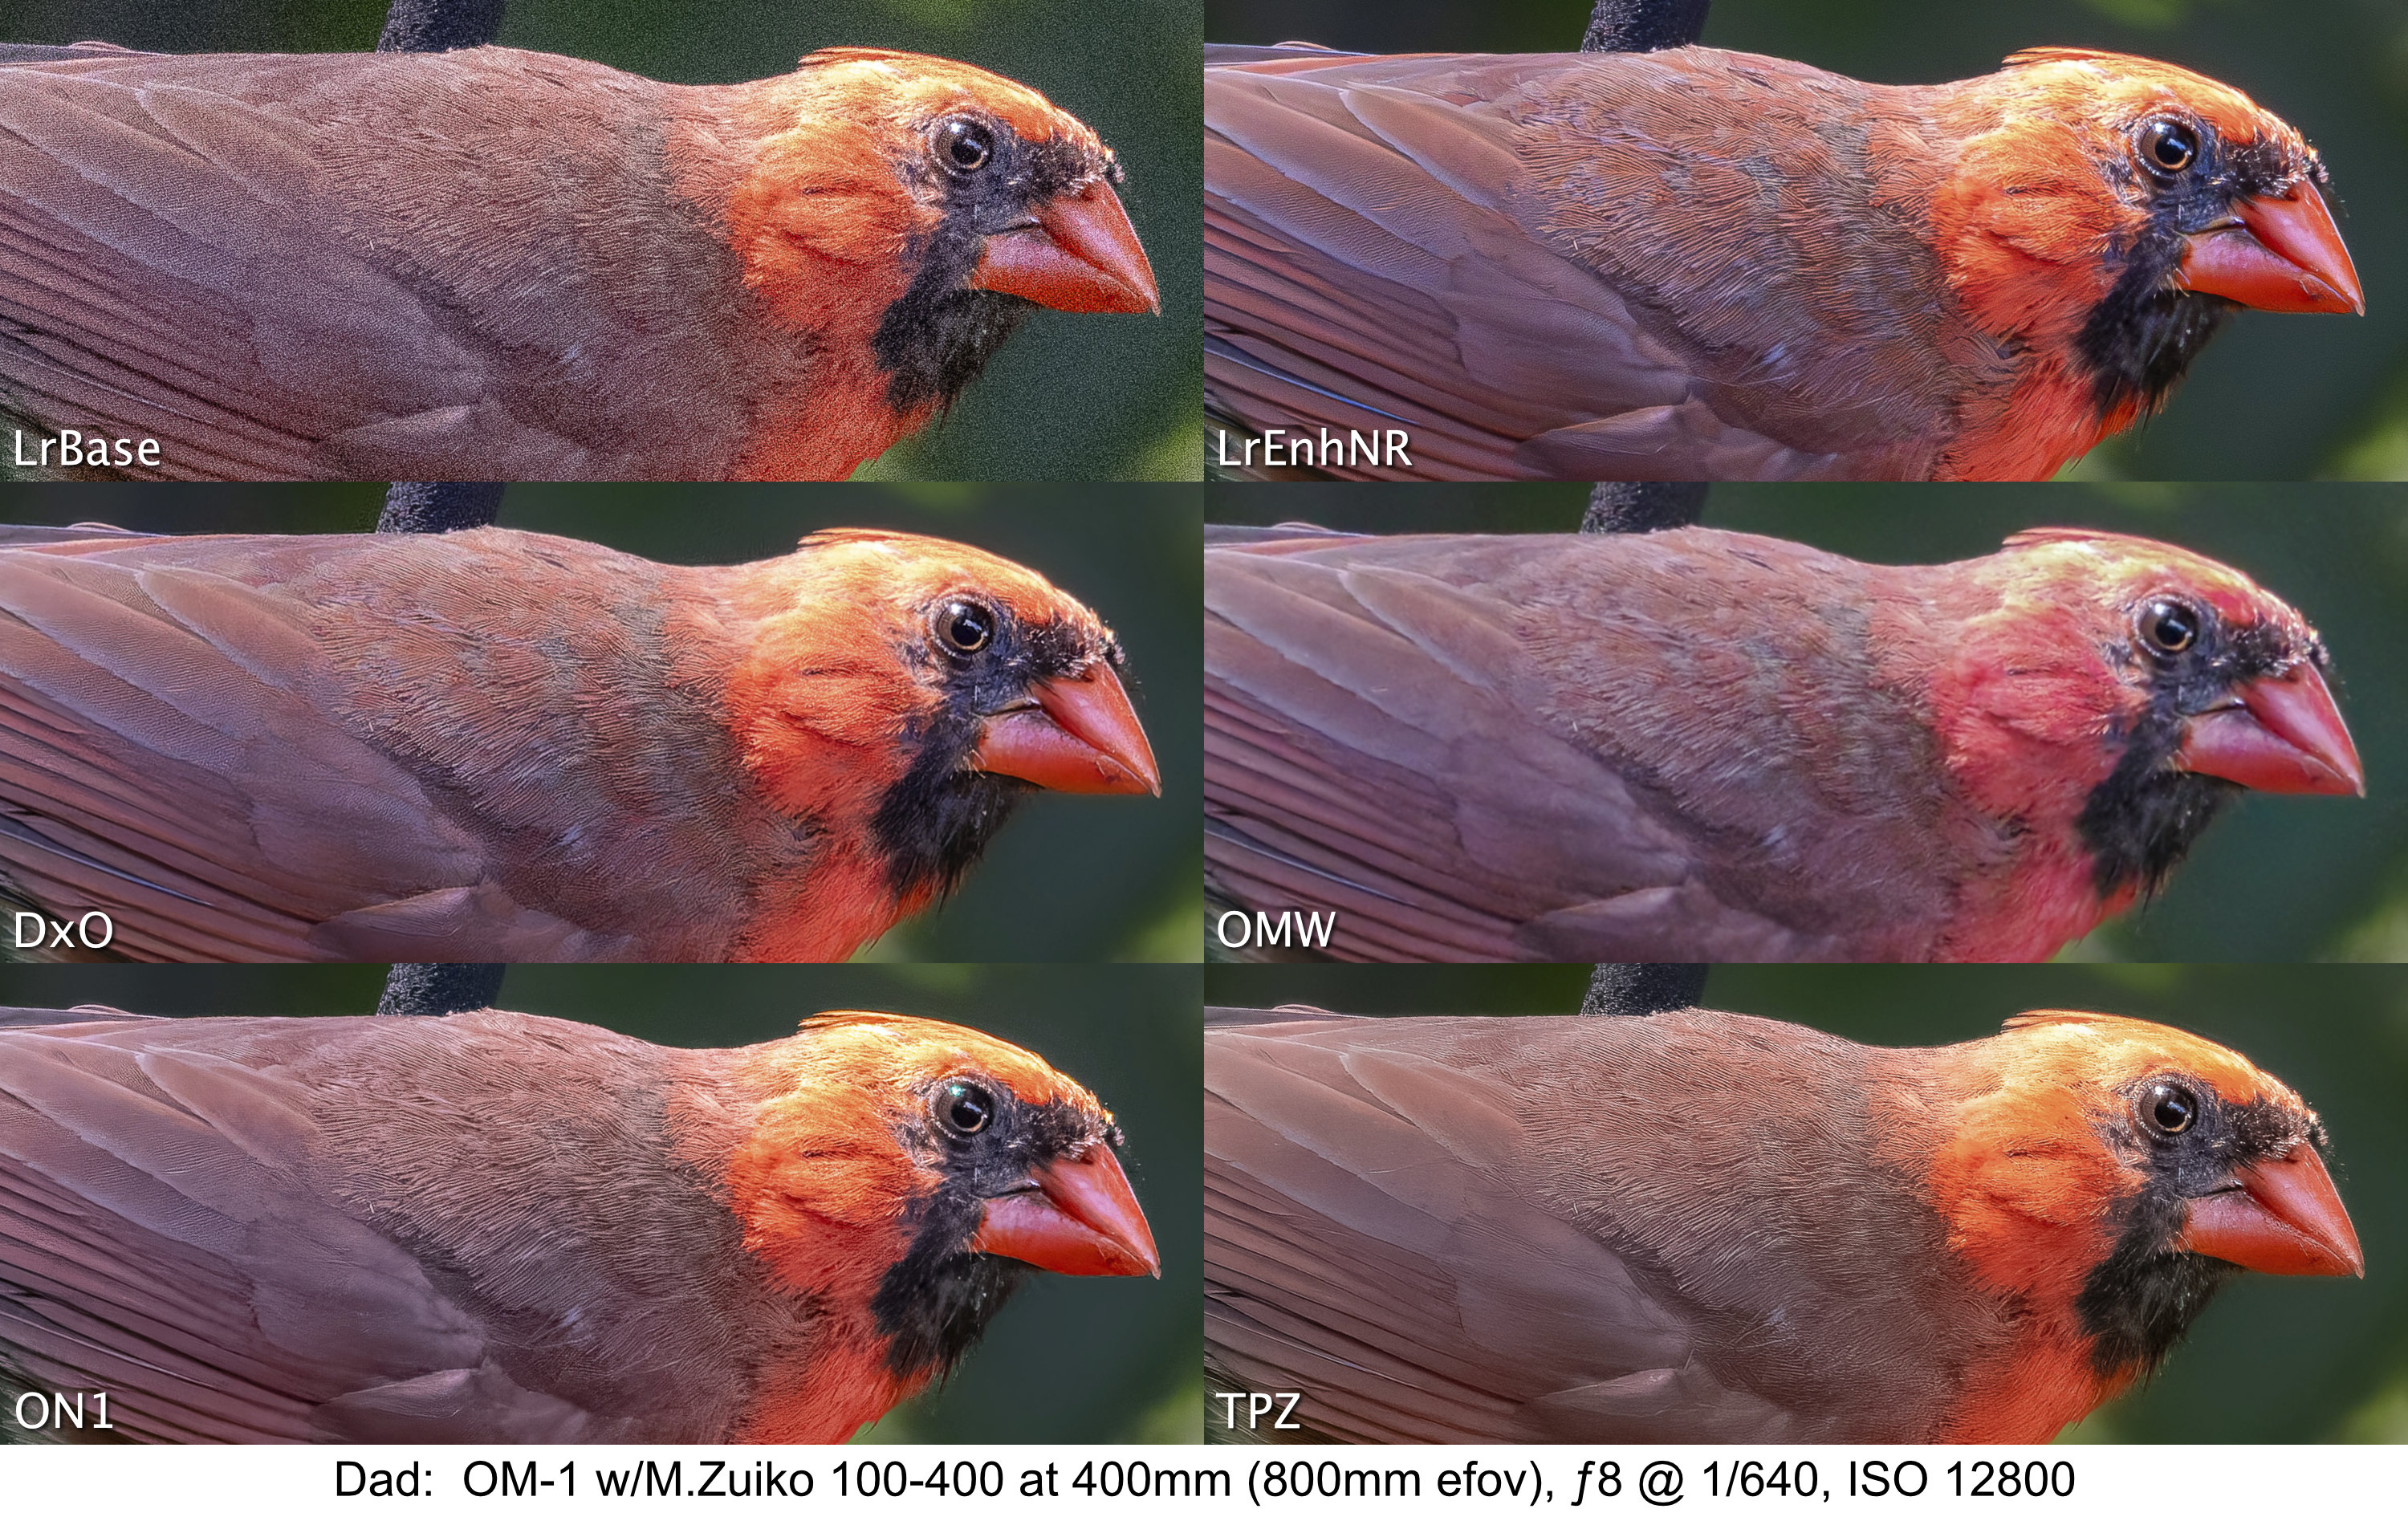
6. Dad (male Northern Cardinal). This ’grab shot’ would not normally make the cut. Taken in the deep shade of our back yard, the Cardinal is moulting and looks plain without his crest. He is also perched awkwardly on the bird feeder stand. However, it is one of the few shots I’ve made at ISO 12800. I used the 100-400 at 400mm (800mm efov); ƒ8 @ 1/640.

Raw Treatments
The five raw treatments are all commonly available, industry-standard apps for raw file demosaicing, denoising, and detail sharpening that are easily integrated into a Lightroom workflow. All processing was done on an M1, 16” MacBook Pro with 16GB of RAM.
- LrBase are raw files processed normally through Lightroom CC (v8.1). I edit only enough to breathe life back into the machine image—to re-create my experience and my vision in the field. This changes neither the original intent of the image nor its natural feel. I work with the pixels the camera captures, so there are no dropped-in backgrounds, skies or subjects. Adjustments are made as needed to Exposure, Contrast, White and Black Points, Highlights and Shadows as well as Colour and Tint. Additionally, I add Adjustment Masks to shape the light. Detail Sharpening is typically set to 60.
Each of the additional treatments began with the original raw file and took a reasonable 15 to 20 seconds to complete.
- LrEnhNR is the first of the five additional raw treatments. The LrBase file was run through Lightroom’s own Enhanced Noise Reduction algorithm set to 50 or 60; 75 for high ISO files. Finding the balance of noise removal while maintaining detail is critical. Afterwards, Detail Sharpening was typically set to 40, the Lr default for my ORF raw files.
Each of the following treatments began with the original ORF raw file. I did not use ‘File > Open In’ from within Lightroom as it creates unnecessarily large TIFFs.
- DxO: DxO Pure Raw (v4.7.0); DeepPRIME XD2s and DxO’s optical corrections were applied to the ORF. Output to DNG.
- ON1NN: ON1 No Noise AI (v2024.5) was applied to the ORF using the No Noise module set to ‘Standard’. The Tack Sharp AI module was not used. Micro Sharpening was set to the default 100 for all except for the Meru Forest file, set to 50; anything higher than 50 was too aggressive. Masking was not used. Output to DNG.
- TPZ: ORF raw file + Topaz PhotoAI (v3.4.3) Raw Denoise at Standard (Strong was too aggressive) and Sharpening set to ‘All’ for landscapes and ‘Subject’ for birds and wildlife. Some tweaking of the subject mask was needed; it was helpful to have that option and something only Topaz and ON1 have. Output to DNG.
- OMW: ORF was processed through OM Workspace (v2.3.3) with AI Noise Reduction plus the various built in lens corrections. Output as a TIFF; OMW does not output to DNG.
Output
After treatment, each DNG (or TIFF) was added back into Lightroom. The original LrBase edits were copied and pasted To each file, with some colour and distortion correction. JPEGs were output at 80% or 100% quality in sRGB colour space with Sharpening set to Screen. The three sizes of JPEGs represent common, everyday uses of photographs by the vast majority of photographers:
- 1500x1125px (1.7mp), at 80% quality, to represent the needs of social media platforms, blogs, forums and other web uses, plus for HD projection; e.g. at camera club presentations. Typically, social media sizes are smaller, so any differences at this larger size should be even more noticeable.
- 3840x2880px (11mp), at 80% quality, for 4K TV presentations, as well as laptop and desktop screens; e.g. wallpaper. This is also sized for prints a little larger than 9×12”, so it’s a test of prints up to that size as well.
- 4800x3600px (17mp), at 100% quality, is an ideal print size for photo competitions and to hang on your wall as it makes a 12×16” print at 300ppi, easily matted to 16×20” for framing or presentation. Note: each of the wildlife photographs had to be up-sized from the original to this size during the Lightroom export to JPEG. Normally, this would mean a hit on quality, but surprisingly . . . well, read on.
Results
The results I report are based on real-world uses of photographs, not on pixel-peeping. At times, I zoomed in to 200% to check sharpness, but viewing photos at this magnification is completely unrealistic. As photographers, it is all too easy to make judgements and pronouncements based on pixel-peeping simply because we can, rather than we need to— a real dis-service to the overall photograph. After all, it’s the emotional impact that attracts people to photographs, not the pixels. The details are helpful in creating that impact but what they look like at 200% is irrelevant. My feeling is, pixel-peeper internet bloggers are simply after clicks in the guise of truth, precision and service to photographers.
(1) Web- and projection-size (1500x1125px; 1.7mp)
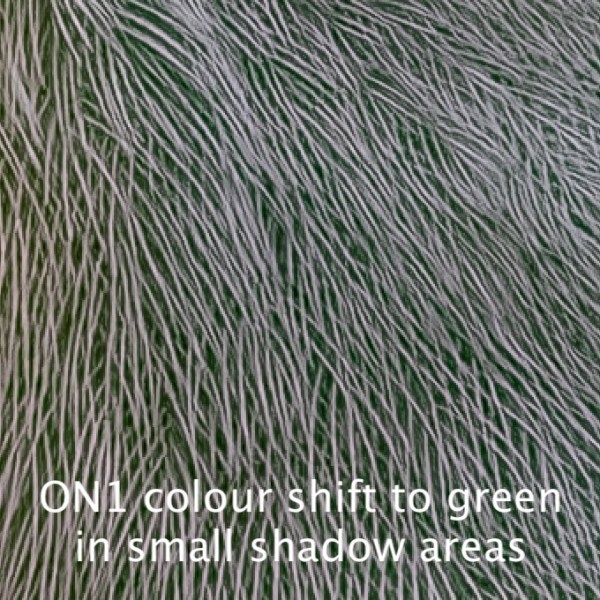
This size is larger than is needed for social media and were viewed at ‘Actual Size’ on my MacBook Pro, which is at 100%, but does not fill the screen. In each case, there is very little difference between any of the six treatments. Only when images are directly compared, one with another, very small differences begin to be noticed. The edge goes to LrEnhNR, DxO and TPZ for having very slightly sharper images that would show when viewed using HD projection (e.g. for camera club presentations), but would go un-noticed on the web. Even the LrBase image held its own against the treatments. ON1 and OMW were also excellent, but suffered from a very slight shift to green in the small deep shadow and black areas between fur and feathers.
Bottom Line: With correct sharpening and texture, any of the six treatments would produce fine web images. If projecting, then a run through LrEnhNR, DxO or Topaz would produce slightly sharper results.
(2) Screen Resolution and up to 9×12” (3840x2880px; 11mp)
When JPEGs were viewed at 100% on-screen, as would normally be the case for these photos, the differences became more apparent. All five raw treatments produced excellent results with a light edge going to LrEnhNR and DxO for their consistency across all photos, with smooth skies, balanced mountain and cloud detail, and micro-detail in foliage, fur, and feathers.
Below is a series of 100% crops from each of the 3840x2880px files arranged for side-by-side comparison. Viewing them like this, on screen, gives a sense of what they look like as web images (#1 above). Click on each image to open it to view it at full size.
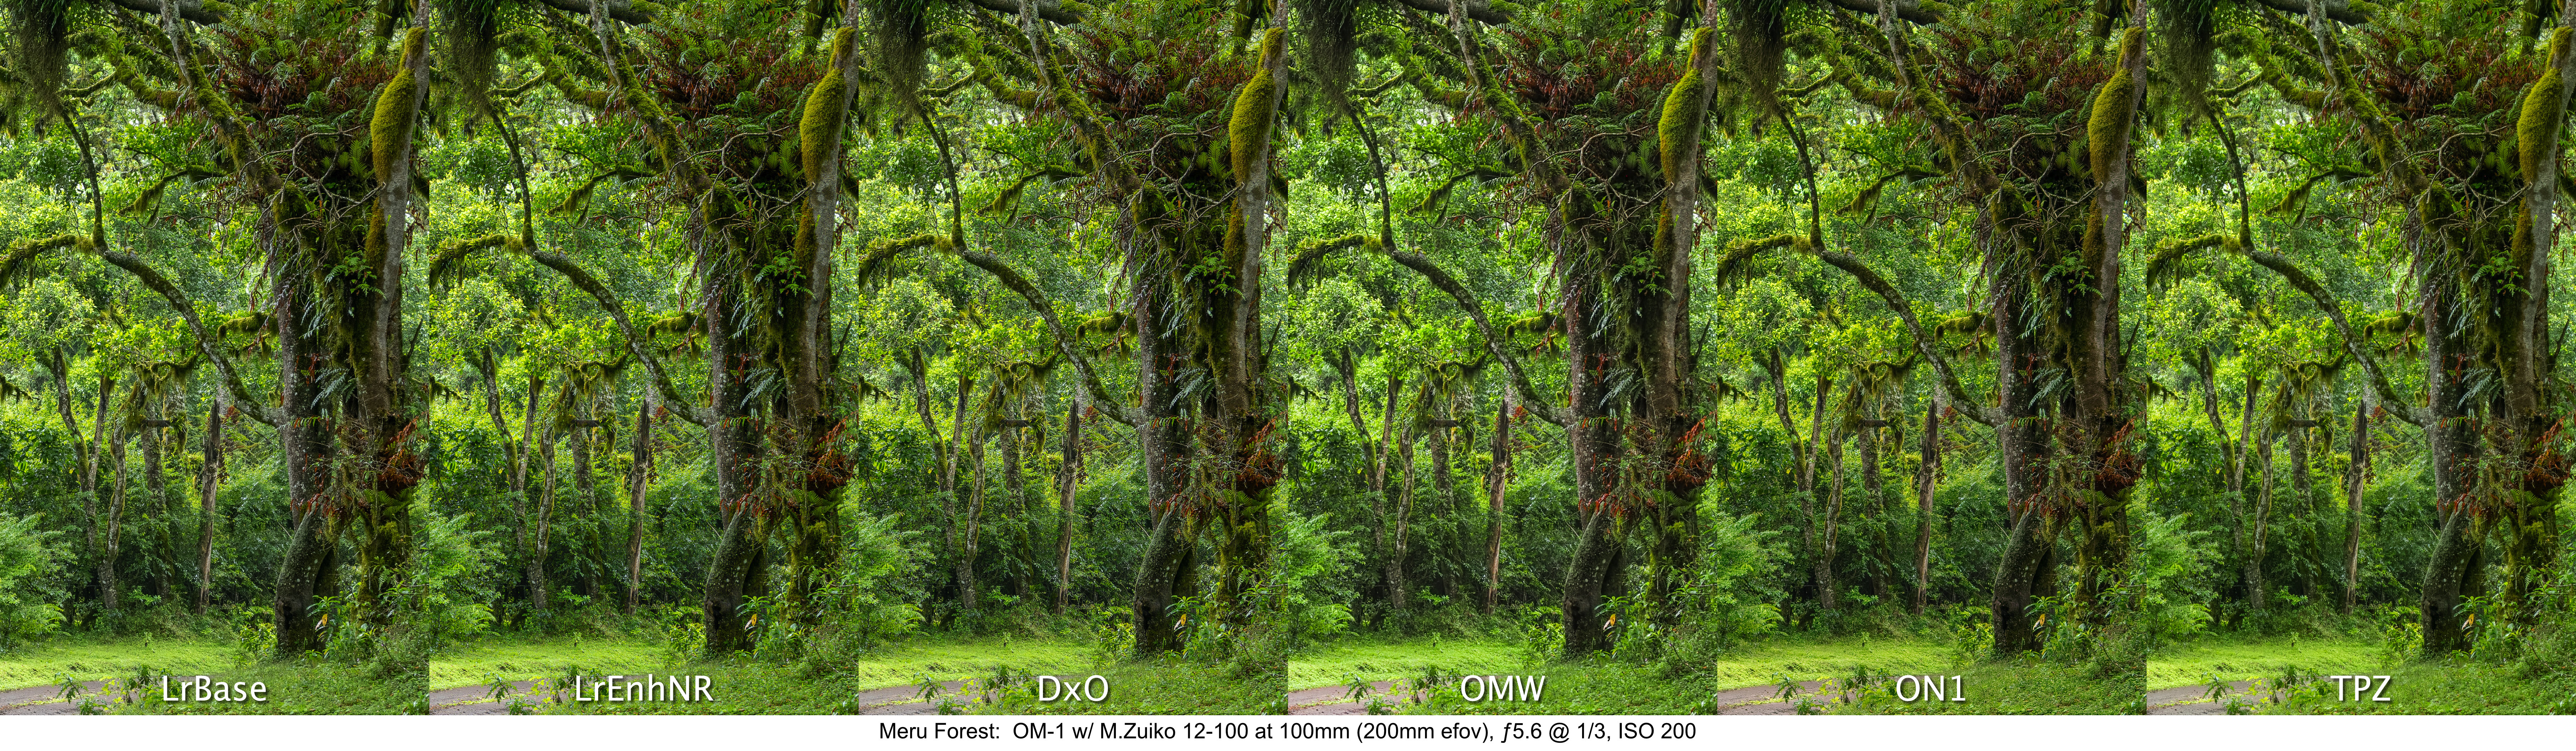

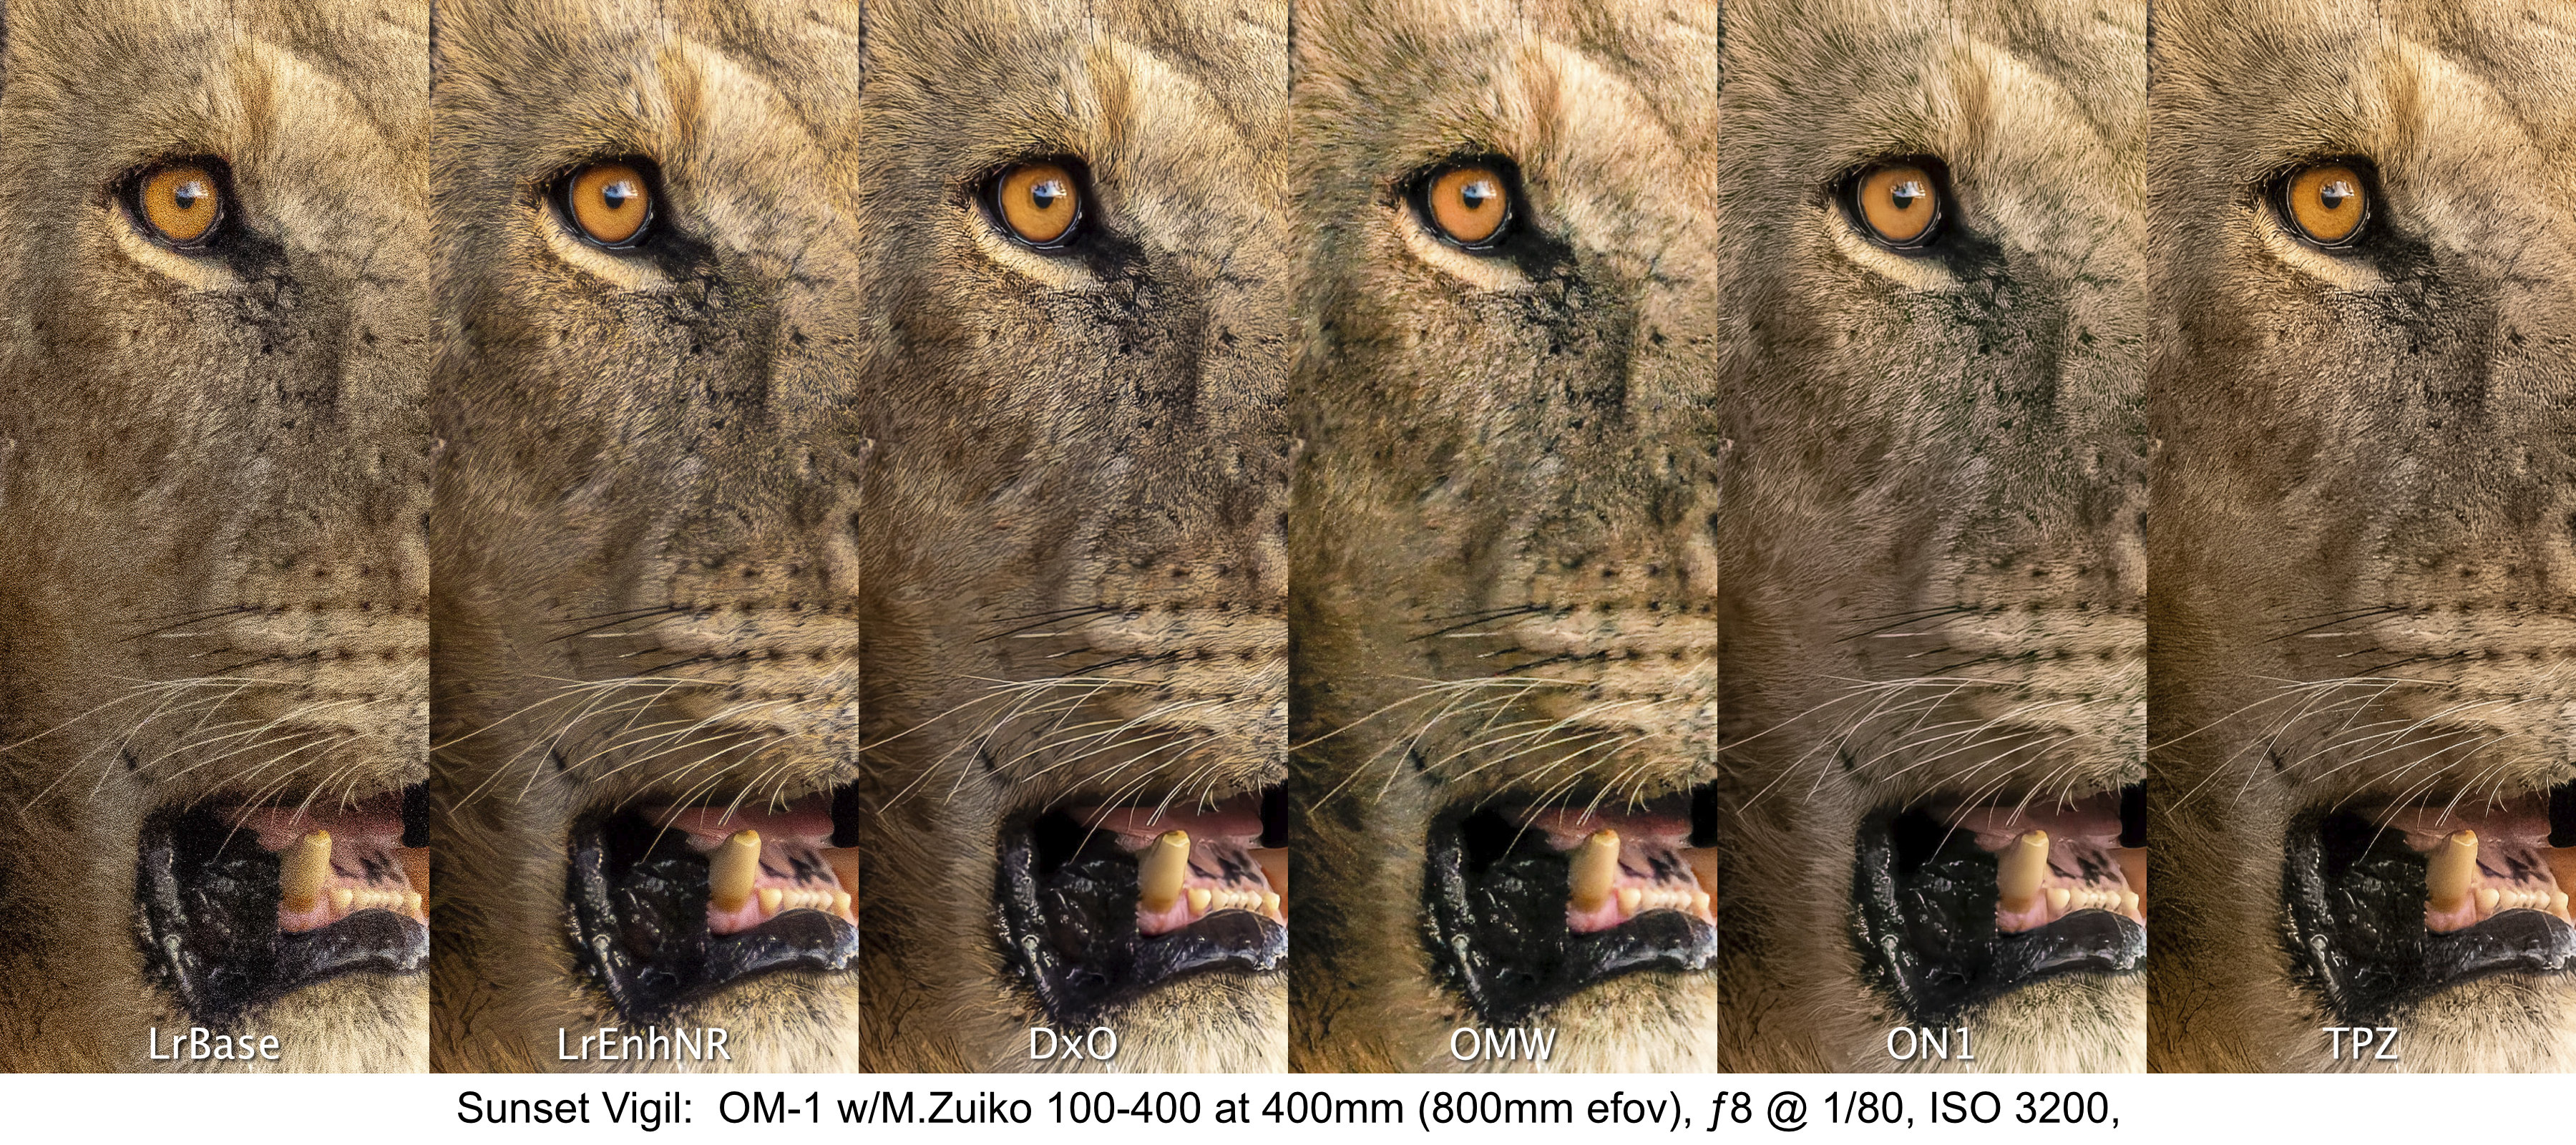
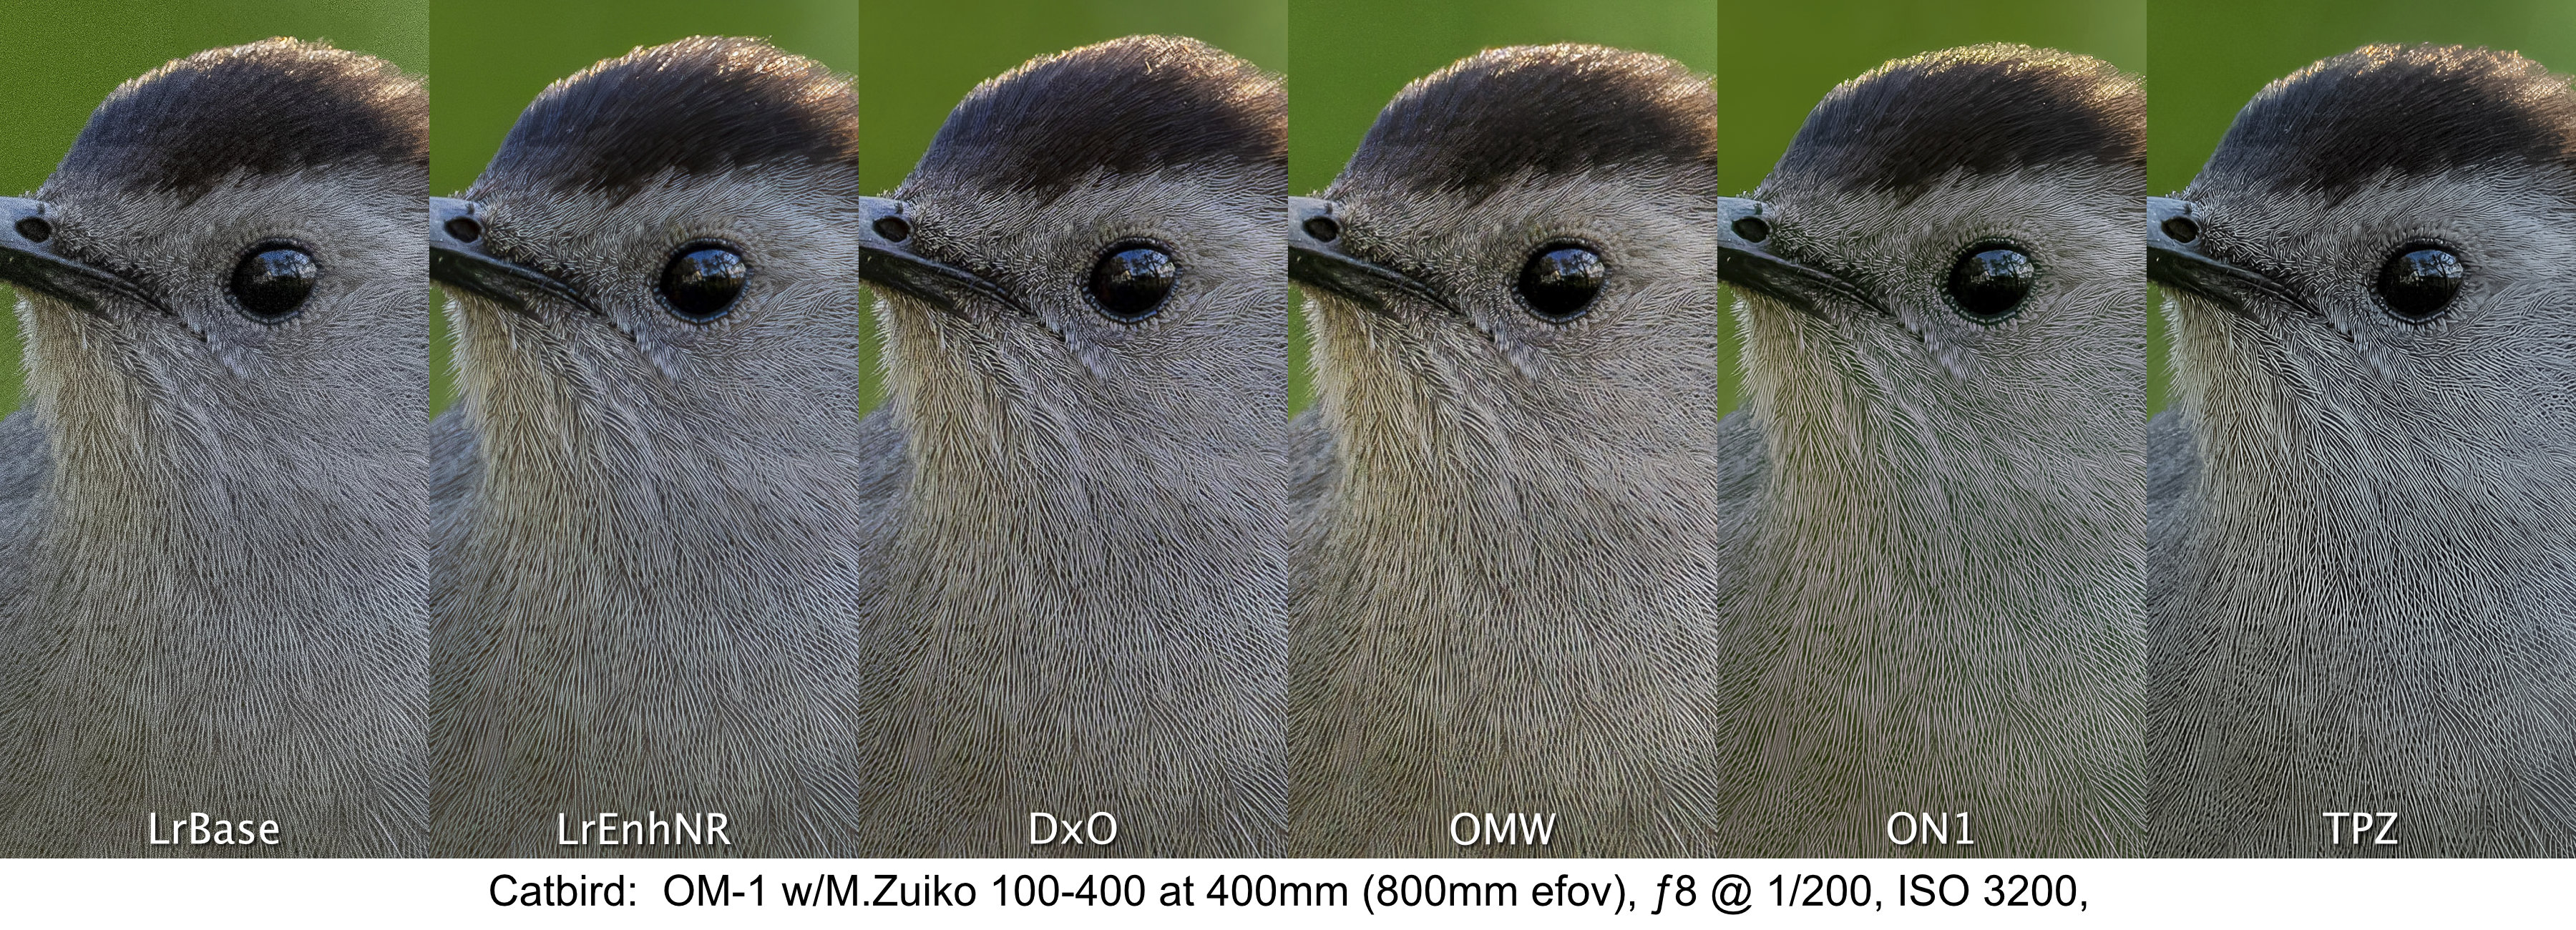
To my eyes, the stand-outs continue to be LrEnhNR, DxO, ON1 and Topaz. They are all equally sharp. Unfortunately, the ON1 and OMW files suffer from the same slight colour shift noted above.
By the way, this size of 3840x2880px is similar enough to the 3600x2700px required for a fine art 9×12” print. The results shown above, clearly show that any of the five treatments (barring artefacts) would make excellent fine art prints at that size.
Not seen in the Topaz crop of Kili Blues is some colour mottling in the plain, blue sky area along with diagonal banding at the near pixel level. This showed up each of the multiple times I ran the file through. I have contacted Topaz about this and they are working on it. TopazLabs claim the ‘pin hole’ artefacts are ‘dead pixels’, yet they do not show on any other treatment.
(3) Framed Print Resolution (4800x3600px or 17.3mp)
To best approximate viewing distance for actual prints, these larger files were evaluated on-screen at 50%. Again, judging at 100% is simply not realistic as only photographers and internet pixel-peepers, not buyers, view prints this close.
Despite the larger size (17mp vs 11mp), the results of these comparisons closely mirror the results of the previous files, but as expected, the fine differences start to reveal themselves.
Once again, the LrEnhNR and DxO versions are the best, but not by far. The ON1 and Topaz versions are equally good, but each suffers as they did previously from colour shift and artefacts respectively. I’d like to work out these problems as the sharpness and three-dimensionality are excellent.
High ISO Photos
The last two of the six photos I examined were shot at very high ISOs of 6400 and 12800. I now know that my previous scepticism is unwarranted and I’m proven wrong, again—the results are phenomenal, across the board. Web-sized JPEGs are virtually indistinguishable across the five treatments. At 4K size, the OMW file drops out of the running. Even upsized to 4800 pixels, the detail, colour balance and exposure are amazing and very printable amongst the LrEnhNR, DxO, ON1 and TPZ files. The LrEnhNR appears more naturally sharp with the others appearing more hyper-realistic, easily tamed by dialling down the Texture adjustment in Lightroom to –30 to –50. This is something I will discuss further in my conclusions.
Like the photos above, click to open each file to view them at full size.

One surprise was the quality of the LrBase photo of Junior at ISO 6400. I printed it to 4×6 as an ArtCard and you would never know it was shot at ISO 6400. This is something we as photographers easily lose sight of when pixel-peeping becomes the norm. Most prints on a lustre baryta or matte paper will not show the noise to the same extent as is shown at 100% on screen.
Conclusions & Discussion
I would love to say that one treatment stood out head-and-shoulders above the rest and was a clear winner, but I can’t. They all produce excellent results. There may be differences at the pixel level when viewed at 200%, but as I’ve made a point of saying, that 200% is an unrealistic yard stick to use.
Lightroom’s own Enhanced Noise Reduction is excellent throughout the ISO range, providing very natural-looking sharpness and micro-contrast while maintaining smoothness of skies and excellent overall three-dimensionality. DxO Pure Raw seems like the best of the raw optimizing apps, with Topaz and ON1 being equally good, but with a couple of artefacts that need more investigation. OM Workspace was disappointing in its ability to create clean, sharp images, particularly at higher ISOs.
Natural versus Hyper-realistic ‘Look’
One thing I kept noticing with all the photos is the very natural-looking, clean sharpness and presence of the LrEnhNR files, which contrasts with what I see as the hyper-realistic sharpness and smoothness of the DxO, ON1 and Topaz versions. The initial appeal of JPEGs from them is captivating, but to me they seem too real, the birds and lion looking more like museum specimens prepared for exhibit. They look great to the untrained eye, but to someone who knows nature, they appear, perhaps, too perfect. As a former ‘film guy’, maybe I’m just more tolerant of a more natural look, and less tolerant of the plasticky smoothness associated with these treatments. It’s like they are trying to emulate something that doesn’t really exist in nature.
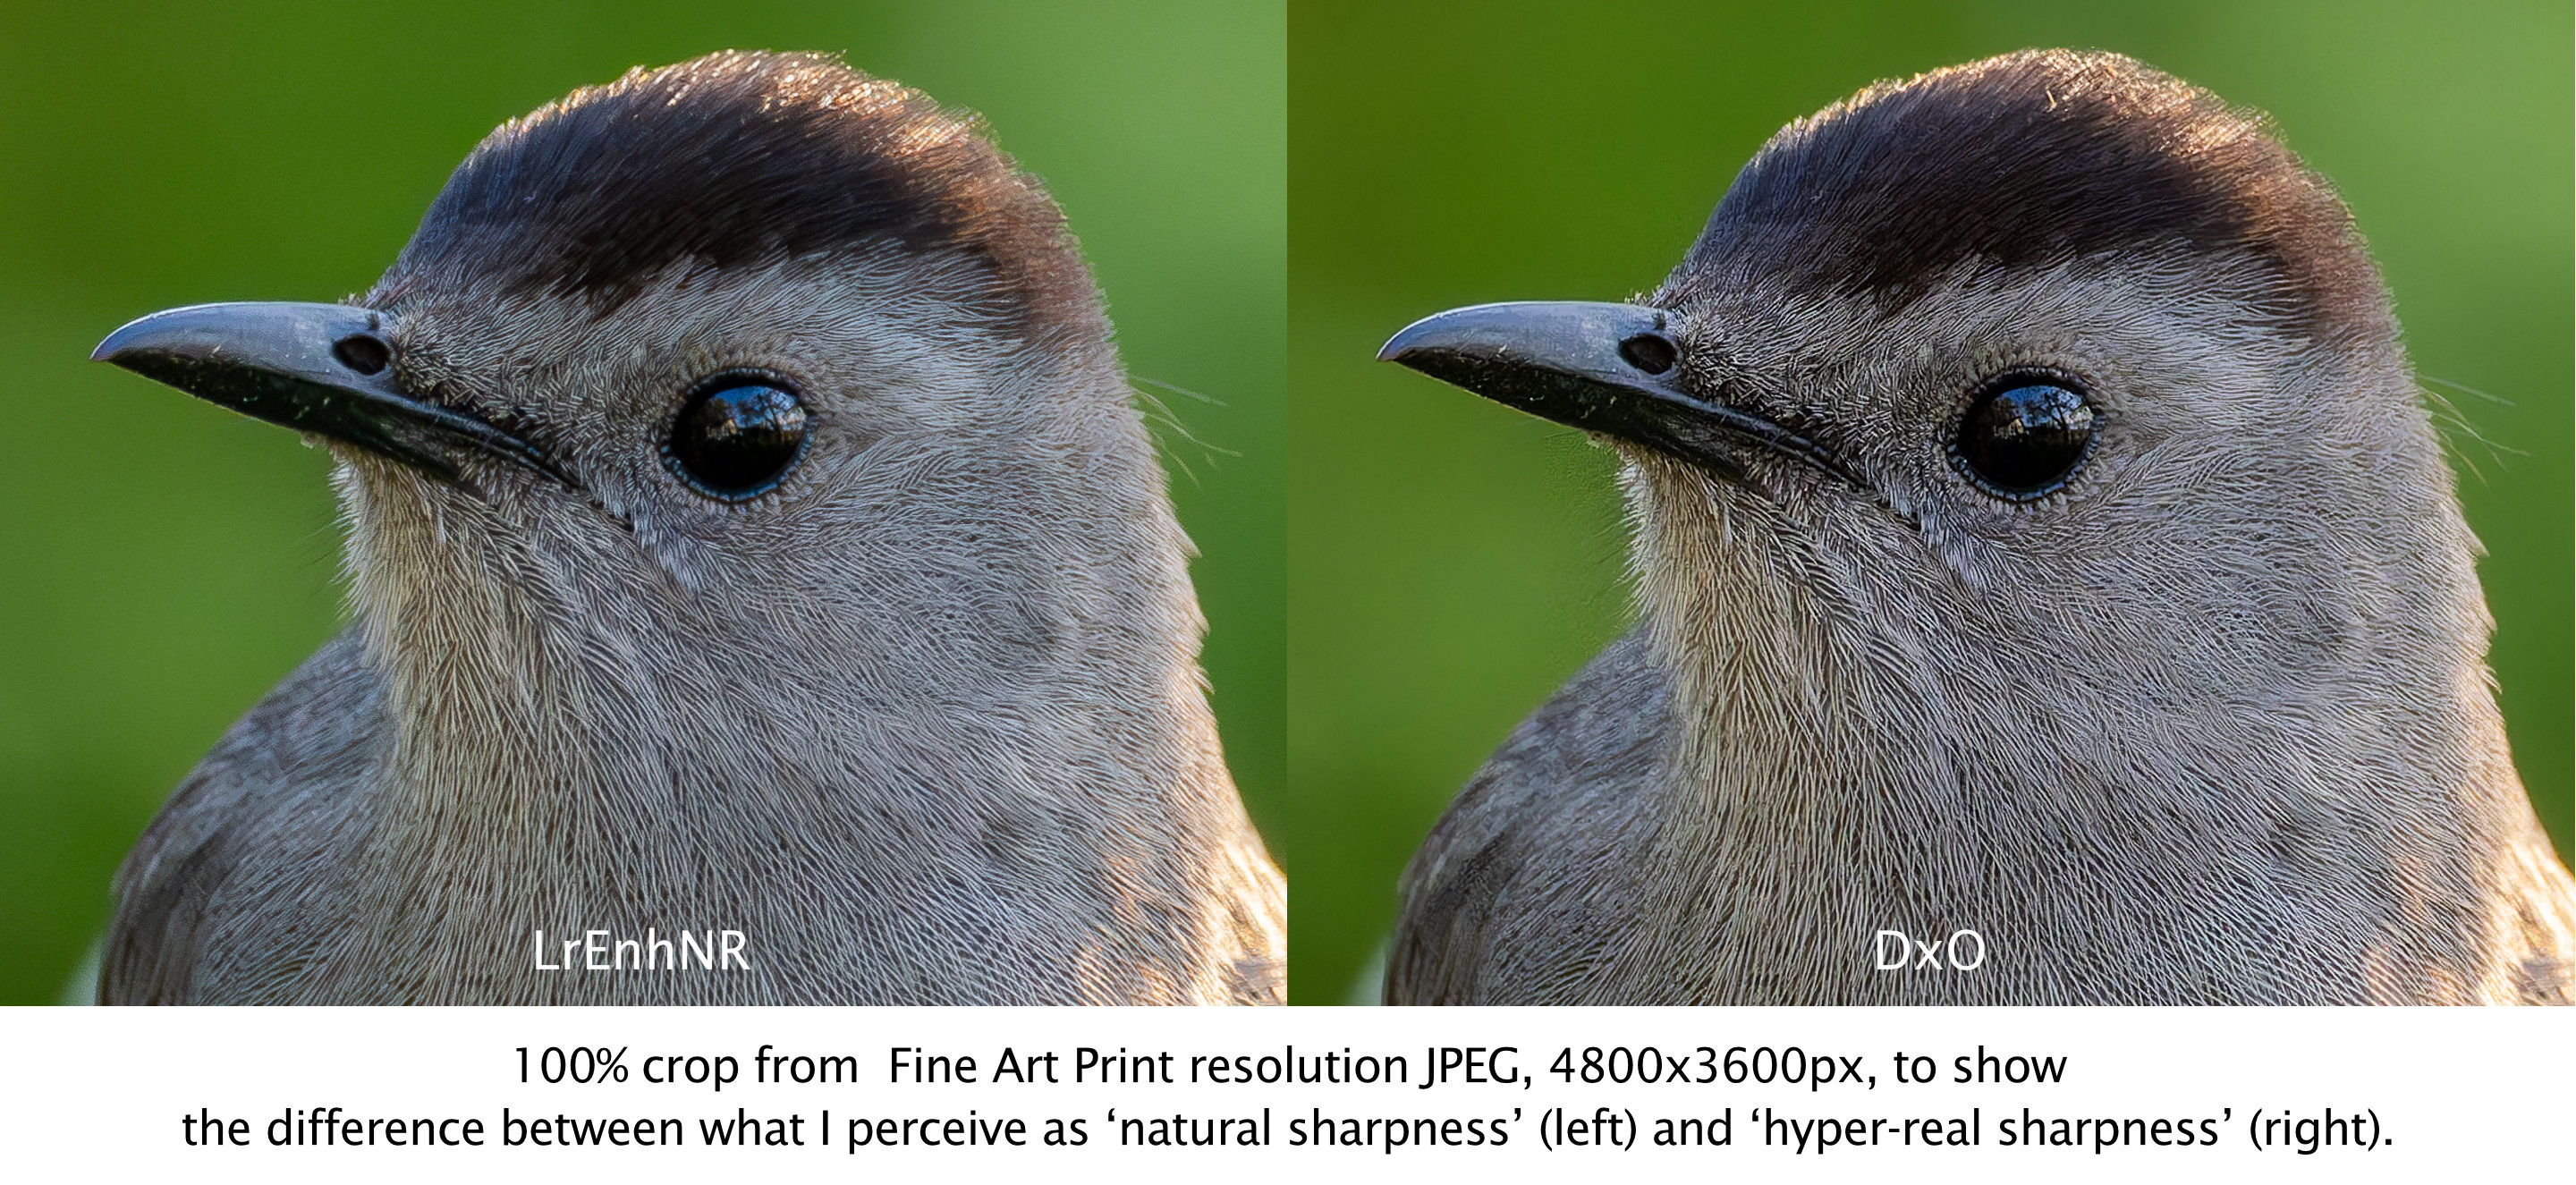
My concern is that this is the way photography is going due to large sensors and this pixel-peeping drive towards minute, clean detail—detail and perfection at a level which one would never see in nature without the proverbial bird in the hand. Perhaps it’s the generative AI aspects of the algorithms, creating pixel-level detail that is not normally seen. Or, maybe it’s just me. Having been involved with nature interpretation for decades, the look comes across as a bit hyper-real, perhaps in an effort to make nature look glossy and catch attention, rather than showing nature as it is. But, as I said, this is only my perception, a feeling I have.
Final Assessment
Overall, you can’t go wrong with Lightroom Enhanced Noise Reduction, DxO Pure Raw, ON1 No Noise, and Topaz Photo AI Raw Denoise and Sharpening for demosaicing, denoising and sharpening raw files. If you’re looking for a clear winner, you won’t find one. They all perform brilliantly and, save for the Topaz and ON1 artefacts which are being looked into, any differences highlighted here are only noticeable upon direct comparison, which in itself, is unrealistic. Differences may be more or less noticeable depending on the raw files you start with and your personal workflow.
I realize these results may be different from what internet bloggers and vloggers have found, and I did not rank one above the other by unnecessarily splitting hairs—but I have no skin in the game either. I do not represent any of these companies, nor do I make a commission from links or profits from clicks. I am only reporting what I see and for the vast majority of photographs, any one of the apps, other than OM Workspace, does a superb job of cleaning up noise while maintaining and sharpening the fine details of foliage, fur and feathers, with the noted caveat of glossy perfection.
For me, I will continue to use Lightroom’s Enhanced NR and am building into my regular workflow both DxO and ON1. I will also be spending more time making some prints to see which versions look better on baryta and matte papers.
Up next in this series:
How well can Topaz PhotoAI and ON1 No Noise ’rescue’ images with motion blur? — now available!
Thanks for reading! If you have any questions about OM System, the quality it produces, or the photos and observations shown above, be sure to add a comment.
This work is copyright ©2025 Terry A. McDonald
and may not be reproduced in whole or in part without the written consent of the author.
Please SHARE this with other photographers or with your camera club, and consider signing up to receive an email notice of new blogs.
Have a look at my work by visiting www.luxBorealis.com and consider booking a presentation or workshop for your Nature or Photo Club or a personal Field&Screen workshop at Workshops.
Finding the Sweet Spot in Photography
NOTE: This article first appeared on the Luminous-Landscape.com as a three-part series, beginning with: https://luminous-landscape.com/finding-the-sweet-spot-in-photography-part-1/. The whole of the article is included below.
If you’ve ever played tennis or baseball, then you’ll know what a sweet spot is—the magical power centre of a racquet or bat between ‘best bounce’ and the ‘dead zone’. Finding that sweet spot can make the difference between repeated success or pain and frustration. So too with photography, but over the years, as technology has advanced, that sweet spot has changed with it, creating a new ideal point where image quality, system size and cost meet.
I’m not a working pro, but like many photo enthusiasts, I take my photography very seriously. A few years ago, unhappy with the status quo, I began a quest to find that photographic sweet spot. It was not a quest for perfection as much as finding a camera system that fulfils my demands of landscape, nature, birds & wildlife and travel photography—one that:
→ produces raw files of high enough IQ for publication and fine art prints;
→ can get wet, performs in extreme weather, and at ‘the edge of light’;
→ has fast autofocus, excellent stabilization, sharp lenses, and high ISO detail; and
→ won’t break the bank.
In all, a system that works with me, not against me.
But this defines a lot of systems out there. In fact, I could make a case for any of the systems I’ve used through my photography journey: 35mm film, 6×7, 4×5, 4/3, digital full frame, 1” sensor, even the camera that’s ‘always with us’—the ubiquitous phone camera. Each has performed extremely well for me in a variety of outdoor, indoor, and studio situations.
NOTE: Tap or click on a photo to open it full-screen. Use the back button to return to the blog. Each photo is optimized for 1200px on the longest side. If your device shows it larger, some blurring may be noticeable.

Navigating the trade-offs
Photography is and always has been one trade-off after another. Take landscape photography: a smaller aperture is needed for greater depth of field, but not too small to cause diffraction. Yet, a fast enough shutter speed is needed to stop the motion of foreground grasses or cattails. We’ve all been there, waiting patiently, perhaps for the light, but more often for the @#%$! wind to die down.
On the other hand, birds and wildlife demand long telephotos, tack sharp and well-stabilized, often heavy and costly. For both scenarios, we need a sensor large enough to capture, in low light, fine details in foliage, fur and feathers, but equipment that is not so large and heavy as to make it unwieldy. More trade-offs.

Travel, reportage and documentary photographers want a small, light, portable system with fast lenses, but they don’t want to give up image quality either. Can there possibly be a sweet spot to meet all these demands?
Yes, and surprisingly, it’s been out there all along, hiding in plain sight, gradually evolving, maturing and perfecting its specs. The problem has been that, like many in the field, I’ve had blinders on. Embarrassingly, I began my digital journey with the ideal system but, following the hype, I went down the path most travelled instead. All this time I’ve been looking in the wrong direction. It took a young, open-minded student of mine to get me to remove the blinders and re-consider my roots.
The proof is in the print
Before I get to that sweet spot, I want to share some photographs since, in the end, it’s the results that count. Here are three photographs from a recent trip to Tanzania. I’ve chosen them because each represents one or more limiting factors in photography: fine detail, low-light performance, and smoothness of tone. Other factors contributing to overall performance include ergonomics, weight, and speed or ease of use. However, the costs and benefits of these can only be judged through hands-on experience with the equipment.


Note: All three photographs were made handheld, a testament to modern IBIS.
So, what about those trade-offs?
Would you believe me if I said these were made with an iPhone? No, definitely not. How about a 1” sensor camera. Possibly. A few years ago, I wrote in LuLa about The Ultimate Travel Camera—the Sony RX10iii (now iv), with its excellent ƒ2.4-4 stabilized Zeiss 24-600mm equivalent lens. What about M43s? APS-C? Full frame?
When I shot 4×5, it was because I could not get a decent 16×20” print from 35mm. With recent advances in digital technology, I can now produce a 16×20 from my current system that is of higher visual quality than a 16×20” made, at the time, from a 4×5 negative or transparency. And, I can make that raw file without a tripod from a camera and lens combination weighing less than a quarter of my 4×5 camera and lens.

The high image quality of these files gives pause for thought. I know you want to pixel-peep them, and you may have already started, but they are down-scaled JPEGs for online use, so you don’t get the genuine experience of seeing them ’live’.
But it’s pixel peeping that created the beast we live with and has become a national past-time for photo bloggers around the world. Yet, that’s not how we view photographs. Perhaps it’s time to turn the Holy Grail on its head. If it sounds provocative, it’s meant to be. You can take in one of two ways: either take a moment to think differently, even if it’s just a thought exercise at this stage, or you can remain trapped in the status quo.

Let’s face it, full-frame is the default, though costly option and marketed as the best choice for modern photographers. After all, bigger is better, isn’t it? Why drive a Ford when you can afford a Ferrari?
But perhaps we’re looking at it the wrong way around. If the files produced above are of high enough quality for prints and publication (which they are), then shouldn’t that be the ruler we measure systems against? After all, you don’t need a 20-foot ladder to climb a 10-foot wall. While the 20-foot ladder is bigger, it’s not necessarily better. While you may claim neighbourhood bragging rights for having the longest ladder, it’s overkill and it’s unwieldy.
I ran into this two winters ago when I missed some shots of snowy owls. For me, it was the last straw, after missing other bird shots over the previous year. I was using a 3.3kg (7¼ lbs) FF Nikon camera plus telephoto zoom and it was too unwieldy to acquire focus and shoot in time. My current system with 60% more telephoto reach is only 2kg and half the size.

Confession Time
You’ve probably figured it out by now, but I did not make these photos with my iPhone, nor with a full frame system. They’re from an OM System OM-1 with M.Zuiko lenses. My guess is you are now scrolling back up to those images, scrutinizing them for any tell-tale signs. I’ll admit, they are downsized to 1200px from the originals and shown as JPEGs online, so you don’t get the genuine experience of seeing them ’live’.
But let’s get back to real-world scenarios—when was the last time you made a fine print larger than, say, 13×17”? Typically, photos are never shown larger than 3840×2880 pixels which is an 11MB file, the same width as a 4K TV. In fact, it’s estimated that more than 90% of photos made are never seen beyond a computer screen. Another way of looking at it is this: how may MB have you paid for, but are throwing away each time you downsize a file?
I feel I might be hitting a nerve right now. During presentations, this is when the audience starts to shift uncomfortably in their seats and the defensive posturing begins, usually around the need for extra pixels for cropping. If that’s the case, then M43 is the sweet spot as the effective focal lengths are doubled. So my 100-400mm/5-6.3 zoom provides the equivalent field of view (efov) of a 200-800 full frame lens. My 12-100/4 PRO IS lens is like a 24-200. Tack sharp from one end to the other and corner to corner, it’s the perfect zoom for travel photography. And my landscape lens is an 8-25mm/4 PRO, or 16-50mm in FF terms, another ideal zoom range, unavailable for FF.
All this represents photography’s dirty secret that no one wants to admit to—unless they’ve actually worked with M43: small sensors are now technologically advanced to compete with full frame. The system is mature enough to have a range of high quality optics that don’t break the bank. In one sense, M43 represents a democratization of photography in that we can achieve high IQ without paying the full-frame premium. I could never afford the kind of FF telephoto lens that is producing the wildlife and bird photos I am now able to make. Nor would I want to carry it around.
Back to prints
Many pros claim to make 30×40” fine art prints. They’re big and they’re gorgeous. Can you do that directly from M43 raw file? No, not without up-scaling. But you can’t make them directly from a FF sensor either. Even a 60MP sensor has a maximum direct print size of 21×31”. Are there M43 users making 30×40” and selling them? You bet there are. The bottom line is this: If you make dozens of 20×30” fine art prints (not canvases, as they require less resolution) a year and sell them, then a FF maybe your best option.
But here’s what Pulitzer Prize-winning and National Geographic Photographer Jay Dickson said, ”I have prints hanging in our home, shot with an [M43] Olympus, that are 50” on the long side, and the quality is stunning.” (Link) That was said eight years ago—long before OM System upgraded the sensor for the OM-1 and OM-1 Mark II.
Professional wedding and portrait photographer Joseph Ellis agrees. He regularly makes, “absolutely stunning prints from M43 up to what the Europeans call A1 (about 23”x33”). (Link) In his side-by-side comparison of 30” prints from a 20MP M43 Olympus and 60MP Phase One IQ16030, there was ”no discernible difference at normal viewing distances”. As he described, differences didn’t really show up until they were ”sniffing the prints”.
In one sense, a paradigm shift from full-frame to M43 mirrors that of the shift from large and medium format to the ’compact’ and ’miniature’ 35mm cameras that began to appear over 100 years ago. While not the first 35mm, ”Oskar Barnack had designed the original 35mm Leica back the 1920’s with the design ethic of small, compact, unobtrusive and capable of extremely high quality” says Jay Dickman (Link). Dan O’Neill adds, ”While older photographers avoided Barnack’s invention, the younger crowd embraced it. Leica quickly became popular with the new generation of artists and photojournalists influenced by avant-garde styles like the Bauhaus movement”. (Link) Whether or not M43 gains the same kind of following remains to be seen, but the shift in thought remains the same: smaller, lighter, yet professional in design, build and performance.
Micro 4/3 achieves a number of sweet spots each of which have suffered from a disturbing amount of disinformation on photography websites, eager to monetize by promoting the more popular SoNiCan full-frame and APS cameras.
Effective aperture and shutter speed
Despite the disinformation regarding aperture, depth-of-field and exposure scattered around the web, physics tells us that ƒ8 on a M43 lens has the equivalent depth of field of ƒ16 on a full-frame lens of equivalent field of view (efov), the M43 bonus being a shutter speed 2EV faster. Let’s go back to that landscape: given the same ISO, a M43 exposure of ƒ8 at 1/125 produces the identical result in terms of depth of field and exposure as a full frame shot of ƒ16 at 1/30. To me, having that 2EV faster shutter speed means less time waiting for the @#%$! wind to die down. Combined with industry-leading stabilization (see below), it also allows for more flexibility with hand holding the camera.

Sensor Size
A 20.4MP M43 sensor is 5184×3888 pixels, or 17×13” at 300ppi—large enough to cover a two-page spread in a photo book with full bleed. How many prints larger than that do you make? When I need something larger, I use one of two methods for up-scaling:
(1) Lightroom’s Enhanced Super Resolution after running the base raw file through DxO PureRaw or ON1 No Noise—both with phenomenal results; and (2) Topaz PhotoAI’s upscale. It all depends on the photo. There is also OM System’s native High Res Mode, either handheld for 50MP or on a tripod for 80MP. Both do an excellent job. A third alternative I’ve begun using more often is to lock exposure and shoot multiple photos panoramic style. Three-across gives me a vertical of 5184px with a horizontal of around 7000px for a 17×23” direct print. Another option is to shoot across and down in rows, then Merging them in Lightroom with outstanding results.

Size and weight
To me, this is the elephant in the room. Photographers will jokingly complain about the weight of their FF gear, but still consider the struggle part of the experience. Those days are gone for me. I’ve hiked the remote and rugged Superior Coast trail with 35mm and 4×5 gear, and dragged full-frame gear all around the Galápagos Islands. Working with M43 is so much sweeter!
With full-frame gear, I always needed a backpack, and it was nothing by a pain. I couldn’t switch lenses on the go like I can with a sling or waist bag. A backpack, must be removed and put down somewhere to open it, take out a lens and switch over, or change a battery, or get a filter, etc. Where I work, this is a problem: next to waterfalls, on a beach, in a wetland, along the muddy banks of a river.
My whole OM system fits into a small sling bag. I have the FF equivalent of 16mm to 800mm glass plus a 120/2.8 Macro lens and a 1.4x Teleconverter, all in a small LowePro AW sling along with a POL, a couple of NDs, a spare battery, a lintless cloth, lens cleaning kit, and a couple of granola bars. When flying, it’s my ‘personal bag’—with all my gear—and it weighs about 4.5kg. When I ‘travel light’ with only a LowePro waist bag, I can still have my three zooms covering from 16mm to 800mm: two in the bag and one on the camera on a shoulder harness, with all the same extras. It doesn’t get better than that.
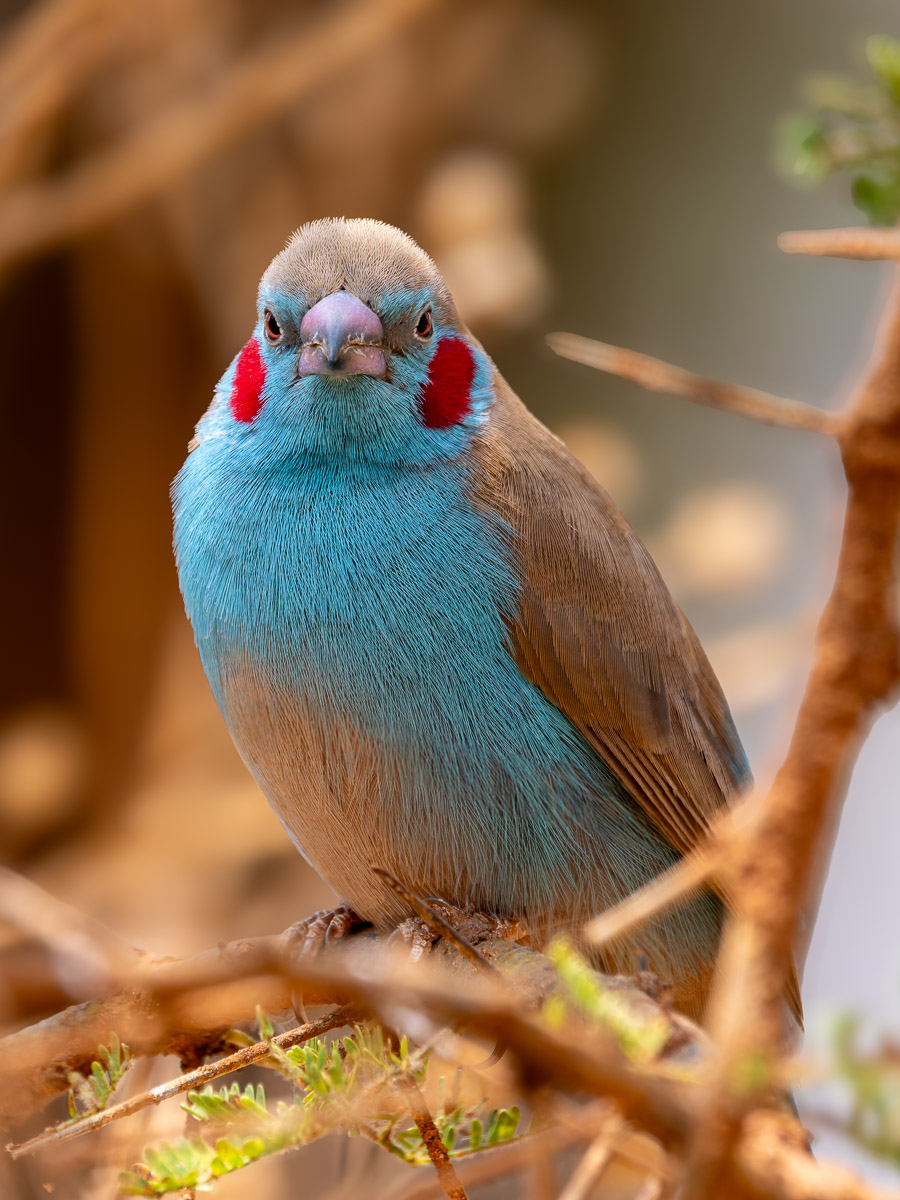
Cropping
Admittedly, there are times when ’zoom with your feet’ isn’t feasible. Take the Cordon-bleu bird above. Tack sharp. I got as close as possible to it and managed a 3888×2916 pixel image—a vertical crop from a horizontal frame. Could I have achieved the same with a full-frame system? Almost. Although the focal length was 400mm, on a M43 sensor, that’s equivalent to 800mm in FF terms. If the same shot was made on a 60MP Sony A7Rv with a 400mm lens, the height of the identical photo would be 3461px (13mm/23.8mm*6336px), a loss of 427 pixels at an additional cost of CAD $3000. With a 47MP Nikon Z8, the image height would be 2994px (894 pixels less) and $4100 more expensive. That’s the FF premium. So, as far as pixels on subject are concerned, the OM-1 has it.
Sensor stabilization
I am neither a physicist nor an engineer, but what I understand from both is that the smaller M43 sensor is far easier and more efficient to stabilize than a full-frame sensor 4 times the size. Therefore, in a less expensive camera, Olympus has achieved extremely effective in-body stabilization, some say industry-leading, especially when paired with in-lens stabilization.
The High ISO Noise Debate
There is no doubt that M43 produces more noise than a full-frame sensor at every ISO. You can see the difference on-screen at 100%. In fact, it was the first thing I noticed with my OM-1 files. However, that’s the trap everyone falls into. Internet pundits love comparing on-screen at 100%, but no one who actually appreciates photographs examines them on-screen like that, only pixel-peeing photographers and internet bloggers do. The reality is, it’s the final photograph that counts, and its emotional appeal. Is grain noticeable in the final photograph? Not for the vast majority of uses, and if the on-screen noise bothers you, cleaning it up is only a few clicks away using DxO PureRaw, ON1 No Noise, Topaz PhotoAI or Lightroom’s Denoise. While I find DxO and ON1 the best of the lot, any one of them cleans the image up beautifully. Voilà, no noise. (More on raw file optimization in an upcoming article).
BTW, the lion shot up above was shot at ISO3200 and you can see every fine hair, even before it was cleaned up. Raw optimization just made it sing.
What about Dynamic Range?
M43 sensors have less dynamic range than FF sensors. There is no doubt. The most recent data from DxOMark measures the DR of the older Olympus OM-D E-M1 Mark II at 12.8, two EV lower than the class-leading Nikon 850 at 14.8. When a scene’s brightness is too great for any sensor to handle, photographers use exposure blending to compensate, to ensure detail is captured in both the shadow and highlight areas. With my OM-1, I keep HDR controls in my customized ’My Menu’, and use them about as often as I do with my D800E (DR of 14.3), which is rarely.
Why not APS? Isn’t that the sweet spot?
APS seems like a good option, but is it really? For me, there are too many trade-offs. If you already have a full-frame system of lenses, then you might think an APS body is the way to go, but you’re not saving any weight or bulk. The savings comes in matching an APS body with lenses designed for it. While lighter-weight APS bodies and lenses certainly have very good functionality at a low price, they have two inherent problems. One: APS bodies and lenses are cheaper for a reason. They are simply not built as ruggedly as an OM-1 or FF, and they often have only one memory card slot along with those shortcomings. Secondly, APS lenses tend to be slower and lack the corner-to-corner and full zoom range sharpness and professional finishing of both FF and M.Zuiko lenses.
To me, the sweet spot lies in creating engaging, high IQ photographs with equipment rugged enough to perform under any circumstances. A system that captures grand landscapes with dramatic light, minute details on a forest floor lit only by tree-hued softness, fleeting birds and wildlife—in any weather, at any time of day, even after the sun’s gone down. A system that will travel with me, provide a range of high quality optics from ultra-wide to telephoto, all in a small package. Funny, how similar the thinking was behind the ’miniature’ Leica 35mm camera. A hundred years on, are we on the brink of another sea change in photography or is the ‘bigger is better’ mantra still too entrenched?
What’s in your future?
Thanks for reading! If you have any questions about OM System and the quality it produces or the photos shown above, be sure to add a comment.
Please SHARE this with other photographers or with your camera club, and consider signing up to receive an email notice of new blogs.
Have a look at my work by visiting www.luxBorealis.com and consider booking a presentation or workshop for your Nature or Photo Club or a personal Field&Screen workshop at Workshops.
Wildlife and Bird Photography—On Safari in Tanzania, Part 2 – Tarangire National Park
This is Part 2 of a series of posts on our Tanzania trip. Here are links to Part 1 in Arusha National Park (opens in a new tab).
While Arusha National Park is known for its views of Kili, Tarangire is nothing short of quintessential Africa.
It’s the Tarangire River that draws in the wildlife. This is especially true in these dry season months of September to November, when water becomes more and more scare. It’s a gently rolling patchwork of grasses, brown from lack of rain, and still-green acacias dotting the landscape. Baobabs, bare-branched with new flowers and leaves just opening contrast with the leafy-green sausage trees that line river banks, their wares hanging down like a traditional delicatessen.

Olympus/OM System OM-1 w/ M.Zuiko w/ M.Zuiko Digital ED 12-100mm IS PRO @ 12mm (24mm efov); ƒ8 @ 1/400, ISO 800, Hand-held High Res; processed in Lightroom
—❦—
Technical note about the photos: Unless otherwise noted, all photos were made with an Olympus/OM System OM-1 with an M.Zuiko Digital ED 100-400/5.0-6.3 IS zoom. Raw files were processed in Lightroom for iPad during the trip with subsequent processing afterwards, as well. Any alterations from this are stated in the captions.
Viewing photos: Click on a photo to view a larger version. Use the back button to return to the blog. The size of each photo is limited to 1500 pixels on the long size. If it appears full-screen, then your device may be up-sizing it, which can lead to blurriness.
—❦—
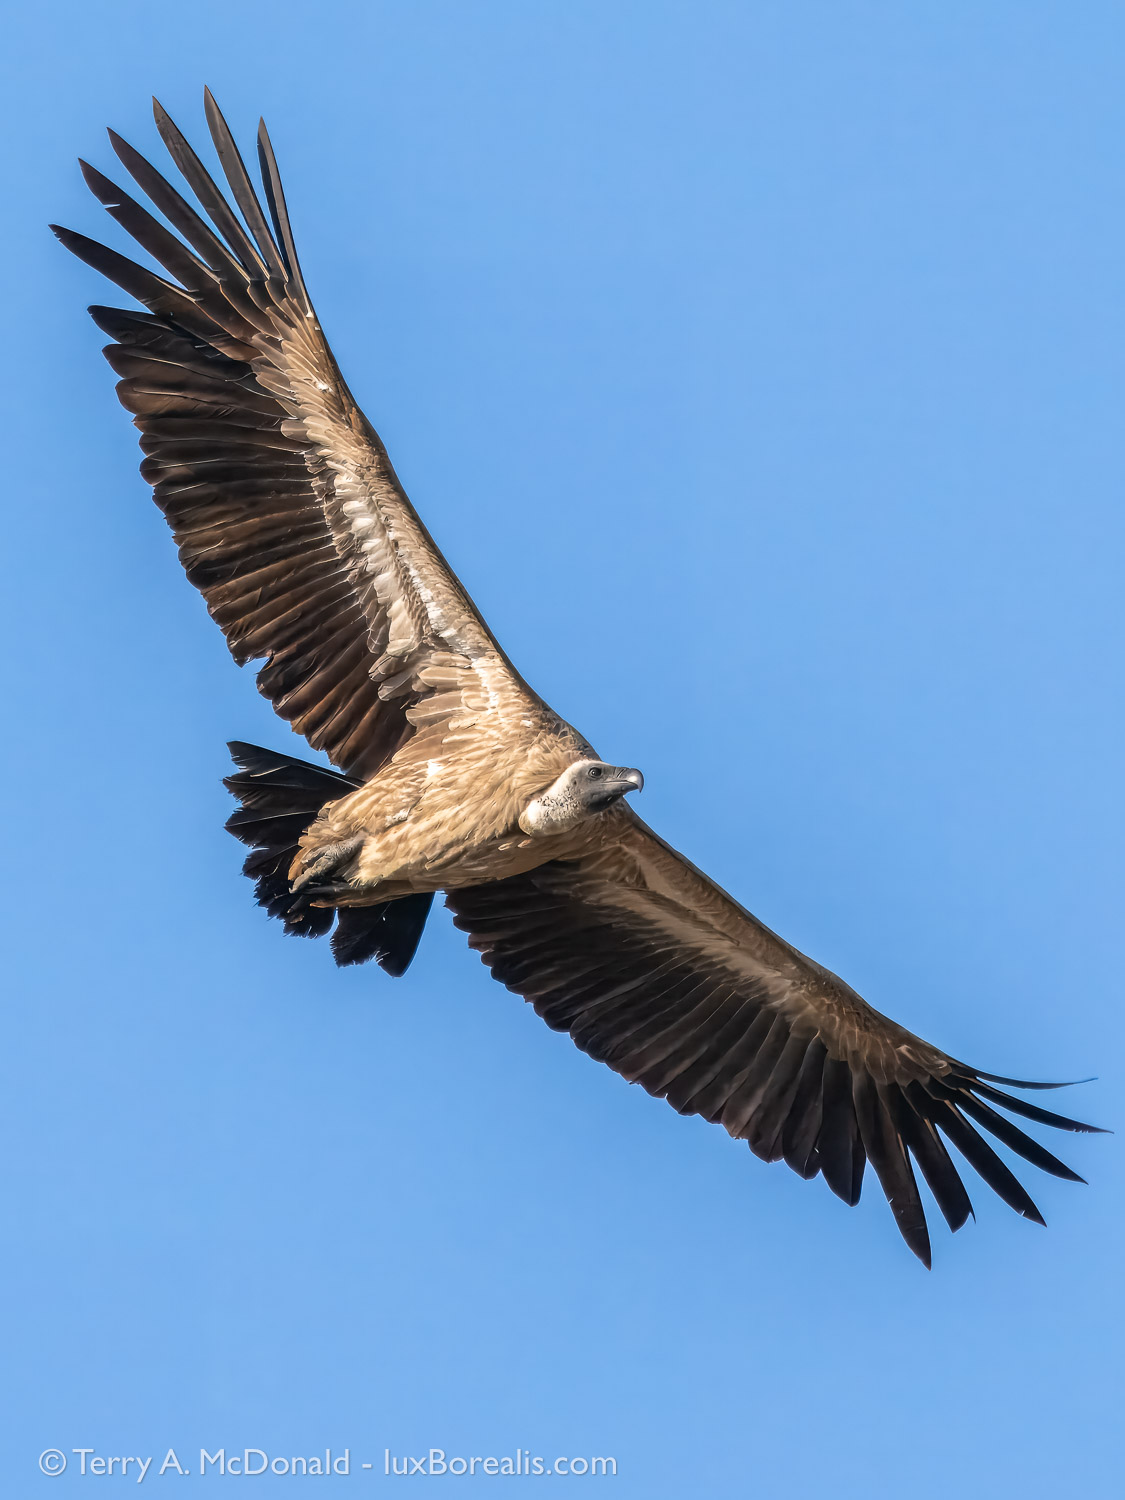
Strolling through the grasses and amongst the trees are a host of Africa’s finest wildlife: elephants, giraffes, Cape buffalo, waterbuck, impalas, antelope, zebras, wildebeest, dik-diks, and eland amongst others—always with lions, cheetah, leopards and jackals awaiting their opportunity partake of the buffet. Soaring overhead are kettles of vultures, auger buzzards, tawny eagles, fish eagles, martial eagles and snowy-white black-winged kites.

400mm (800mm efov); ƒ11 @ 1/400, ISO 1600
These ’cute little guys’ were all around the lodge area, drinking from the water dishes kept full by the lodge staff. Dik-diks are the smallest antelopes, only about 35cm at the shoulder or the size of a dog and are usually quite skitterish.
We stayed in the park at Tarangire Safari Lodge, a relaxed, casual tented camp with safari tents arranged along the top of a ridge overlooking the Tarangire River valley. We’ve been fortunate to travel to many truly beautiful locations around the world, but this is, above all, our favourite. It’s a chill place in the heart of wild Africa. The Simonsons have been running the lodge since the mid-1980s and Annette, her son Brendan and their staff are wonderful stewards of this quintessential corner of Africa, balancing the needs of their guests with the fact that wildlife regularly roams through the lodge grounds (and sometimes the lodge, itself—check out their Insta and FB pages!)
(Gryps africanus)
400mm (800mm efov);
ƒ8 @ 1/5000; ISO 1600; Lightroom + PhotoAI

(Xerus rutilus)
400mm (800mm efov);
ƒ8 @ 1/400; ISO 400

(Poicephalus rufiventris)
400mm (800 efov);
ƒ11 @ 1/800, ISO 1600
Why ‘red’ when it’s ‘orange’? The word ‘orange’ hadn’t been invented when this bird was named!!
But, it’s the captivating and engaging view that really makes TSL such a favourite place to stay. You could choose not to go on a wildlife drive and still see everything! We’ve sat for hours on the terrace or, during the heat of the day in the open-air lounge, enjoying the unobstructed 270° view—a living diorama of herds of elephants and zebras and waterbuck and giraffe and Cape buffalo and- and- and—casually and continuously moving down the valley slopes to the river, into and across the river, then up the other side.

100mm (200mm efov); ƒ8 @ 1/400; ISO 200
314mm (628mm efov); ƒ8 @ 1/320, ISO 800
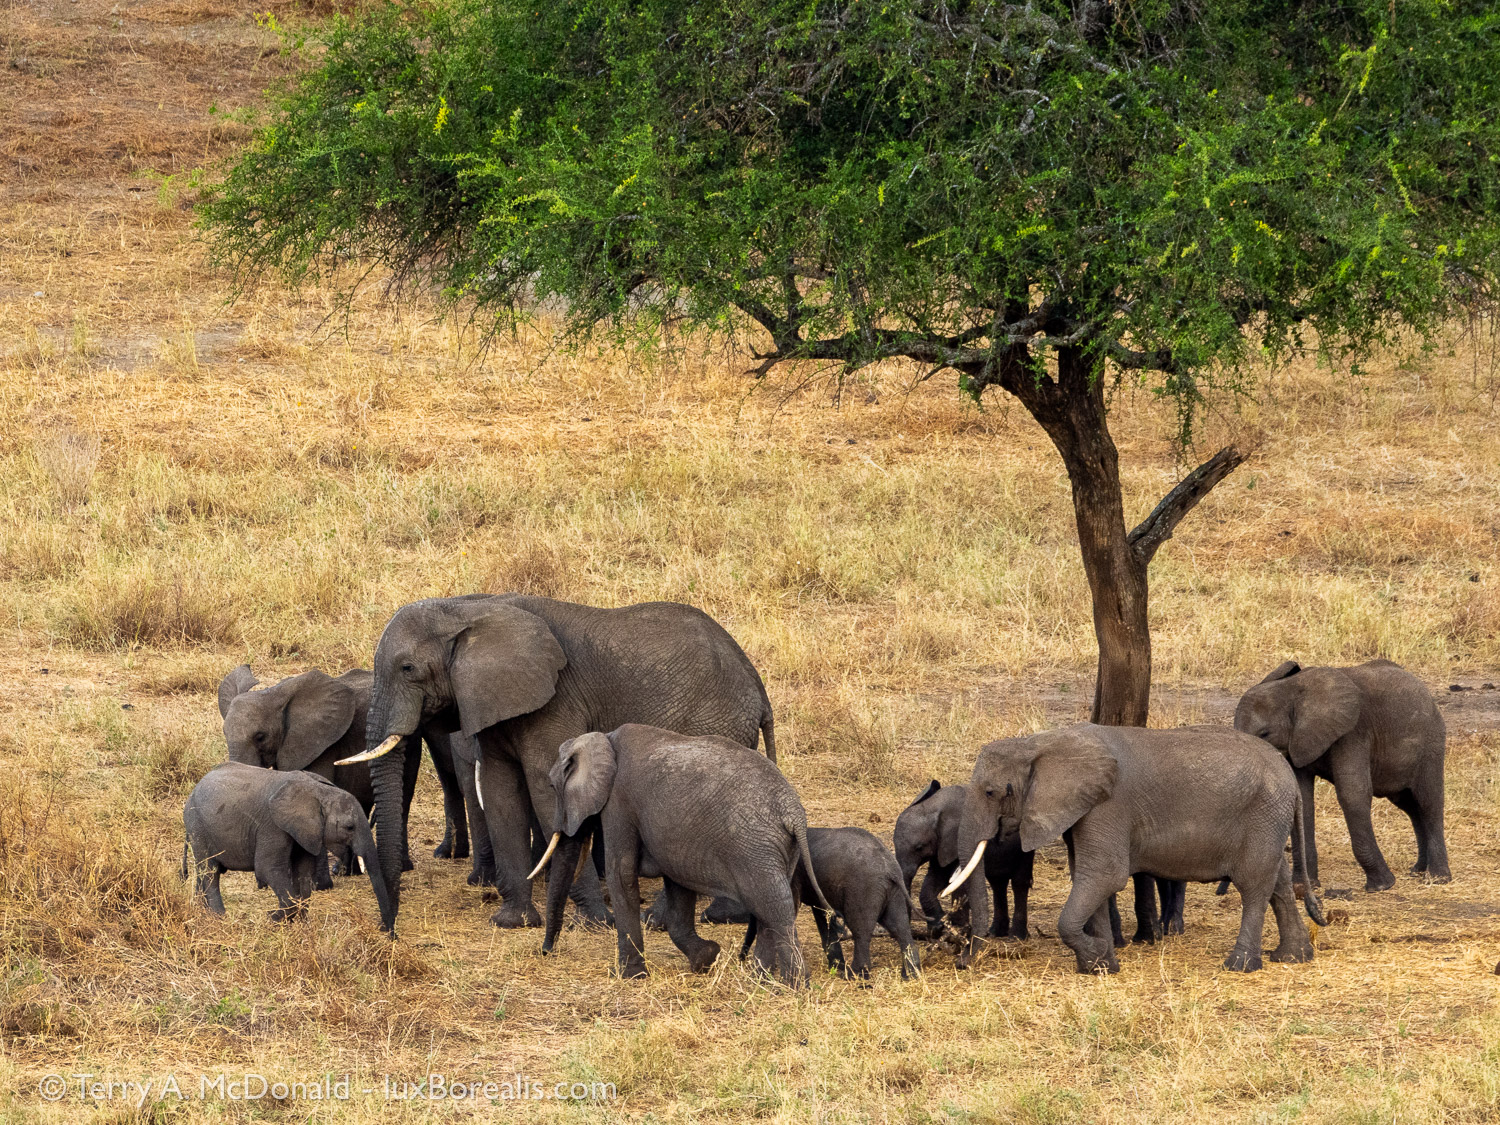
While reading a book or editing images, a sudden movement down in the valley catches our eye: a young elephant is running, scampering in its trunk-flopping, comical way, towards the water and play time. Just as Arusha National Park is known for its giraffe (Giraffic Park), Tarangire is known for its elephants, though Pachyderm Park, doesn’t have quite the same cachet. The real excitement comes when someone announces that there are elephants on the lodge grounds.
Elephants regularly pass along the back of the tents, browsing on the acacias and sometimes trying to access the water. In fact, we watched as they turned on faucets with their trunks to access water. More on that in Part 3!
iPhone 11 Pro, 2x camera
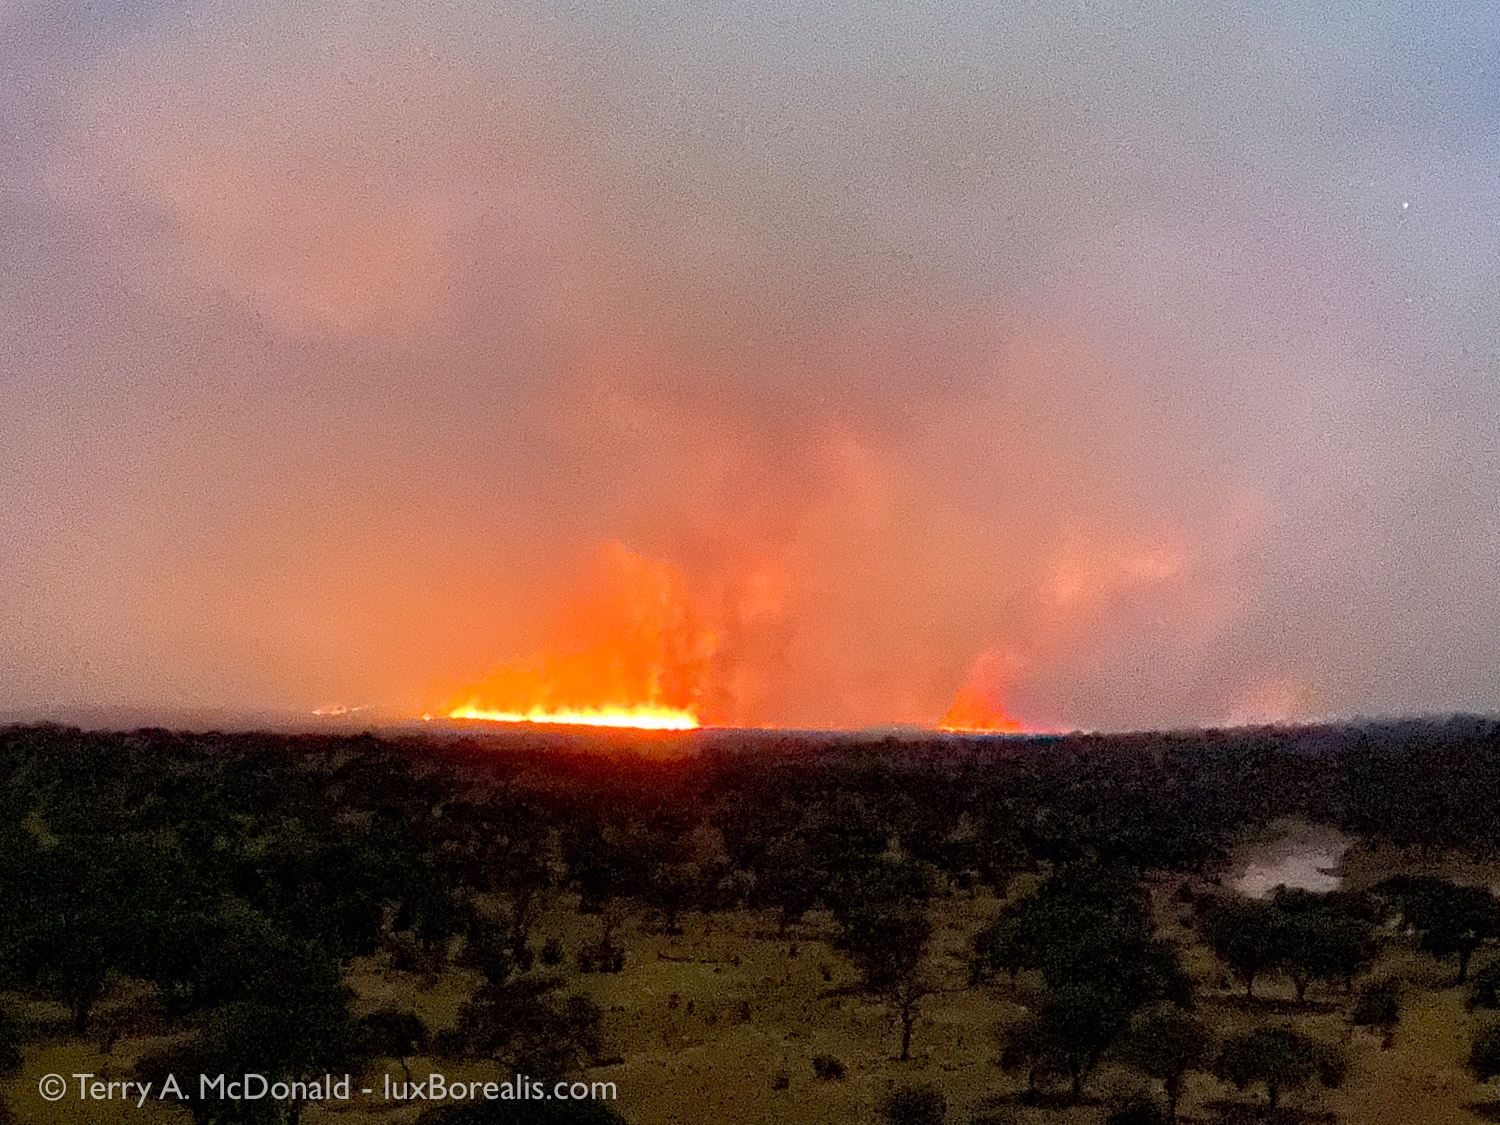
One of the realities of Africa is that famers still use fire to burn crop residues to fertilise the next crop. This fire got out of control and entered the park, burning grasses but not trees, contributing significant air pollution and tiny black cinders of burnt grass that covered everything. The subsequent bonus was that it drove the antelopes, zebras and wildebeest northwards, followed by lions, of course.
One other advantage of being at the lodge is Brenden—the guy in charge. In his young thirties, he has literally grown up there. After his dad passed a few years ago, Brenden stepped in to keep things running with his mom, Annette. Brenden is a knowledgeable birder and accomplished photographer (see @brenden_simonson on Insta) and offers bird hikes from the lodge. Walking through the bush with an armed ranger is an adventure not to be missed. Because Brenden is there all the time, he knows exactly what birds can be found where.
Furthermore, Brenden has put a few large agricultural disks as bird baths out in various places around the lodge and has instructed the staff to keep them clean and filled with water. This alone is all the birds need to congregate around the site. The one outside the dining room provides endless entertainment with parrots and go-away birds competing for time at the bath. The one he’s placed down at the far end also attracts wildlife. We were woken up late on night by the loud sound of lapping, like a dog drinking from its dish. Under the light of the full moon, I kid you not, there was a full-grown leopard, 3-metres from our tent drinking its fill. The next night it returned. The night after that four water buck drank the disk dry. Phenomenal!! If only I could shoot through the mesh of the tent netting.

400mm (800mm efov); ƒ11 @ 1/60, ISO 3200
Despite its nondescript colouring, this bird is, hands down, the most interesting animal in Africa. Look at its scientific name. Now, look at its common name. This bird has formed a symbiotic relationship with humans—one of only a few animals to do so—classic mutualism. It finds nesting bees, uses a specific call to signal to traditional foragers like the Hadza people of Tanzania, then guides them to the bees where the Hadzabe enjoy the honey and the honeyguide enjoys the eggs, larvae and beeswax. This may also be the only example of co-evolution between an animal species and humans, that doesn’t involve domestication. Truly fascinating!! I was thrilled to see one and photograph it.

(Uraeginthus bengalus)
400mm (800mm efov):
ƒ8 @ 1/320; ISO 400

(Lamprotornis superbus)
276mm (552mm efov);
ƒ/8 @ 1/200, ISO 400

(Terpsiphone viridis)
400mm (800 efov);
ƒ8 @ 1/640, ISO 1600

(Glaucidium perlatum)
400mm (800mm efov);
ƒ8 @ 1/1000; ISO 1600

400mm (800mm efov); ƒ8 @ 1/800; ISO 1600
After this adult followed its yoiung into the nest—a hole in a baobab tree—I waited. Within a few minutes I could see it stirring near the entrance, then out it flew!
Okay—enough about the lodge, though I could wax on about it forever.
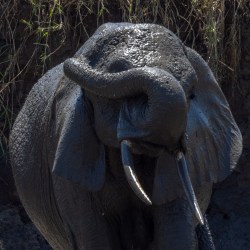
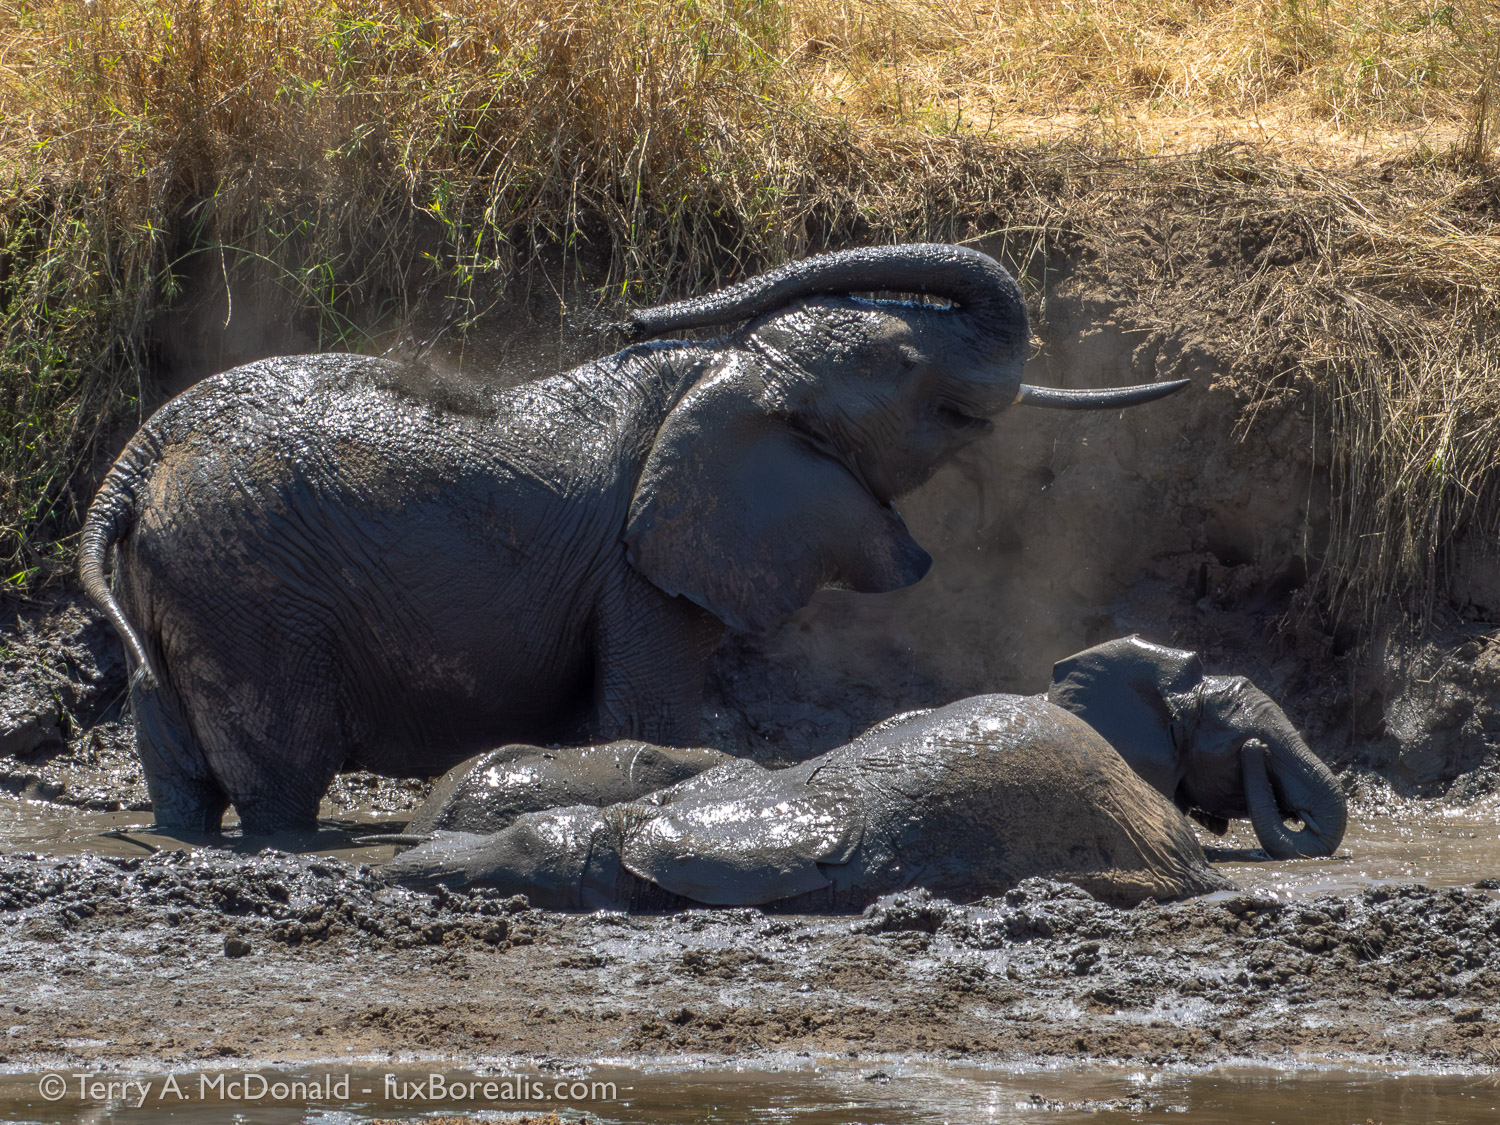
Just like Arusha National Park, Tarangire is full of surprises. However, once you get to know the park, you learn where to look, and the river is biggest draw. After crossing the bridge about 1km south of the lodge, we headed south taking each of the River Loops A, B and C. Where loop B meets the river there is an elephant mud hole. They’re not there everyday, but if the timing is right, like it was for us, you are treated to the happiest, most joyous hour of watching elephants of all ages flipping and flopping in the mud and splashing and spraying themselves with mud and water. Pictures and words don’t begin to describe the experience of pure fun and joy the elephants are having, trumpeting and calling to each other. Even my poor attempt at a 10-minute video doesn’t do it justice.
138mm (276mm efov); ƒ16 @ 1/400, ISO 800
First one family arrived—the youngest literally running towards the mud—then a second family followed. They waited patiently for at least half an hour while the first elephants wallowed and splashed and sprayed and dusted themselves and scratched their sides and bums against a very large boulder. After their time at the spa, the second family did the very same.


Further down, in Loop C, we forded the river, passable during the dry season as the water is only axle-deep. After crossing we could have gone further south, down to the Silale Swamp, but decided to wind our way back to the lodge, slowly meandering north along the east side of the river. Earlier, we had spotted a number of safari trucks stopped in one location—a good indication of something interesting. Sure enough, there were six lions resting and sleeping on the sand beside the river.

269mm (538mm efov); ƒ11 @ 1/2000; ISO 1600
Right: 560mm (1120mm efov) w/ MC-14 teleconverter; ƒ11 @ 1/1600, ISO 1600
Oh to have the life of a lion. Sleep all day, periodically keeping an eye out for dinner, then attack, eat and sleep. If only it were that easy, say the lions!

We carried on up to the Matete Picnic Site high above the river, where we found resident and habituated Vervet monkeys with young. Years ago, long before the picnic site was formally developed into what it is now, we encountered mating lions, who just continued on doing their thing as we pulled up near them and watched and listened. Unforgettable really, in so many ways! This time, it was the intimate portraits of these monkeys and their young that made the stop so captivating.

(Chlorocebus pygerythrus)
L to R: 150mm 400mm, 138mm
ƒ/8; ISO 1600 and 800


Sometimes we approach this same road by turning south just before the bridge, driving down the east side of the river. This is often where elephants are tracking down to the river along with zebras and wildebeest. Lions are also around, frequenting the ridges and humps in the ground, keeping a watchful eye on what’s happening below. We’ve seen zebra kill along here on a few occasions.

(Giraffa camelopardalis) and Yellow-billed Oxpecker
(Buphagus africanus)
314mm (628mm efov);
ƒ11 @ 1/200; ISO 1600

(Struthio camelus)
400mm (800mm efov);
ƒ16 @ 1/800; ISO 1600

(Procavia capensis) in Baobab
400mm (800mm efov);
ƒ11 @ 1/160; ISO 800
A third favourite location is along the river to the north and west of the lodge. Though we didn’t get there this time, it proved to be a most exciting place when our daughter joined us two weeks later for our second safari to Tarangire. Because she is less interested in birds, Laura and I tried to pack as many birding moments into this safari as we could.
On another drive, we drifted north and eastwards then south to the open country in the hope of seeing a cheetah. No go, but it was still a worthwhile exploration, turning up a black-winged kite, beautiful lilac-breasted rollers, huge ground hornbills, some antelope, zebras, wildebeest, and eland. We also came across large areas burned by the bush fires. At one point, the road was heading directly into a bush fire, but we joined up with the main road which allowed us to head north again, back to the lodge.

(Connochaetes taurinus)
400mm (800mm efov);
ƒ8 @ 1/400, ISO 200

(Elanus caeruleus)
400mm (800mm efov);
ƒ8 @ 1/1000, ISO 200

(Coracias caudatus)
400mm (800mm efov);
ƒ8 @ 1/1250, ISO 400

400mm (800mm efov); ƒ8 @ 1/320, ISO 200
269mm (538mm efov); ƒ11 @ 1/500, ISO 1600
It is always with sad hearts that we leave Tarangire Safari Lodge and the National Park. There is nothing that can replace those few days of casual and exciting wildlife viewing combined with chilling on the terrace or in the lounge, never knowing what might suddenly appear, but always knowing there will be something amazing.
Stay tuned to Part 3: Close Encounters with Lions!
If you have any questions about safaris, gear, processing or the photos, add a comment below.
Please take a moment to share this post with other photographers or travellers, armchair or otherwise.
Also, consider signing up to receive an email notice of new blogs.
Subscribe below or scroll up to the top right.
Visit luxBorealis.com for more photos, to order fine art prints and ArtCards, book a Field & Screen workshop, or inquire about an evening PhotoTalk for your nature or camera club.

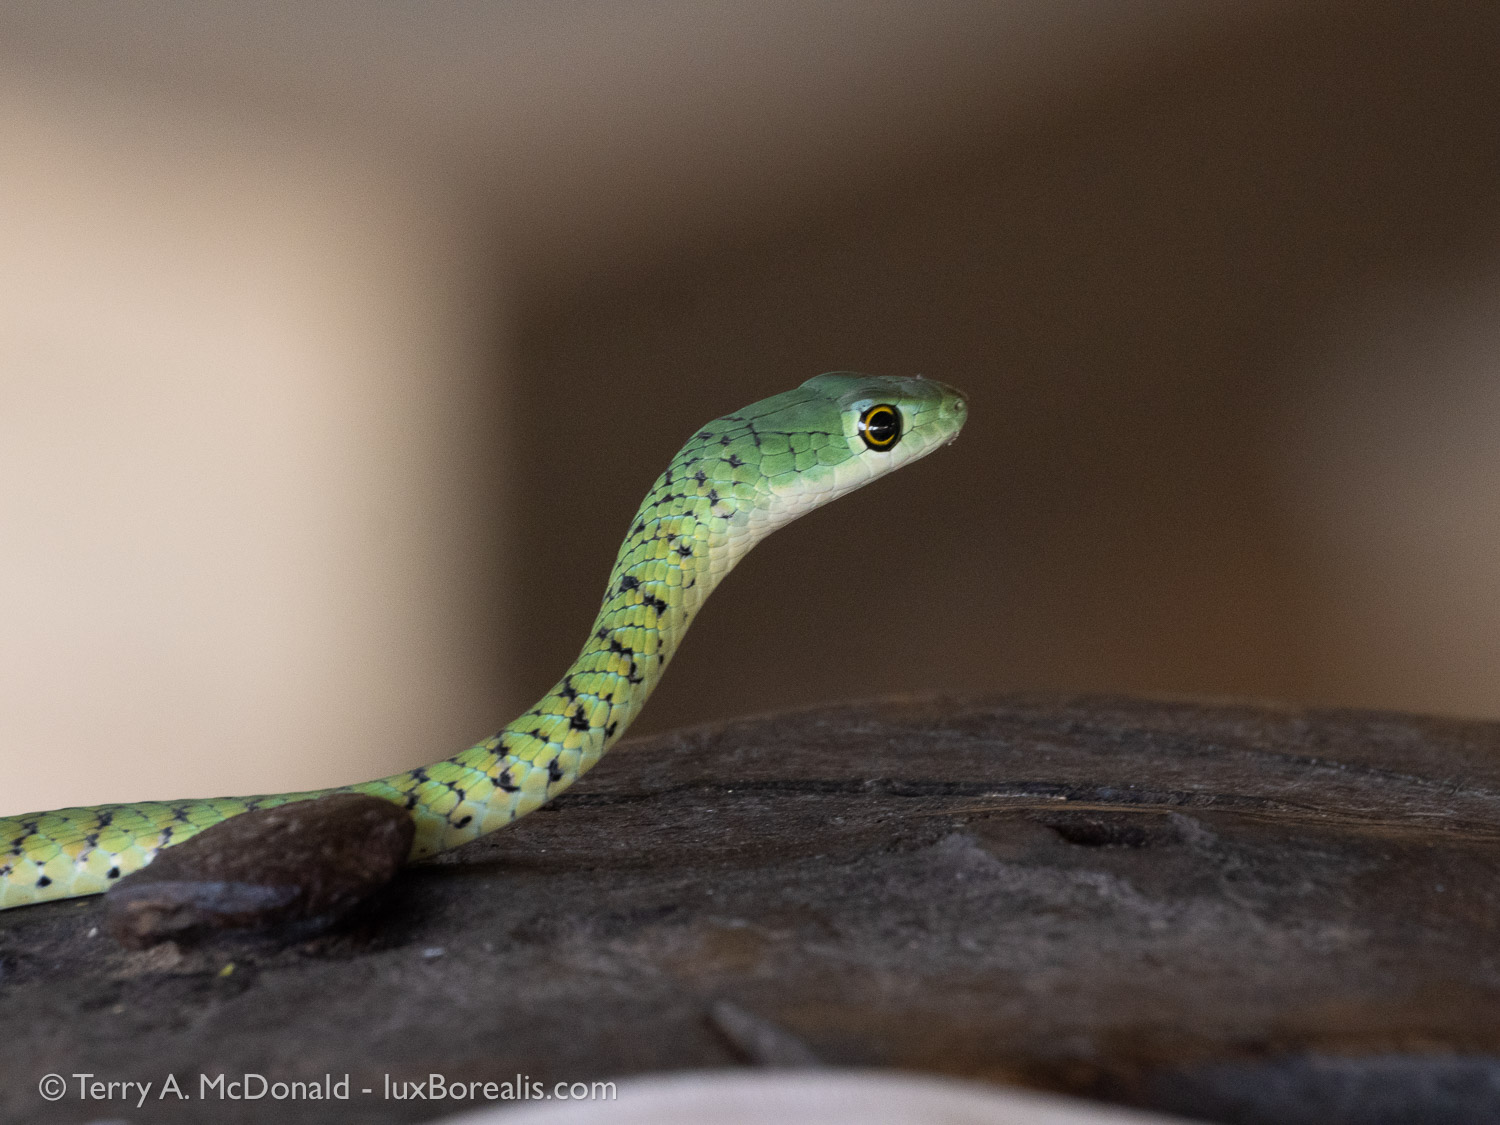
While casually working away writing and editing, this ‘fellow’ showed up with much hoopla amongst the staff. I wanted to watch and photograph the snake; they just wanted to shuffle it out of the lounge ASAP. But they were very accommodating, waiting until I had the shot I wanted before carefully scooping it up in a bucket and taking it outside.
Adobe Subscription Changes
Just an FYI—Adobe has re-aligned their subscription packages, and it may be in your favour.
Up until yesterday, I was paying CAD $25.99/month for Lightroom CC, Lightroom Classic and Photoshop. To me, this isn’t a great use of my resources as I almost never use Photoshop and almost never for photographs, mostly for creating graphics. The problem was, to get both Lightroom CC and Classic, you needed the $25.99/month place, which included Photoshop.
The only time I need a Photoshop-like product for a photographs is when merging images for HDR, focus stacking or panoramic and only when working on iPad (as Lr for iPad does not!!), so it’s not too common. When travelling with iPad and I want to Merge, I’ve begun using Serif Affinity Photo. Works perfectly!

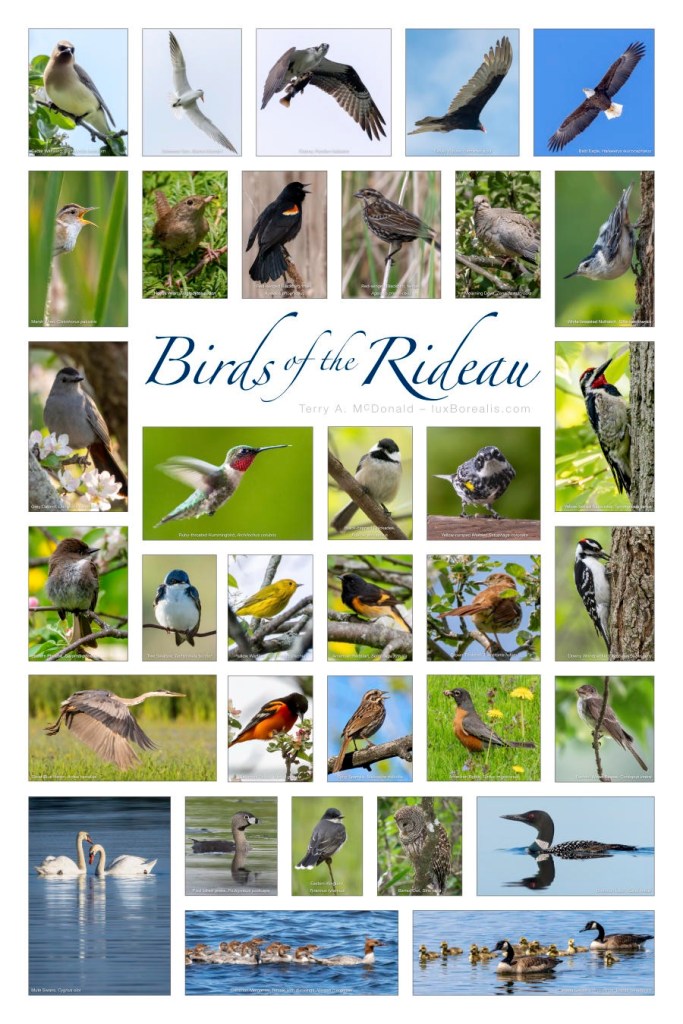
Over the past year or so, I’ve been transitioning to using Serif Affinity products. Originally, I purchased Affinity Publisher to create the large ‘Birds of the Rideau’ poster. But buying their three products together was such a bargain that I purchased Photo and Designer as well.
So, there I am, paying $10/month for Photoshop and hardly using it.
Back in December, I picked up on a mention of Adobe re-aligning plans and it seems to have worked out in my favour. Up to now, if you wanted Lightroom Classic (which is still my legacy photo editor), you were required to subscribe to the higher-priced monthly plan that included Photoshop.
Now, at CAD $15.99/month, we get Lightroom CC and Lightroom Classic. Hooray!! And it still comes with 1TB of online storage. I like working on iPad, so having files available online is very convenient. Surprise, surprise, it also comes with the mobile version of Photoshop, certainly not equal to the laptop/desktop version, but it’s there if I need it.
———
UPDATE – 23 Jan ‘25: I just switched from 15.99/mo monthly payment to an annual payment of $155.88, which is $12.99/month. Easy peasy and was done using the virtual assistant.
———
The switchover was as easy as going to Adobe.com, signing in have a look around. It seems everytime I go back to the Adobe site, the layout has changed. Look for ‘Plans and Proiducts’ and/or ‘Change your plan’.
While my recent files (last 18 months or so) are in the Adobe cloud, my legacy files are all backed up on a hard drive. I’m gradually moving the more used files into the cloud. Having files available anytime, anywhere, without having to cart a hard drive along is certainly convenient.
With all my recent raw files in the cloud, I can work on iPad or laptop anywhere I have a connection. And, if no connection exists, I keep working on Smart Previews and everything gets updated when I next connect.
So, have a look at what plan you’re using. Do you have Photoshop? If you make good use of it, great. But if you’re paying for it, like I did, to get the 1TB Lr CC + Lr Classic plan, have a re-think. You may end up saving yourself $10/month with the new re-aligned plans.
Every little bit helps!
