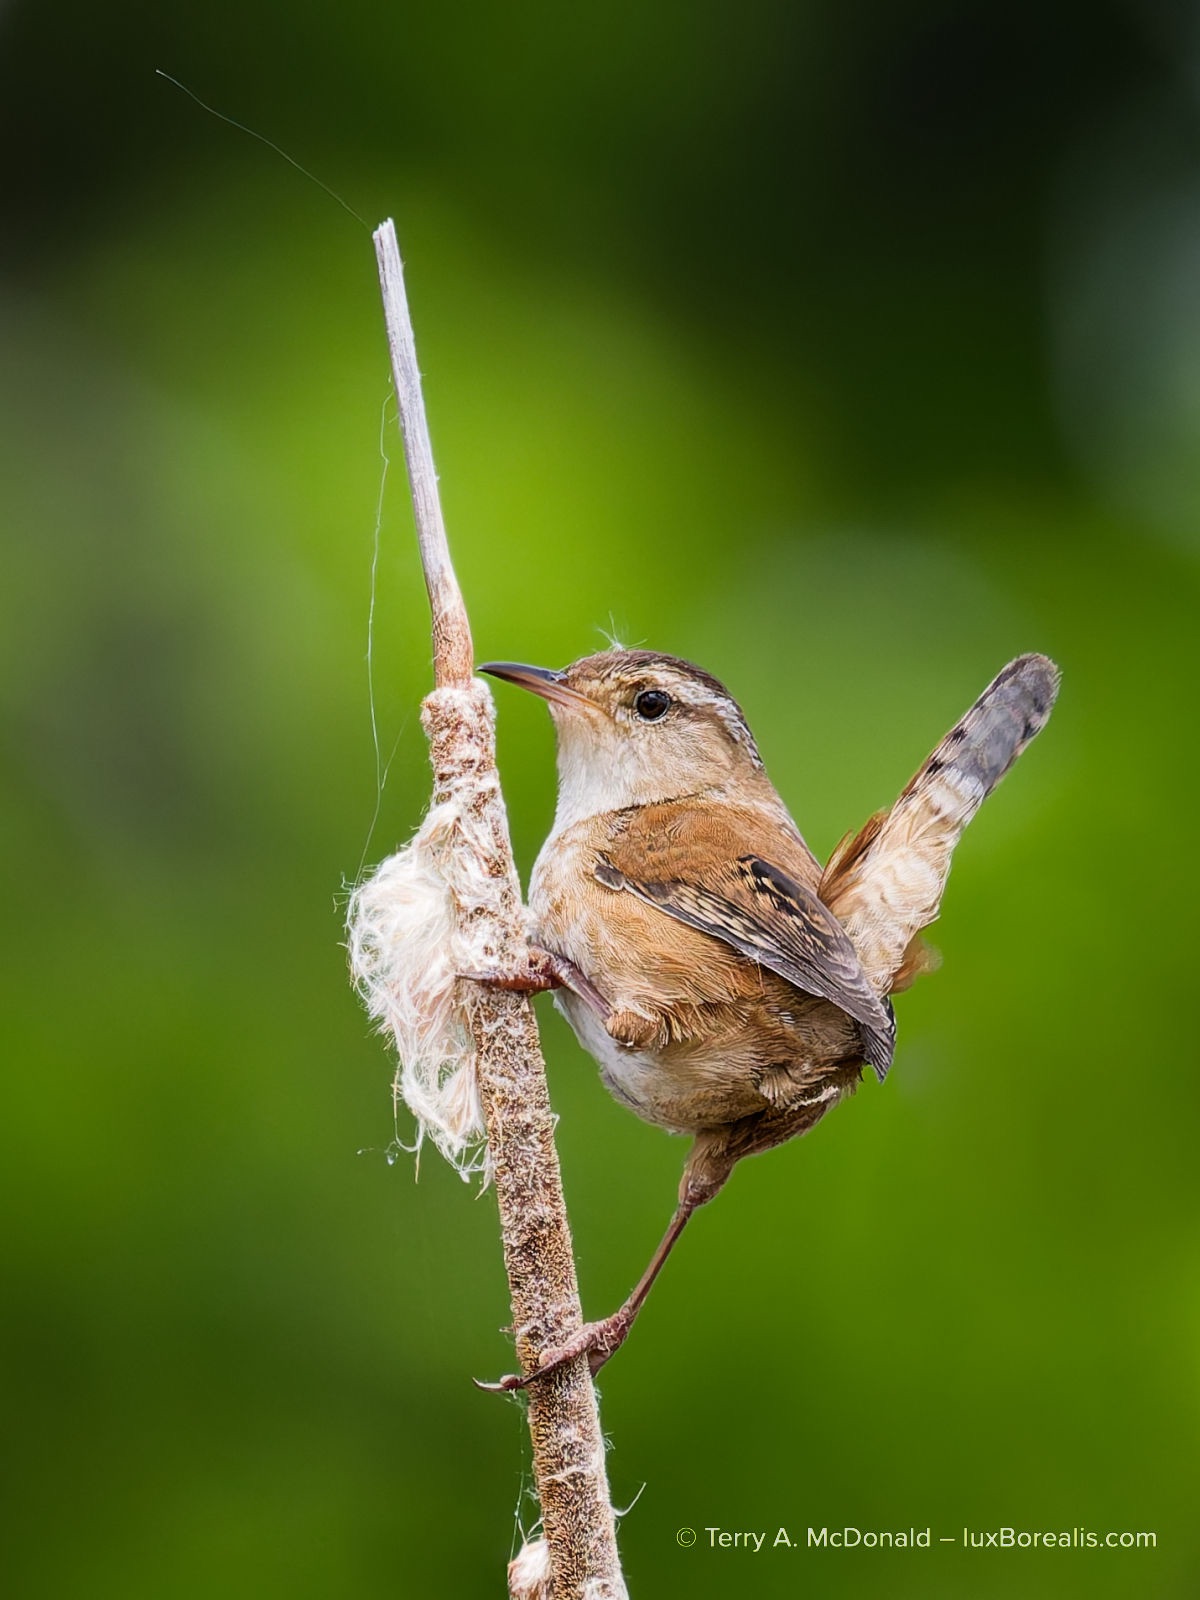
Gearing up for Winter Photography
How to stay warm and dry in the dead of winter
Terry A. McDonald, luxBorealis.com
1922 words; 11 photographs; 10-minute read
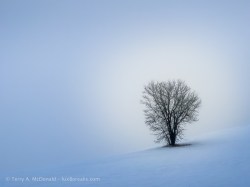
Winter is the most satisfying of seasons for photography. A fresh blanket of snow changes everything! Places you’ve visited before appear new again. Low sun angles produce wonderful shadows that linger for hours; and the warm light contrasting with cold shadows crates wonderful colour contrasts—a landscape photographer’s dream.
For those who begrudge mornings, sunrise is later in winter, so you can sleep in a little. And, the great evening light starts in mid-afternoon so you can be finished a day of shooting in time for dinner.
But it’s cold. And it can be very cold. Days with bright sunshine and clear blue skies are the coldest. How do we fight that cold? The answer is as simple as two concepts: layers under windproof.
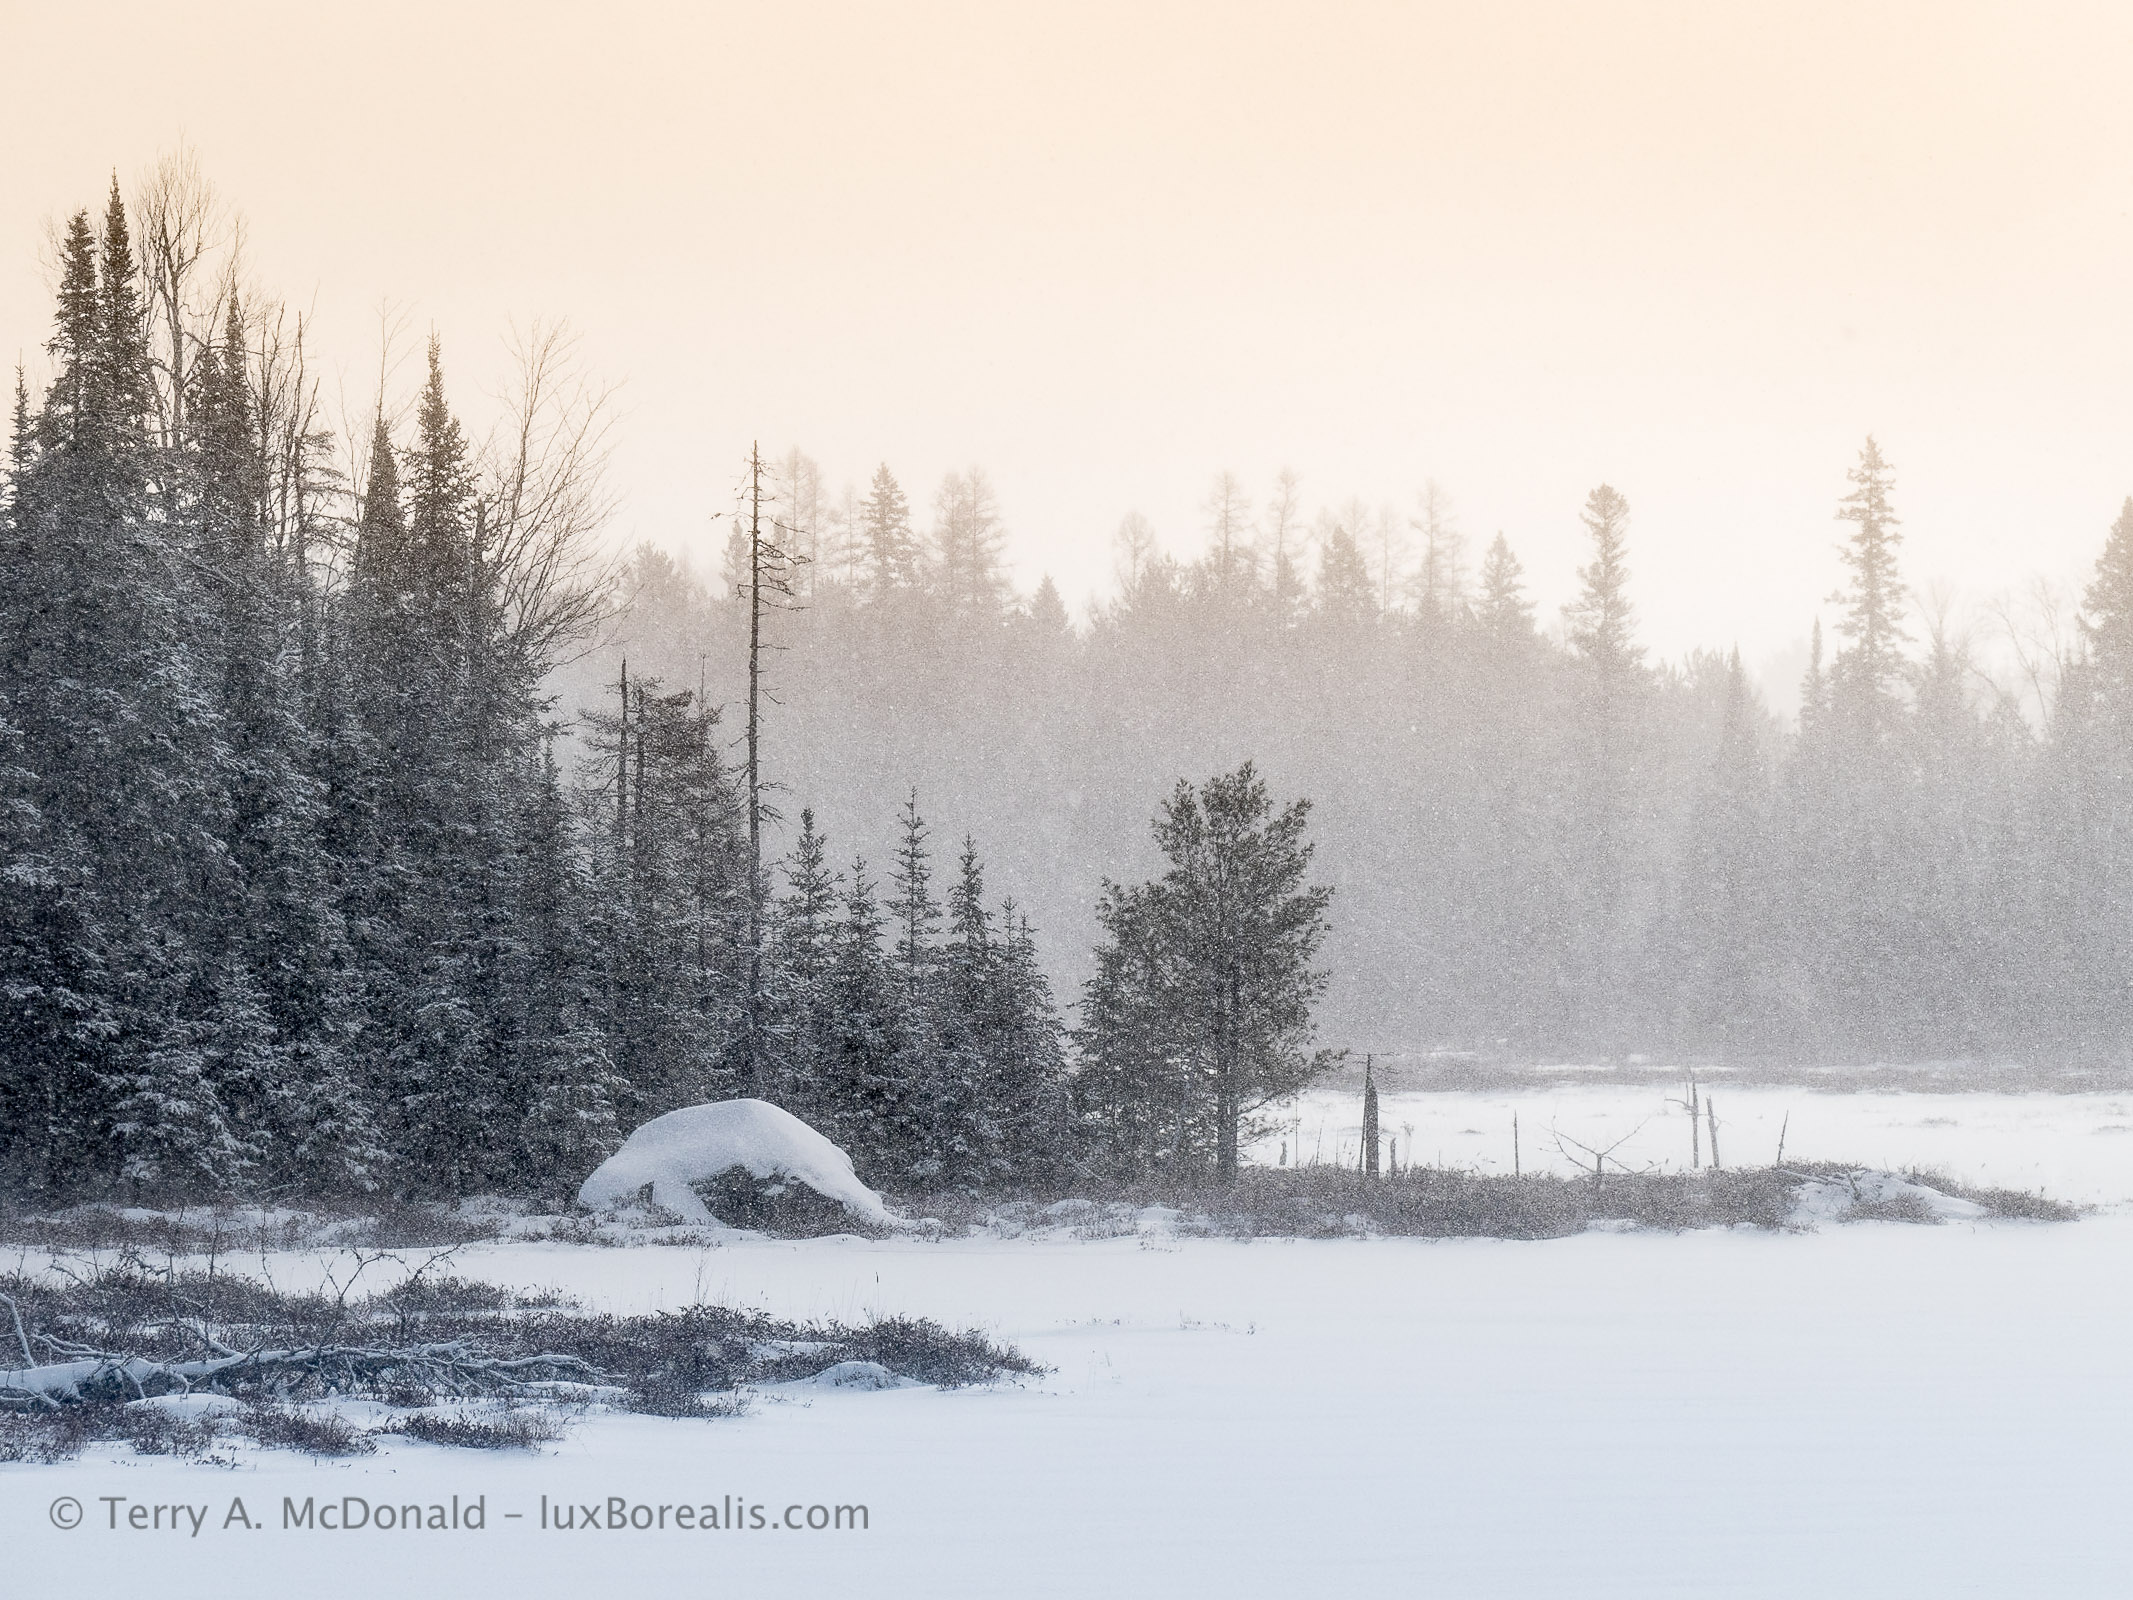
Sunrise, In February is around 7:20am, a nice change from July, when it’s at 5:45am. Of course, in February, it means crawling out of the tent, getting dressed and skiing out across Lake George. But it’s worth it!
Base Layer
Remember those waffle-cotton white long underwear you may have had as a kid? Forgot them. They were the best we had at the time, but base layers have moved on. Polyester and nylon are the most common for their ability to wick moister away from your skin. Personally, I prefer staying with natural fibres so, over the years, I’ve used both silk and merino wool, though not at the same time.
A silk base layer is simply luxurious. It’s sheer against your skin and anything you pull over it slips on easily. Given its incredibly light weight, silk is also warm. For years, I used silk sock liners, silk long johns and a silk long sleeve top and I was very comfortable. But after about 10 years of sporadic use, it began coming apart at the seams. Literally. It served me well.
As I aged, I began to slow down a bit. This meant a heavier base layer was needed to keep me warm. Enter merino wool. And, no, it is not scratchy! Merino wool is soft and durable and, perhaps more importantly, the best in odour-resistance.
Panasonic FZ1000 • 73mm (200mm efov) • ƒ5.6 @ 1/1250 • ISO 125 • Lightroom
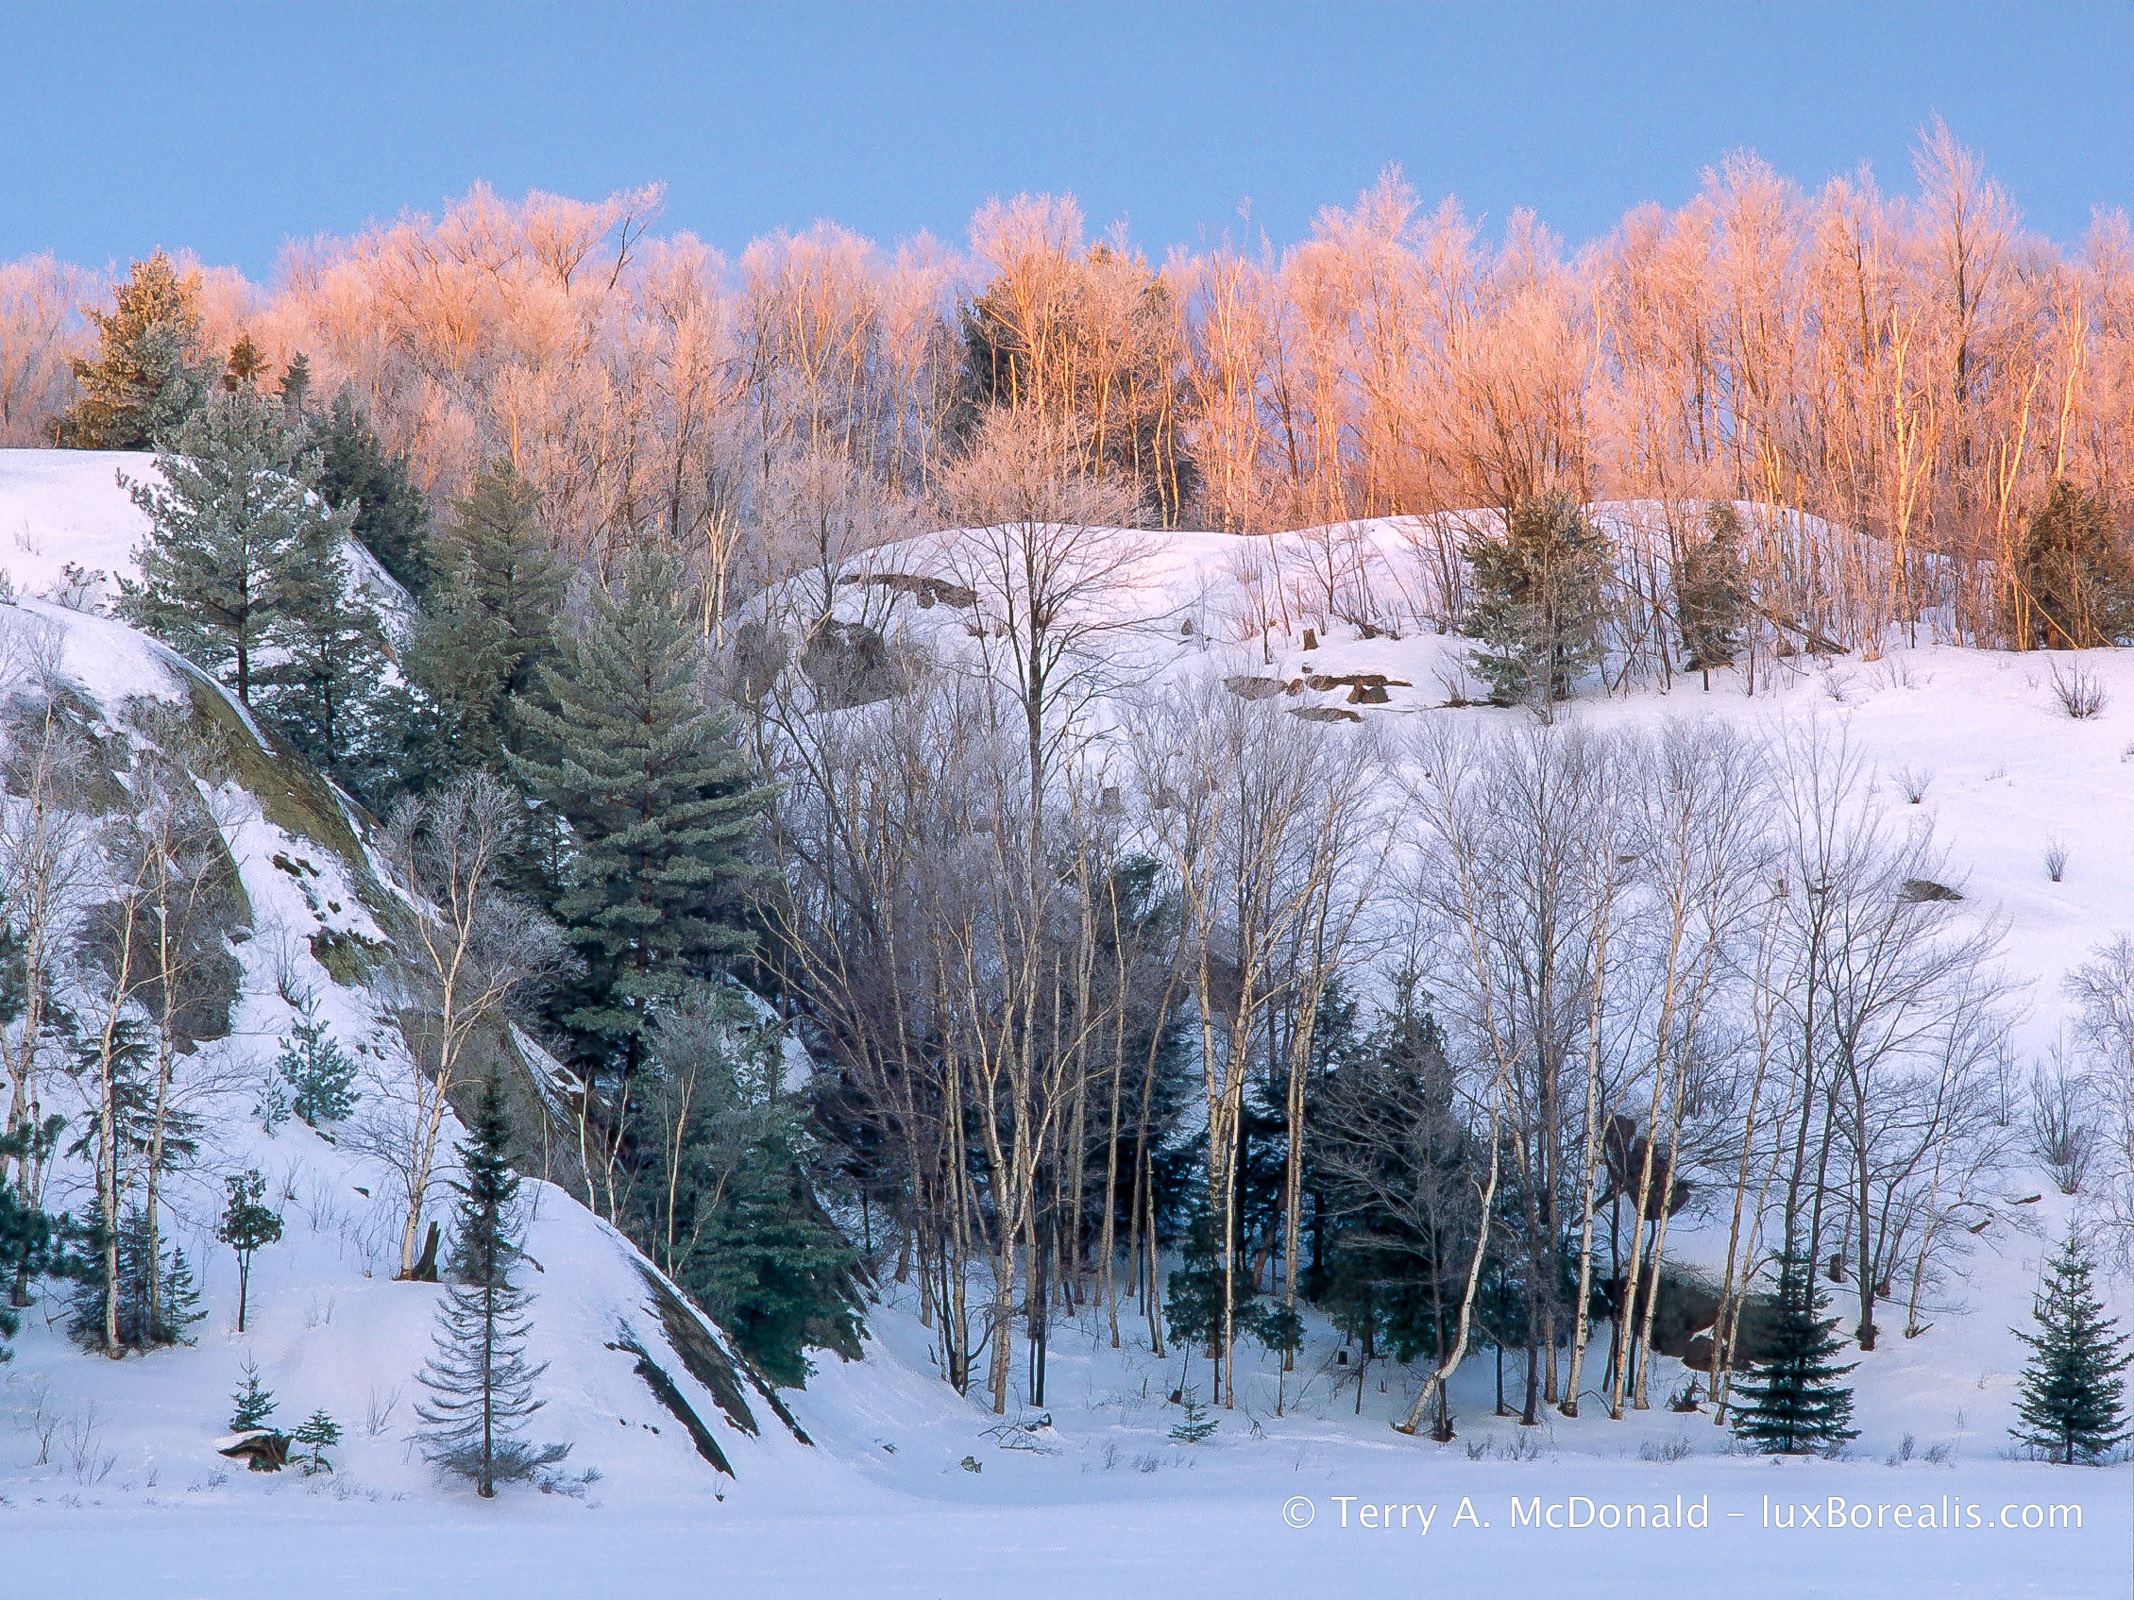
This was made at 9:30am, showing how lovely the mid-morning light is.
Mid-layer
This is where fleece comes into its own. I prefer natural fibres, but for its lighter weight, lower cost and washability, fleece is the way to go, especially for the pants. Wool can be heavy which is why a fleece pullover is ideal for on top.
However, the best top I’ve found for light weight and warmth is an Icelandic sweater made from real, Icelandic sheep’s wool called ‘lopi’. The sweaters are expensive, but they are luxuriously warm and have no weight to them.
I mentioned wearing a cotton turtle neck over the base layer and under the sweater. A good base layer wicks moisture from you skin keeping it dry. The jury is out on using a cotton layer as I do as cotton holds moisture. But I have yet to find anything better. A good sweater or fleece on top . . .

OM-1 • M.Zuiko 8-25mm at 10mm (20mm efov) • ƒ8 @ 1/500 • ISO 200 • 80 MP Tripod High Res • Lightroom
The warm tones are stretched out in the afternoon and contrast beautifully with blue shadows.
Outer Wear
Here is where the wind proof layer comes in. My outer coat is unlined, uninsulated. Why? To me, stopping the wind is the key to staying insulated against the cold. I also find that when I’m tromping through snow, snowshoeing or Nordic skiing, I’m building up enough warmth without adding more insulation. It’s only when I’m still, while waiting for the light or a cloud to pass, that the cold begins seeping in, but typically, I’m not standing around long enough for it to be a problem.
GoreTex is perhaps the best known name in windproof outer wear and it’s good. But there are many others out there that are equally good. I don’t wear it for its ability to release moisture, but simply as a wind block. The pants are easy enough to find, but the kind of coat I like is more of a challenge.
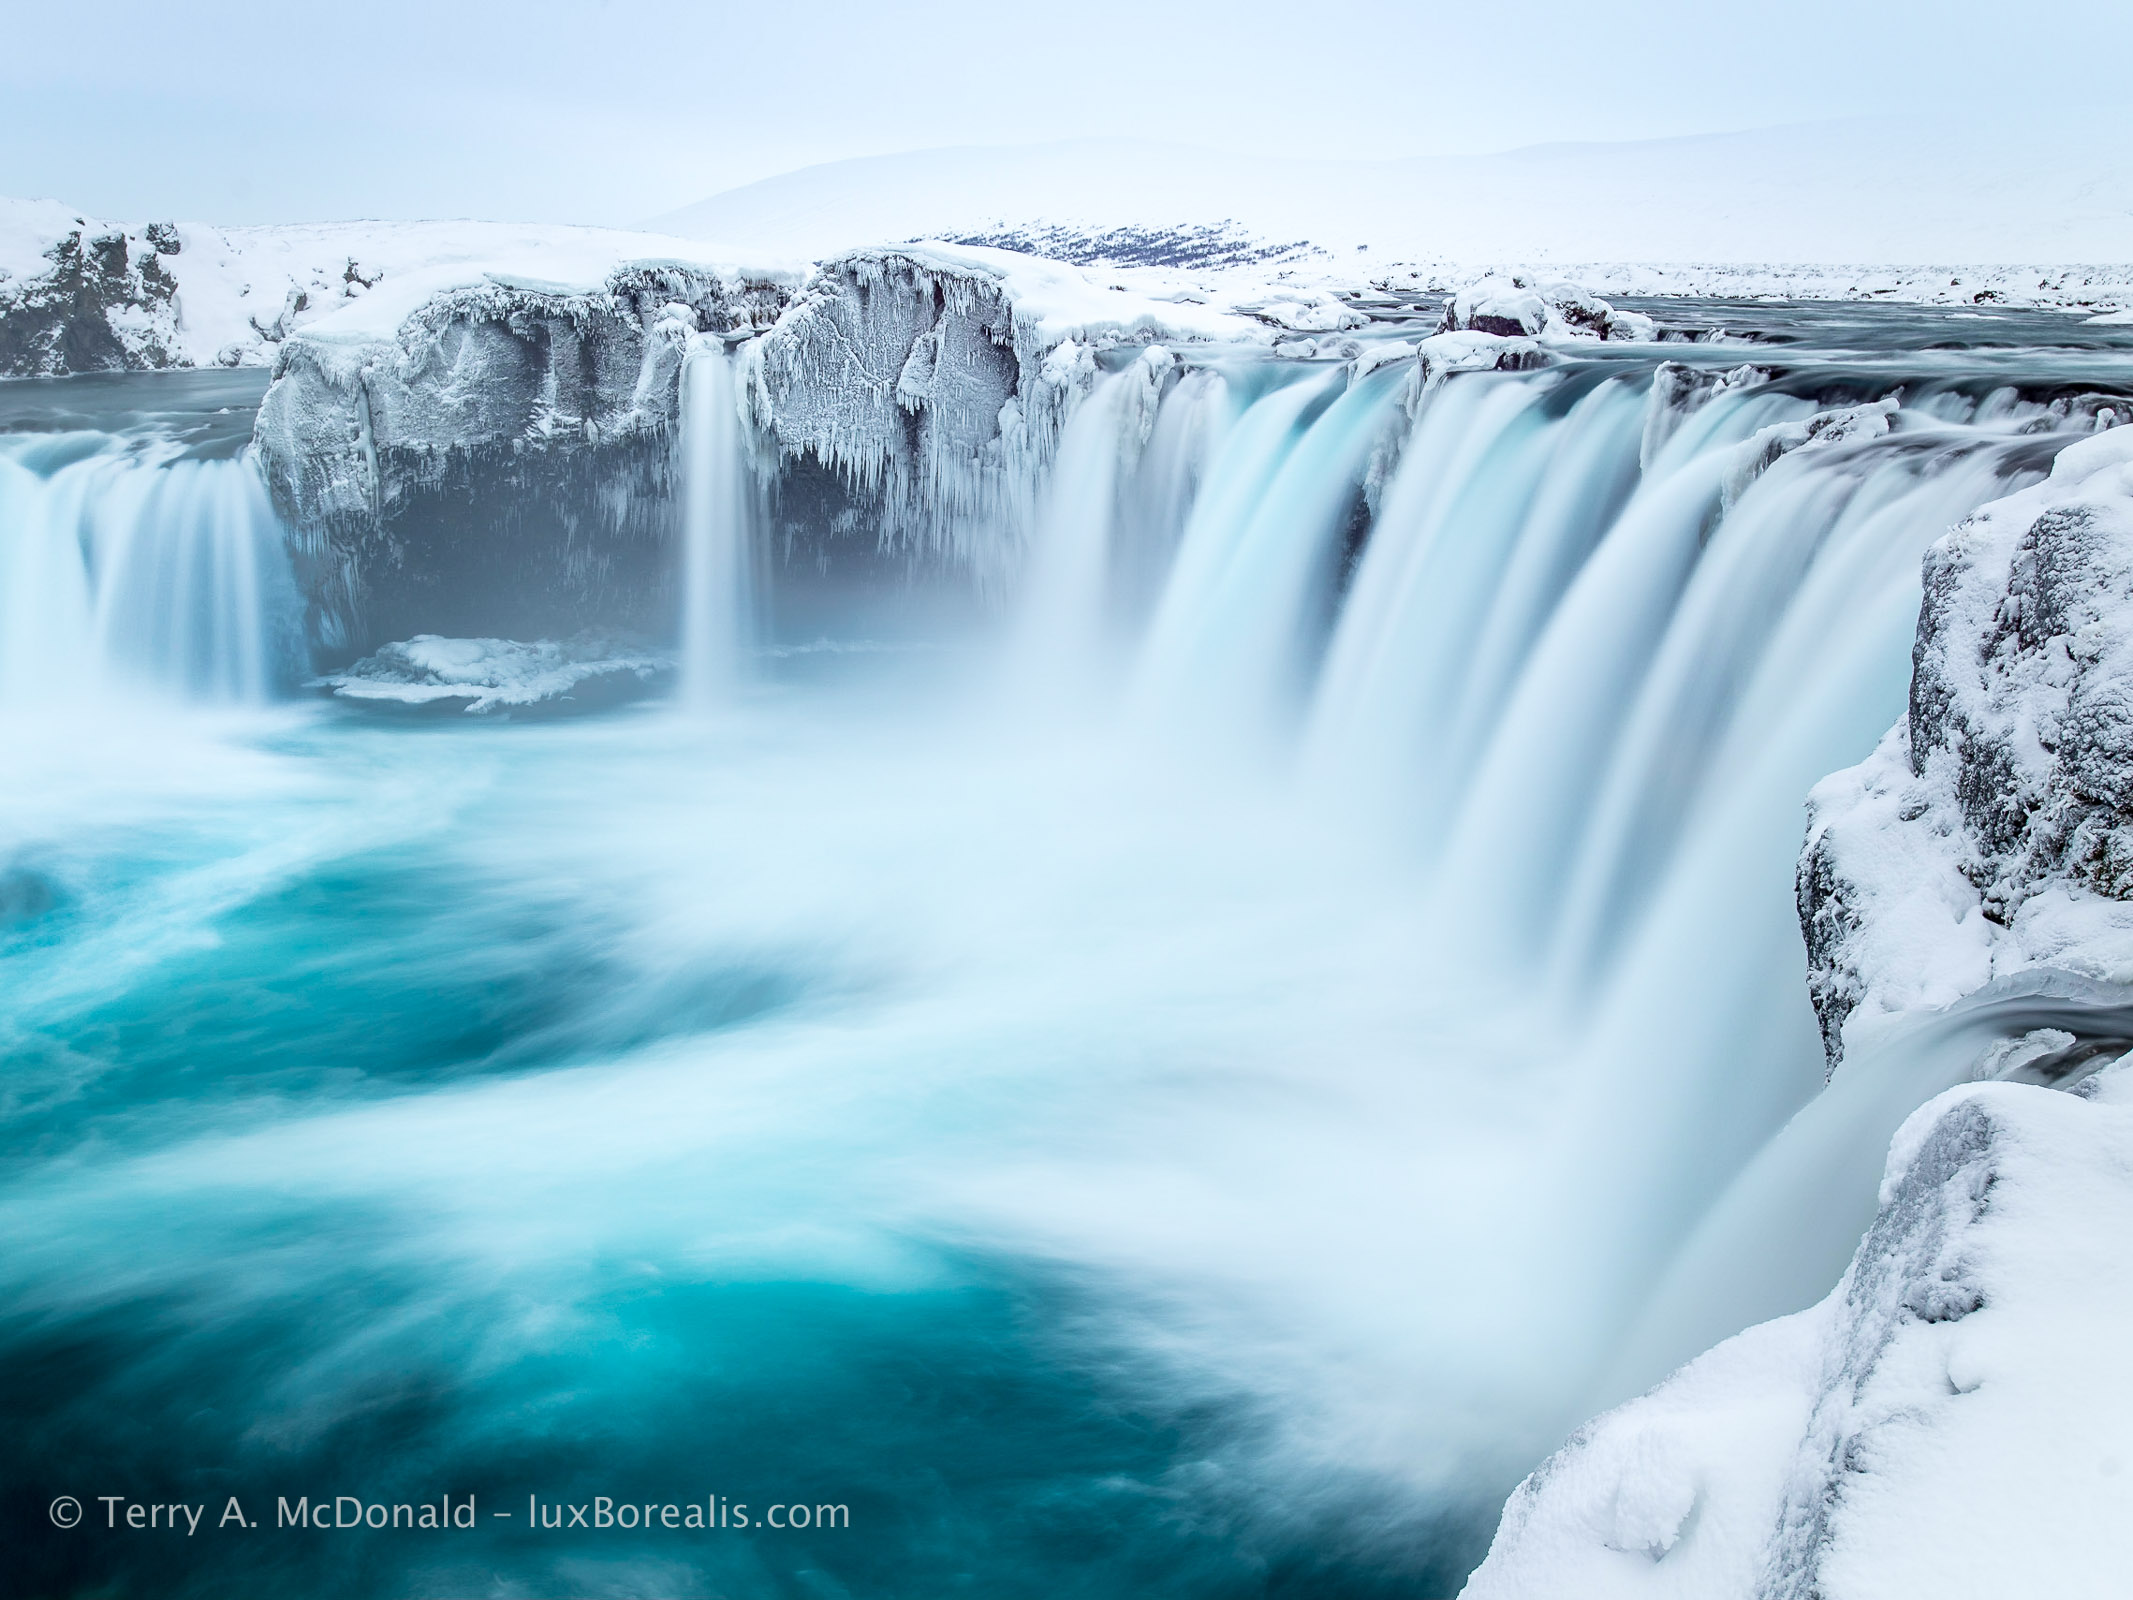
Nikon D800E • AF-Nikkor 18-35mm at 32mm • ƒ8 @ 4sec. • IOS 100 • Tripod • Lightroom
I’m the odd one out in that I prefer anorak-style, over-the-head outer wear. Coats like these are becoming more and more difficult to find, but to me, they provide better windproofing than a zip-up coat. For photography, I also find the large front ‘kangaroo’ pocket especially helpful for holding stuff, along with the tube-like hand pocket below. With the hood pulled up and all the pulls and cuffs cinched down, I’ve weathered –32°C plus wind, quite well for a morning.
A couple of things to be aware of with the outer layer. Make sure it
- is well and truly wind-proof;
- can be cinched down with Velcro at the cuffs;
- has elastic pulls and toggles around the hood, at the waist, and at the bottom of the coat;
- has a hood adjustment toggle to allow the hood to be pulled forward in a storm or held back off glasses or for when working at the camera
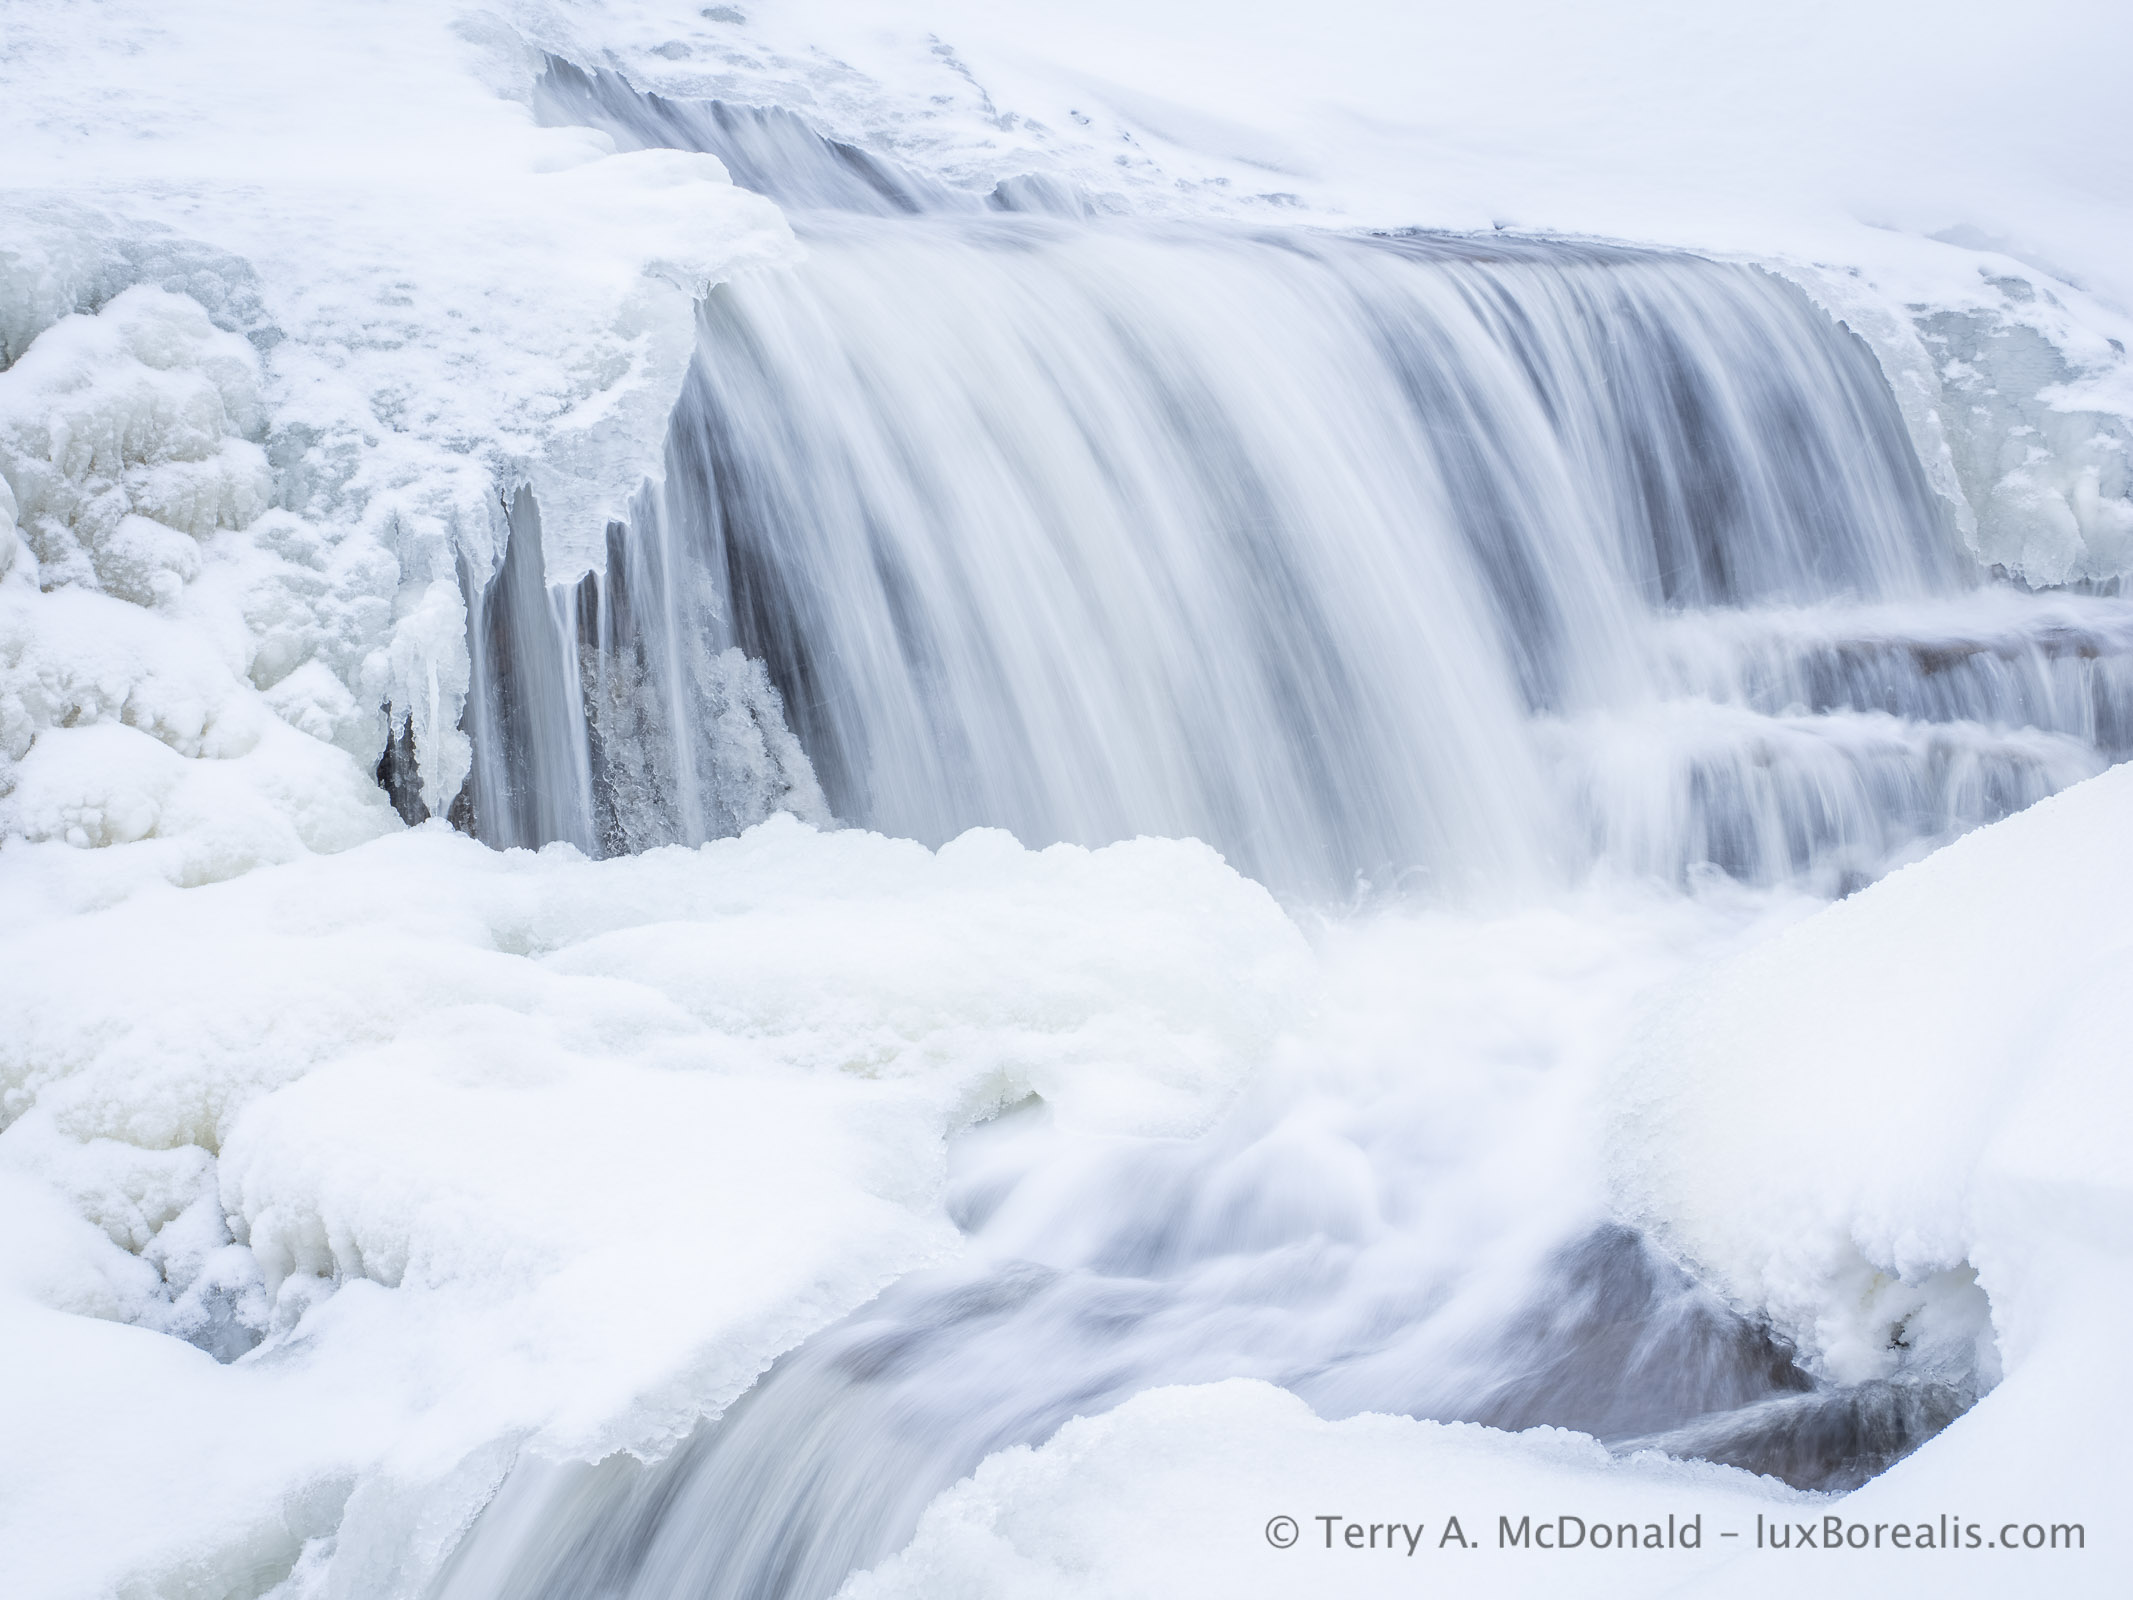
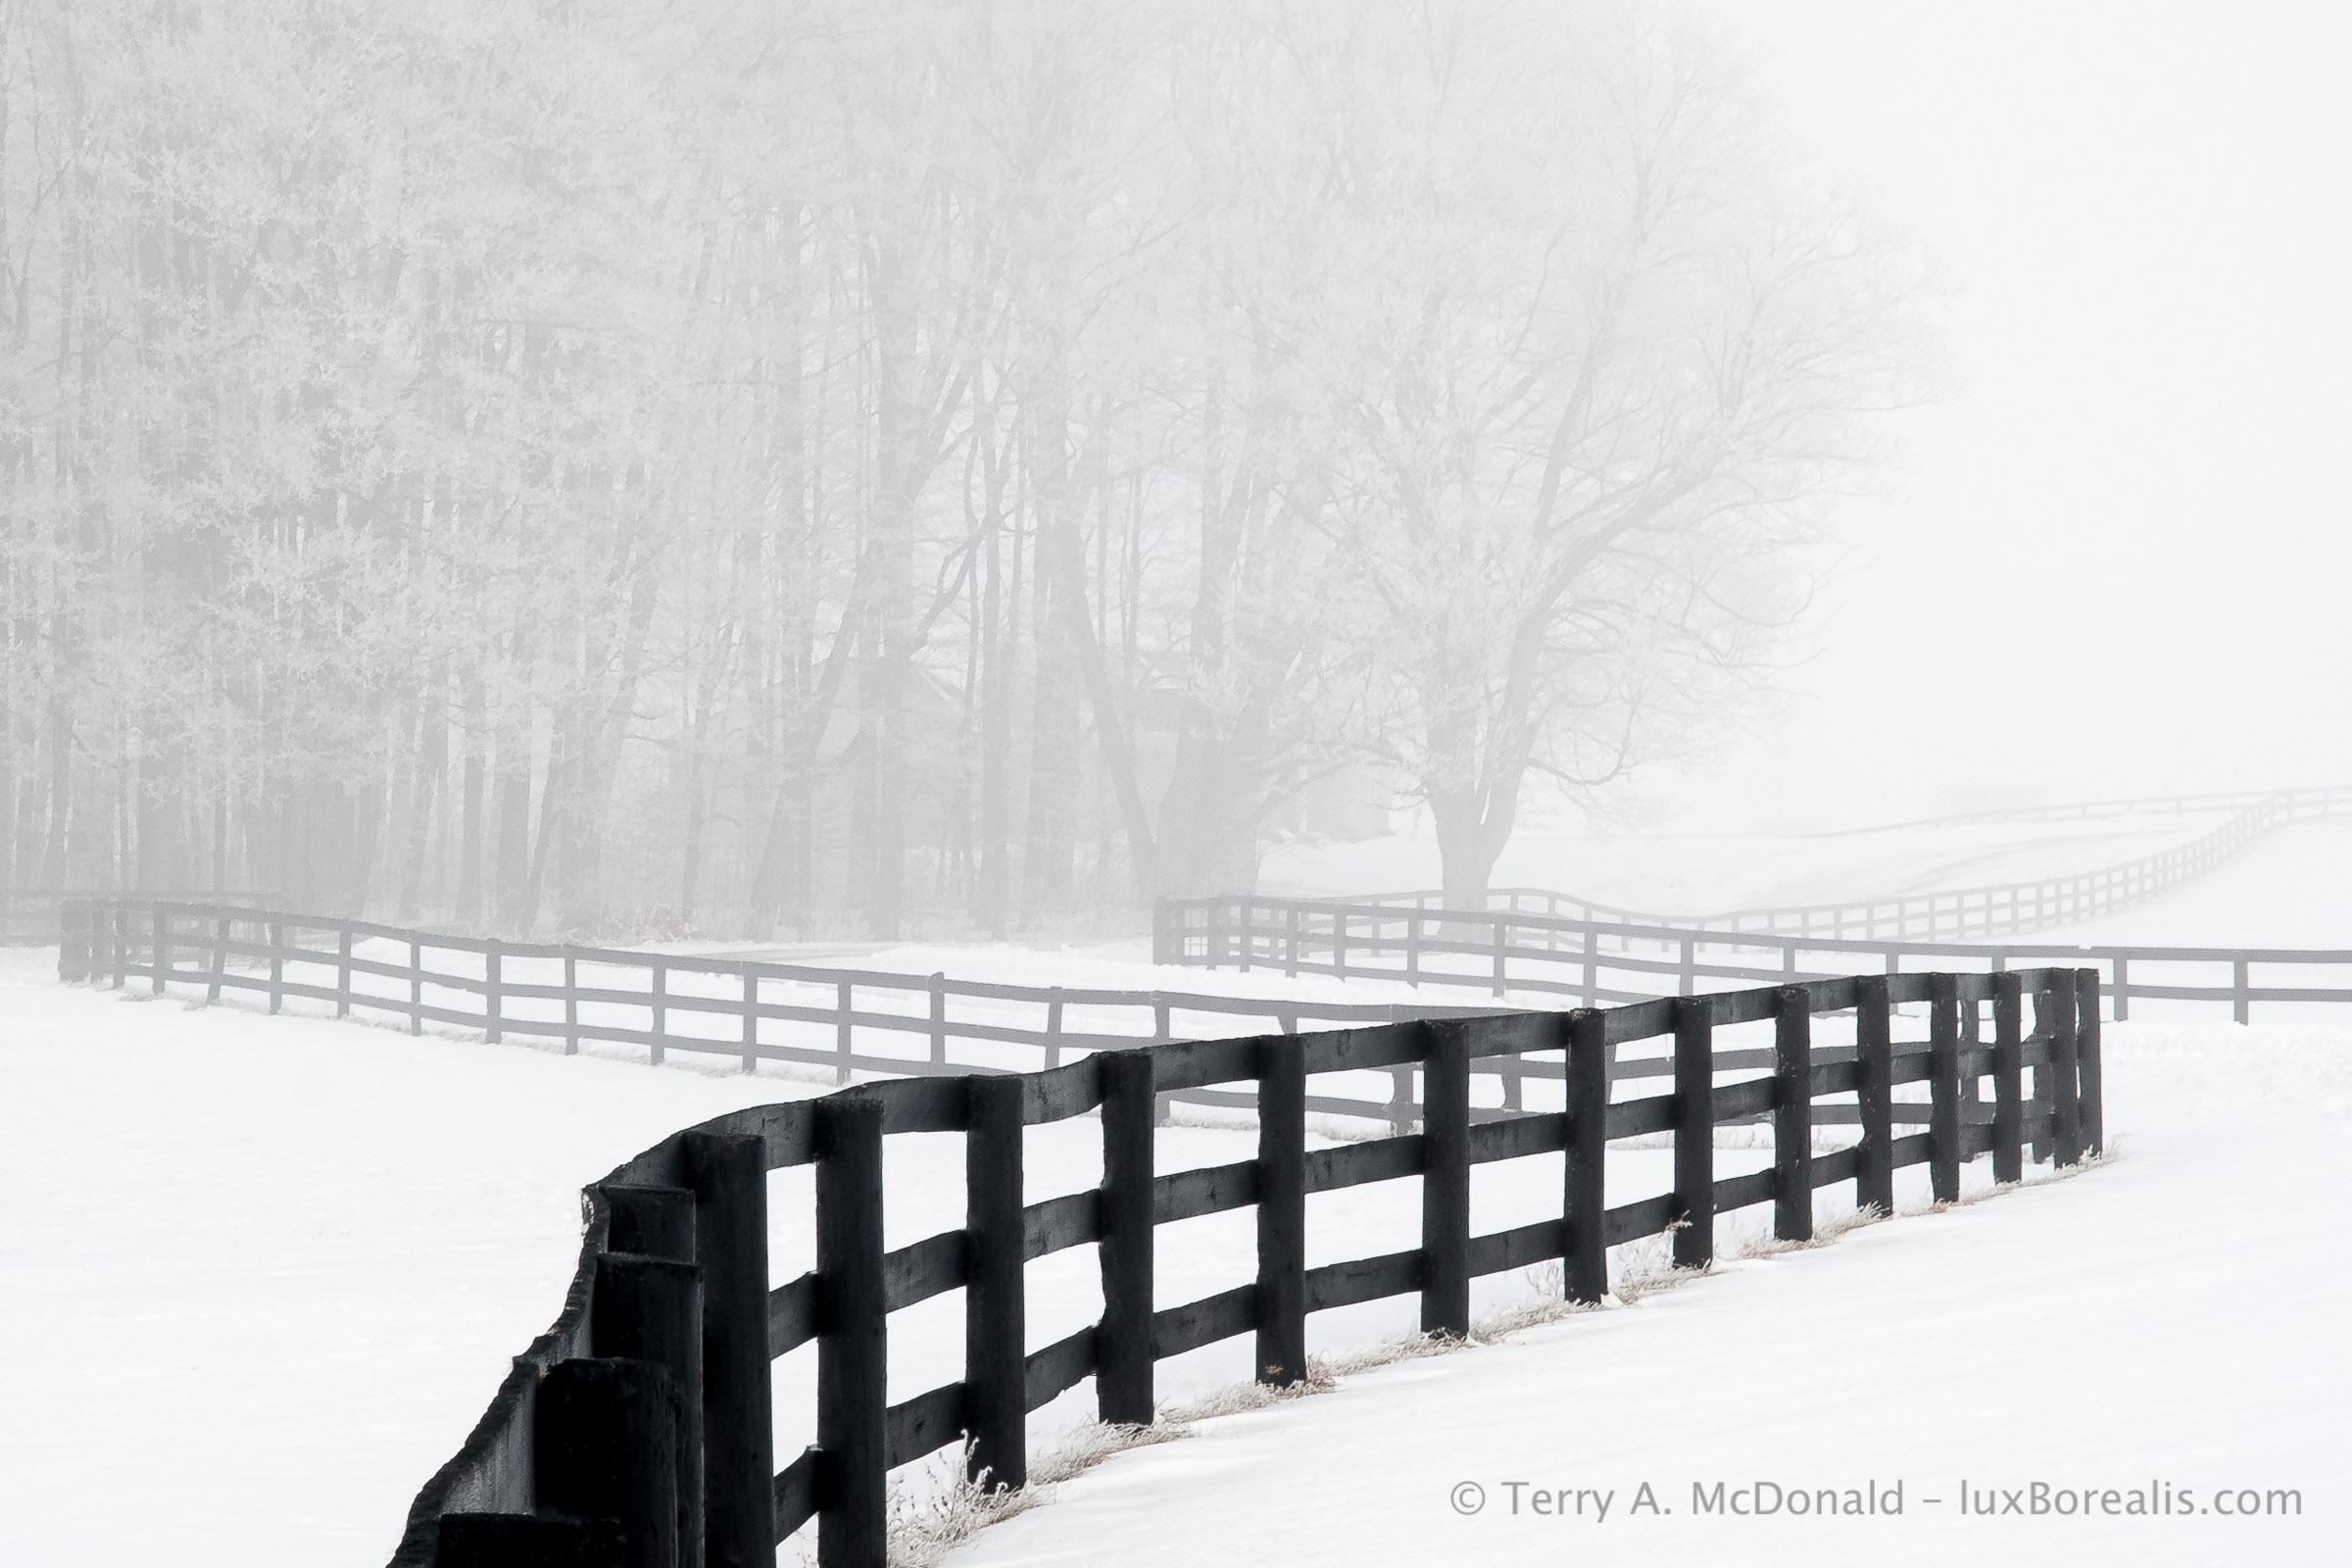
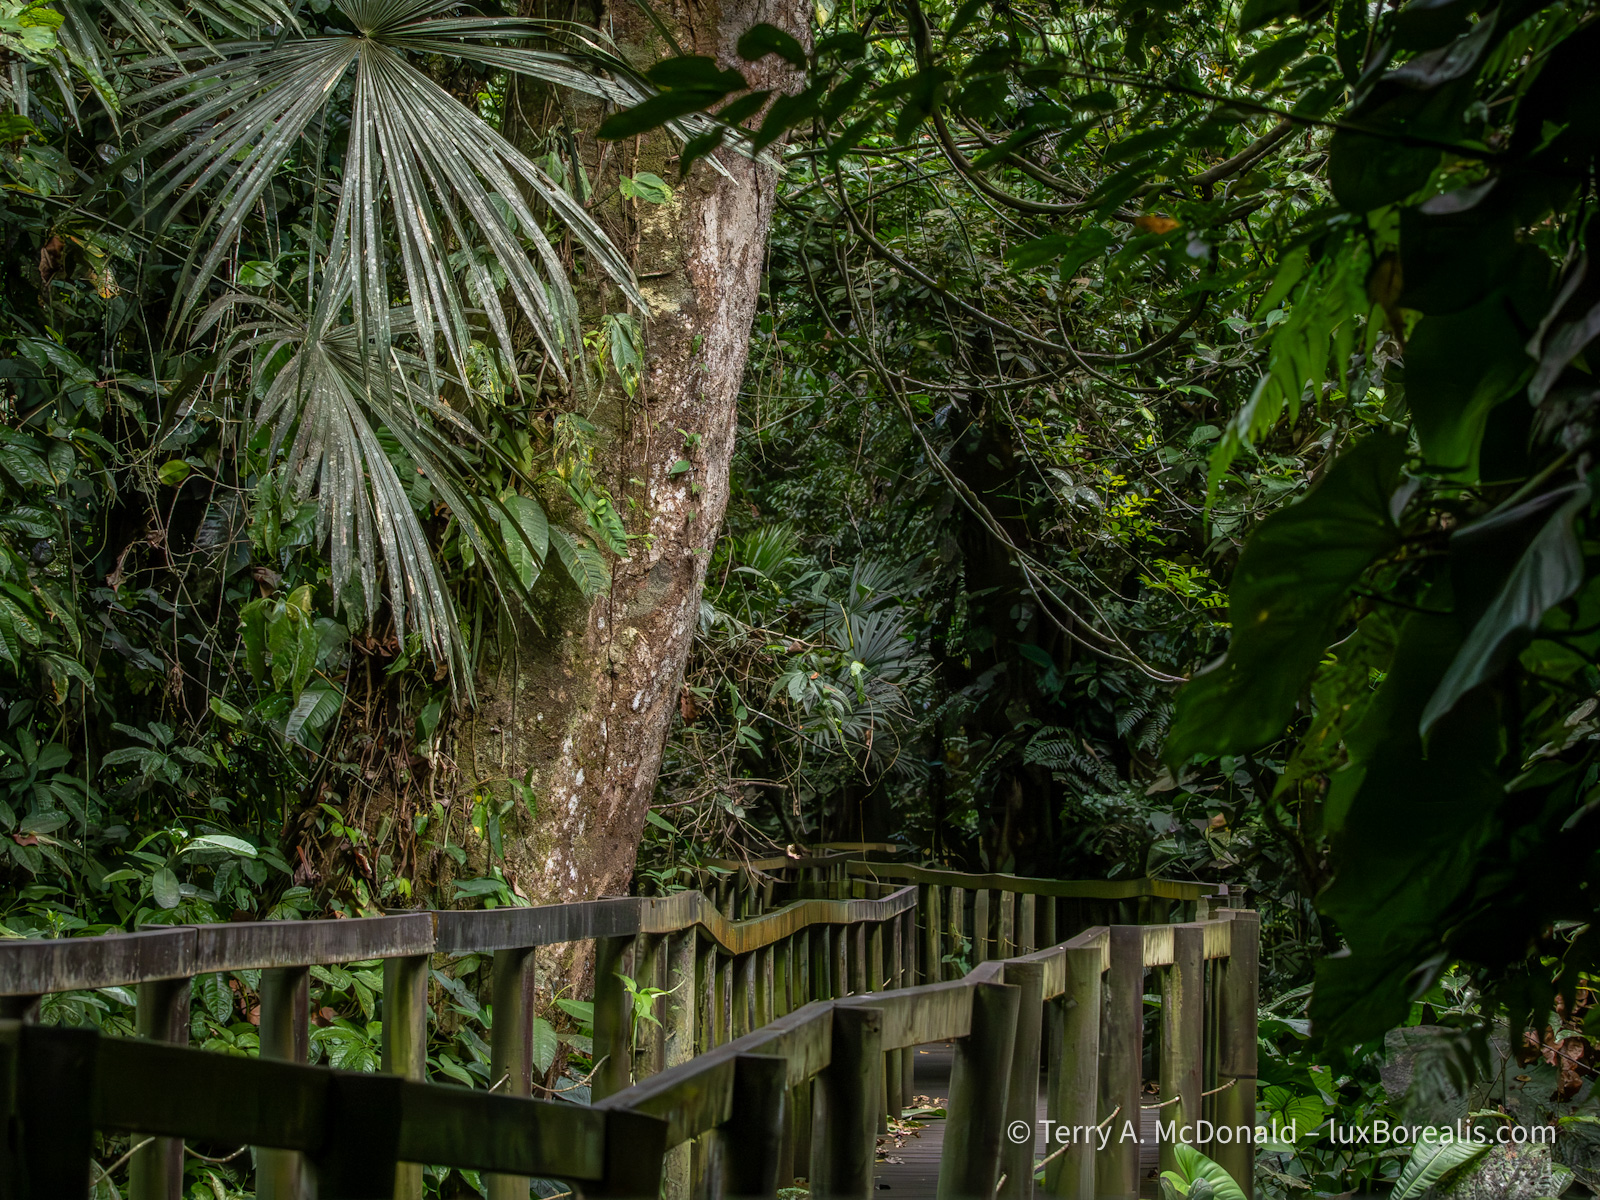
OM-1 • M.Zuiko 100-400mm @ 123mm (246mm efov) • ƒ8 @ 1/250 ISO 200 • Lightroom
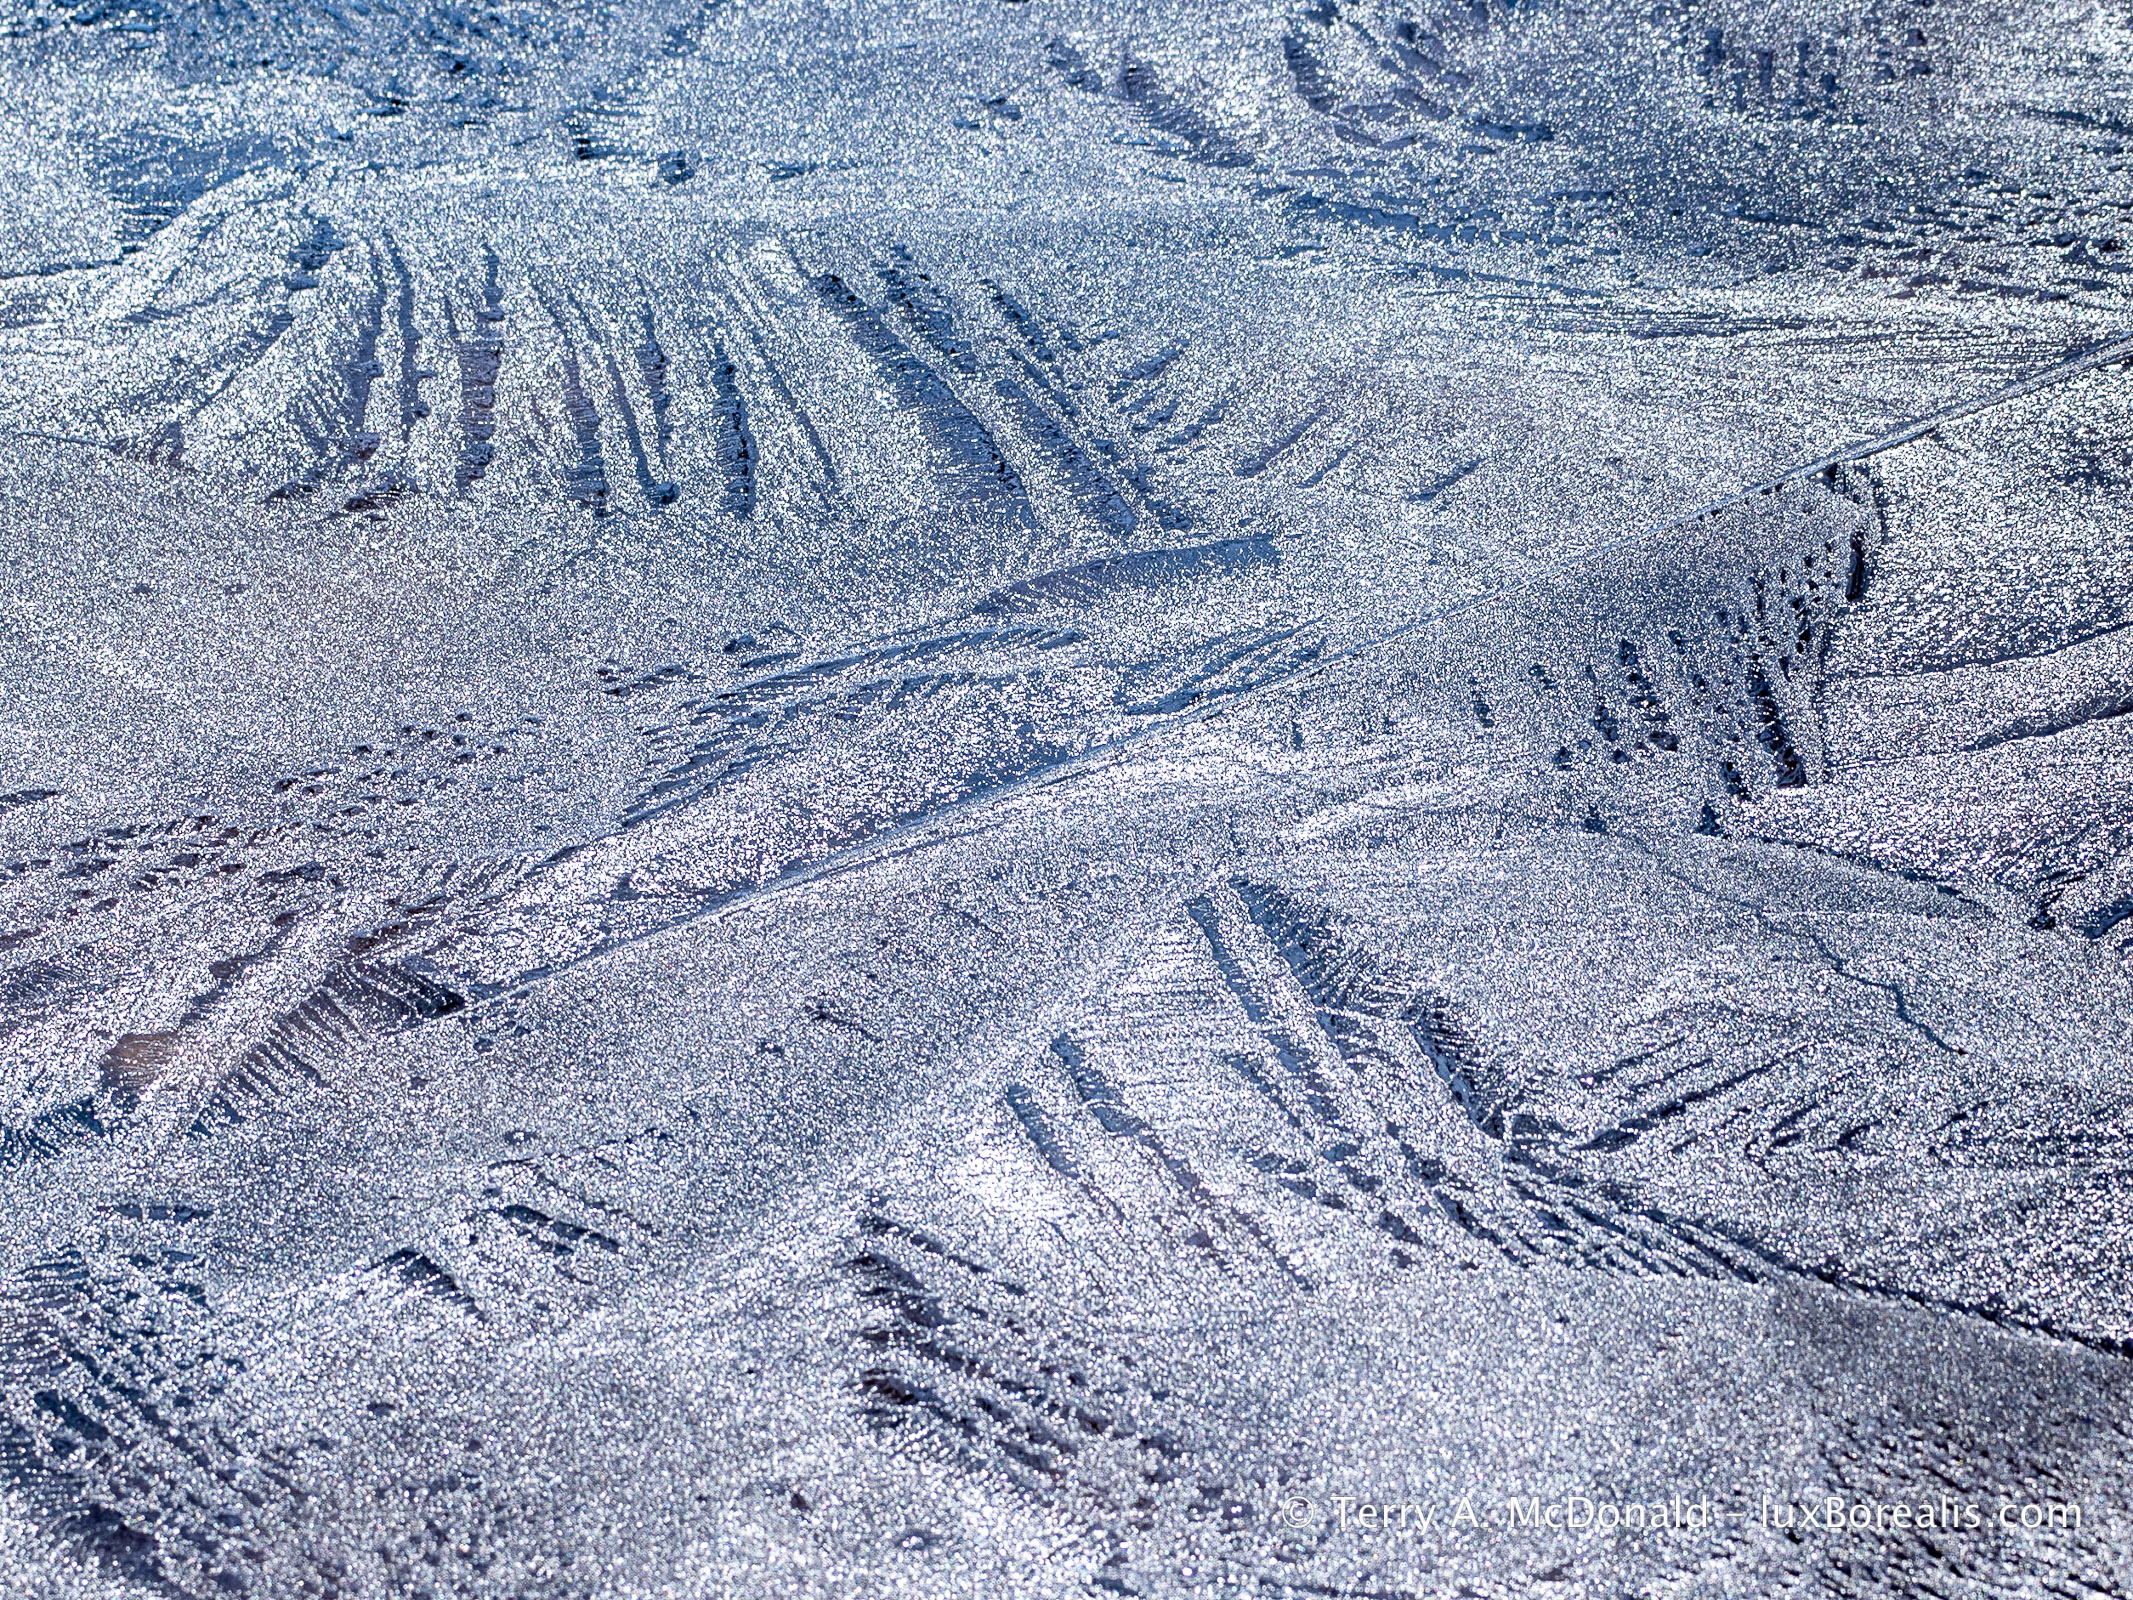
Keep an eye out for snow and ice patterns, especially when new ice is forming.
Head
Most of the time, I wear one of those winter headbands that cover the forehead and ears. When the wind blows, I pull up the hood of the outer coat, which keeps me toasty for hours. However, during the really cold days, I wear a wool hat that covers both my head and ears. A beanie may be fashionable, but I’d rather be warm and the bare skin of my ears and forehead is where the cold is felt most acutely.

D800E • 24-85mm at 85mm • ƒ4.5 @ 1/250 • ISO 200 • Lightroom
Hands and Feet
On a cold day, hands and feet are often the weak point in staying warm. For hands, I like a three-layer system of glove liner, glove and GoreTex (or similar) over-mitt. After tromping/snowshoeing/skiing, I remove the over-mitt and work in gloves to set up the tripod if I’m using one and to do general set up.
I keep the gloves on as much as possible, only removing the outer glove when needed. Glove liners stay on for fine-tuning camera settings, but most controls are accessible through the outer glove. If my hands get cold while waiting, I’ll slip on the over-mitts until the action starts again.
OM-1 • M.Zuiko 12-100mm @ 31mm • ƒ10 @ ⅛ • ISO 200 • LiveND • Lightroom
Feet follow the same pattern: sock liner, wool socks then a good set of lightweight but insulated winter boots or Nordic ski boots. Sock liners wick moisture just like the base layer. The sock itself is all-important. I’ve found Icelandic wool socks or Alpaca socks to be the best. While they are more expensive, they are natural fibres and will last a lifetime.
The only additional I make to this is an Alpaca wool boot liner. Any boot liner is better than nothing, but Alpaca hair has extra insulation. The liner sits in the bottom of the boot and provides that extra layer of warmth for when I’m standing around composing or waiting.
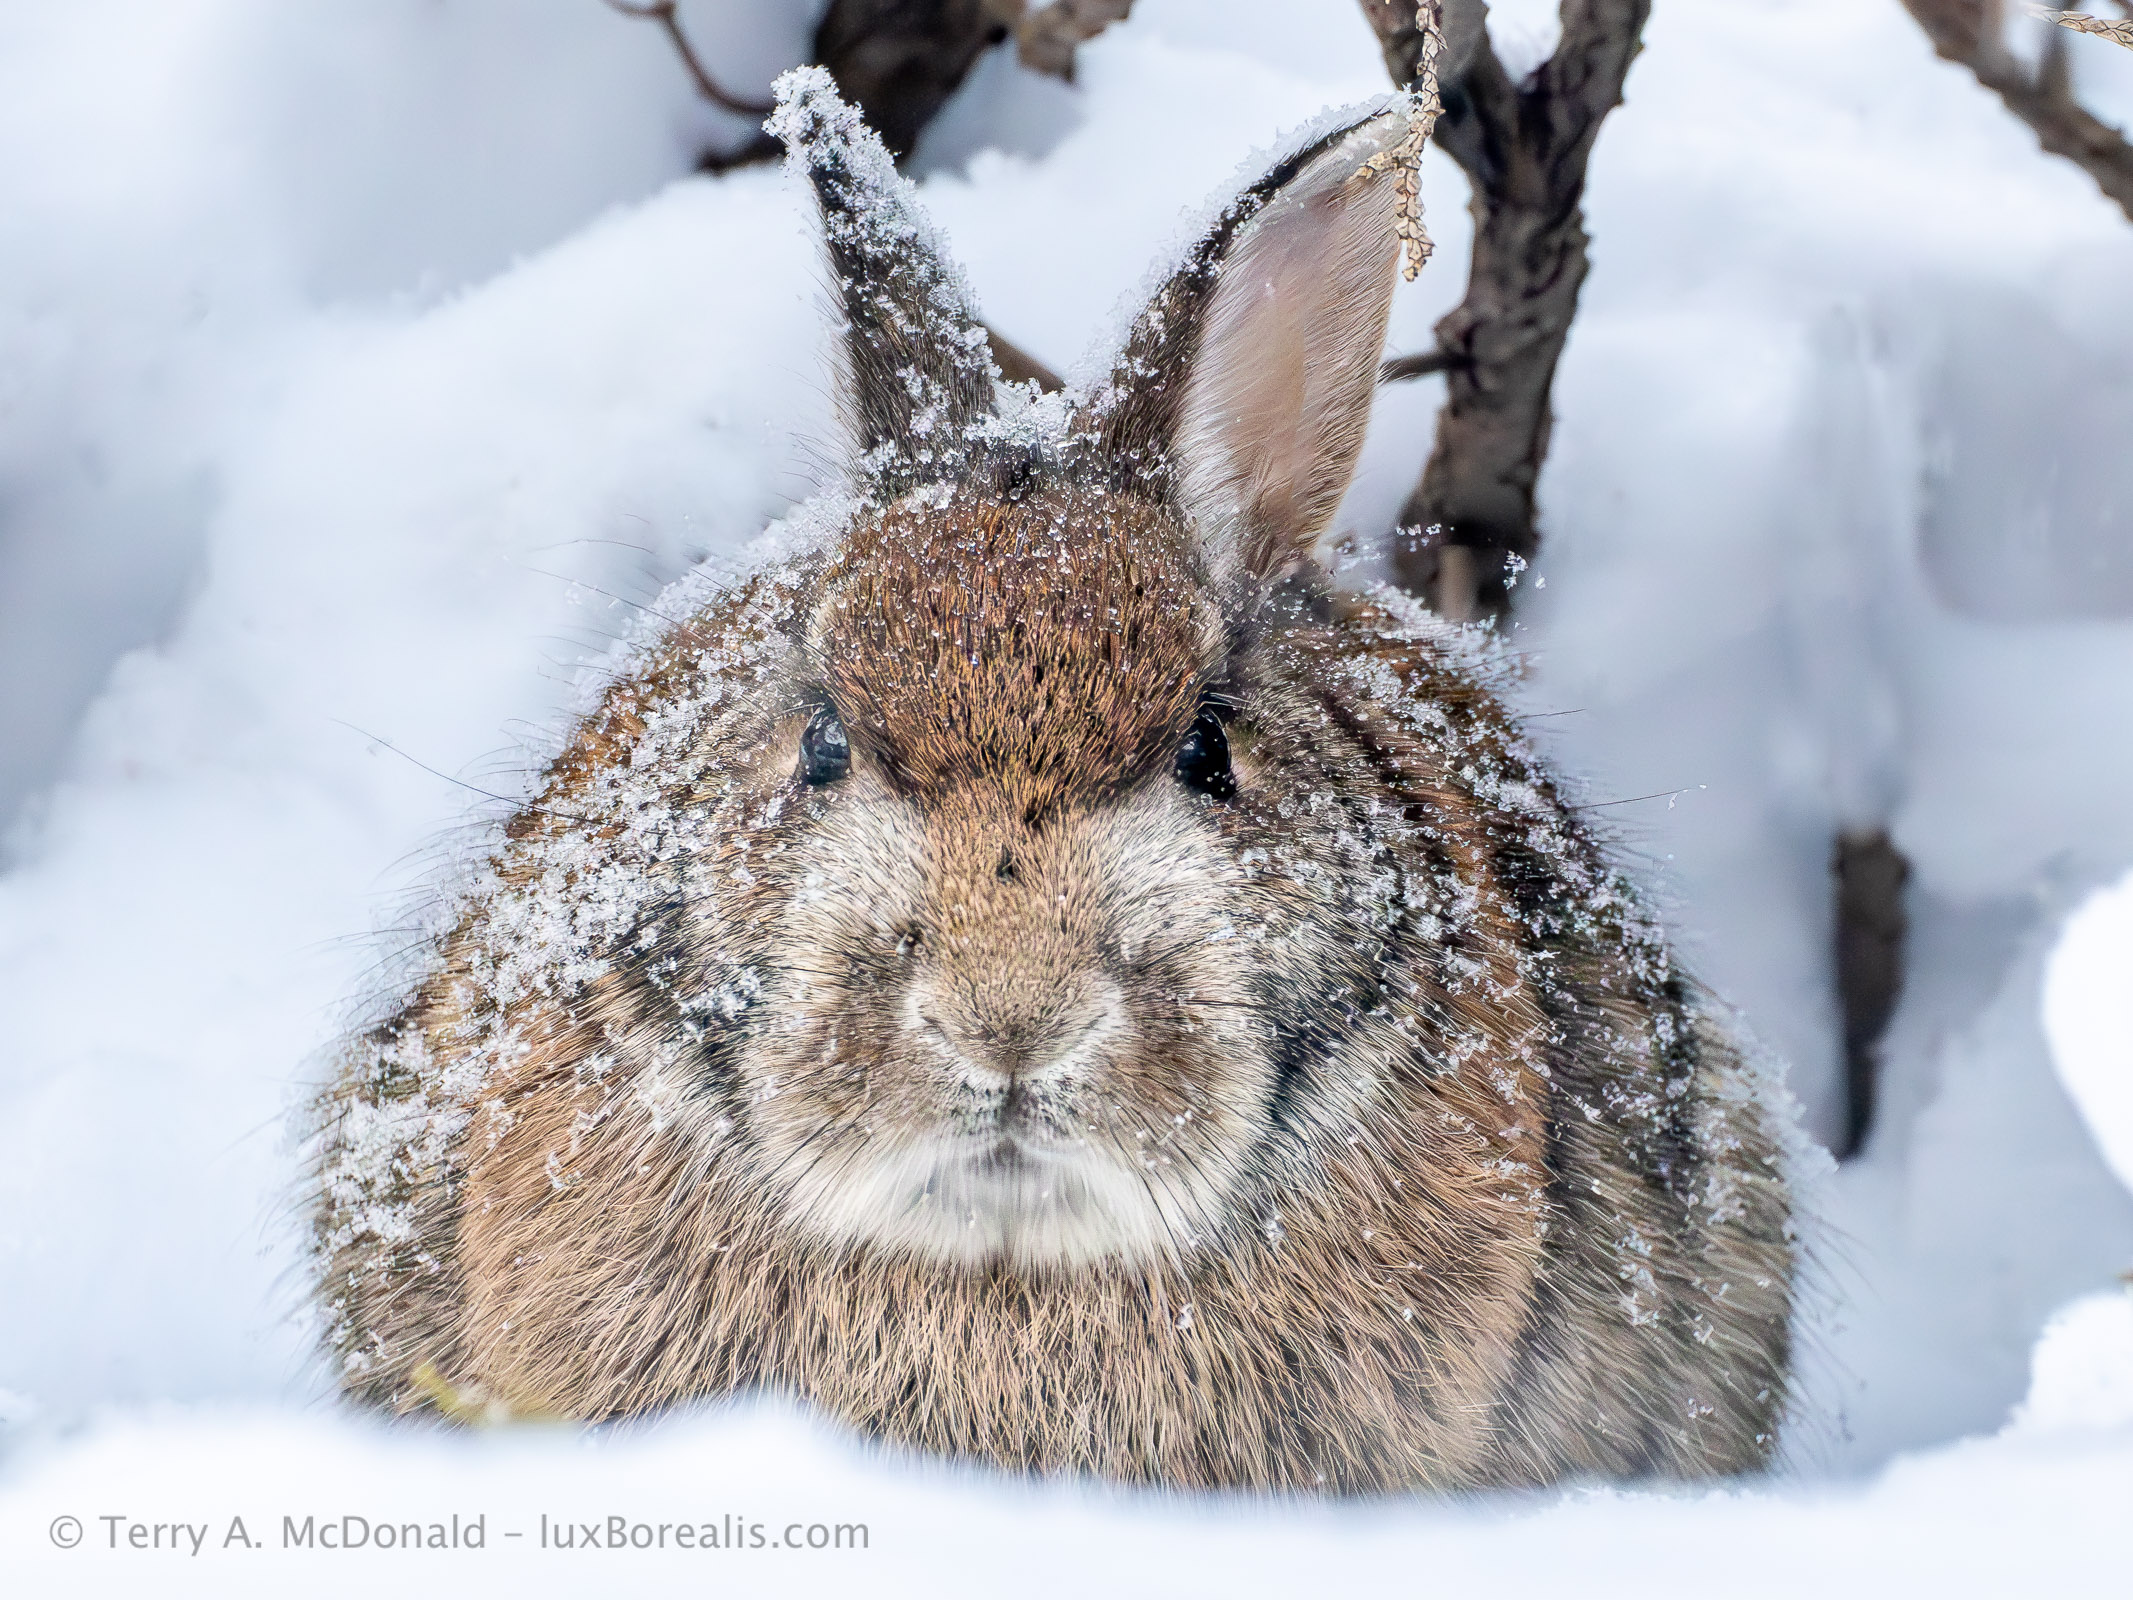
OM-1 • 100-400mm at 300mm (600mm efov) • ƒ8 @ 1/125 • ISO 6400 • Lightroom
Brands
I’ll not go into naming any brands because everyone has their preferences. If anything, I’m anti-brand, especially because some of the top brands like North Face, Helly Hanson and Patagonia, while good, are priced high due to the name. I’ve found that the off-brand gear I’ve purchased at Mountain Wearhouse and Marks has worked perfectly well.
I’m often asked if I use chemical hand warmers or battery-warmed gloves or socks. The simple answer is no. I’ve been out in –32°C but limited my time to only a couple of hours. It is just too difficult to work in those conditions with the back of camera icing up with every breath.
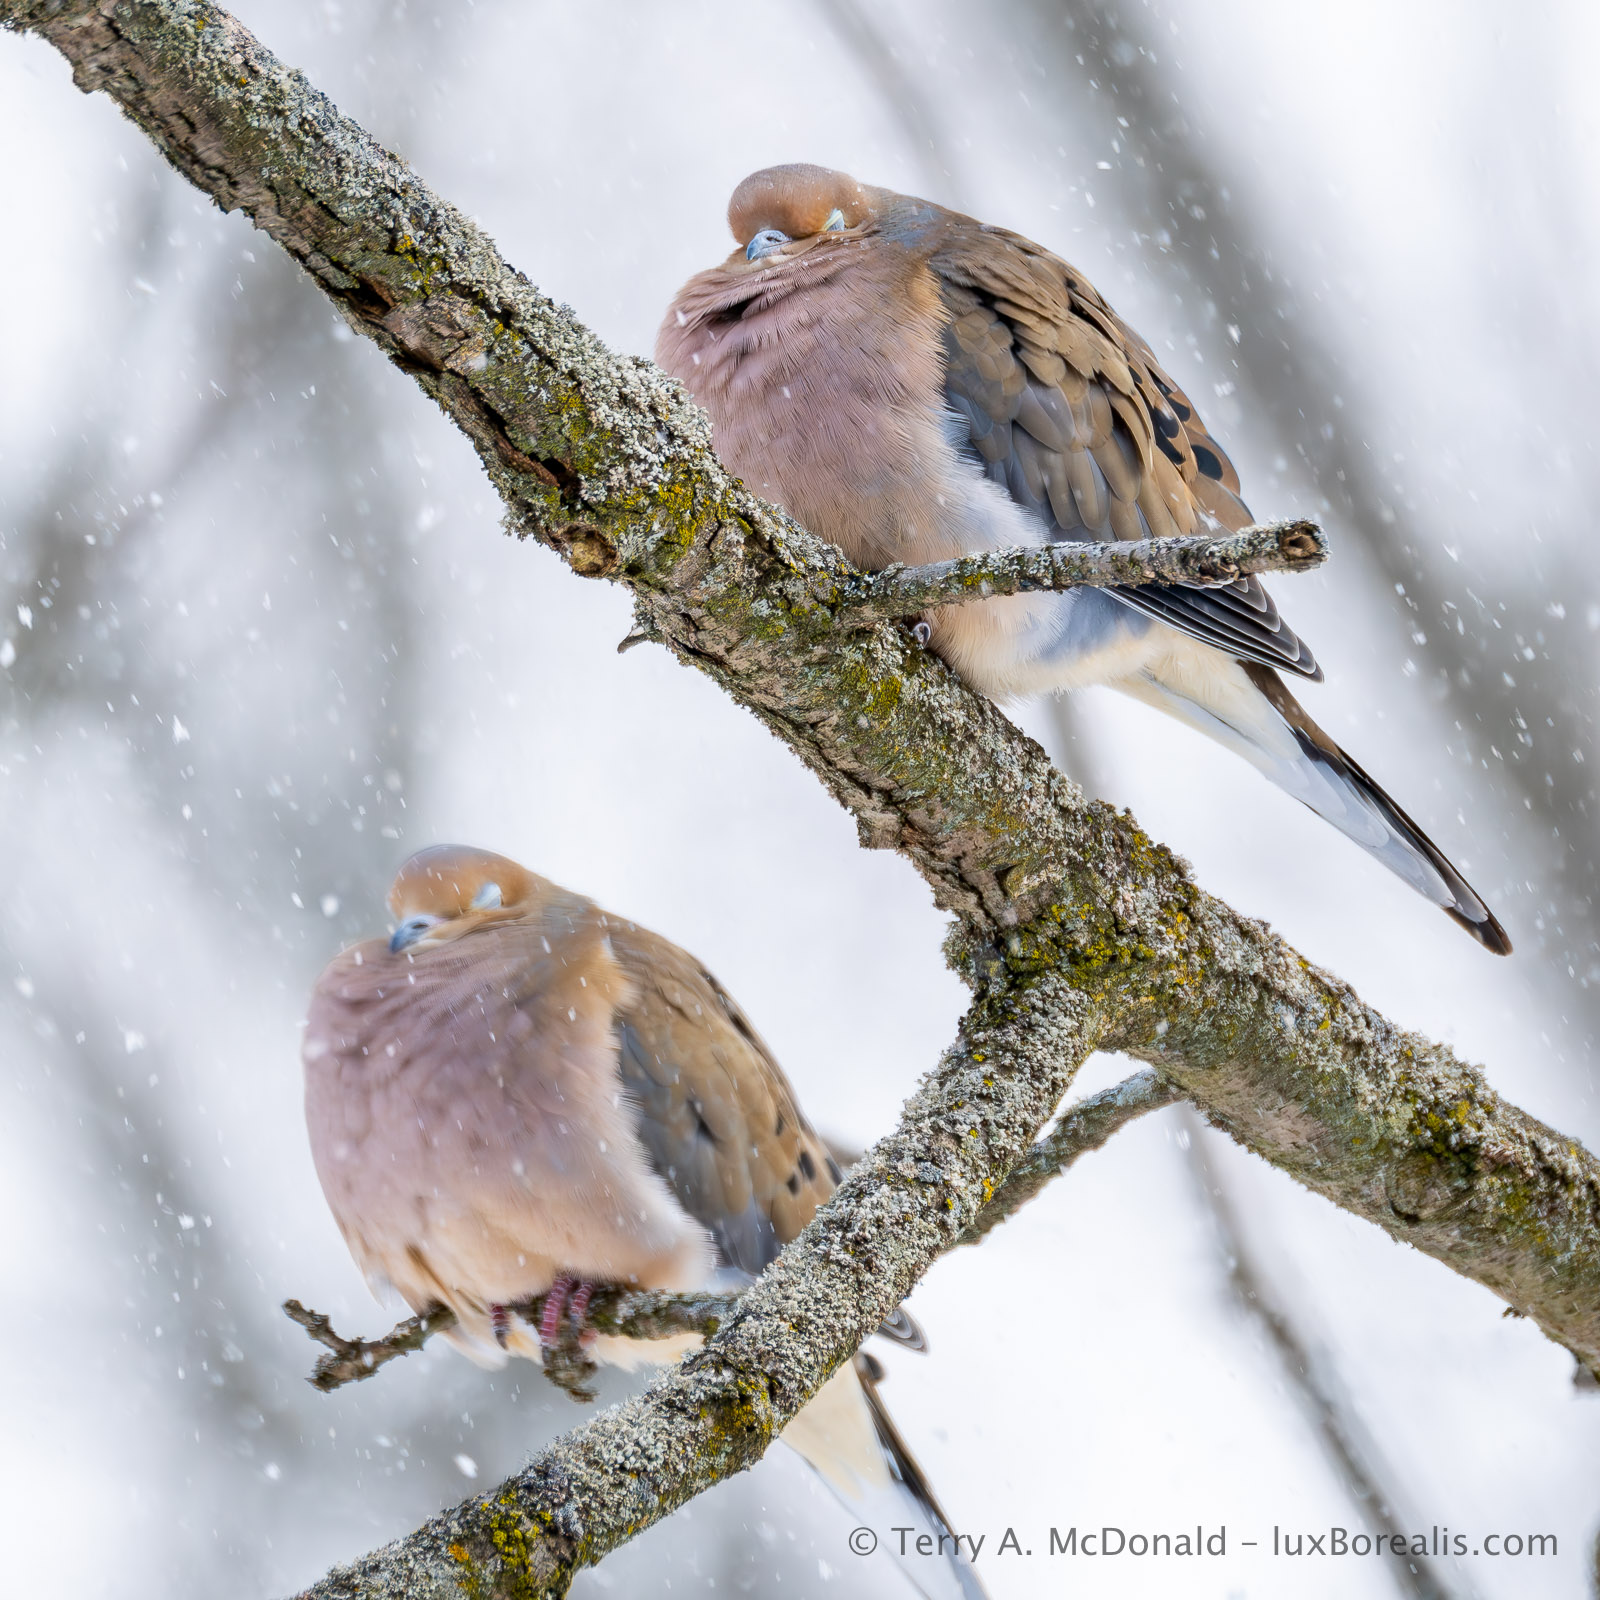
OM-1 • 100-400mm at 400mm (800mm efov) • ƒ6.3 @ 1/1250 • ISO 800 • Lightroom
De-Icing
Which brings me to another question I’m often asked: how do I deal with fogging and frost or ice build-up. I wear glasses and have a moustache, so, yes, it’s a pain. Keeping glasses slightly away from your face helps reduce fogging and the moustache, well, there’s not much that can be done when it is really cold, except chip the icicles off! Two other points to make are:
(1) Keep your camera cold. I keep mine in the trunk on cold days, not in the car itself. That way, I can stay warm without my camera getting warm, then fogging or icing when it hits the cold air. Batteries suffer in the cold, so keep your spare in packet where it can stay warm.
(2) Don’t breathe on your camera. As much a possible, breathe through your nose as it directs the moist air downwards, I’ll sometimes wear a scarf around my mouth and nose so that it catches most of the moisture I exhale. Alternatively, I literally hold my breath when the camera is up to my face.

iPhone 11 Pro • 7mm (50mm efov) • ƒ2 @ 1/700 • ISO 20 • Lightroom
Final Thoughts
The idea of dressing in layers means you can remove layers as you get warm, for example when snowshoeing or Nordic skiing though, even tromping through snow will get your heart rate up. The key thing is to avoid sweating as moisture can cool you down.
Instead of removing layers, my first line of defence against excess moisture is to vent. The anorak I wear has a back vent and underarm vents that I open as I heat up. If you pause for a while to compose photos, keep the vents open, at first, to expel excess moisture. You don’t want that moisture to cool you down. However, once your body temperature has stabilized after activity, zip the vents closed to seal in the warmth.
Something to remember: Cold kills! Continually monitor your fingers, toes and core temperature. If you are out alone, then don’t stray far from where ever you started from—your car, home, cottage or base camp. Best practice would be to go out in the cold with someone else or in a group. At the first sign feeling chilled, let the person or people with you know and begin heading back. The worst possible scenario is getting caught out with your core temperature dropping, especially if it’s the afternoon and the sun is setting. If that happens, get out of the wind as much as possible and stay active. Work with the person or people with you and head for home.
Olympus E-1 • Zuiko 14-54mm @ 54mm (108mm efov) • ƒ16 @ 1/50 • ISO 100 • Lightroom
Thanks for reading! Be sure to SHARE this post with other photographers. Continue the discussion! Questions, comments, and suggestions can be added under COMMENTS.

This blog is completely free and I do not include commercial affiliate links. To help keep it free, consider buying me a coffee.
DxO PhotoLab 9 vs Lightroom – Part 3: B&W, Output and Cost
Can standalone DxO PhotoLab 9 dethrone Lightroom as the one-stop photo editing suite?
Terry A. McDonald | luxBorealis.com
This is the third in a series of articles reviewing DxO PhotoLab 9 compared to Lightroom, and was first published at Luminous-Landscape.com
2421 words; 4 photographs; 13-minute read
Black-and-White / Monochrome
I love black-and-white. Like many of you, I cut my teeth using Dektol, stop bath, fixer, Agfa Portriga Rapid, Ilford Galerie, Multigrade FB, and Kodak Elite during the wet darkroom era. And today, without chemicals and millions of litres of wash water, digital has made B&W not only easier, but far more satisfying.
While I’m used to the tools in Lightroom, PhotoLab 9 was an easy switch, though I noticed two differences, one of which is significant. Firstly, there are only six colours in the Channel Mixer, where Lr has eight. Not too significant. More significant to the production of monochrome images, though, is having the ability to tone the final image. I tone ALL my monochrome nature images to what I would call a slightly warm, earthy brown, using Lr’s Color Grading. Hue 48 is applied at a Saturation of 18 and a Balance of -50, which applies disproportionately more to the shadows. It’s my ’look’, one I developed through much testing. None of this is possible with PL9.

OM-1 | 12mm (24mm efov) | ƒ8 @ 1/1000 | ISO 800 | HHHR | Lightroom with my own toning ‘recipe’ applied.
In fact, DxO limits PL9 in its toning capability, as only Sepia is available and Split Toning is completely unavailable. There is no way to tweak the values of Sepia to achieve the same effect I have with Lr, unless I shell out an additional USD $150 for the DxO FilmPack. What?! FilmPack is a set of third-party pre-sets that many herald as being a must-have.
Though push-button presets are popular now for users to find just the right look, my feeling is the basic controls of Toning and Split Toning should be available within PL9 to allow users to explore and learn, without relying on presets. But that’s me.
Export / Printing
Being a digital-focussed app, the Export to Disk command in PL9 is very useful, though, oddly the keyboard shortcut is Cmd/Ctrl+K, not E, which is ’Force Parallel). Its dialogue box offers a great range of options that would satisfy most requirements along with a few presets.
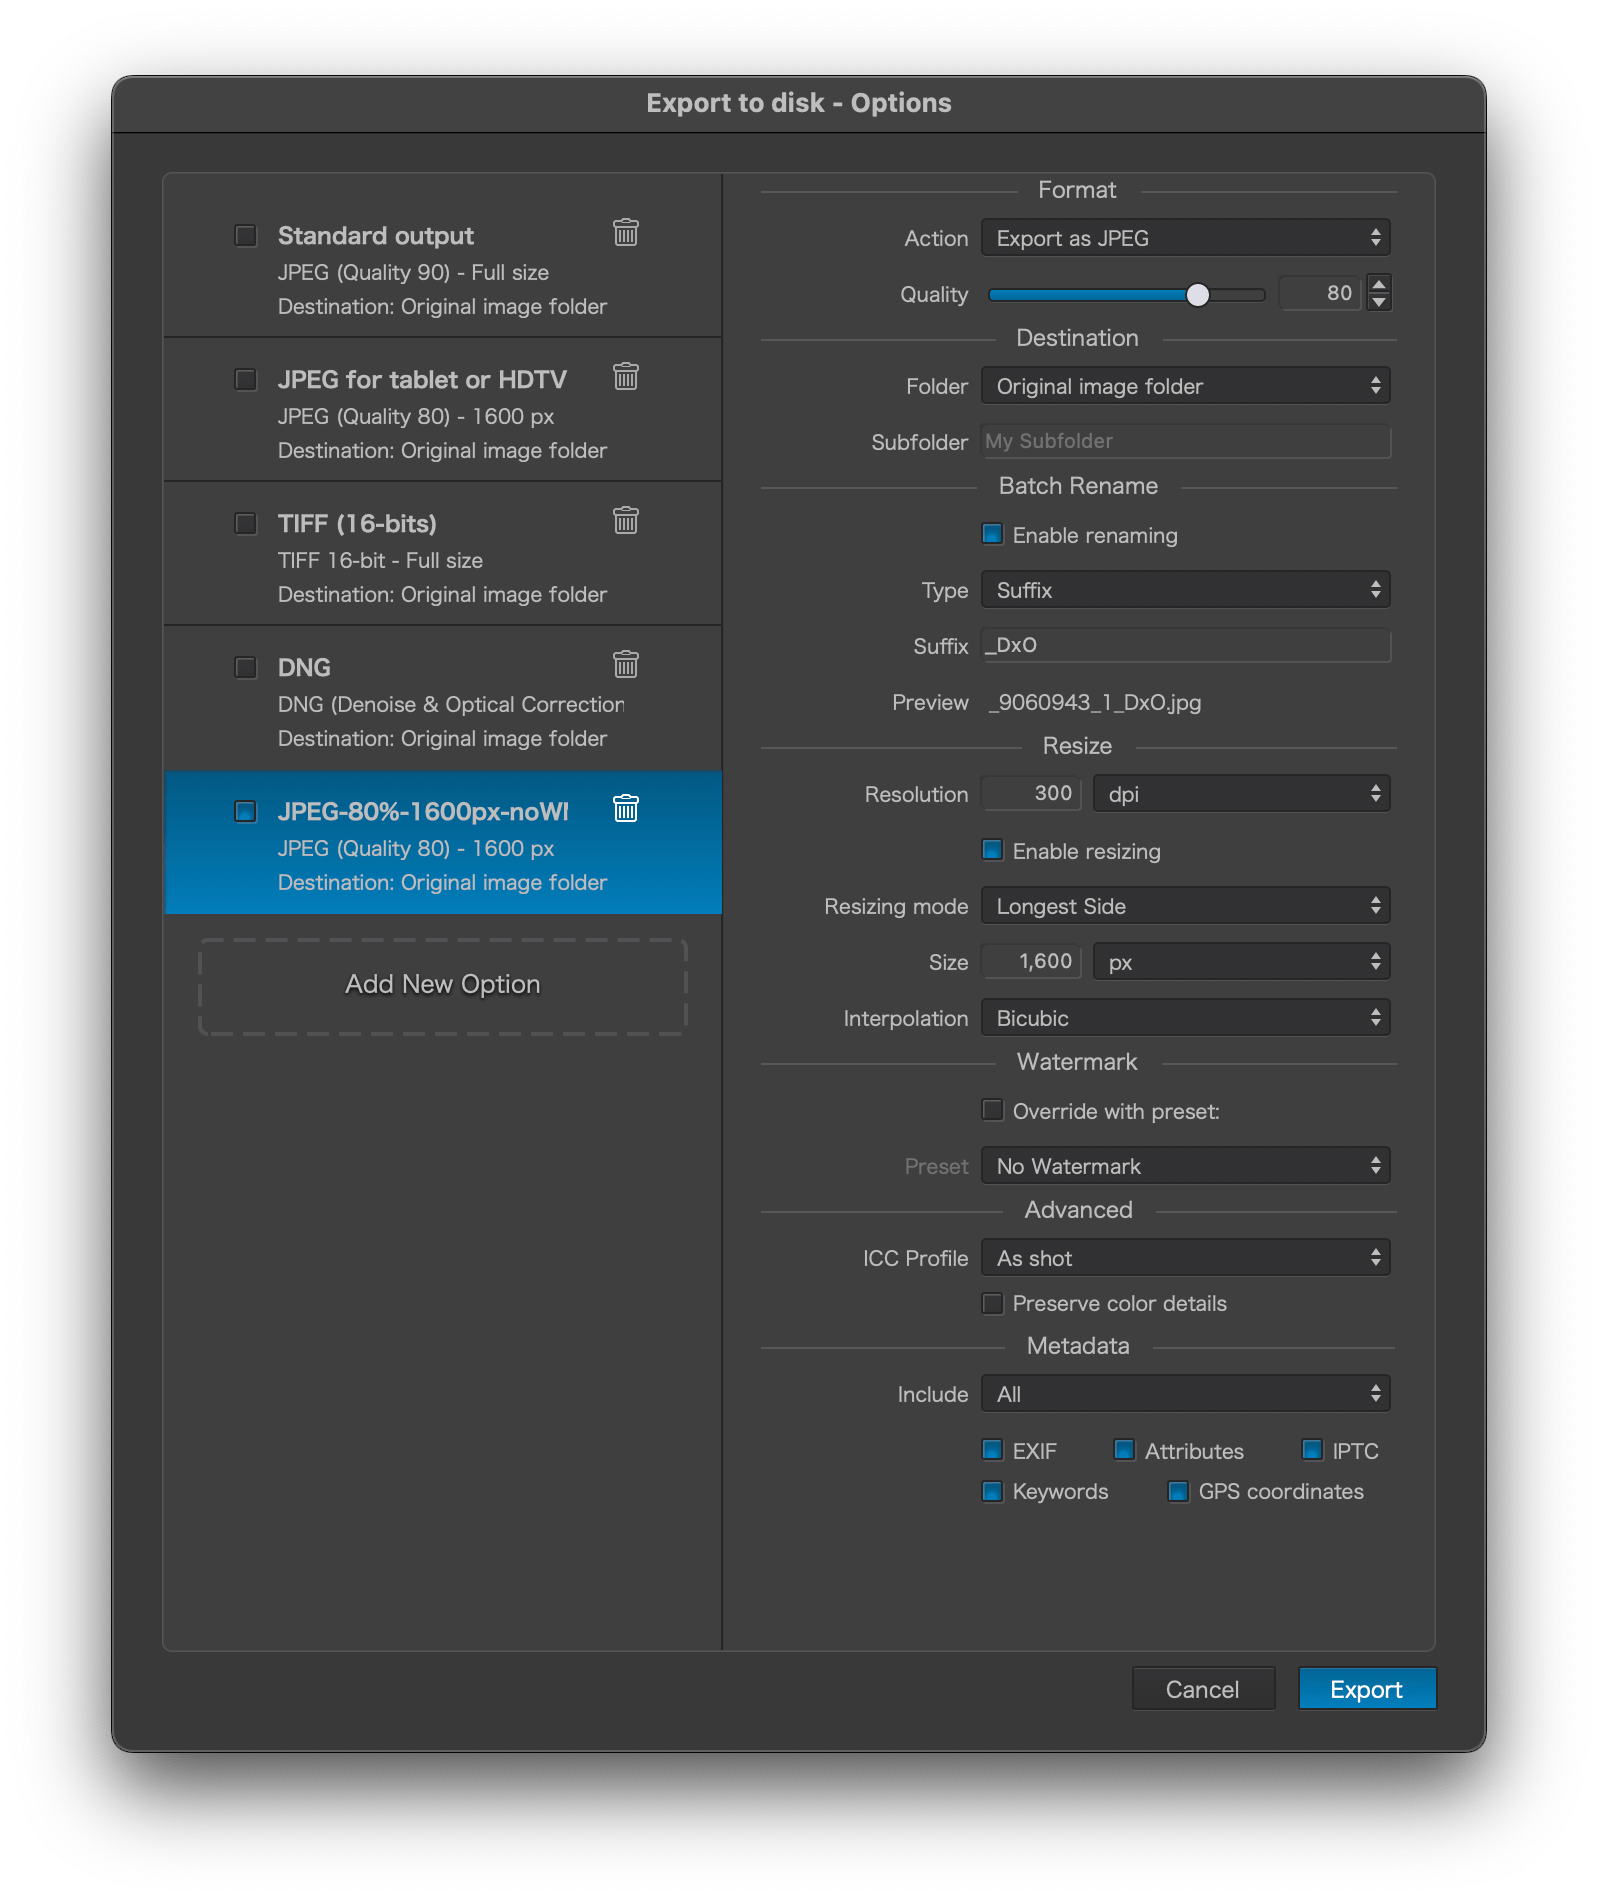
Most importantly, it allows the user to create presets for commonly-used file sizes and types, plus processes, destination, metadata, and re-naming. This is much the same as LrC and significantly more versatile than LrCC. New presets are easy enough to make, however they start from scratch, rather than starting from settings already entered, which adds unnecessary steps. On the other hand, any change is automatically kept, without having to save it as a new preset—very helpful. Export to Disk also allows multiple different presets to be selected at once, which is ideal for professionals who may need to export a DNG to one folder, a full-size JPEG to another, and a small JPEG to a third.
Again, PL9 seems to fit between LrCC and LrC in its capabilities. LrCC has woefully few choices for export and no ability to save presets other than the last one used. One aspect of LrC I wish PL9 had, though, is the option, under Destination, to ’Choose folder later’. This is helpful for presets as I don’t always export to the same folder. On the plus side, folders are remembered and added to the drop-down menu. Different horses for different courses, I suppose. I notice that even for small 1600px JPEGs, the Export process takes much longer than I’m used to with either version of Lr. I expect this is due to processing times.
Watermarking
All is fine here with plenty of options for both graphical and text watermarks. I’ve always used text watermarks and am missing the ability (found in Lr) to add a drop shadow to help white text stand out against light tones. Also, watermarks can only be edited in Customize. And, to use an edited watermark upon Export, the watermark must be saved as a new pre-set.
In the Export dialogue box, the user must ensure the correct Watermark preset is chosen. I found that what I see in the Customize preview may not be what is exported, unless I’ve chosen the updated or new Watermark. Confusing for the uninitiated, and something to keep in mind if you’re finding the wrong watermark on your image. What users may find is that they accumulate a number of Watermark presets for left and right watermarks at different sizes and opacities, depending on the image. In LrCC, watermarks can be edited upon Export, tweaking the watermark on the fly to best fit the image.
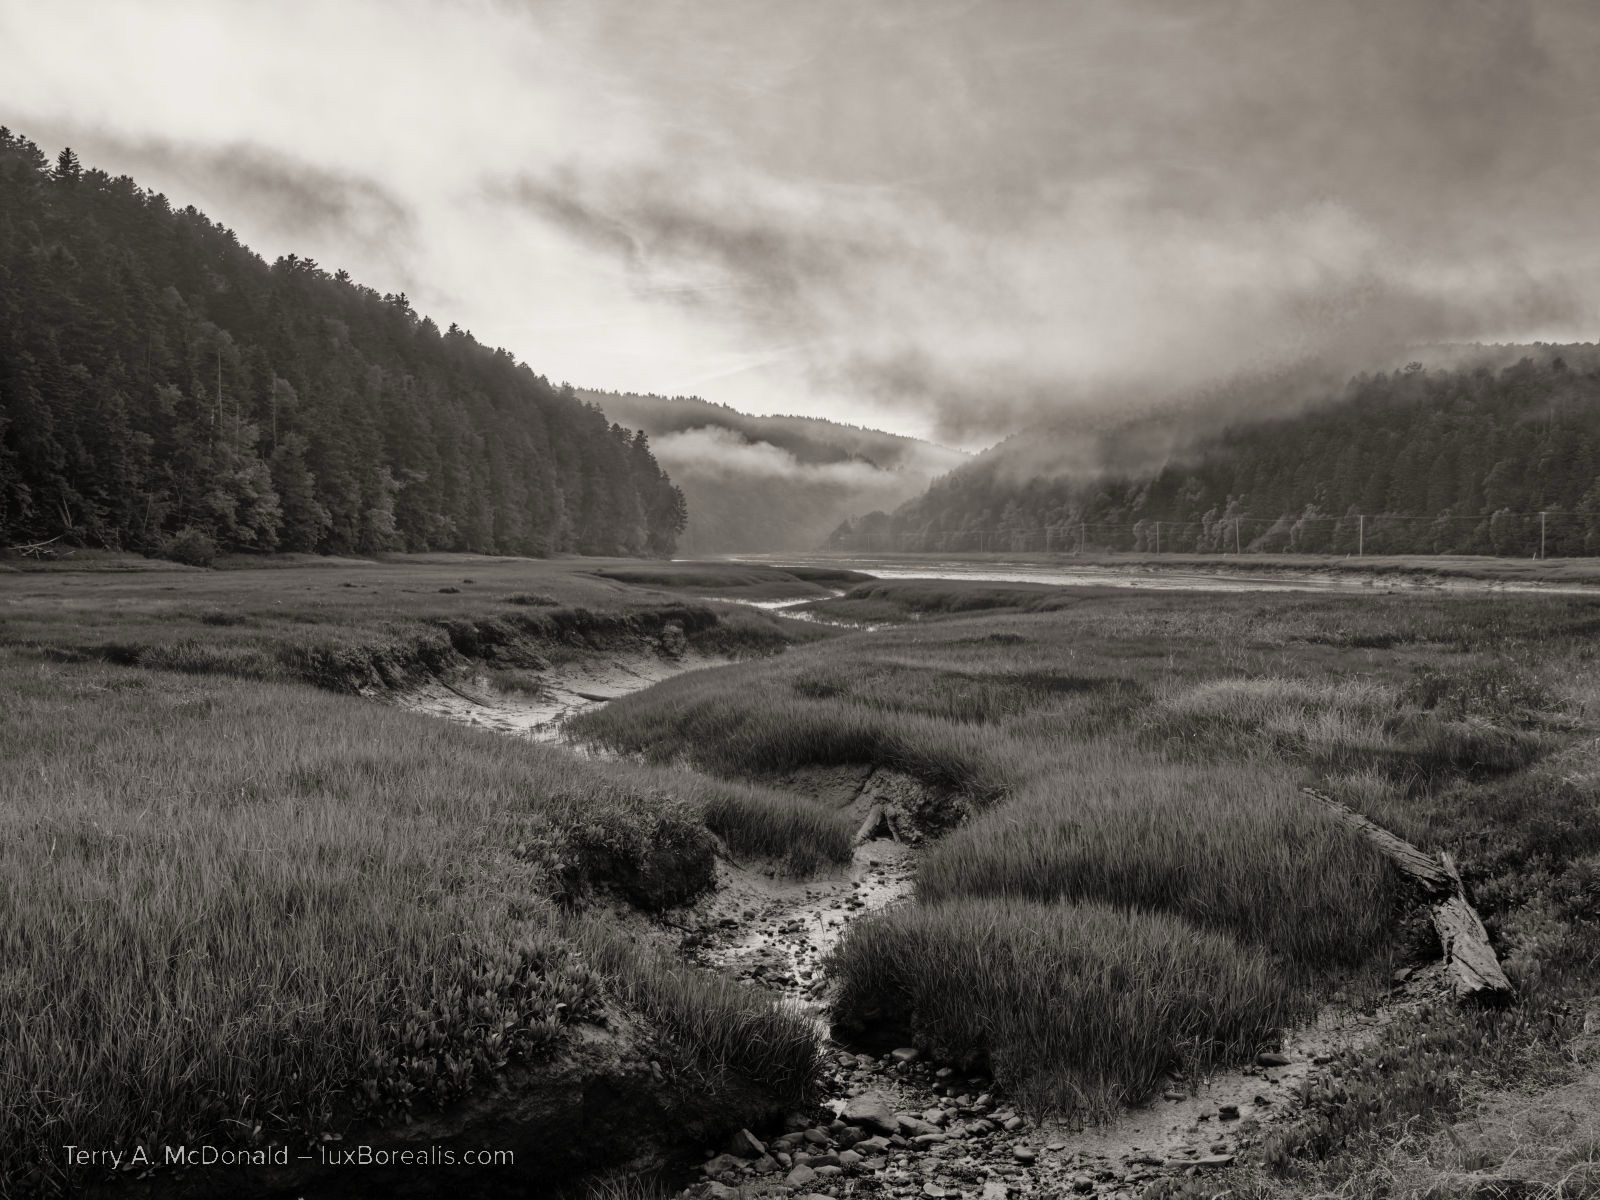
OM-1 | 17mm (34mm efov) | ƒ5.6 @ 1/500 | ISO 400 | Tripod-HiRes | PhotoLab 9
‘Sepia’ toning is at 10, the closest I could get to my preferred ’Sh48/16/-50’. I can’t say I like the look of the 65% opacity watermark from DP9, compared to the Lr watermark in the photo above this one.
Printing
Fewer people print these days, but if you do, you want a smooth interface. Some have argued the LrC interface is confusing to use, and it is, if you don’t use it often enough to build routines. With PL9 users set up the page using Page Set-up then choosing Print or Cmd/Ctrl+P to bring up the printer interface. This might be fine for straight prints, centred on a page with standard margins, but it’s not really useful for fine art printing or printing specialty items like photo cards. Even for third-party printing, it’s okay, but not ideal.
One alternative is to Export a JPEG or TIF to the exact size, then use a free printing app like Epson Print Layout, Canon’s equivalent, Another is to use Affinity Photo or Apple Pages in Layout mode to compose the print along with any text details you want on the print. PL9 has a simple output sharpening option in Export, though it is not ideal for printing. Users may be tempted to use the Unsharp Mask feature, but, ChrisWhite.photography cautions that it is part of the process sharpening, not output sharpening. He also cautions against using it across the whole image and recommends using it within a Mask for specific areas.
OM-1 | 400mm (800mm efov) | ƒ8 1/2500 | ISO 3200
So, what to do about Output Sharpening? I wondered about this until I discovered that DxO has the NIK software package which includes a sharpening module. It will set you back another USD $170, but in its defence, it appears to be a helpful set of modules not just for output sharpening, but also for Pre-Sharpening (instead of the lens module sharpening in PhotoLab 9). Many also use it for adding textures, SilverEfex for black-and-white, and a host of other effects.
However, from a comparison perspective, for something that can be done within Lightroom, at no additional cost, DxO offers yet another up-sell—a very good package of modules, but still, an up-sell.
Another alternative is to output to Qimage (USD $90), an app specifically dedicated to printing. Some Lightroom photographers use Qimage for printing, though the Lightroom Classic print module is excellent.
I regularly print from LrC and find it more than capable, for creating black-and-whites without SilverEfex, and for making properly sharpened fine art prints for framing. I’m able to set output sharpening, paper size, image size, border, margin, add text and a watermark, use ICC paper profiles—just about anything a professional printer might need, including saving it all as a pre-set, so I don’t need to set it up all over again. So, out of the box, PL9 falls short. If you’re serious about printing anything beyond straight prints, you will need to purchase extra software or use Lightroom.
Merge to . . .
It is not unusual for photographers these days to shoot multiple frames for HDR and Panoramas. Both can be blended in Lr. It even has HDR Panorama Merge. There is no facility for any of this in PL9. Panorama stitching has been a feature request since at least 2019. How unfortunate. DxO correctly points out that both blends are best done after images are denoised, demosaiced and sharpened. I agree, but I would expect photographers are doing this in Lightroom prior to blending.
Cost
This brings us down to the last variable: cost. My Adobe Lightroom subscription does NOT include Photoshop. I dropped Ps almost a year ago in favour of Affinity Photo at considerable savings. This will allow us to compare like with like.
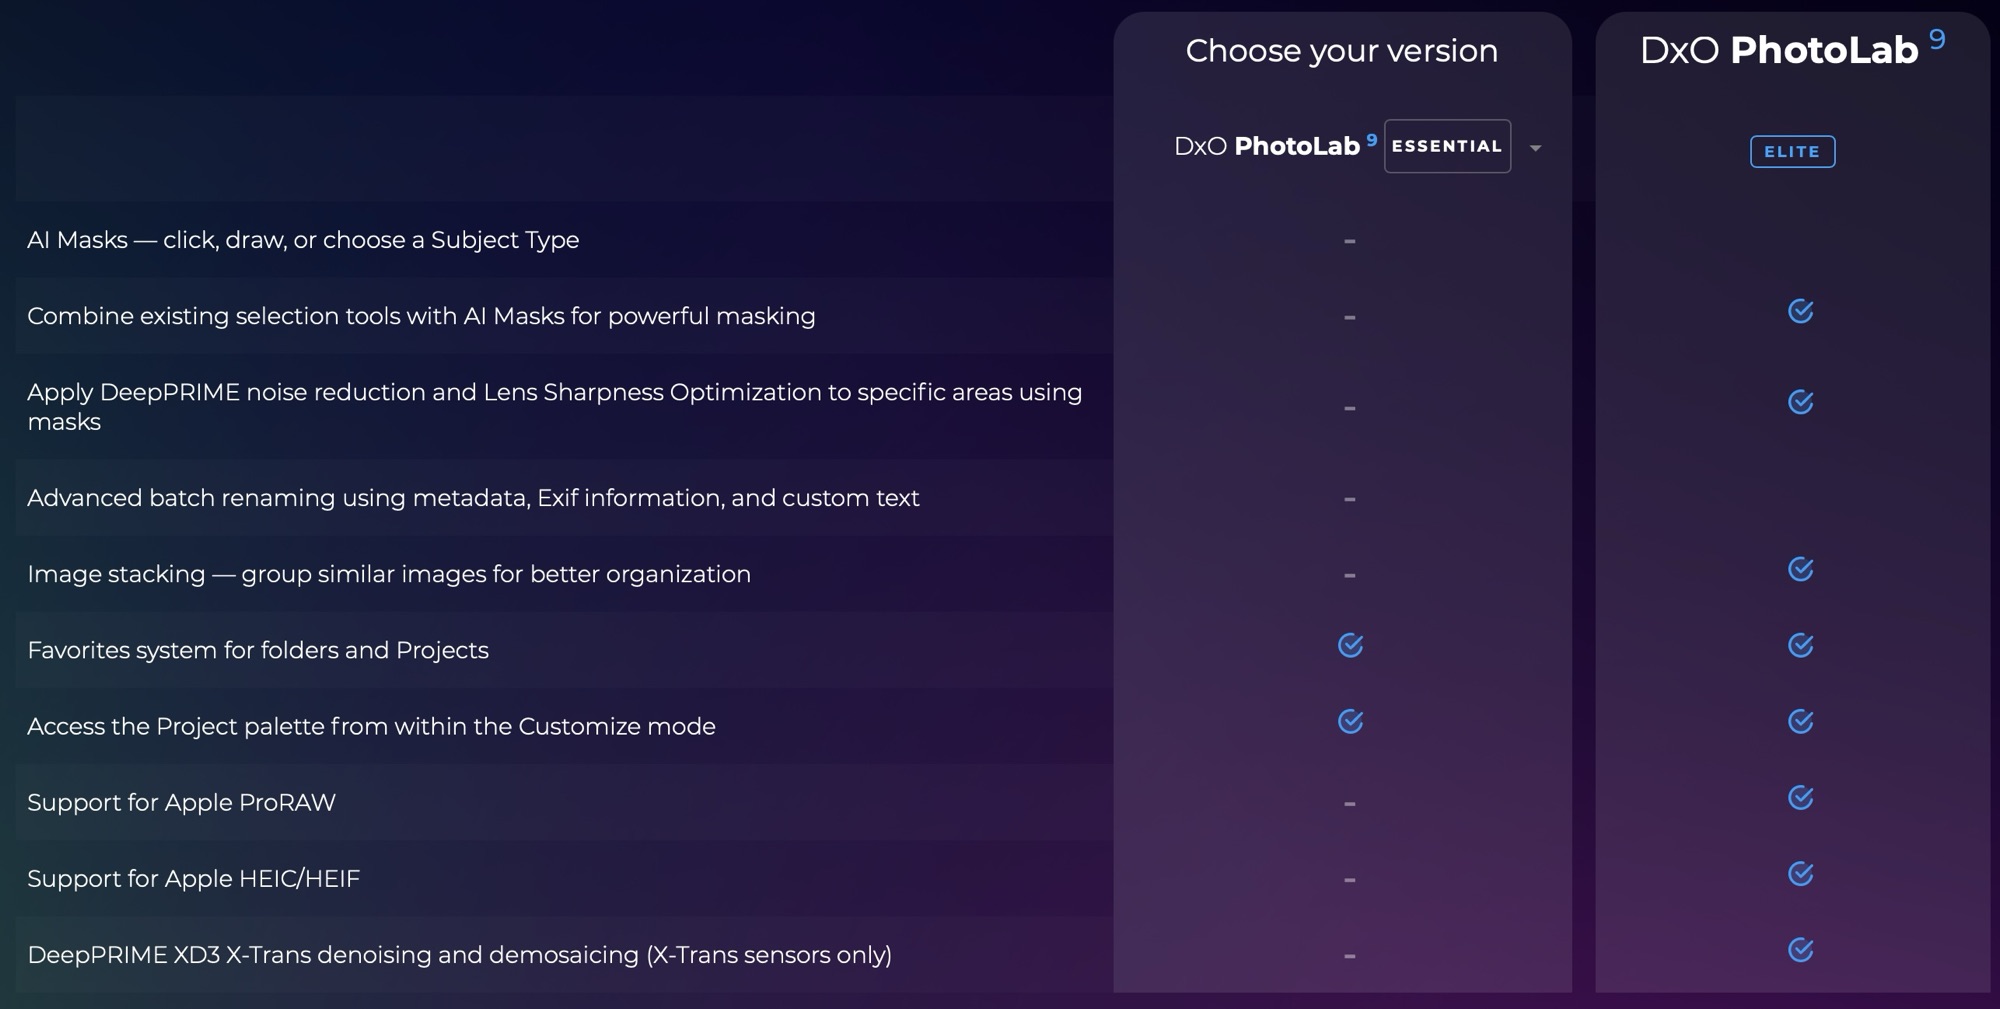
In the US, a Lightroom-only subscription is $12/month or $144 annually. Here in Canada, I’m paying $16/month or $192 annually. I see that the UK and Europe are on par at £12 and €15 respectively. For a standalone ’forever’ licence, PL9 Elite is USD $240 or CAD $336 (UK £220; EU €240). This is about 1 year and 8 months of Lightroom. To save some money, users could opt for the PL9 Essential Edition for USD $150. It has much of what I’ve written about, but I notice DxO doesn’t promote it, keeping it behind a specific link. Here’s a breakdown of the differences:
However, my Lightroom subscription isn’t just for Lightroom. It includes both Lightroom Classic and Lightroom CC, both the desktop version (LrD) and the mobile version (LrM), which I use on iPad. And, it includes 1TB of Adobe Cloud, Lightroom camera, a Portfolio website and Adobe fonts. I apologize for this is sounding like a TV ad!
I have come to rely on Lr on iPad far more than I ever expected. No it’s not perfect and it’s down-right frustrating at times in not having some features which I and many others feel should be on a professional app. That being said, I find using a pencil/stylus to retouch and create masks completely intuitive. In fact, I’d go as far as to say that I dislike having to move to the laptop to finish things up or do things I can’t do on iPad, simply because the iPad experience is so intuitive.
OM-1 | 400mm (800mm efov) | ƒ8 @ 1/2500 | ISO 3200 | Lightroom for iPad
With iPad, not only are AI Background and AI Subject masking easy and lag-free, I can tweak each mask using brushes by drawing with a stylus, or my finger.
I also use the Adobe Cloud space. Having access to my photos anywhere and anytime I have internet is wonderfully appealing. I can post a ‘Friday Fave’ to Instagram from the waiting room of the doctor’s office. I am no longer tied to my laptop, nor am I tied to an external drive as well and a back-up of that external drive. Our docs are in the cloud with Google, Pages, and Office 365, why not our photos?
I know some have reservations about theft or photos being used for AI training, but not through Adobe Cloud. By the way, if you’re worried about it, then stop using Google Photos and check the user agreements for your social media accounts, not to mention all the scraping being done from popular online photo sites.
I also use Portfolio to run my website. At no extra cost. I can update it using an iPad or a laptop, from anywhere I have an internet connection. While Adobe Portfolio may not be as complete as SquareSpace, Wix or SmugMug, it’s adaptable to my needs, mostly professional-looking, and I’m not paying extra for it. The basic, lowest-priced monthly subscription for each of the website builders listed above is CAD $19, $21, and $17.50 respectively. Remember, I pay $16/month for Lightroom.

Lastly, for me to express fully the way I do monochrome photographs and to use Hue Masking, I would need to purchase the DxO FilmPack. That’s another USD $150 (CAD $210), though the two can be bundled for USD $310 (CAD $434). Add another USD $170 for the NIK Collection t allow me to print to the same standard as Lightroom. This equates to 2½ years’ worth of Lightroom. Currently, a PL9 upgrade is USD $120—almost the cost of a year of Lightroom —and don’t forget a FilmPack upgrade for another USD $90 and NIK collection upgrade for USD $100. That’s now $310. For an upgrade. Hmmm.
I think you can see where I’m headed with this.
Conclusion
Don’t get me wrong. DxO PhotoLab 9 is a great product. Its demosaic, denoise, and sharpening algorithms are cutting edge. AI masking is excellent and ahead of Lightroom in some respects, though not quite all. The lens corrections are precise, slightly better than Lightroom, as is the Geometry correction. The more I use PL9, the more I become accustomed to its rhythm. But, is this enough to make me ditch the subscription and switch?
It’s not like Lightroom isn’t without its faults: the Ai subject and background masks could use some fine-tuning; Geometry could use a Transform tool à la Photoshop; and there are inconsistencies in keyboard shortcuts between versions;
Considering the other aspects of PL9 editing that I’ve found don’t quite match up to the efficiency and ease of Lr—retouching, masking, colour adjustments, monochrome toning plus the GUI, the lag times, Library, the added cost of FilmPack, etc.—I can’t make the plunge. I know many photographers use PL9, but the more I read, the more I realize it’s really the raw file optimization they credit and some of the masks–and I agree. They are excellent components of PL9. However, I’m not convinced PL9+FilmPack is overall ‘better’ than my Lightroom subscription. Lastly, it’s a stretch to think DxO saves money over the Adobe subscription model, not unless you are willing to go years without an upgrade.
Believe me, I would so like to be able to remove myself from a subscription model, but DxO PL9 is not the app to cause me to switch. Sorry DxO. I was really hoping for a long and productive relationship with PL9. However, I will continue to use the part of DxO that works best, their raw file optimization in PureRAW 5, but from within the Lightroom ecosystem.
OM-1 | 400mm (800mm EFOV) | POL | ƒ8 @ 1/160 | ISO 3200 | PhotoLab 9
This blog is completely free and I do not include commercial affiliate links. To help keep it free, consider buying me a coffee. And, feel free to hit the SHARE button up in your browser to pass it along to others.
Previous parts in this series:
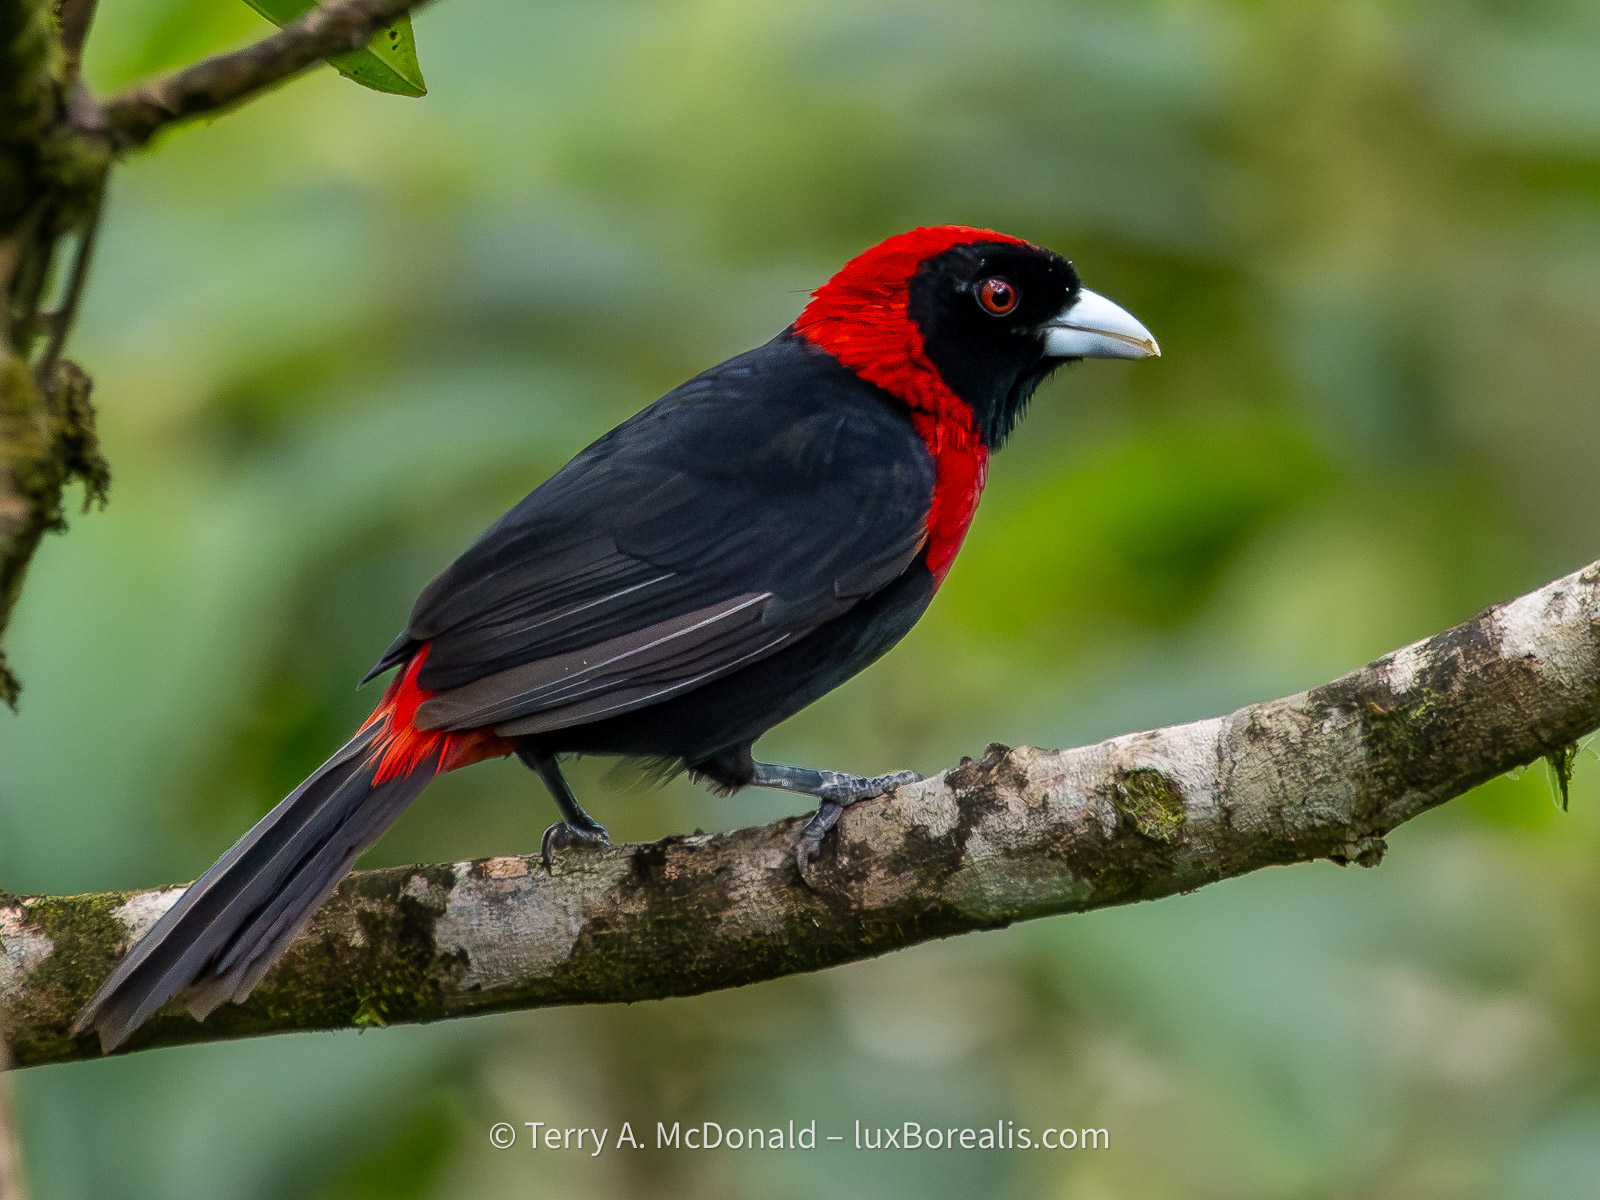
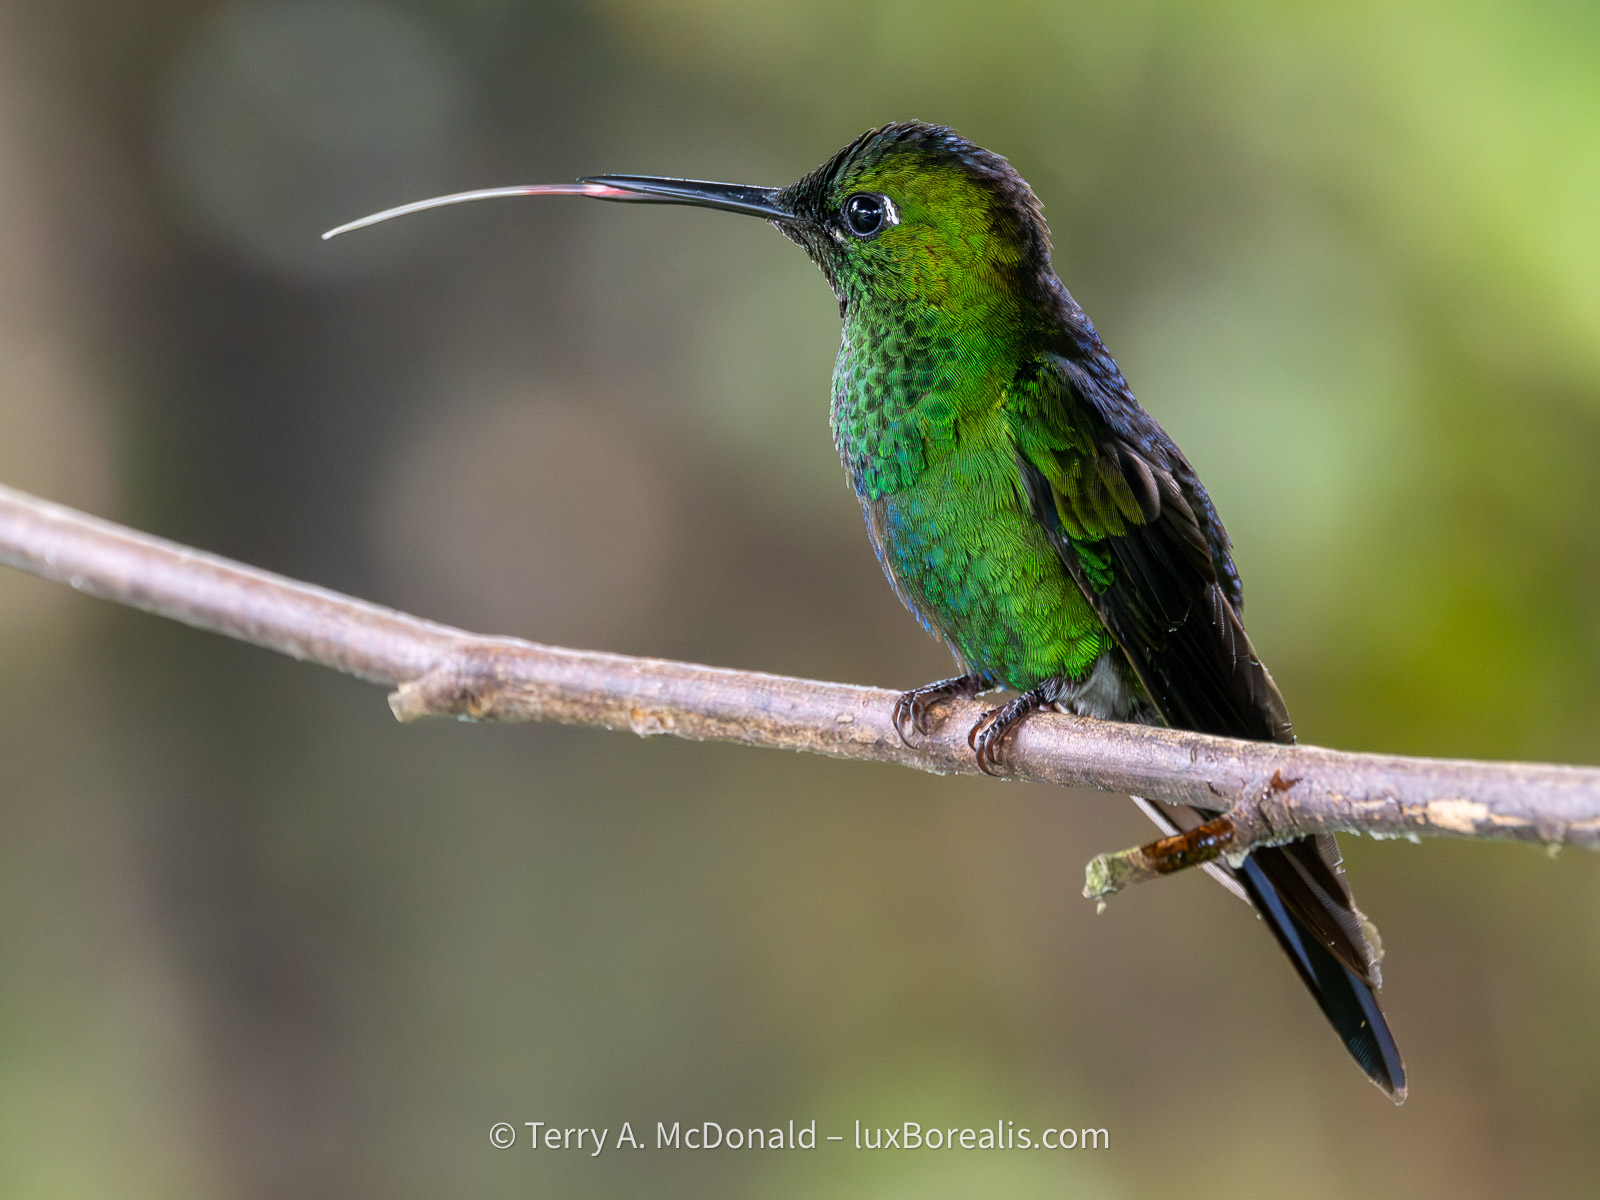
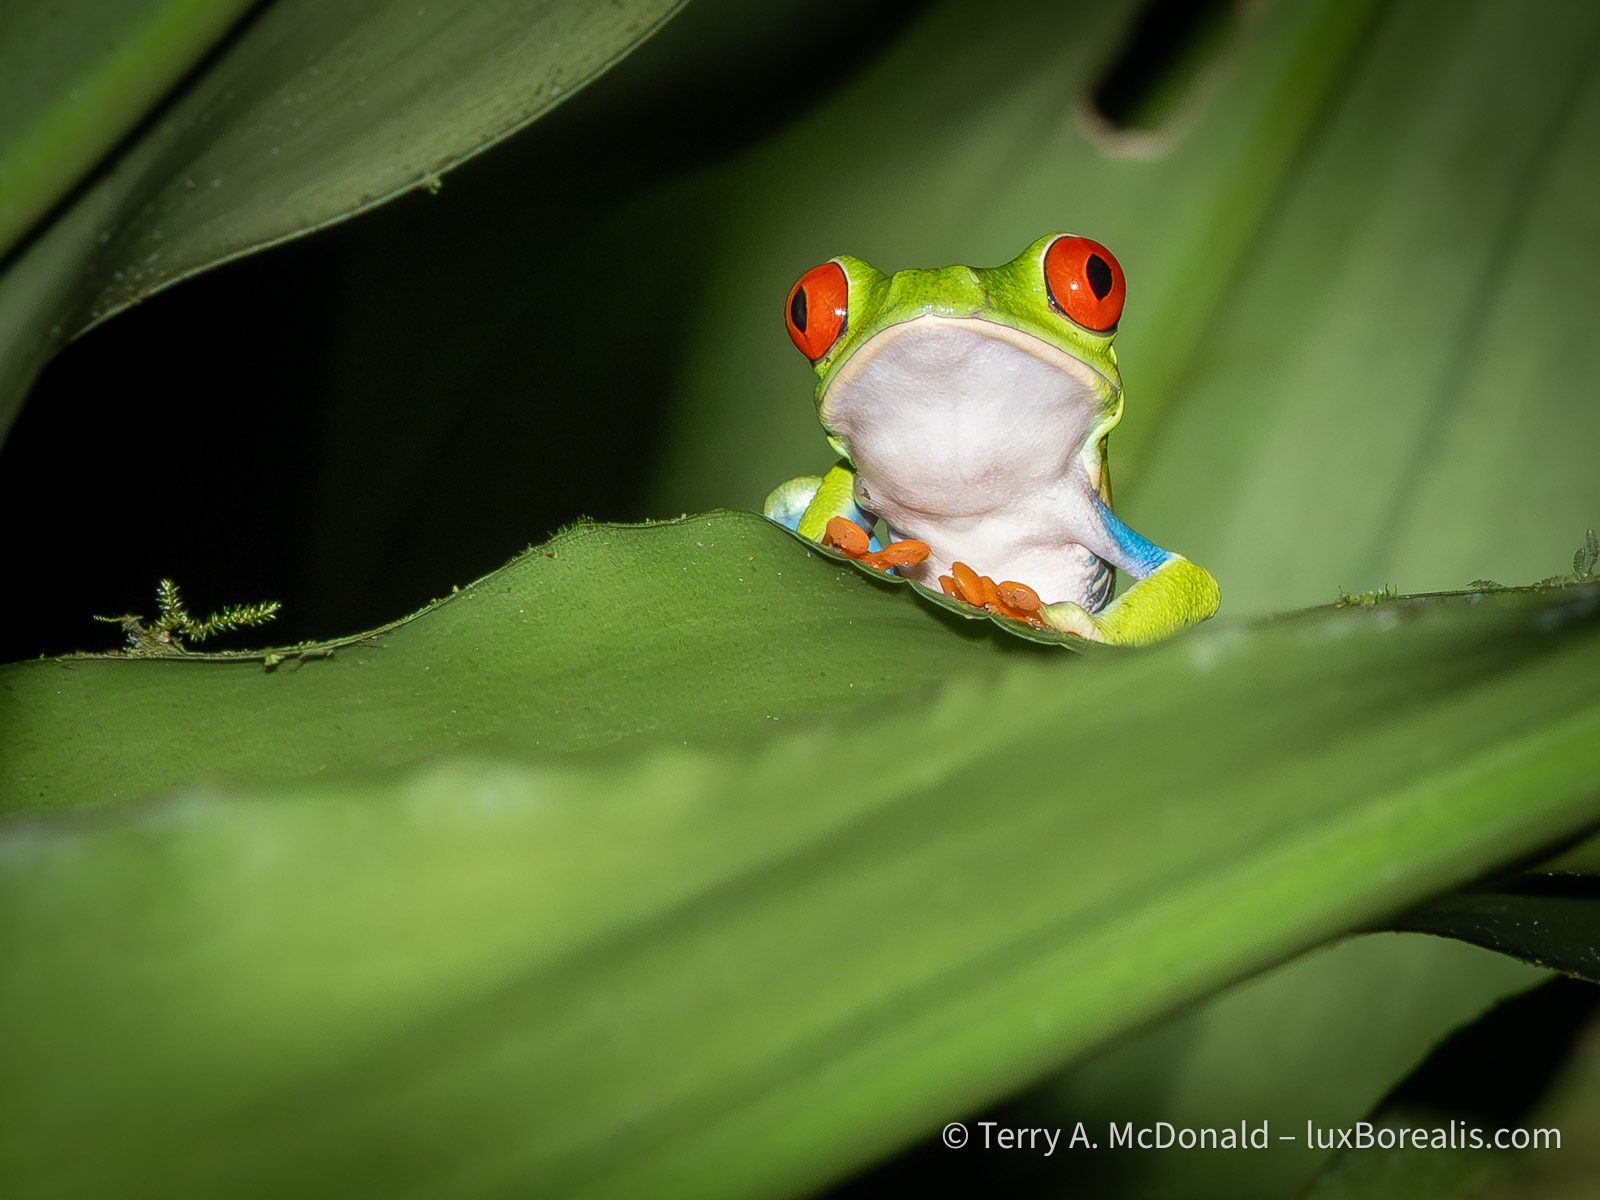
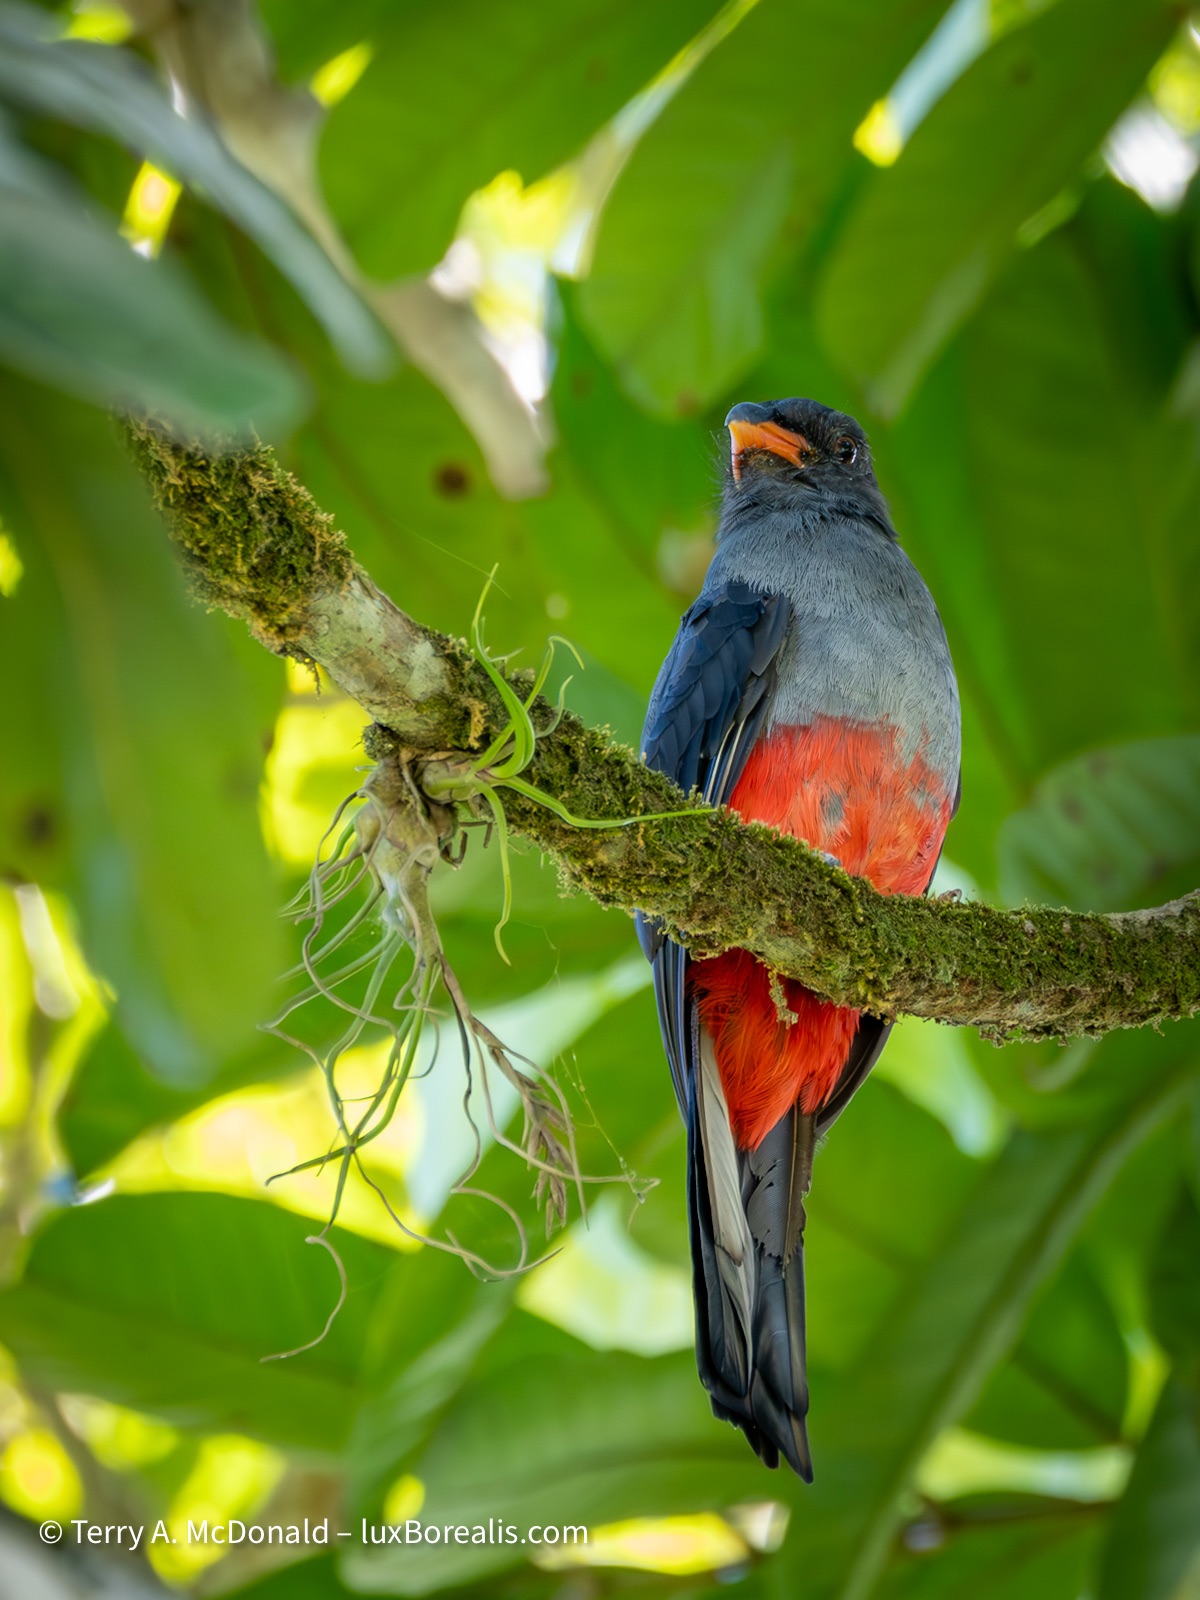
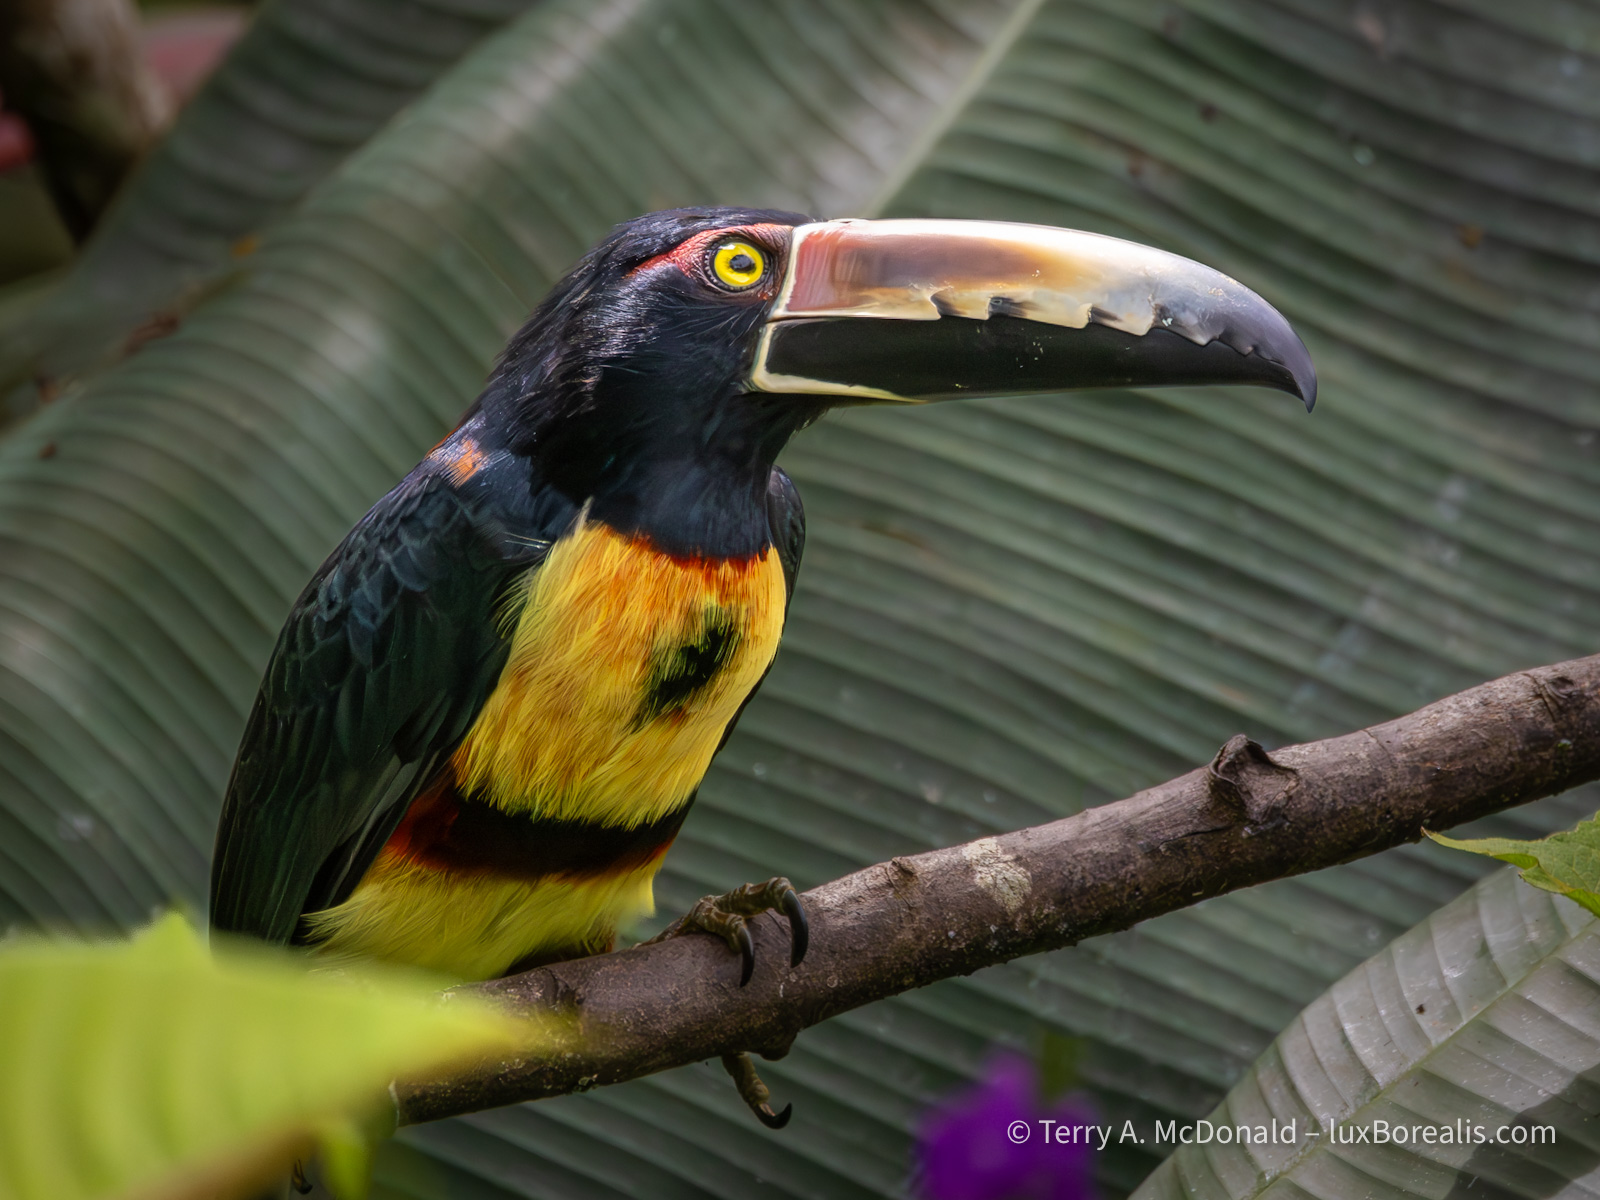
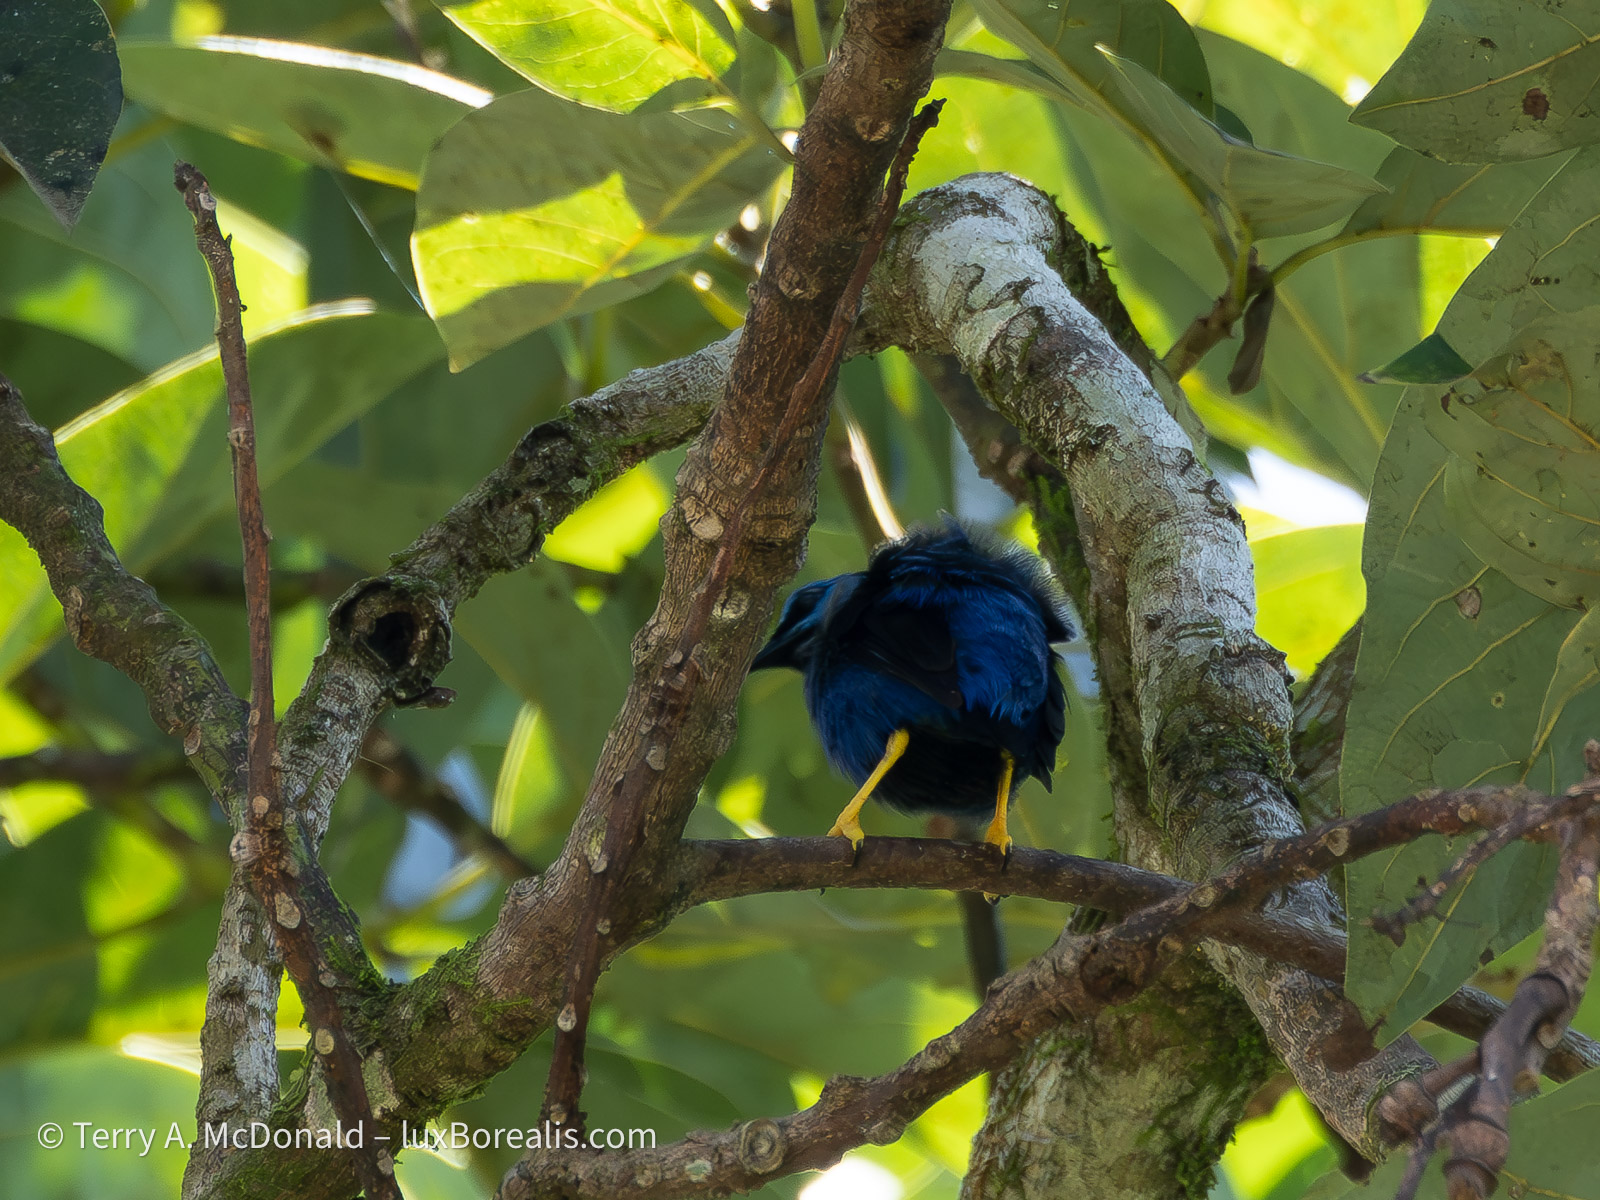
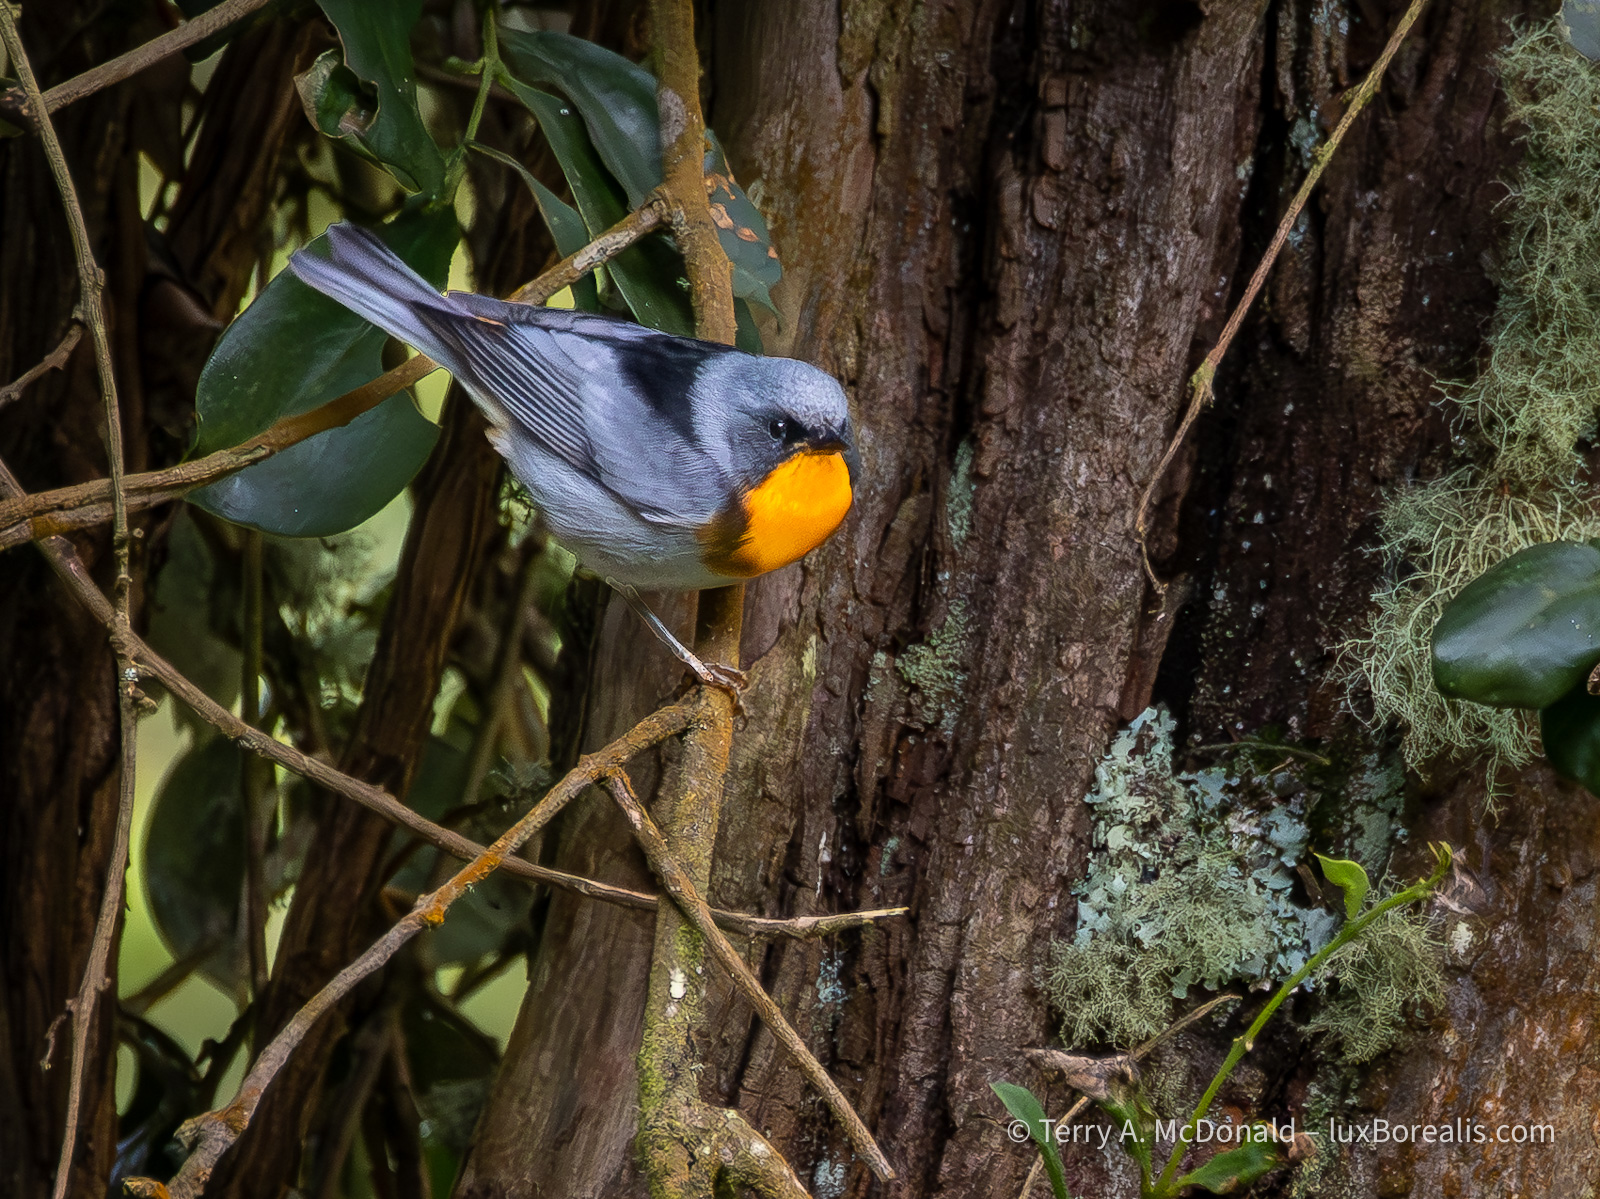
Wildlife and birding photographs from Costa Rica

2346 words; 34 photos; 12-minute read
I’m writing this on our last day here in Costa Rica. It’s 20°C in San José, and the sky is overcast. Earlier we had a light sprinkle of rain. Although it’s the wet season, rain has not been a factor in our three weeks here. In fact, we’ve had many beautiful days of sunshine, though it usually came with 30+° temps and 100% humidity.
The view from our balcony at the Hotel Bougainvillea is a near 10-acre spread of beautiful tropical gardens and ponds filled with flowers, birds and butterflies. Frogs and owls call at night, but right now it’s the raucous parakeets and parrots who are making their presence known. In auditory relief, the musical duets of Melodious Blackbirds are echoing from tree to tree.

OM-1 | M.Zuiko 12-100mm/4 PRO at 57mm (114mm efov) | POL | ƒ5.6 @ 1/800 | ISO 800 | Lightroom
The smouldering mass of the Arenal volcano looms over the surrounding forests. Active as recently as 2010, a plume of steam still rises from the top.
Birds have been our specific focus for much of the trip as we were two of 12 participants on an Eagle-Eye Tours birding tour. Collectively, we recorded 337 species which, from what I’m told, is a huge number. Given that Ontario has a total of 511 recorded species (ever), I guess seeing 337 species in 12 days is significant. This is thanks to our guides, Ernesto and Jody, who were, bar none, the most knowledgeable and perceptive guides I have ever worked with. It also helped that the folks on our tour were also excellent birders. Me? I spent my time looking for ideal backgrounds in a very busy space of tropical plants, pointing the camera, and patiently waiting for each bird to make its appearance, hoping I had enough light.
OM-1 | 100mm (200mm efov) | ƒ11 @ 1/1000 | ISO 12800 | Lightroom
Not only are rainforests hot, damp and dark, they have a kaleidoscope of green layers both vertically and laterally, allowing birds, frogs and insects to be heard, but rarely seen. In this scene, there appears to be lots of light, and I could have shot at ISO 1600, but with birds in the leafy shadows, I had the ISO set for action, not still life.
In a typical day, I had between 20 and 40 opportunities when birds or other wildlife were close enough for decent photographs. I translate ‘decent photographs’ into:
- the bird is close enough for a clear image without too much cropping;
- the light is contrasty enough to show their amazing colours;
- the background isn’t a milk-white sky as we often had, nor a jigsaw puzzle of distractingly glossy leaves with annoying highlights;
- there is enough light to keep ISOs at or below 12800; along with
- a high enough shutter speed to freeze my movement at high magnification and that of the bird.
It seems simple enough, but these ideal conditions simply did not occur as often as I liked. There were times when I shot absolutely nothing, despite seeing dozens of different species. Most were simply too far away, even with an 800mm equivalent zoom. I have more photos of beautifully coloured birds silhouetted against a white sky than I’d care to disclose. A waste of pixels, no matter what camera system is being used. Oh well. Despite the limitations, I think I have a fair crop of decent photos.
OM-1 | 123mm (246mm efov) | ƒ11 @ 1/160 | ISO 3200 | Lightroom
With the bulk of the birding part of our trip over (though true birders are always on alert), I began turning my attention to details in the forests. I photographed this both with focus stacking at ƒ8 and this version, a single shot, at ƒ11. They are both very similar, but I chose this version due to the slightly better composition.
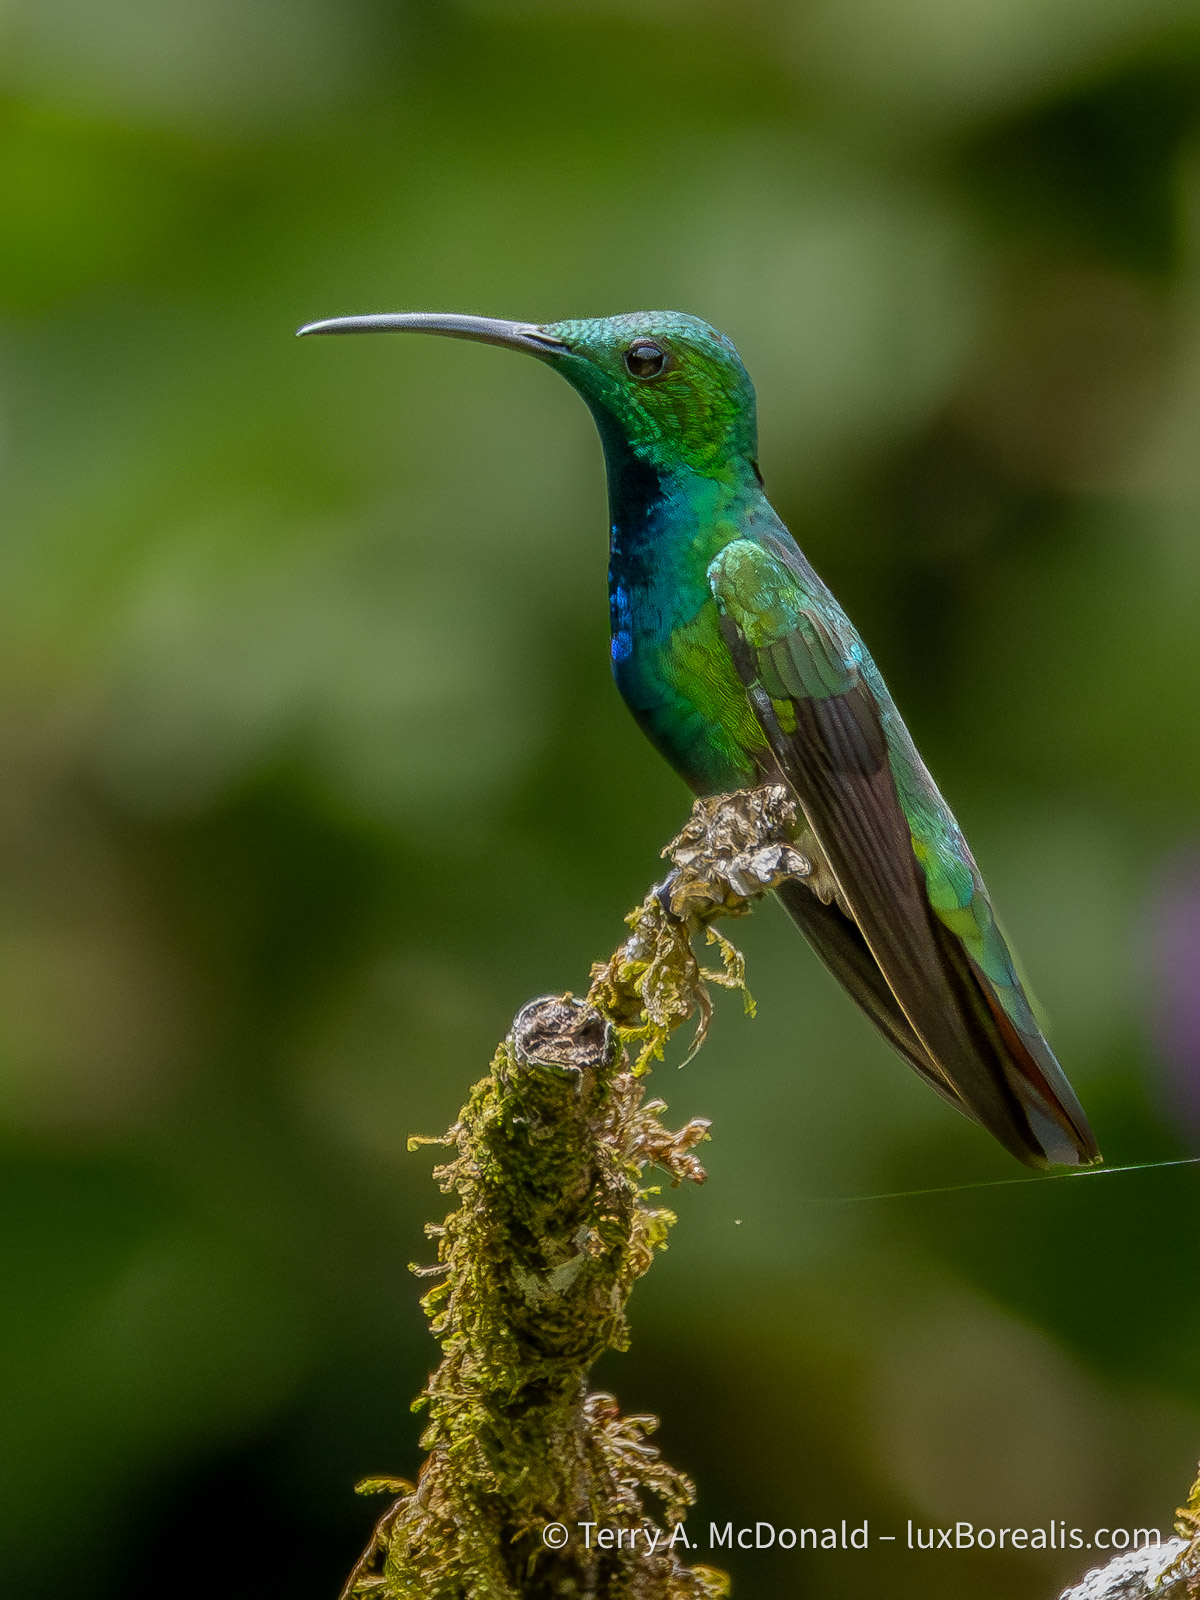
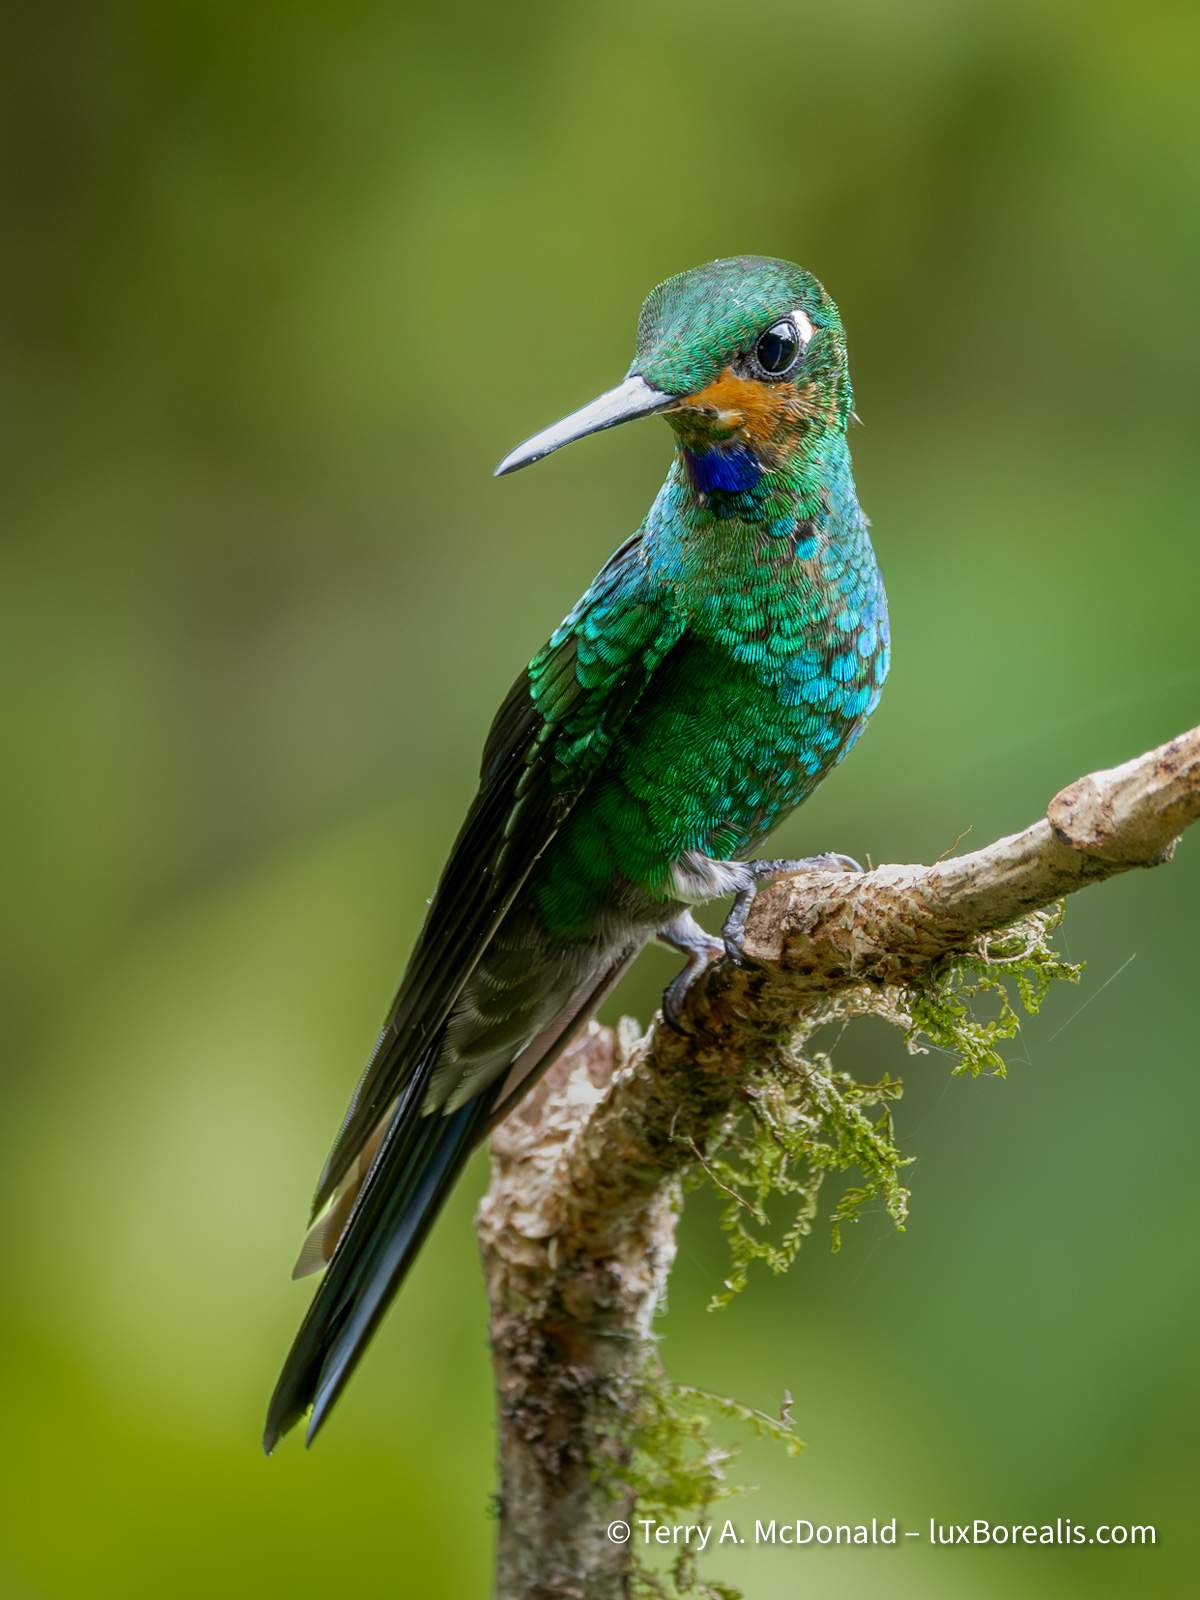
I can honestly say, I’ve culled from thousands of captures, about 300 which I am happy to share. Many of them are repeats of the same species, and many have more meaning to me, personally, than to you, the objective observer. I hope the 24 I’ve chosen to share give you a sense of the experience.
As I always state up front, my goal in photography is capture the essence of place and the art inherent in nature. I think I’ve achieved that in this set of photographs. Ansel Adams always maintained that ”twelve significant photographs in a year is a good crop”. The 30 I’m presenting here aren’t all ‘significant’, but given the stunning colours of the birds, it’s hard not to include them.

OM-1 | 400mm (800mm efov) | ƒ8 @ 1/4000 | ISO 3200 | Lightroom
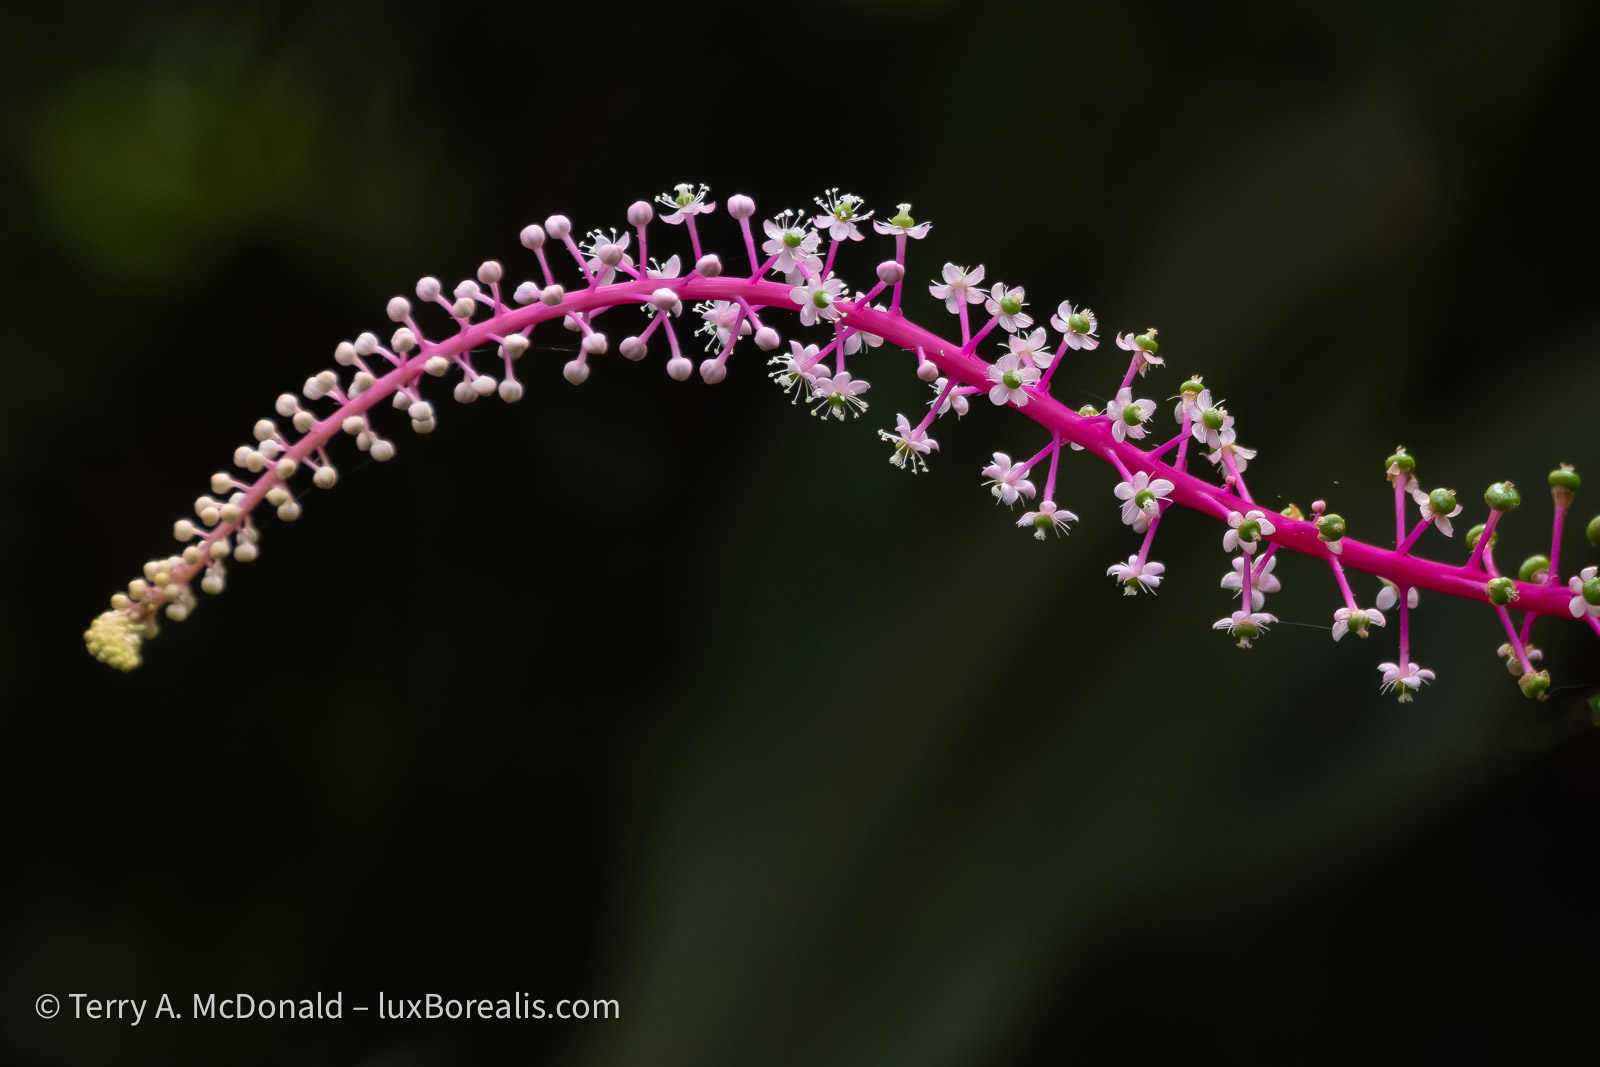
The industriousness of leaf-cutter ants is miraculous. Thousands of steps from their nest they climb a tree or shrub, cut the leaves and carry them down to the nest. Along the way, there are ‘quality control ants’ which determine if the leaves being cut are still acceptable as, once the leaf-cutting starts, the plant defensively begins producing toxins to discourage the ants from stripping all the leaves. Ingenious! BTW, the ants don’t eat the leaves; down in the nest, the leaves are used to farm a fungus, which is what the ants eat. If this was written into a story, no one would believe it.
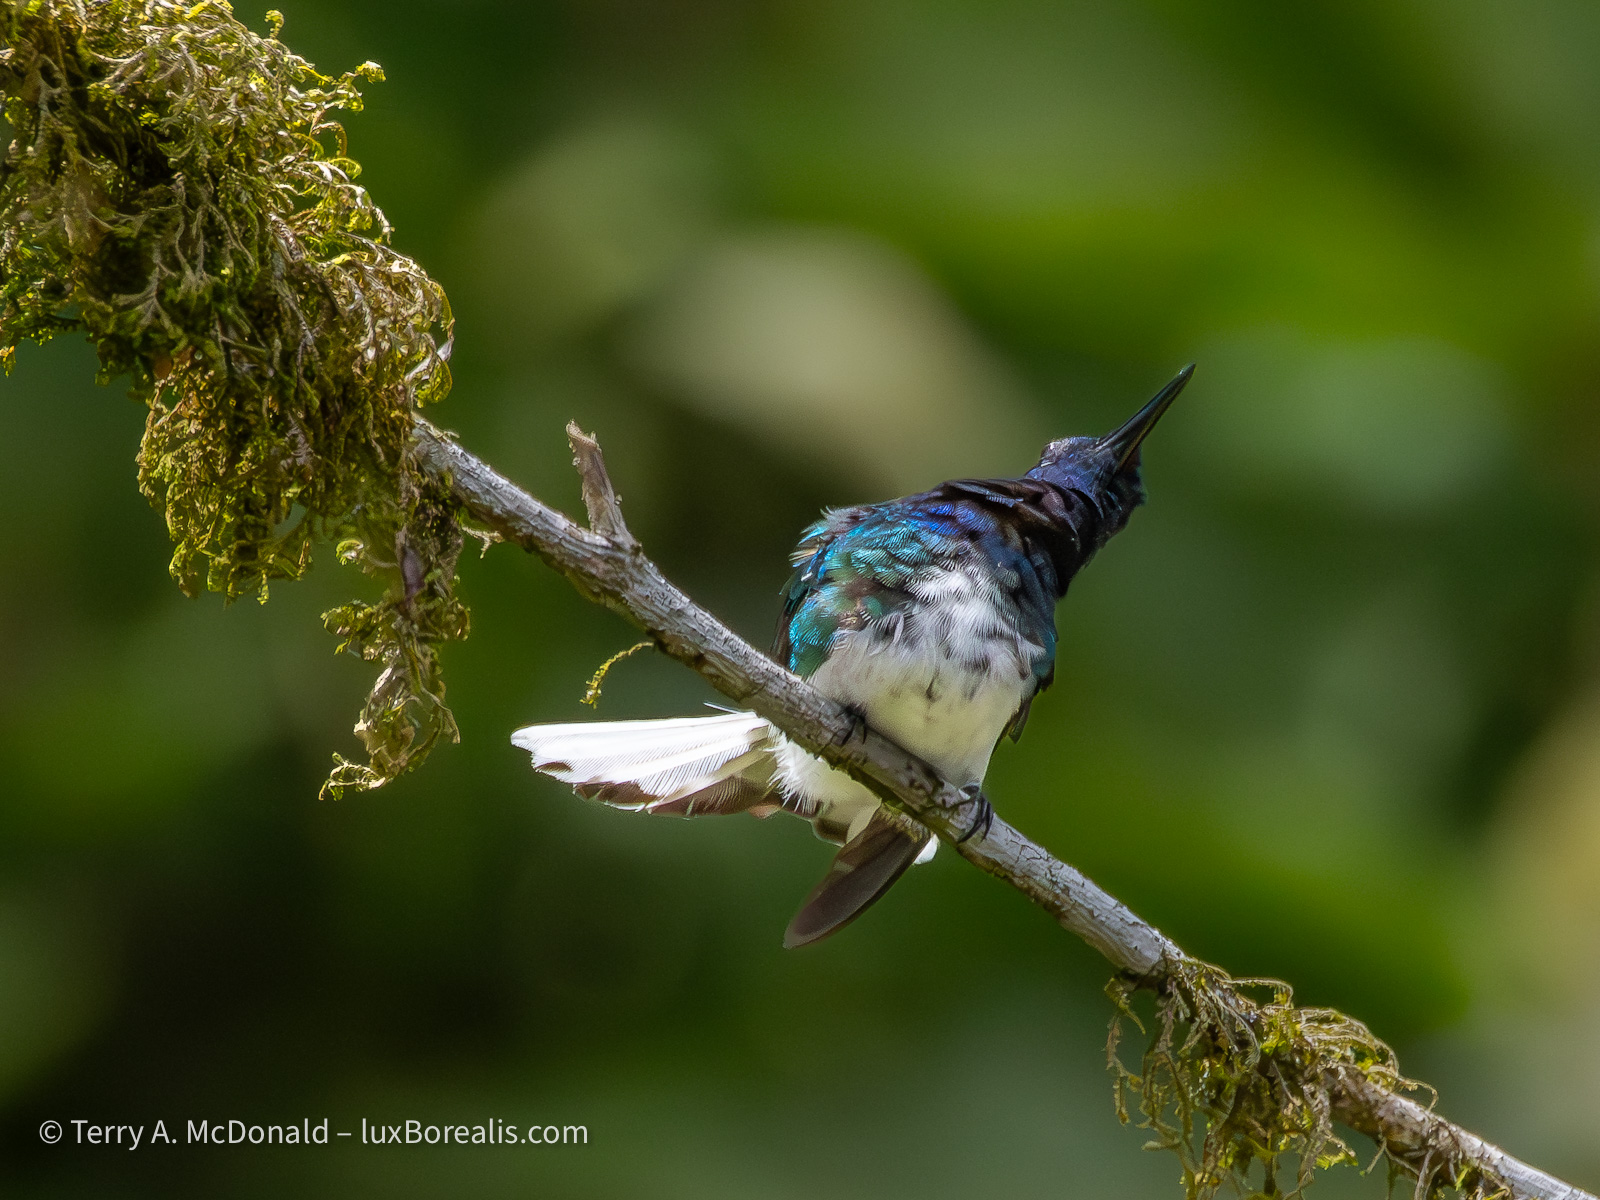
As the photographer, I’m responsible for ‘working’ the composition plus all the techy stuff of exposure and post-capture processing. The beauty is in what I am photographing. The colours run the whole gamut of the spectrum; the patterns and designs are simply wild. Honeycreepers with electric blue next to azure and black with glowing red legs. The shimmering colours of hummingbirds changing in the light, blinking on and off like disco lights—amazing!

OM-1 | 400mm | ƒ8 @ 1/640 | ISO 3200 | Lightroom
Strikingly coloured, especially against the dark green of the forest, as if it’s being lit from inside.
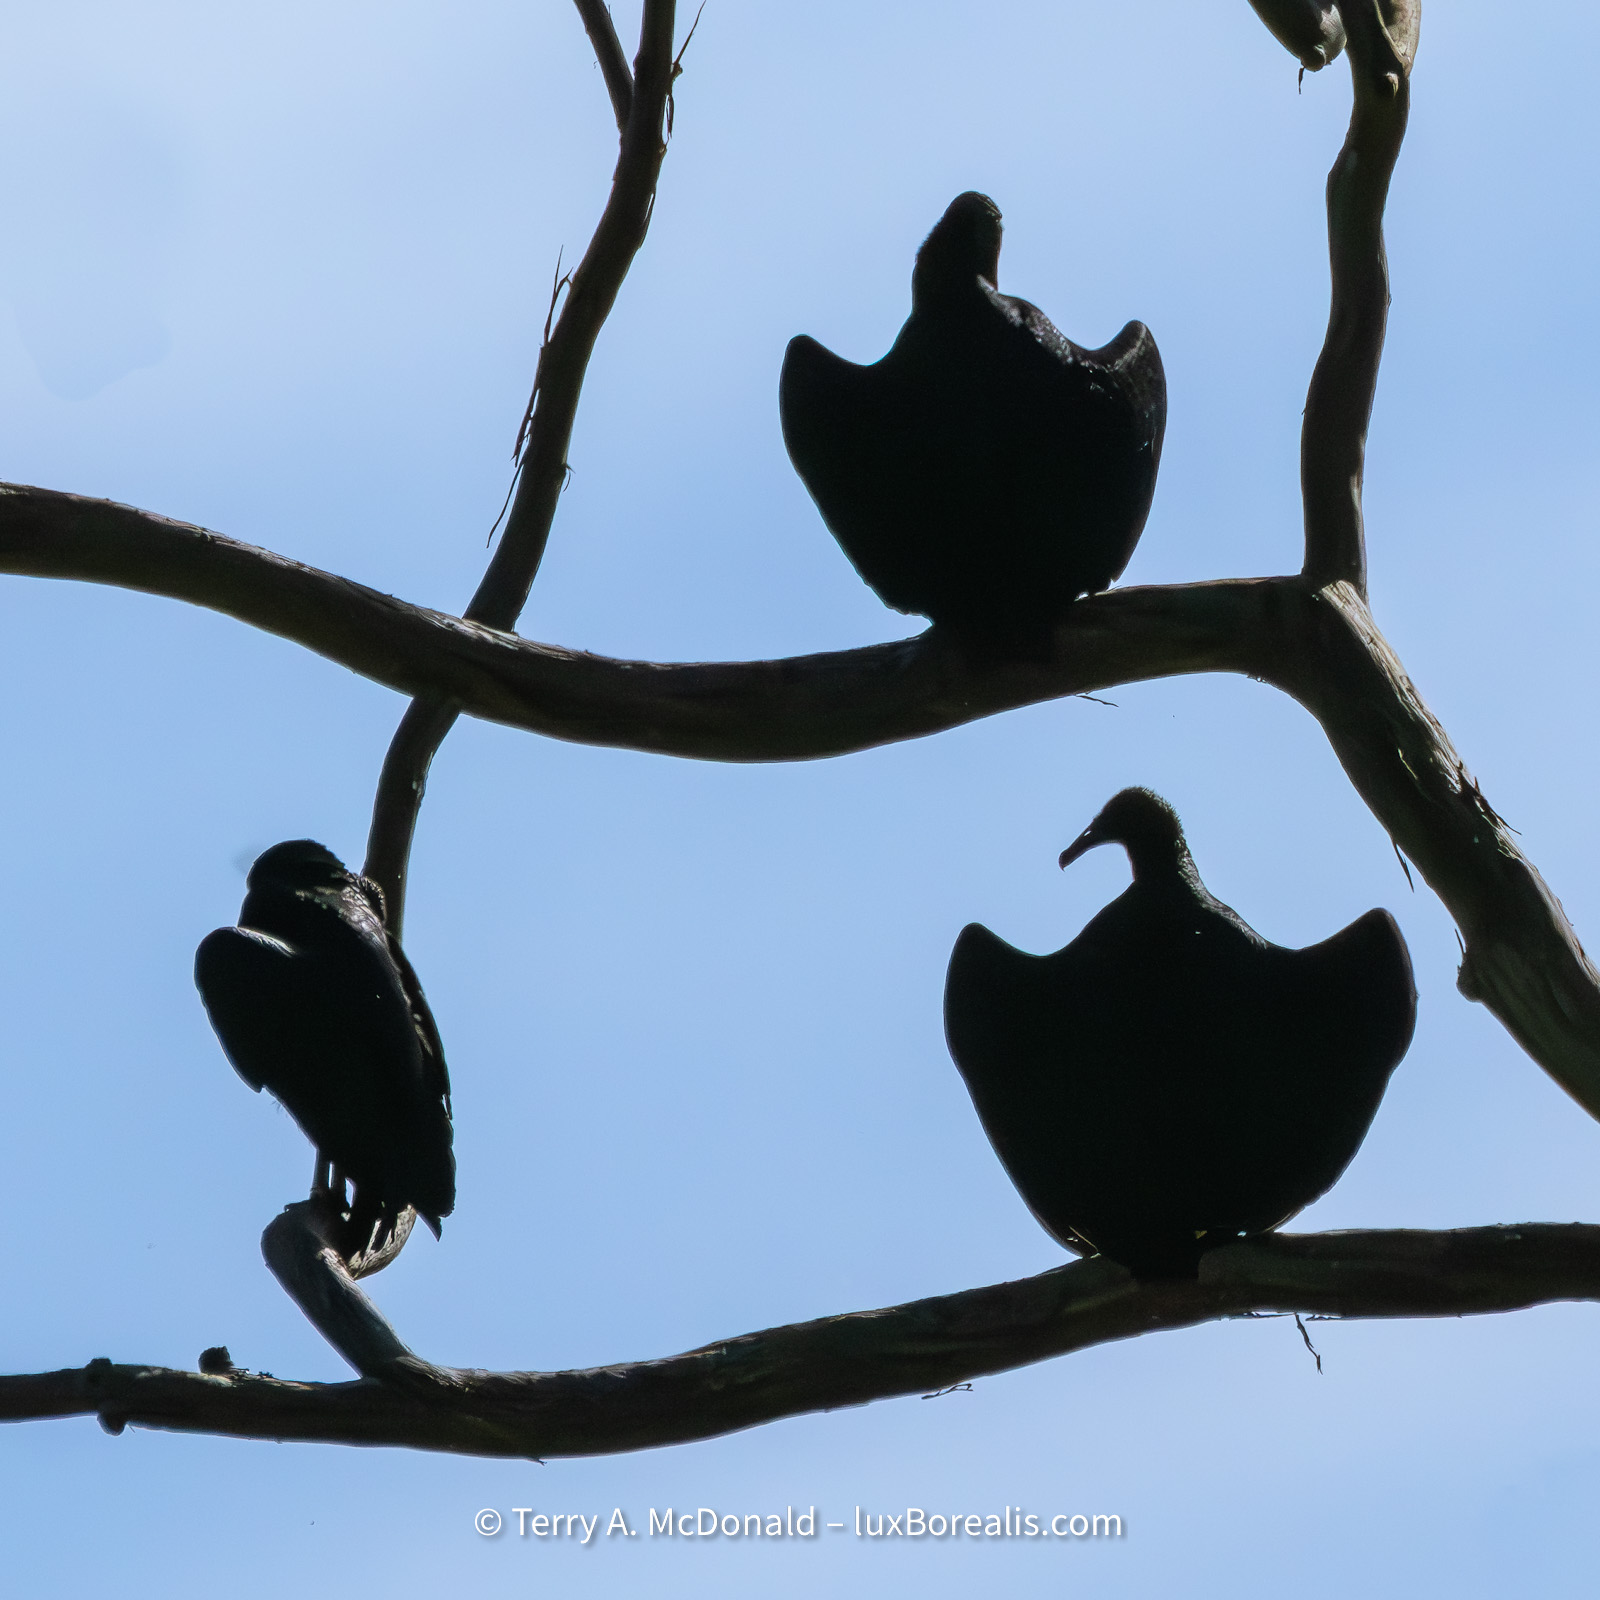
Perhaps the most memorable moment of the trip was stopping along a highway busy and loud with transport trucks carrying bananas and pineapples to the port of Límon. The show was happening above us: thousands upon thousands of turkey vultures, black vultures, broad-winged hawks, and Swainson’s hawks were migrating—swirling and kettling and streaming above us. We often see videos of the caribou migration in the Arctic or the wildebeest migration on the Serengeti Plain; this is just as impressive. The sky was filled with large raptors. Phenomenal.
Throughout the past few weeks I was constantly reminded of how exquisitely intricate, connected, diverse, and beautiful nature is, and how vulnerable it is to our disturbing human influences.
Costa Rica is regarded around the world as a gem of biodiversity, but even it is on the edge. National Parks, the only way to actually protect tracts of land large enough for wildlife, are woefully underfunded. And, like in Canada, unless protected by conservation movements, land that’s not in a national park is fair game for just about any development that comes along.
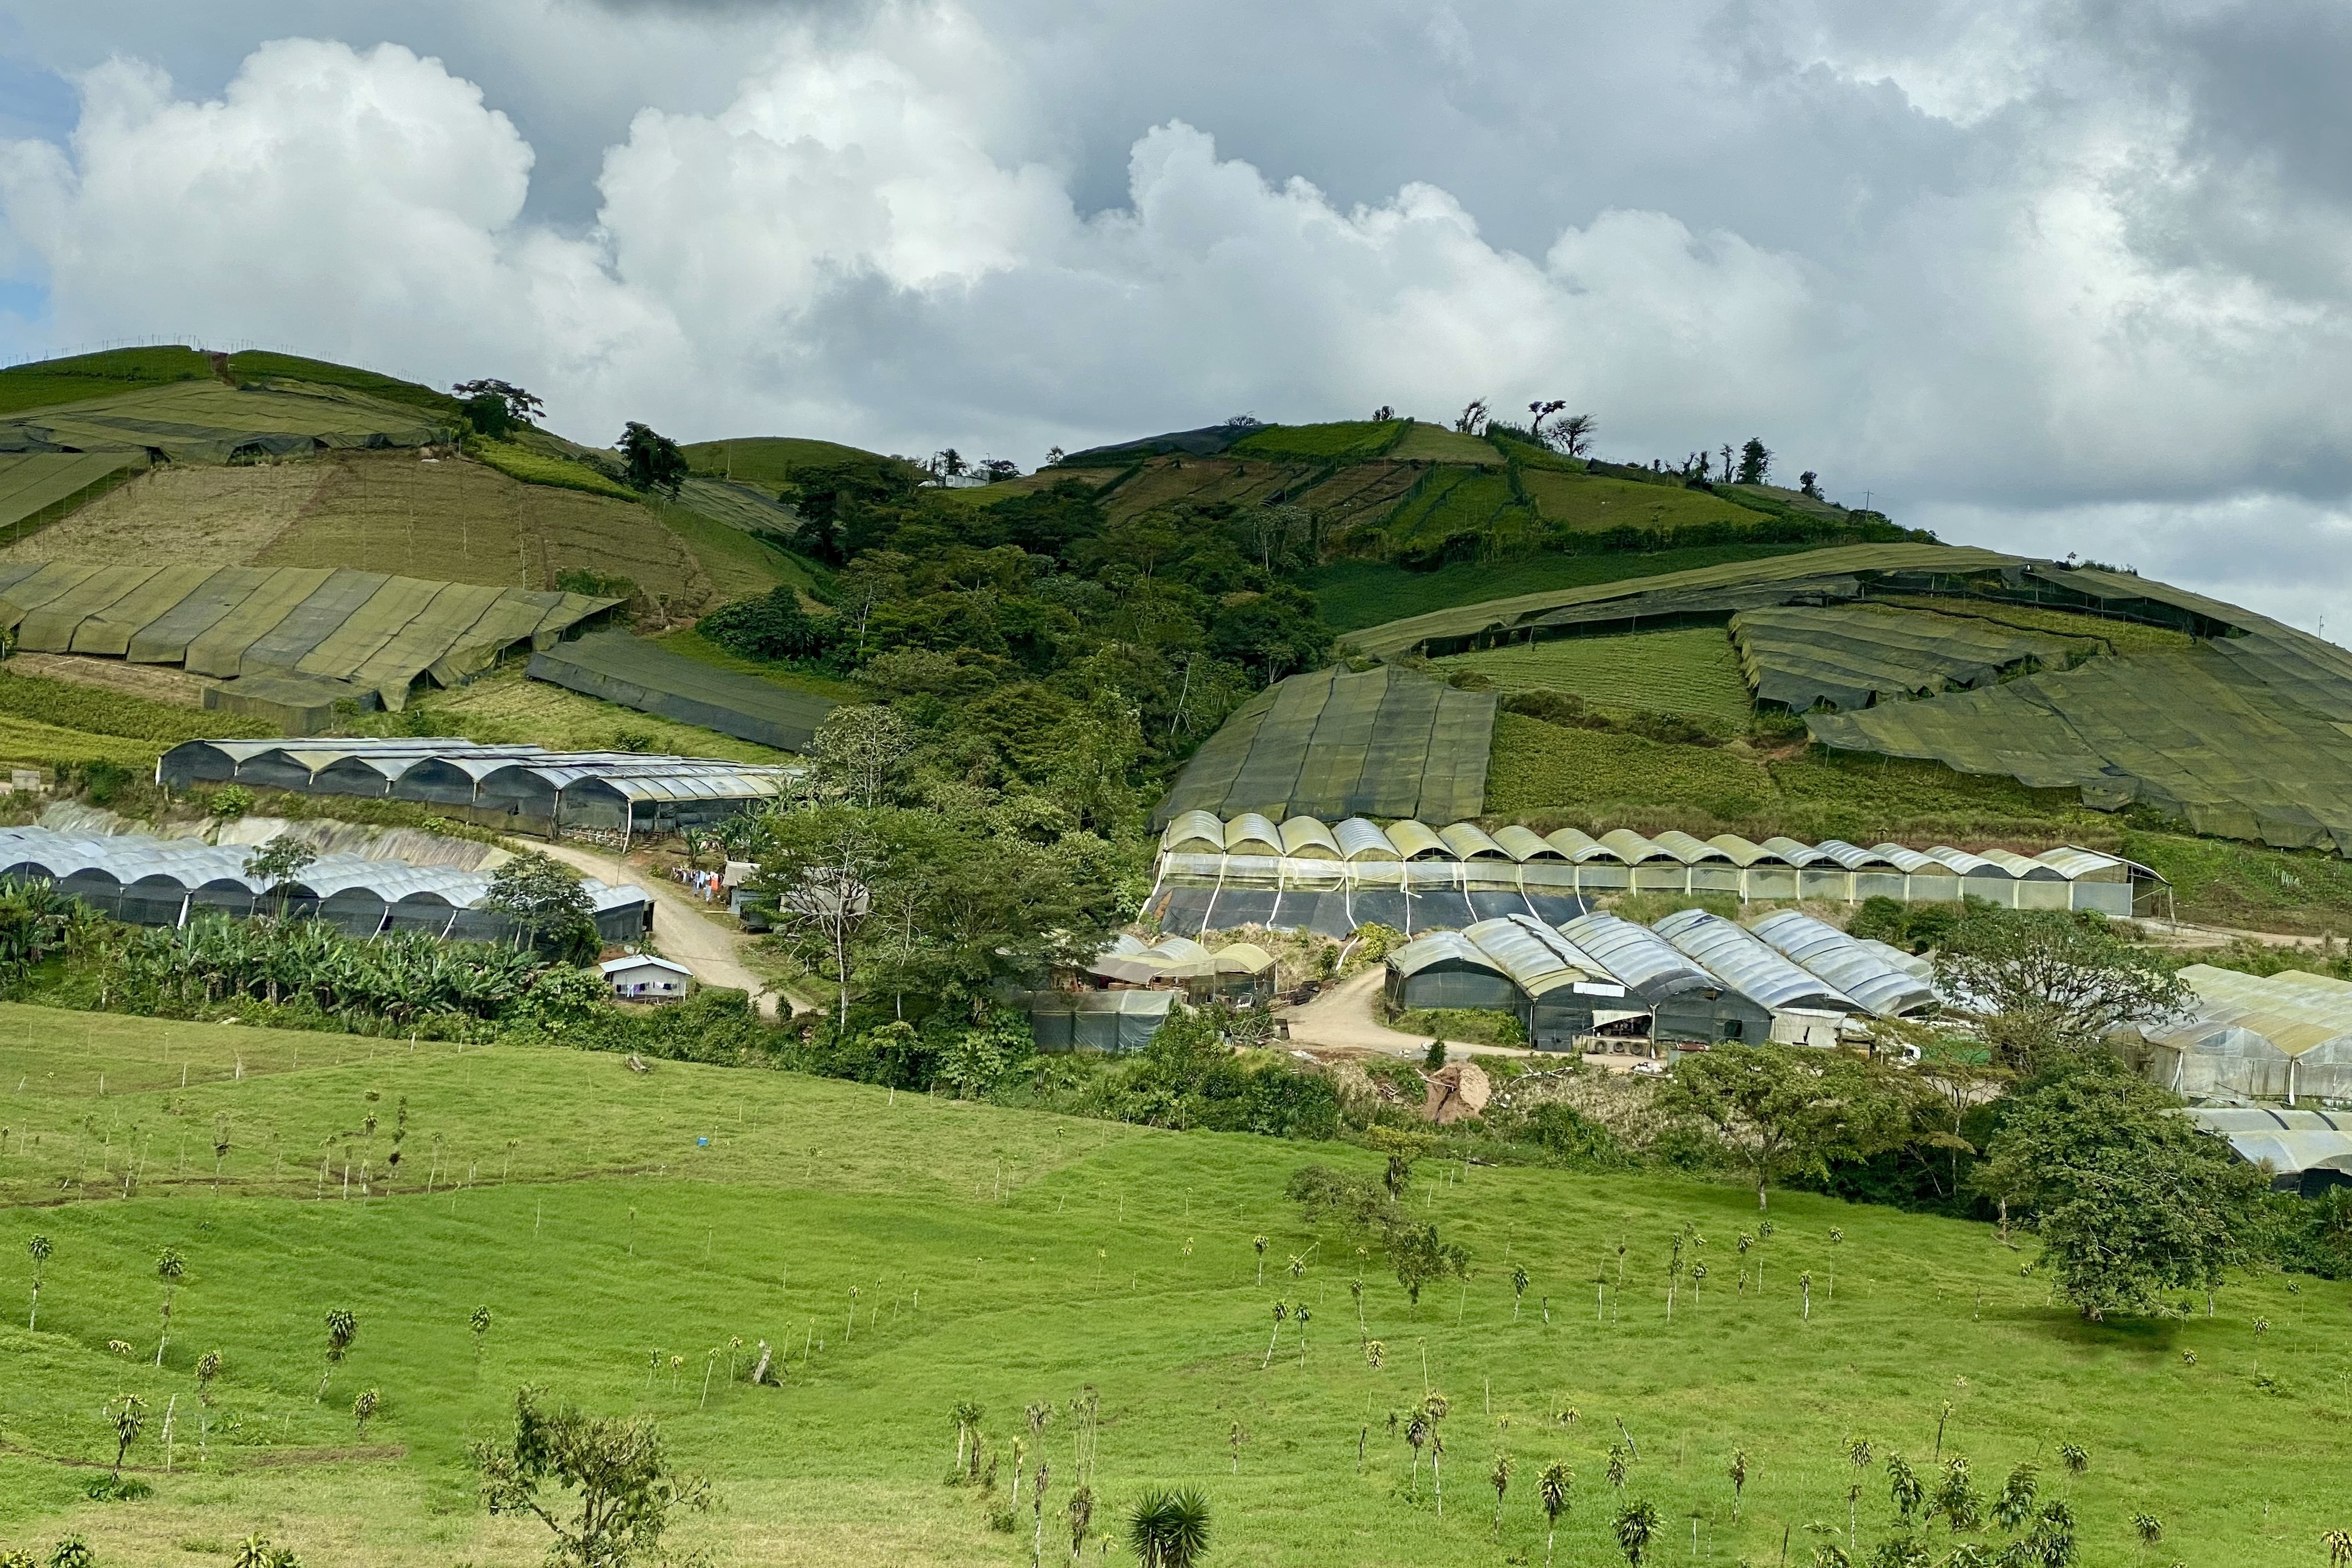
Much of Costa Rica is farmed and cash crops are their agricultural staple. We passed thousands of hectares of plantations: oil palm, bananas, pineapple, coffee, coconuts, sugar cane, papayas, mangoes. I’m not being critical of this, especially considering our ‘plantations’ of soybeans, corn, wheat, oats, flax, lentils, not to mention all the thousands of square kilometres of monocultural tree plantations across our country. But, to our collective surprise, we learned that Costa Rica has the most intensive use of pesticides of anywhere in the world, on a per capita basis. We watched as farm workers aggressively sprayed crops, by hand, with no protection other than the clothes they wore, rubber boots, and an apron. Some had gloves. None had masks. Scarey!
iPhone 11 Pro
Every wonder where your tropical house plants come from? Costa Rica is not all cloud forest and rainforest! A significant area is farmed for palm oil, bananas, and pineapples, amongst others. Oil palm plantations are the worst, though. We really need to stop using palm oil.
But Costa Rica is well-forested, right? It is, but half of the forested area is secondary forest. This means that, just like in southern Ontario, the original forest has been cut down. As ecosystems go, secondary forest may look good, but it is very incomplete. The point is, Costa Rica is green, but all is not as good as it seems. Eco-tourism is fundamental to Costa Rica, but there is also a lot of greenwashing going on.

OM-1 | 123mm (246mm efov) | ƒ8 @ 1/250 | ISO 400 | Lightroom
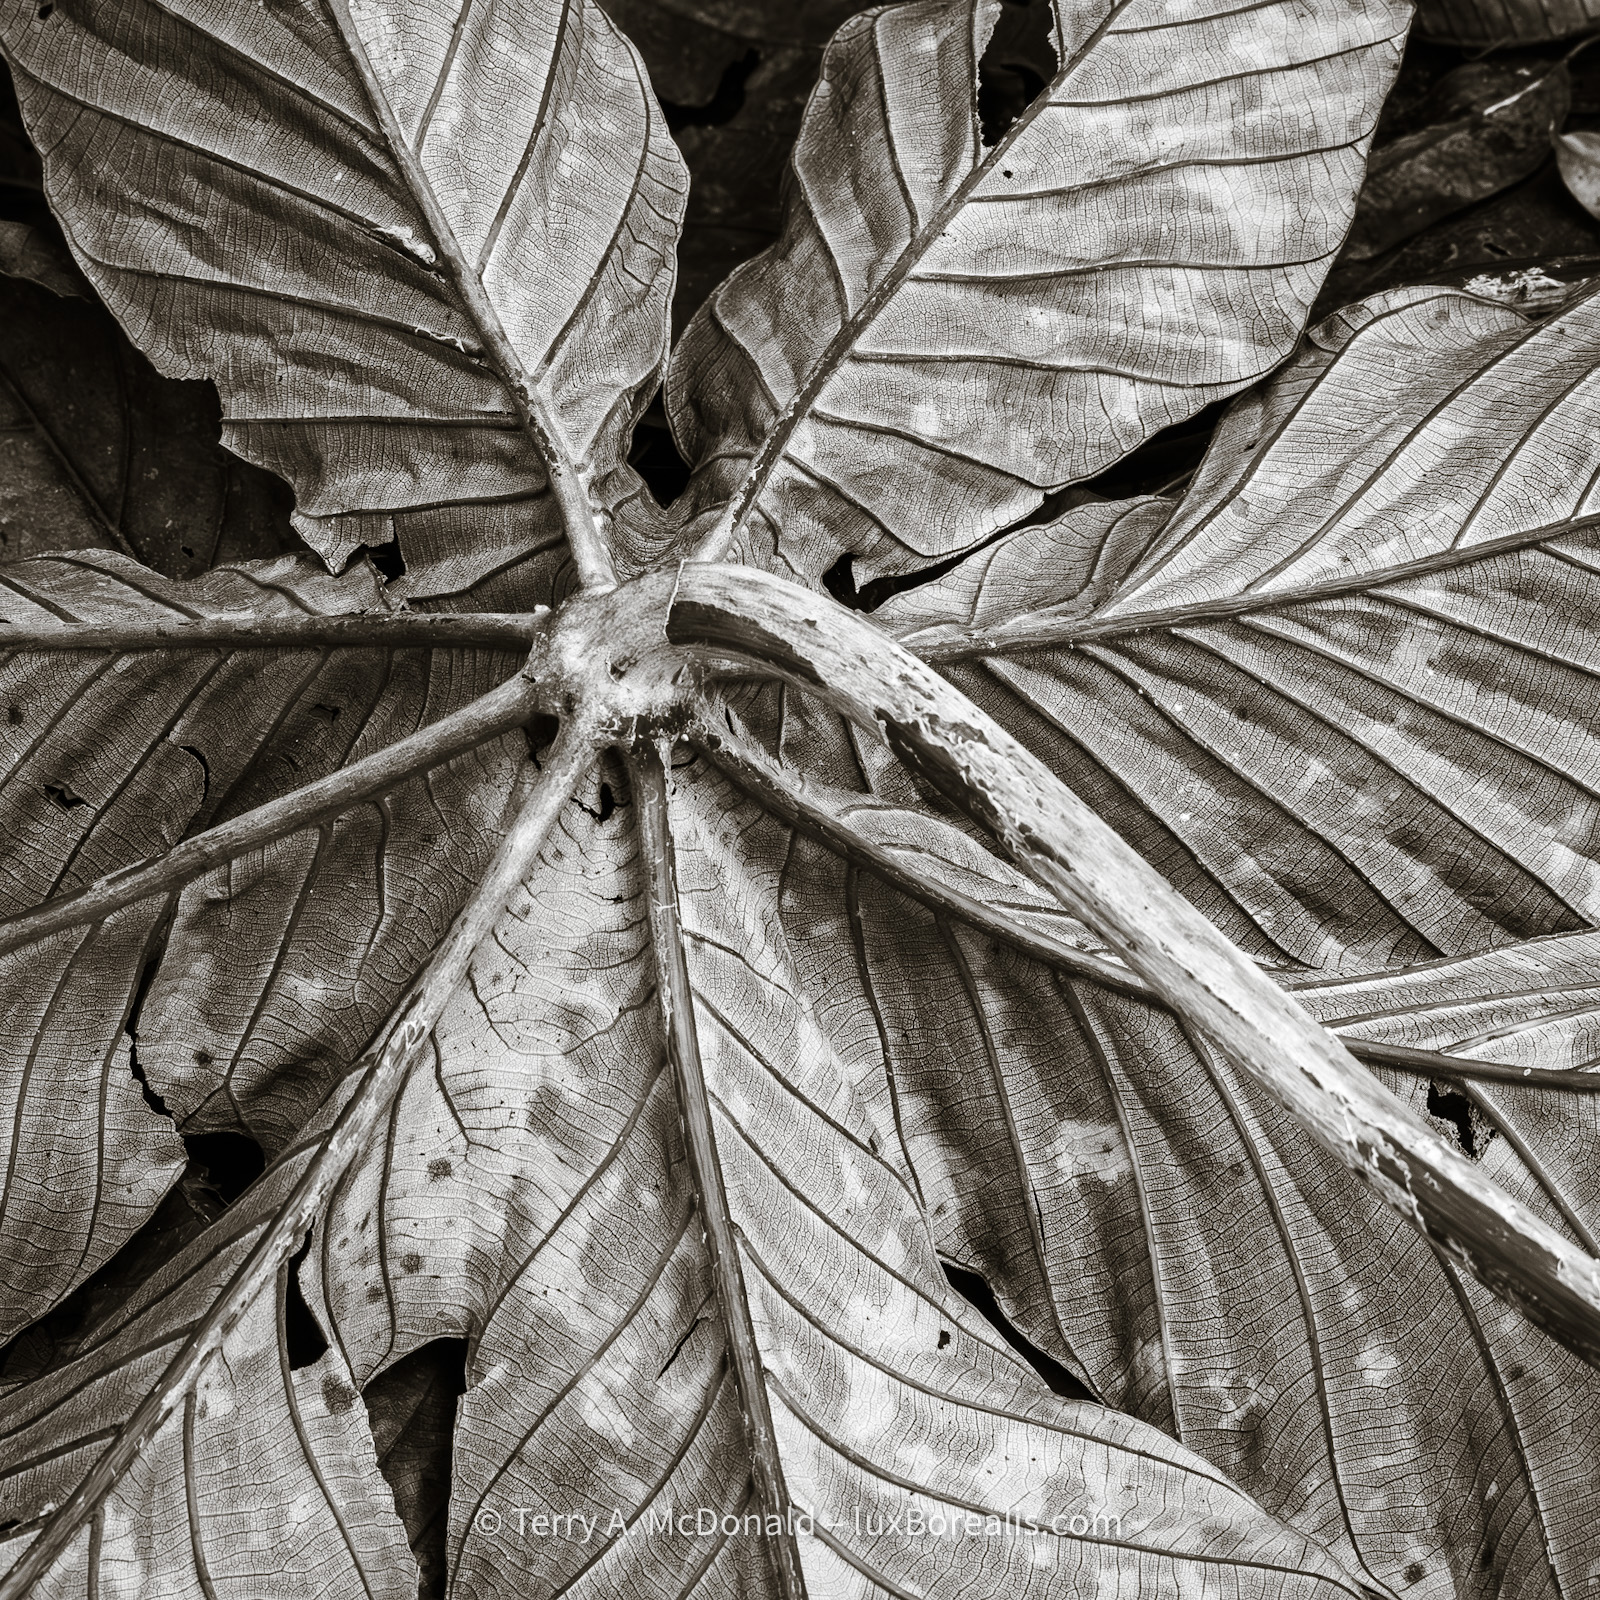
Rainforest leaves and vegetation are renewed regularly and quickly. Seeing a growing leaf with moss and lichen on it really stands out from the the shiny, new leaves of all the vines, lianas, shrubs and trees.
Why am I telling you this? Partly for context, but also to say that the incredible biodiversity that still exists in Costa Rica is highly vulnerable. Tourism that involves seeing wildlife and birds in their natural habitats definitely helps maintain ecosystems by providing reasons for protecting that biodiversity. However, mass- and over-tourism with the subsequent demands by tourists for food, water, extravagant accommodations, and sewage disposal all lead to an erosion of that diversity. It’s a balancing act that, so far, Costa Rica is doing okay with. Hopefully that will continue.
In Canada, when our governments don’t properly protect significant habitats, at least we have land conservancies and land trusts that use public contributions (that’s you and me!) to purchase ecologically significant parcels for permanent protection (Nature Conservancy of Canada, Bruce Trail Conservancy, Escarpment Biosphere Conservancy, to name just three). This idea is just getting off the ground in Costa Rica. One such organization is Cerulean.org: a group of like-minded, ecologically-conscious researchers who have joined forces to begin the process of protecting land essential to migrating birds and endemic species alike. They will soon begin fundraising to secure the beginnings of a new and critical nature reserve.

iPhone 11 Pro
Due to the fast decomposition of leaf litter and recycling of nutrients, the soil in rainforests is poor and thin, forcing trees to spread their roots near the surface. To better anchor themselves, trees develop massive buttressed roots, an idea borrowed by the cathedral-builders of Western Europe. The trees also rely on the surrounding forest to reduce the impact of winds.
Okay, enough waxing; let’s see more photos. For your viewing pleasure, I’ve set this up as a gallery that you can scroll through without having to come back to this text. Unless otherwise stated, all photographs were made with an OM Systems ‘Olympus’ OM-1 with the M.Zuiko 100-400mm IS zoom lens and processed in Lightroom. I really need to credit the outstanding IBIS stabilization of the OM-1 as well as its sensor. With 20 MP packed into a Micro FourThirds sensor, I am always amazed at the image quality, even at ISO 12,800. Thanks OM Digital Solutions and Lightroom denoise for helping me to look good!
I’ve included some notes in the captions, but if you have any questions about the animals you see or the techniques or equipment used to make the photographs, be sure to add a COMMENT or send me an email.
This blog is completely free and I do not include commercial affiliate links. To help keep it free, consider buying me a coffee. And, feel free to hit the SHARE button up in your browser to pass it along to others.
Click on any photo to open the Gallery. Camera settings are available by selecting the i button in the Gallery.
For more photos, see my two early posts about Costa Rica:
- 19 Oct: Photographing in the rainforest is bloody difficult, but oh so satisfying!!
- 25 Oct: Update: Bird Photography in Costa Rica


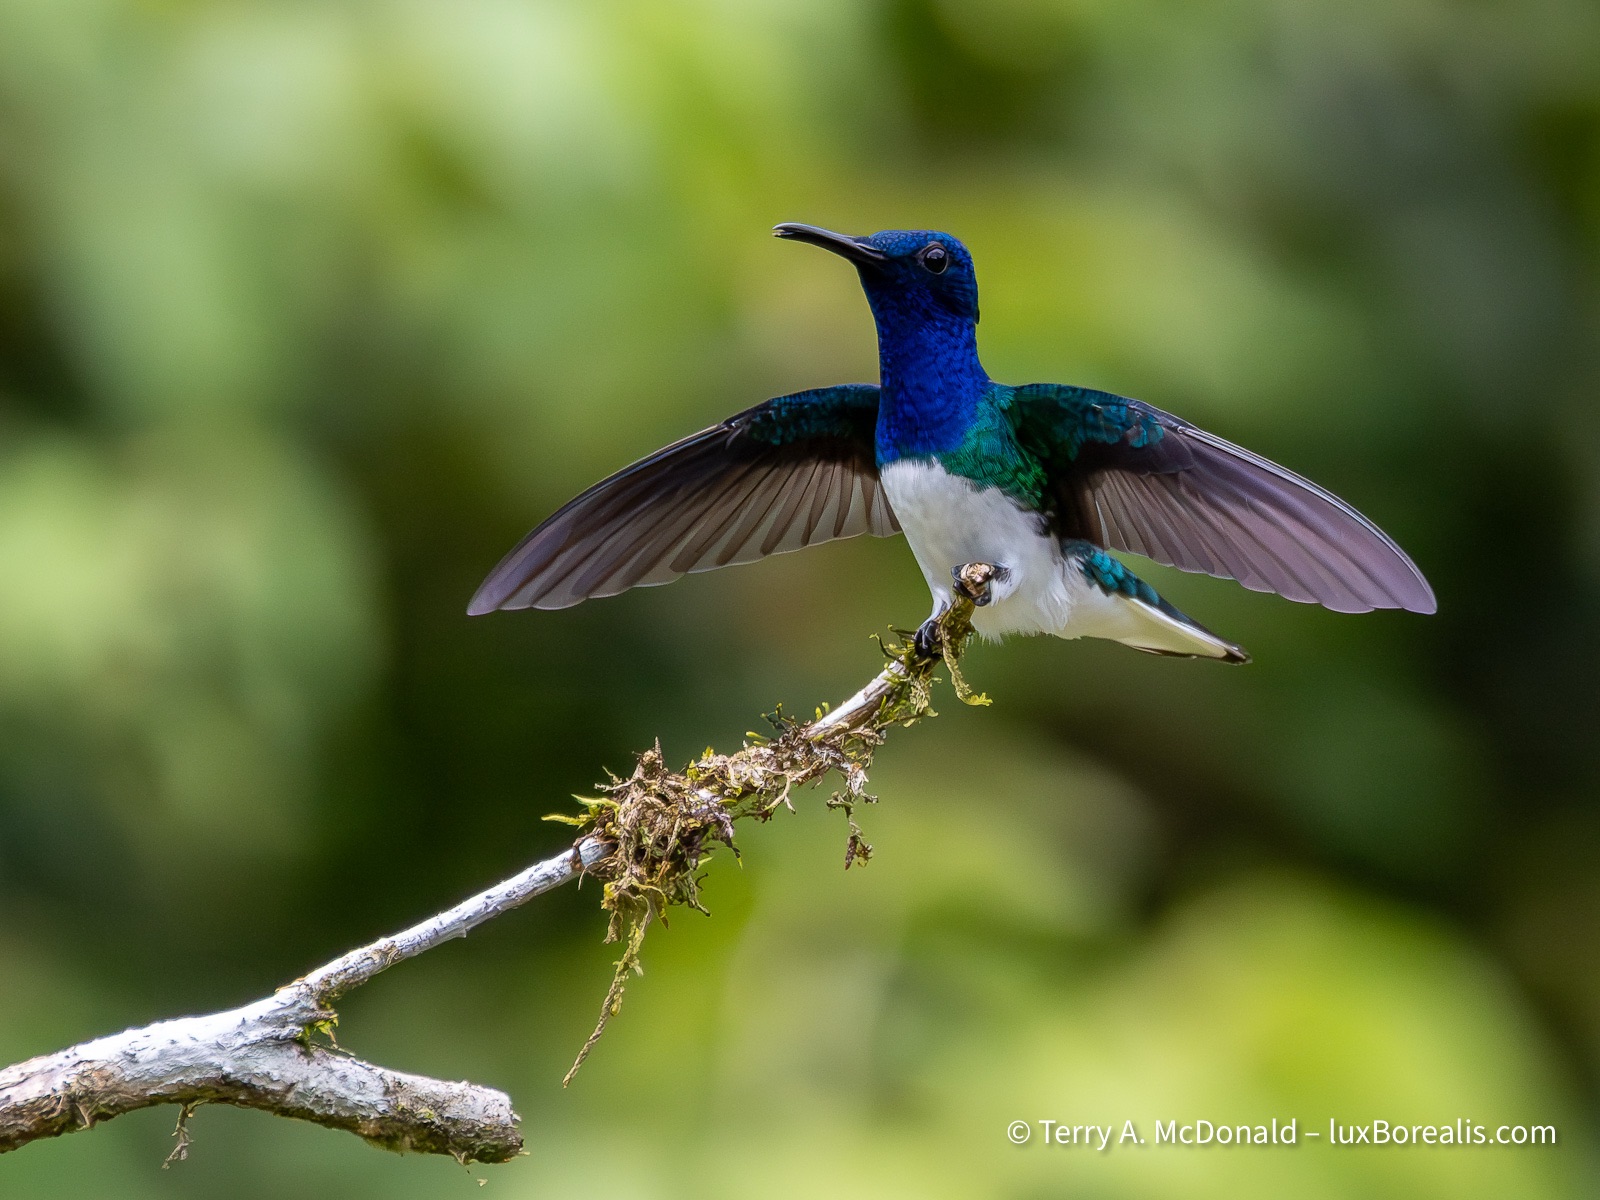
Even the immature male is colourful.

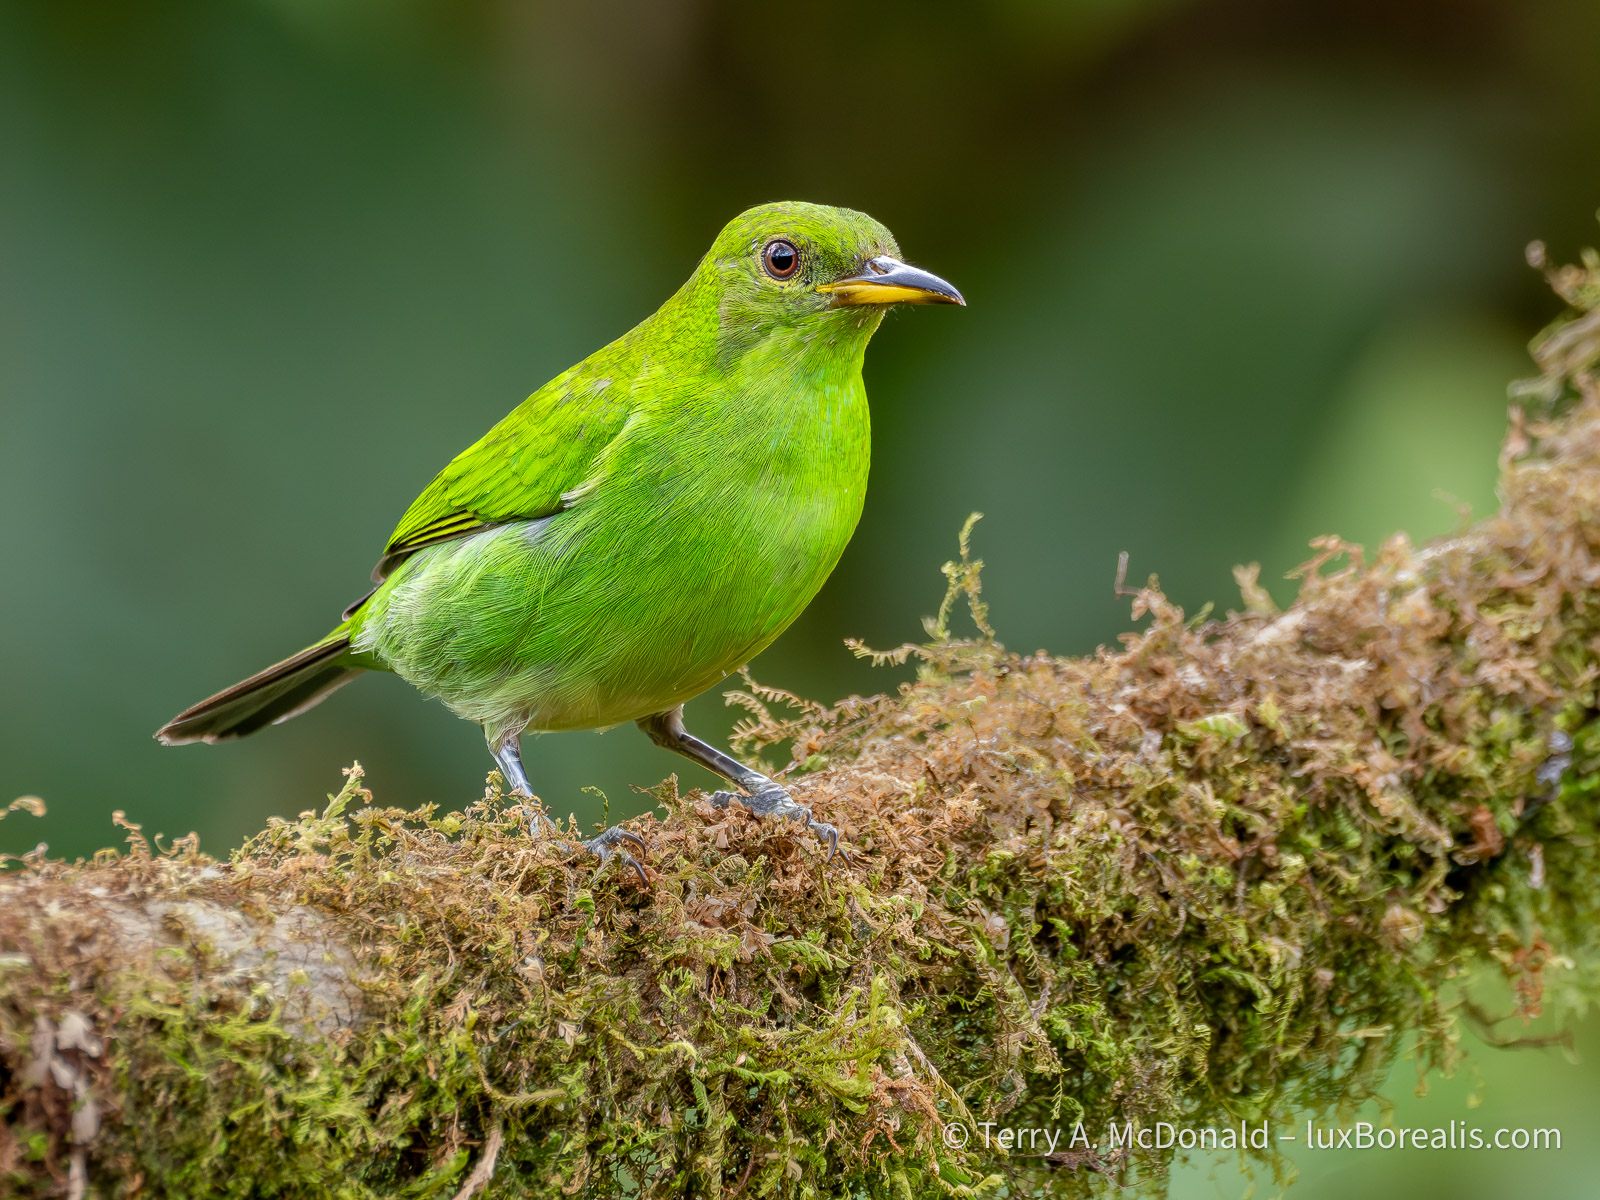
If you think this is green, wat ’til you see the male . . .

Neon tourquoise!


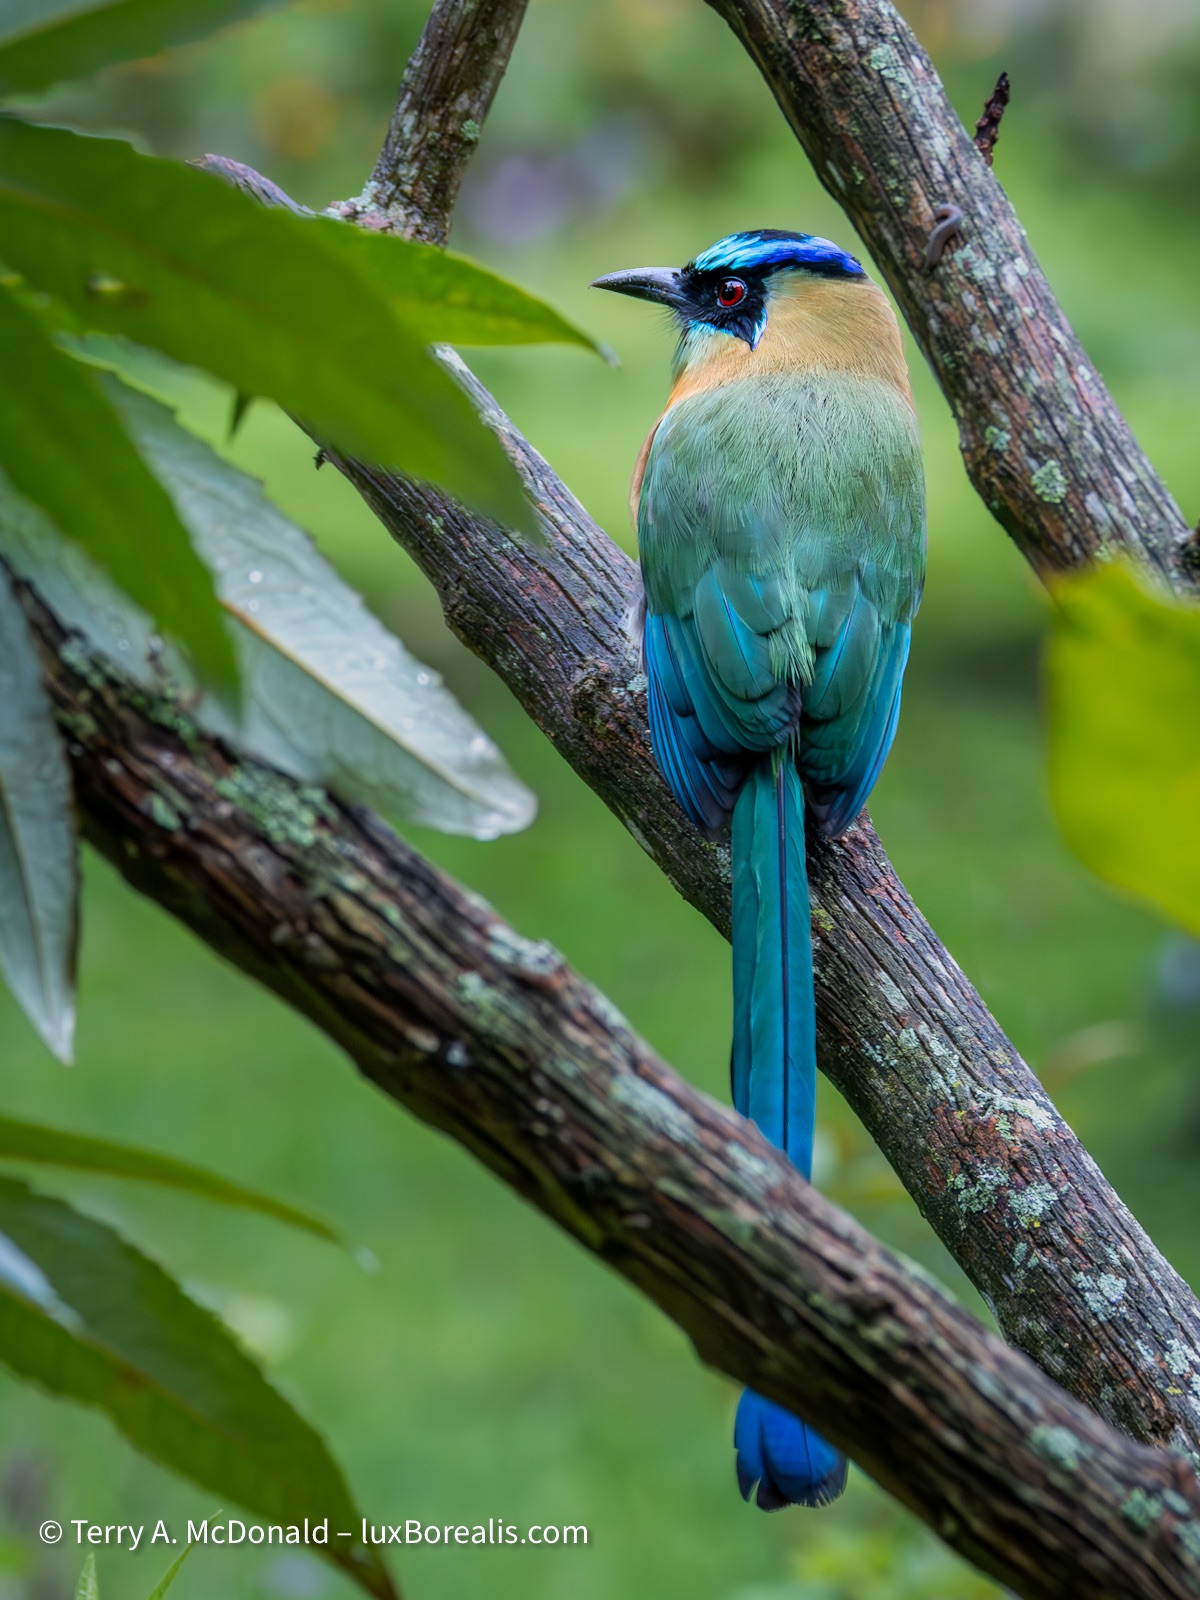
A quiet, forest bird which communicates with a quiet, owl-like ’mot-mot’.

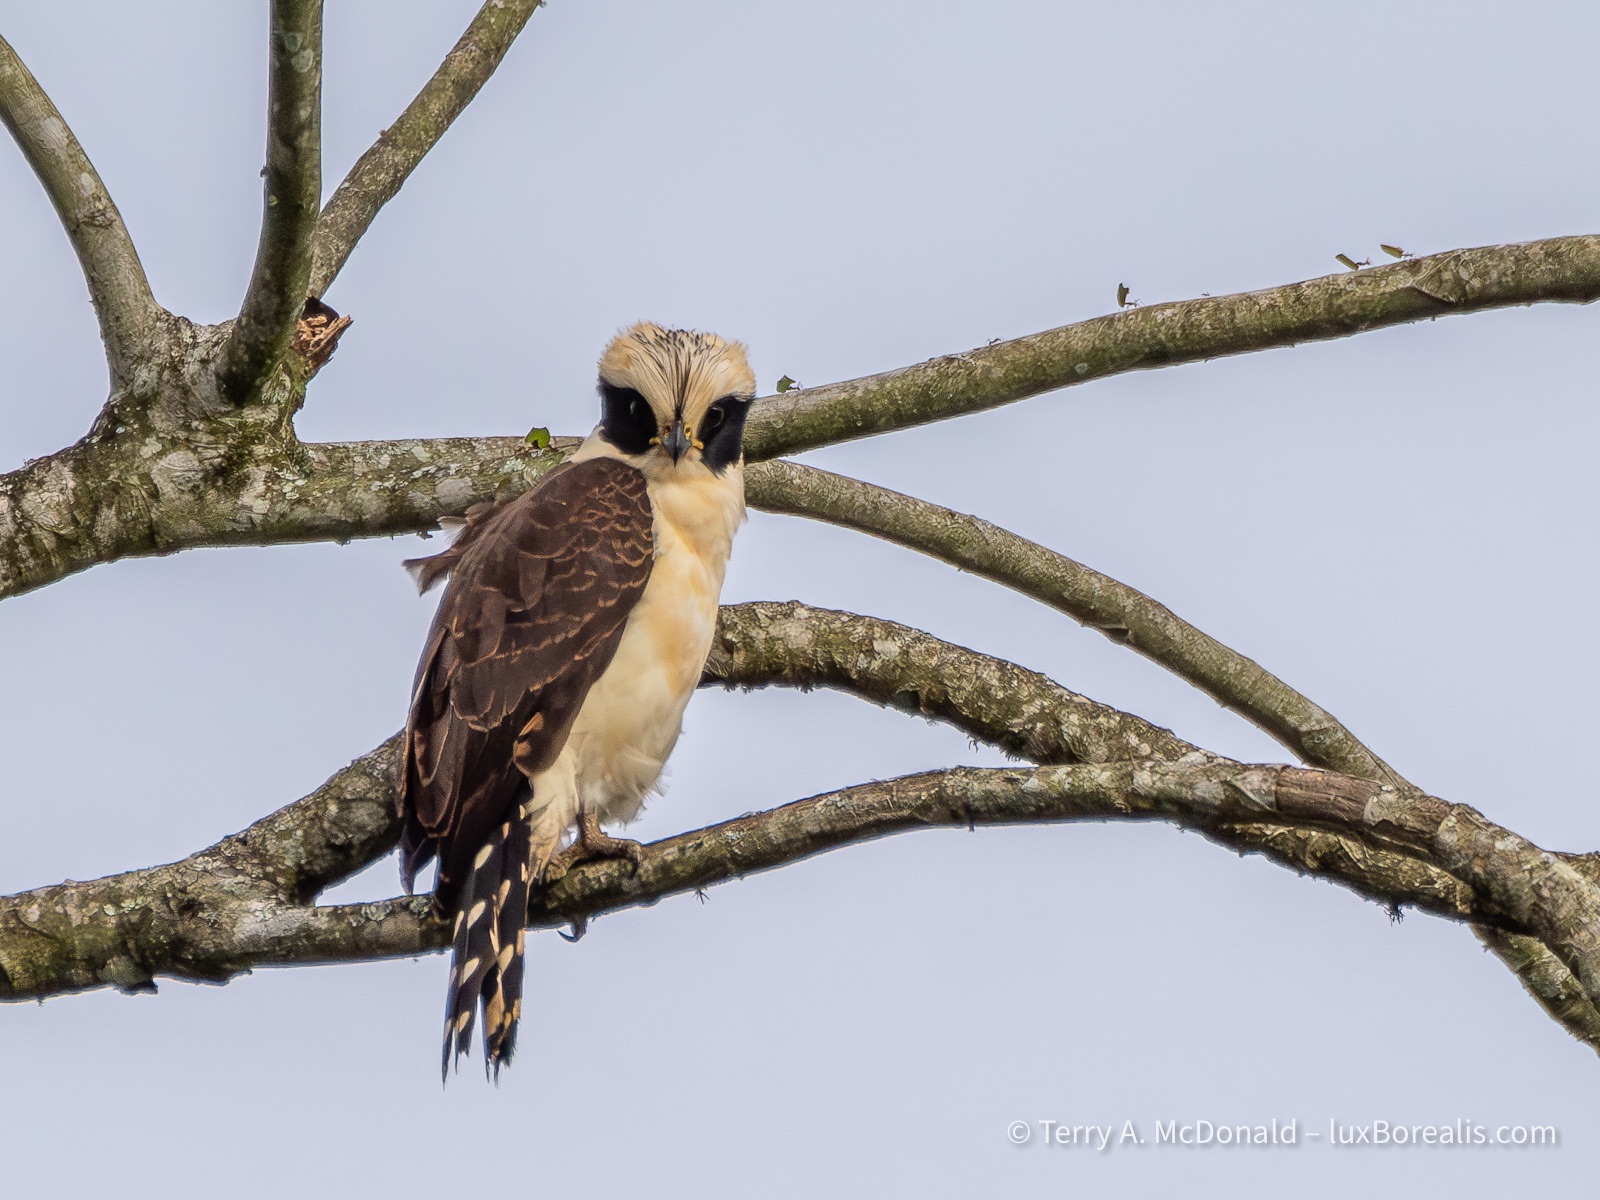
This must be the happiest, most content-looking animal around.

How our guide Ernesto saw this snake is incredible. It is only the width of a baby finger and maybe a hand-span long and was twirled around a tree, in the pitch dark.


This ‘fellow’ slowly navigated along telephone wires, past hibiscus flowers and leaves, to enjoy a meal of morning glory leaves.

This is the largest kingfisher in the Americas, as opposed to . . .

. . . the smallest kingfisher. This one was buried deep in the rainforest of Cahuita National Park.


This bird is the size of a turkey. I was only a few metres away, yet in the thick foliage and deep shadows of a 3m shrub, it completely disappeared.


This magnificent jay was the focus of some serious searching below the slopes of the Arenal volcano.
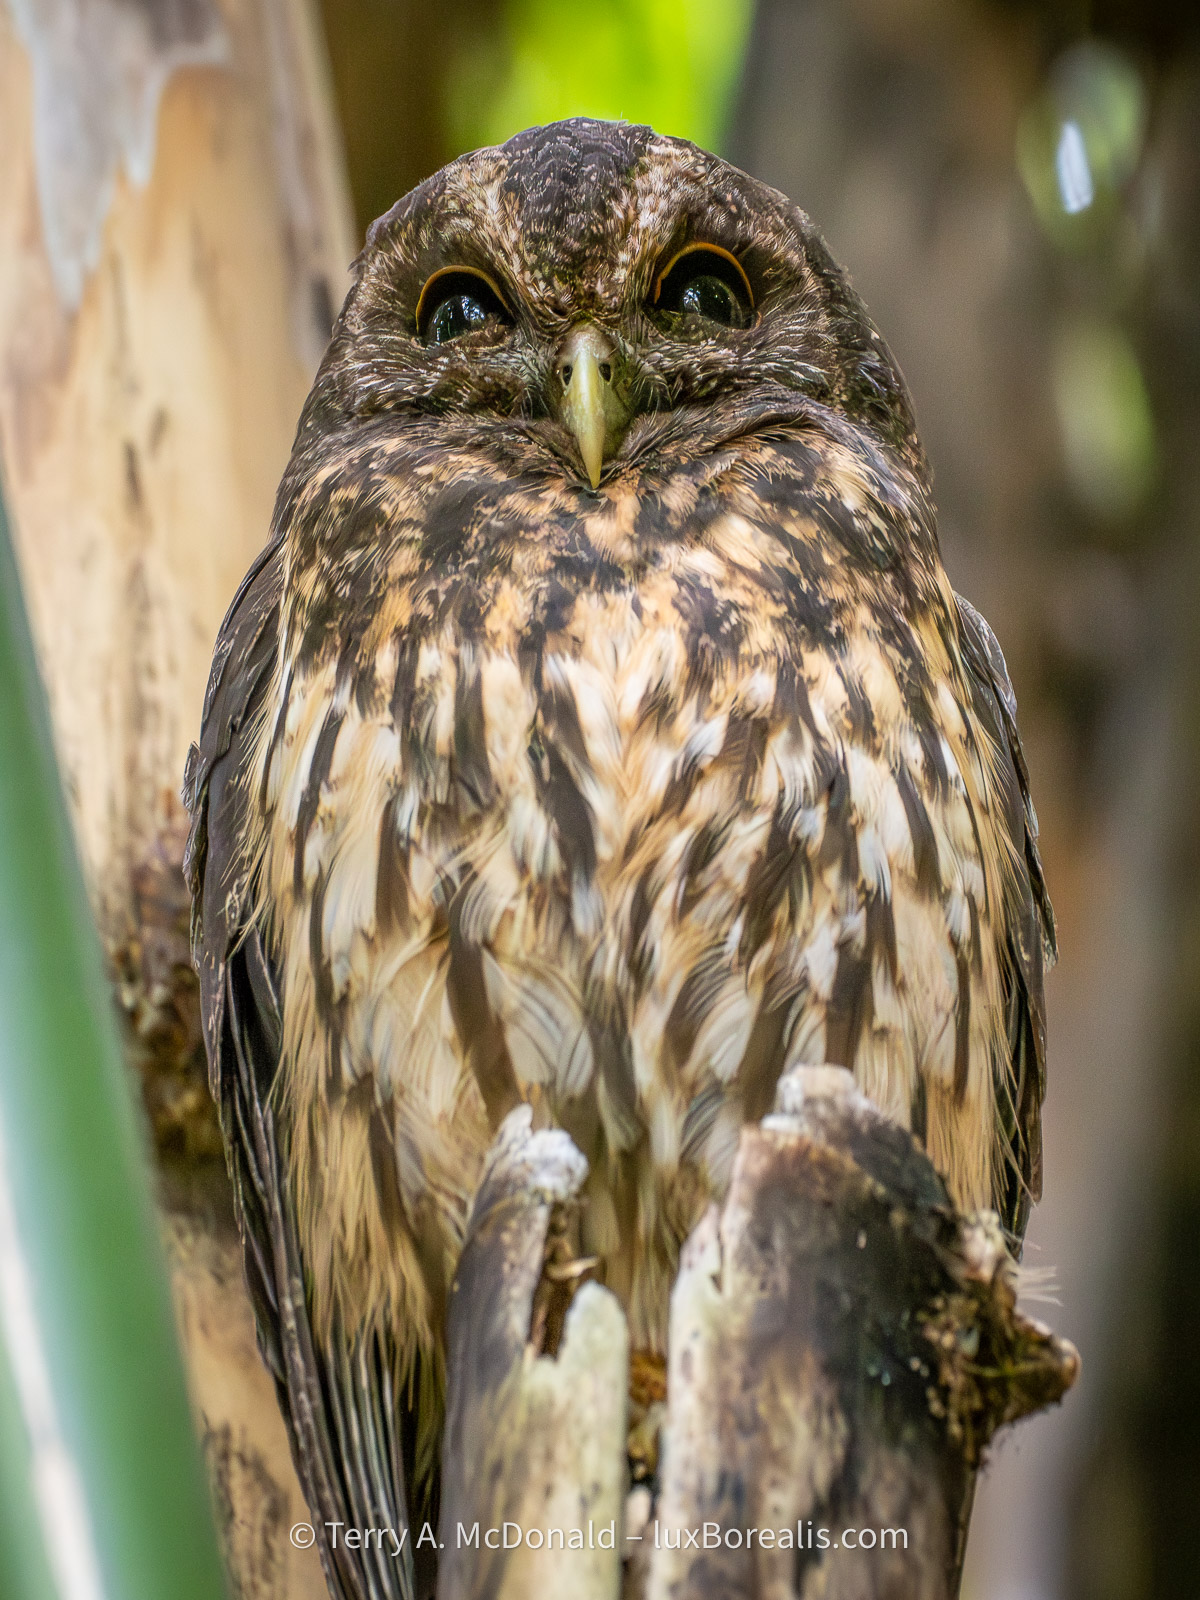
A gardener at Hotel Bougainvillea pointed out this owl and its mate to us, buried deeply in the 15m high stand of bamboo.
Affinity: Completely re-designed and absolutely free—forever—with a twist.

881 words; 5-minute read
Wow! Four weeks ago, Affinity put out a teaser that something big was on its way. We in the photographic community were fearful that a big, new, super-duper change would turn into subscription pricing. As it turns out, that’s only partially true.
A year ago, Affinity was (sadly) acquired by Canva, so subscription pricing seemed to be a certainty.
Guess what? The brand new Affinity Studio brings together Affinity Photo, Publishing, and Designer into one unified suite. And . . . “it is and always will remain completely free of charge”. That includes every update and new feature moving forward. This is truly significant!

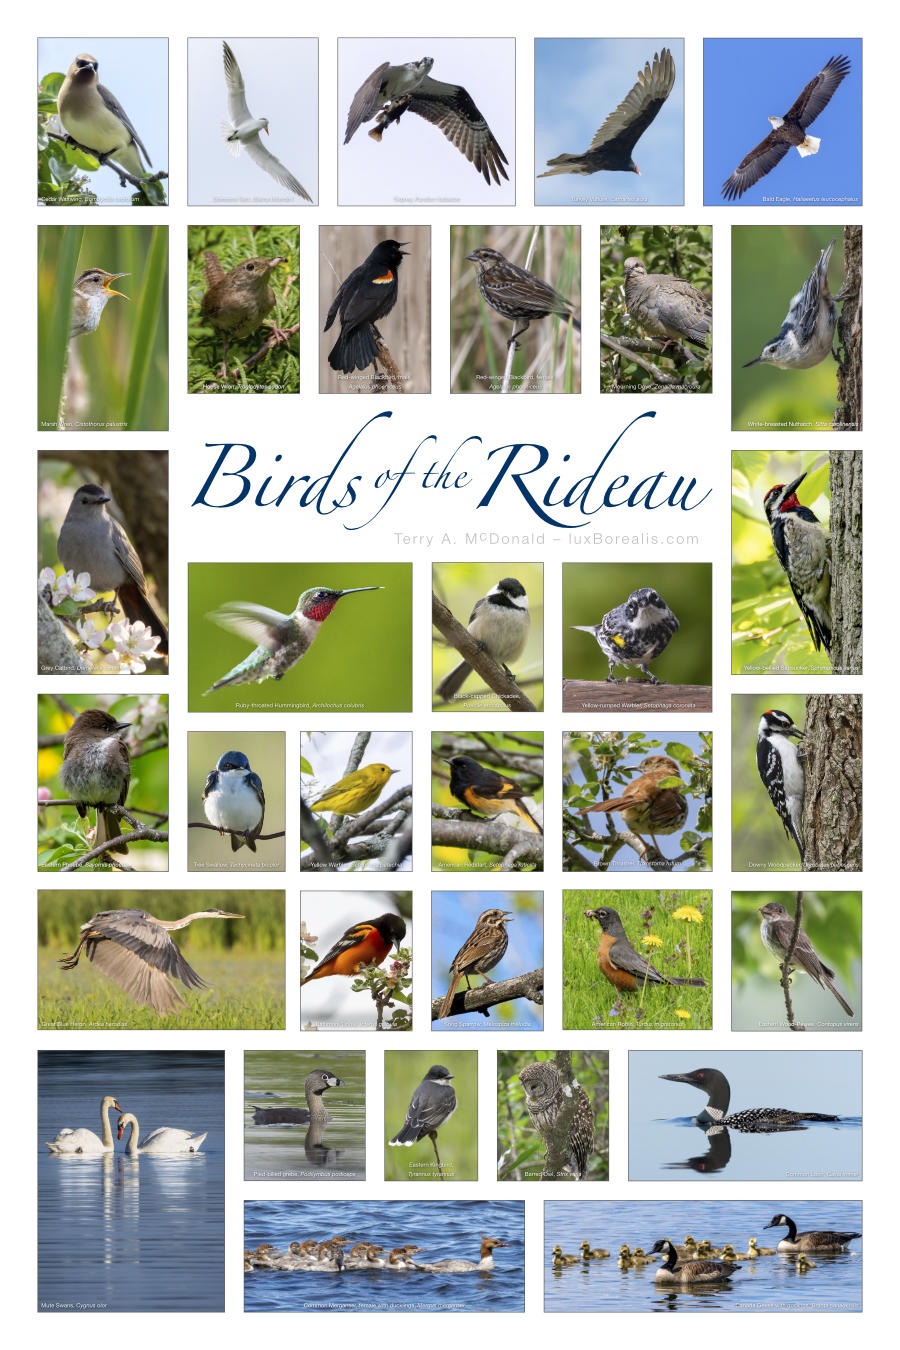
I’ve always liked Affinity. A year ago, I dropped Photoshop from my Adobe subscription saving about $10/month. Affinity Photo was a lot less expensive and does everything I need it to do. As well, I found it to perform better on iPad than Photoshop. I use the app for merging panos, HDR blending, and focus stacking, making composite images for blogs—all on iPad. Plus, it’s great when I need to create title graphics. I’ve also used Affinity Publisher to make multi-image posters, such as the Birds of the Rideau.
Now, the three Affinity apps—Photo, Publisher and Designer—have been amalgamated into one suite that offers Vector, Pixel and Layout workspaces. And it’s incredibly powerful, and free. It’s like getting a whole slew of Adobe apps—Illustrator, Photoshop, Acrobat, etc., etc.— all in one smooth and fast app. For free. ‘But,’ you say, ‘there’s no such thing as a free lunch!’ This time, there is.
If you’re not familiar with Affinity Photo, it is, arguably, the best Photoshop replacement. You can edit photos from raw in a dedicated workspace and output your images in just about any format, including Adobe Photoshop’s .psd files. You can do masking and filtering and all the amazing things you do in Photoshop, and more. For free! Users of Affinity Photo will find the upgrade to the Suite straightforward; just keep in mind that for photos, you’ll be working in the Pixel workspace.
Perhaps the one caveat is that Affinity Suite is being marketed to ‘creatives’ as opposed to ‘photographers’. If you watch the Keynote video or the Intro video, you’ll see what I mean. Photo editing is still a mainstay of the app, however, with everything Affinity Suite can do, it really is for those who are doing far more than editing raw files, including making posters, books, graphics of all inns and just about anything that uses photos, raster and vector graphics.
The other big difference, though, is AI. Like the old Affinity Photo, the new free version, Affinity Suite, does not include AI. This suits me fine as, for my work in #RealWorldPhotography, aka #AuthenticPhotography, I’ve made the conscious decision not to include any form of generative AI. (Read my article Navigating the AI Juggernaut here.)
If you want to use Affinity and have AI available for generative fill, generative expand and generative remove, you will need to subscribe to Canva AI Studio. But, at $150/year, if AI is that important, you are better off using Photoshop with your Lightroom package. Not only is the integration seamless, but the price point is better.
I think Canva’s decision to price its Studio app as high as $150/year (= CAD 12.50/mo) is a bit surprising. Canva Studio AI will not draw Lightroom users away as, let’s face it, Lightroom is the de facto industrial-strength photo editing suite. And, adding Photoshop to Lightroom is only another $10/month, which makes it cheaper than Canva and includes 1TB of cloud space and Portfolio website design.
This seemingly high pricing is similar to Topaz’s decision to price its PhotoAI subscription as high as they do. Photo AI is about CAD $24/mo; Topaz Studio, which includes all their apps, is over $50/mo. I don’t understand the thinking behind this, as neither Canva nor Topaz have the same ‘industrial strength’ as Lightroom+Photoshop. DxO PhotoLab (reviewed here), which also carries a comparatively high price at about $28/mo or USD $239/yr, is also over-priced. Why have these companies priced their software higher than Adobe? I have no crystal ball, but my concern now is that Adobe will be jacking up their prices. Yikes! Let’s hope not.
So, what to do? First of all, Affinity Suite is only available for macOS and Windows; the iPad version is ‘coming soon’. If you’re happy with Affinity Photo, then upgrading to the free Affinity Suite may not be needed. However, if you are convinced AI is your route to better photography, then I suggest using Lightroom+Photoshop. At CAD $26/mo it’s also the most complete and the most competitively priced photo editing suite. If you have a Lightroom subscription and you’re happy doing #RealWorldPhotography with no generative IA, then stick with Lightroom plus Affinity Photo or upgrade to Affinity Suite, which is what I’ll be doing.
Thanks for reading. This blog is completely free and I do not include affiliate links. To help keep it free, consider buying me a coffee.
Be sure to SHARE with your photog friends and/or continue the discussion with a COMMENT or QUESTION.
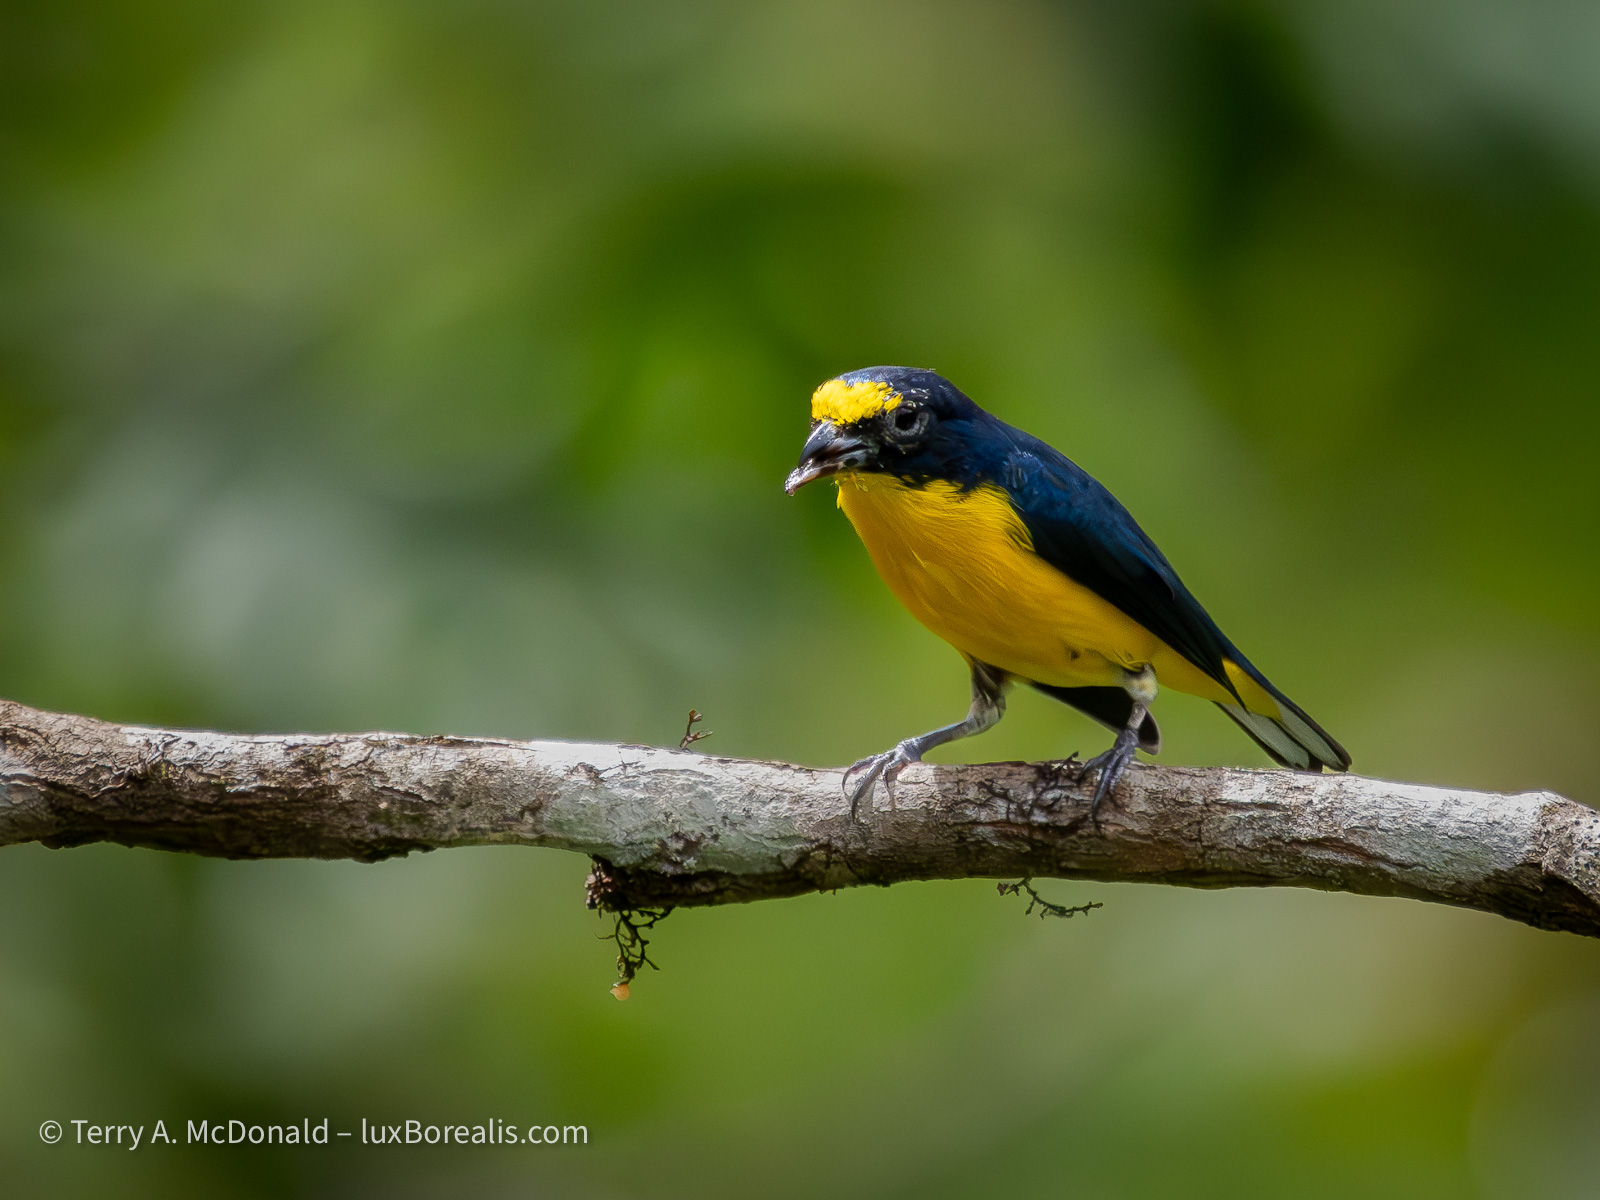
Update: Bird Photography in Costa Rica
2113 words; 17 photos; 11-minute read
Clicking on images will enlarge them.
Although it’s the rainy season, we’ve had more than our fair share of sunny weather. Up in the Central Valley and highlands, it was actually pleasant, with just enough cloud to soften shadows. But down here on the southeast Caribbean coast, just a few kilometres north of Panama, the sunny skies bring heat and humidity. The past two days have been scorchers!

OM-1 | M.Zuiko 100-400mm at 400mm (800mm efov) | ƒ11 @ 1/200 |ISO 6400 | Lightroom
This beauty is arguably the most sought-after bird in Central America. It feeds on wild avocados, swallowing the plum-sized fruit whole, then regurgitating the pit before retreating back into the canopy.
The birds here in Costa Rica are simply stunning. Our guides from Eagle-Eye Tours are on top of everything that moves or calls, with instant identifications. Ernesto Carman is from Costa Rica and knows not just the birds but is an encyclopaedia of natural and cultural history. Jody Allair, from Birds Canada, is amazing with the IDs, and both are quick on the scopes, providing us with clear views of distant birds. Even our driver Ricardo is a birder with a keen eye.
400mm | ƒ8 @ 1/5000 | ISO 6400 | Lightroom
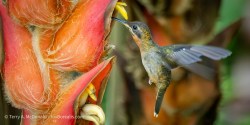
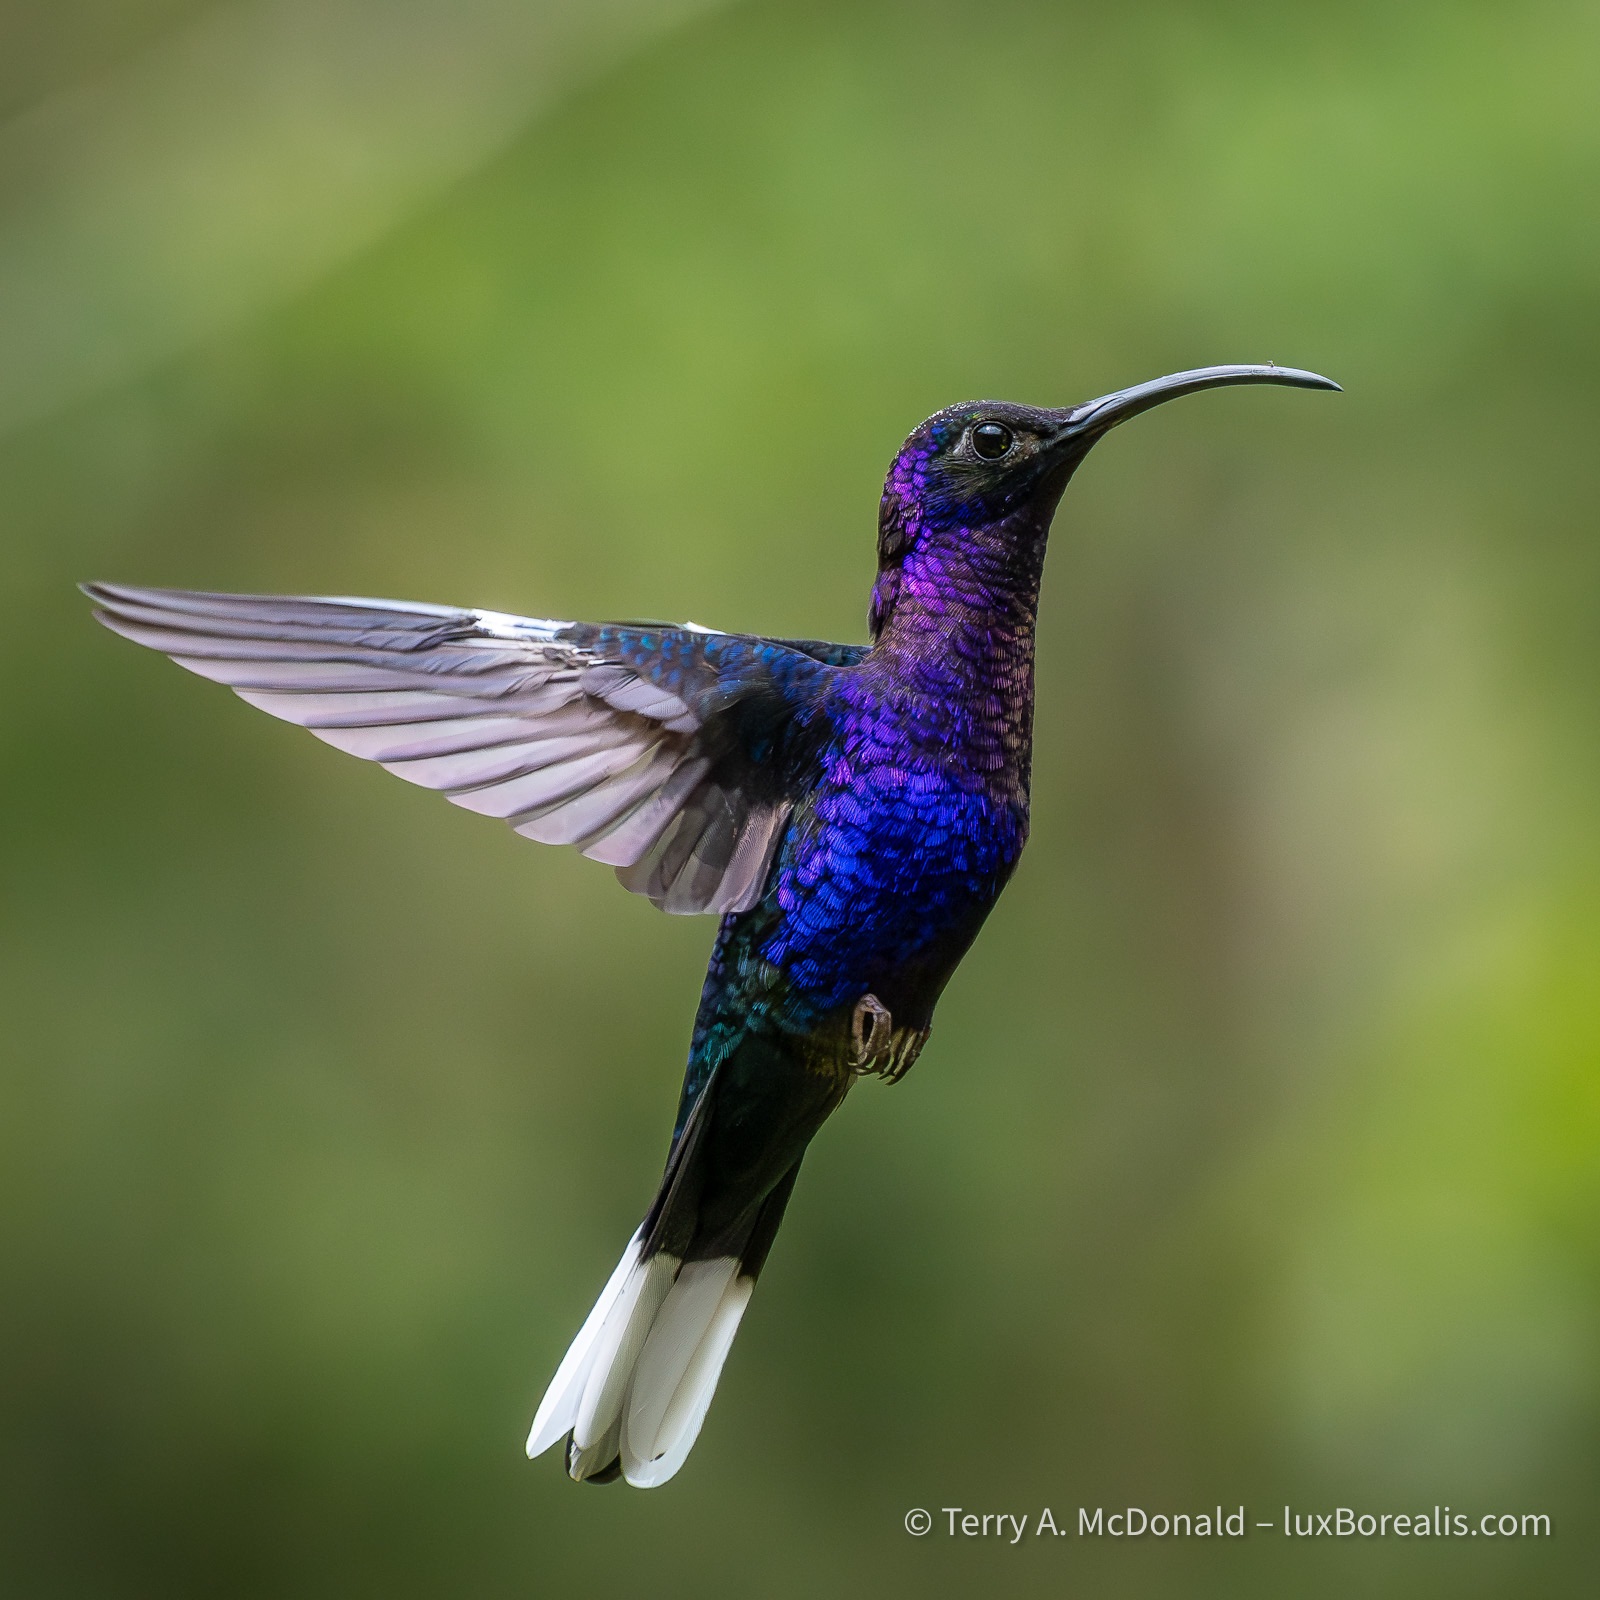
The hummingbirds are nothing short of magnificent and most of the time, predictable. They either have perches they return to, like this Jacobin, or like the Violet Sabrewing below, they hover away from the feeder for a brief second before and after feeding.
The folks we’re travelling with—a total of 12 —are also excellent birders. They are from across the continent from Vancouver Island to Toronto to south Texas and Arizona and bring with them a world of birding. It’s been great to share travel stories and experiences.
400mm | ƒ8 @ 1/2500 | ISO 1600 | Lightroom
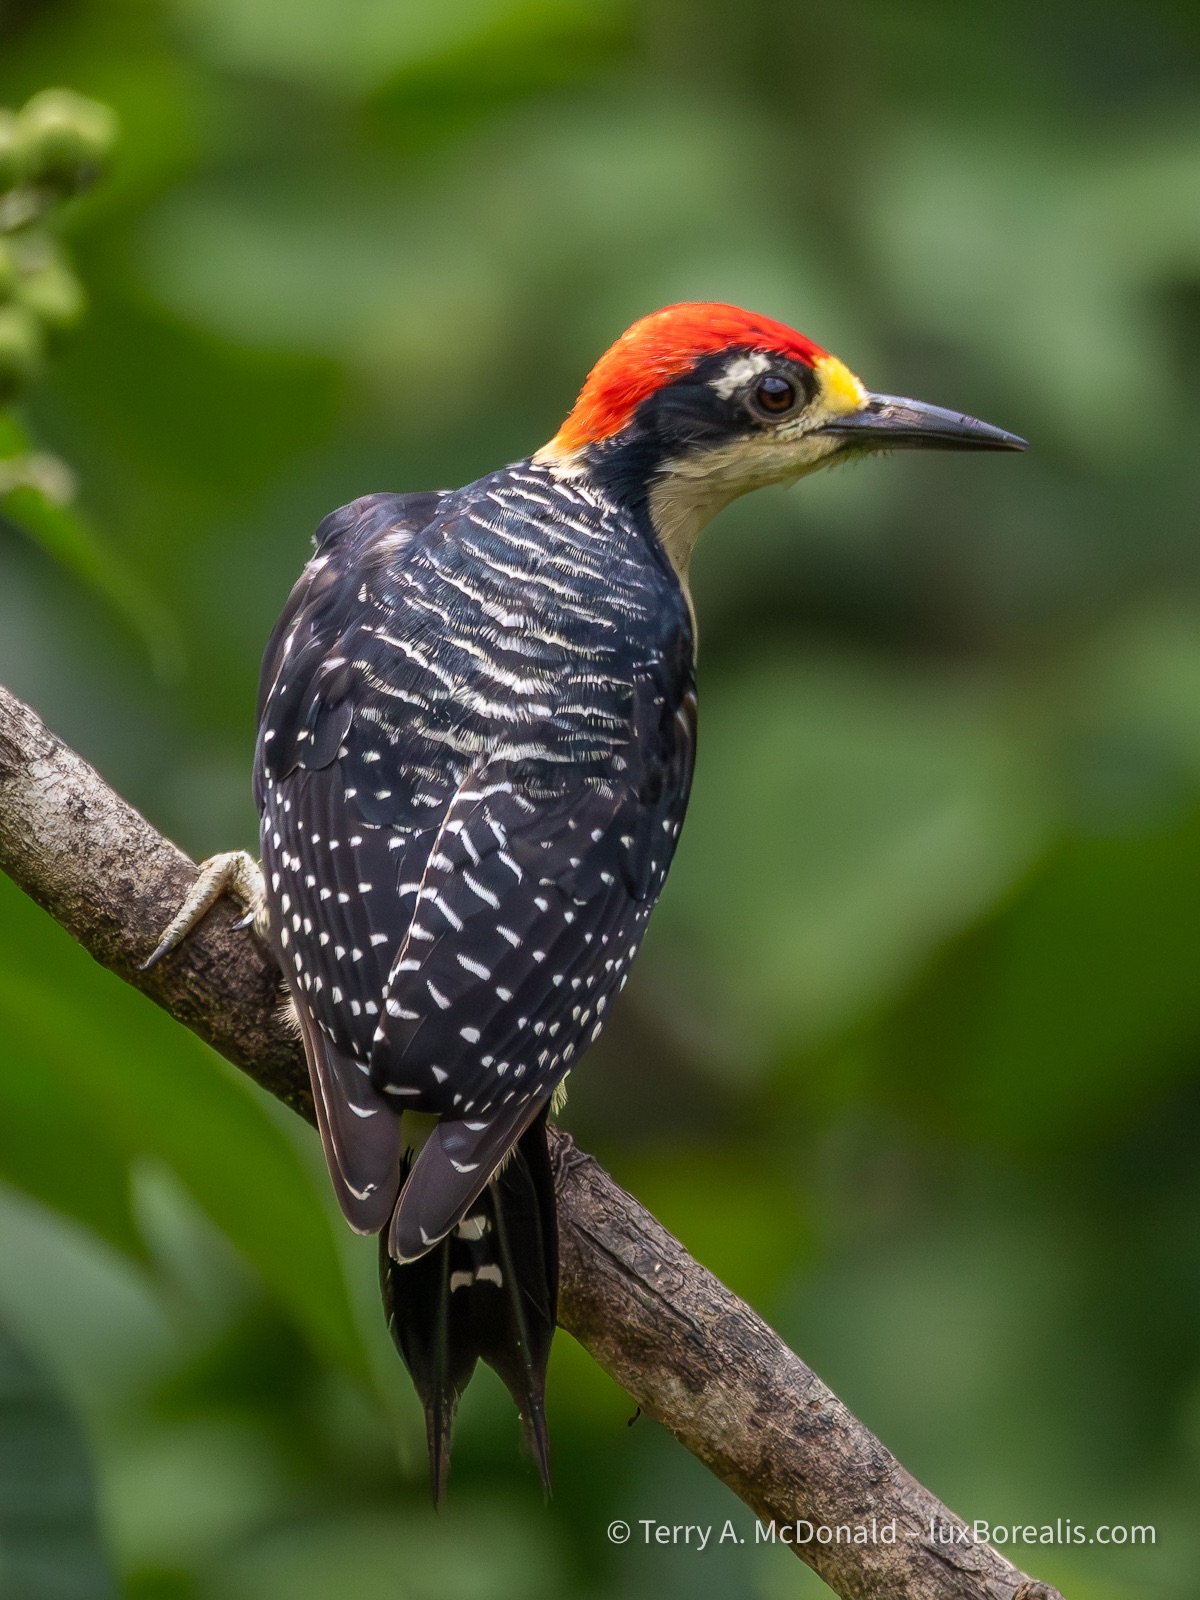
And guess what? It really does make a laughing-like call. Note leaf cutter ants carrying pieces of leaves along the top edge of the branch.
From a photography perspective, I really can’t complain. I’ve had some excellent photo ops, most of which I’ve been able to take advantage of. However, I’ve also noticed that birders are satisfied with seeing a bird half a kilometre away, provided they can ID it. How they can see the leg-colour or a flash of whatever at that distance is beyond me!
400mm | ƒ8 @ 1/5000 | ISO 6400 | Lightroom
400mm | ƒ8 @ 1/200 | ISO 3200 | Lightroom
Field Equipment
On my OM-1, I’m using the M.Zuiko 100-400/5-6.3 (200-800mm efov). For me, even with an 800mm equivalent lens, I need the bird within 20m for what I would consider a successful photo. The Olympus Big White or the 150-600mm would have allowed a greater number of successes, though the added weight would have its own consequences. For ease of vertical shooting and near limitless battery power, I’ve added the HLD-10 vertical grip.
400mm | ƒ8 @ 1/5000 | ISO 6400 |Lightroom
The massive bill on this toucan is actually quite light as it is constructed with a thin skin of keratin over internal structural supports, like an airplane.
Another addition I’ve made to my set-up is a monopod. I know how Olympus/OM System users love to boast about handholding such light equipment with great stabilization, almost as a badge of honour, to the point where even on the OM System website, you’ll rarely see a tripod and never a monopod.
Holding a 2+kg system of body and lens for minutes on end while watching a hummingbird or scanning the canopy for a tell-tale flash of colour simply became uncomfortable when repeated over the course of the day, in 30° heat at 100% humidity. I’m used to a monopod from my years of shooting sports, so using one in these conditions was a no-brainer.
400mm (800mm efov) | ƒ8 @ 1/32000 | ISO 3200 | Lightroom
Silly settings for a static, sunlit silhouette. Just before this, I had been photographing birds in the shaded, dim forest canopy and failed to switch on the fly.
Two of our trip-mates are getting some great results from the Nikon P950, considered to be one of the best birding cameras within financial reach. It’s a super-zoom bridge camera that sports a 2000mm lens (efov), which is great for most sunny and bright conditions. Having a smaller sensor, it is limited to ISO 1600 and even that’s a stretch.
Another thing I’ve learned about birders is that they are happy if they can ID a bird through the leaves or branches of tree. This doesn’t really work for photographs. I have lots of photos of parts of birds seen through the leaves (mostly the butt end) that have now seen the trash bin. They ask me, “Did you get that Shining Honeycreeper?” Well, I did, but only the yellow legs!
Most of our birding has been along road sides, places Ernesto has flagged as being productive. A few great successes have resulted from patiently waiting around feeders and flower gardens set up to attract birds, especially hummingbirds. It’s fine to see the hummers on the feeder, but catching them on the wing or on flowers is a great deal more difficult, again with plenty of misses. The OM-1’s subject tracking allows me to focus on the bird while on the feeder, then track it when it backs off.
One of the most significant features of a good wildlife photo is having a clear background, free from distractions. This has been difficult in the chaotic jumble of a rainforest and tropical plants. With vines, glossy leaves and spots of sunlight through the canopy, it has been especially important to find shooting positions that provide as neutral a background as possible.
300mm (600mm efov) | ƒ8 @ 1/4000 | ISO 6400 | Lightroom
Culling & Processing
At the end of each day, I’ve had between 200 and 500 image files to wade through—the most I’ve 3ver had to deal with on a daily basis. I’m glad I brought my MacBook Air with me. Not only does it make culling faster, it provides full processing capability with Lightroom, with noise reduction and batch processing. On our Tanzania trip last year, I had only my iPad, on which Lightroom is still a bit limiting.
Using the MBA has sped things up, but with hundreds of files each day, it is still a bit of trial keeping up. I enjoy the editing side almost as much as the field work, so it’s doable. What I don’t enjoy is wading through countless rather similar photos of the same subject. But duplicates are unavoidable.
227mm (454mm efov) | ƒ8 @ 1/15 | ISO 6400 | Lightroom
The slow shutter speed and high ISO indicate that this photo was made at 6:11pm almost 45 minutes after sunset. At this point, I hadn’t started using the monopod, so it’s a good example of how good the stabilization is.
I prefer shooting in single-shot mode, but with birds in near constant motion, I find that continuous AF and burst shooting allows me to capture subtle movements resulting in better facial expressions and body position. It also means multiple near duplicates which require scrutiny.
400mm (800mm efov) | ƒ8 @ 1/1000 | ISO 12800 | Lightroom
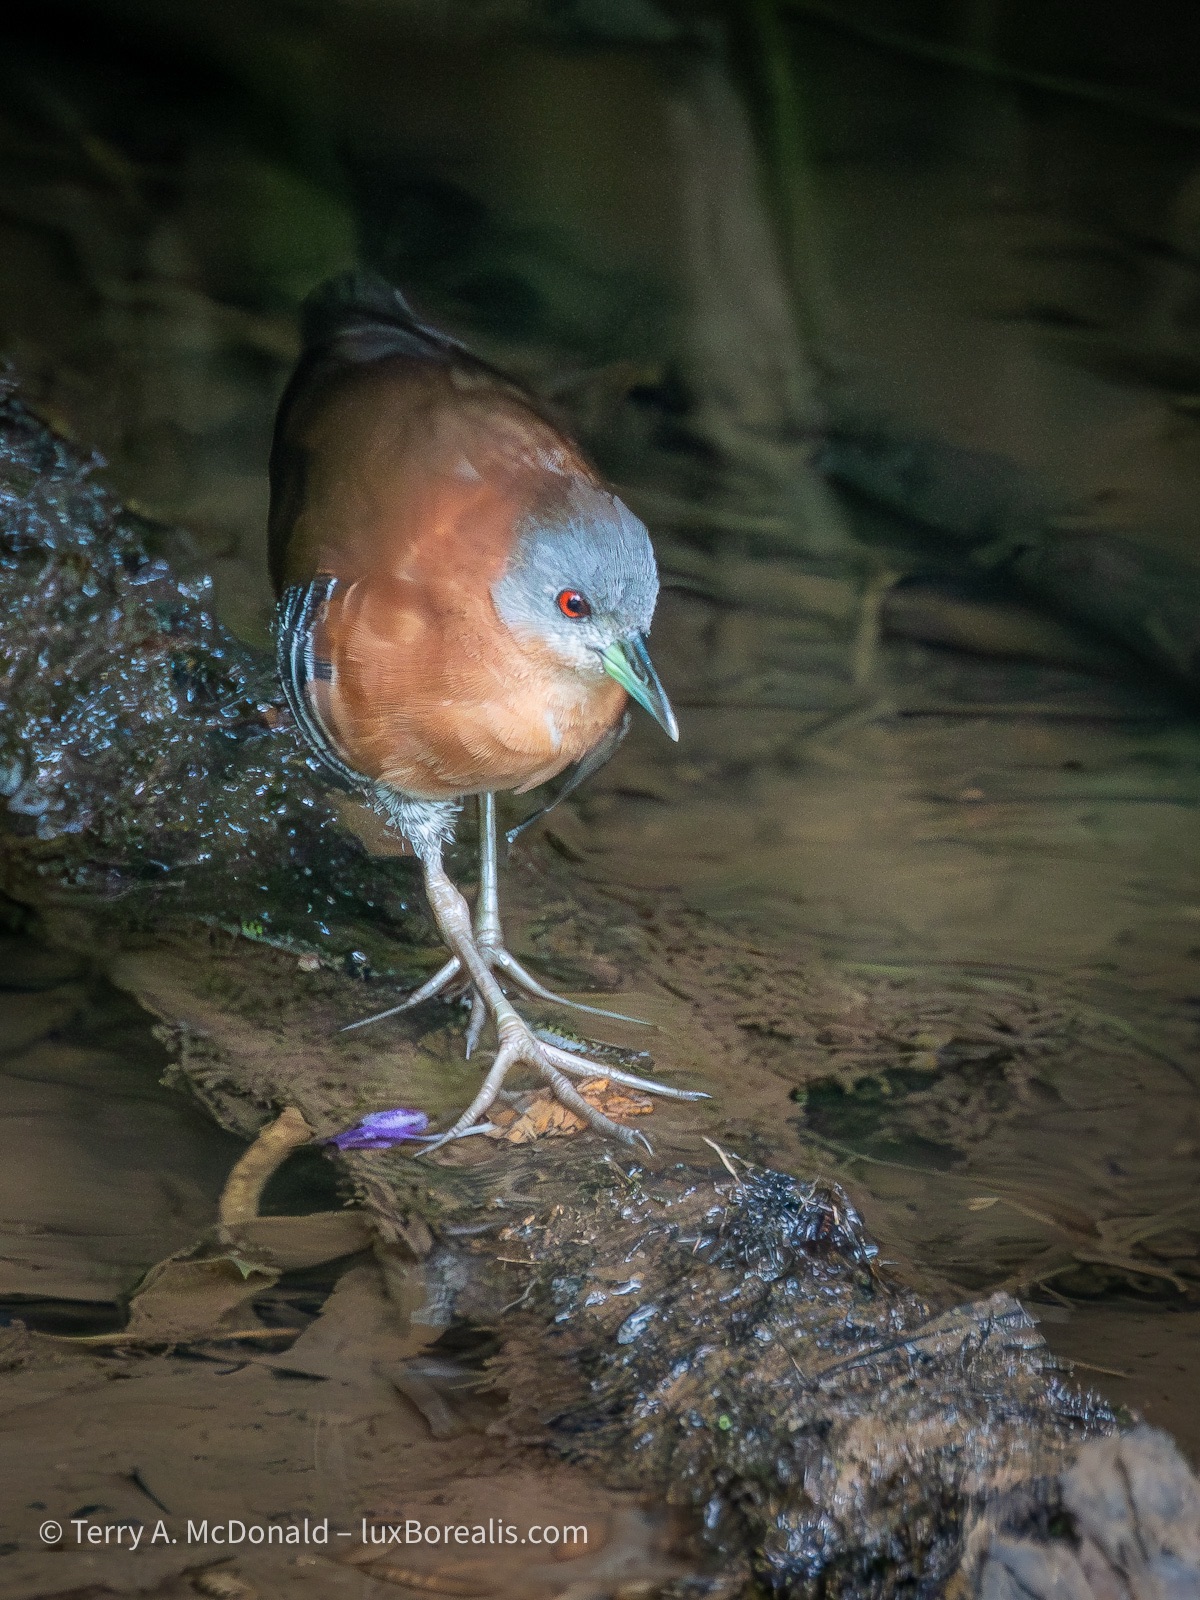
This elusive and rarely-seen marsh bird skulks amongst the overgrown vegetation, coming out only to feed.
307mm (614mm efov) | ƒ8 @ 1/2500 | ISO 6400 | Lightroom
I start by flagging the best of the lot. As I scroll through I quickly flag potentials, X the definite out-takes and leave the duplicates of something I’ve flagged. As I’m working, I’m paying close attention to sharpness, body position, duplicates and overall design.
With over 50% of files culled in the first pass, I then check and double-check focus and facial expressions. I find the 100-400 great up to about 20m, but beyond that it noticeably softens, even at ƒ8. Some of the photos I was hoping would be production quality, simply don’t make the cut. This is disappointing. Other than investing in a different lens, I’m not sure what to do, except to be aware of the shortcomings and work within them.
400mm (800mm efov) | ƒ8 @ 1/400 | ISO 6400 | Lightroom
We must have spent 30 minutes on a grey, slightly drizzly day up in the highlands, trying to track this fellow. With its distinctive orange chest, the birders had immediately ID’d the bird, but getting a clear photograph of it was a challenge/
With flagged images identifies, I then concentrate on finding the best of them. I don’t want to waste time processing sub-standard images, so I’m really critical at this stage. If it has great potential, I give it three stars.
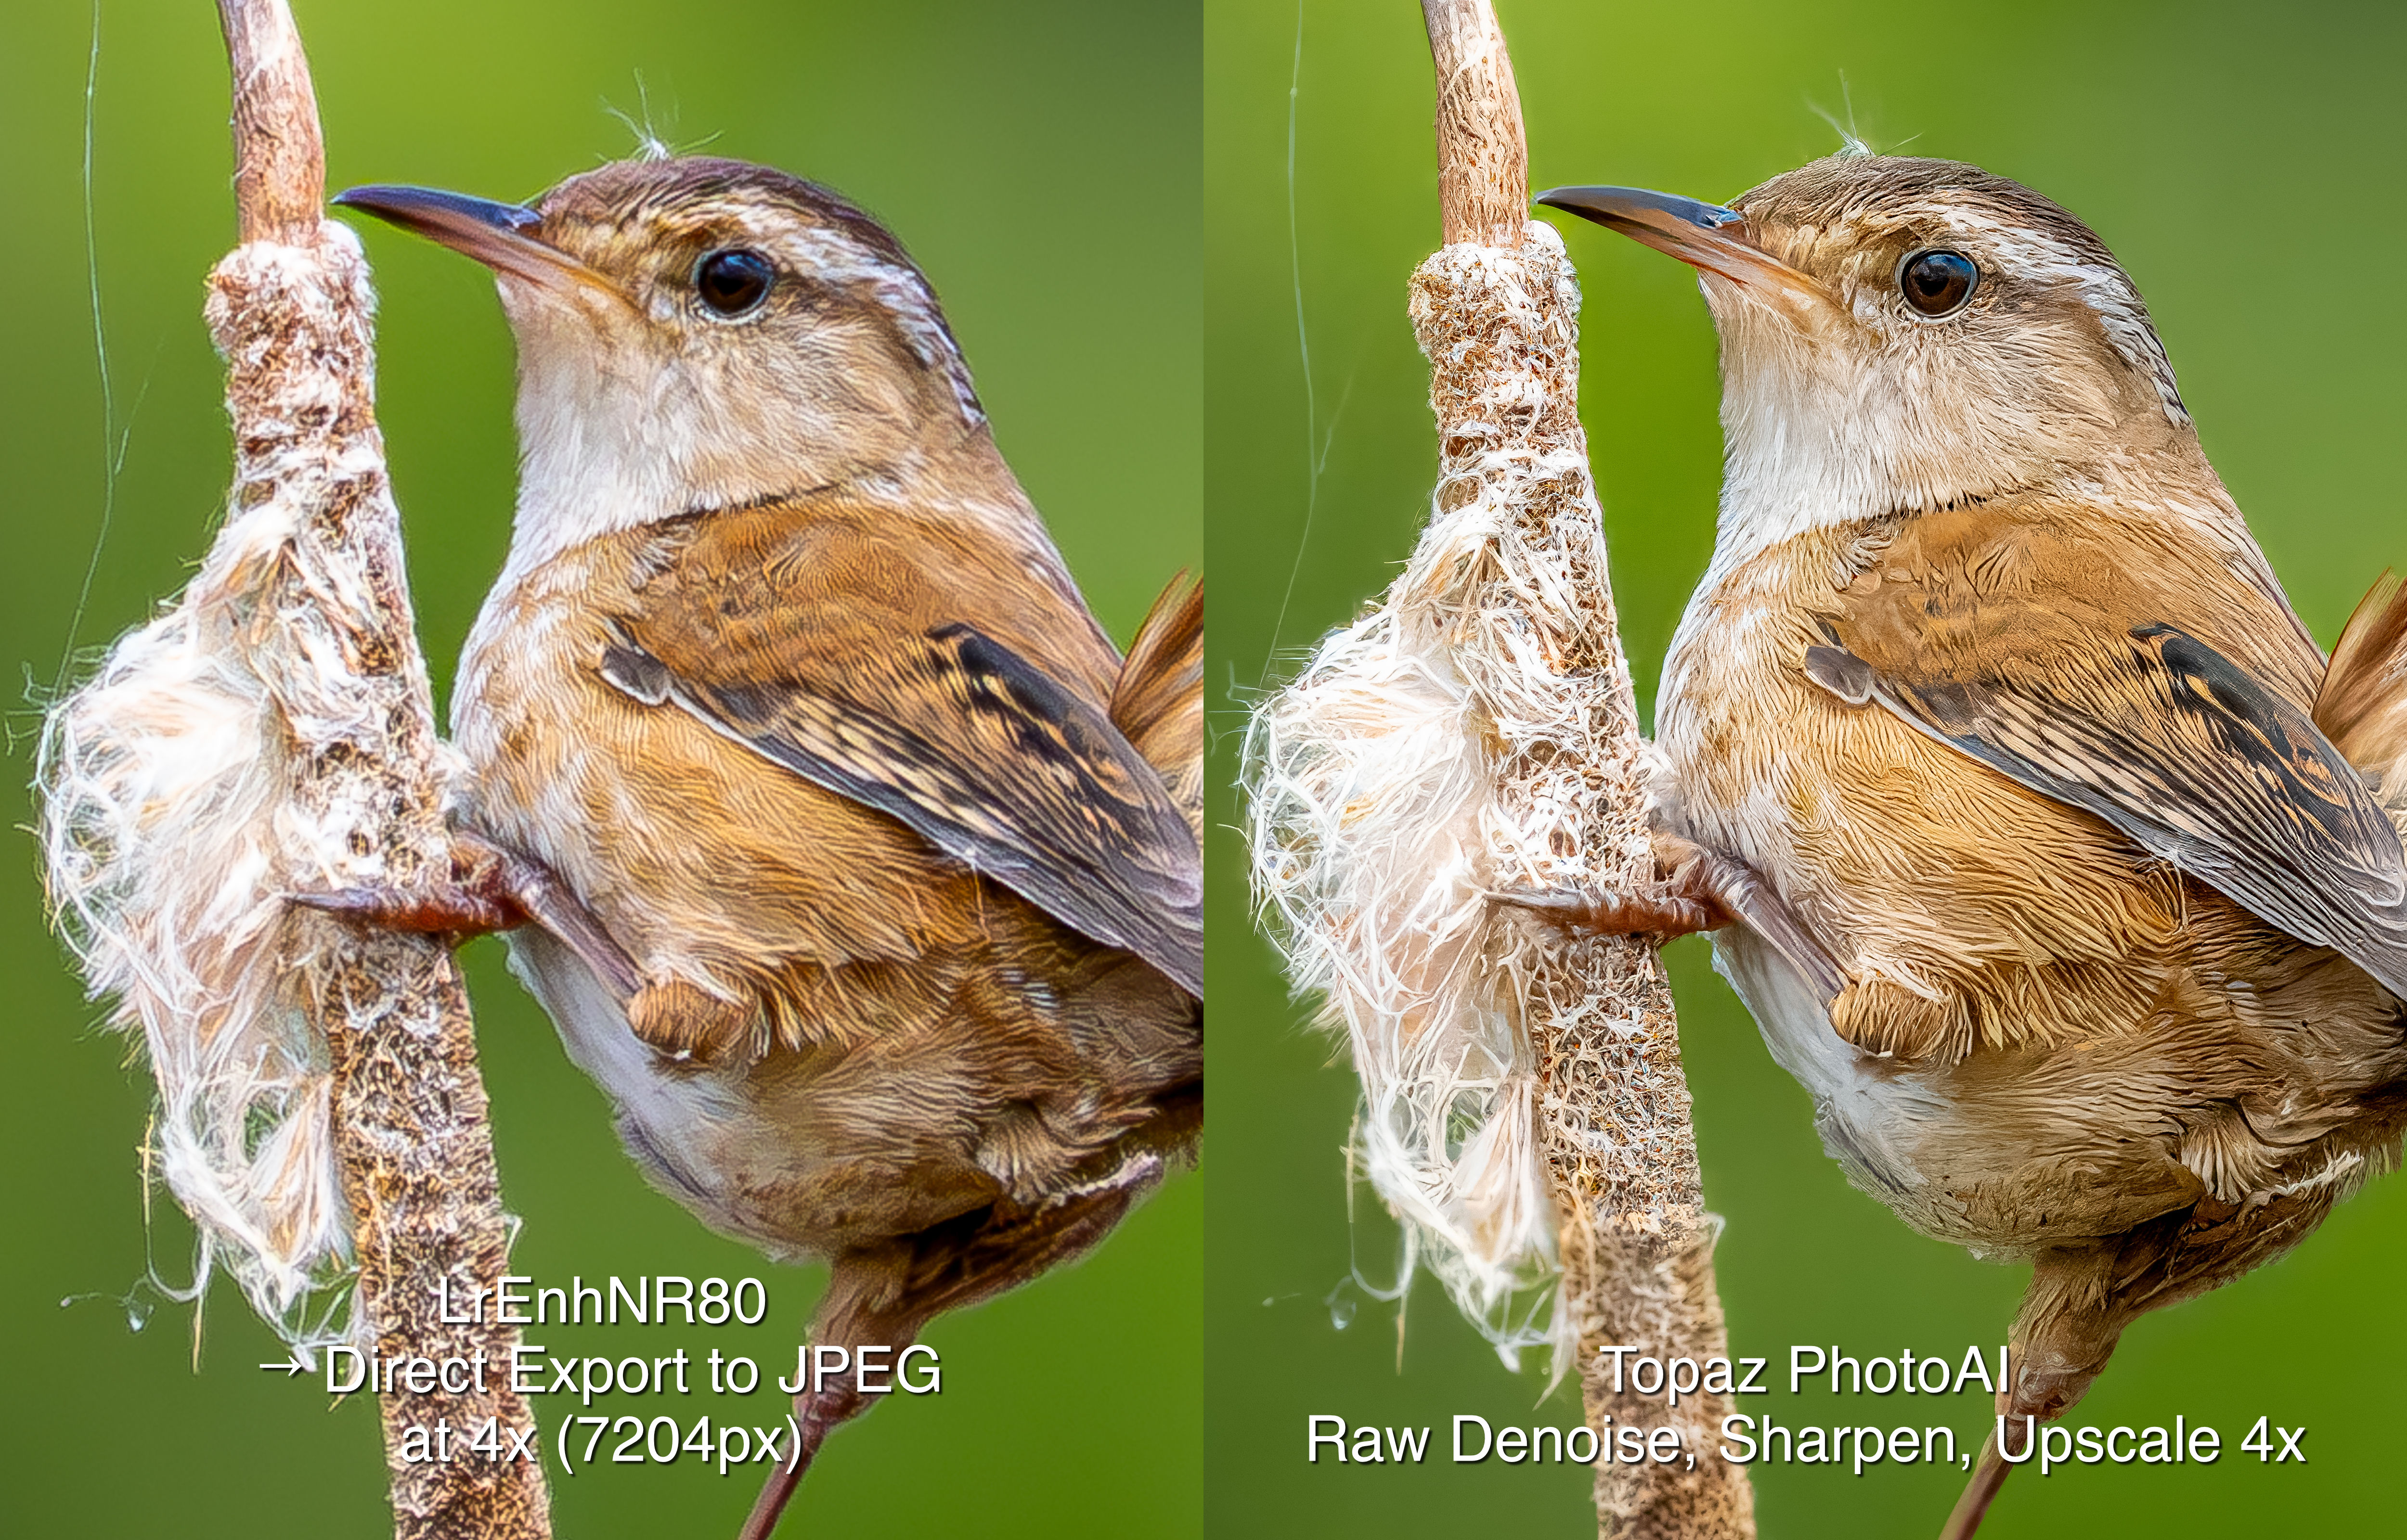
Initial processing includes denoising as ISO is often in the 3200 to 12800 range. I find that a Denoise value of 50 to 65 works well with 80 to 100 in Detail Sharpening, plus 30 in Masking. I built these into a preset which also includes +10 in Clarity. If I had time, I might consider running some of the troublesome files through DxO PureRAW or, to correct slight camera movement, Topaz Photo AI. I might still do so once I’m home and have the t8me, but not here.
Next, the file is off to cropping and the various Exposure adjustments. Raising shadows is always important, as well as having an accurate value for ‘White’s to lift the overall colour and presence.
400mm (800mm efov) | ƒ8 @ 1/12800 | ISO 6400 | Lightroom
Watching the behaviours of these hummingbirds—some skittish, some bold, others downright aggressive to each other—was entertaining, especially when they were displaying like this..
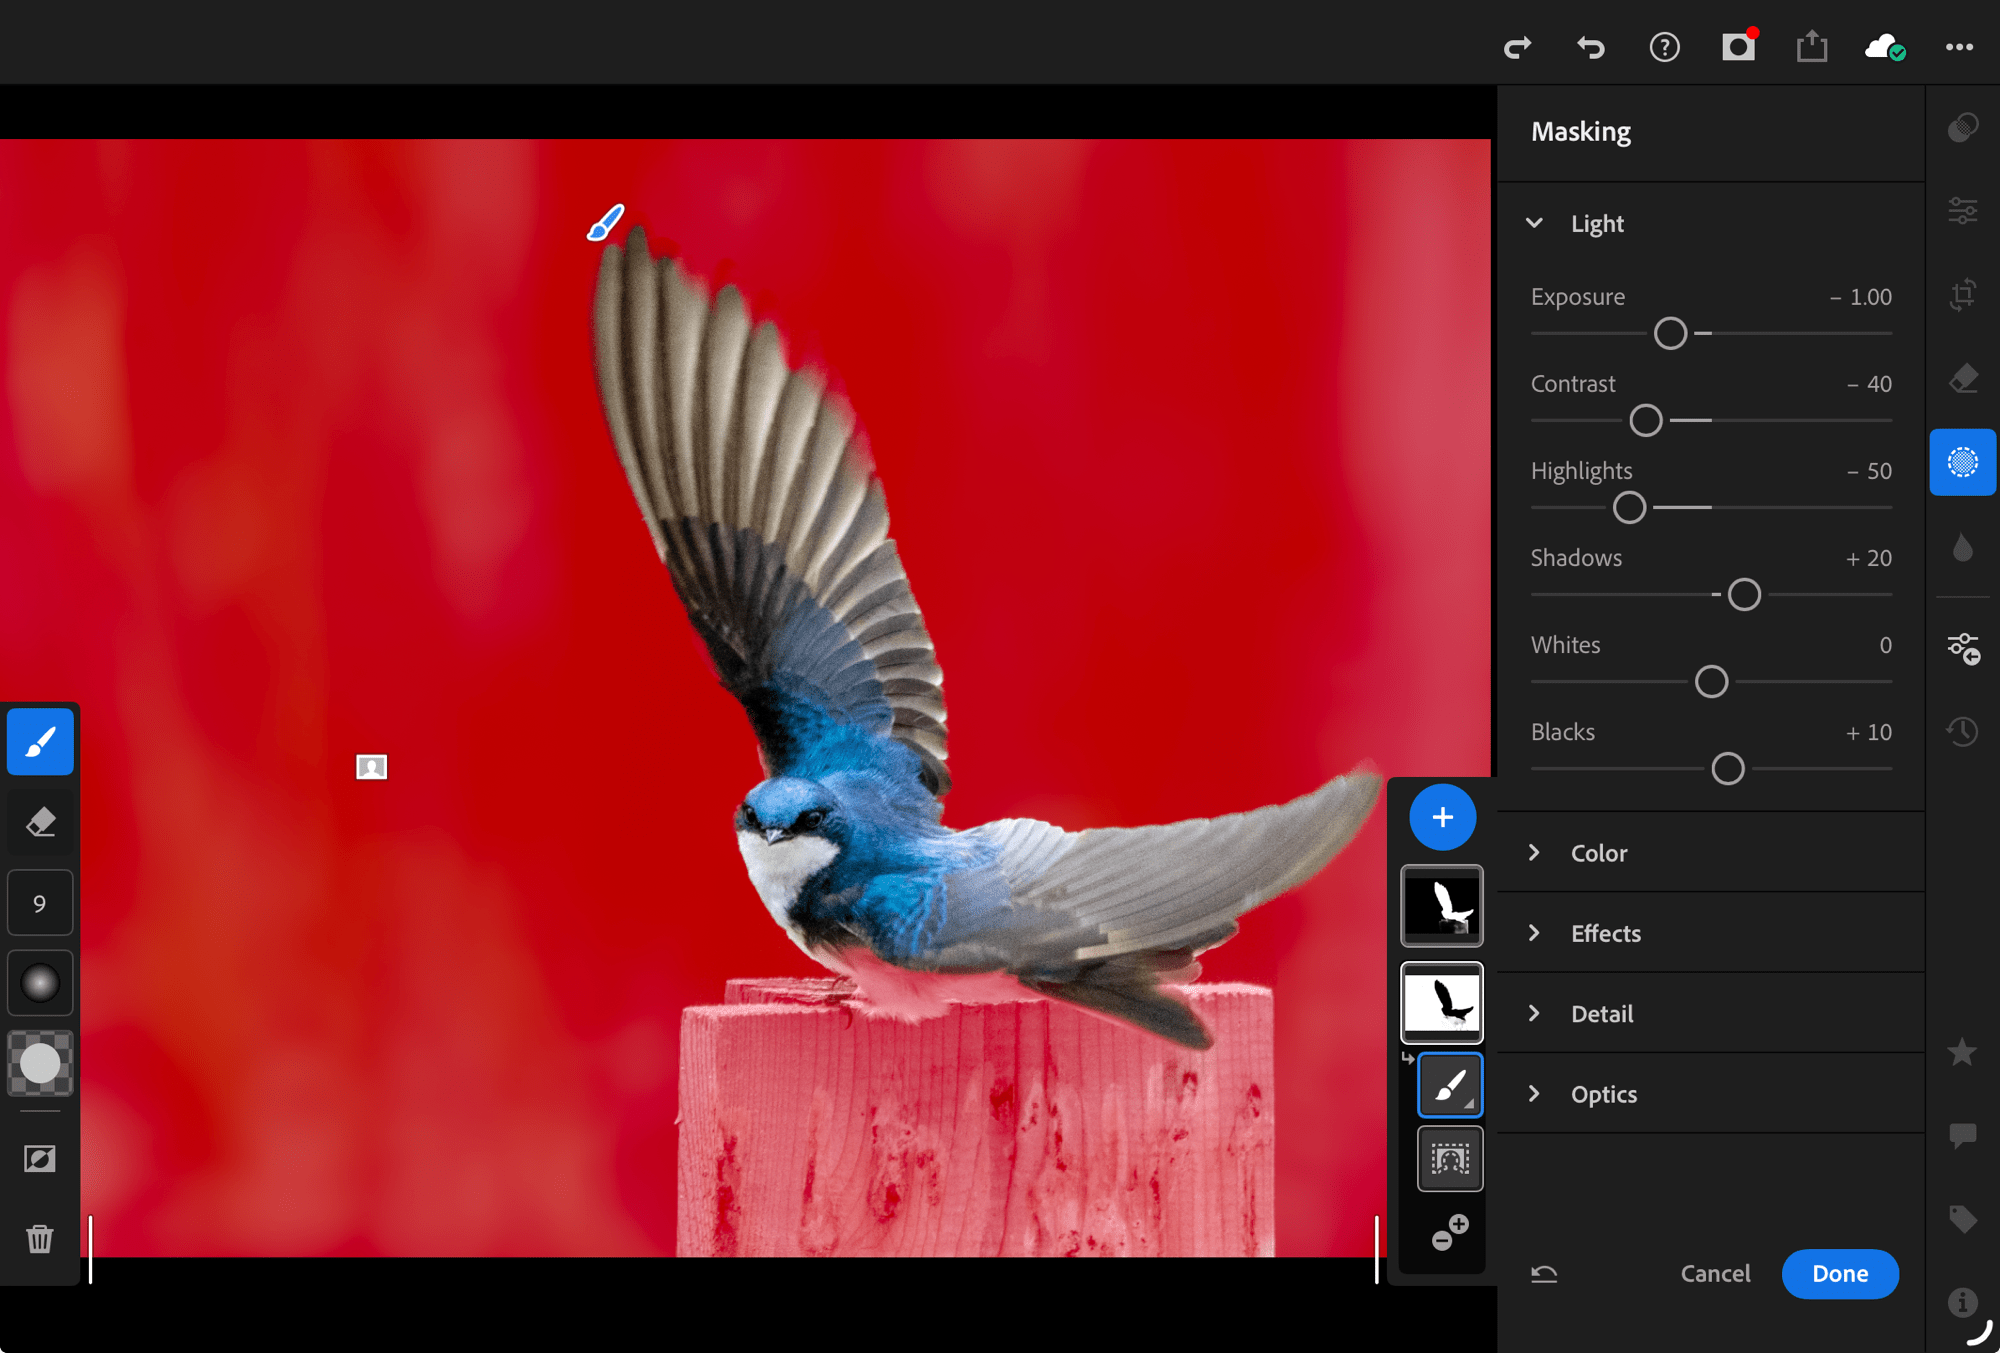
At this stage, I begin masking. With birds, I use two masks: Subject and Background. Once the subject mask is tweaked to include just the subject (or anything else I want lit equally, such as the branch they are on), I ‘Duplicate and Invert’ to create a background mask.
The background mask is important for reducing the visual distraction of background elements. I also find that when the exposure of the background is slightly reduced, the subject itself stands out more clearly. Again, this is done in a way that maintains the natural look of the scene. Typically, I will decrease Exposure by 0.3 to 0.5, and reduce Contrast, Highlights and Whites by 30 to 50.
400mm (800mm efov) | ƒ8 @ 1/8000 | ISO 6400 | Lightroom
300mm (800mm efov) | ƒ8 @ 1/400 | ISO 6400 | Lightroom
At this point, the file will earn an additional star, the fourth star indicating it has been processed, but is an image with high visual quality. ‘5 stars’ is reserved for only the best of the best.
So this is how I spend my downtime. Culling and editing takes time and I’m always conscious of finding the balance between being ‘in the moment’ with the group and finding that personal space I need. Laura and I just aren’t used to travelling in a group so, for me, the downtime is essential. Everyone is very understanding. Some are also doing some selecting and editing, others are leaving it all to when they get home. There’s no right way to approach it; I just find that if I’m faced with a couple thousand images at home, all of birds that are totally new to me, I would feel completely overwhelmed. So I continue to chip away at it.
400mm (800mm efov) | ƒ8 @ 1/6400 | ISO 6400 | Lightroom
Identifying the birds is the most difficult part for me. Our guides are great at calling out the names in the field as we see each bird, but my brain just. cannot retain all that new data. Once I have decided a photo is worth editing, I use the Cornell Labs Merlin Bird ID app to identify the bird and Wikipedia to look up and copy the Latin or scientific name. It is an essential tool, not just for IDing brids after the fact, but for use in the field. The Identify by Sound feature is game-changer, alerting you to what’s out there that you can’t yet see.
Stay tuned from more! Now that we’ve been down to the southeast the country and visited Cahuita National Park, I’ll be sure to post at least once more from Costa Rica.
Thanks for reading. Be sure to SHARE this with other birders and photographers and feel free to SUBSCRIBE and COMMENT. Note, this is not a commercial blog. The links are not afflicate links and I earn no kickbacks from having you read and share.
