New Page!

OM System Resource Page for OM-1, OM-1ii, OM-3, OM-5, OM-5ii and OM-D cameras
Look up—look waaay up—to the right corner. See the OM? That’s where you’ll find a page of curated links to resources to help you get the most from your OM System gear.
This blog is completely free and I do not include commercial affiliate links. To help keep it free, consider buying me a coffee.

12, 2025
Twelve significant photographs in any one year is a good crop
–– Ansel Adams
18 photographs; 1700 words; 9-minute read
Taking the word of the master to heart, I have assembled what, to me, are my twelve most significant photographs for 2025. I wrote about this last year and encouraged readers to work through this exercise.
Have you begun narrowing down your 12 for this year? I find it to be an excellent exercise in seeing: seeing what is working for you and what techniques you might consider refining or getting more practice with. Are you seeing a lot of repetition of technique or vision or are you working beyond what you have traditionally photographed?
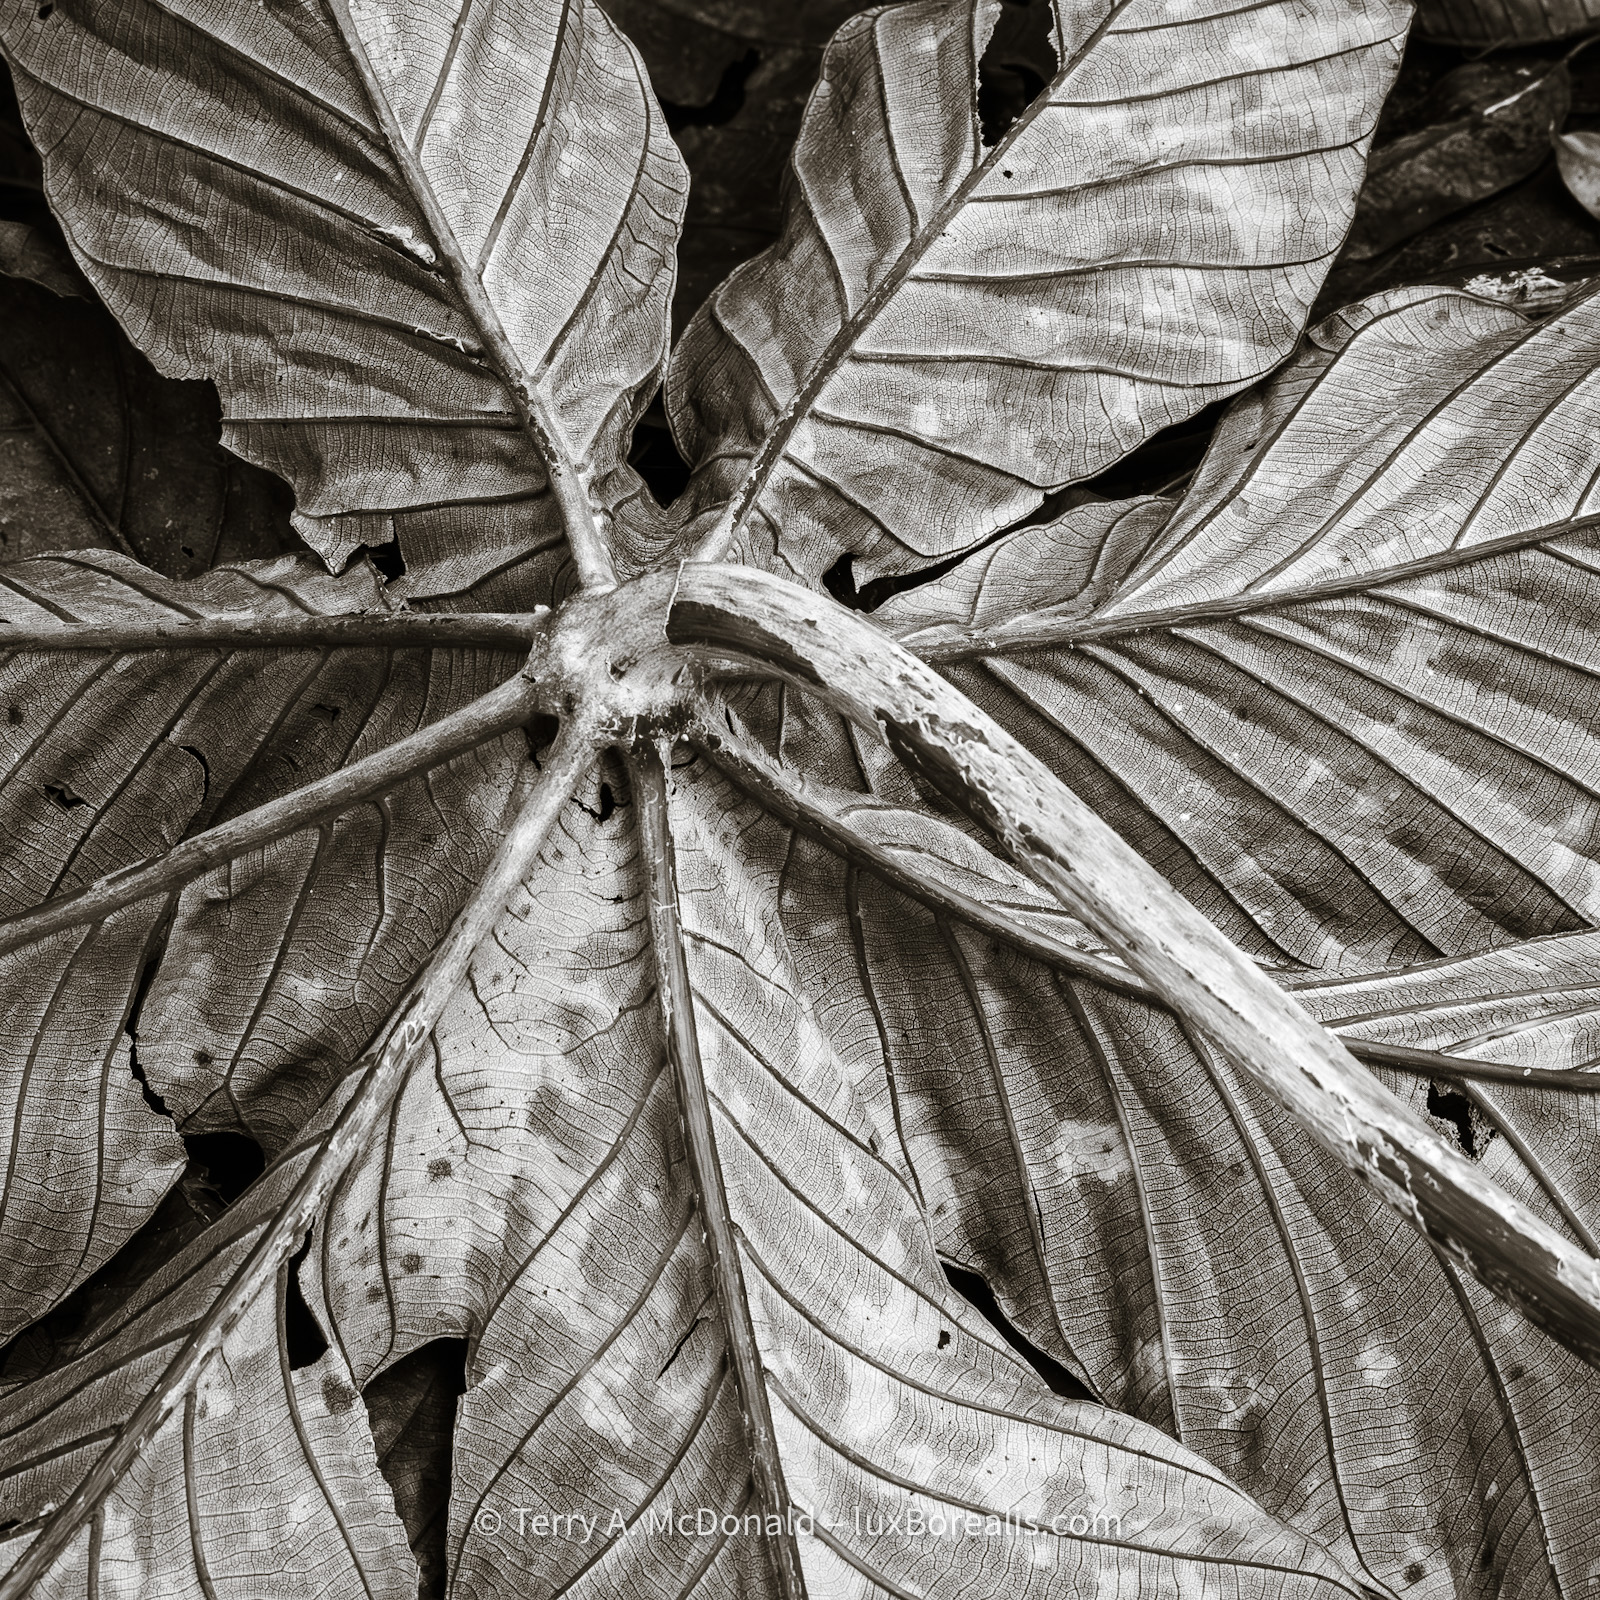
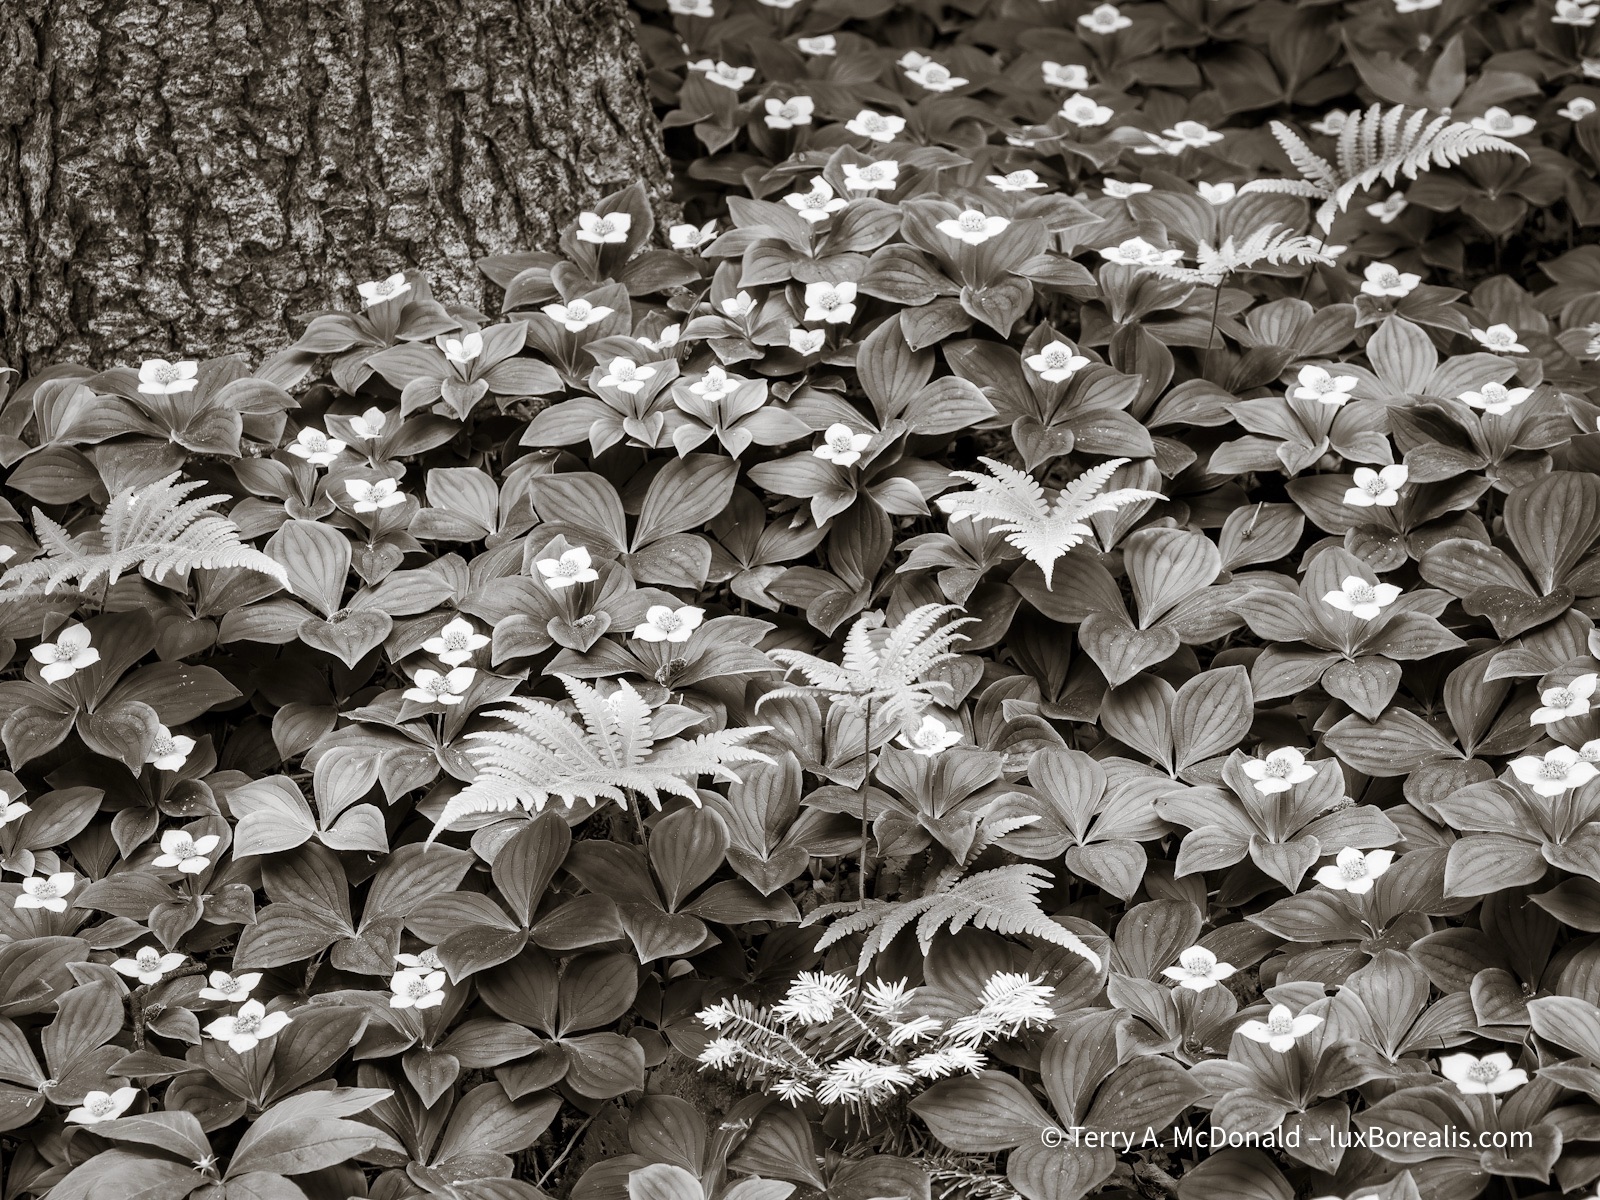
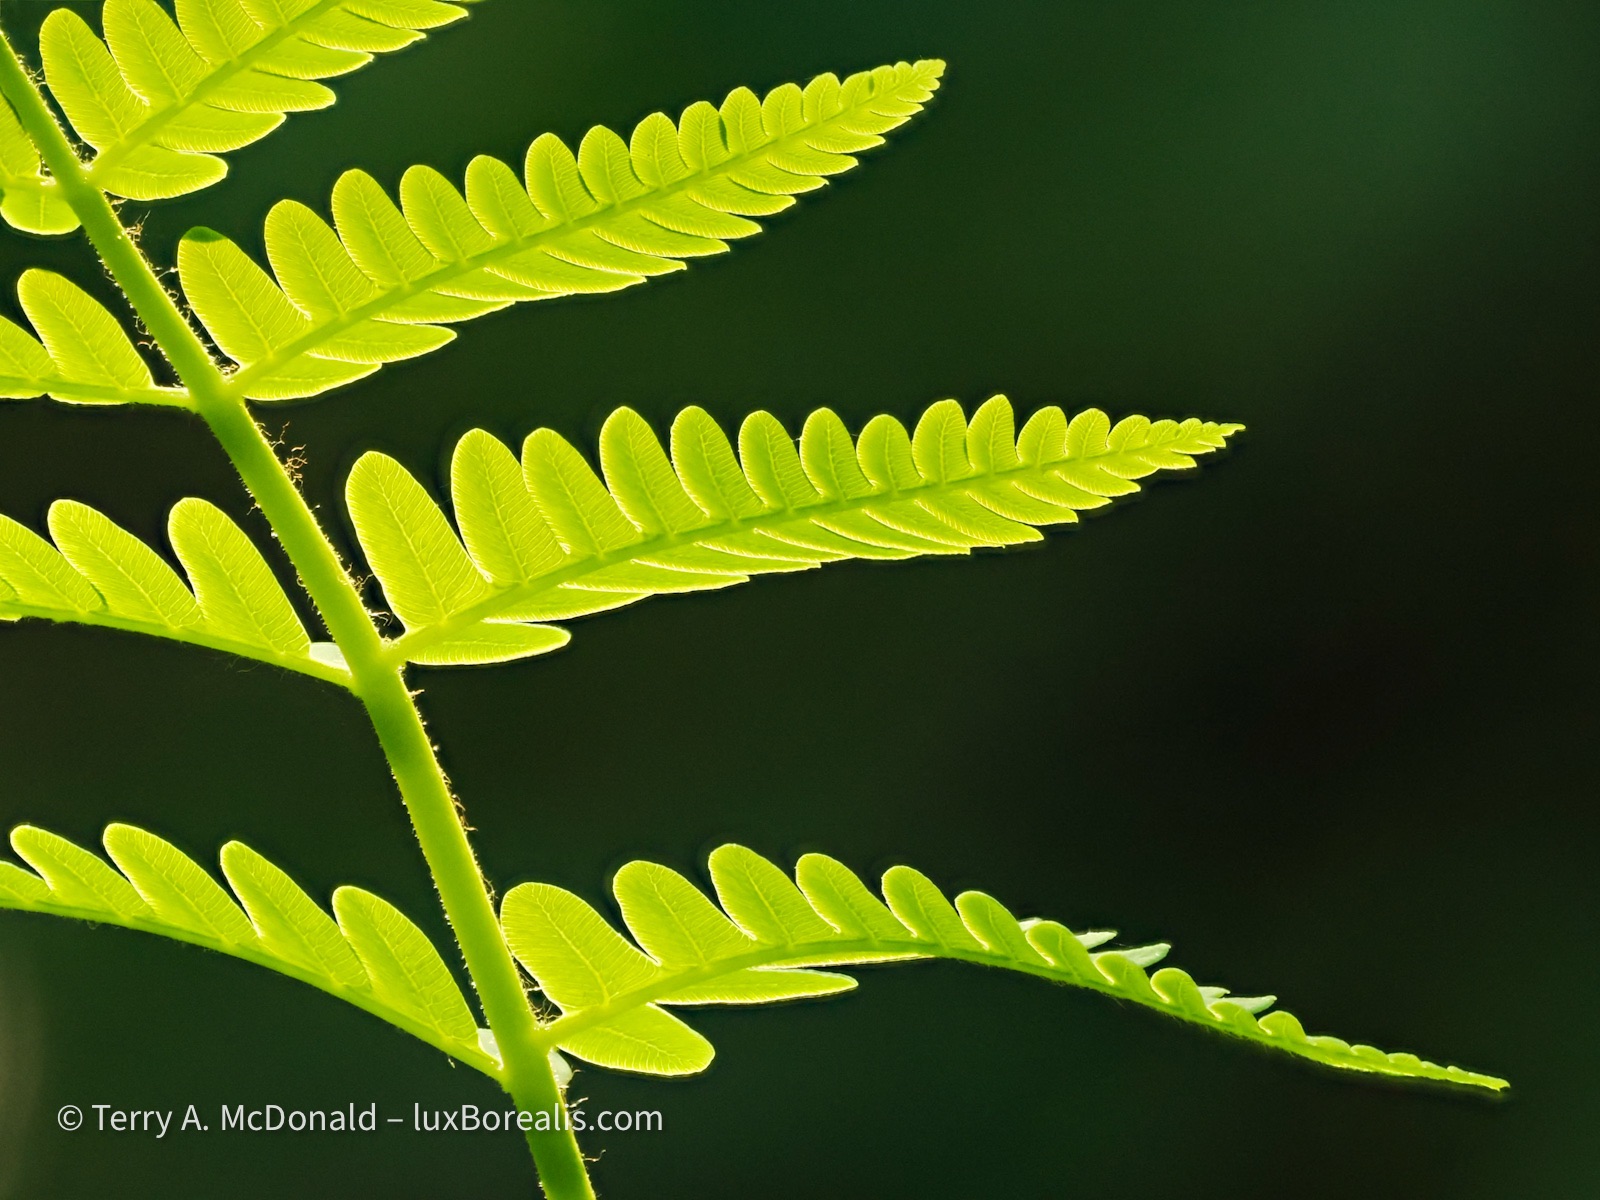
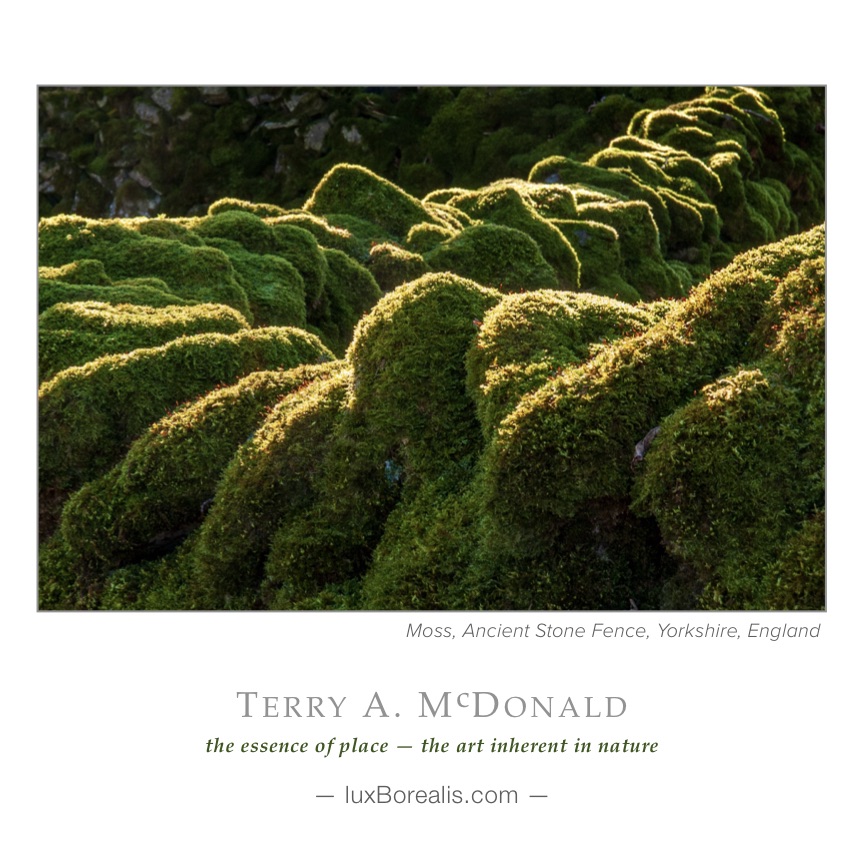
Being a nature photographer, this kind of image speaks volumes to me about life in the rainforest. No, it’s not one of the shiny green new leaves, but one that is rotting its way to become nutrients for the next generation.
The process
Narrowing down any body of work is a process, one I began a month ago by filtering all my 4- and 5-star rated photographs. But which ones are ‘significant’?
I define significant in a few ways. First of all, I want photographs that reflect a variety of locations and experiences I’ve had over the year. Each photograph must also have ‘nailed it’ in that they must work technically, aesthetically, and emotionally.
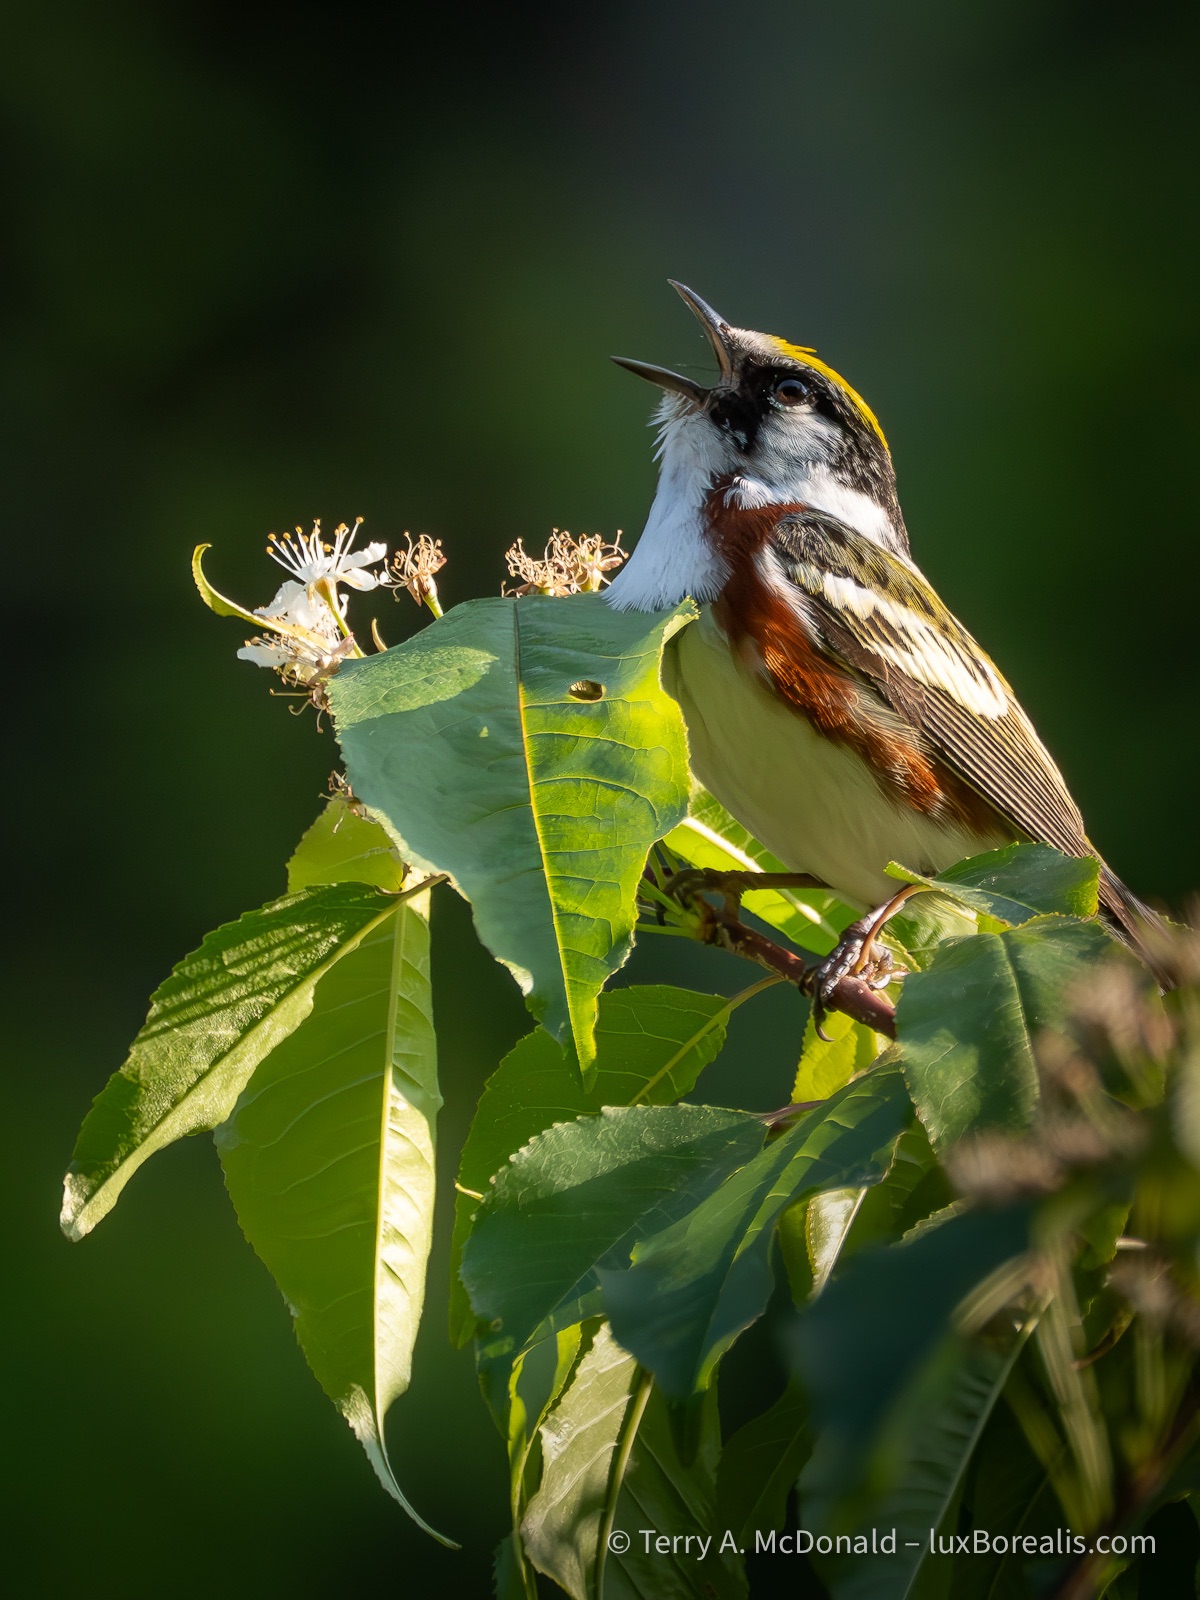
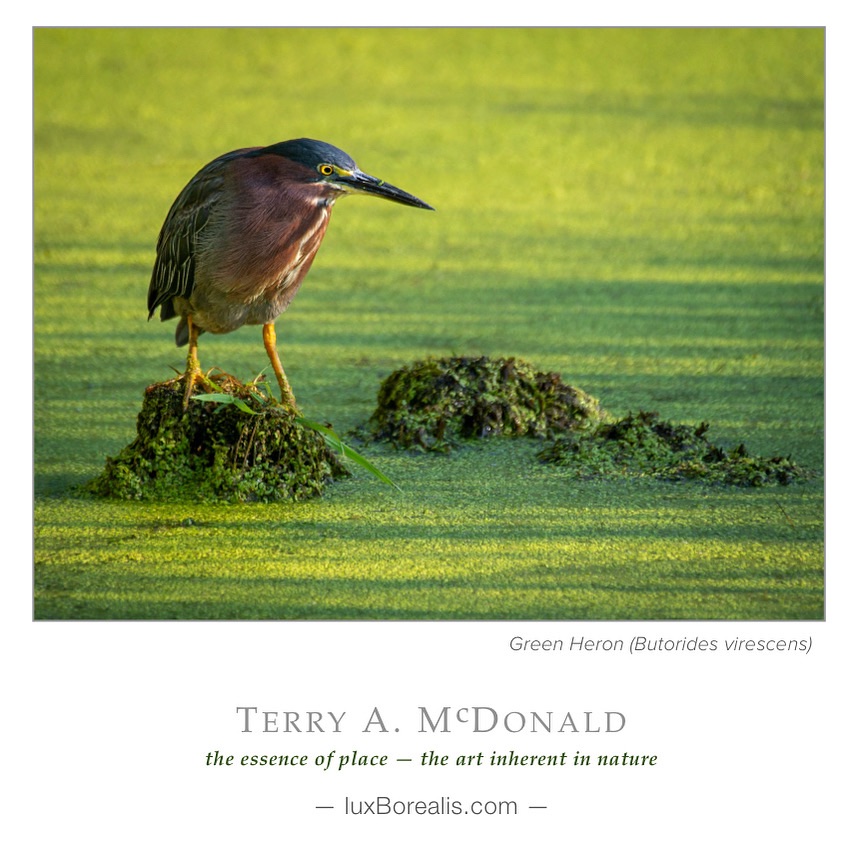
I wish still photos could capture sound. This year, I photographed dozens and dozens of birds, some of which were startling colourful, but only two made ‘the list’. This was not one of them, but is in my 25.
Significance
Technical significance means I have used the tools of photography to their best advantage in capturing the moment. To be aesthetically significant, a photograph must have that perfect blend of composition and movement to draw the viewer in, to have them ‘look again’, to tell a story, or evoke questions.
The most difficult aspect of photography is emotion. When I write of emotion, I don’t mean cutesy set-ups of babies or pets or couples walking on a beach at sunset. With nature and wildlife, this will often mean cute young fox kits or lambs gambolling or tender mother-young interactions. That is not what I want when I choose emotionally significant photographs. I want the photograph itself to be emotive, not the subject.
To me, emotive photographs cause the viewer to wonder and feel something beyond, “Oh, that’s cool.” They are drawn into the photograph on a level beyond the simple visual connection. Very few of my photographs ever achieve this level of engagement and certainly not all of my ‘12’ for this year have achieved it.
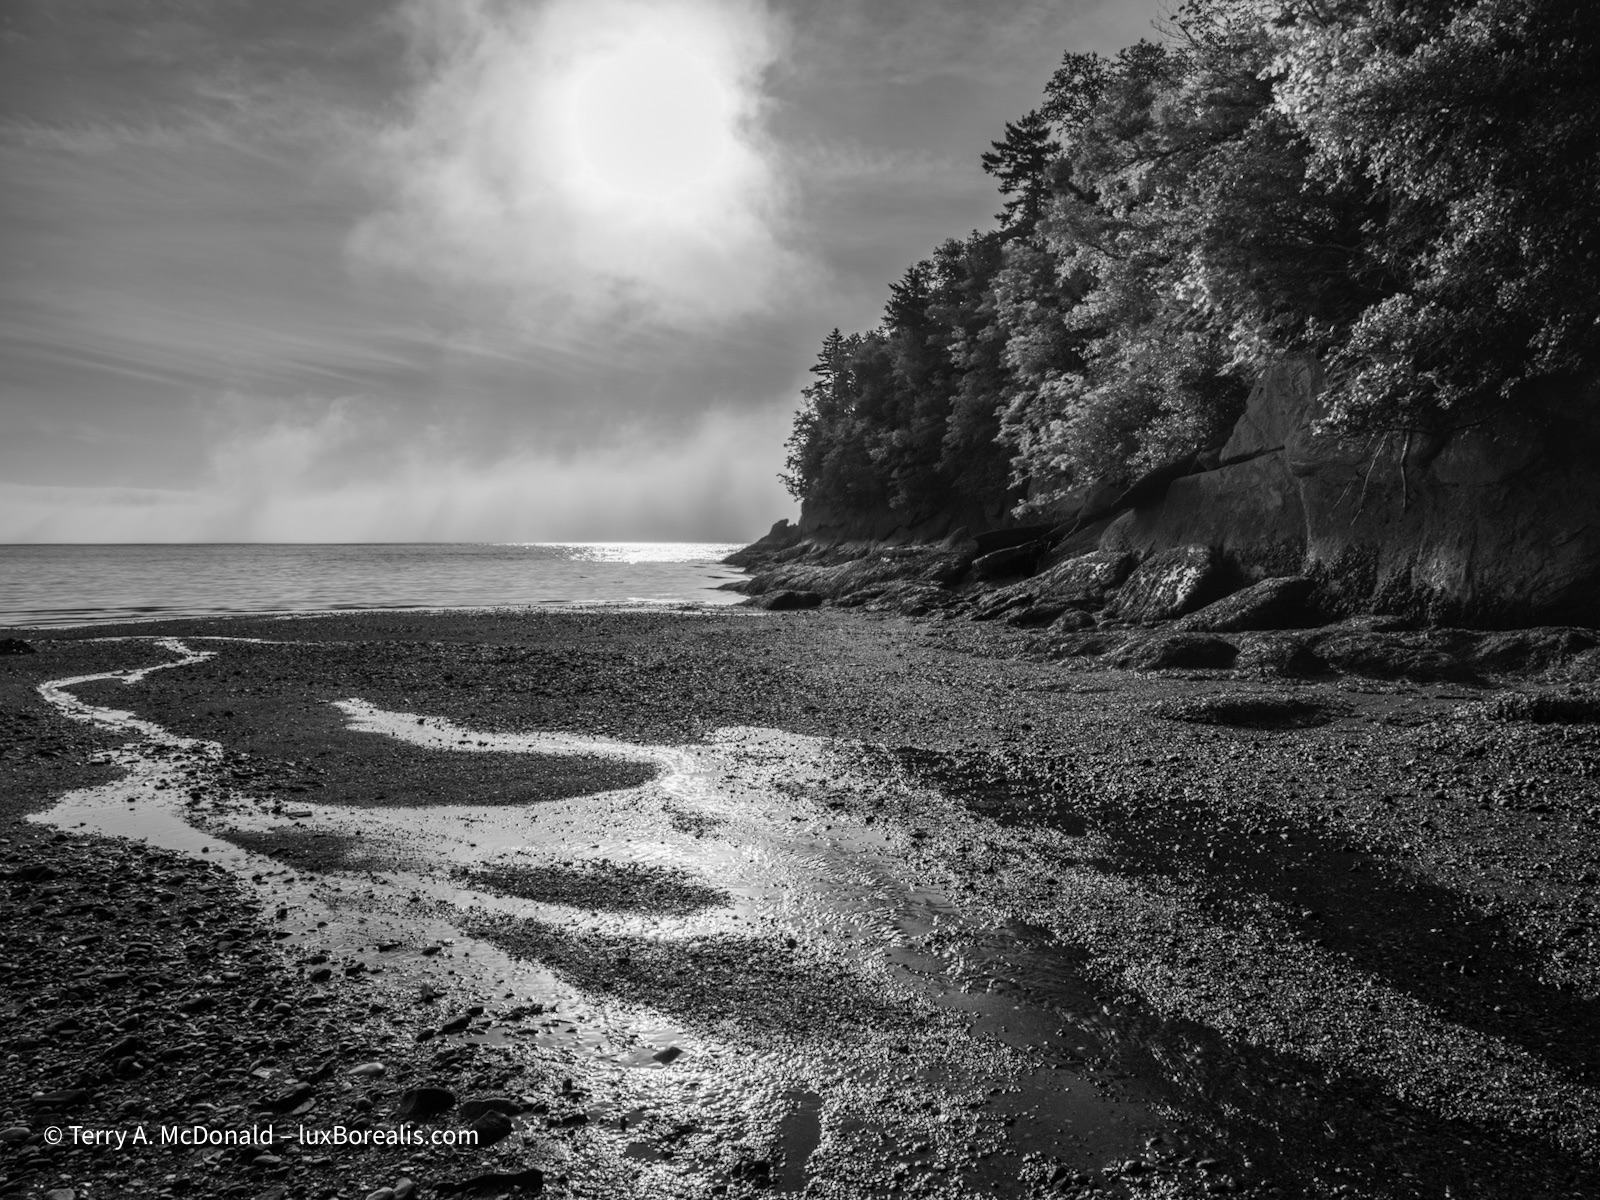
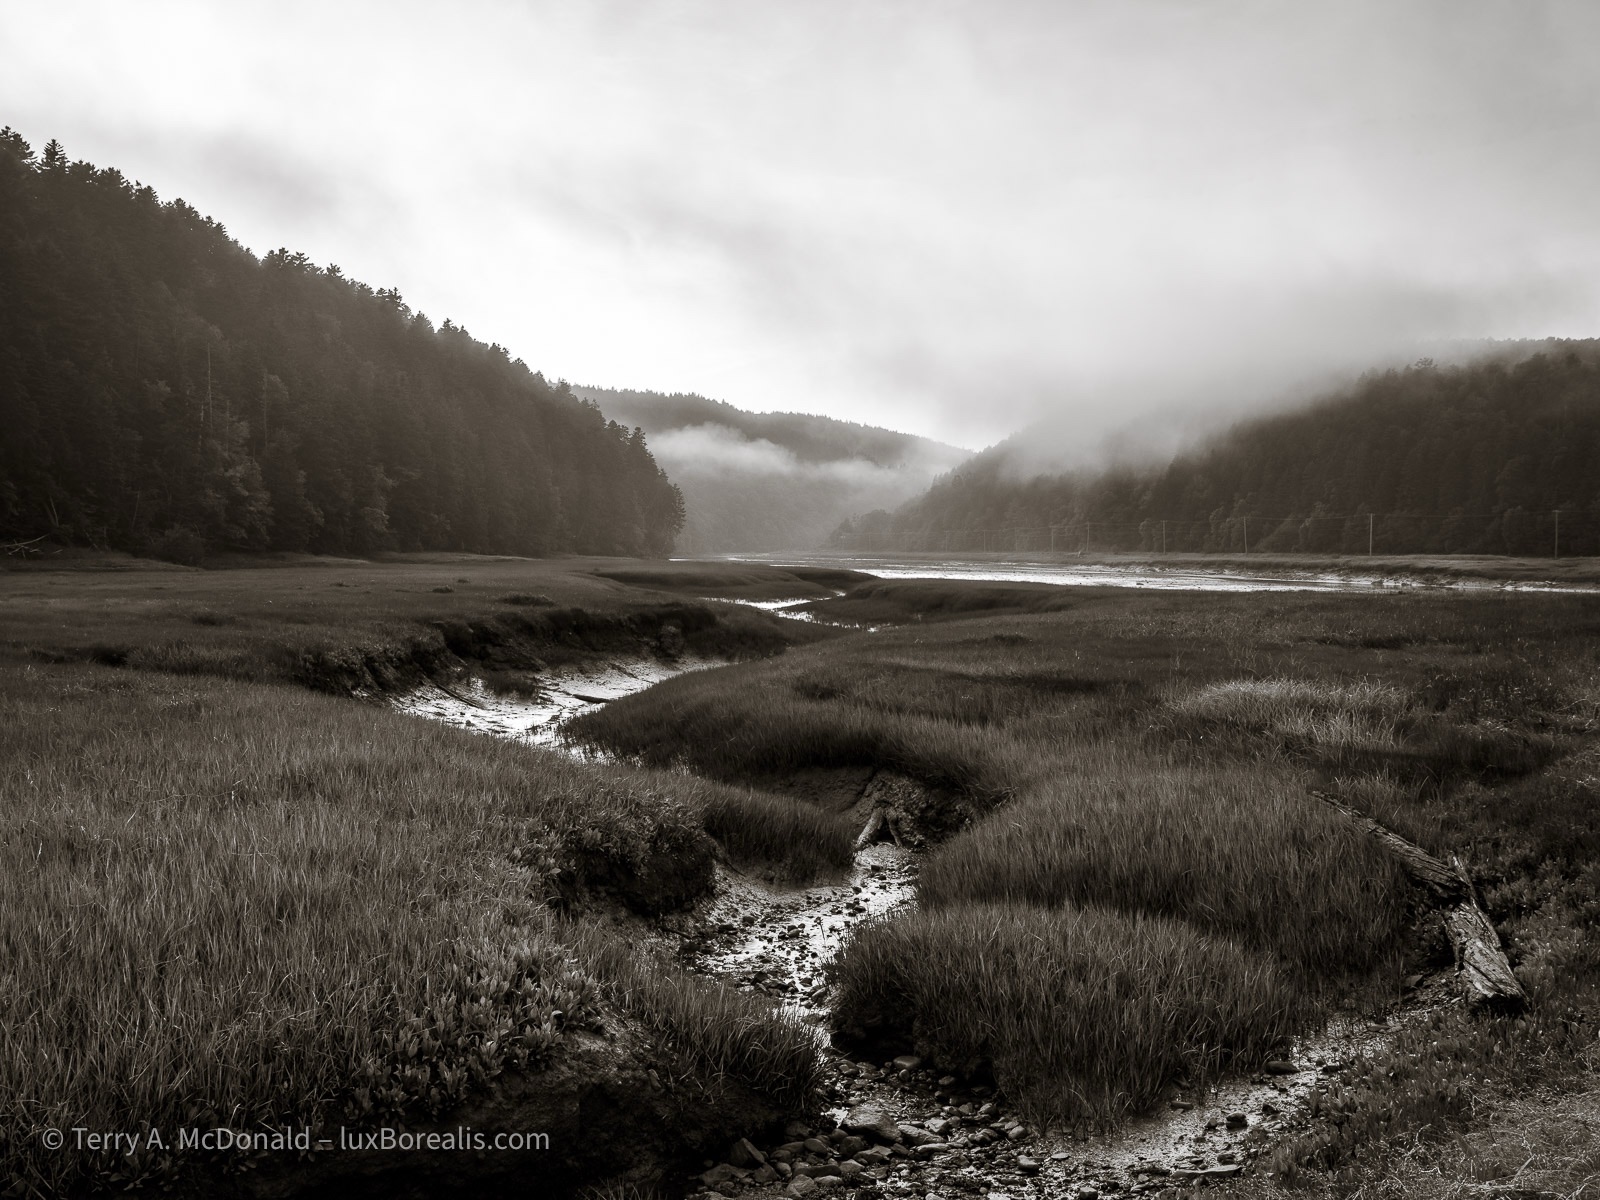
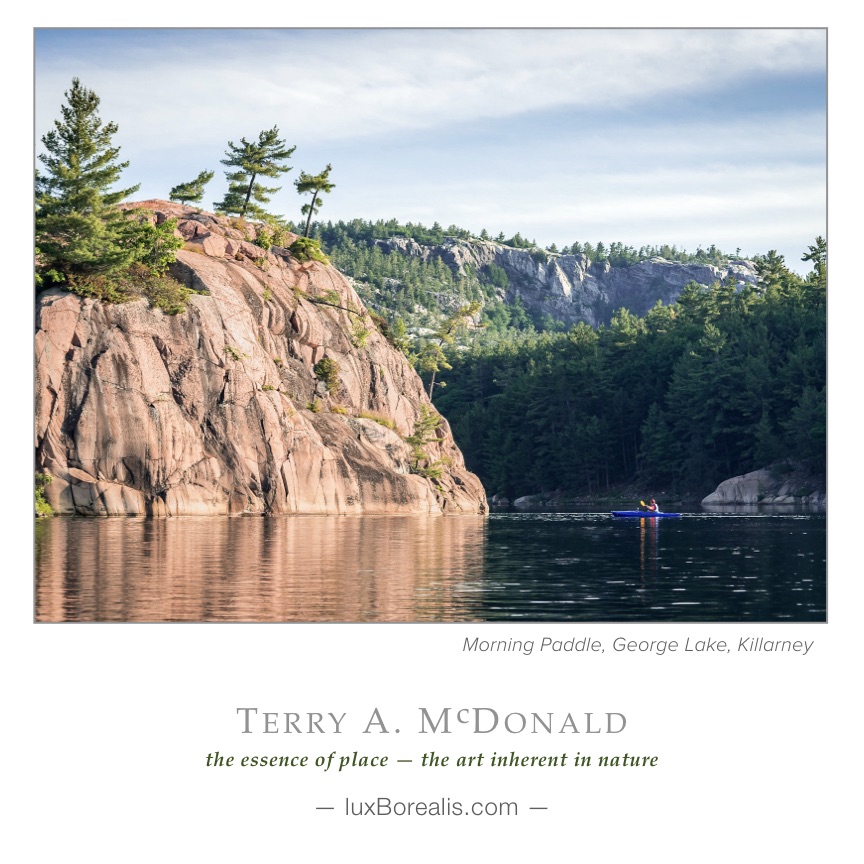
When I look at this photograph, I get a feeling of complete ease, tranquil as they say in Spanish. This was the morning of Canada Day, one I vowed to spend photographing—a few hours of complete Zen. That’s what I feel, anyway.
42 to 25
So, from all those 4- and 5-star photos, I selected 42 to begin my whittling down to 12. I looked for photographs that were successfully made using techniques new to me. Others speak to my dual desire of capturing ‘the essence of place’ and ‘the art inherent in nature’. Some are colour, others are black-and-white. Some portray movement and others are composite photographs—a technique I enjoyed exploring in 2025.
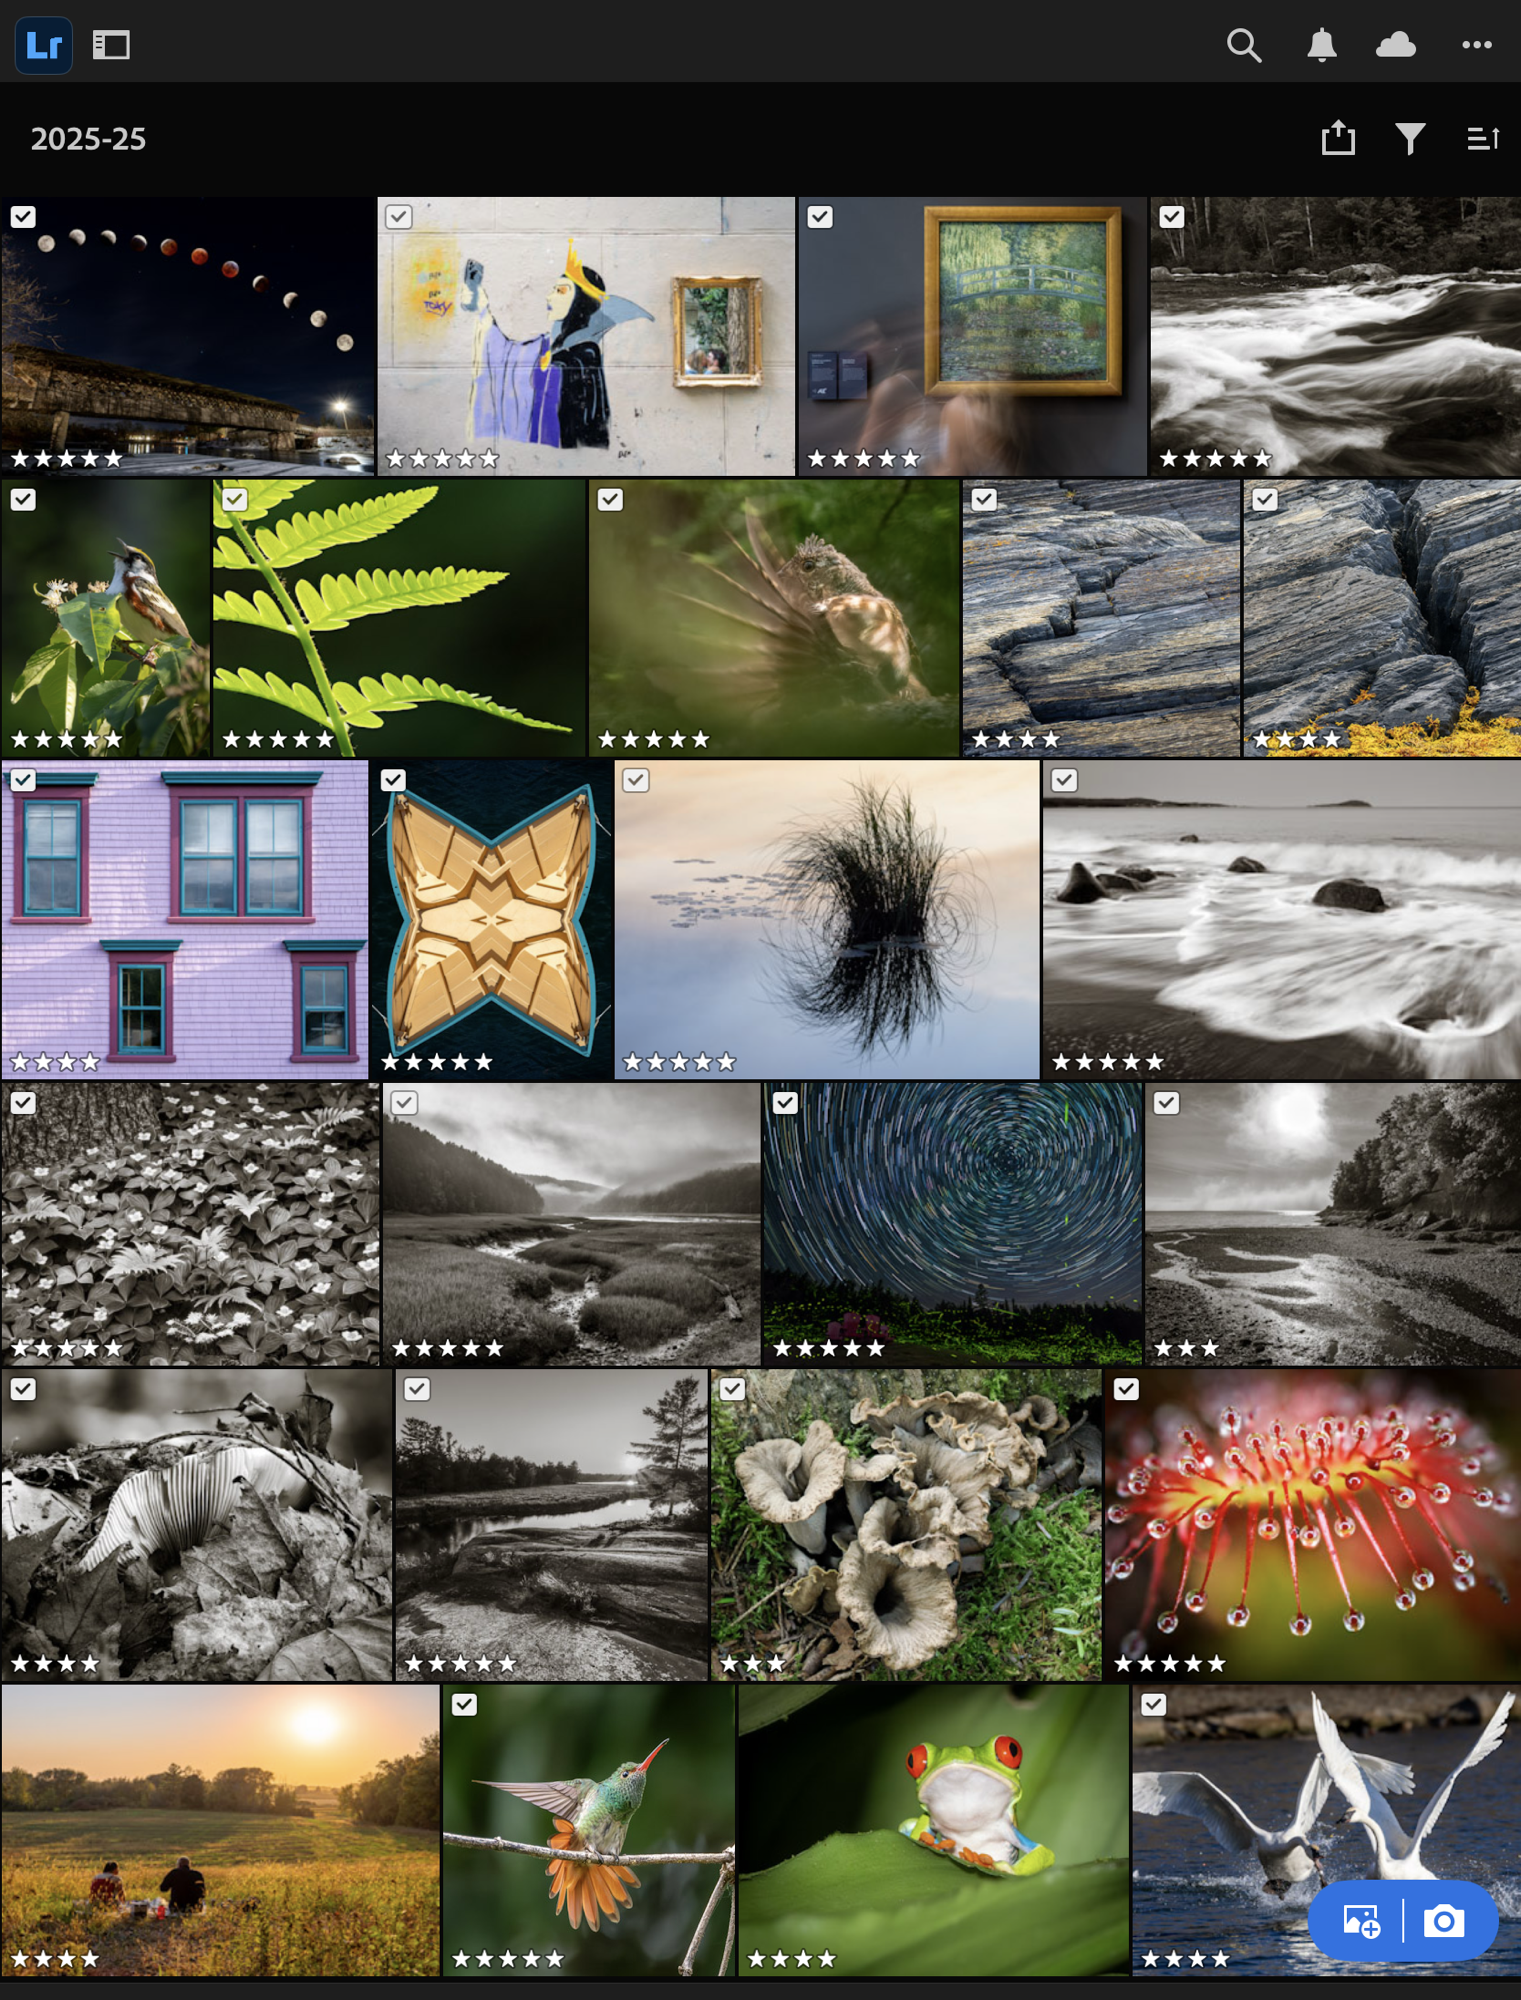
By carefully considering which duplicates and similar photographs to eliminate, I am managed to get that 42 down to 25; which is where the real work began. The process was simplified in Lightroom by creating albums: 2025-Best → 2025-25 → 2025-12.
The Final 12
In the final 12, I tried to preserve not just different photographic techniques, but also different perspectives, different ways of seeing and different experiences. You see, these are not my 12 ‘best’, but rather my 12 most significant. I could have chosen a dozen landscape scenes, or brilliantly coloured birds. The landscapes would simply be repetitions of landscapes; and for the bird photos, well, in many cases, it’s the bird that makes the photograph, not me, the photographer.
This happens a lot, as I alluded to above in the discussion about emotion. Over the course of each year, I see thousands of photographs across a variety of media, and I’m always conscious about whether it is the photograph that is significant or the subject.
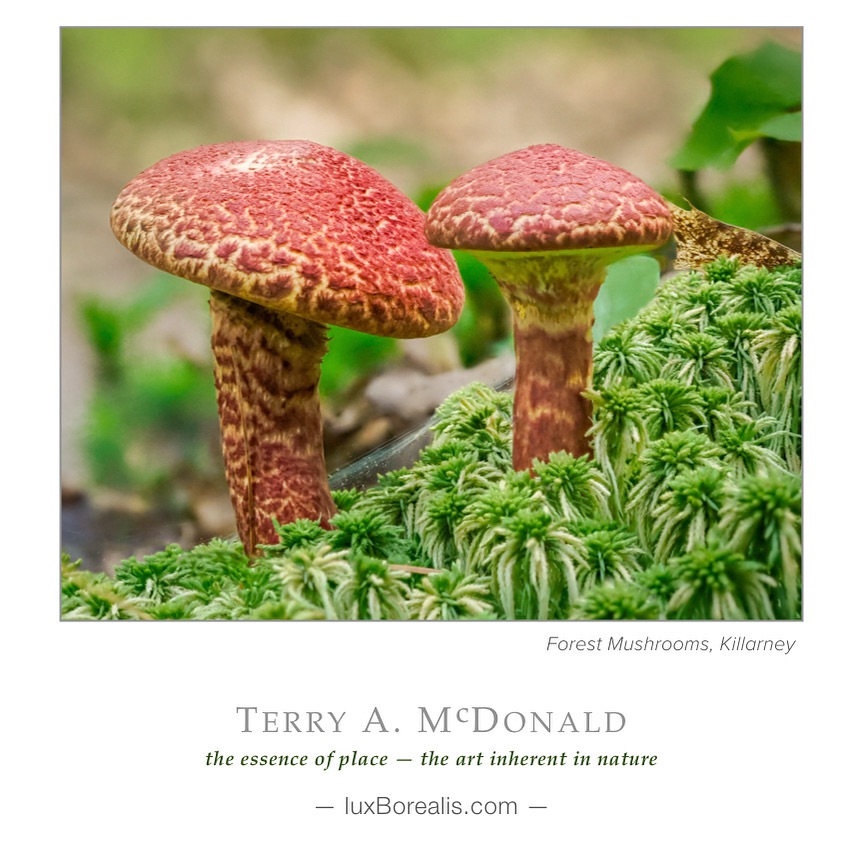
I love the detail, tones and soft light of this photograph. It represents the intricate relationships found on the forest floor and reflects my personal interests in ecology, making it significant to me.
Is it the photograph or the subject?
Photographers are very proud of their work, and rightly so, but many of the photos we see are great because of what was captured, as opposed to what the photographer did to make the photograph. I respect that there is certainly a lot of grey area between what any two people may think regarding where a photograph is on that spectrum, but to me it’s an important consideration.
Every photograph must have a subject of some kind. When considering photographs, the question I try answering is this:
Is it the subject that is drawing me in to the photograph, or is it the photograph itself—that combination of technique and aesthetic that creates an emotive response?
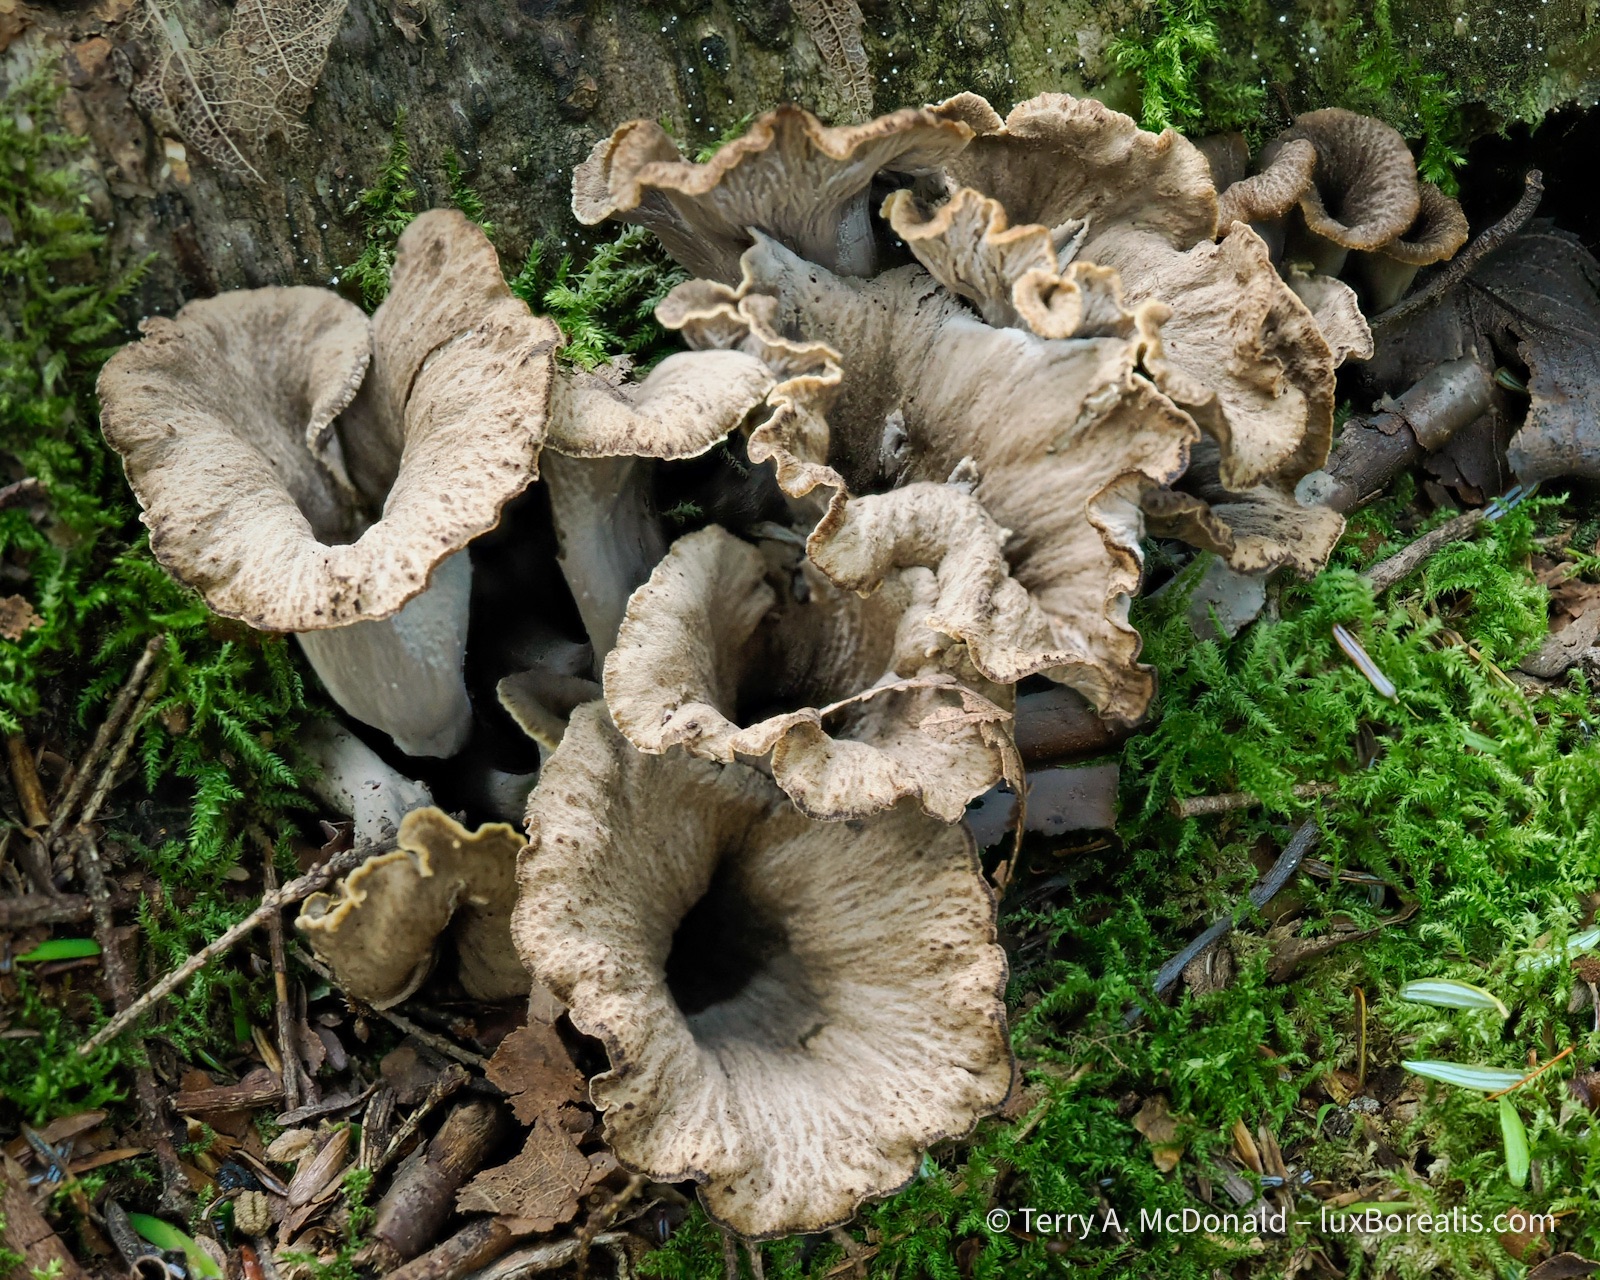
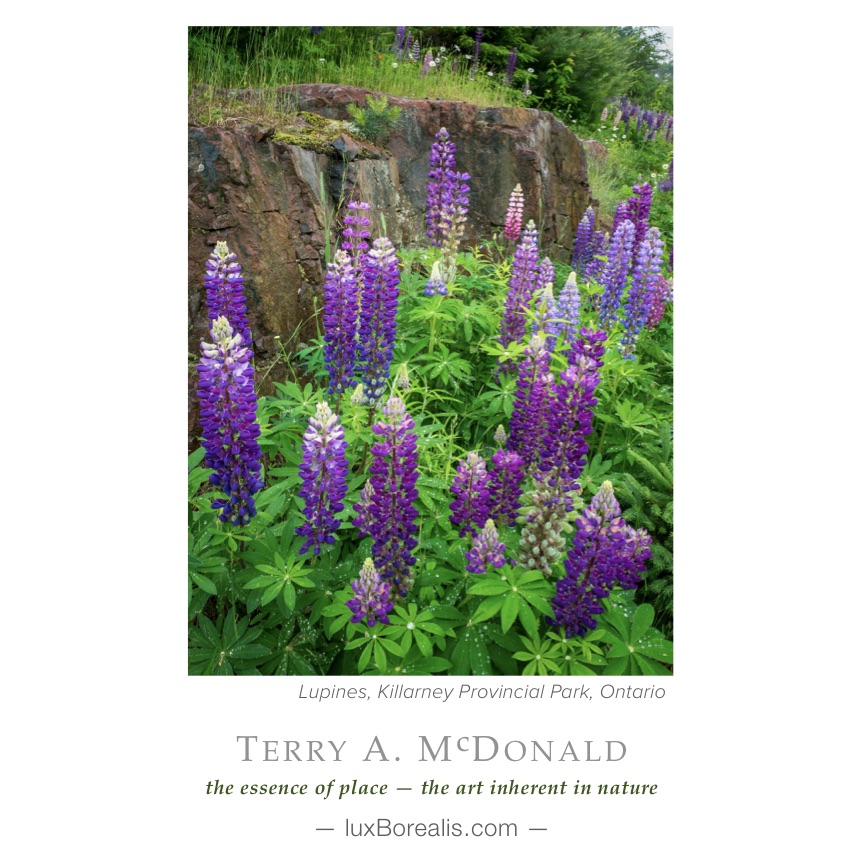
The week I spent at Killarney as their Artist in Residence was very productive but in ways I wasn’t expecting. I was thinking astrophotography, but ended up down on Earth, literally, admiring the array of different mushrooms that proliferated with the rain.
It’s the reason why I’ve left out many of the bird photographs I made. They sharp and colourful, but that just makes them glorified textbook images. As a result, I have preciously few photographs that rise to beyond this. My problem is, I am not one to see the abstract or the concept in subjects or scenes. By nature, I am a realist devoted to #RealWorldPhotography—the pursuit of photography to accurately reflect the reality of the scene or subject in front of me.
In other words, I tend to shoot the obvious. I work hard at going beyond the obvious, but still have a ways to go.

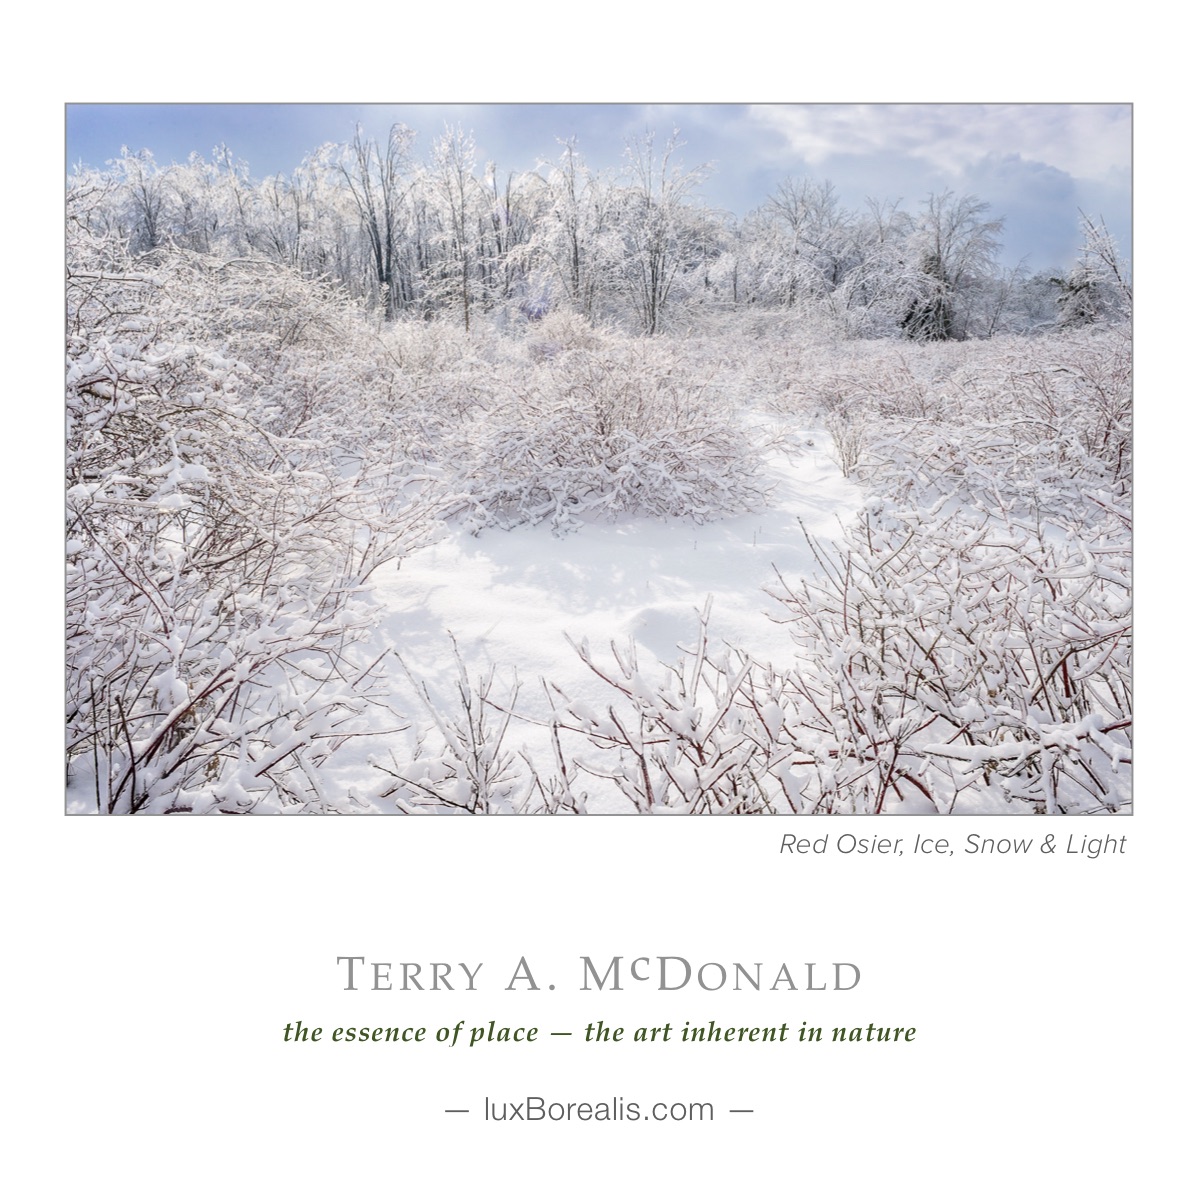
I am always attracted to patterns and designs in nature. They remind me that in what often appears to be the chaos of nature, there is an underlying structure.
Conceptual Photography
There is nothing worse than a sharp image of a fuzzy concept. — Ansel Adams
As I review my photographs each year, I tell myself this, over and over again—look beyond the obvious to the conceptual, the abstract—and re-commit myself to that goal. Over the years, I’ve made some progress, but am still blinded by all the beautiful, exotic, and colourful patterns and designs, tones and hues of the world around me.
Okay, enough introspection . . . Now for the photographs. They are presented in a Gallery format, sorted by capture date. Click on any photo to start and it will open in full-screen view with arrows to take you back and forth through the twelve. There is also a small ‘ i ’ button for more information.
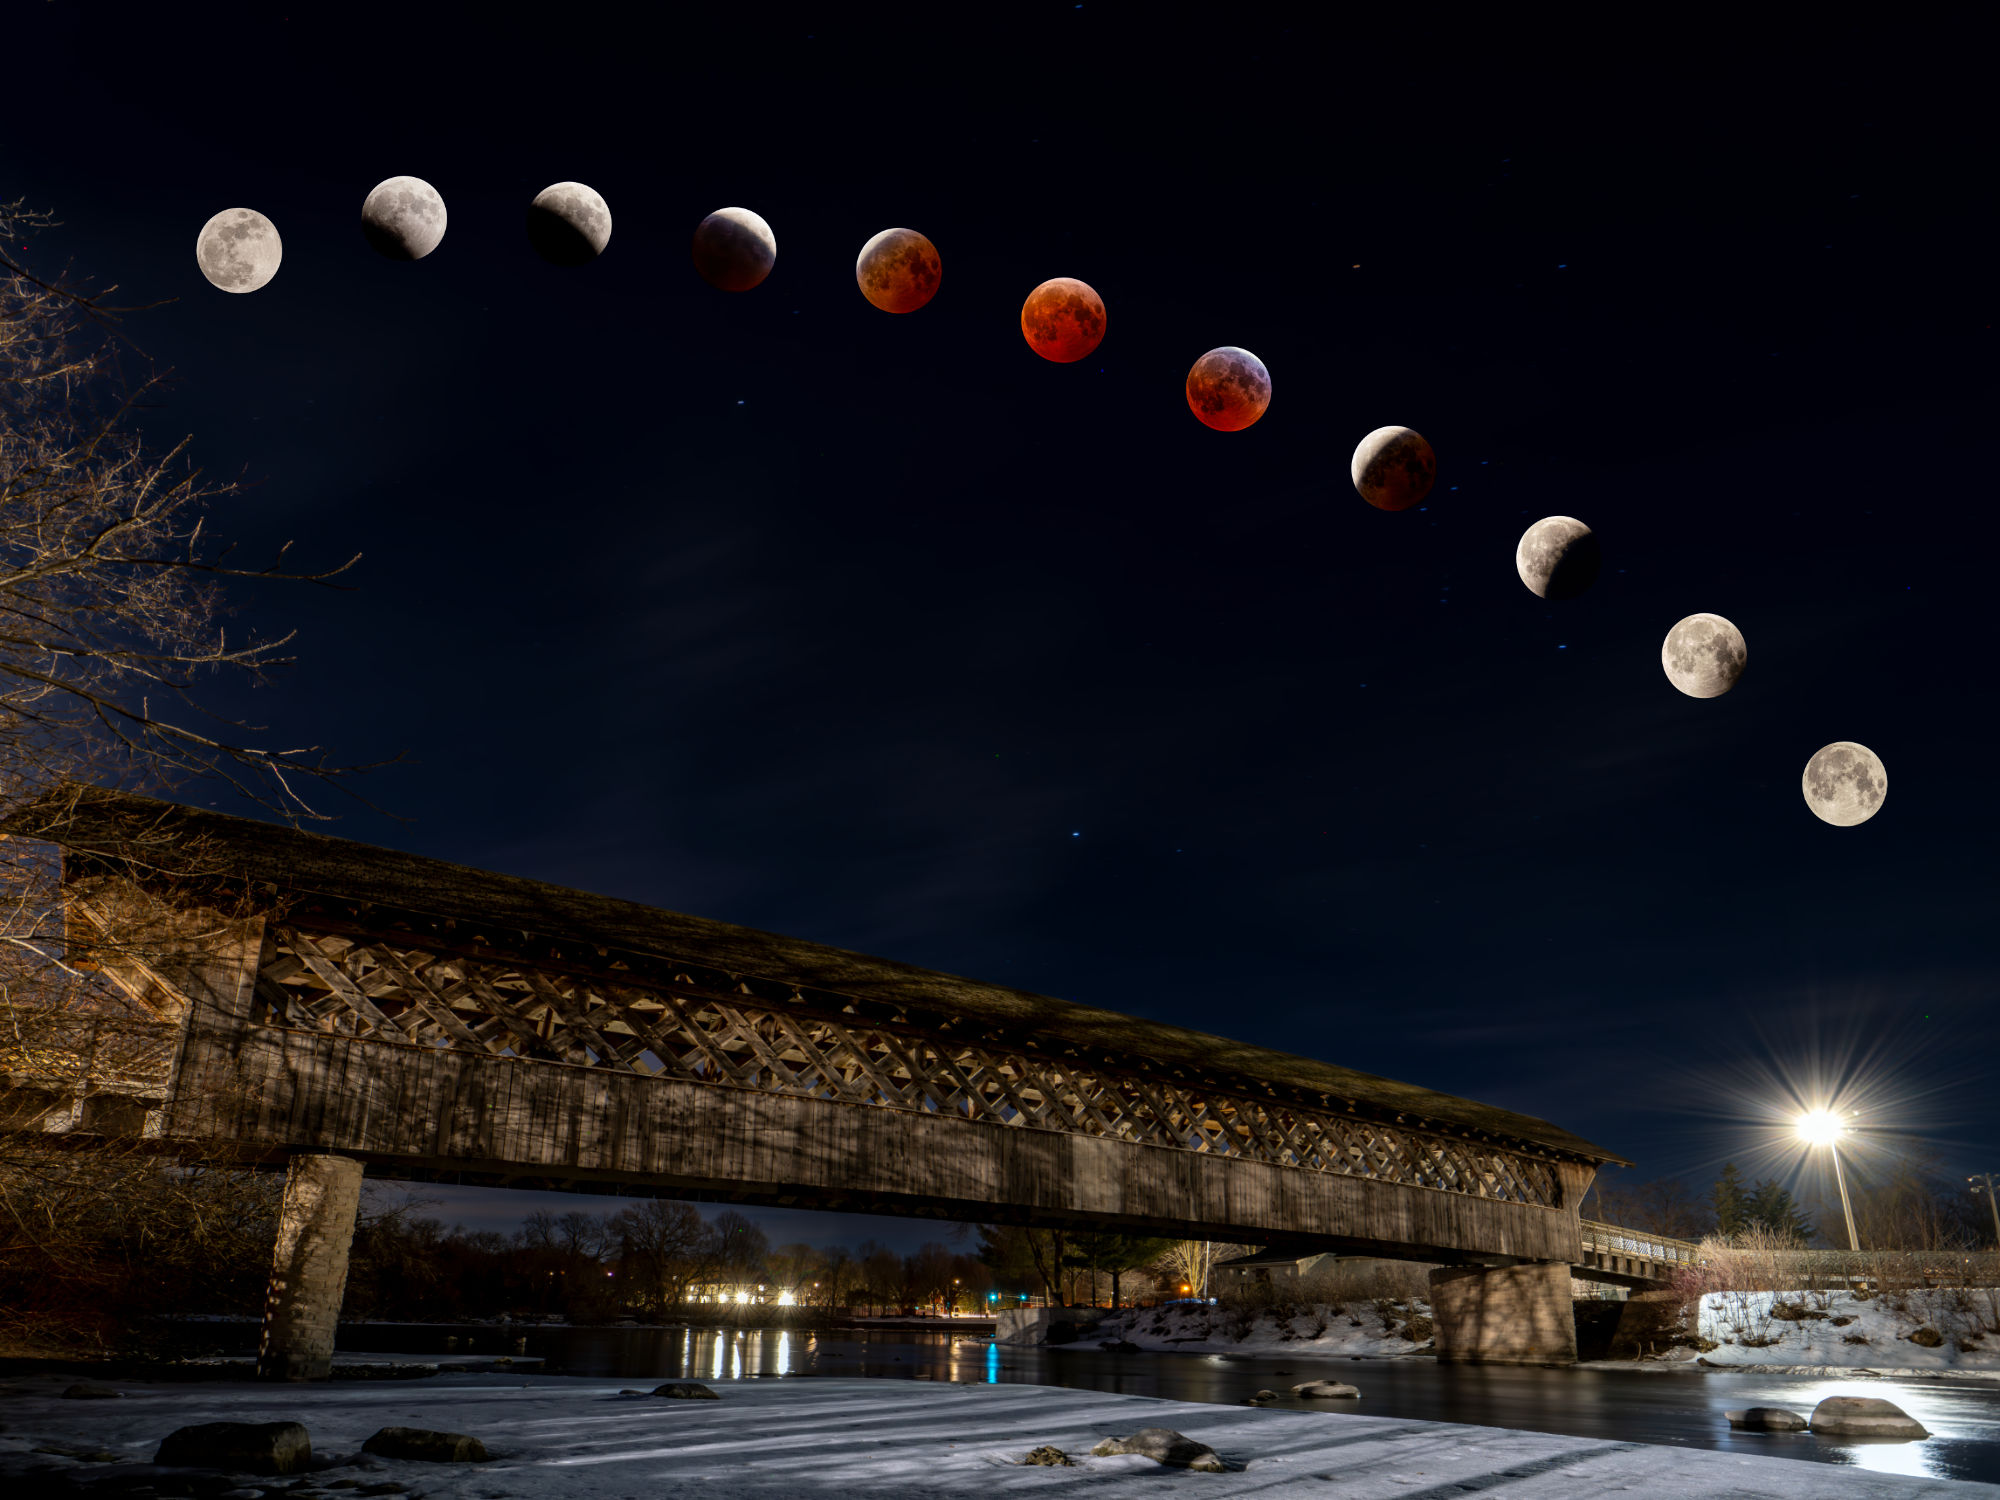
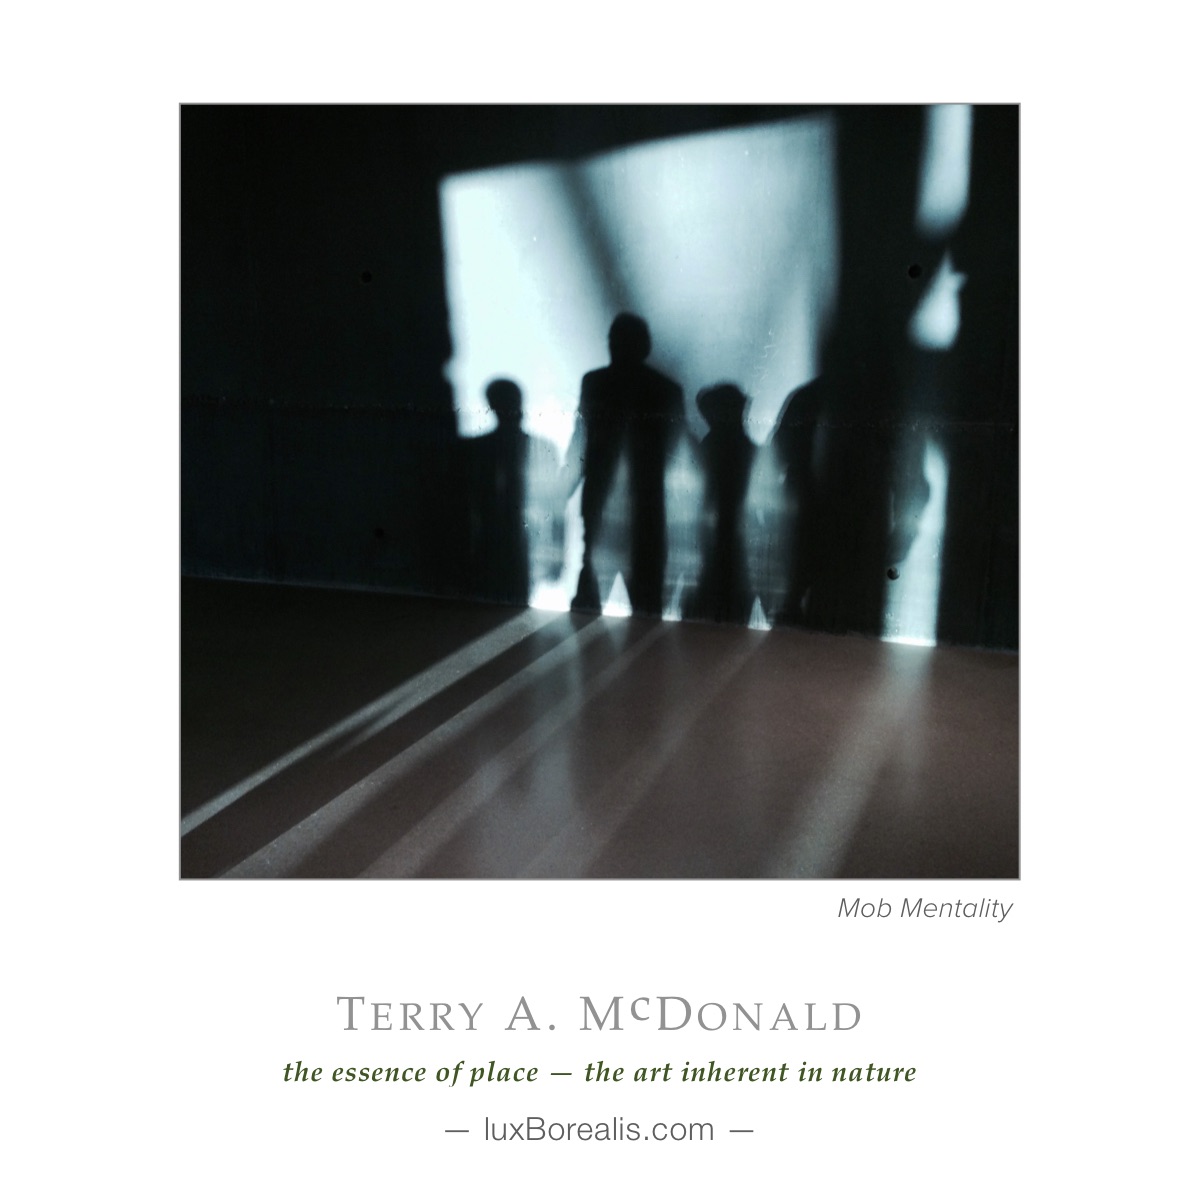
Finally! I have visualized this photograph for years, waiting for just the right combination of clear skies and personal time to prepare for the event, capture it, and assemble the photos into a composite.

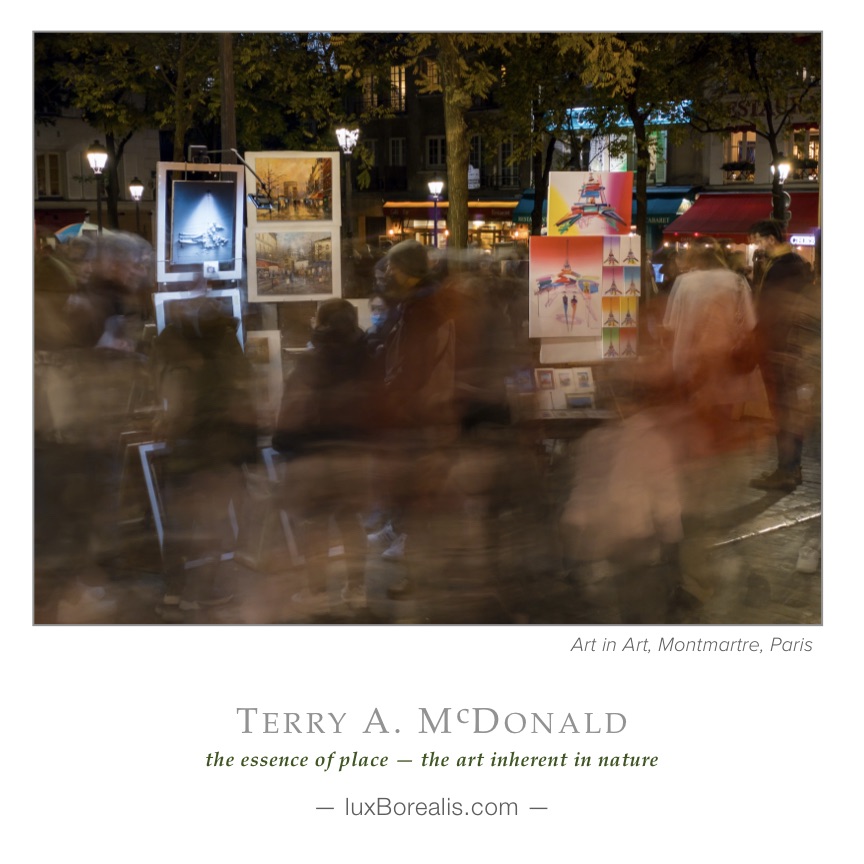
I enjoy photographing street art in Paris and this juxtaposition of the fairy tail, the mobile phone and the mirror—not my creation—caught my eye. It was serendipity that brought the two Paris lovers together in a kiss.

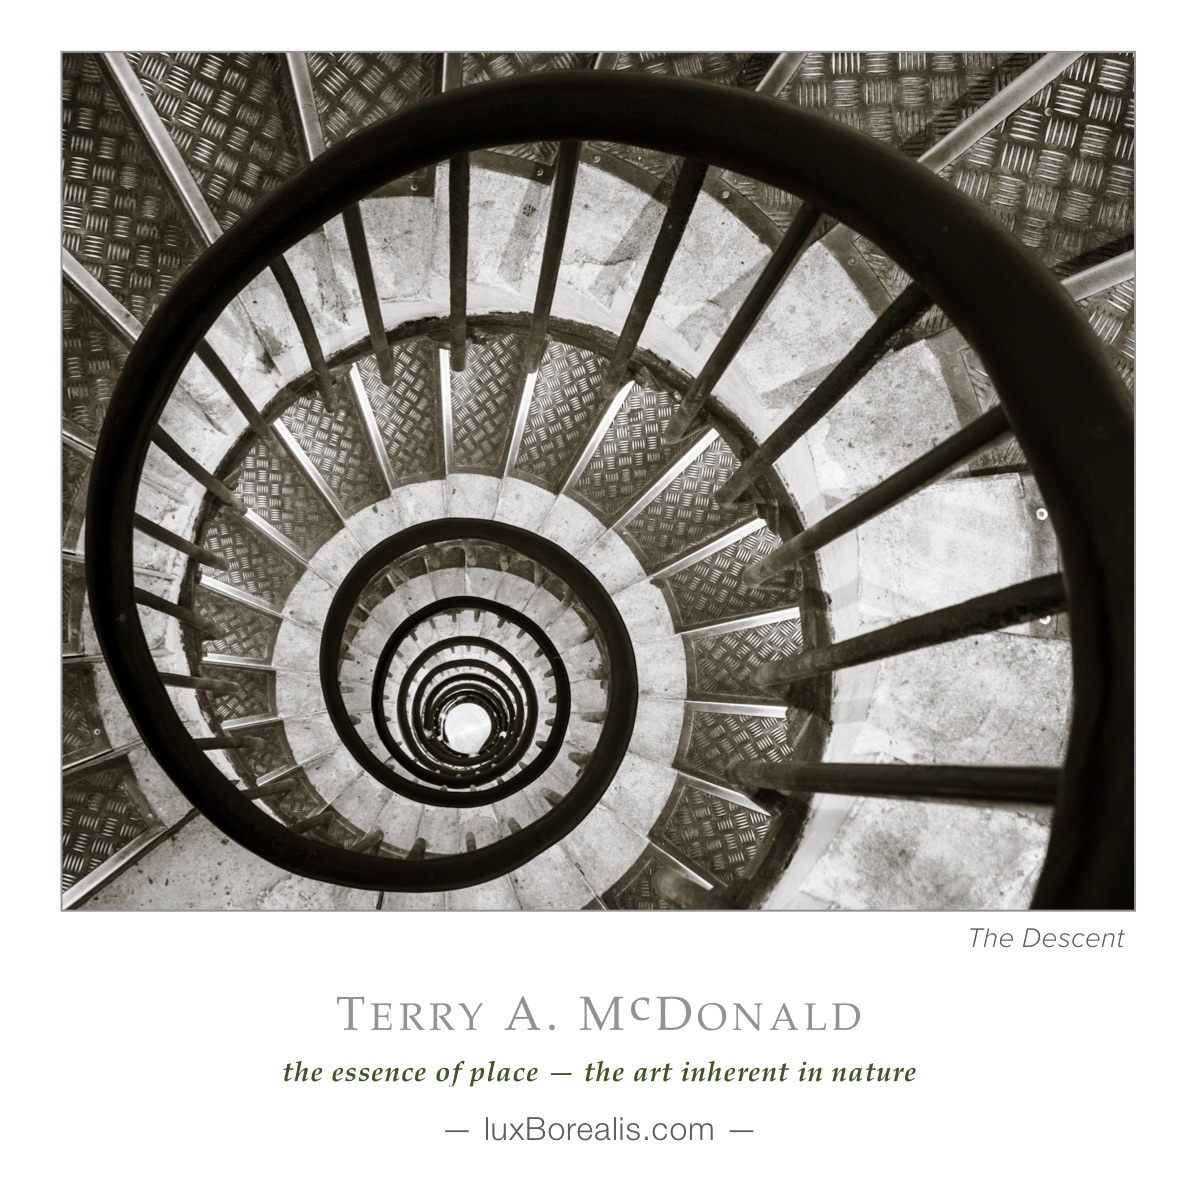
I set myself the goal of capturing the essence of place within the Musée d’Orsay using LiveND and slow shutter speeds. This was one of the many photographs that resulted.
Pure simplicity captured using handheld focus stacking
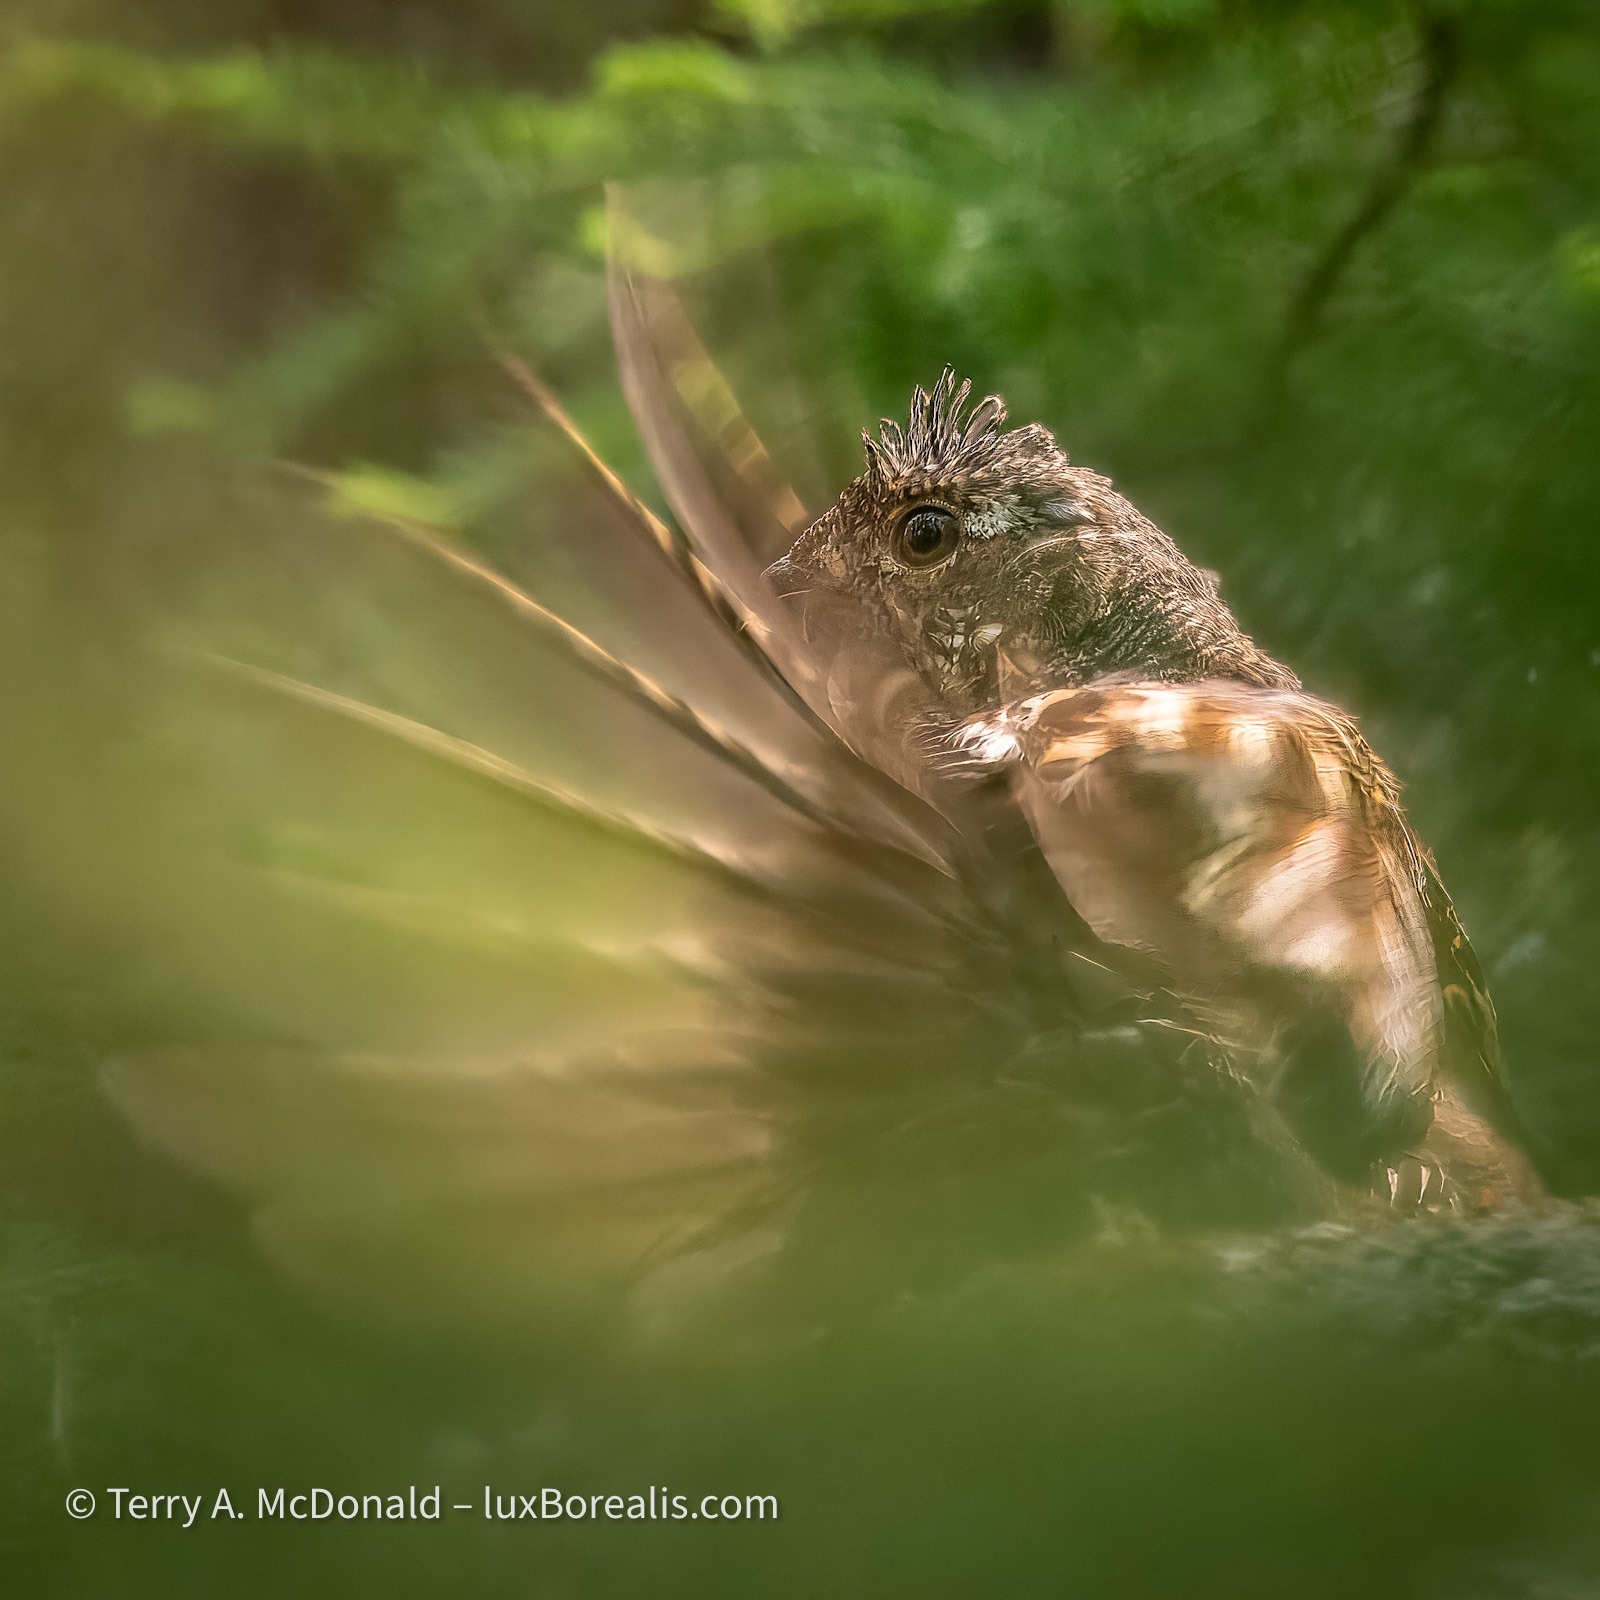
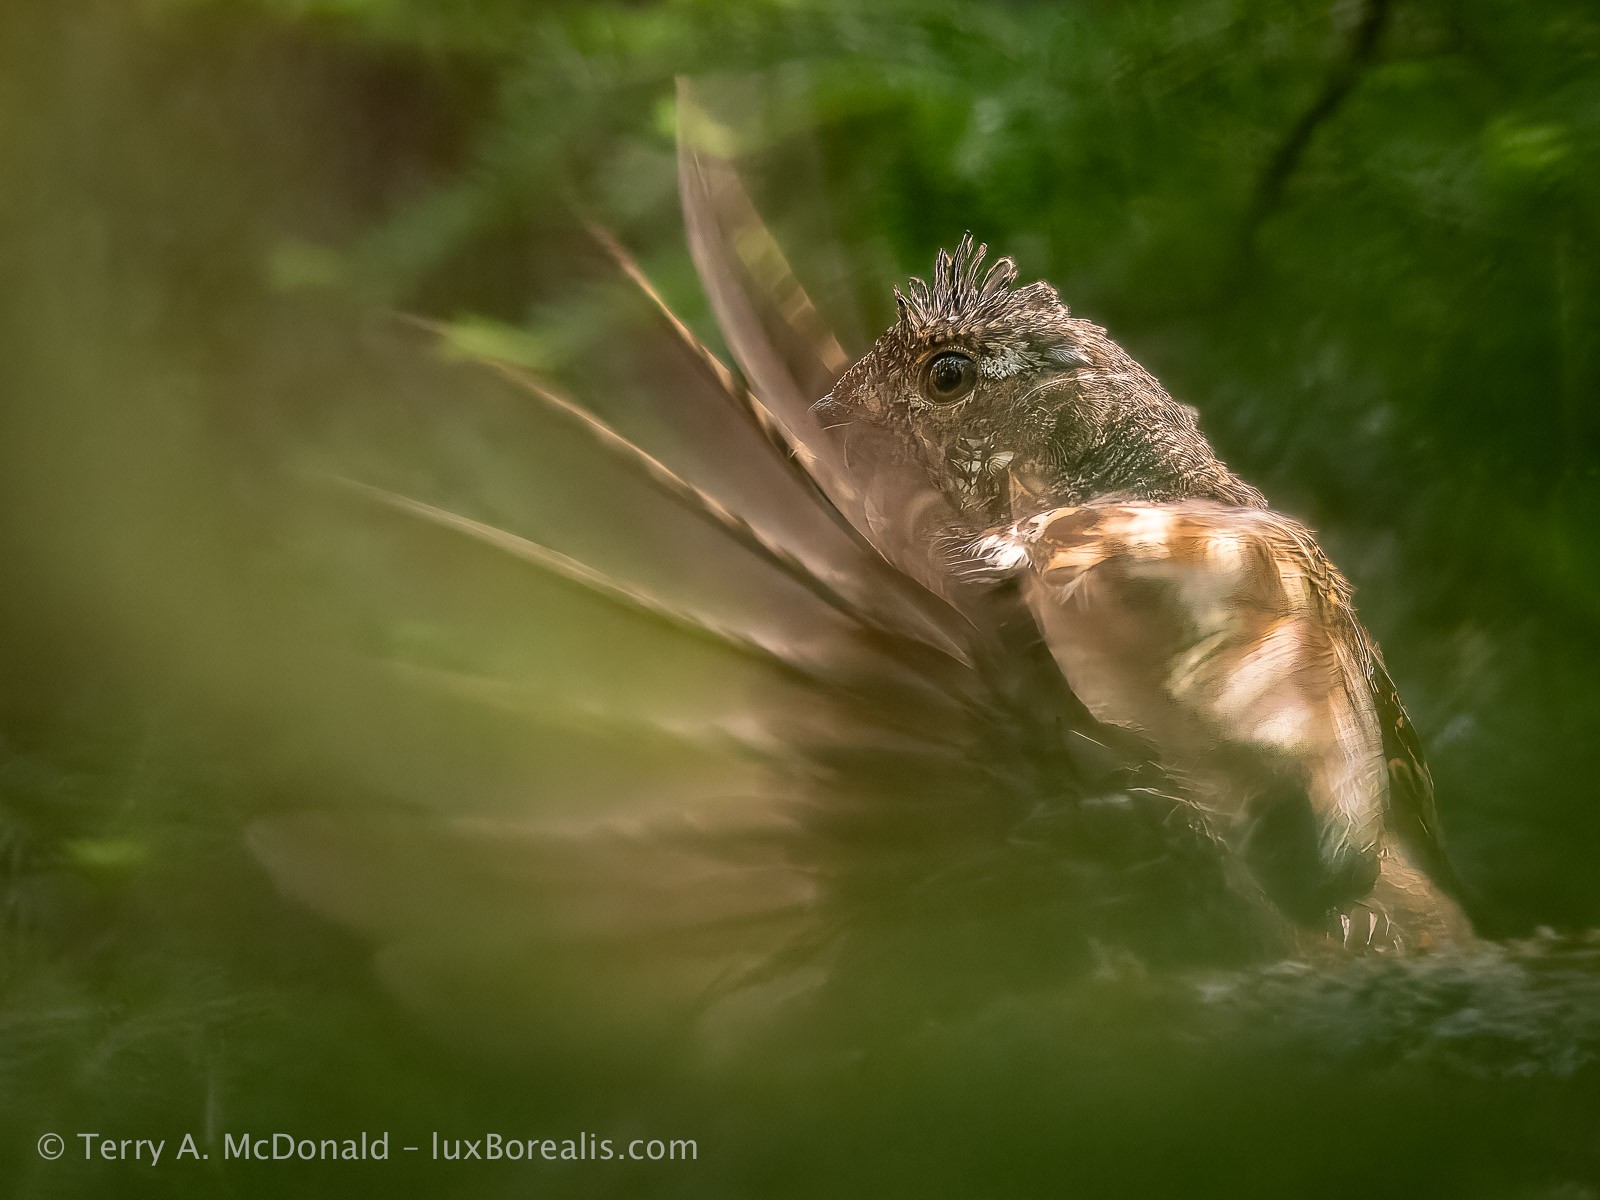
For decades I’ve been startled by the sudden thump-thrump-thrump of a grouse wingbeat, so to watch it and photograph it was exhilarating!

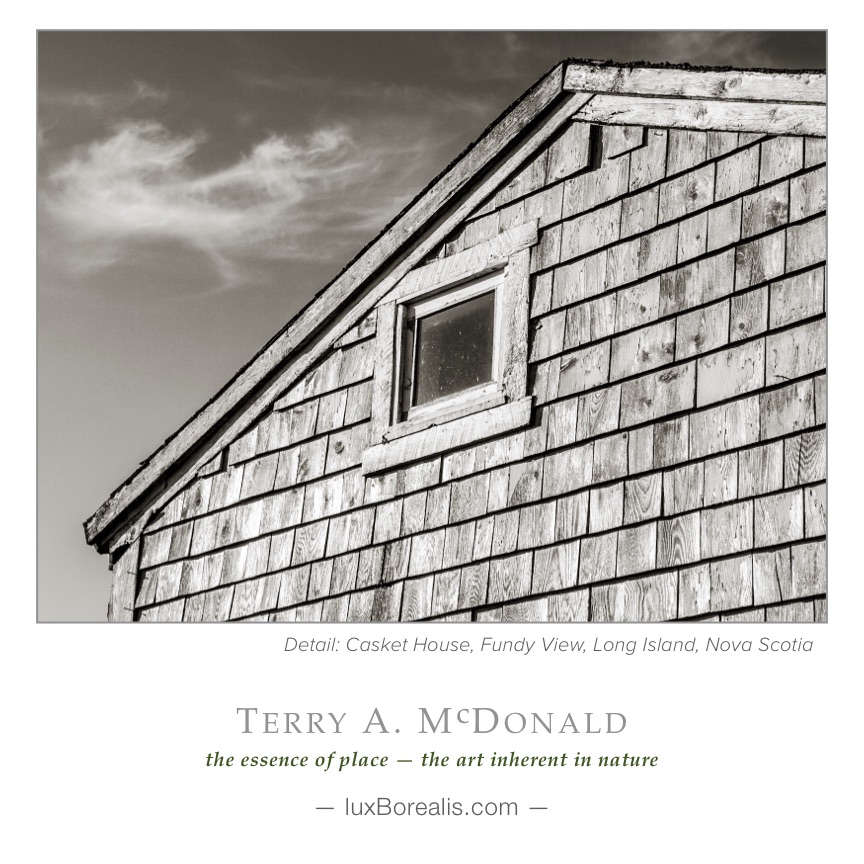
Lunenburg is, well, Lunenburg: quaint and beautiful, but in a beautiful-for-tourists way. So I actively looked for something different. This composite photograph is the result.

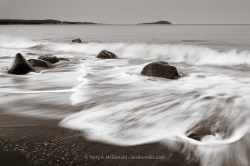
This came out of nowhere—a casual evening walk with my daughter and her dog down to the beach. After 20 minutes, they left and I stayed, using LiveND to capture the. magic.
As the tide receded and the evening fog rolled in, I watched this photograph develop in front of me. What I needed was a foreground, and I found it.

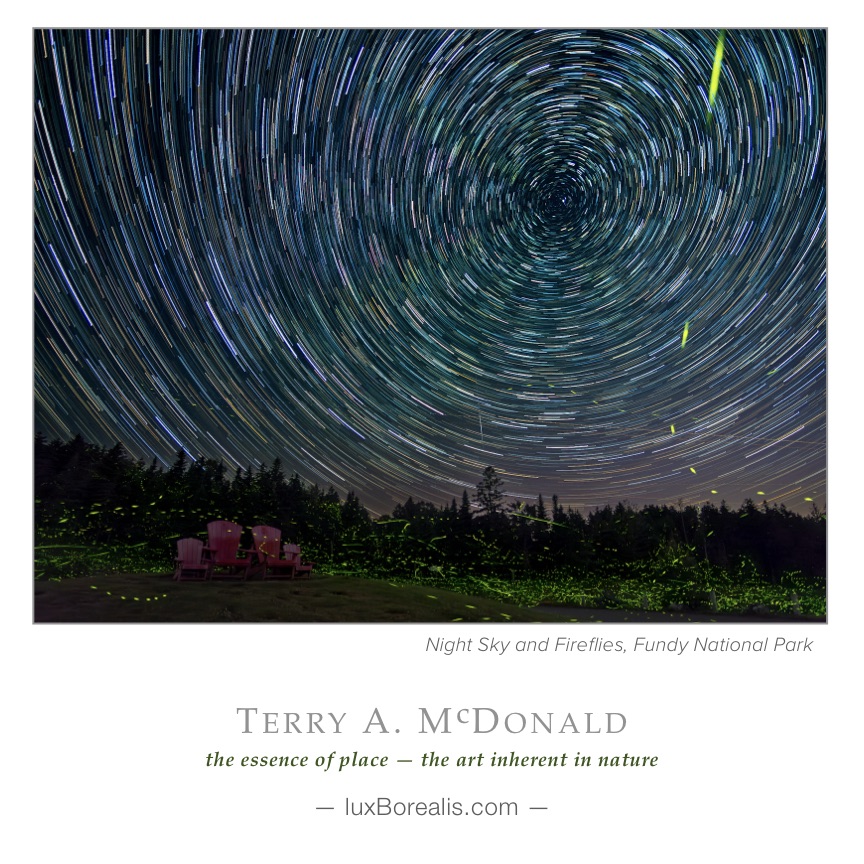
My goal was to devote the whole of Canada Day to photography. That meant starting at 1:30am. The clear sky demanded an attempt at star trails. Little did I realize there would be hundreds of fireflies in attendance!
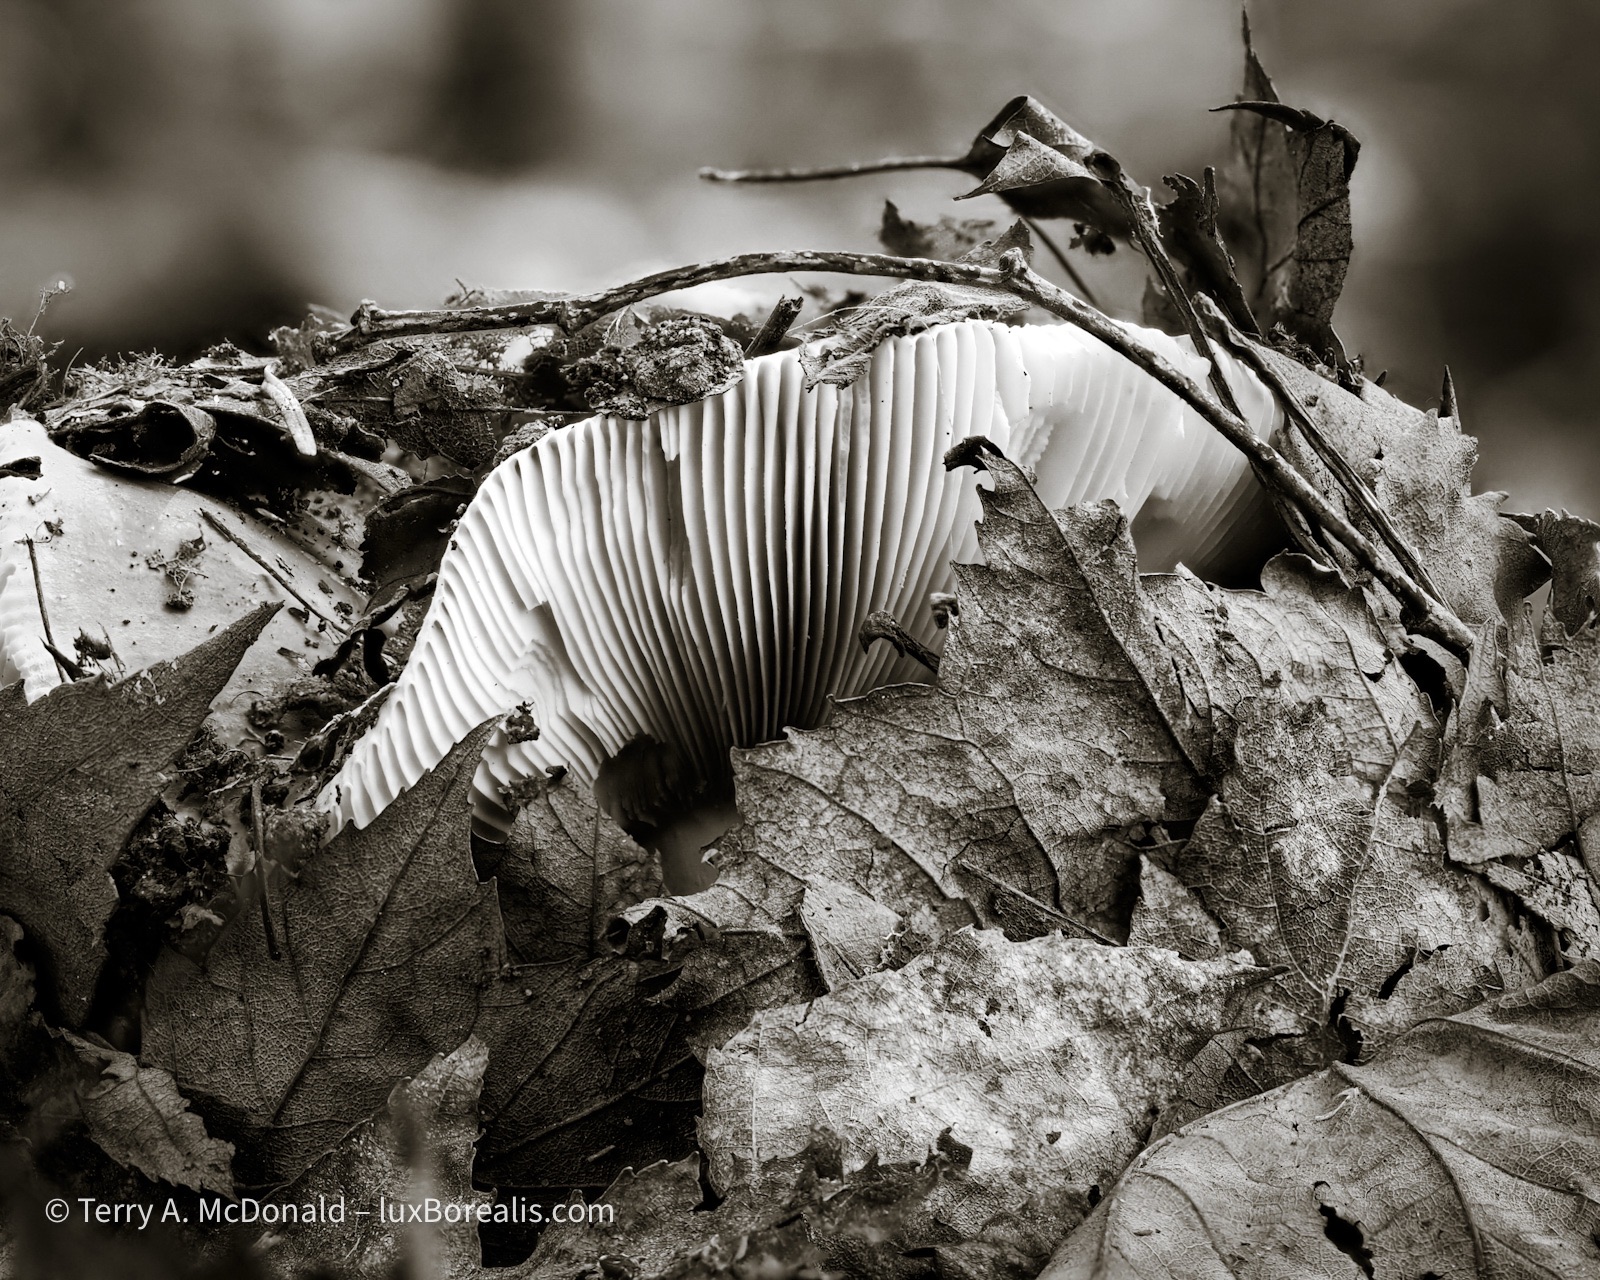
We always see mushrooms fully erupted from the Earth. To see this one still emerging, swaddled in leaf litter, was like capturing a slow-motion dance in mid-move.

I’m enjoying using the 60mm Macro lens—the sharpest lens I’ve ever owned. Getting close handheld with sharp focus has never been easier.

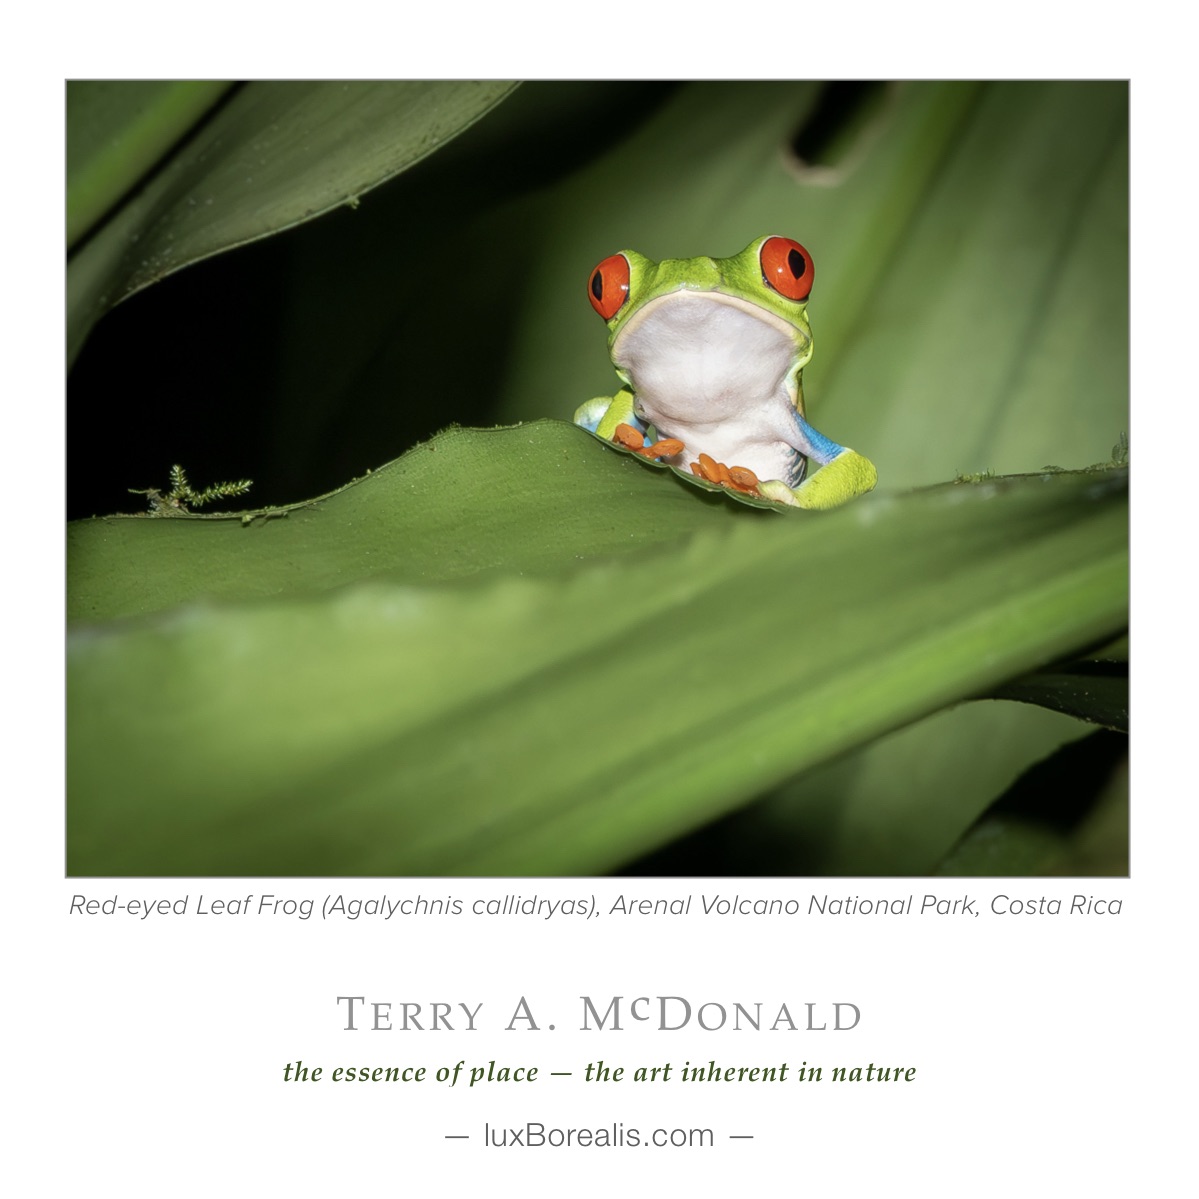
Hummingbirds are everywhere in Costa Rica, but capturing one doing something other than feeding, resting or hovering was the challenge.
So what do you think? Please continue the discussion by adding your COMMENTS, questions or experiences. And take a moment to SHARE this post with other photographers.
52 Friday Faves of 2025
52 photographs; 125 words; 1 minute read; hopefully longer to peruse
I just posted my last Friday Fave of 2025 over on Instagram. It was my 207th week in a row. Here are all 52 of them! Click on any image to open it in gallery view with forward > and back > actions.


Friday Faves are a look back at photographs I’ve made over the years. Stay tuned for 12, 2025 with my twelve most significant photographs made this year.
Be sure to continue the discussion by adding your COMMENTS, questions or observations and feel free to SHARE with other
This blog is completely free and I do not include commercial affiliate links. To help keep it free, consider buying me a coffee.
The New Topaz Photo: How well does it compare to Lightroom and DxO?

Topaz says it’s “Trusted by the Best”. Perhaps so, but . . .
7,031 words; 10 photographs; 37-minute read
I’m revisiting some work I did earlier in the year. Back in February, I completed some fairly extensive testing of DxO PureRAW, Lightroom, and Topaz PhotoAI in Raw File Optimization. Since then a few changes have come about:
- Adobe Lightroom integrated denoise into the regular workflow. No longer does it create a separate DNG for denoised images. A definite improvement in workflow and file management.
- DxO brought out its updated DxO PhotoLab 9, which I reviewed back in October (Part 1, Part 2 and Part 3).
- Topaz Labs moved to a subscription model when they introduced Topaz Photo (and Studio), without AI in the name, but most definitely still reliant on AI.
I could have you read all the way to the end for a conclusion, but let me save you some time. From what I’m seeing, Topaz Photo (v1.0.2) is no better than Topaz PhotoAI. The GUI has changed slightly, but the results appear the same. Are they better than Lightroom or DxO? In some cases, yes, in others, no. Much depends on the end use and what you expect to use Topaz Photo for. Keep reading . . .
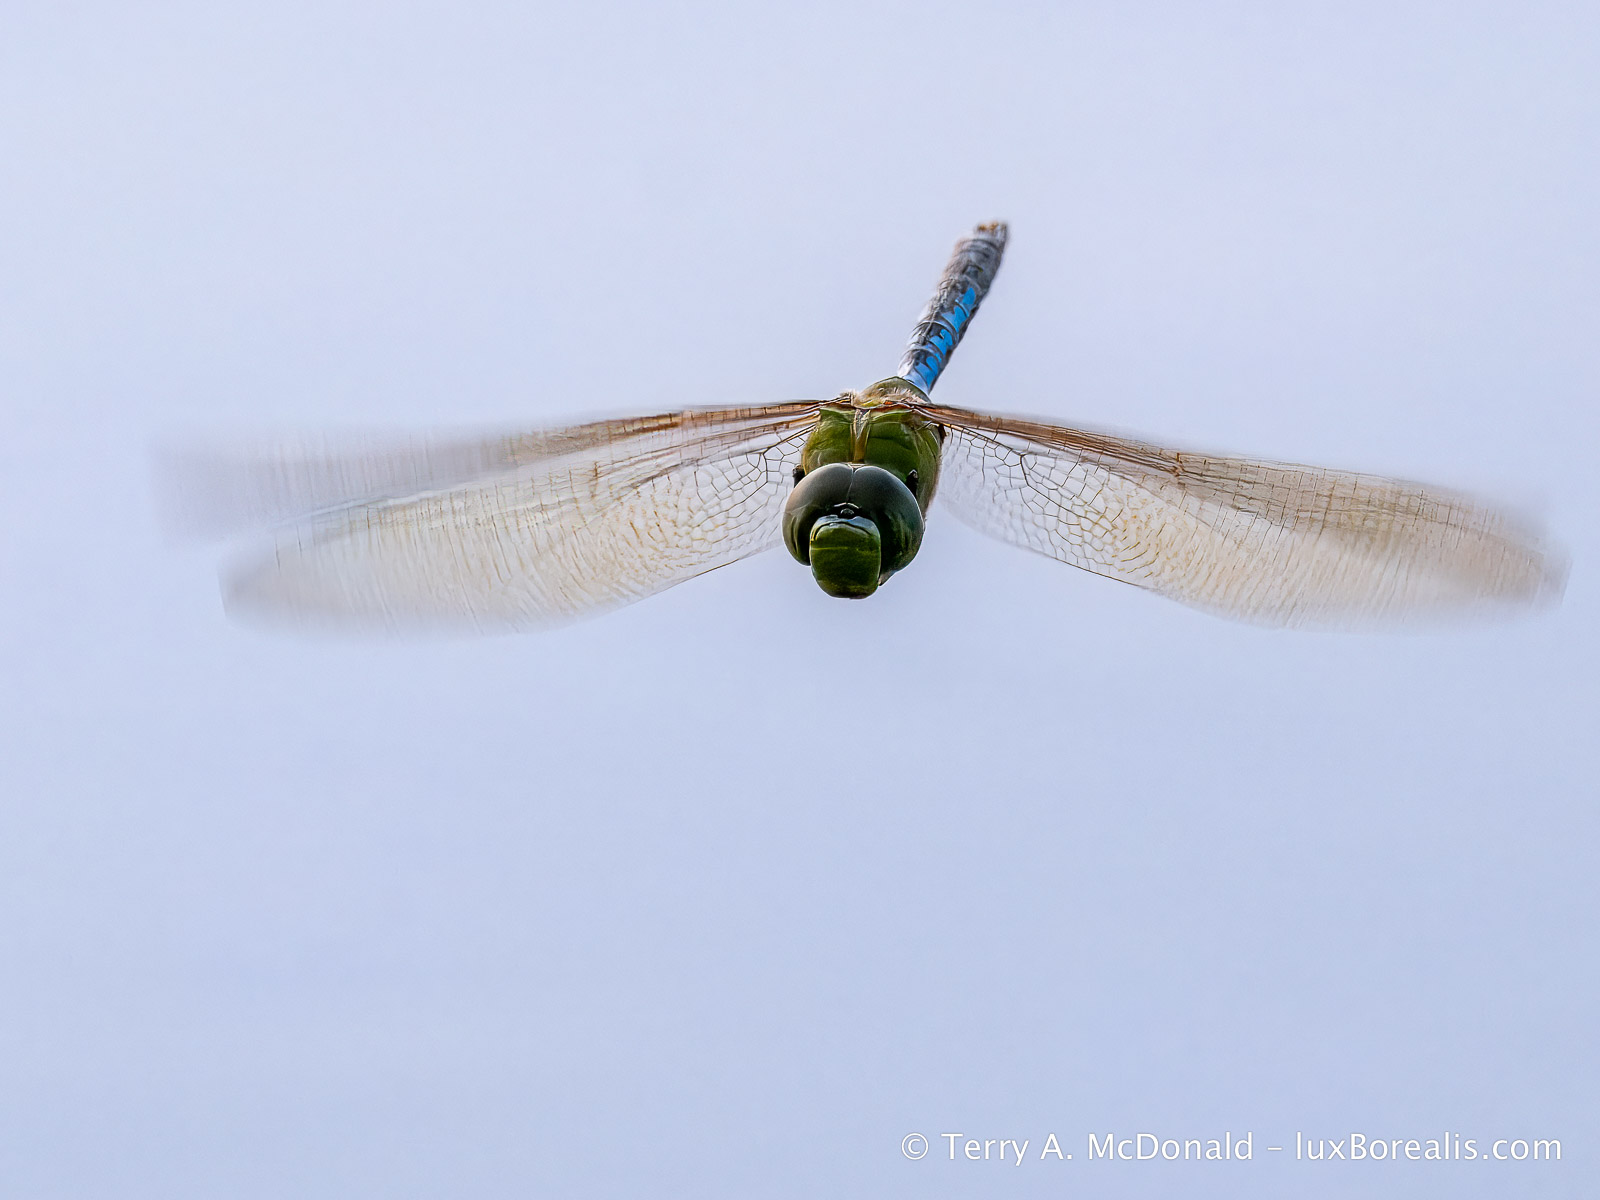
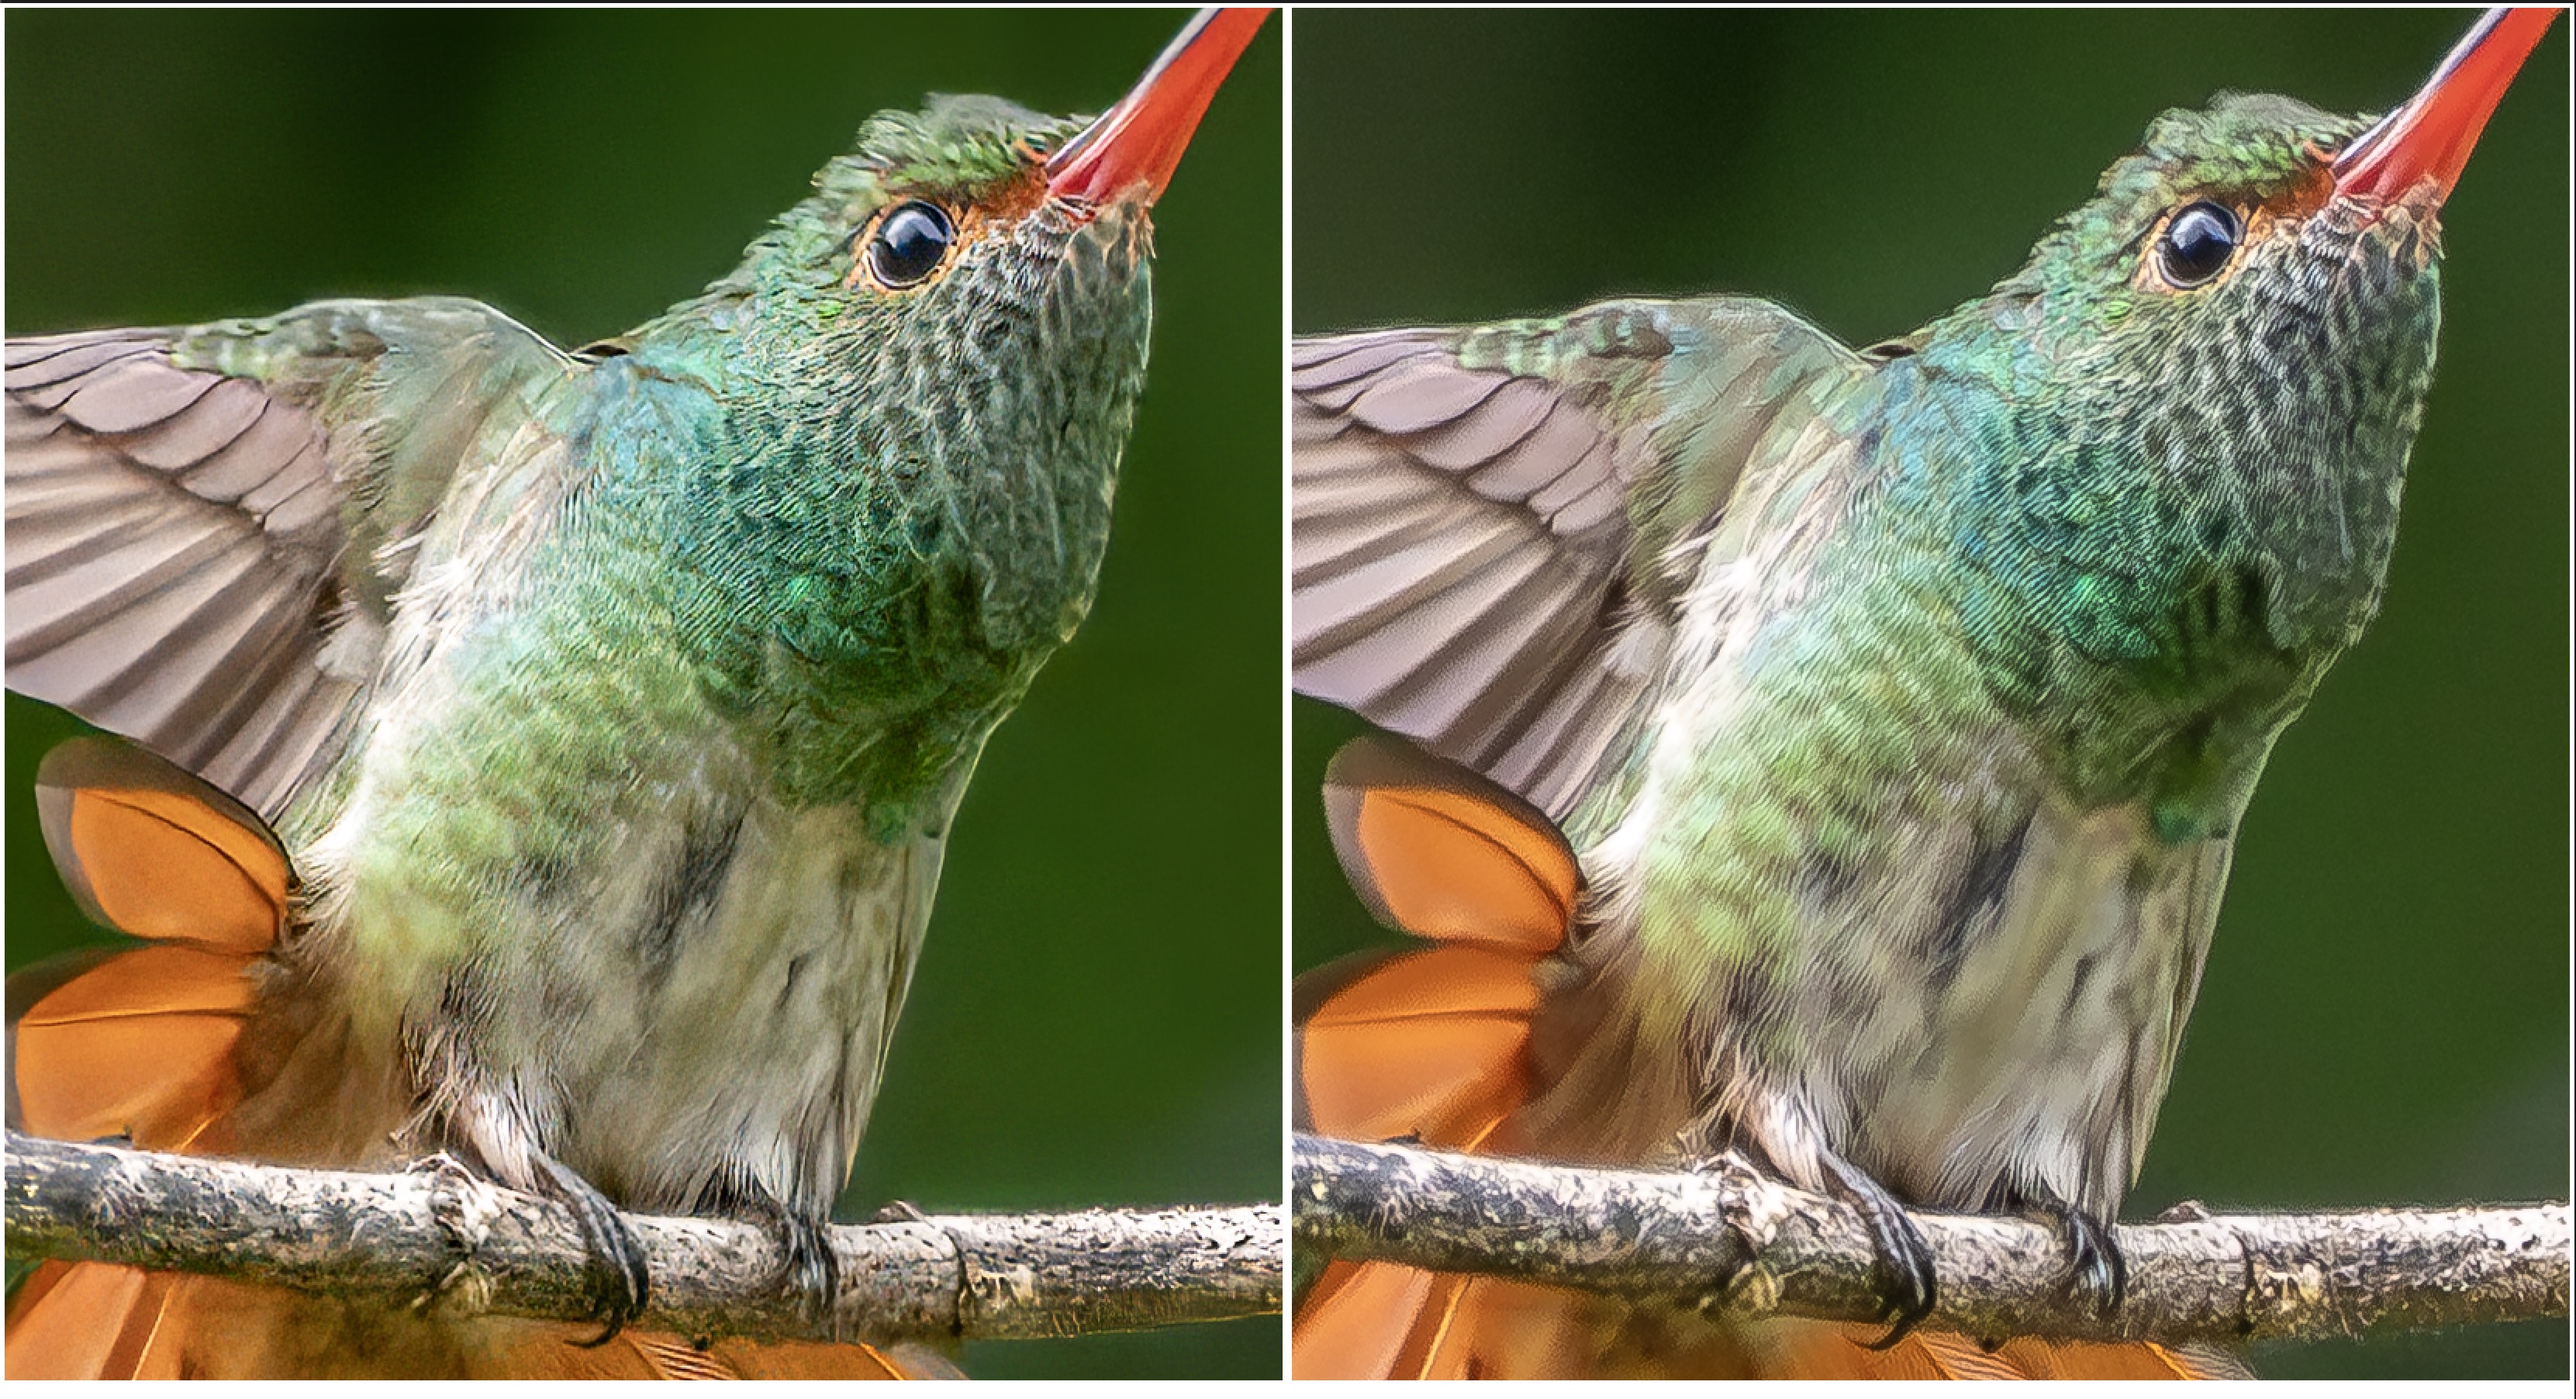
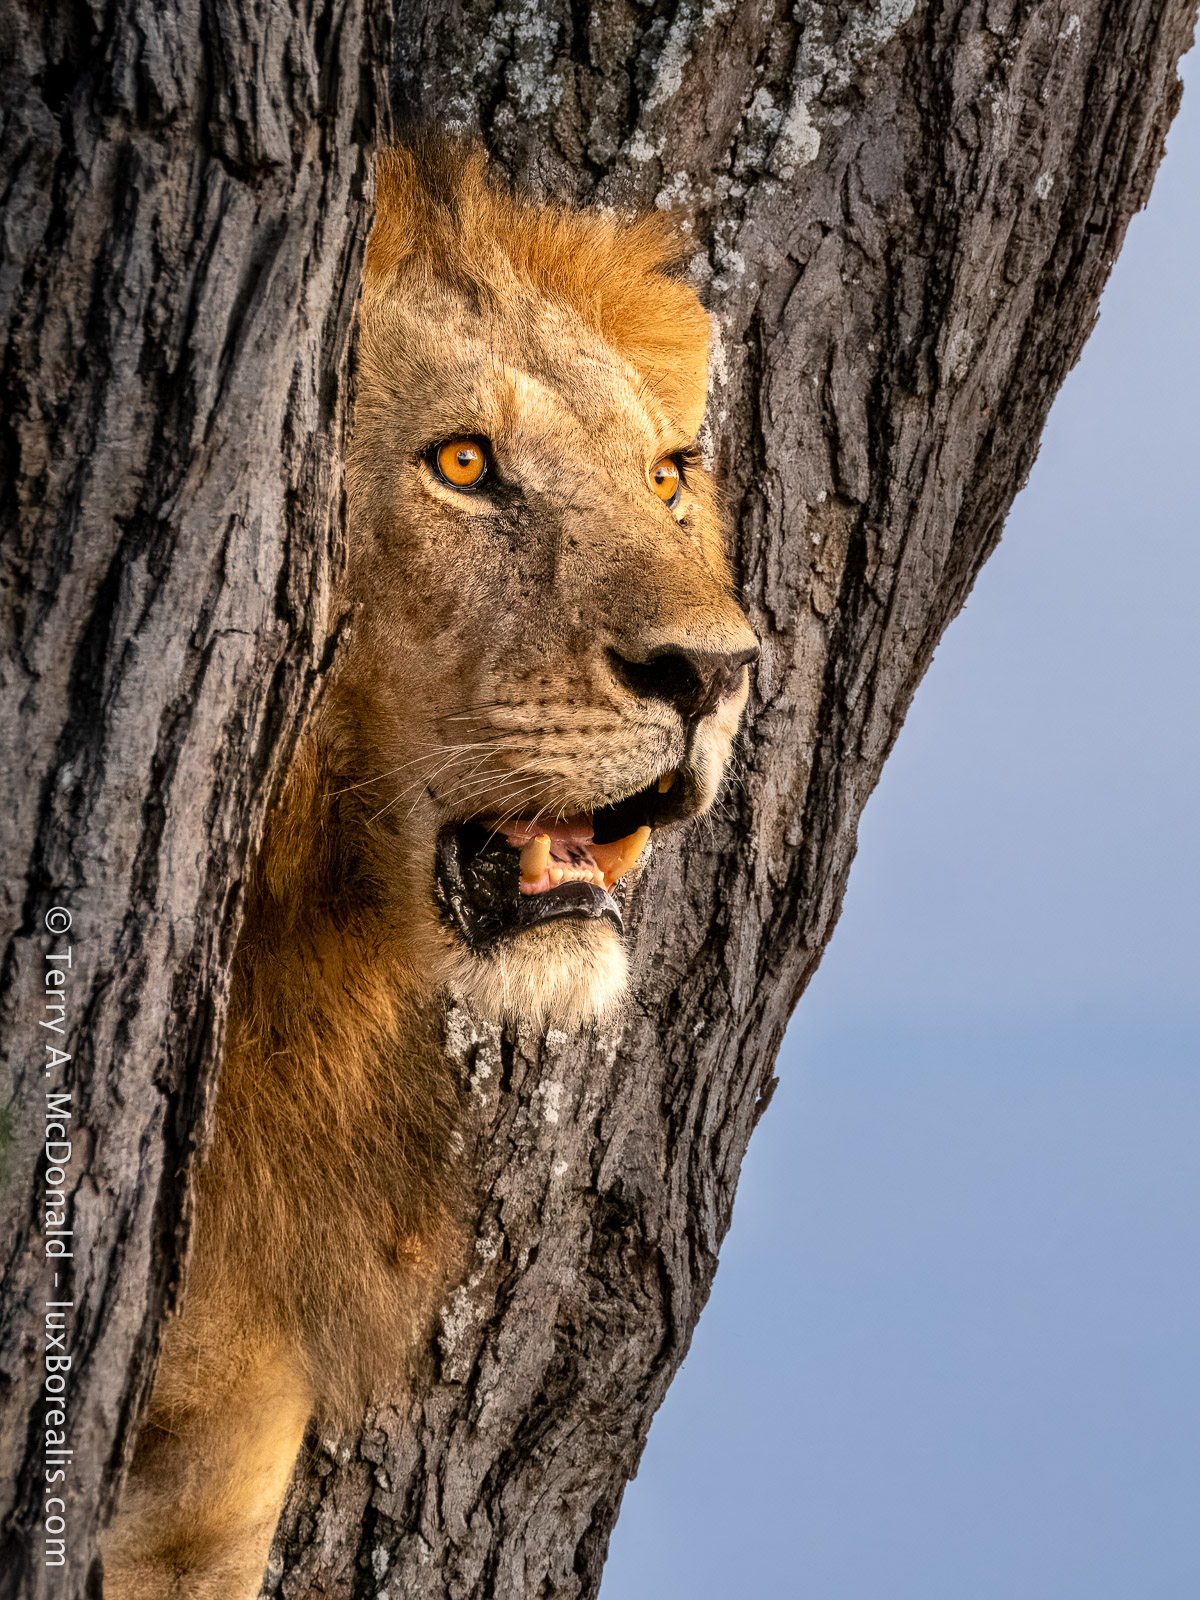
Olympus OM-1 w/ ED M.Zuiko 100-400mm at 400mm (800mm efov) • ƒ8 @ 1/640 • ISO 3200 • Topaz Photo + Lightroom
Topaz to the rescue! Caught on-the-wing, focus is bang-on for the thorax, but the eyes were soft. Processing began in Topaz Photo with Raw Denoise (Standard) and Sharpening (Subject – Motion Blur). The eyes were brought into ‘focus’ using a second sharpening layer masked specifically for the head, set to ‘Refocus’. After exporting the file as a DNG, it was re-imported into Lightroom where exposure and colour balance adjustments were made, which included a ‘Sky’ mask layer.
Before I began testing, I had to ask myself, what circumstance would cause me to take the time to leave Lightroom to use Topaz Photo? You see, Topaz Photo is not a full-fledged processing suite like Lightroom or Capture 1 and, to a lesser degree DxO PhotoLab 9. Fundamentally, both Lightroom and Capture 1 ‘do it all’, like no other editing suite:
- All the Metadata stuff: flagging, rating, keywording, location data, etc.;
- Image Organization in Folders, Albums and Smart Albums;
- Processing: auto exposure or not, auto whites, blacks, highlights and shadows, or not; colour balance, grading, and mixing; black-and-whites;, denoise; effects such as texture, clarity, dehaze and vignetting; detail adjustments; export sharpening; masking par excellence; optics adjustments; lens blur; and geometry.
- Export for multiple uses, geared primarily to digital output; Lightroom Classic has greater capabilities here;
- Fully searchable Library, geared to the needs of photographers, even without keywording.
And this describes the plain version of Lightroom, not Lightroom Classic, which is even more capable. Which brings me around to price. Typically I prefer discussing the features before addressing price, but I really must get this off my chest . . .
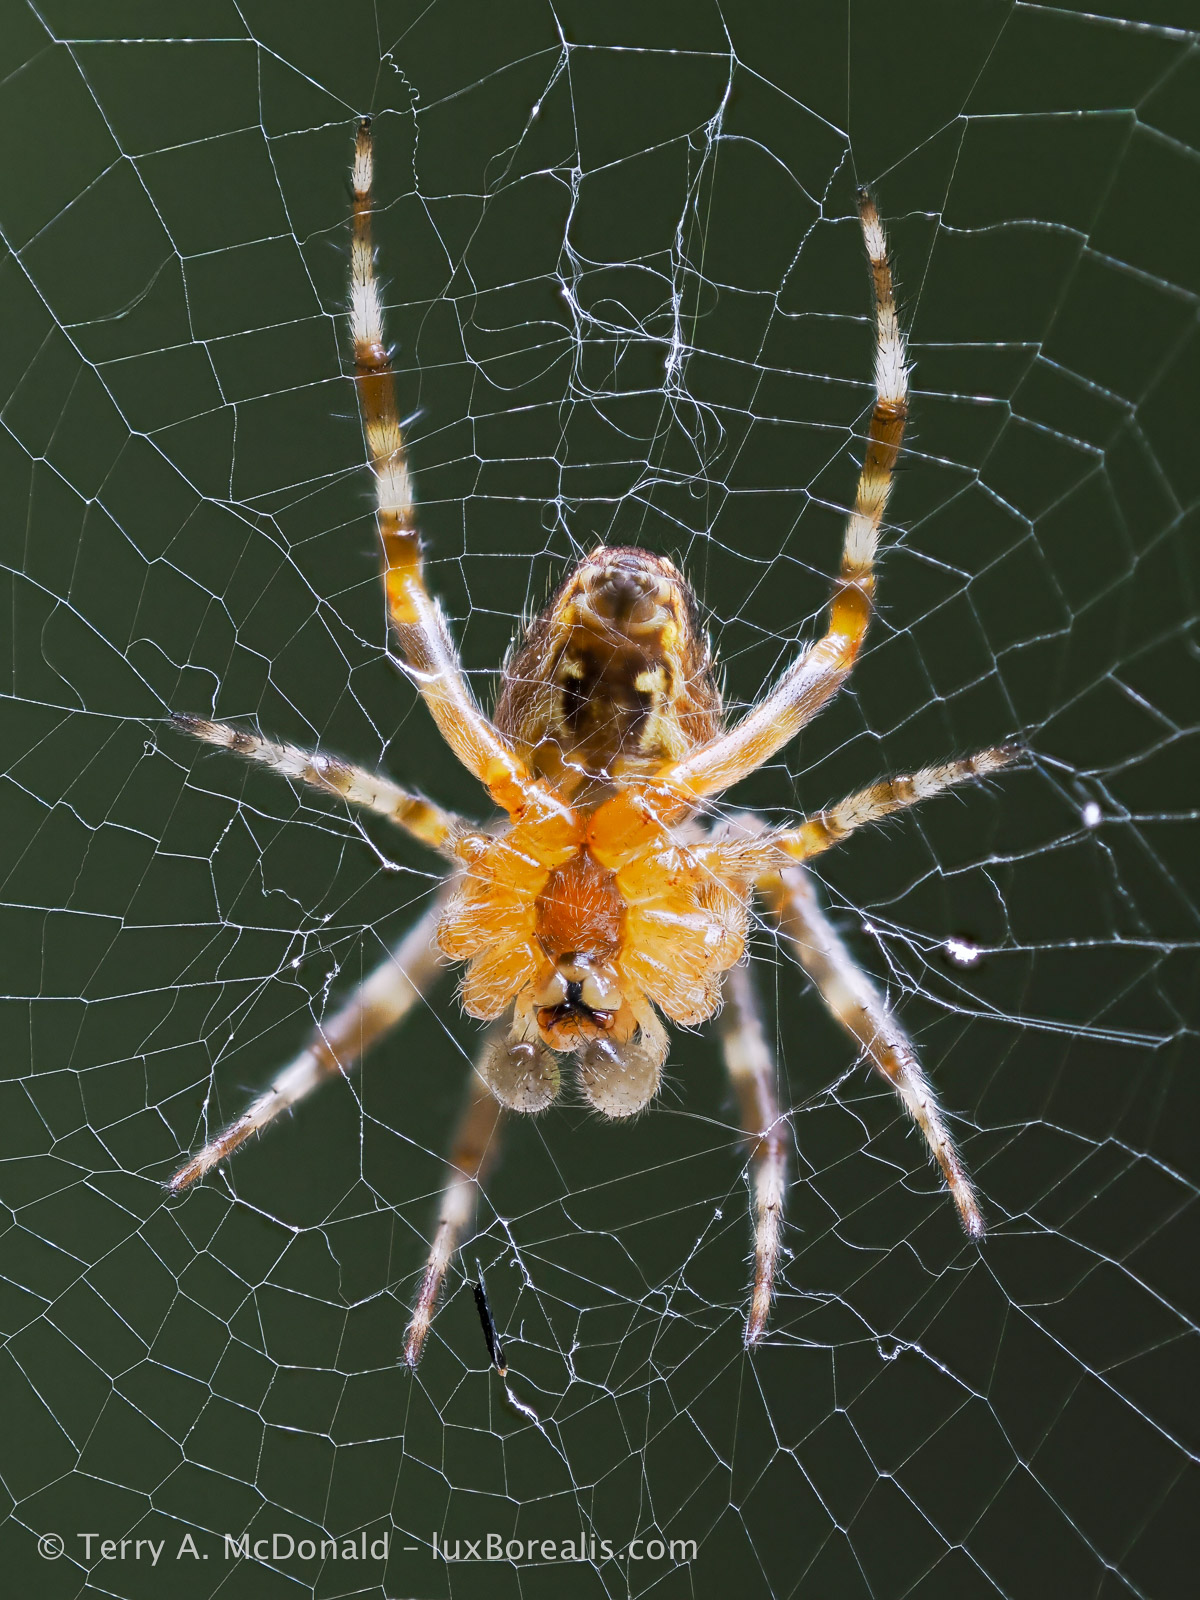
OM-1 w/ M.Zuiko ED 60mm Macro • ƒ4 @ 1/60 • ISO 1600 • 12-image in-camera focus stack • Topaz Photo + Lightroom
This began life as a JPEG, the result of the in-camera focus stack. Lightroom does not Denoise JPEGs except using Manual Noise Reduction, not that there was a lot of noise to begin with as this image is a composite. However, Topaz Photo removed all noise and sharpened things up to about the same level as the original Lightroom edit. The JPEG was exported from Topaz Photo to Lightroom, where additional processing for exposure and colour balance were performed along with a color-range mask of the background green. Is it ‘better’ than the Lightroom-processed JPEG? Not really.
Price
I’ll come right out and say it: any way you slice it, at USD $17/month, Topaz is waaaaaayyyyy over-priced. Lightroom is a far more capable app and it’s USD $12/month. And, that comes with:
- 1 TB of cloud storage;
- Lightroom Mobile for phone and tablet use;
- Lightroom Classic (if you want to avoid working in the Adobe Cloud);
- Lightroom Web editing;
- online sharing of Lightroom albums; and
- a professional-looking Adobe Portfolio website (example here).
Topaz Photo might be worth it at half the price, but seriously, it is nowhere near as complete an app as Lightroom, so there is no reason for it be more expensive.
I don’t get it. Where does Topaz get off charging more than Lightroom, yet delivering far fewer features. In fact, what I discovered is that you really cannot use Topaz Photo for editing without having an additional, more feature-rich photo editor, like Lightroom or Capture 1. Am I missing something here?
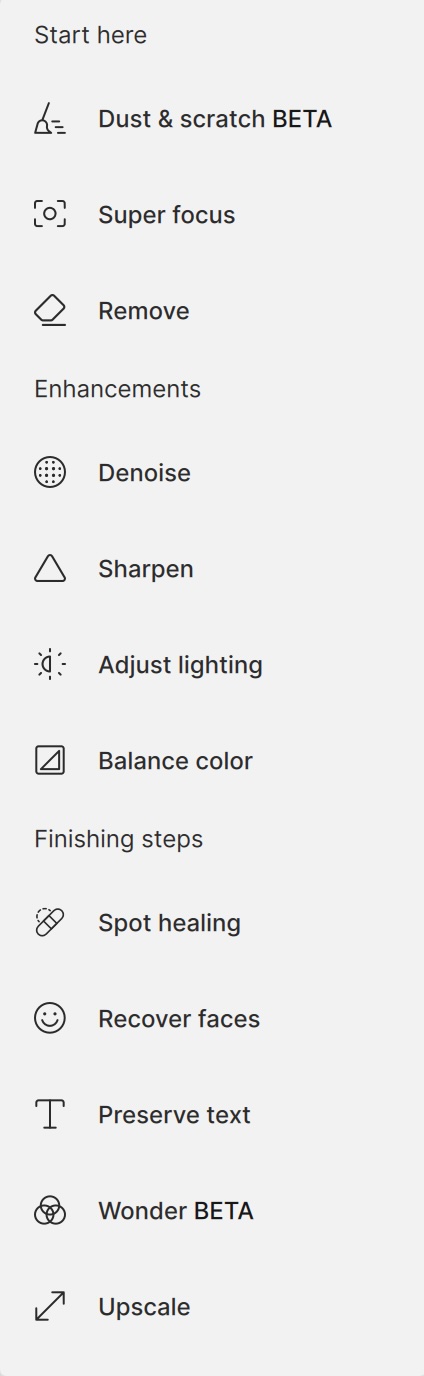
Topaz Photo Features
Despite the array of filters for Remove, Adjust light, Balance color, etc., Topaz Photo is missing many of the features offered by Lr and C1. It’s like a blunt object in that it lacks the artistic finesse adjustments within each Filter. Don’t get me wrong, Topaz Photo excels in Raw Denoise, Sharpening and Upscaling. What Topaz Labs have done is add a few other bon mots such as Spot Healing and Recover Faces, but many of the Filters rely on push-button refinements without the nuanced options available in Lightroom, Capture 1, or DxO PhotoLab 9. Even Apple Photos has a far richer processing environment.
It appears Topaz Labs have chosen breadth of tools to ‘rescue’ photos, over depth of user refinements, perhaps relying on AI to make the ‘correct’ decisions for it.
I’ll state upfront that I don’t like software making decisions in a vacuum. If a photo needs sharpening, or an adjustment to lighting, then I prefer to analyse it myself to make decisions. I also want to see the actual adjustments reflected in the sliders/values, which I can then either finesse or ignore by going back to the drawing board. I find too many of the options in Topaz to be black-box ‘push-button’ decision-makers with few options.
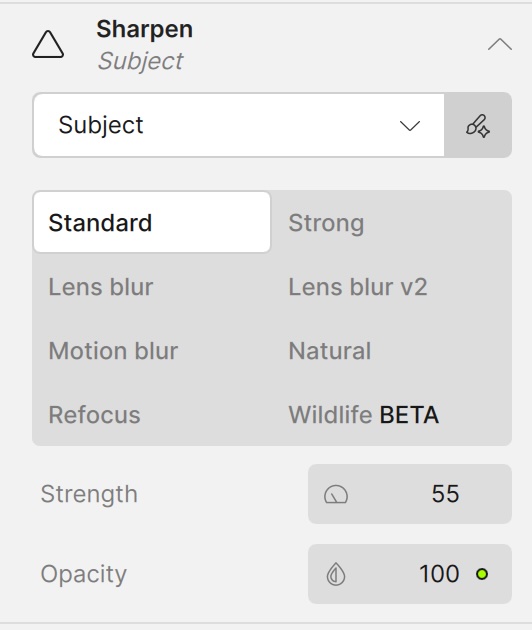
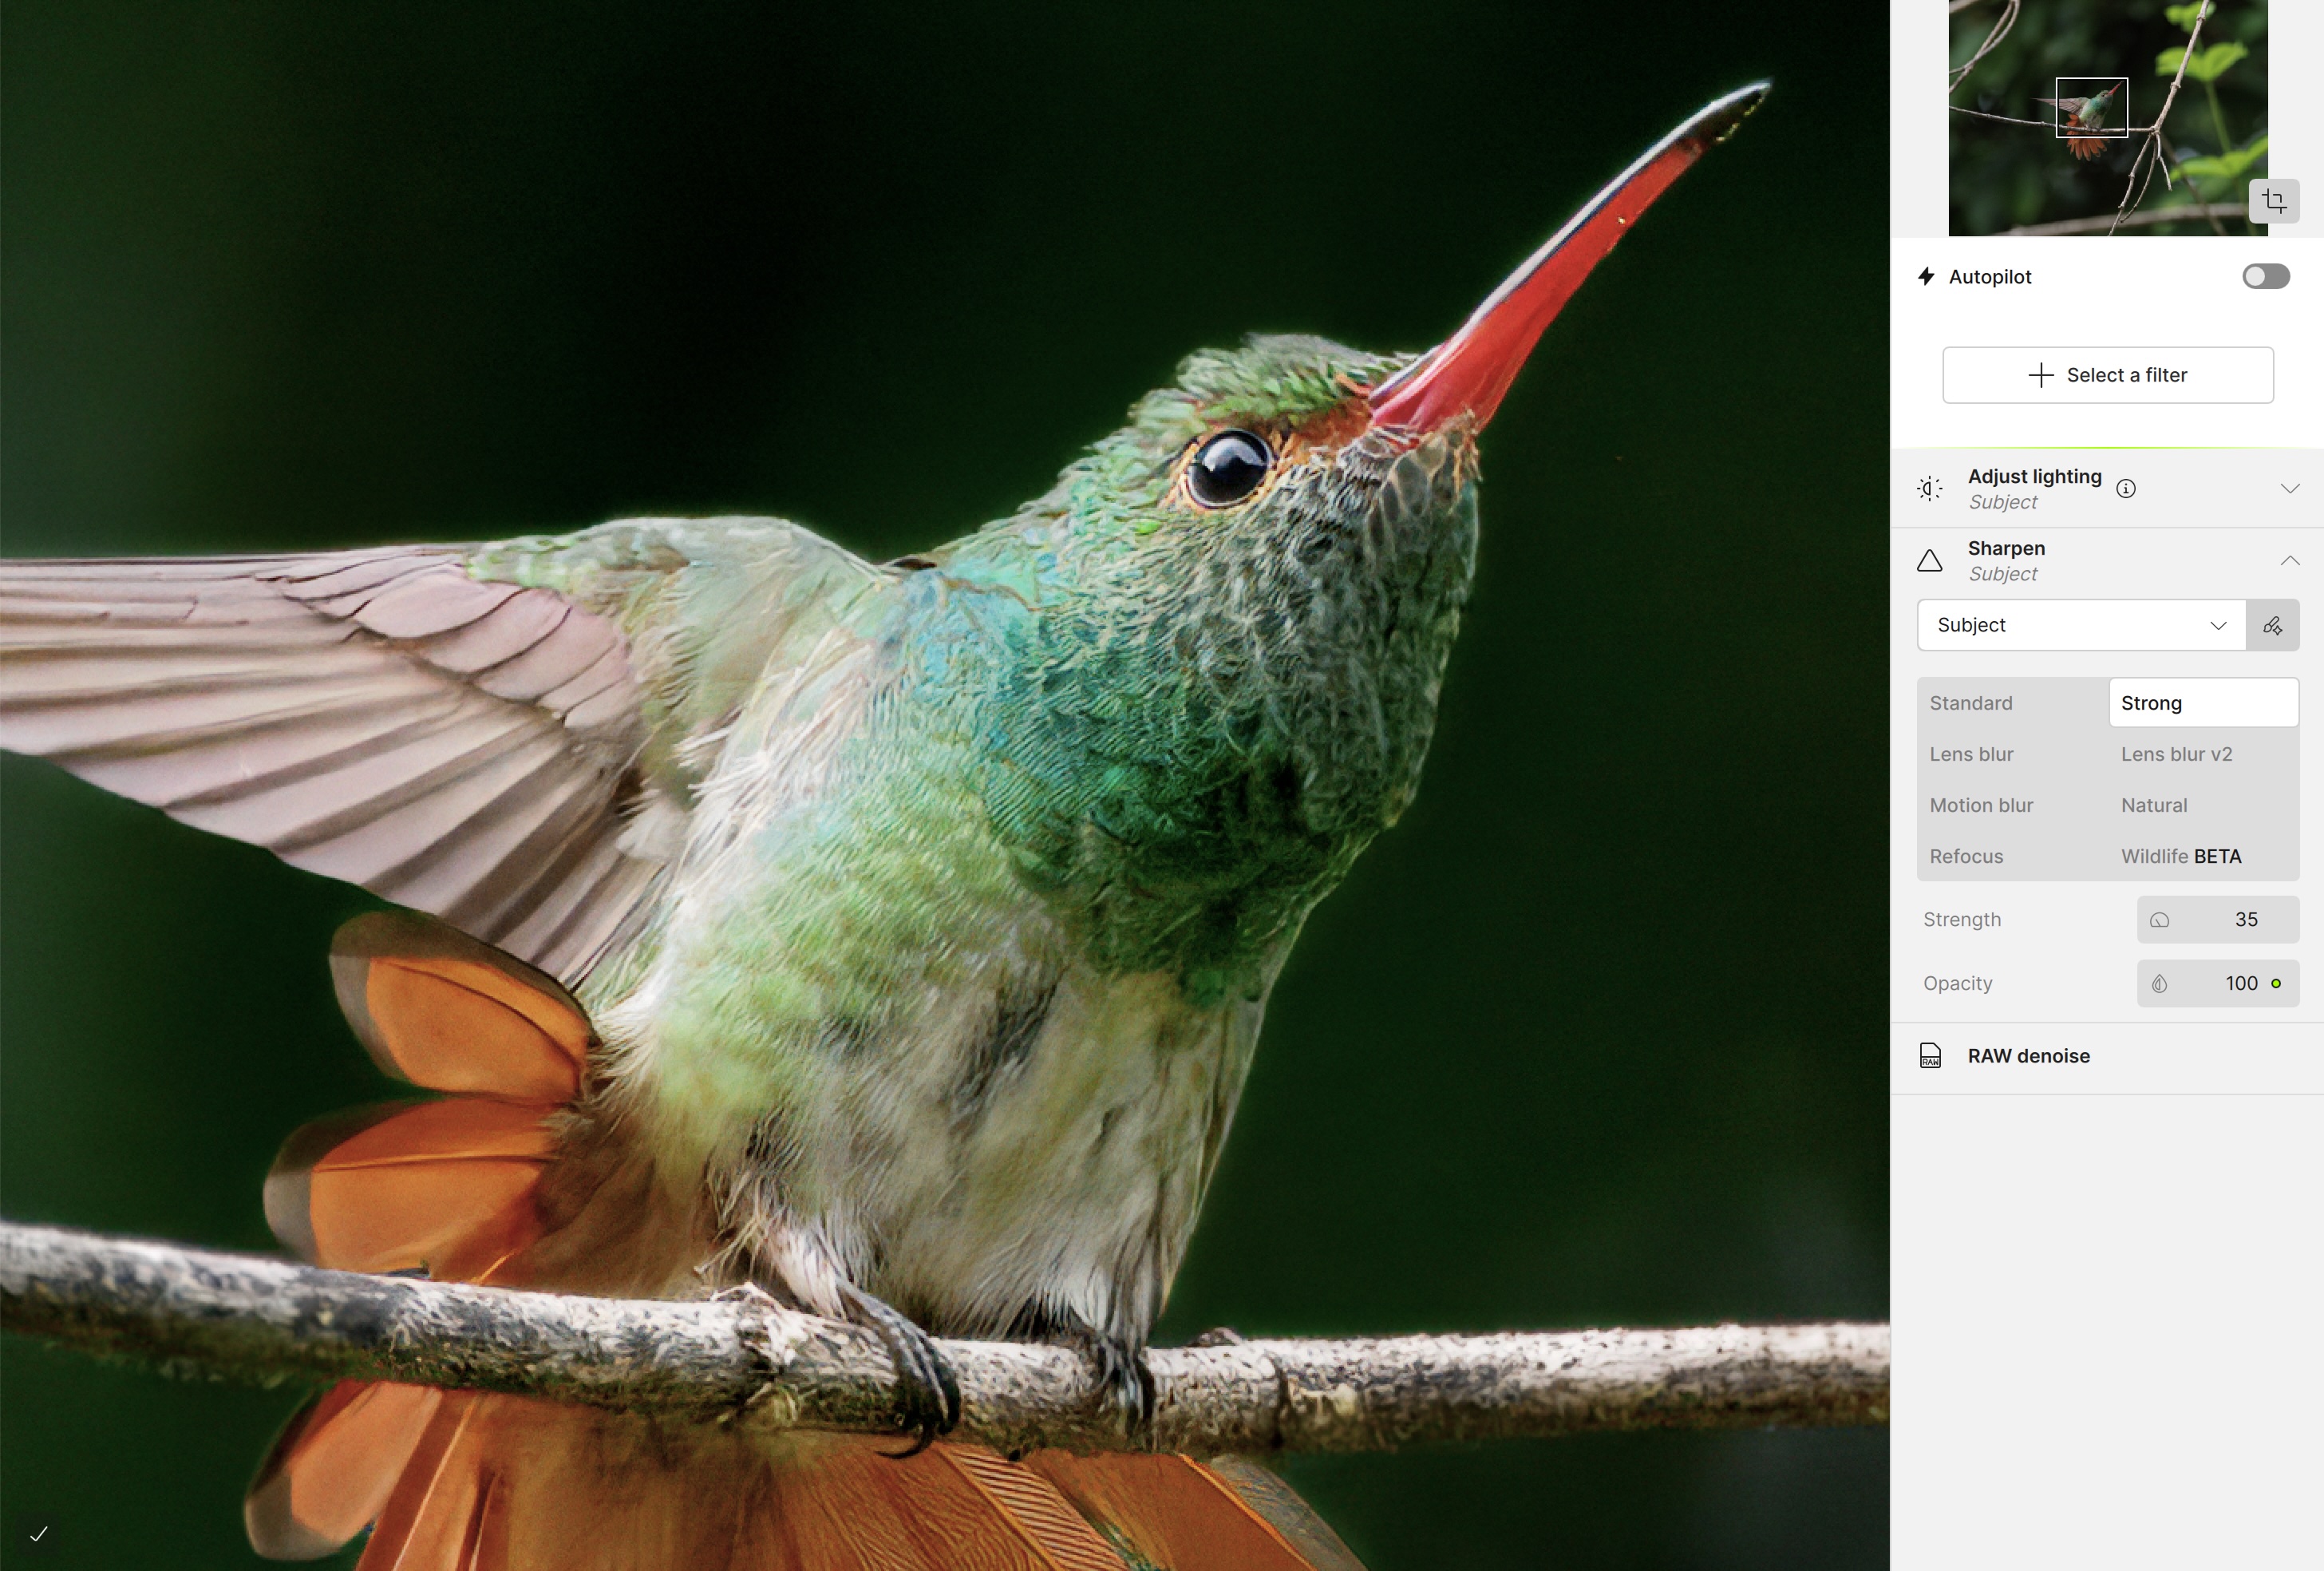
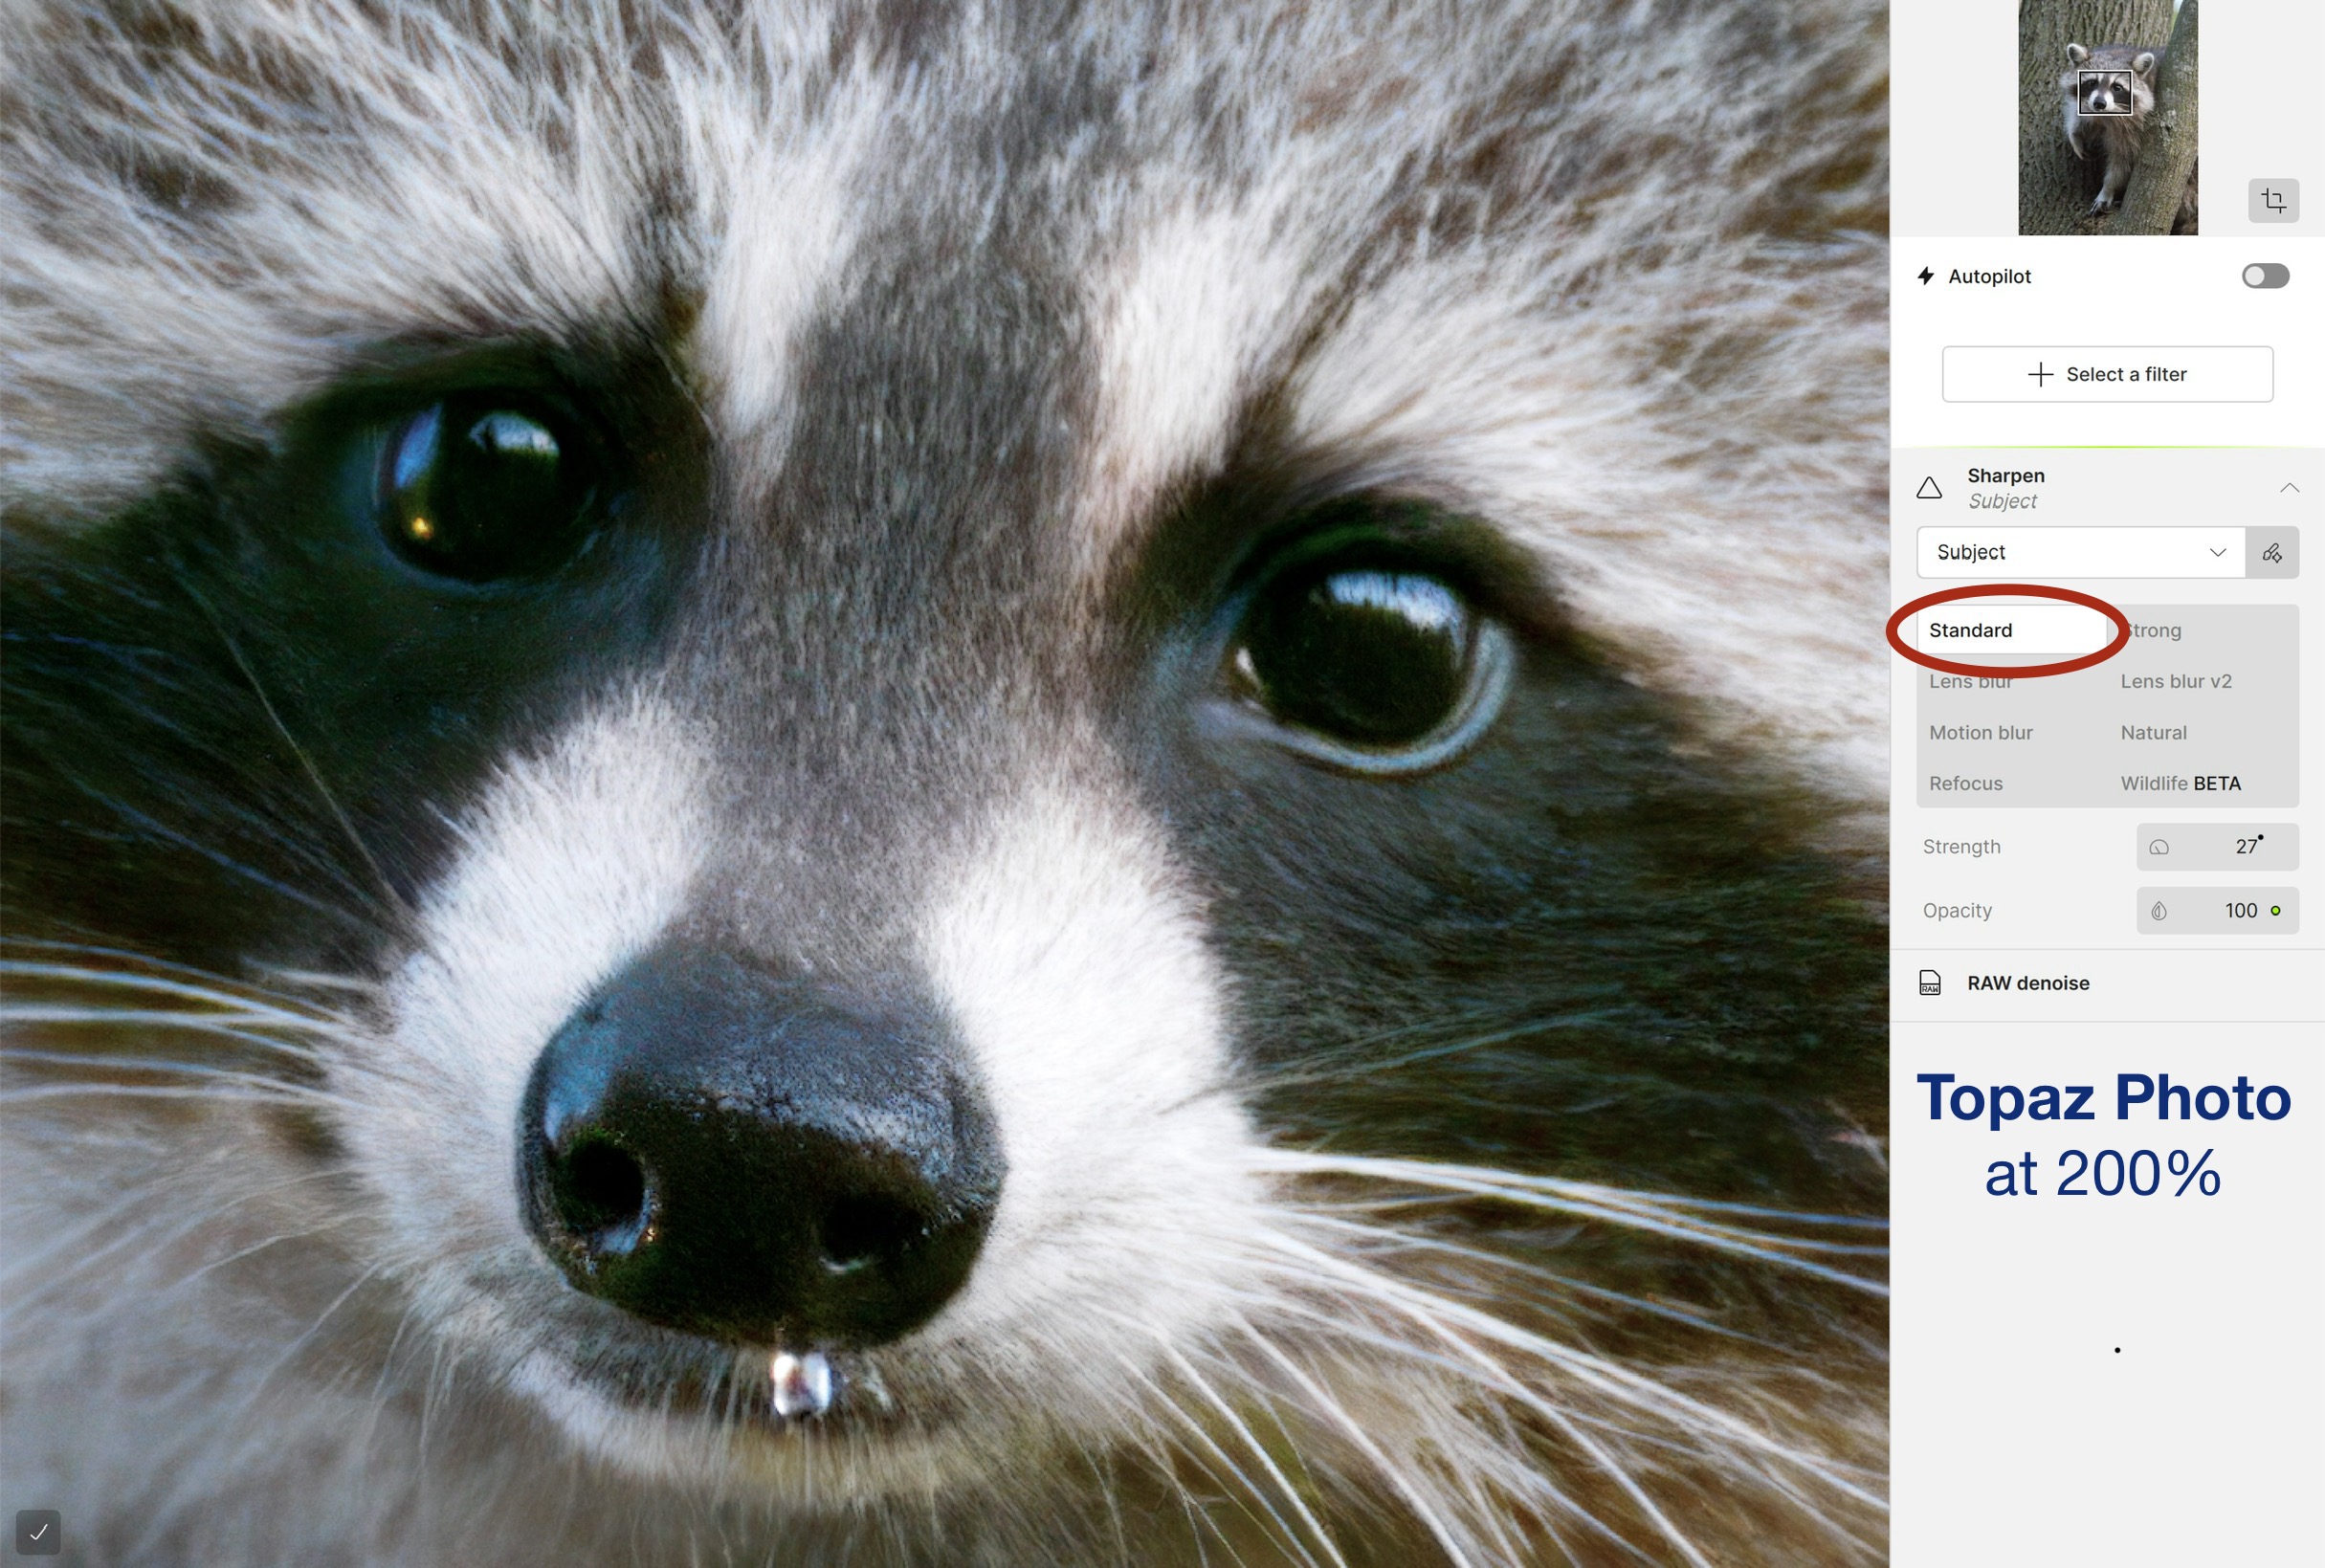
Example 1: Sharpen
Under Sharpen, there are eight push-button options, each with only Strength and Opacity as options. Nowhere is there the more industry-standard Radius and Masking or Threshold, for example.
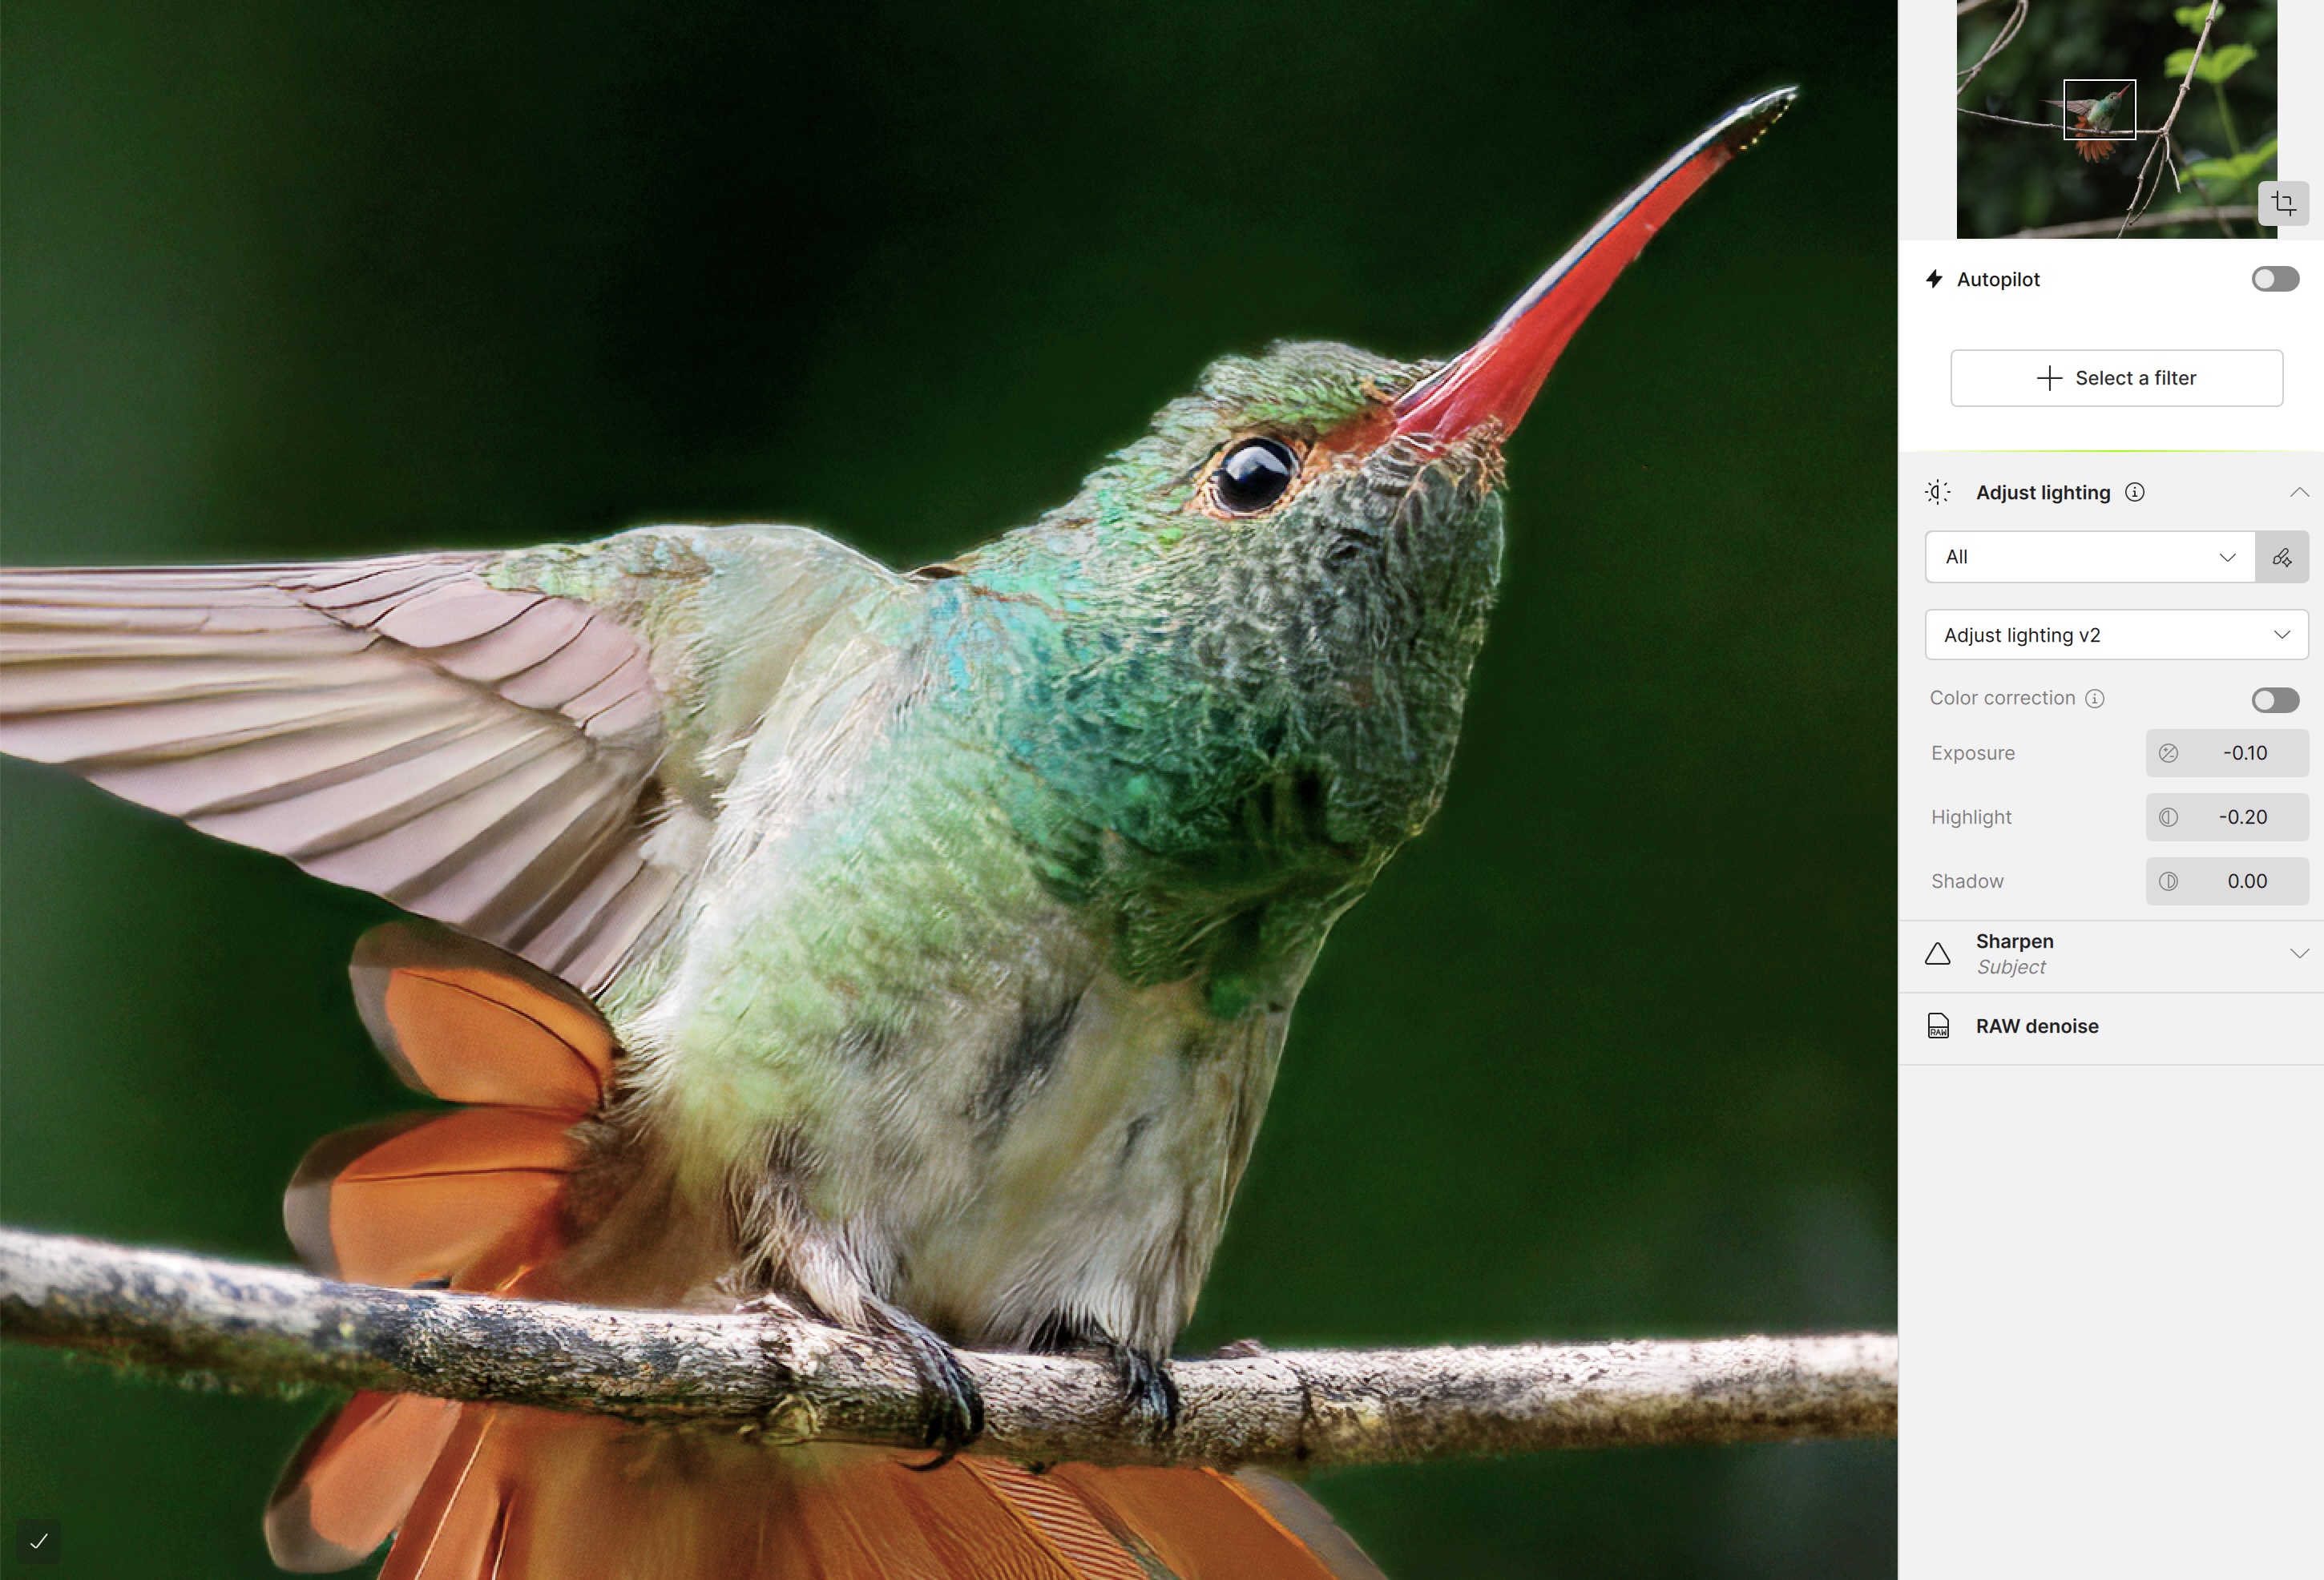
Example 2: Adjust lighting
The ‘Adjust Lighting’ filter is similar: push a button with fine tuning limited to Exposure, Highlight and Shadow. Now, I’ll admit to often using Lightroom’s ‘Auto’ button, as it is fairly accurate. However, when using Auto, Lightroom also shows me exactly what it changed on the sliders. And, I still have full control over those adjustments for further tweaking: Exposure, Contrast, Highlights, Shadows, Whites and Blacks. Lightroom also provides Auto Whites, Auto Blacks, a histogram and out-of-gamut warnings, all fundamental tools for accurate exposure adjustment.

Topaz only provides Exposure, Highlight and Shadow. And, after the push-button changes, they are all zeroed, providing no information to the user about what was changed. To me, knowing what the application is doing behind the scenes is essential for learning how to improve my approach to processing. Information is power. Reliance on back-box decisions is, at best, tenuous.
To make matters worse, when Adjust lighting is used, users cannot output the file as a DNG, only as a TIF file. Huh? What happened to non-destructive raw editing?!? TIFFs bake-in the changes, destroying the whole concept. Not good.
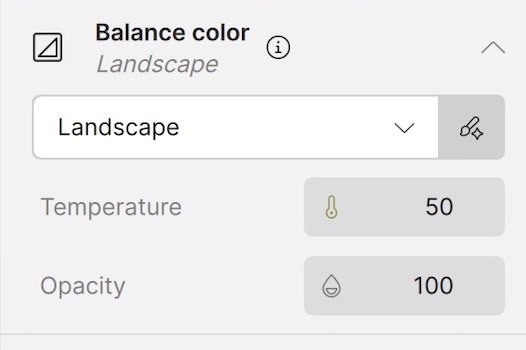
Example 3: Balance color
As with ‘Adjust lighting’, Balance color can be applied to ‘All’ or ‘Subject’ or ‘Landscape’ or ‘Portrait’ (and others). This is helpful, but once applied, the only two user options are Temperature, which is not stated as industry-standard °K, and Opacity. There is no option for Tint, Vibrance or Saturation. And, I wonder, how is colour balance being determined in the first place? It turns out, by AI, but more on that later. As with Adjust lighting, when Balance color is used, raw files can only exported as TIF files. Again, not good.
Two other nigglies, as if I haven’t shared enough already! When I make a change to, for example, Exposure,
(a) the change is not live as I drag the slider (as it is with Lightroom). I must wait for processing to occur; and
(b) there is no simple ‘Undo’ for a change I’ve made; e.g. using Cmd+Z and Shift+Cmd+Z to ‘Redo’, like I can with Lightroom. Seeing is believing; toggling quick before and after changes is essential for finessing edits without having to locate and precisely drag an overly small slider back to where it was.
To me, it seems Topaz is focussing on the two things: (1) the push-button crowd who don’t want to get their hands dirty; and (2) the rescue of photos, not the processing of them. This means that, once a photo is initially processed in Topaz Photo, the app’s distinct lack of depth for refinement demands the use of another, more complete editing suite such as sLightroom or Capture 1.
File Size
Interesting . . . After applying Raw Denoise and Sharpen in Topaz Photo, my 20.7 MB raw file blossomed into a 121.6 MB DNG. That’s 5x larger. In Lightroom, the same 20 MB raw file remains 20 MB after denoising and sharpening. It’s not a huge issue, but something to be aware of if you intend on processing every file or batch processing a number of files at once.
OM-1 w/ M.Zuiko 8-25mm PRO at 25mm (50mm efov) • ƒ5.6 @ 1/13 • ISO 3200 • Topaz Photo + Lightroom
With the sun having set, this scene under a dim forest canopy demanded a high ISO and slow shutter speed. As expected, Topaz Photo Raw Denoise was excellent and, with Sharpen set to All and Motion Blur, the very slight camera movement was removed to produce a clean, detailed image.
So, why Topaz?
Again, I ask myself, for what reason would I take the additional time to leave Lightroom, do some work in Topaz Photo, then go back to Lightroom? Some of the images presented above help to explain it—when a photo needs some kind of rescuing. Those high ISO images that need raw denoising and more precise or targeted sharpening. For me, these are wildlife and bird photos plus any others that are slightly unsharp, due to lens blur or very slight subject/camera motion; i.e. the ones that need a little more TLC. I don’t have too many images like that, but I have a few.
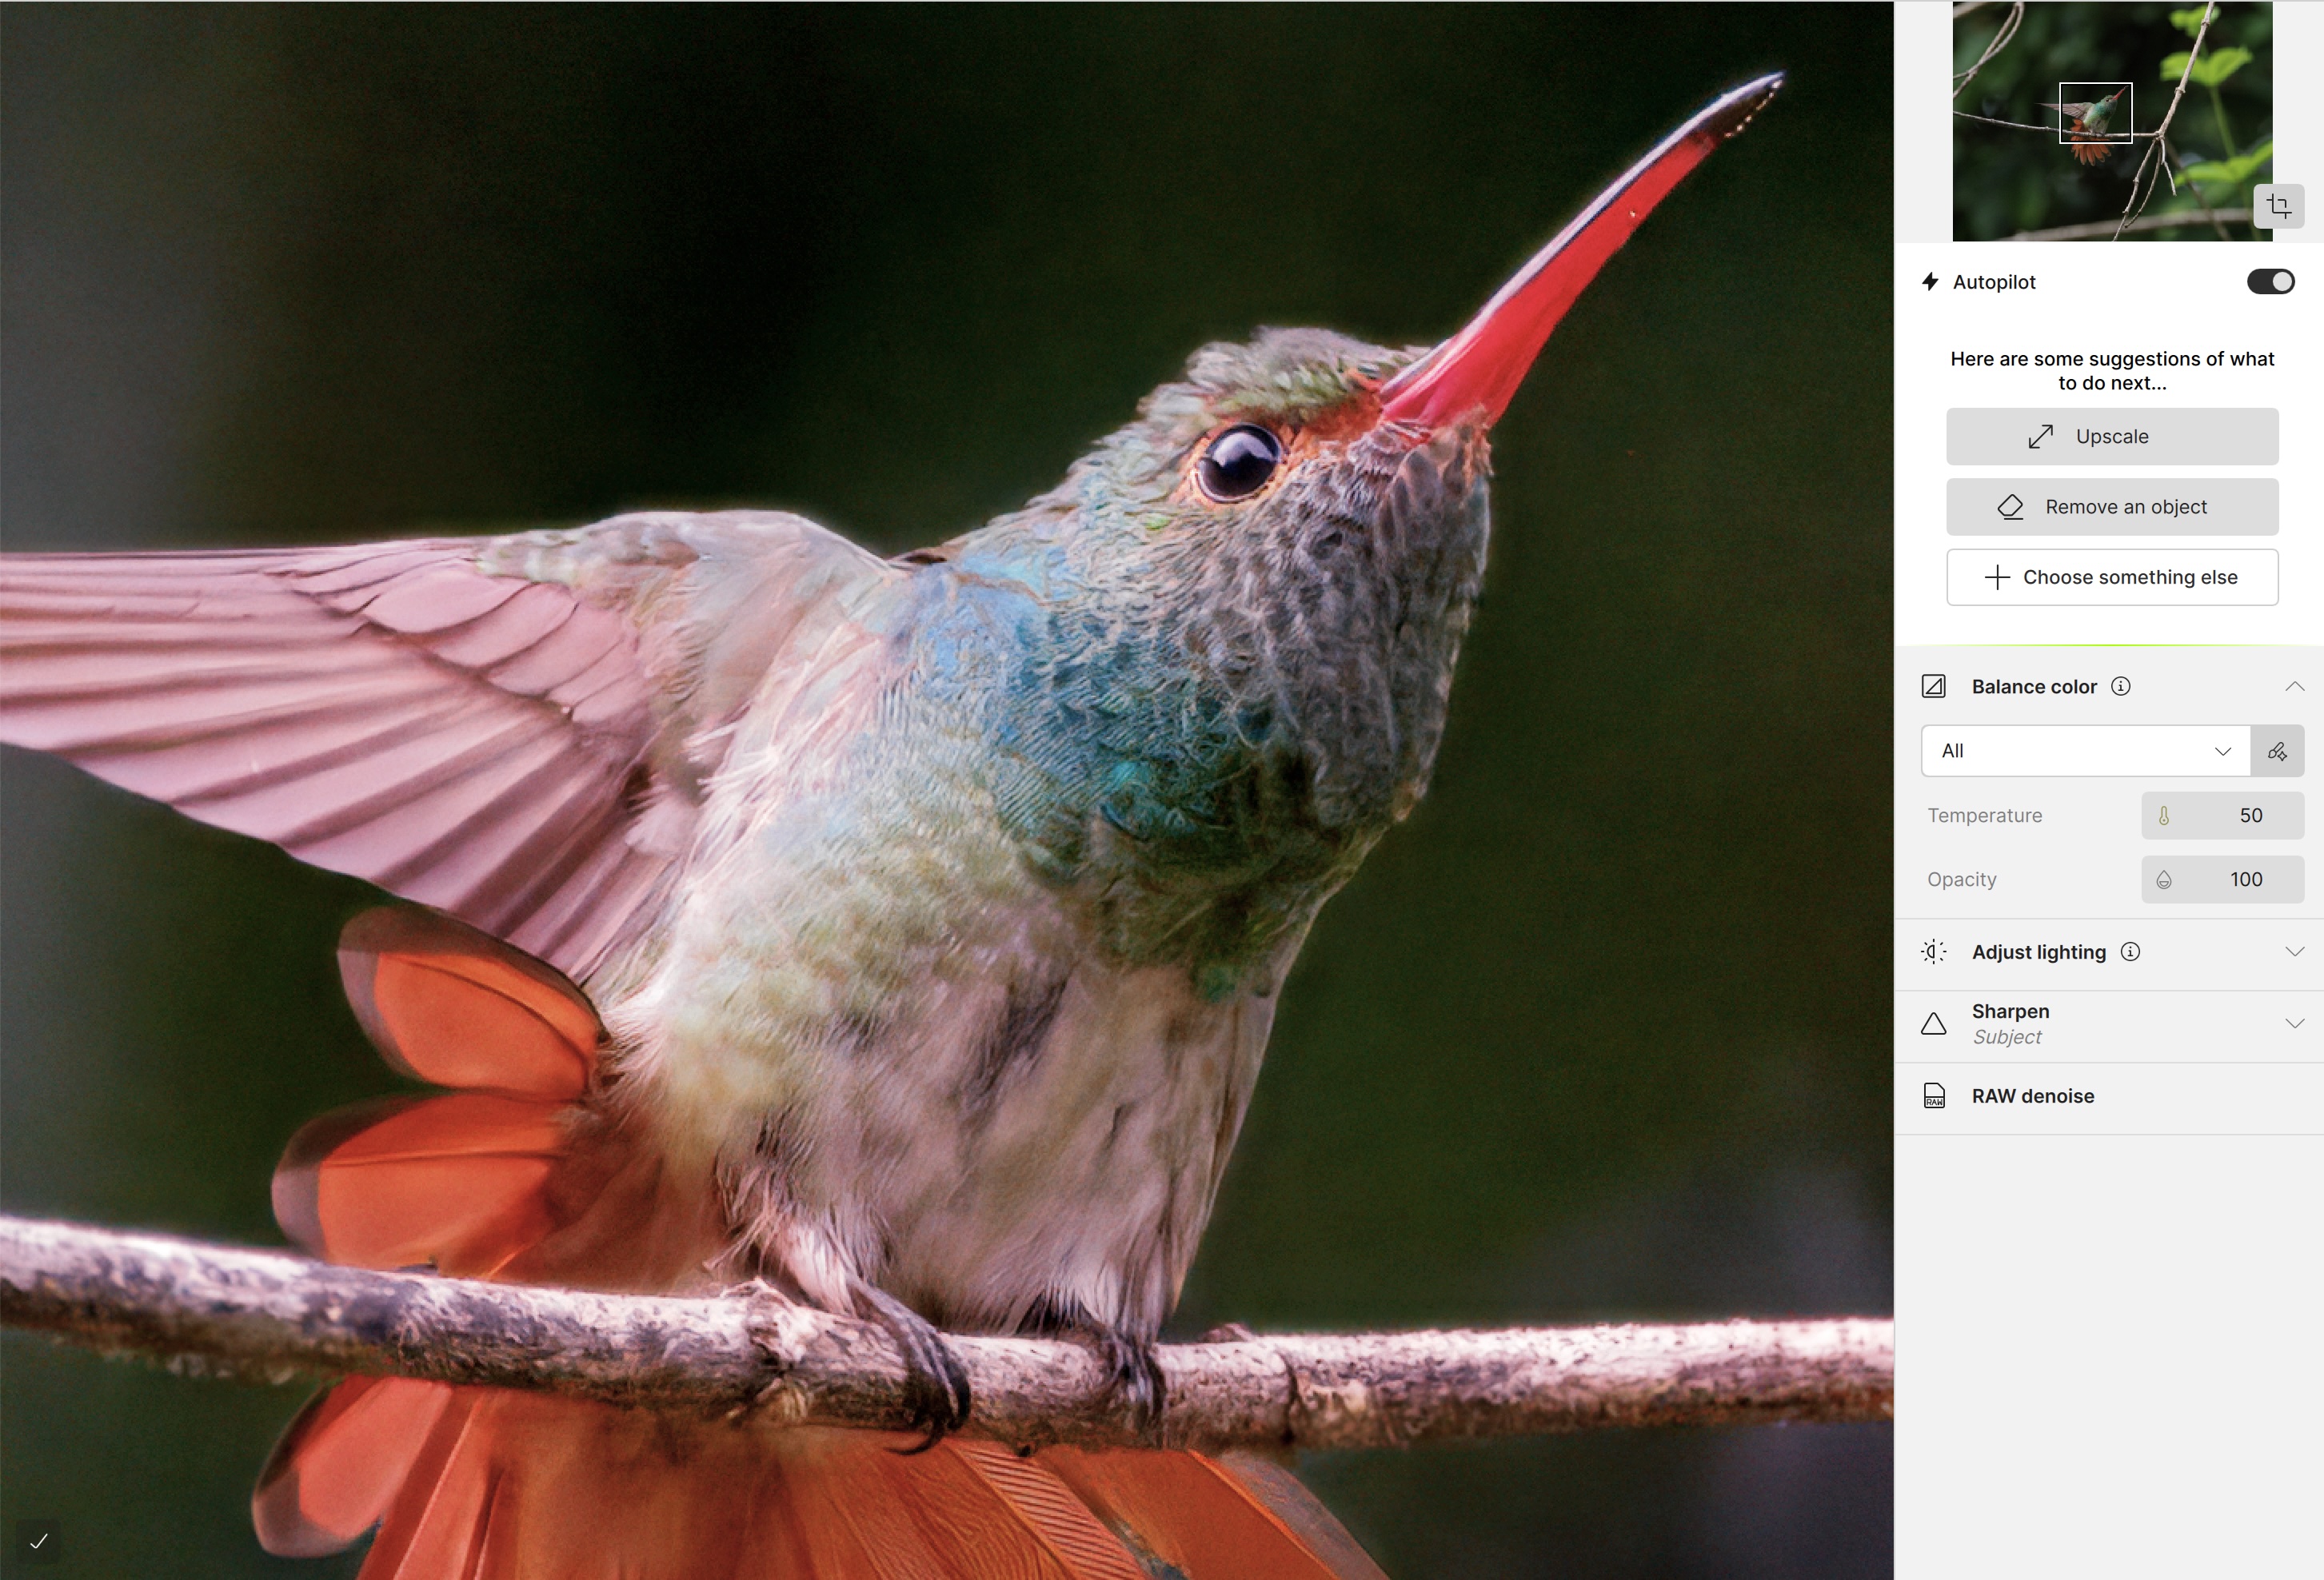
Rufous Hummingbird
This fellow was on display for all to see. He would periodically fly between feeding at a flowering shrub to perch, then display, on this bare branch. It was an overcast day, ideal for allowing colours and feather detail to show without shadows. It also meant I needed to crank up the ISO to 6400 to maintain a shutter speed of 1/320, not really high enough to stop wing action. It is what it is.
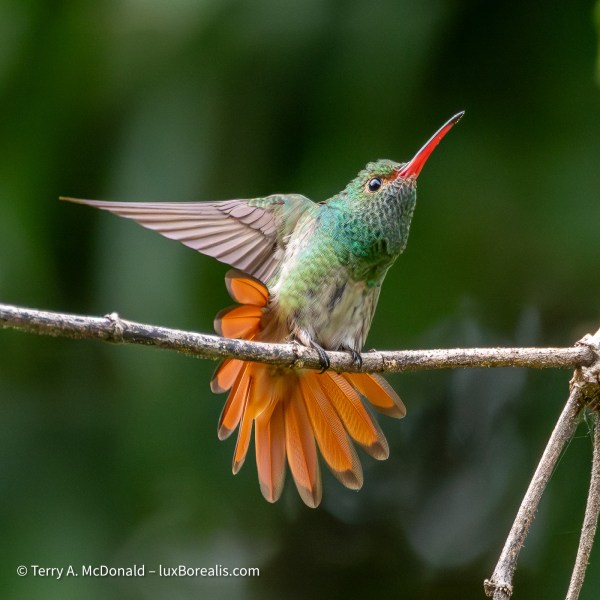
Olympus OM-1 w/100-400mm @ 400mm • ƒ8 @ 1/320 • ISO 6400 • Lightroom
Lightroom handled this high ISO image quite well. Can Topaz Photo improve upon it?
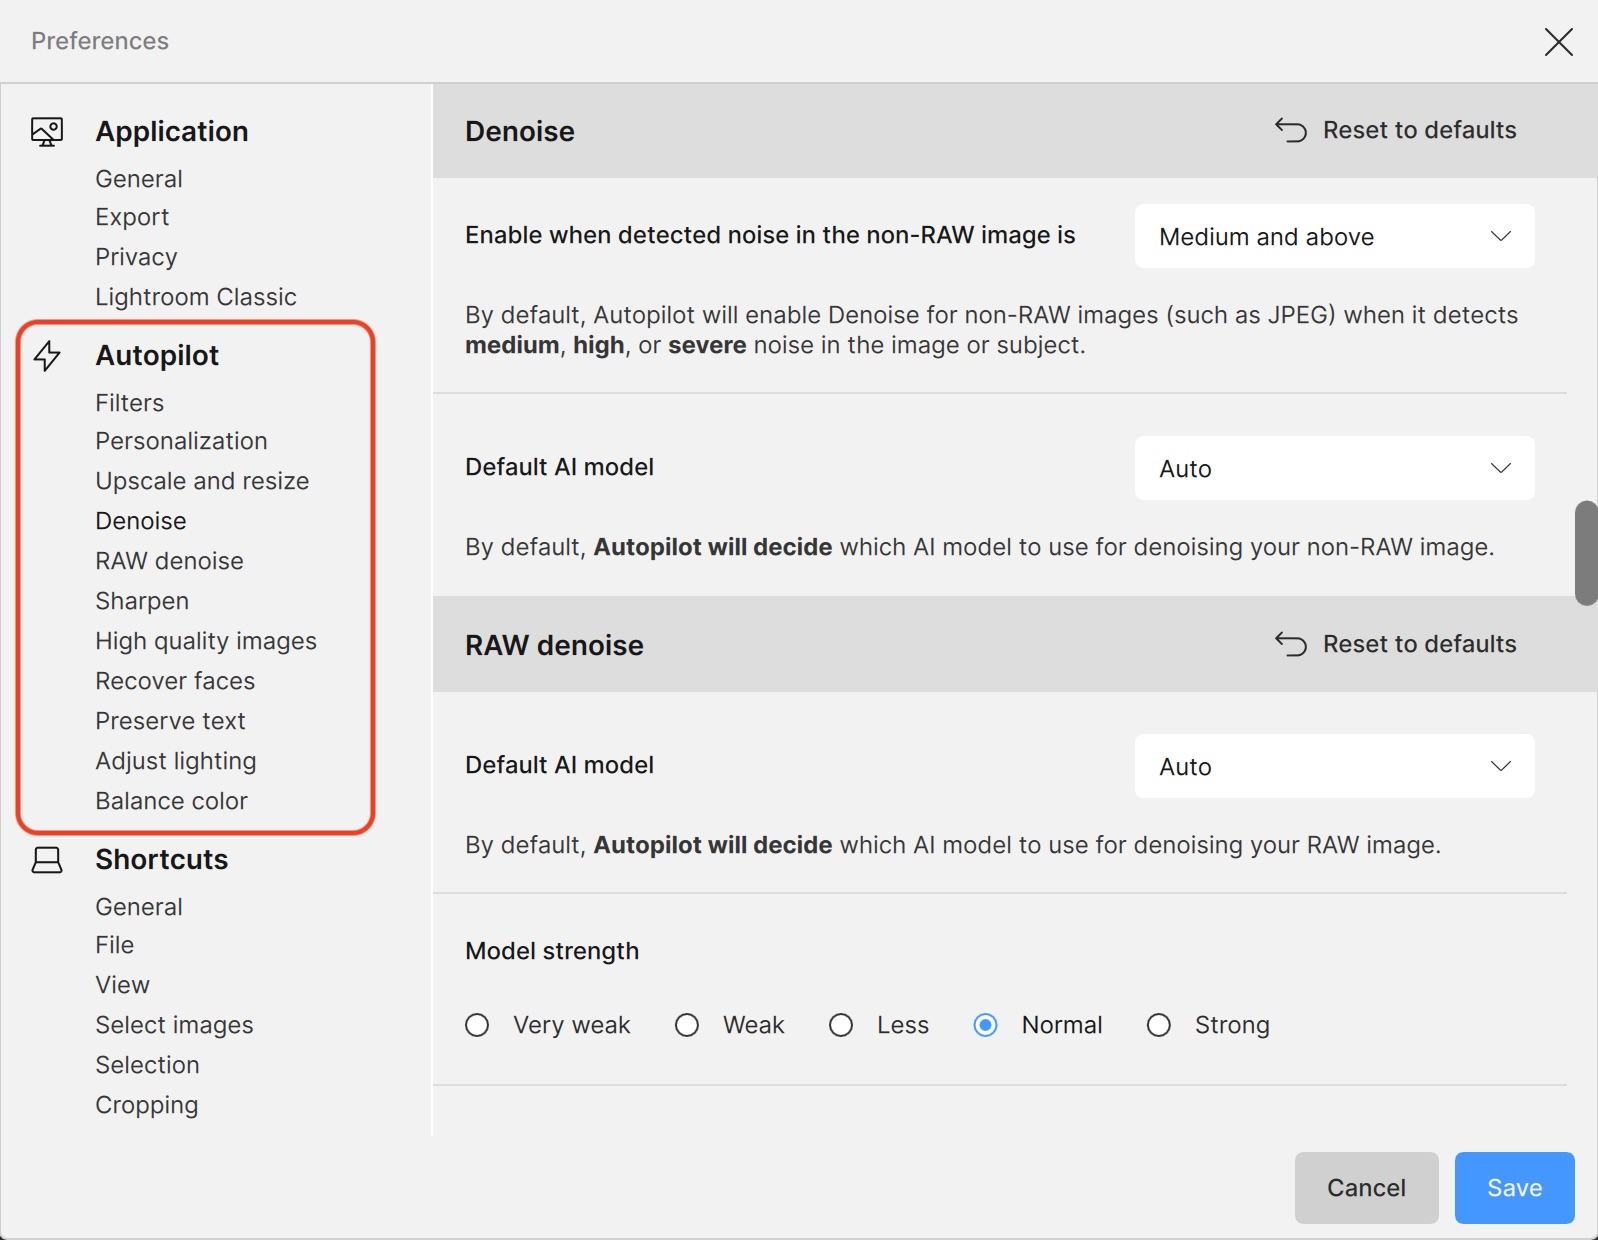
Autopilot
I figured, the best place to start processing was with Autopilot, Topaz Photo’s built-in guru for deciding what’s best for an image. According to Topaz, Autopilot relies on AI algorithms to analyse the type of photo before making the adjustments it feels are necessary. This has the potential to be a valuable tool, especially because it can be customized in Preferences. It also gathers your personal editing history which it assesses and applies to its decision-making algorithm. In one sense, it is automatically creating your own personal Preset. However, users cannot save groups of settings within Autopilot for different types of images, say landscapes, wildlife, portraits, etc. User presets of groups of filters are made and saved outside of Autopilot, allowing users to tailor settings to image type.
So, let’s have a look at what Topaz Photo Autopilot does, compared to Lightroom’s auto Light, auto Color and auto Denoise.
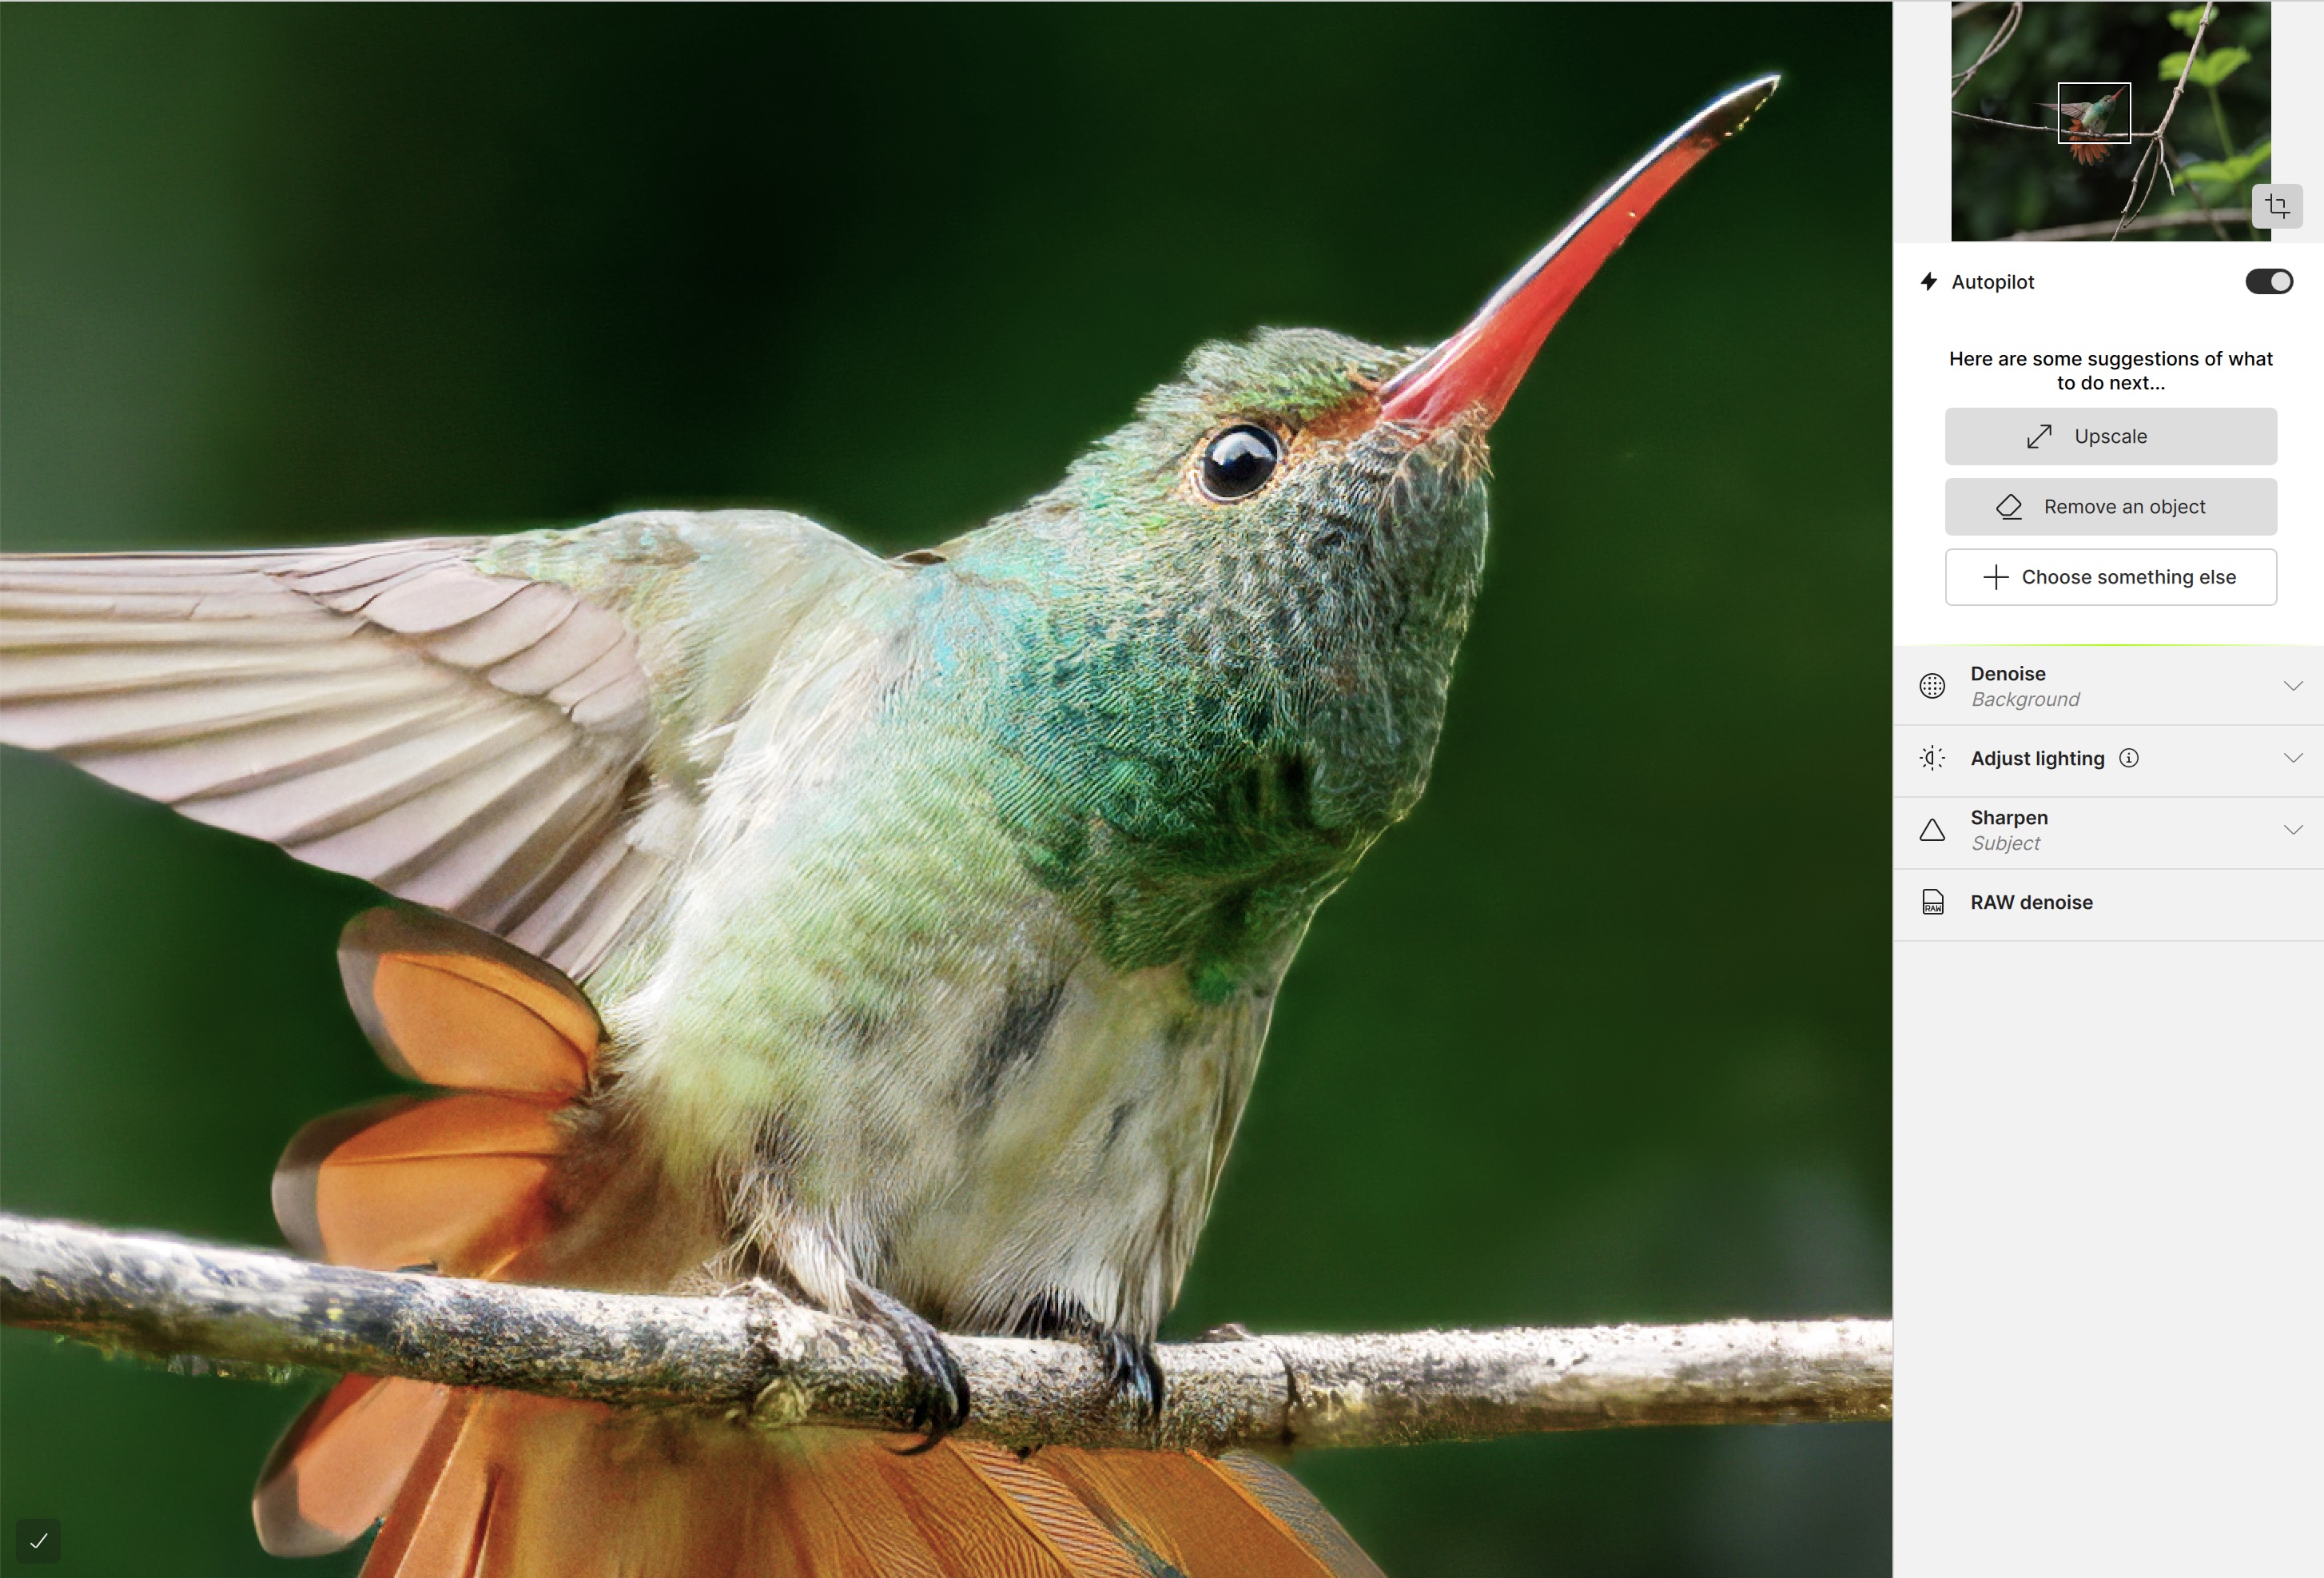

Both apps do a reasonable job using ‘auto’, though the strengths of each become immediately apparent. Topaz does a better job with Raw Denoise and Sharpening in Autopilot whereas Lightroom does a better job of exposure and colour balance. The additional advantage with Lightroom, is that users still have full control over all aspects of Light, Color and Sharpening, whereas with Topaz Photo, options are limited to one or two sliders plus Opacity (the strength of the filter). Overall, the Lightroom version looks ready-to-go, unlike the Topaz image which still requires some colour correction, which, unfortunately, must be done in another app; e.g. Lightroom.
Auto Masking
When I opened the raw file in Topaz Photo, the app did an excellent job of Denoising the image, maintaining good feather detail while appropriately smoothing out the out-of-focus background, though I did notice some mottling of the background. When I selected Sharpening from the list of Filters, Topaz made a fairly accurate subject mask to ensure just the detailed areas received sharpening. Great. One less step for me.
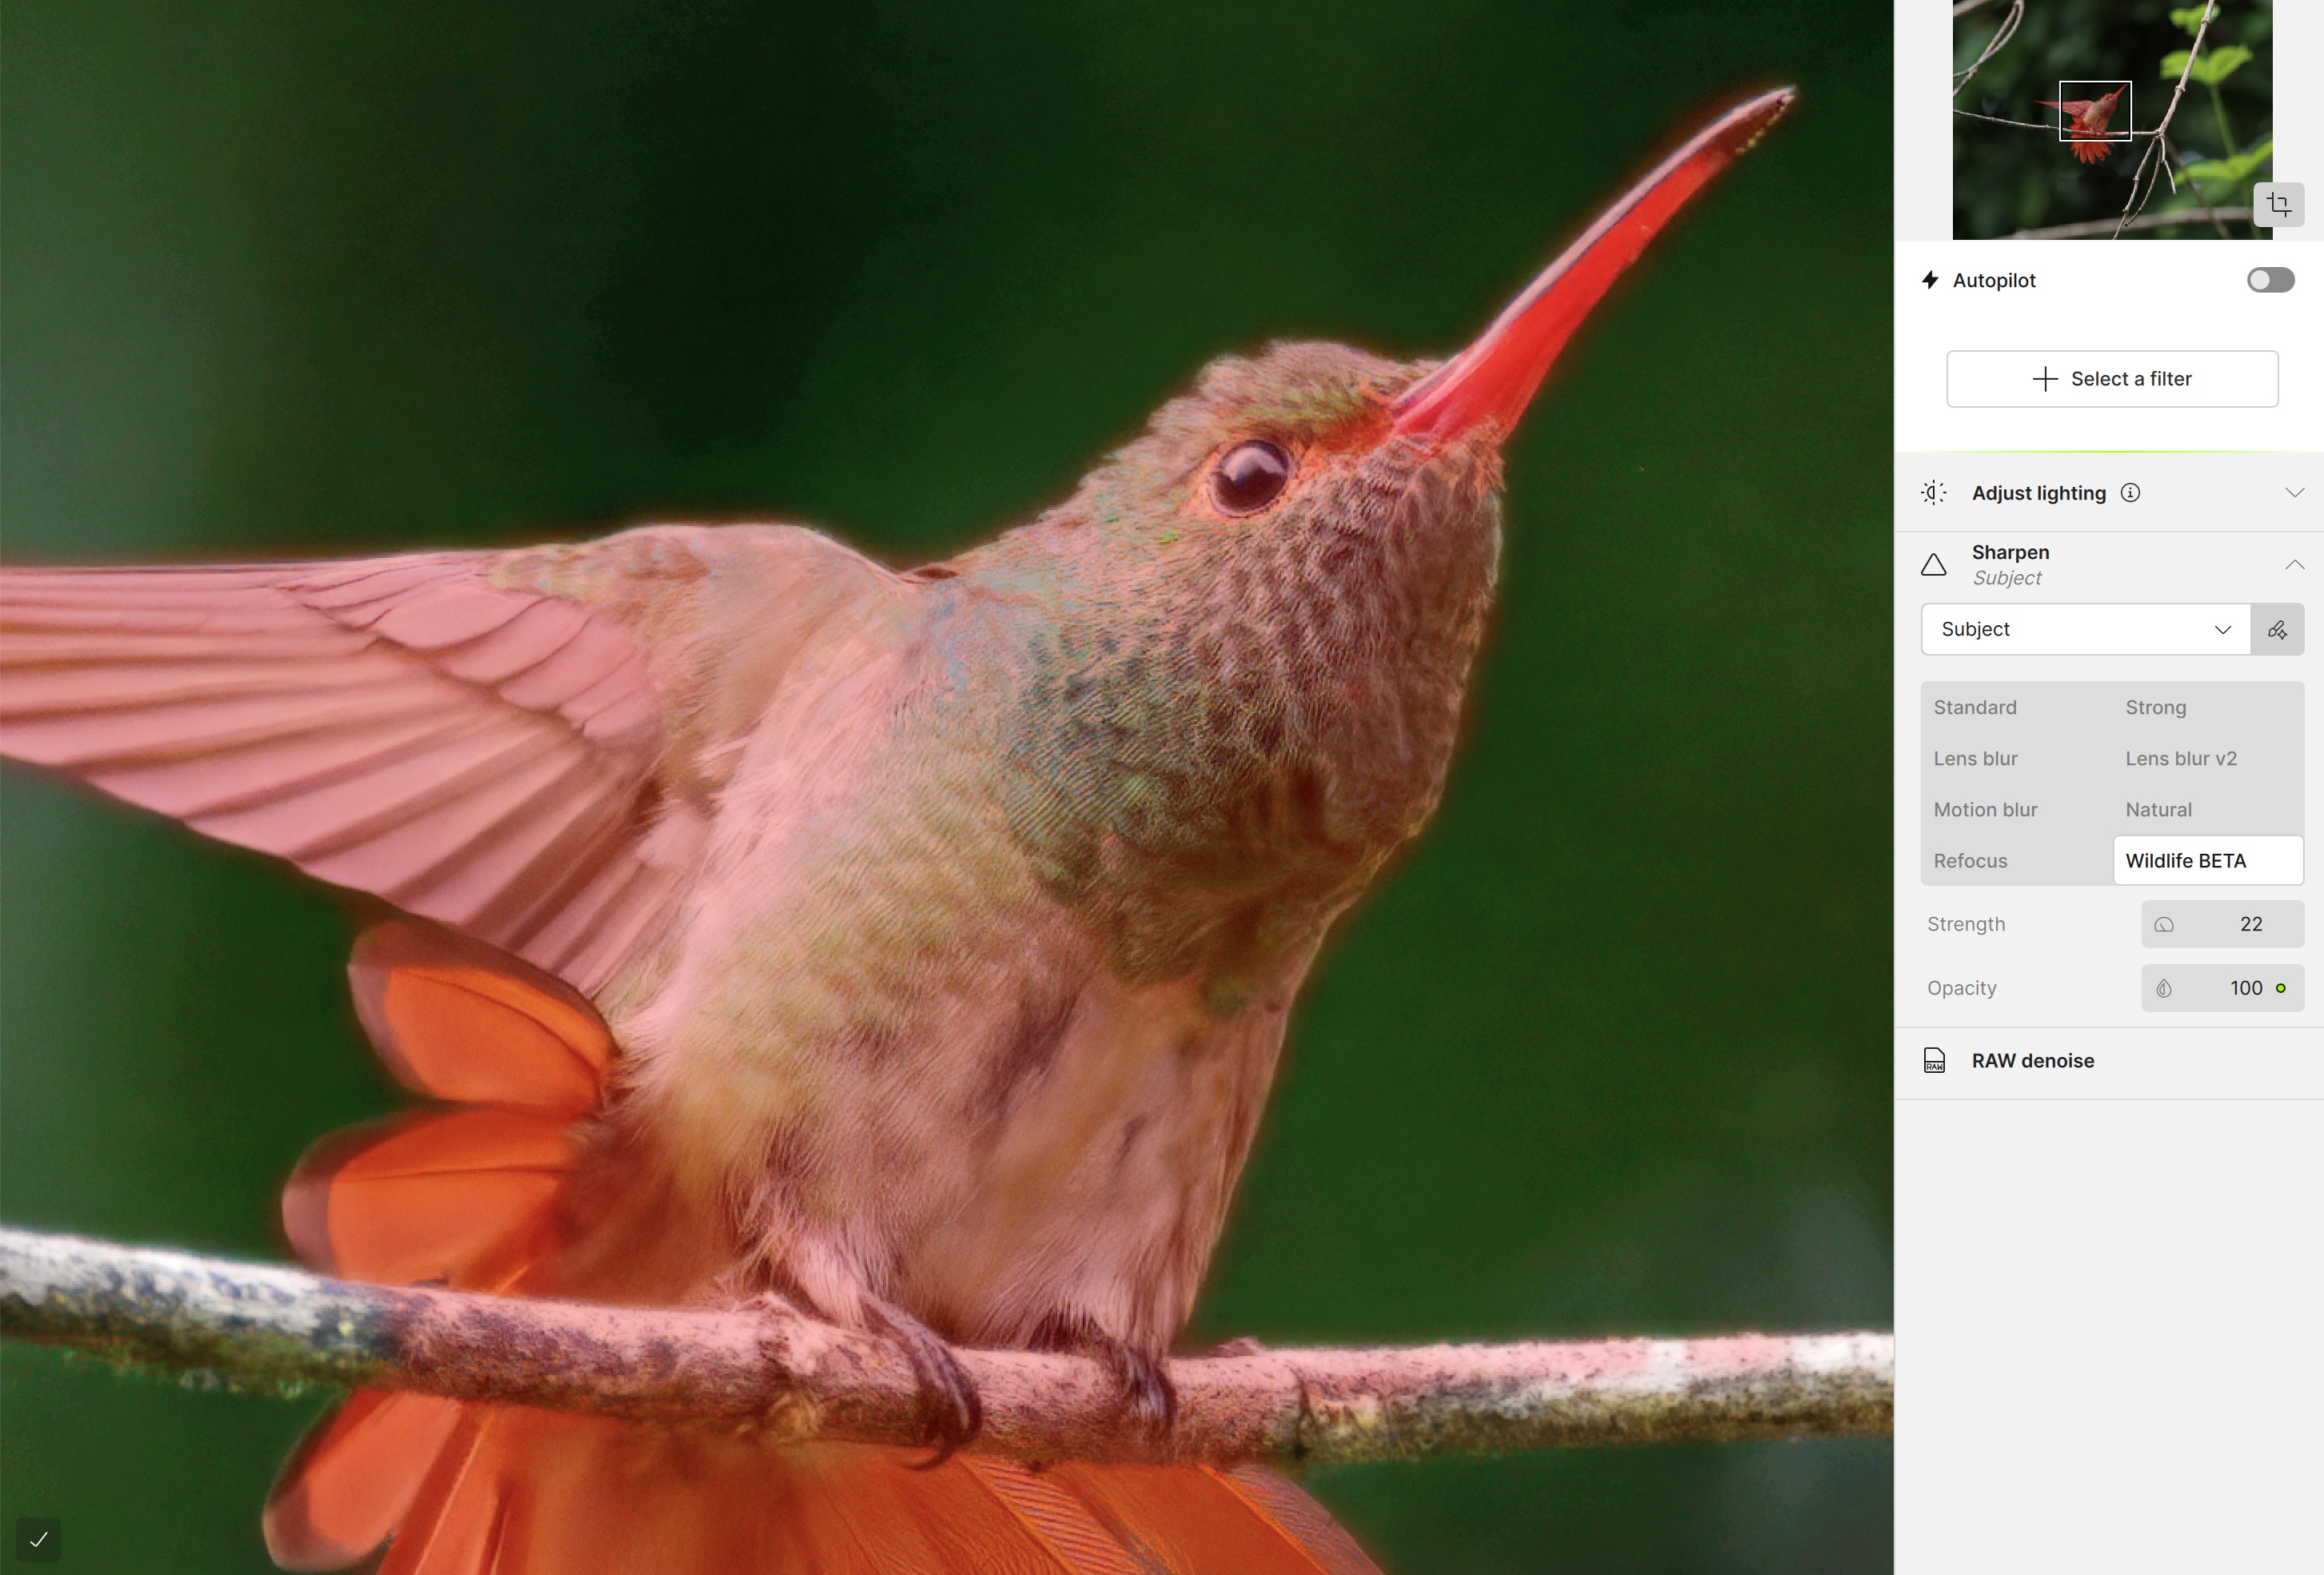
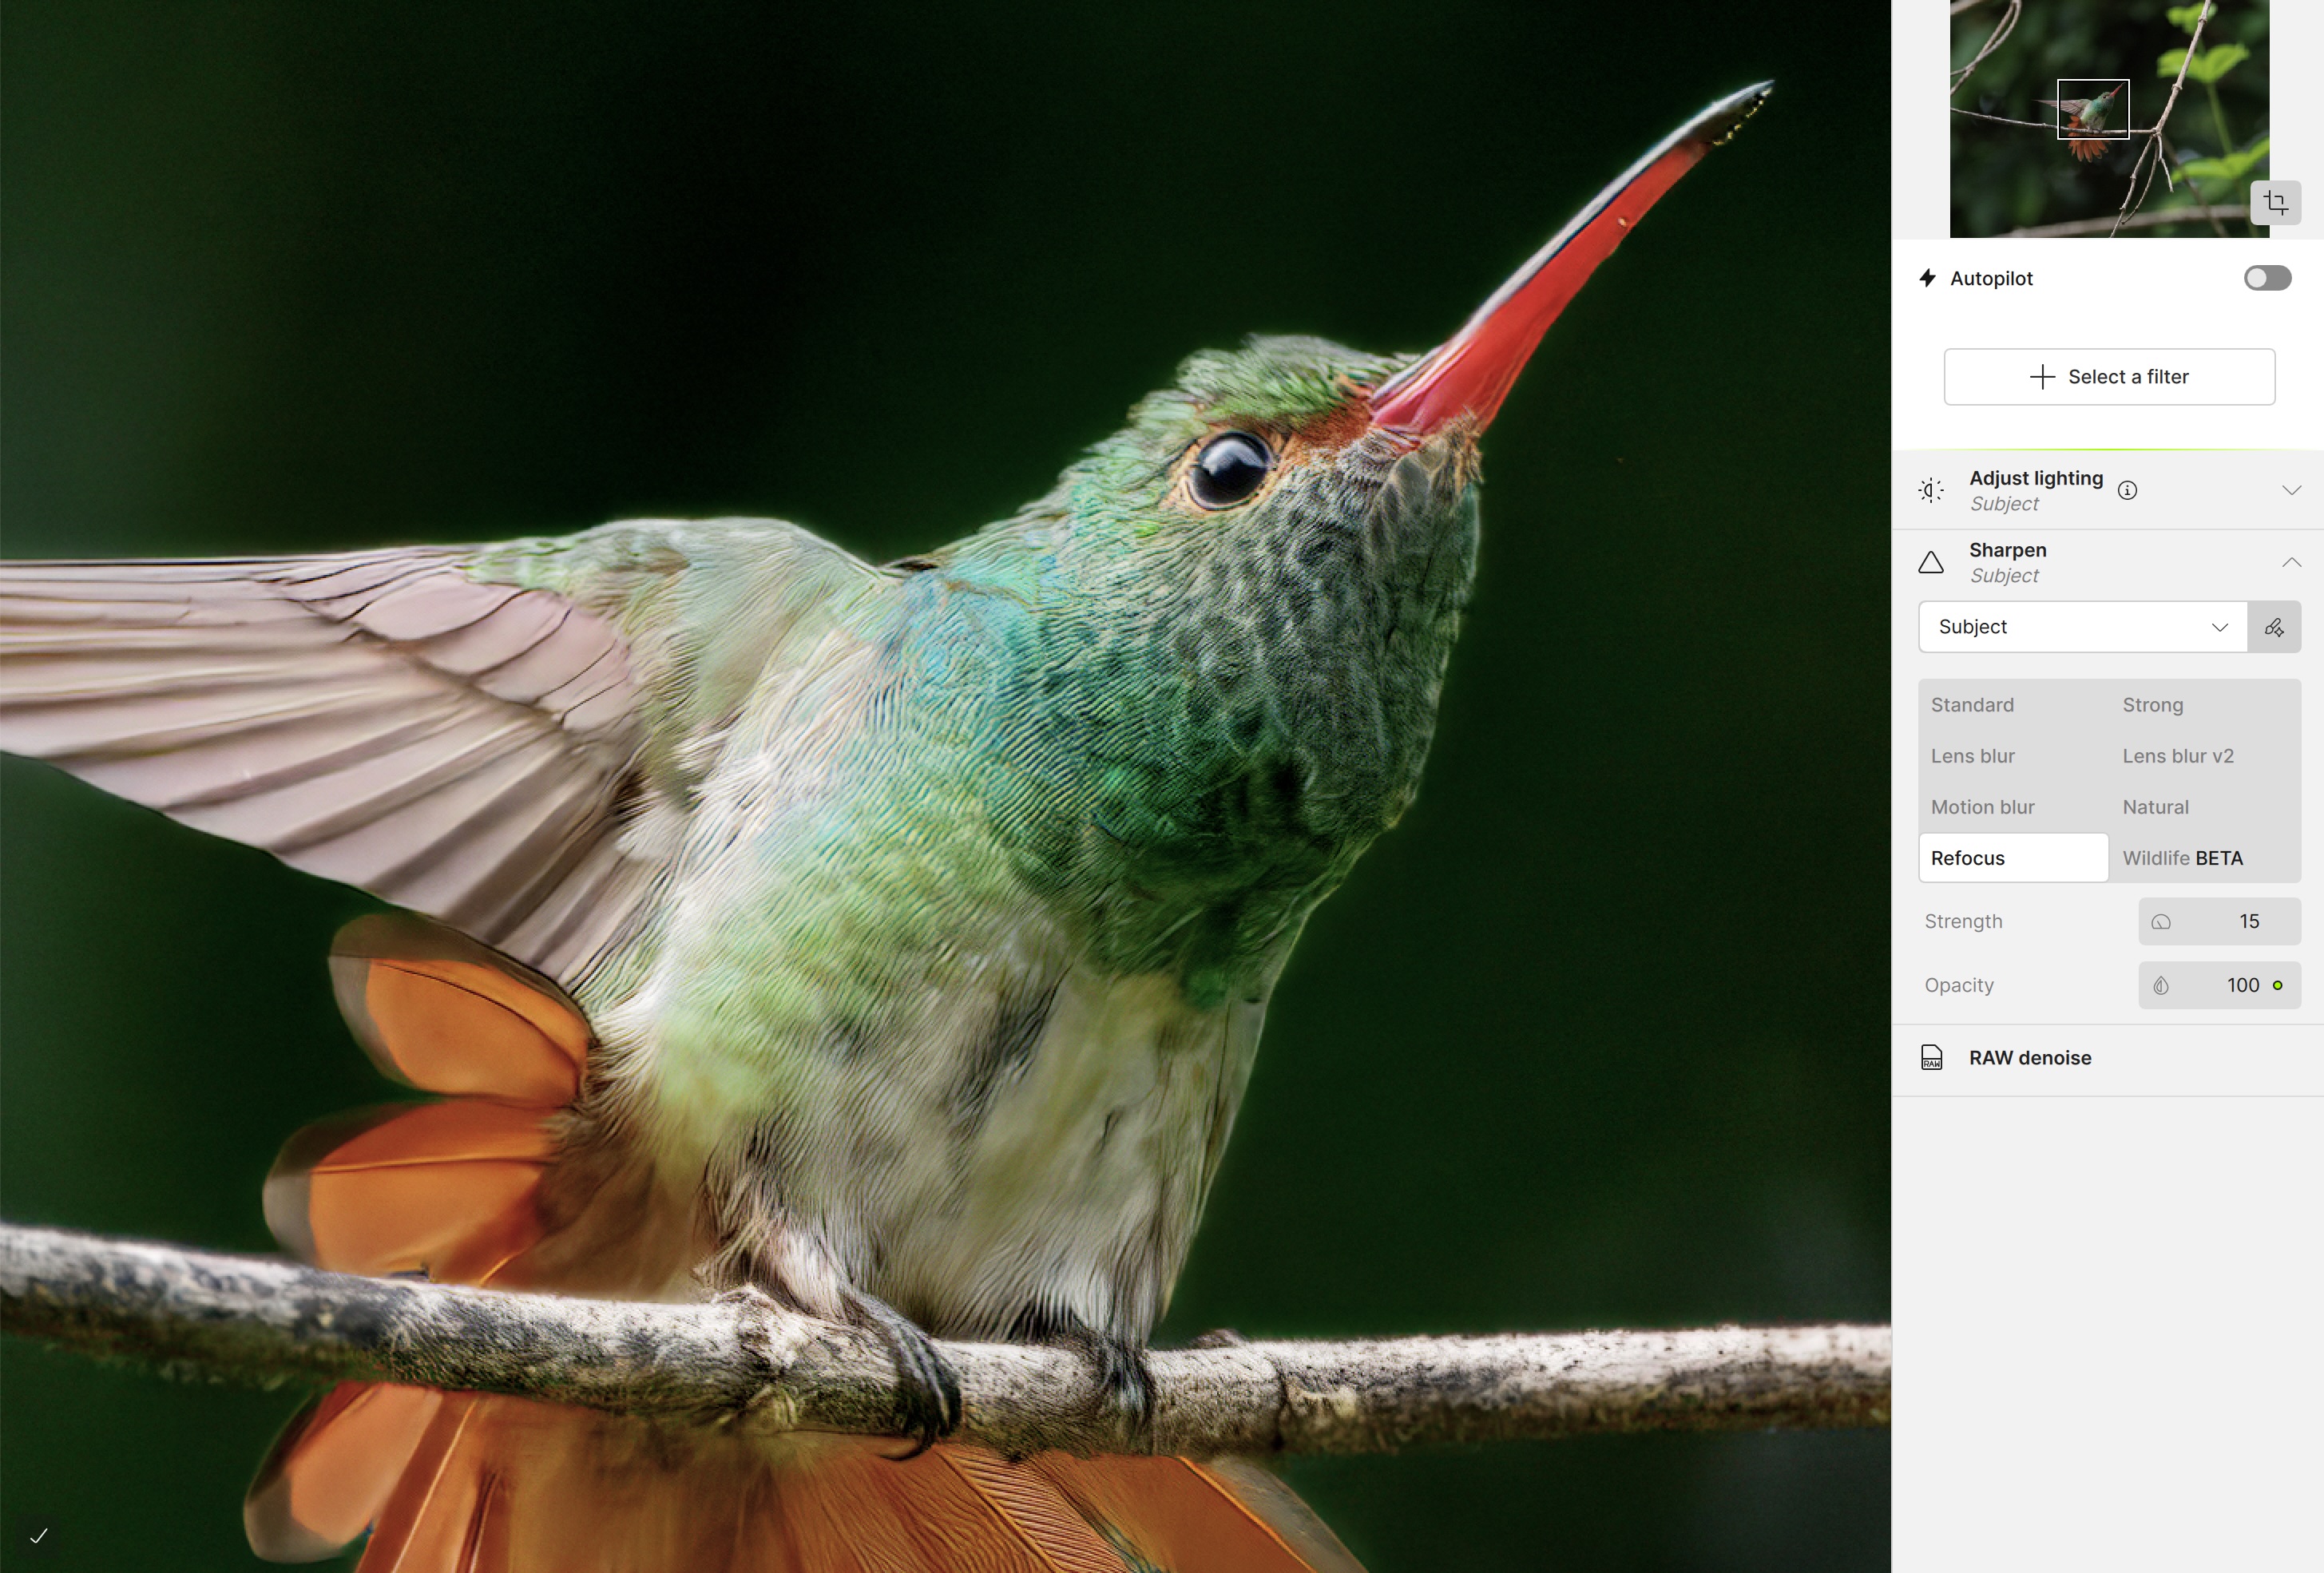
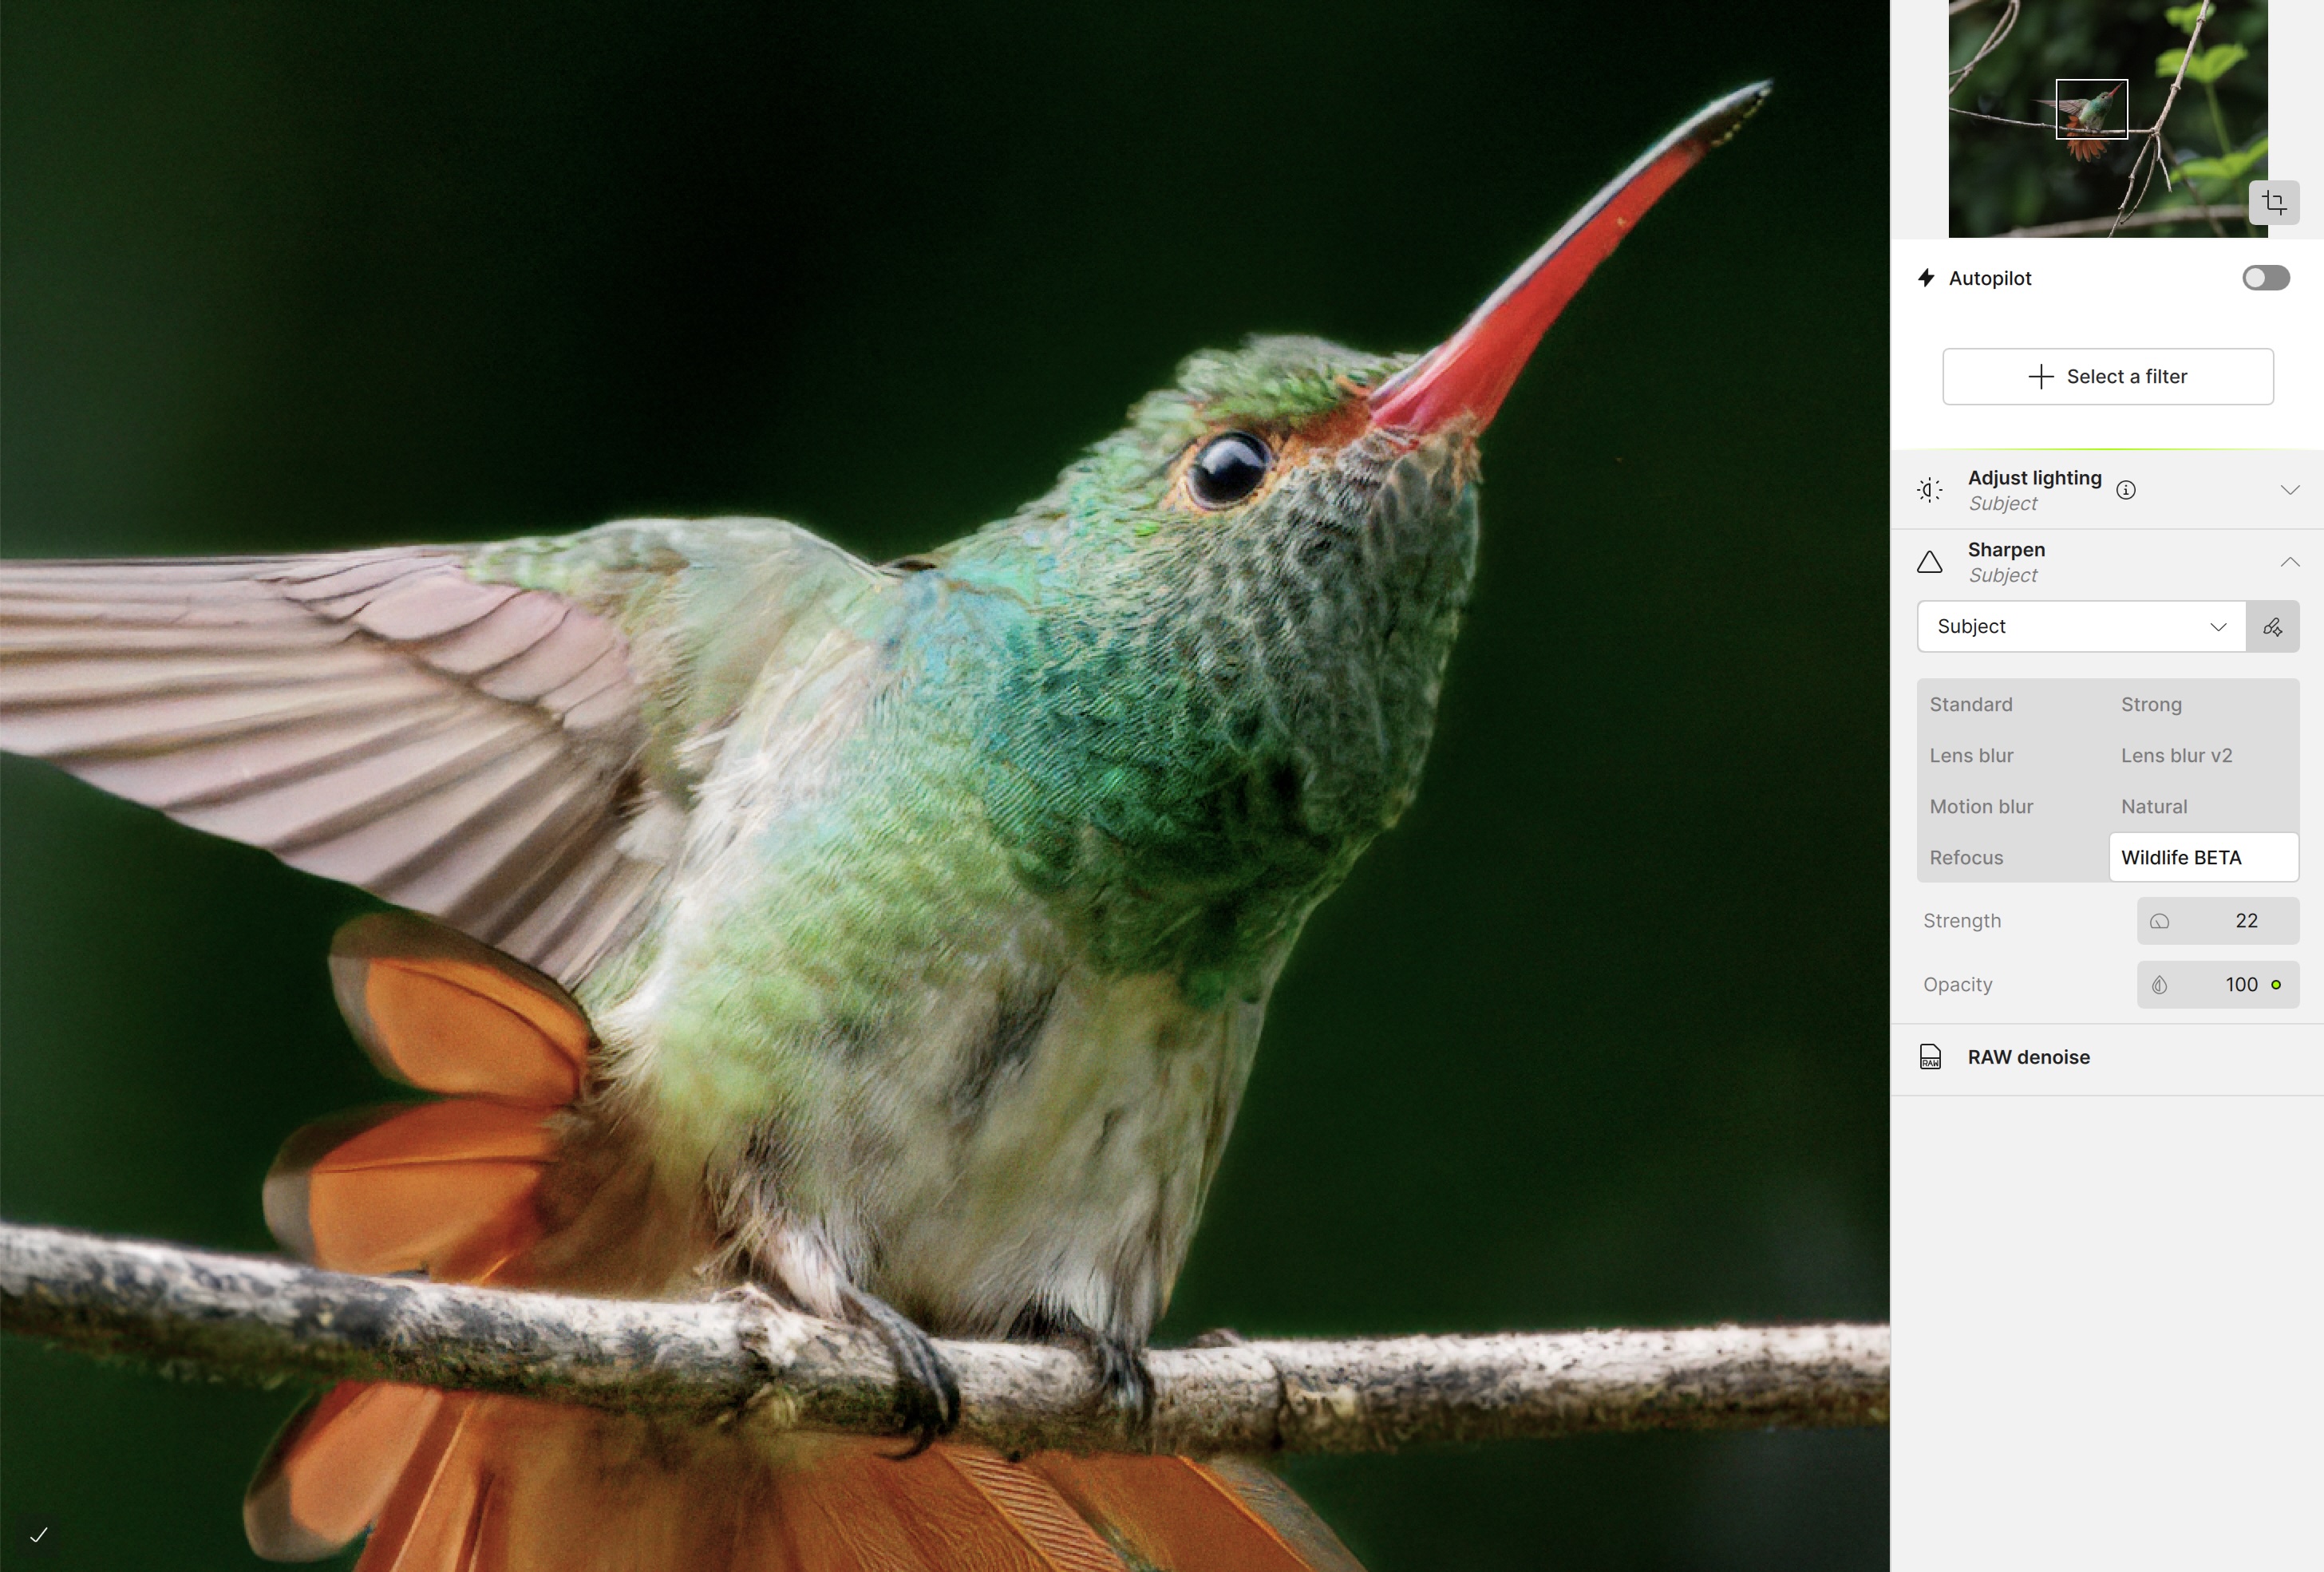
Sharpening alternatives
With the variety of Sharpening options to choose from, which one to choose? I ended up going through each one to see how subtle or aggressive they were. I was pleased to see a ‘Wildlife BETA’ option. In the past, I’ve written about how artificial Topaz PhotoAI sharpening was when it came to fur and feathers. It added patterns that weren’t there, making fur and feathers appear ‘combed’ or ‘groomed’ like a pet might be, but certainly not wildlife. While, I couldn’t really see any appreciable difference between Standard or Strong, Wildlife was significantly more natural-looking than ‘Natural’, so there has been some progress.
Click on an image to scroll through these screen captures in Gallery mode. Which Sharpening would you choose?


One thing to note is the time lag that occurs when switching from one sharpening option to another. The app takes time not only to sharpen, but also to re-Adjust lighting. This is a significant departure from Lightroom, where all changes are live, on-screen, as the user makes them.
Computing Power / System Requirements
Now, before you claim I’m using an underpowered computer, all work is being done on an 2025 M4 15″ MacBook Air with 16 GB of ram. Lightroom, Preview and Safari are open as well as Topaz Photo. With this configuration, the only lag time I experience with Lightroom is when Denoise is initially deployed. To have lag time with each change in sharpening, as is the case with Topaz Photo, is, well, annoying.
In the specs for Topaz Photo, they say 16 GB of ram is the minimum, and 24+ GB ram is recommended. Funny that. Lightroom specifies a minimum of 8 GB and recommends 16 GB. I find it interesting in that a far more capable app has half the requirements. Not only is Topaz Photo more expensive to subscribe to, it also demands a more expensive computer system.
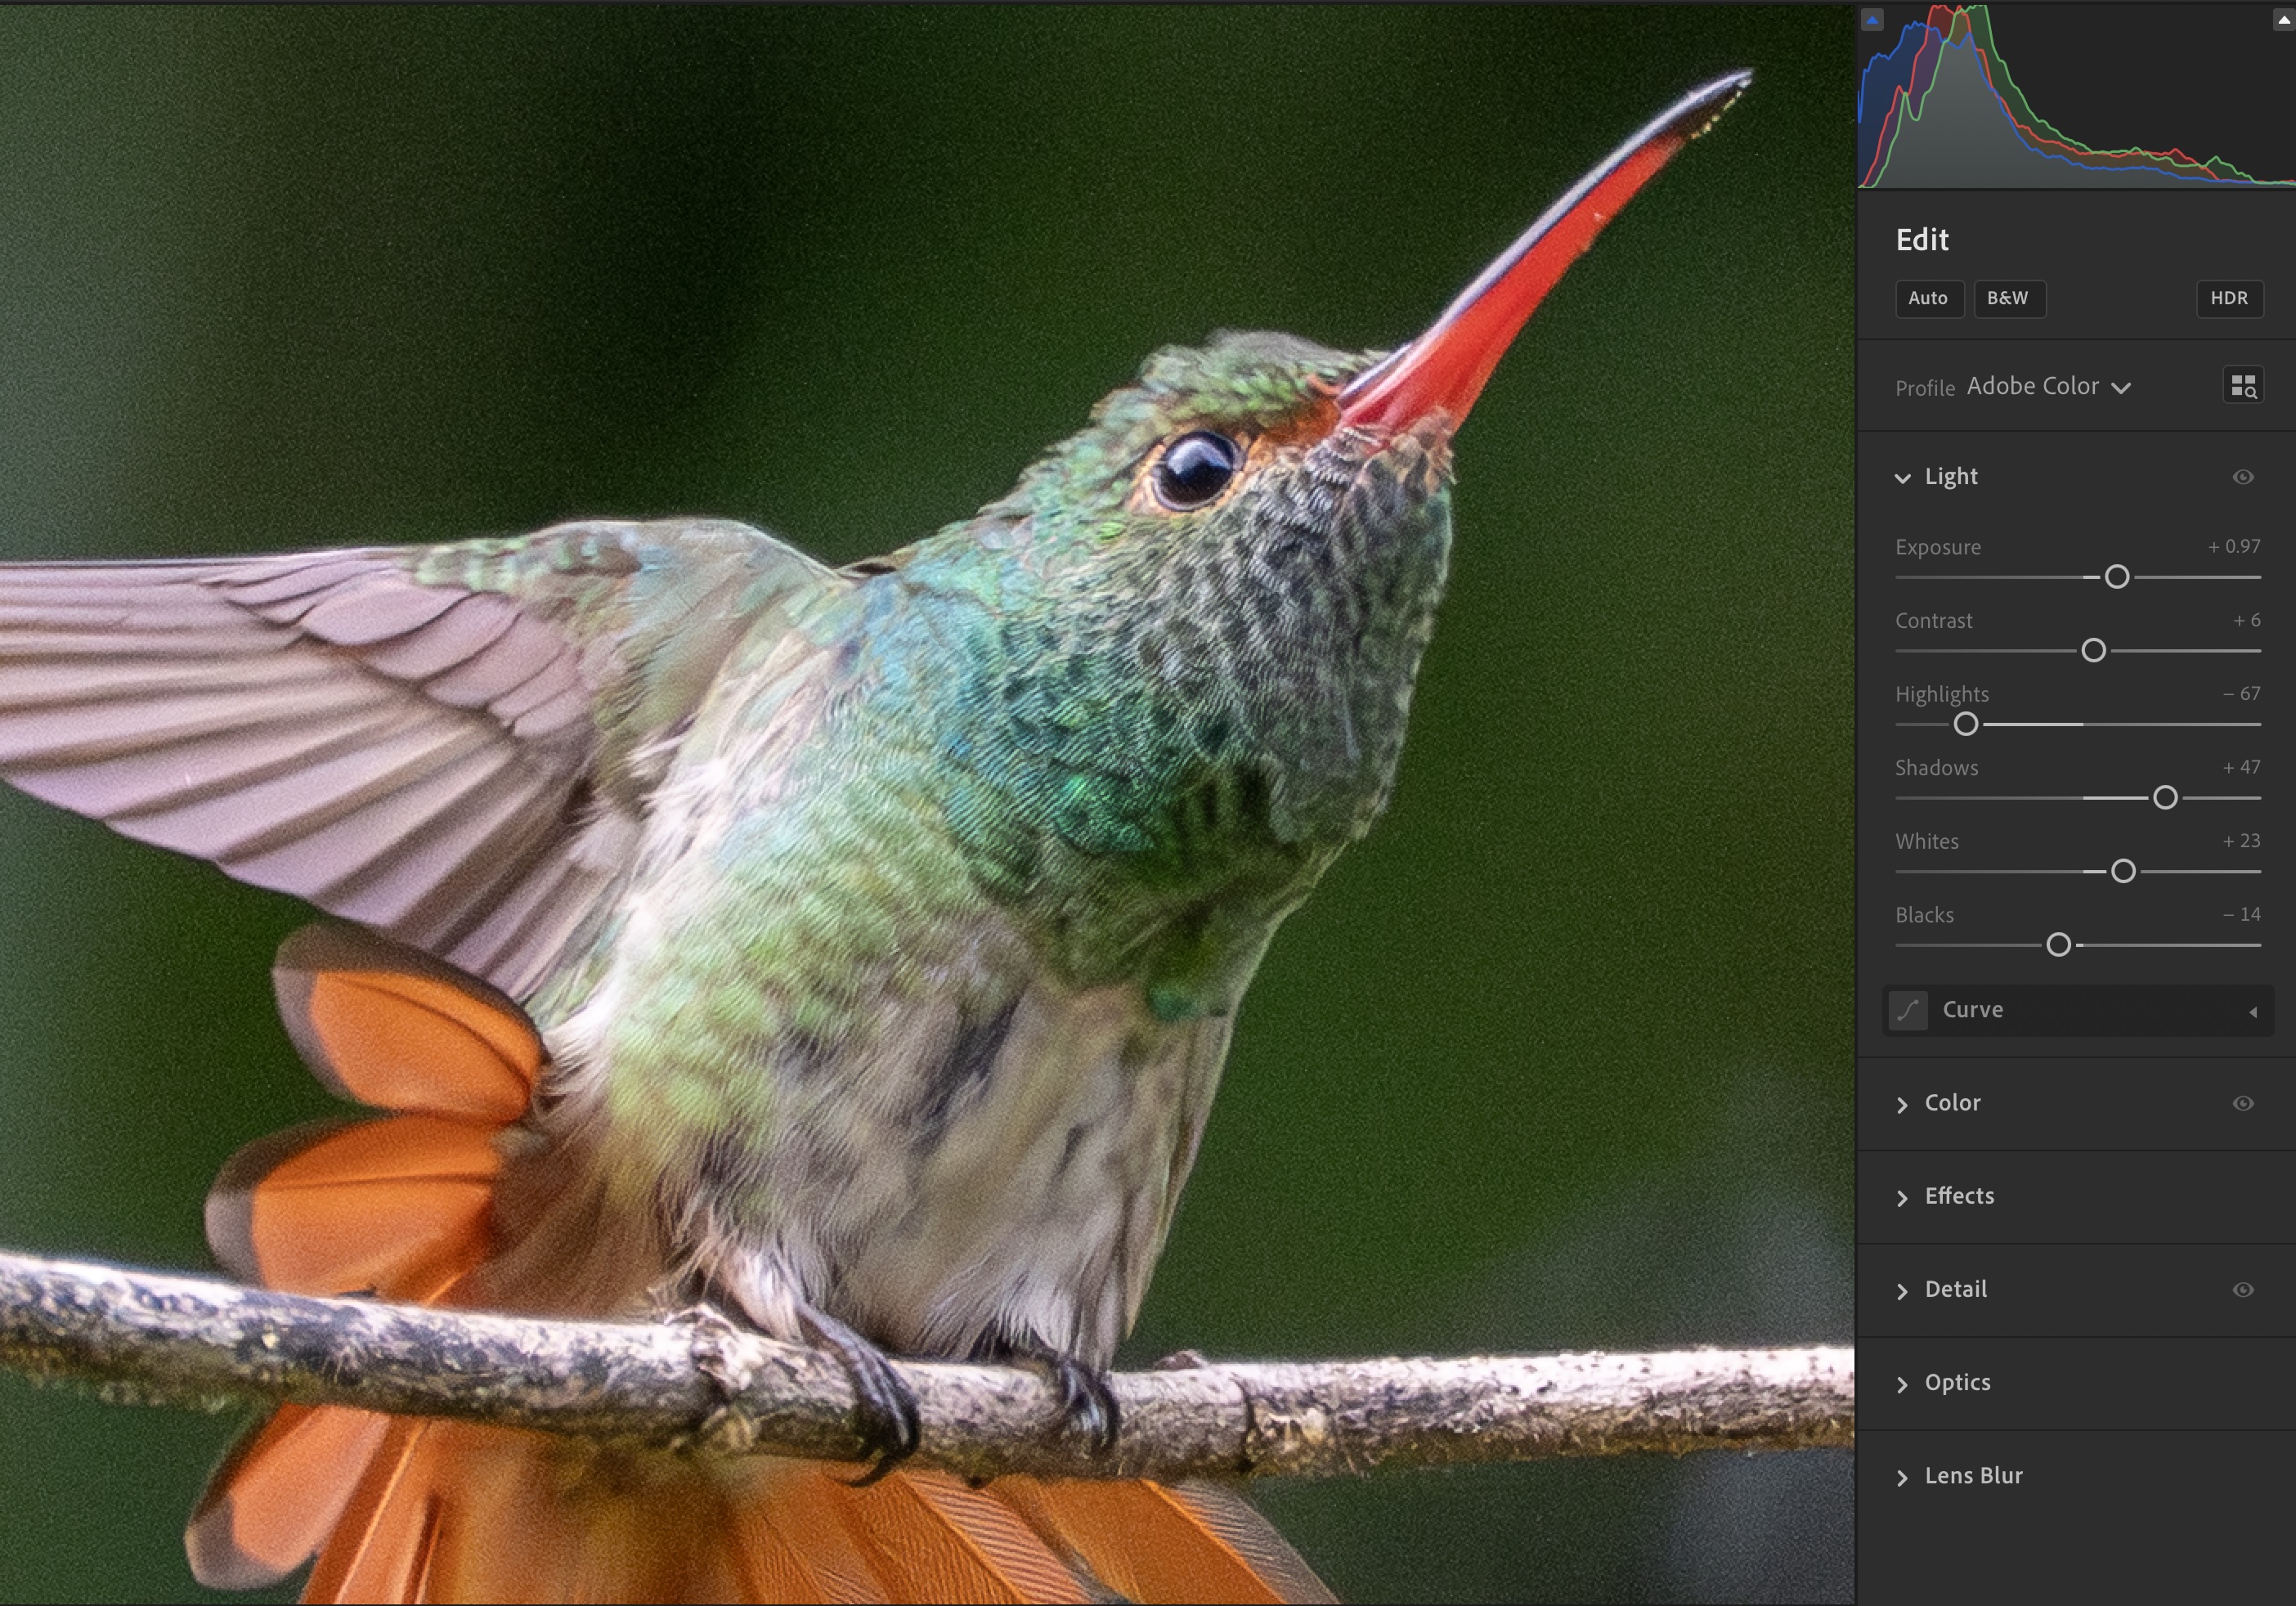
Back to the photo . . .
It took some work on my part, as the original photo appeared dark, though it was correctly exposed to preserve highlight detail. As a result, feather details were not entirely clear in the on-screen Preview. To improve that, I temporarily used Adjust lighting to bump the shadows, then turned it off before exporting the final DNG (to keep it as a DNG and not a TIFF). Upon exporting, the DNGs typically appeared over-sharpened compared to the on-screen Preview. Unexpectedly, the image also required an additional Denoise filter, specifically to smooth the mottling of the background. Therefore, my trial-and-error result was time-consuming and required a total of eight DNGs at different settings to match what I had achieved in Lightroom.
Part of this extra work could be chalked up to me learning the nuances of Topaz Photo. However, there is still a disconnect between the on-screen Preview and the DNG file as well as the need to temporarily brighten the image to more accurately assess the sharpening on-screen—all time consuming and not anything like the smooth workflow of Lightroom, where I can adjust light, colour and masks fluidly before or after attending to denoise and detail sharpening.
So I’ve left you in suspense, or have you figured out which one is which? Left is Topaz Photo; right is Lightroom. The discrepancies are so small that for anything other than a full-size fine print, i.e. for online, screen, photo books and calendars, the difference would be indistinguishable. For a full-size fine print, side-by-side, one would see differences. However, if they were not compared side-by-side, I doubt anyone would find fault with either result.
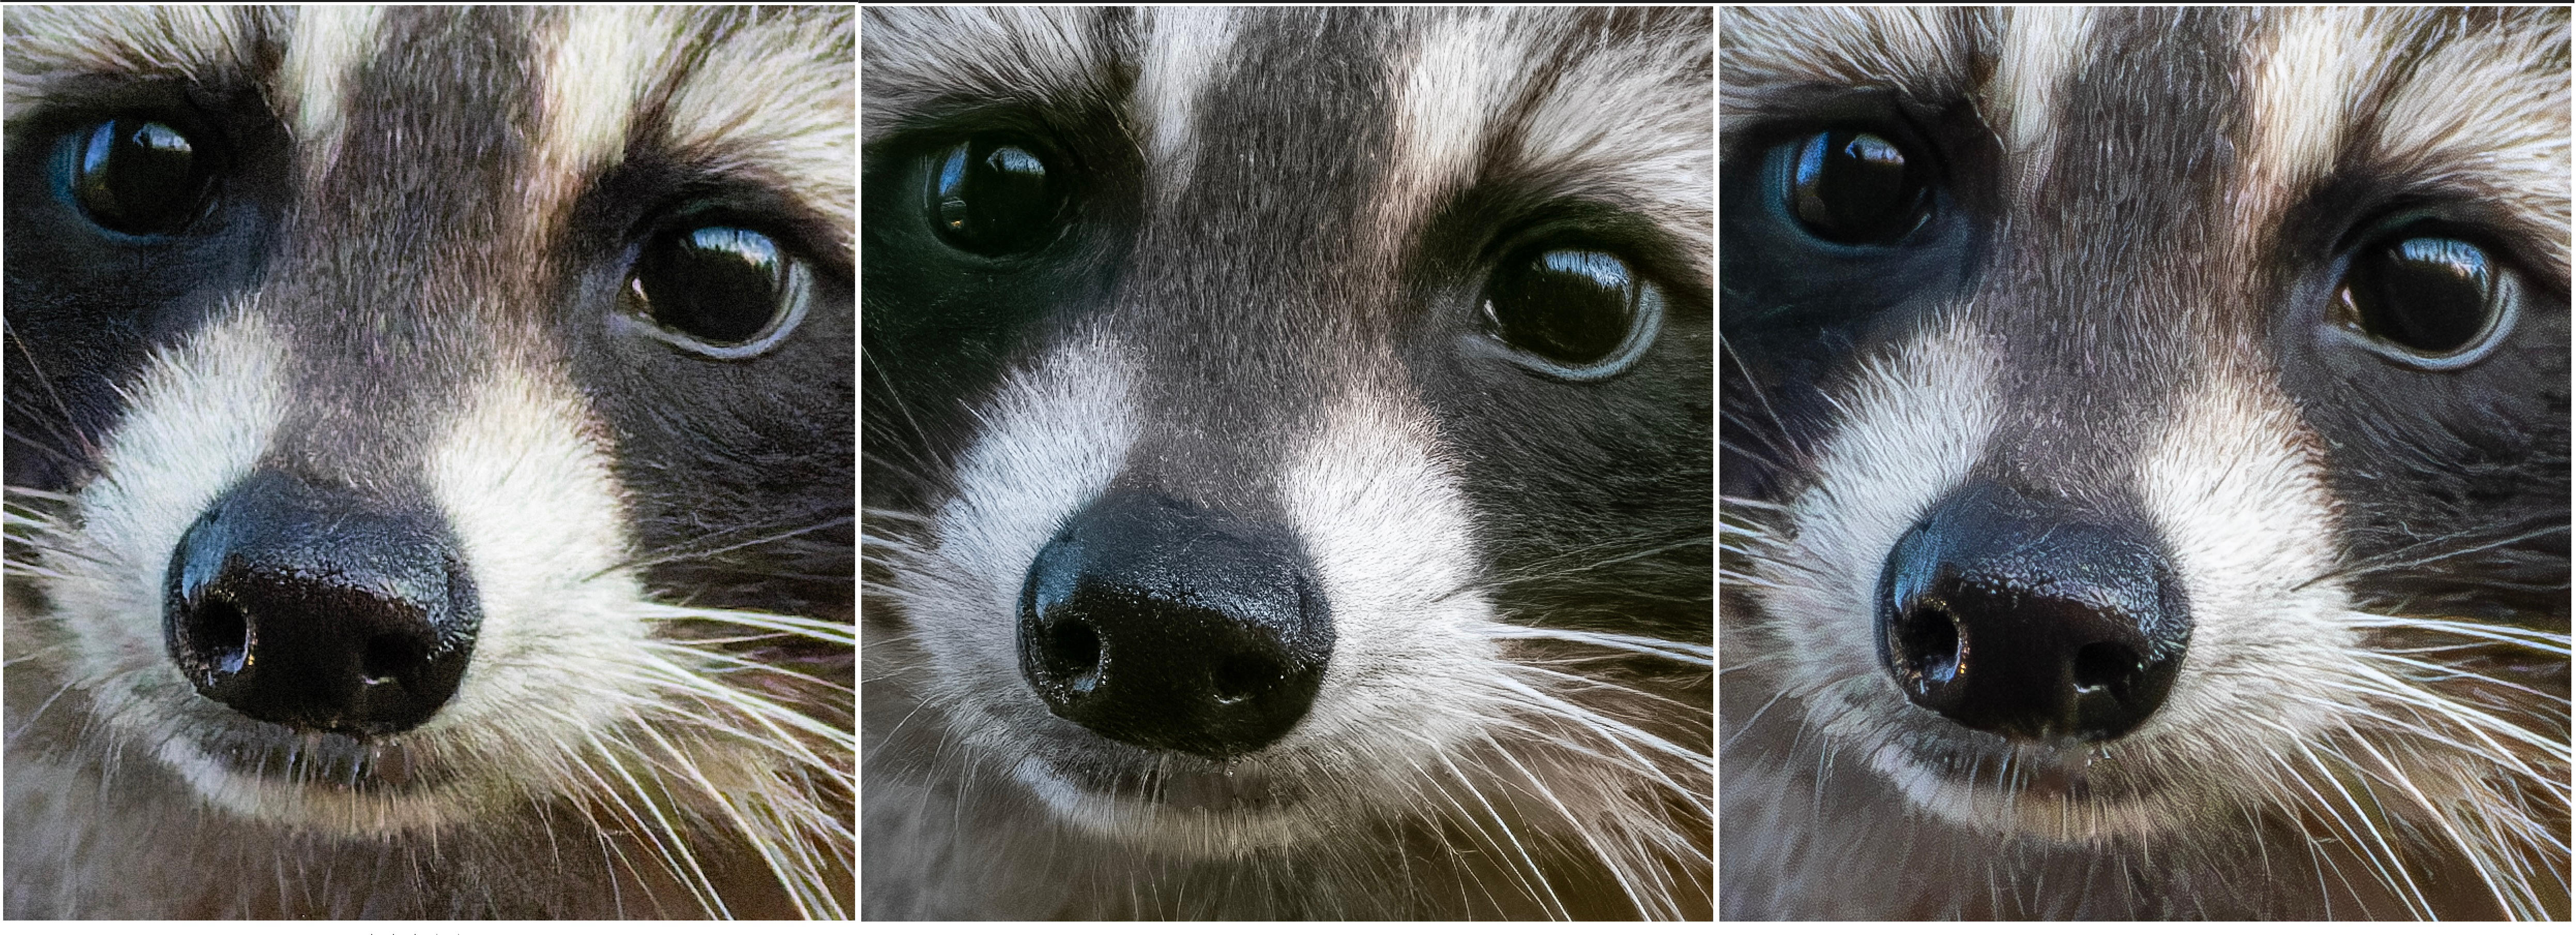
Backyard Racoon
This youngster paid us a visit one evening last May at 8:40pm, 10 minutes after sunset. The poor lighting demanded a wide-open aperture, a slow shutter speed for that focal length, combined with a high ISO of 32000, far beyond what I have used before, making this an ideal candidate for an app that claims to be cutting edge in raw denoising and sharpening.
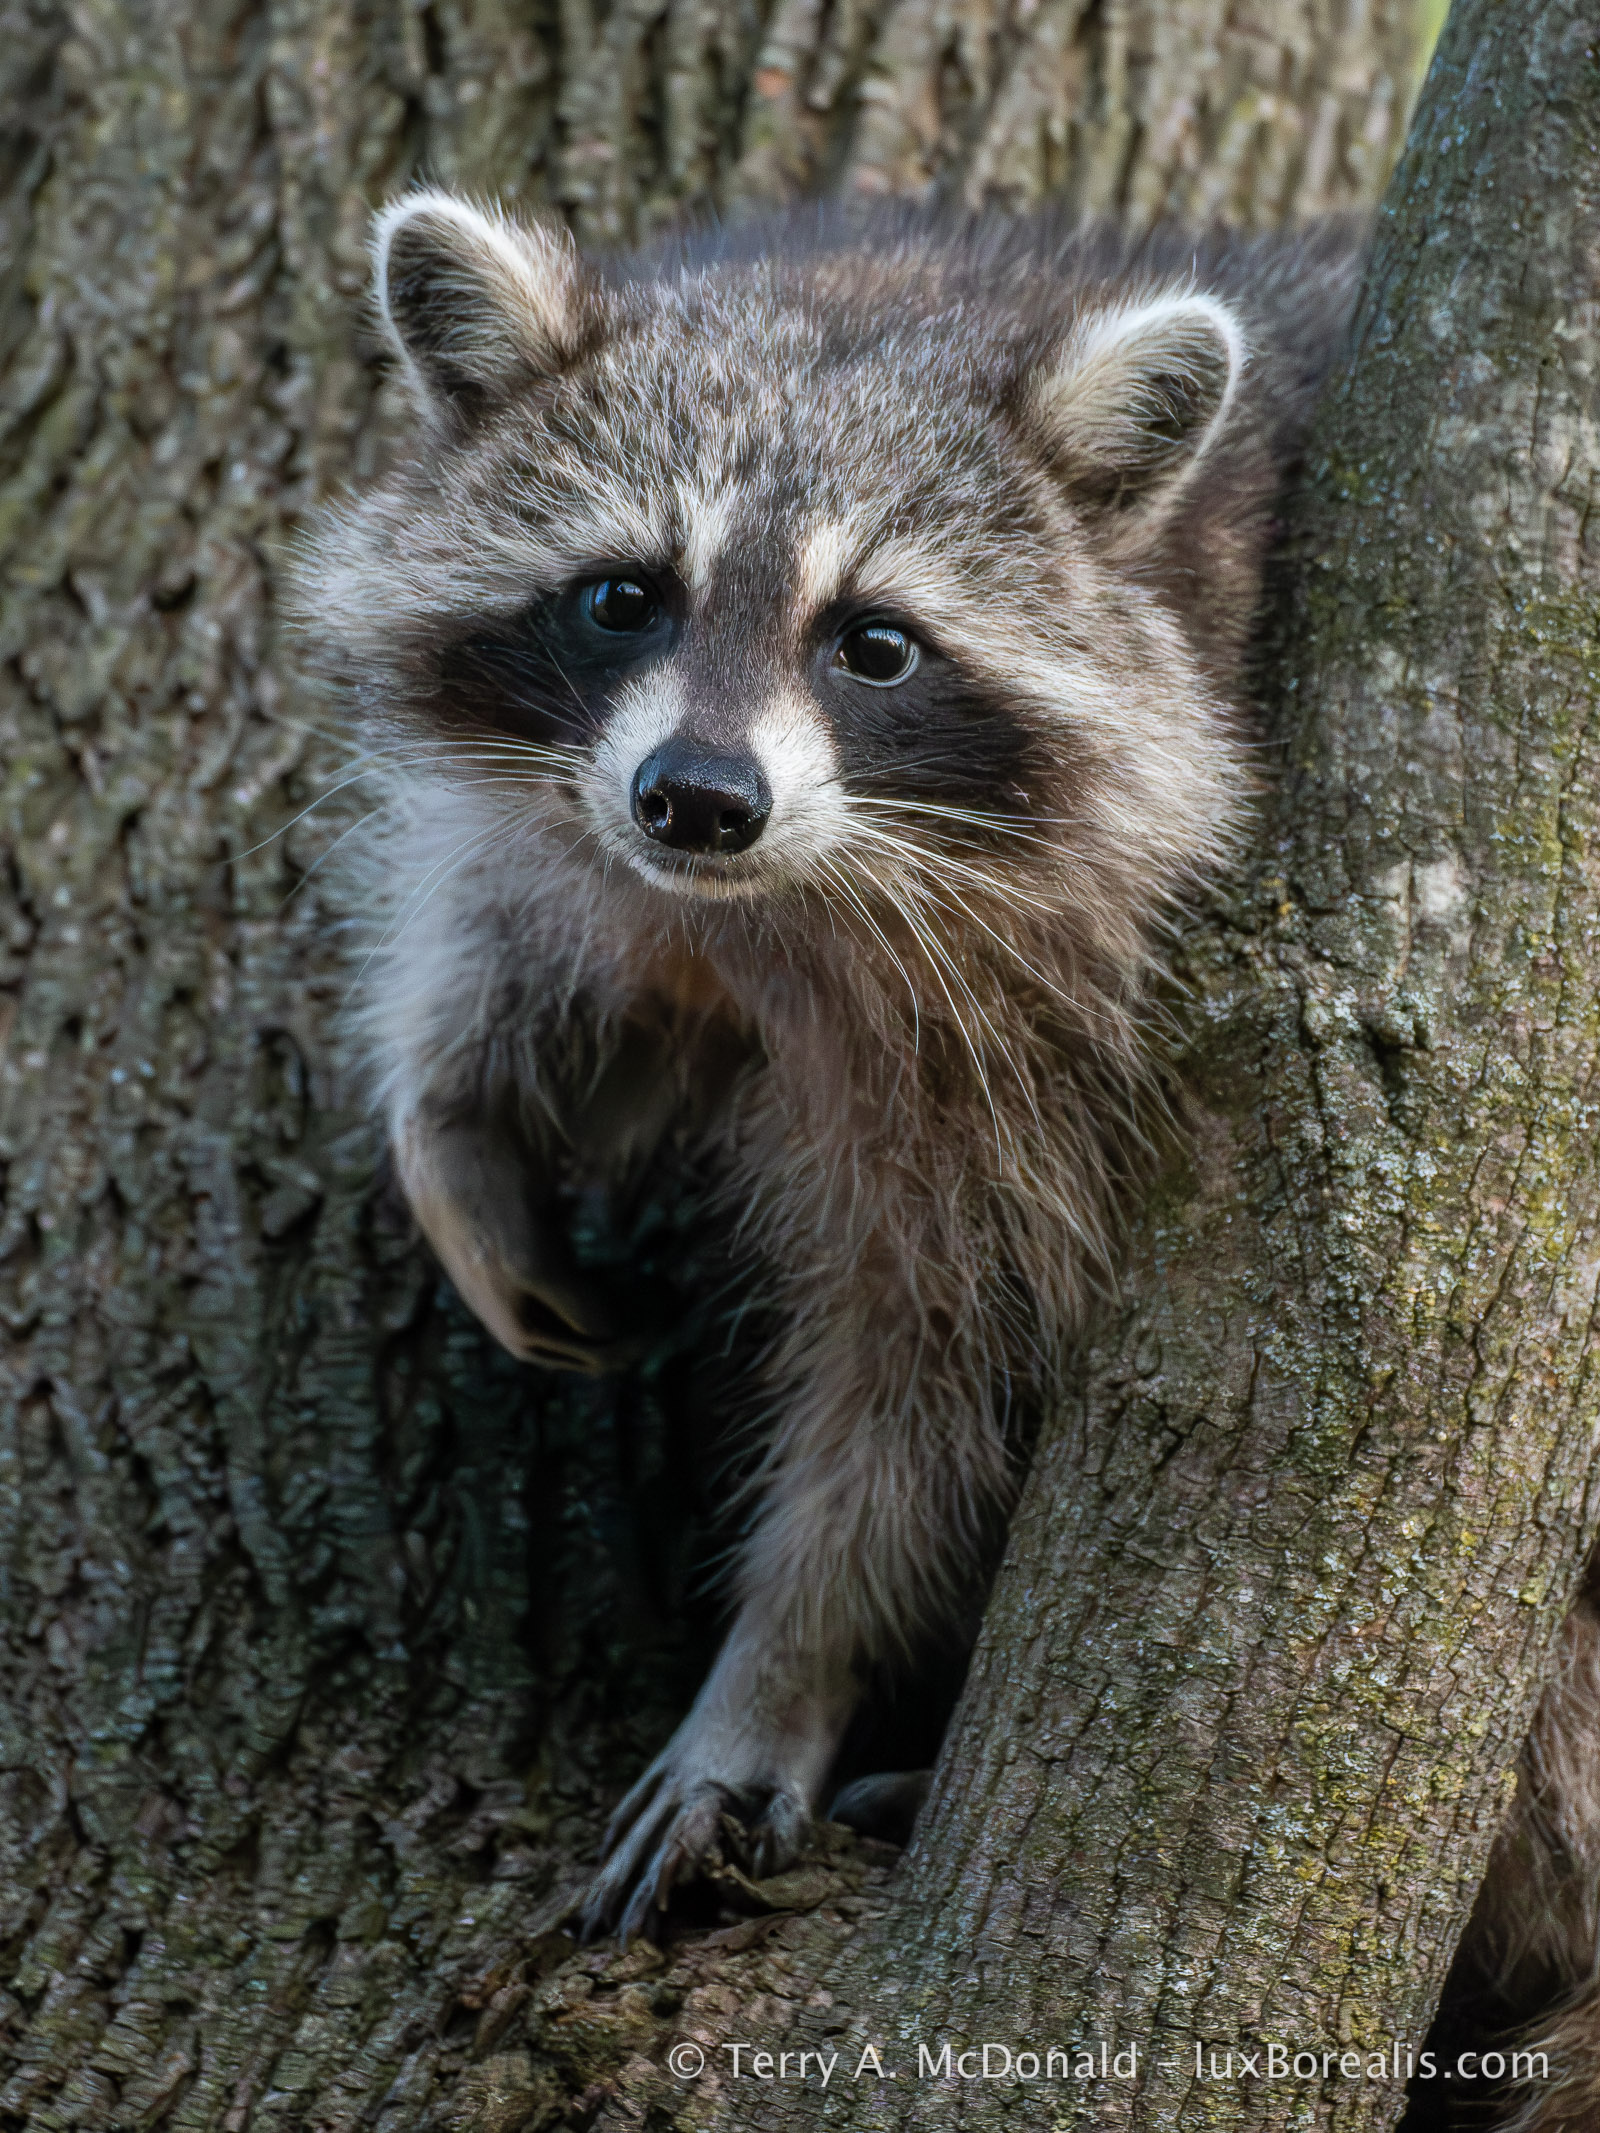
OM-1 w/100-400mm at 236mm (472mm efov) • ƒ6.1 @ 1/60 • ISO 32000 • Lightroom
Anyone shooting with a 35mm sensor camera, take note. MFT is more than capable at high ISOs.
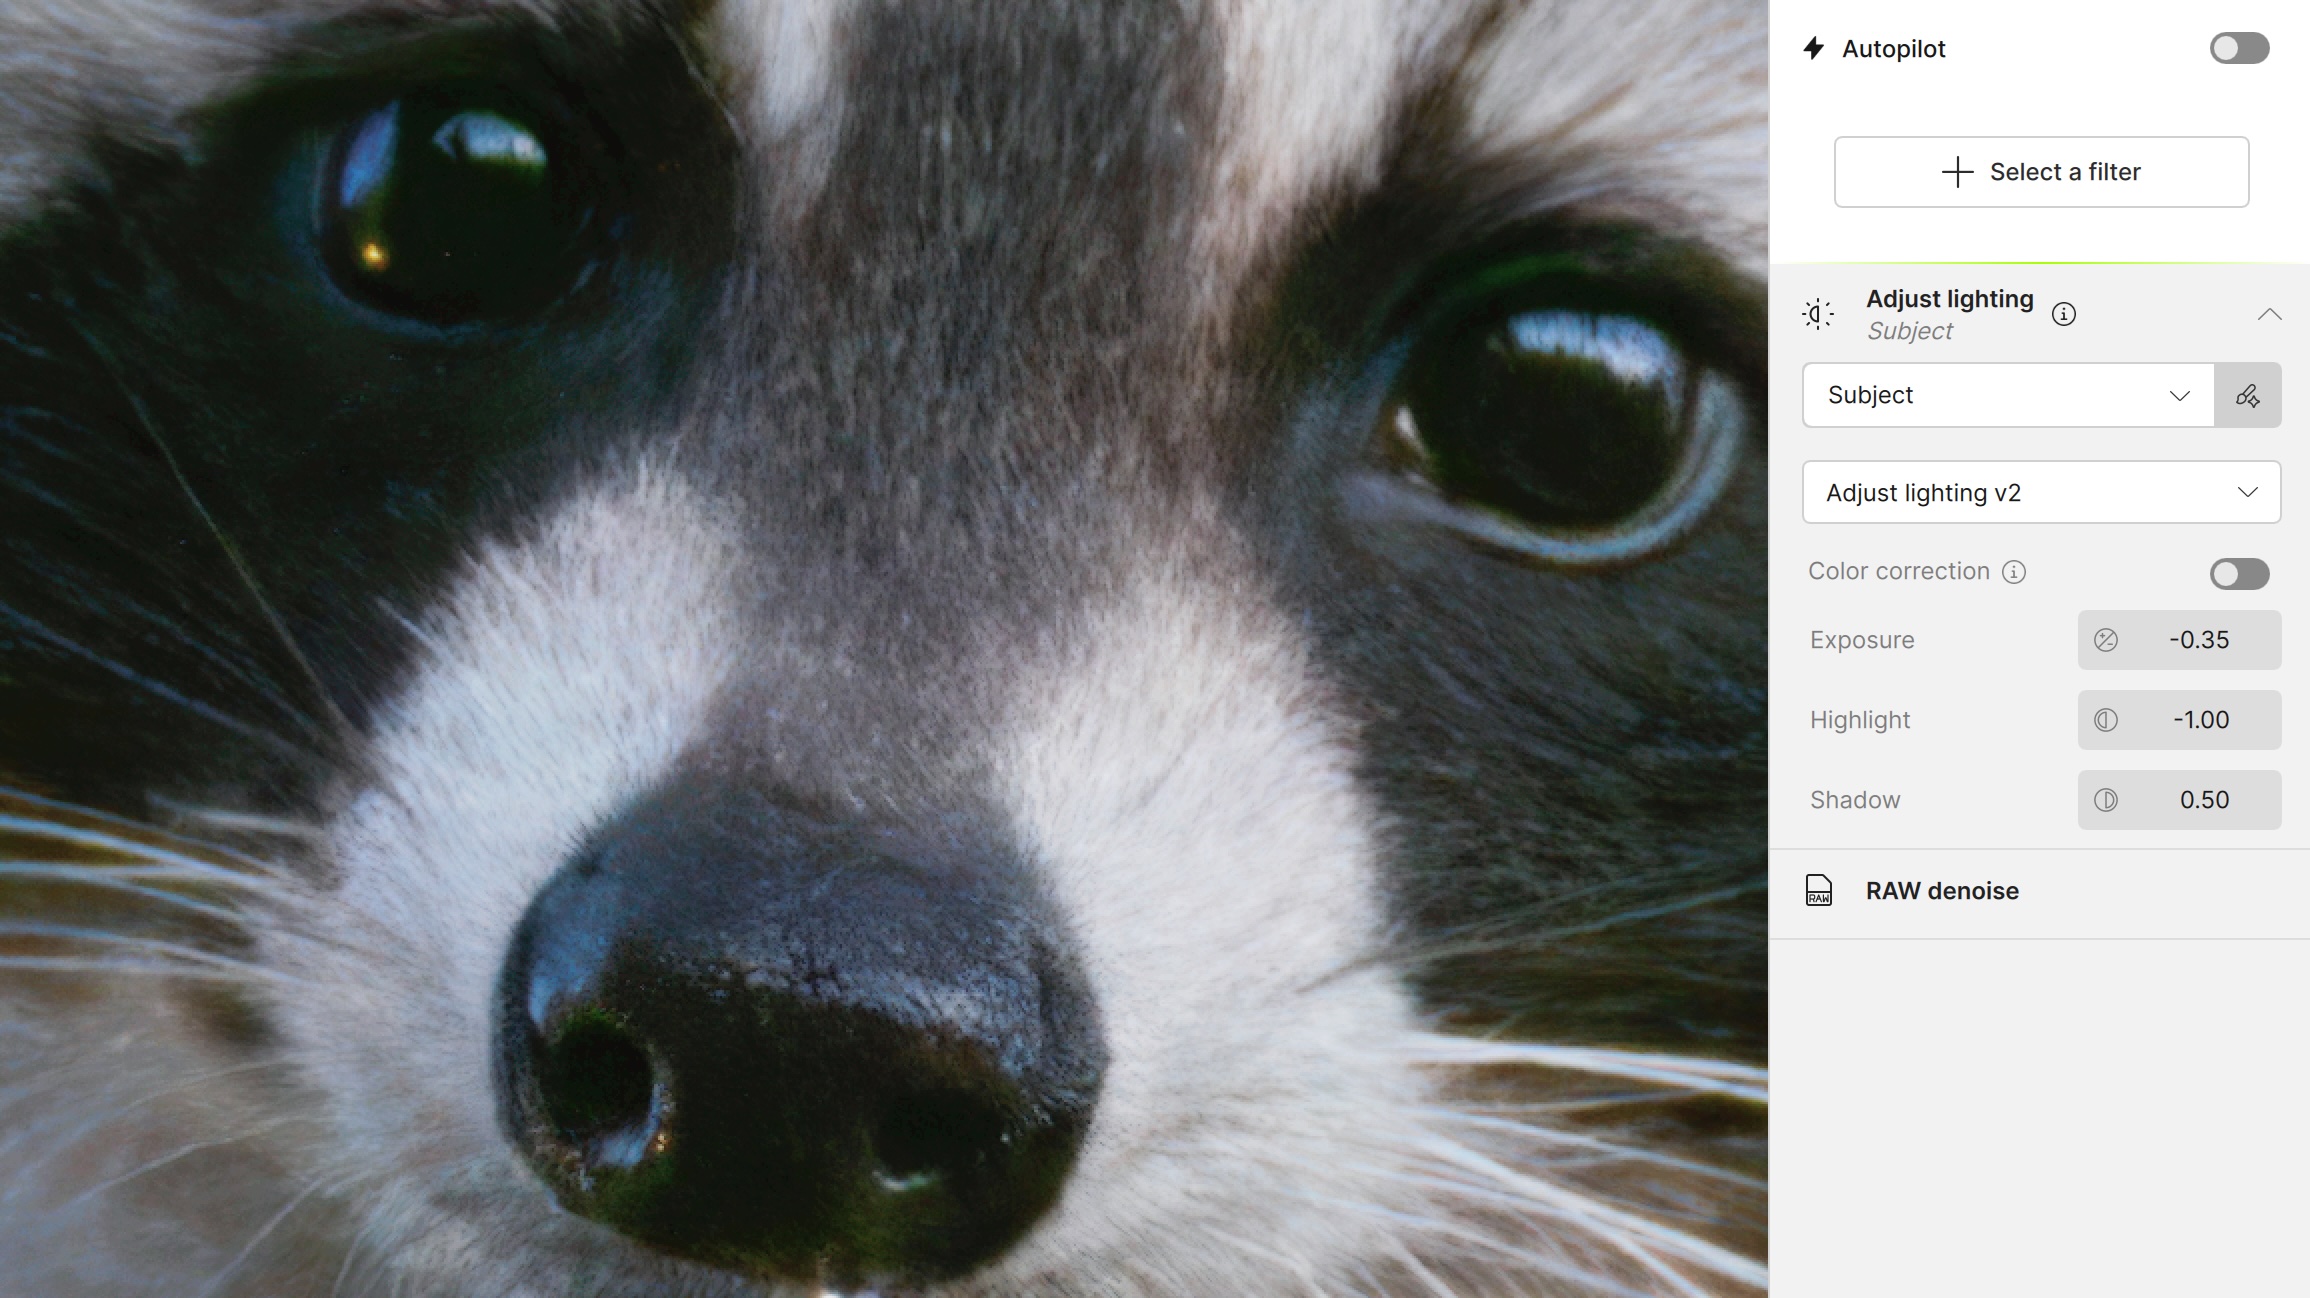
Adjust lighting
Upon opening, Topaz Photo applied ‘RAW denoise’, choosing RAW Strong which provided a clearer result than RAW Normal. No problem, though it now needed some sharpening. Except, with the snout being very bright, it needed some exposure adjustment first to allow me to see how sharpening would be applied to the bright areas. I used Adjust lighting v2 and the image became overexposed with all highlight detail wiped out. I also discovered how aggressive the changes to Exposure are with –0.5 making it quite dark, rather more than the –½ EV a photographer might expect. The changes to highlights were maxed out at –1.0, much more than –1 EV.
Remove Filter
I thought this was also a good time to try the ‘Remove’ filter. Big mistake for a few reasons.
- Changing the size of brush is a bit hit and miss. It would be very helpful if Topaz could show users the change in brush size in real time as the user drags the slider (as Lightroom does). This would save a lot of back and forth like Goldilocks and the Three Bears. Lightroom also allows brush size changes simply by using a mouse or trackpad—very intuitive.
- With the area brushed (e.g. the yellow reflection in the raccoon’s right eye), the actual process of removing took forever. What is instantaneous in Lightroom took 20 seconds or so.
I know, “Big deal,’ say the Topaz defenders. Sorry, but I don’t have all day to fiddle with brush sizes and sit around while Remove does its thing, on top of the lag time for each and every other adjustment.
A third concern I noticed is that after ‘Removal’ took place, the Raw Denoise filter disappeared from the panel. I’ve learned directly from Topaz Support that: “The ‘Filter Flattened’ message appears when using one of our generative AI models or Upscale enhancement, such as Remove, Dust & Scratches, Super Focus, [and] Upscale . . . it’s best to apply generative AI models / Upscale first, and then make final adjustments like Sharpen, Denoise, or Recover faces afterwards.” Good to know, however . . .
Generative AI
. . . instantly, the Generative AI red flag went up. For some, it’s acceptable to have half their photo re-generated using AI. Not me. I have no trouble using Assistive AI, but I’m sensitive to exactly what Generative AI is doing and where it is sourcing the pixels from. I wrote about AI in Photography in a previous article which goes into some detail about the differences. Lightroom uses internally-generative AI (pixels from the image) for Denoising and Lens Blur. External Generative AI is used only for Retouching ,but for me, that option is always toggled off. So what is Topaz Photo doing?
According to a Topaz Labs support request I put in: “The AI models used in Topaz Photo (including Remove, Dust & Scratches, Super Focus, and Upscale) are trained on a large set of internally curated training data explicitly created for model development. We do not use third-party or customer images pulled from the web or external sources for training.”
Bottom line: the pixels being generated by Topaz Photo are from external sources, not from the photograph being processing. To me, this is unacceptable. My fundamental belief is that a photograph should reflect the vision, talents and abilities of the person who made it. I prefer to stay true to the ideals of #RealWorldPhotography, and not use any external generative AI. This means, I’ll leave any retouching for Lightroom.
Sharpen
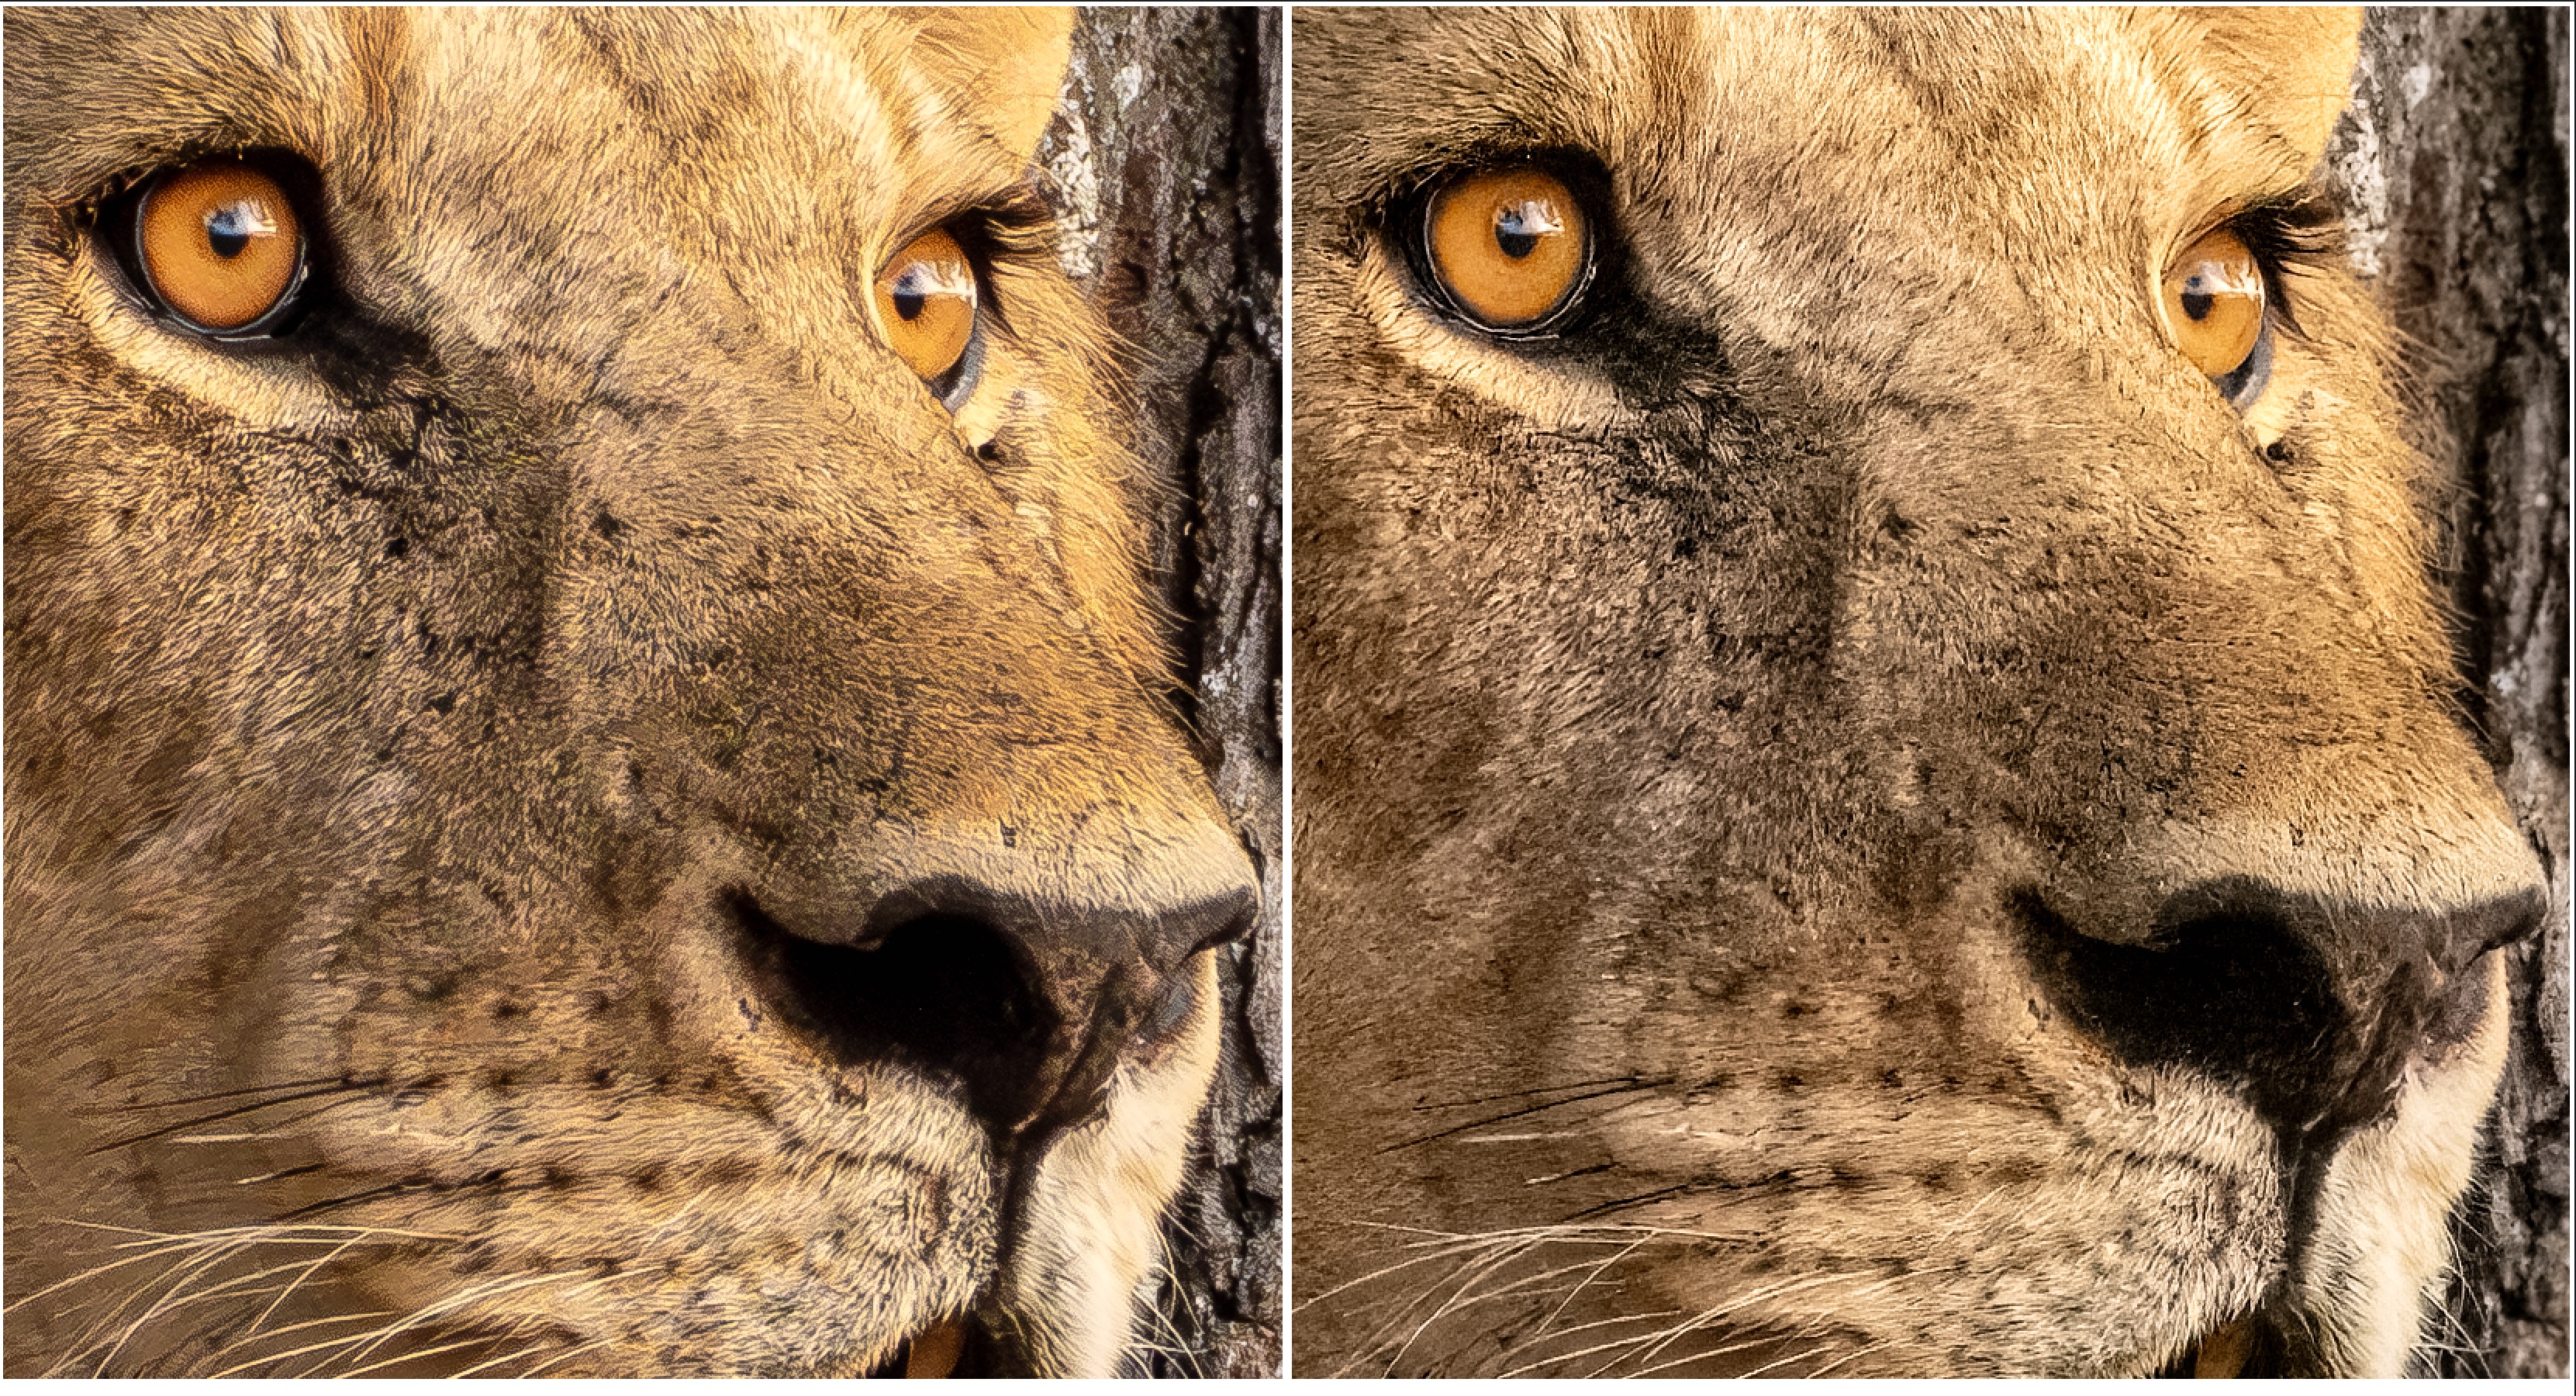
Initially, Topaz selected Lens Blur 2. It looked okay, but not great, certainly not as good as I had already achieved with both Lightroom and DxO separately. Again, I tried each of the Sharpening options and, well, you decide. Each of these screenshots show the different sharpening selections. Click to open them as the scrollable Gallery.
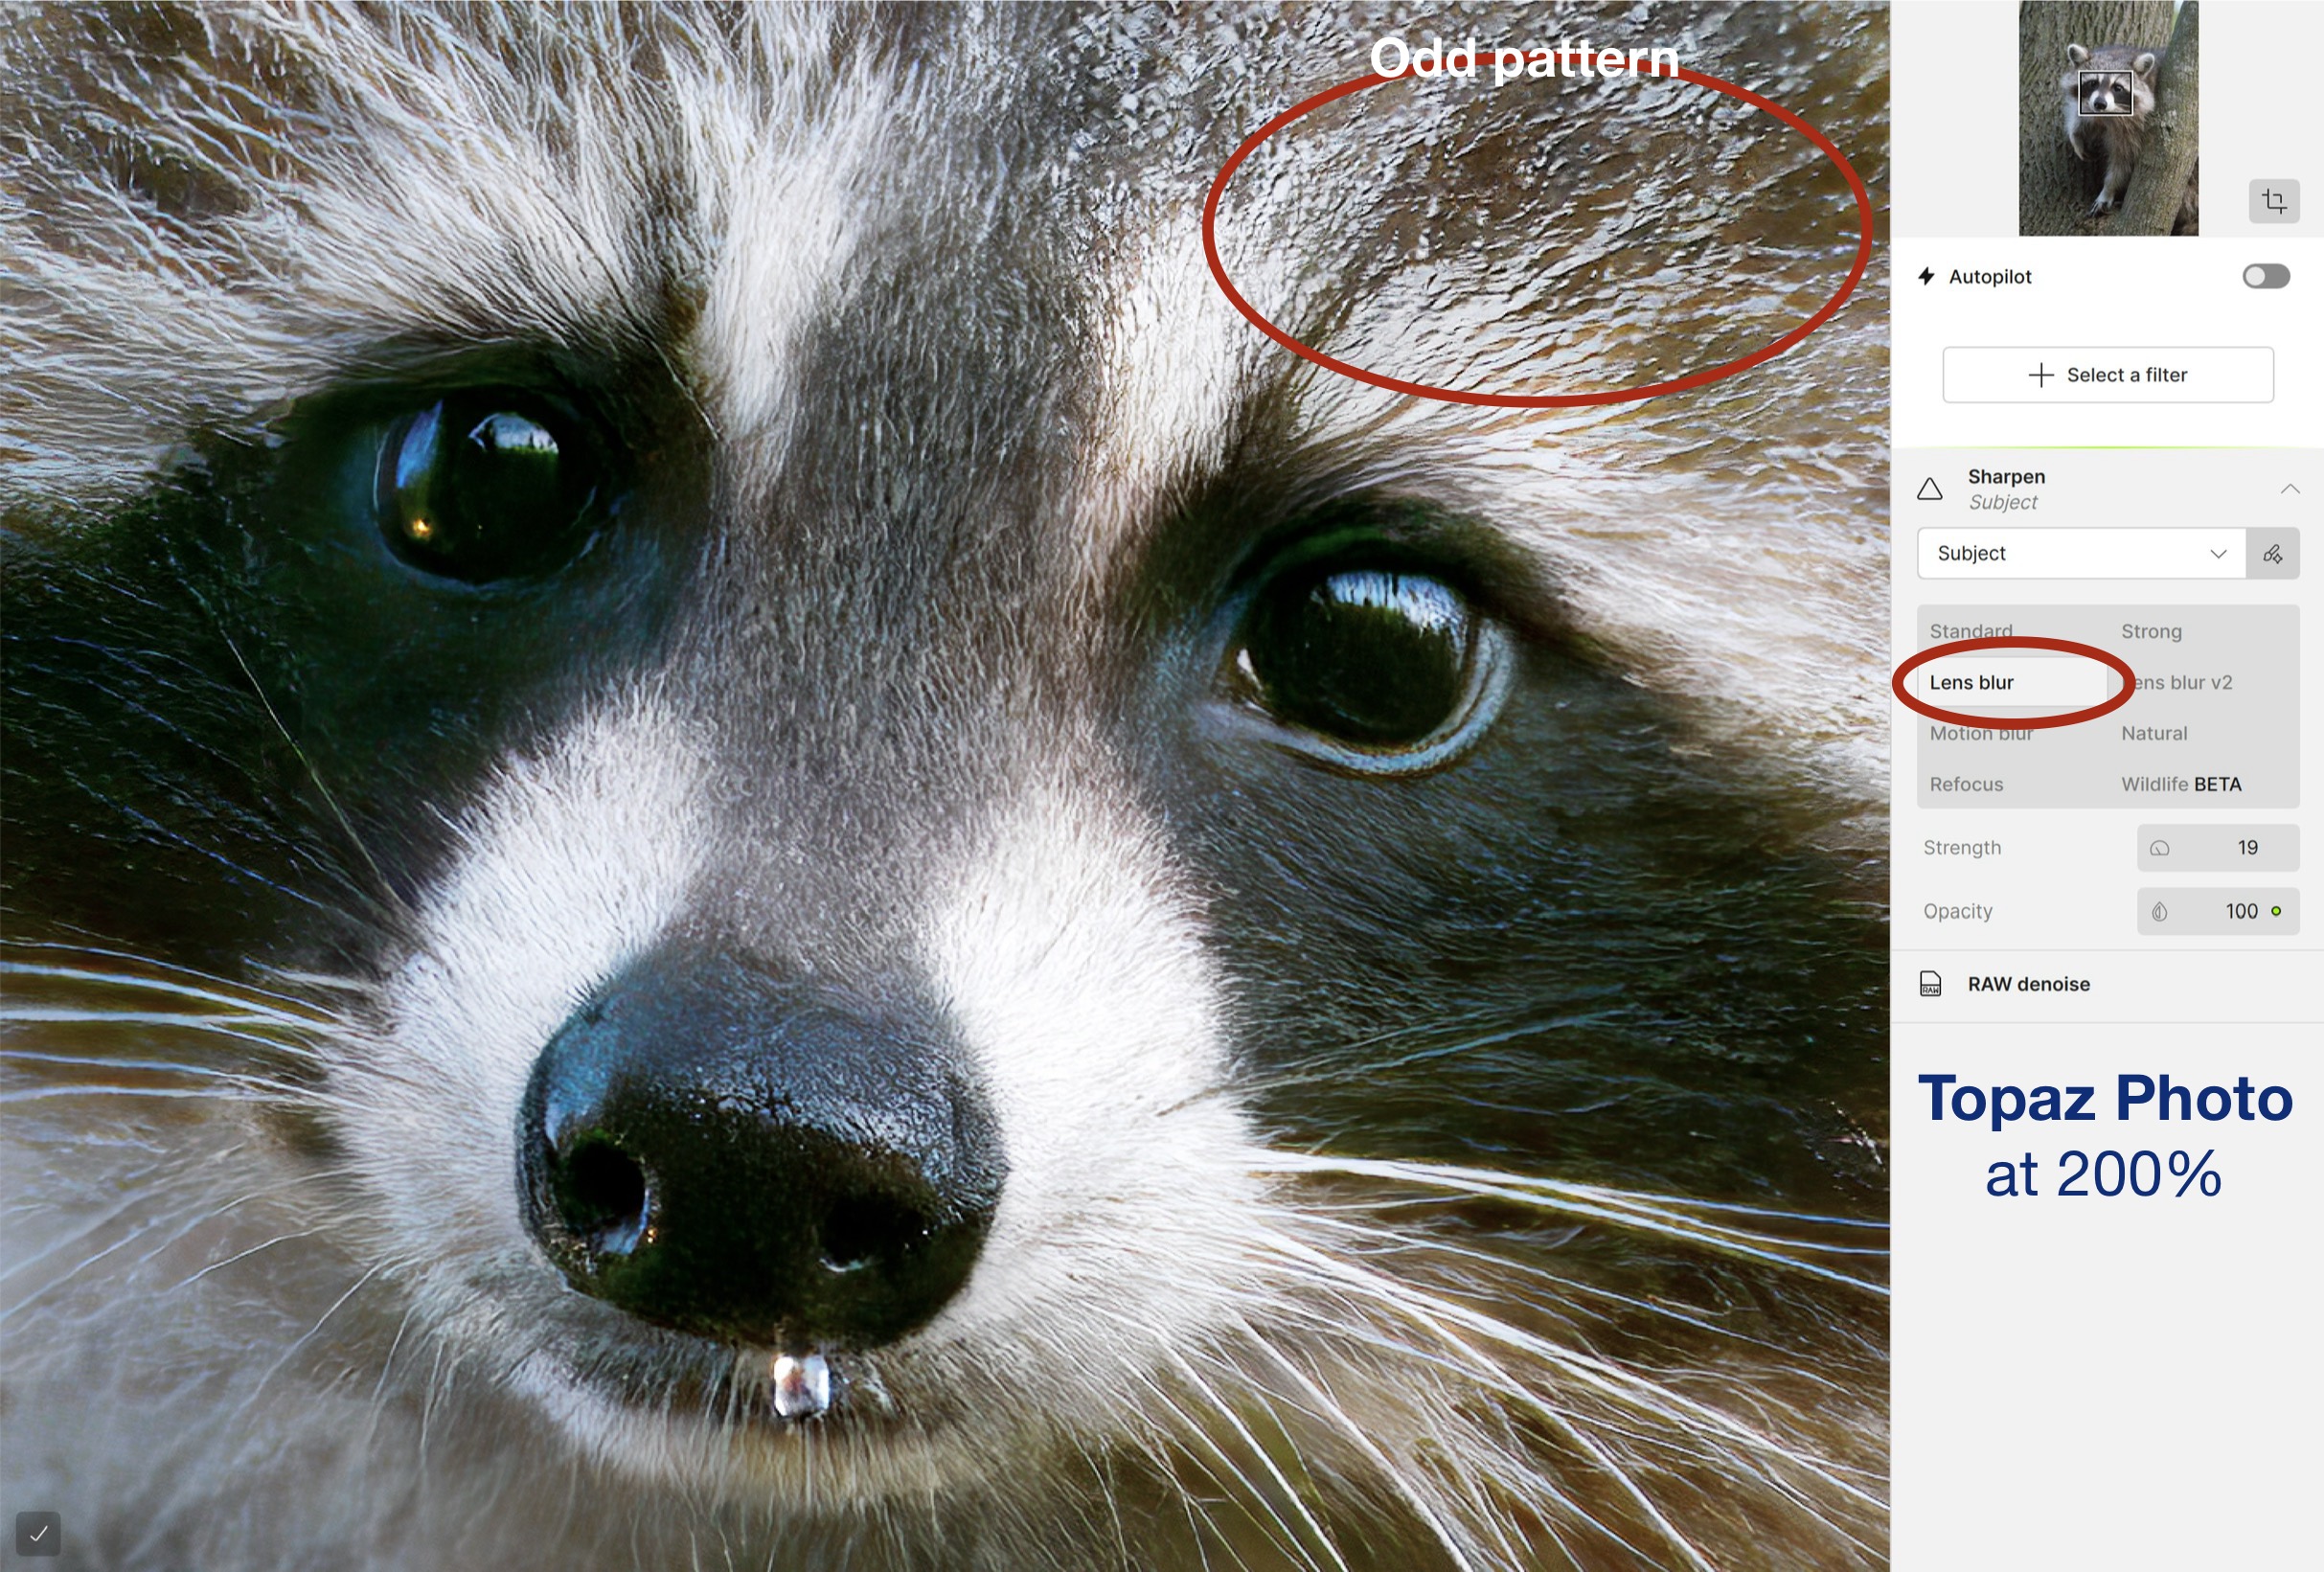


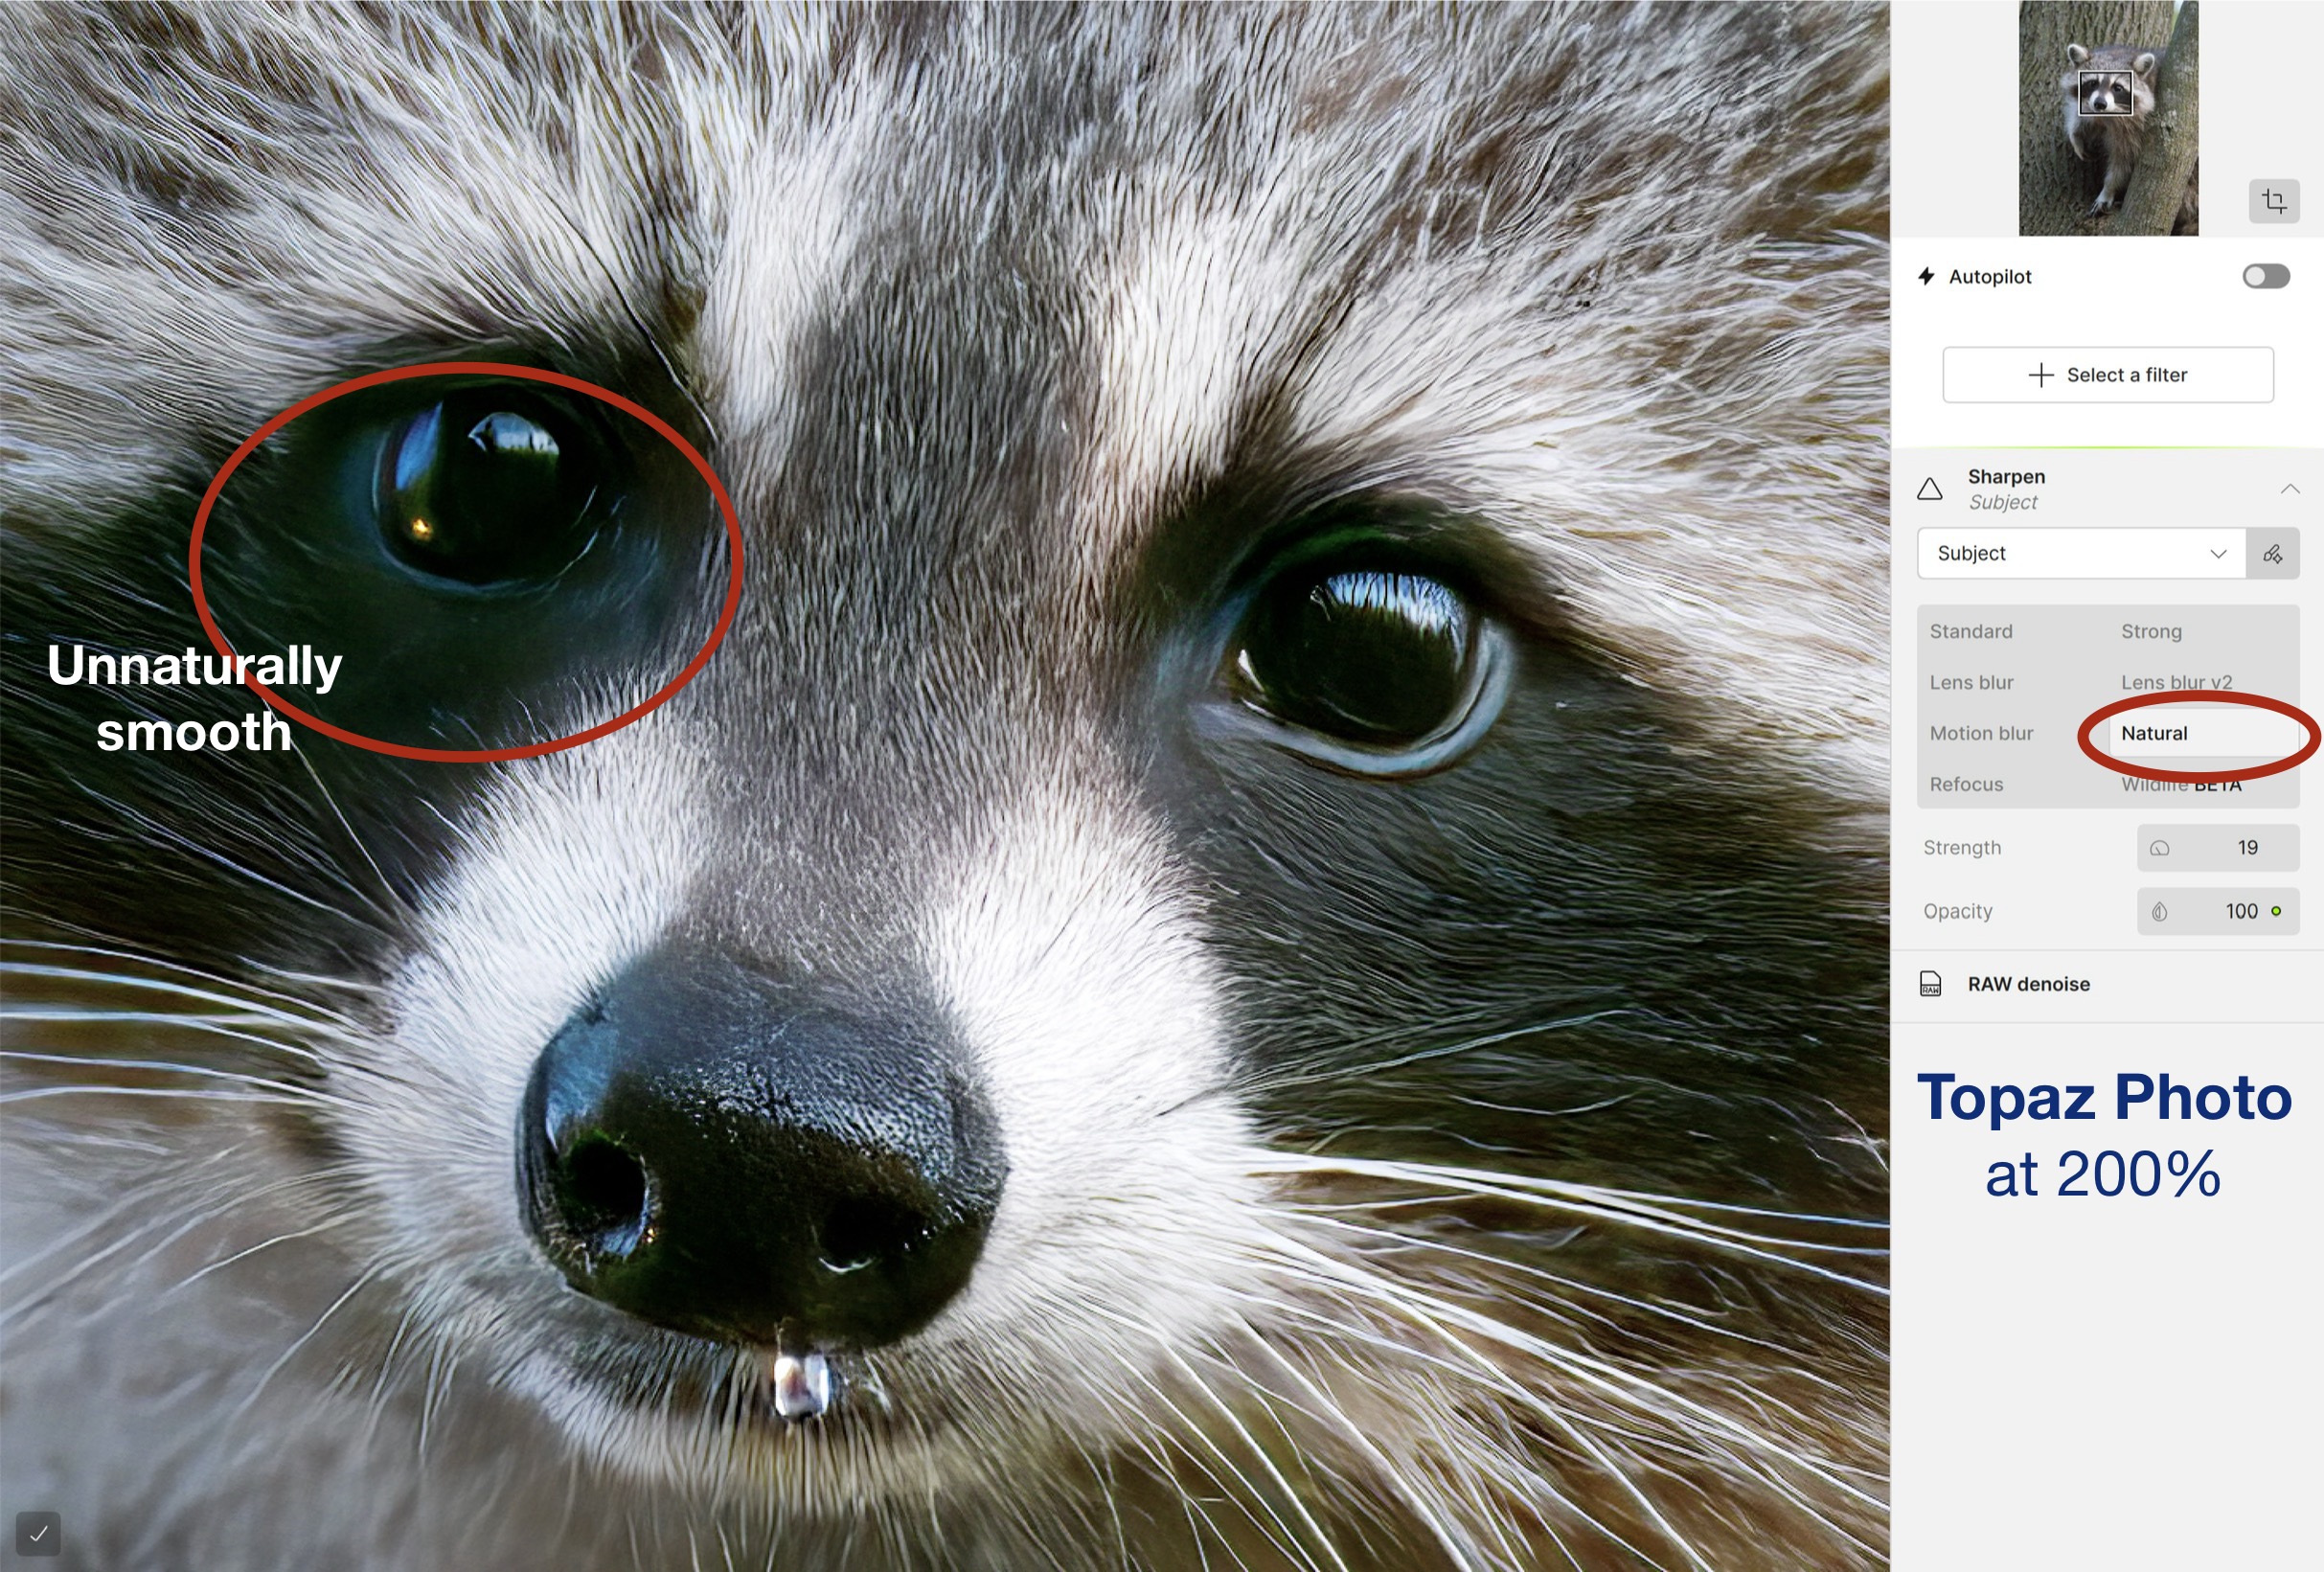
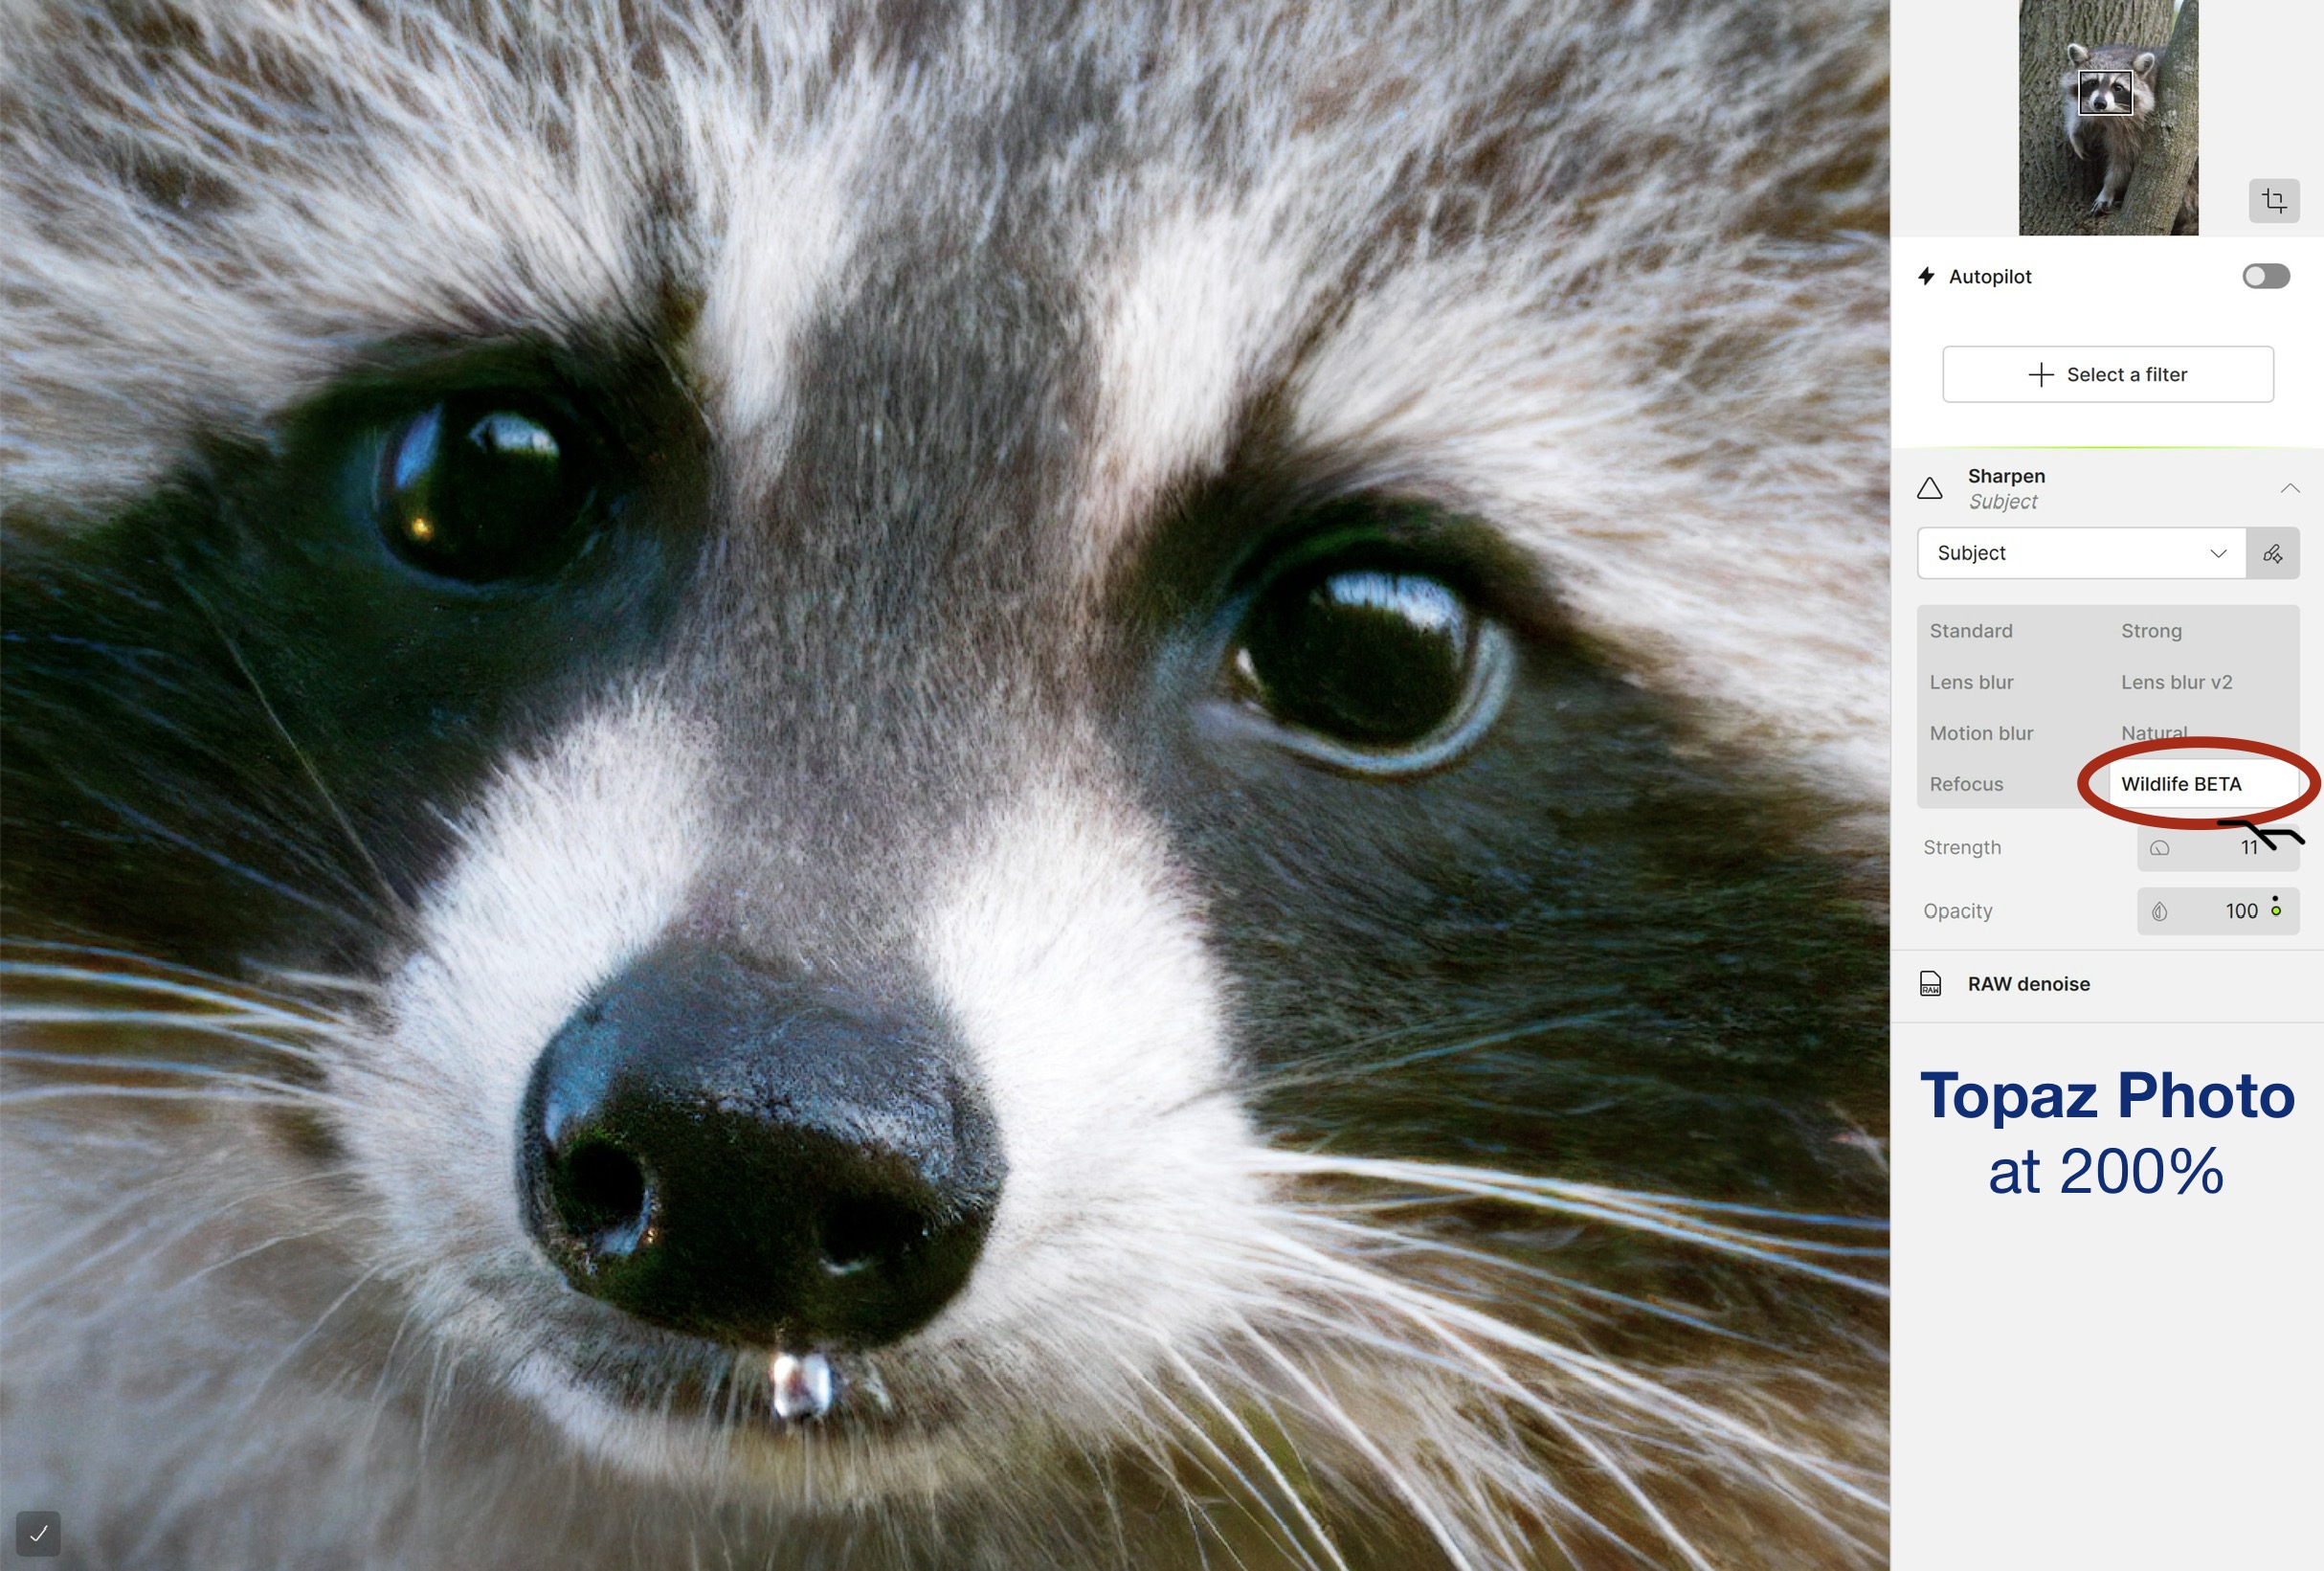

To my eyes, none of the Topaz-sharpened images are ideal, especially when compared to DxO PureRAW and Lightroom. Wildlife BETA and Standard, though soft, look the most realistic. With additional Detail Sharpening in Lightroom, they improved. However, we need to be careful here; many people prefer the more defined Natural or Refocus. But to anyone who knows wildlife, the smooth ‘combed’ appearance is not natural. Also, It’s important to remember that these are 200%, nose-to-print, pixel-peeping views.
Be that as it may, I continued with my processing of the file through Topaz then Lightroom. Here is the result compared to DxO PureRAW+Lightroom and Lightroom alone. Which is ‘best’ in your eyes?
The Topaz version is in the middle, and is excellent. But, at 100% there is no distinguishable difference between the three. This tells me that online, on-screen to 4K ,and for photo books and calendars, any improvement would be minimal. Topaz Photo just might be worth the extra effort for a full-resolution, full-sized fine prints, but not for anything less.
Landscape: Dörlinbach, Evening
I chose this image due to its complexity. It seems simple enough, a landscape photographed at twilight after sunset, with a few stars visible in the sky. But, at ISO 3200, it is also a higher-than-normal ISO for my landscape work. I was walking home after a delicious dinner at the local Gasthof and didn’t have my tripod with me. With a handheld shutter speed of 1 second (maybe the beer I had with dinner helped!), it also gave me an opportunity to test the limits of the IBIS in my Olympus / OM System OM-1. Pretty amazing, if you ask me. Tack sharp with no support; not even a pole or fence post to lean against.
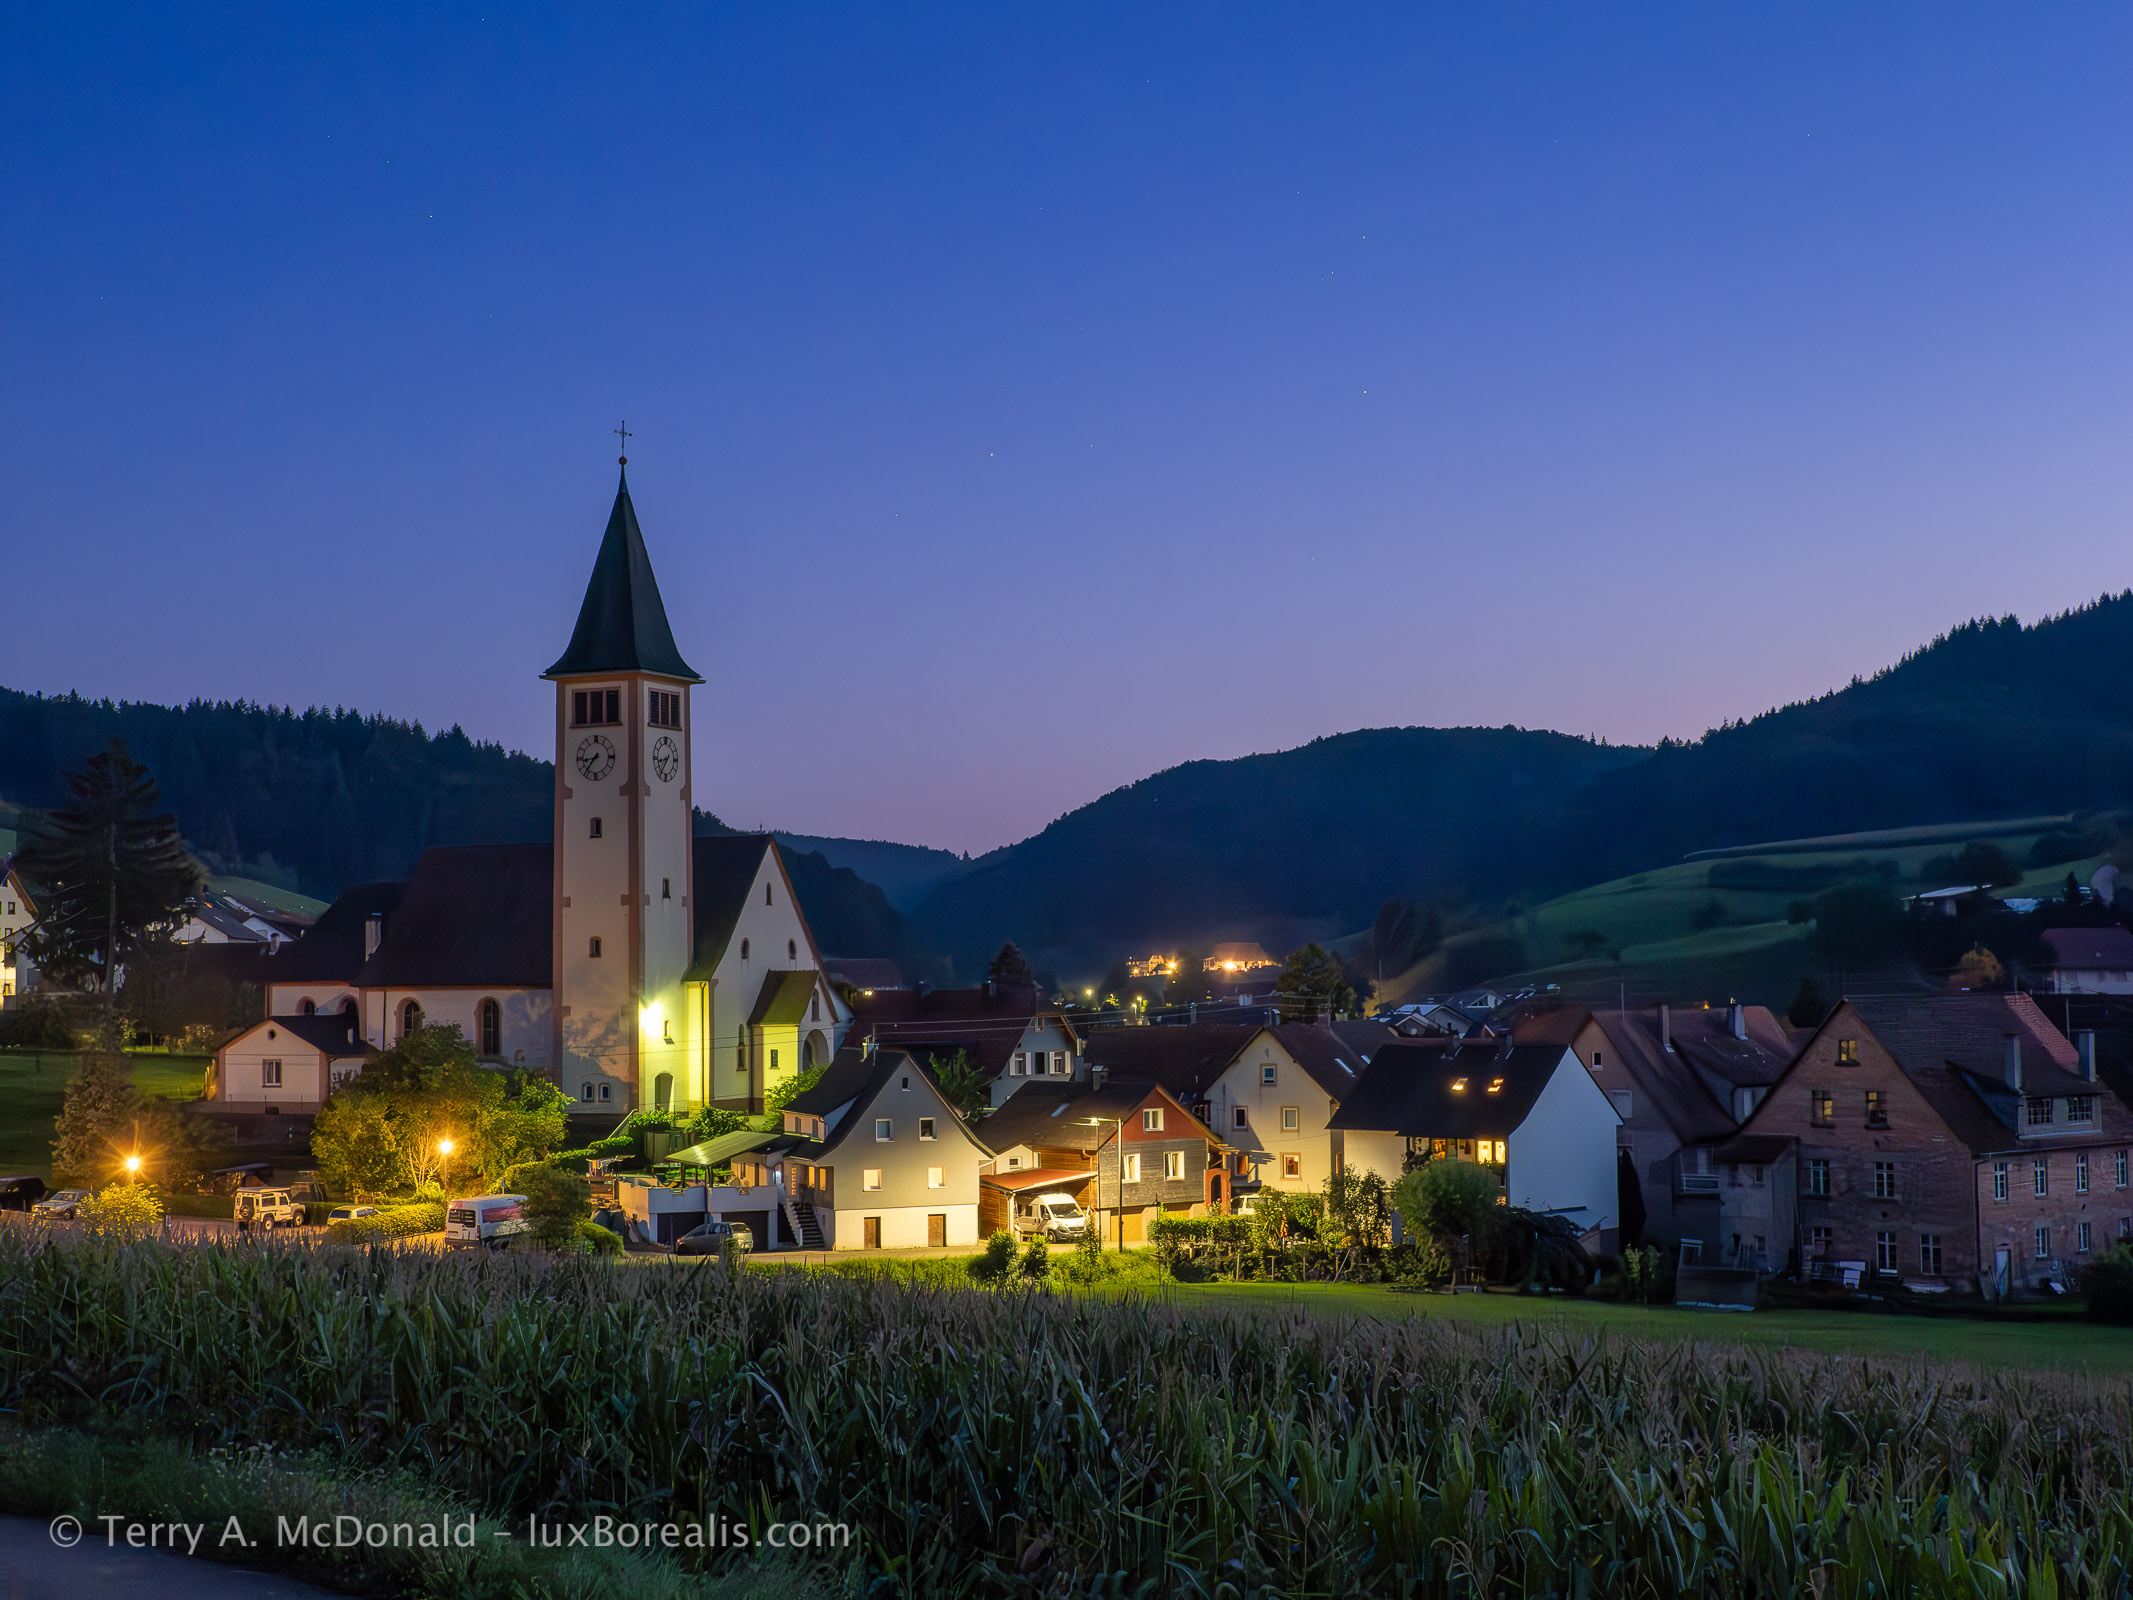
OM-1 w/ M.Zuiko ED 12-100mm PRO at 23mm (46mm efov) • ƒ5.6 @ 1 second • ISO 3200 • Lightroom
What do you think? Did Lightroom handle the high ISO denoising and sharpening well? Or have you found faults?
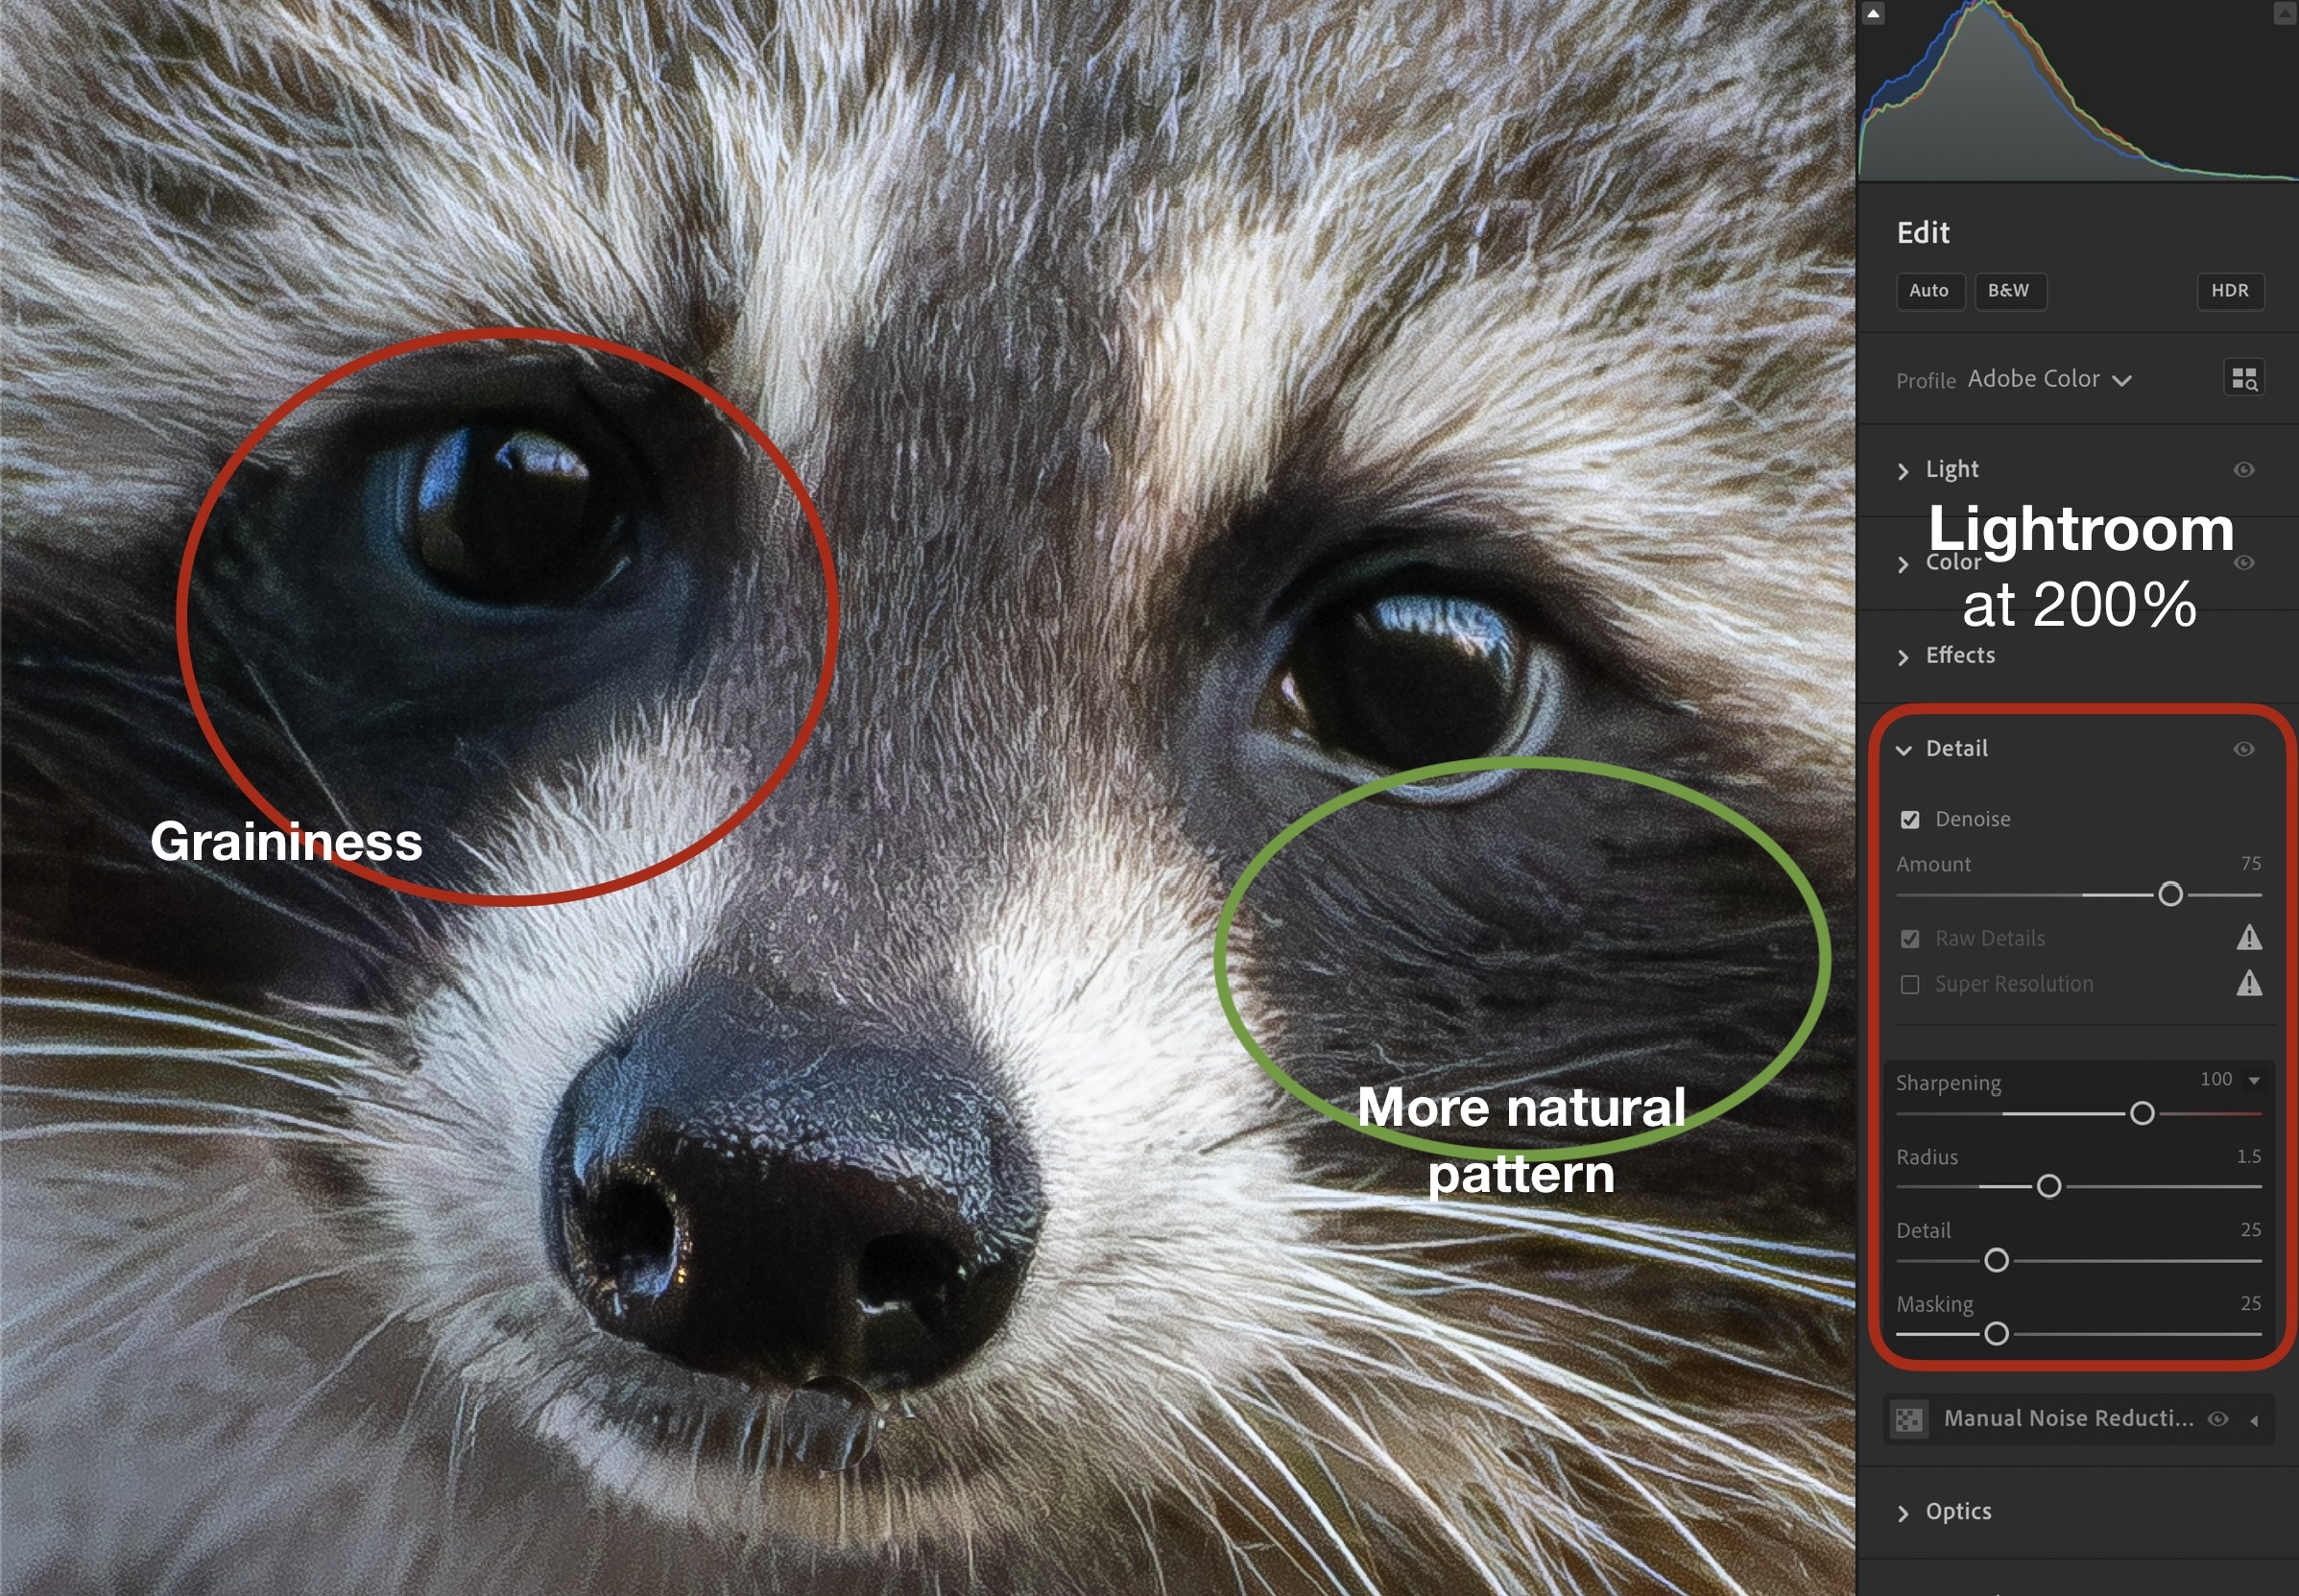
The challenge in processing was denoising while retaining the details captured in areas darker than average, commonly referred to as ‘Shadows’, though not all of those areas are ‘in shadow’.
This is where Topaz Photo shines. When viewed at 100% as it would be printed to its full 5184×3888 size, equivalent to at 13×17″ print or a full-page in a calendar or photo book, Topaz Photo does a better job of maintaining detail in dark foliage and dark roof tops. The image below summarizes it successes.
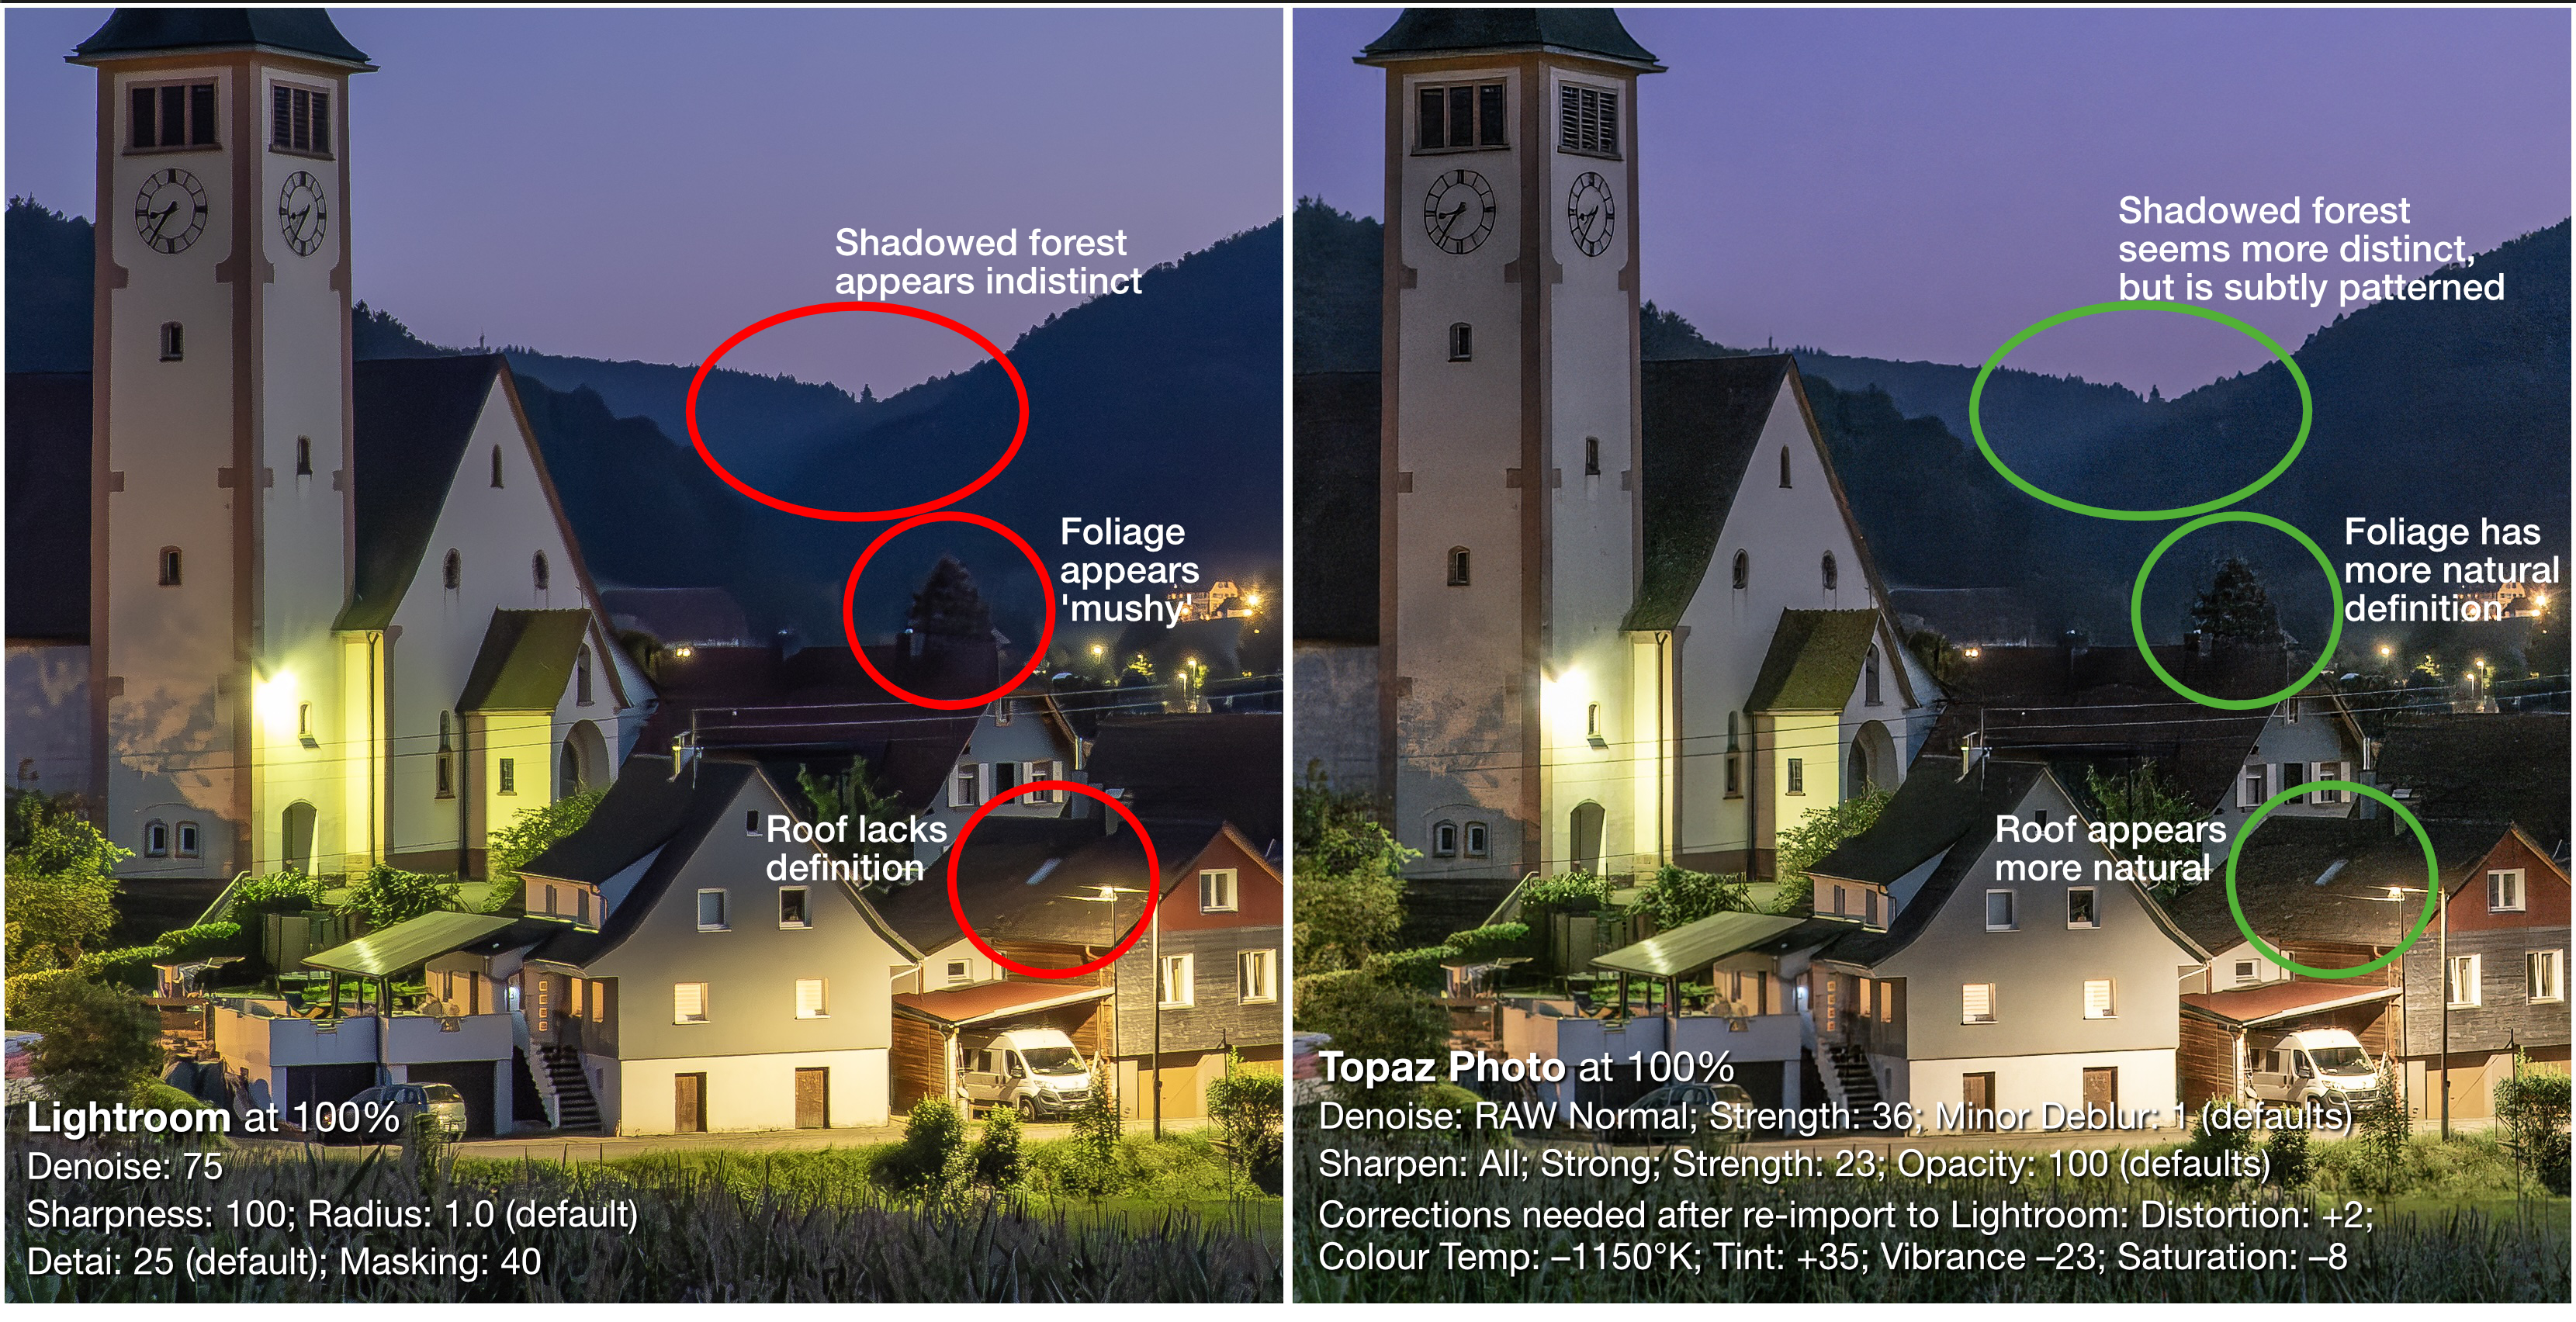
However, there are two caveats:
- In less distinct areas, such as the dark background hills covered in forest, there is a patterned grain in the Topaz Photo version that gives the impression of detail, though none is actually there. I also notice a slight mottling that is visible in the full image, but not in this side-by-side comparison.
- A significant amount of colour ‘correction’ was needed when bringing the file back into Lightroom (Colour Temp: –1150°K; Tint: +35; Vibrance –23; Saturation: –8) plus a small amount of distortion correction (+2). Not a problem, but noted for full disclosure.
Here is a comparison for you to judge between DxO PureRAW, Lr and Topaz, the order of which will be revealed below.
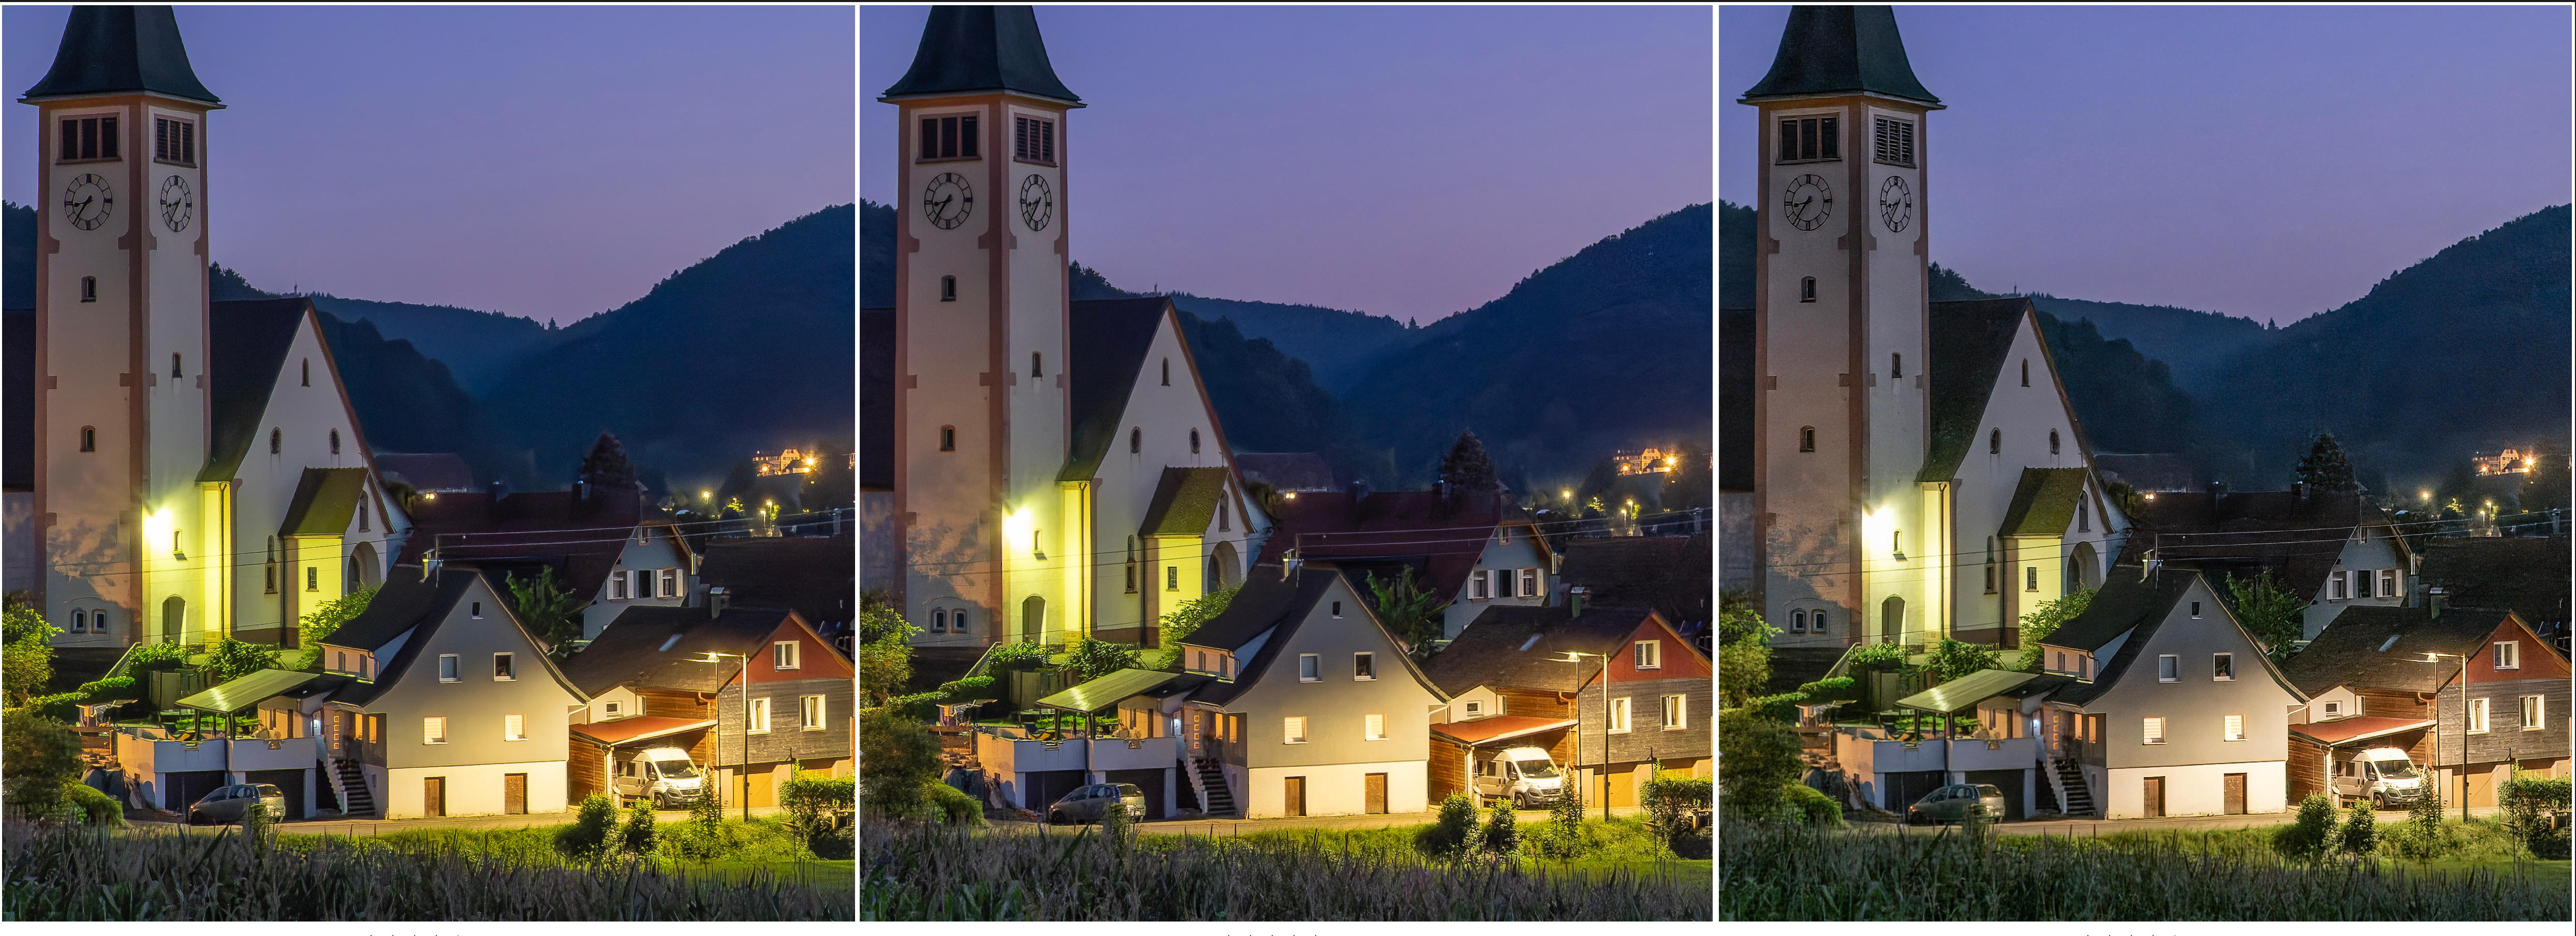
So, what do you think? Like Topaz, DxO PureRAW does a better job of maintaining detail in dark areas of foliage and rooves. Either one would be ideal for printing at full resolution, Lr less so. By the way, from L to R, it’s Lr, DxO, and Topaz Photo. To me, it’s a toss-up between DxO and Topaz Photo.
Topaz Photo ‘Filters’
While working on the file, I thought this photo would be a good candidate to test Topaz Photo’s abilities with ‘Balance color’ and ‘Adjust lighting’ filters (Light in Lr and Exposure + HDR Lighting in C1). I like the ability to create multiple masks to treat different areas of the image differently, for example, Landscape and Sky. The masks are also customizable using a brush to paint in or paint out areas. This is essential for nuanced processing.
Unfortunately, the results were ghastly. The colour and lighting were not at all natural-looking. They changed the fundamental nature of the scene. To make matters worse, the auto masking was imprecise (see image on right). Auto-generated masks may work well for Raw Denoise and Sharpening, but not for lighting and colour balance. Furthermore, masks can only be altered by painting, not by using colour or luminance or gradients.

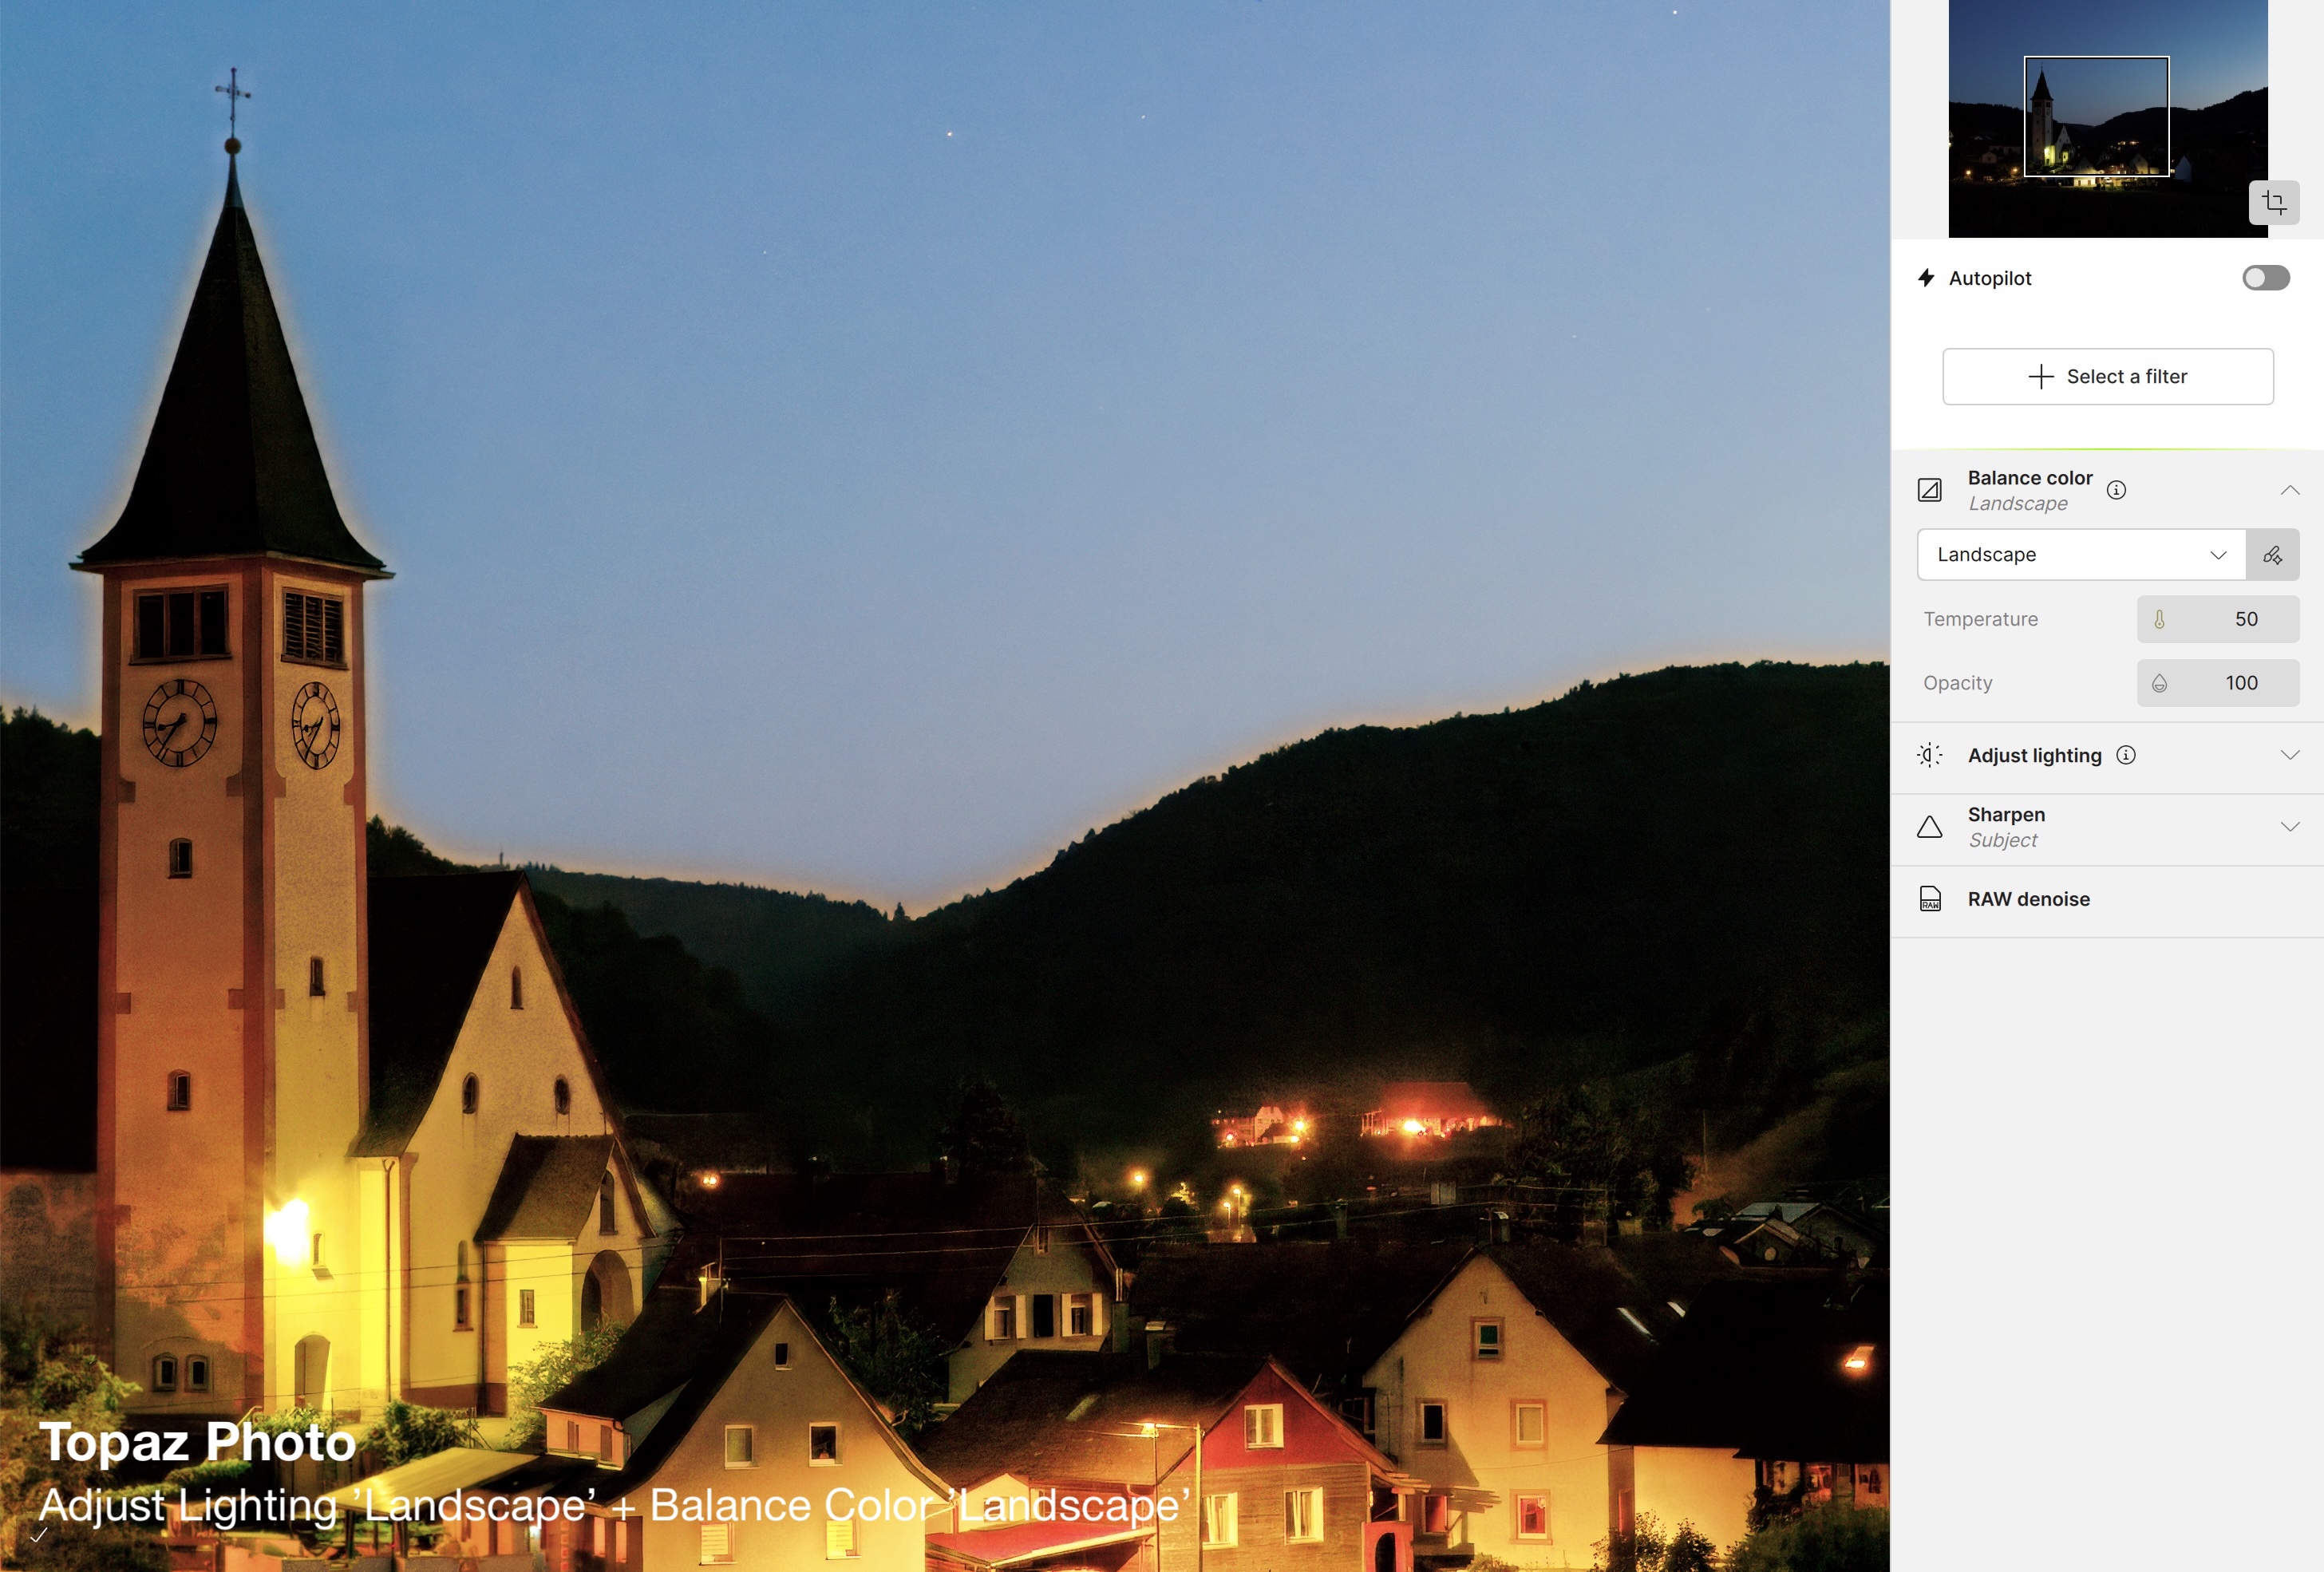
I also found that the limited adjustments with each filter makes them unusable; in Balance color, only temperature and opacity are available. And remember, when either filter is used, files can only be exported as TIFFs. So, again, Topaz Photo falls short due to its imprecise masking and adjustment limitations. Then, there’s the lag: every time I chose a filter, the app spent an inordinate amount of time generating a preview to show whatever it was doing.
In terms of exposure and colour balance, Lightroom’s ‘Auto’ settings are consistently more accurate for enhancing scenes while preserving their natural look. And the auto masks Lr generates for the sky, foreground, subject, etc. are far more accurate and can be altered by more than just painting; e.g. based on colour and luminance range as well as with linear and radial gradients. Any adjustments I make are instantaneous; changes are live as I drag the slider. Not even close with Topaz Photo.
The Root Cause: AI
Upon further investigation, I learned that it’s not just Raw Denoise and Sharpen that use AI, Adjust light and Balance color are using AI models, hence the lag-time after each selection. I’m not against the use of Assistive AI like this, but when decisions are being made in a black-box, with no context, and it takes longer to show me the result, and the results are sub-par, I get annoyed. The underlying assumption when using AI for decisions like these is that the results will at least have artistic merit. But, that’s where it all breaks down.
We photographers are human, and we want our photographs to express our lived experiences, not those of a computer algorithm.
AI might be fine for ‘correcting’ run-of-the-mill images, like catalogue shots, portraits or sports cards, but not for artistic expression and not for preserving the natural ‘look’ of a scene or subject as I and many others strive to do with #RealWorldPhotography.

OM-1 w/ 100-400mm at 300mm • ƒ8 @ 1/4000 • ISO 3200 • Topaz Photo + Lightroom
What to do?
If I was printing the Dörlinbach evening landscape full size, I would want the Topaz Photo (or DxO PureRAW) version of the image, finessed using Lightroom (or Capture 1). If I was entering the same photo in a photo competition, depending on the image size submission requirements, I might also want the Topaz Photo or DxO PureRAW version. However, for a photo book or a calendar, I’m not sure either is worth it. Sure there is a difference on-screen at 100%, but not on downsized images. Besides, typical offset printing does not preserve shadow detail anyway. I can say this because the Lightroom version of this photo is on the back cover of an 8½ x 11″ photo book and the loss of detail is only visible upon nose-close pixel-peeping, which people don’t do with photo books. The same can be said for casual screen viewing either online at 1600px or even up to 4K TV size. Again, for casual sharing, the difference is simply not great enough to warrant the additional time and money to send the file out of Lr or C1 to Topaz Photo and back again.
If you’re serious about photography, chances are you are already using either Lightroom or Capture 1, the two industry-leading full-featured photo editing applications. If not, then you should be, as no other editing package does what Lr and C1 do so well and so completely. Lr and C1 really are the complete deal and worth every penny. If you have either of these, then you may find the Raw Denoise, and Sharpen of Topaz Photo (or DxO PureRAW) helpful for making full resolution, full size fine prints. That being said, I highly recommend performing all other edits in Lightroom or Capture 1. If you are using DxO PhotoLab 9 (see my review of it), I recommend the same: use the DxO PureRAW attributes of DxO PhotoLab, and leave the finessing to Lightroom or Capture 1.
One Last Example
This photo was used in the original comparison of DxO, Lr and Topaz PhotoAI. It also demonstrates the level of finesse available with Lightroom that is not available in Topaz Photo. For example, something as simple as masking the sky in Topaz produced an inaccurate fringe. And to change both lighting and colour temperature of the sky each required a different mask. I also needed a mask for each for whole image changes. The time lag for each mask and each change simply became impossible to work with, especially knowing how easy and immediate the results were in Lightroom.
OM-1 w/ 100-400mm at 292mm (584mm efov) • ƒ8 @ 1/80 • ISO 3200 • Topaz Photo + Lightroom
Another exceptionally sharp image given the high ISO and slow shutter speed. Topaz Photo did the grunt work of Raw Denoise and Sharpen; Lightroom finessed the file for exposure and colour using a variety of masks (see below).

So, the question now becomes, at what point does using Topaz Photo make sense? It all depends on what you’re doing with your photographs—their end-use. Are you selling them as large, fine art prints? Then, it’s worth the time to go from Lightroom to Topaz Photo and back again (or DxO if you have that instead). Are you entering photo competitions? Again, you might use Topaz Photo (or DxO), just to be sure. But then again, the examples given here show how competitive Lightroom is for Denoise and Sharpen at sizes less than full resolution. Are you casually sharing photos online, in photo books or in calendars and perhaps making the odd large print? The differences are there, but again, they may not be worth the additional time and money. Topaz Photo (or DxO) would not even be an advantage for large canvases, as canvas prints typically do not preserve the same level of detail as fine art prints.
Upscaling
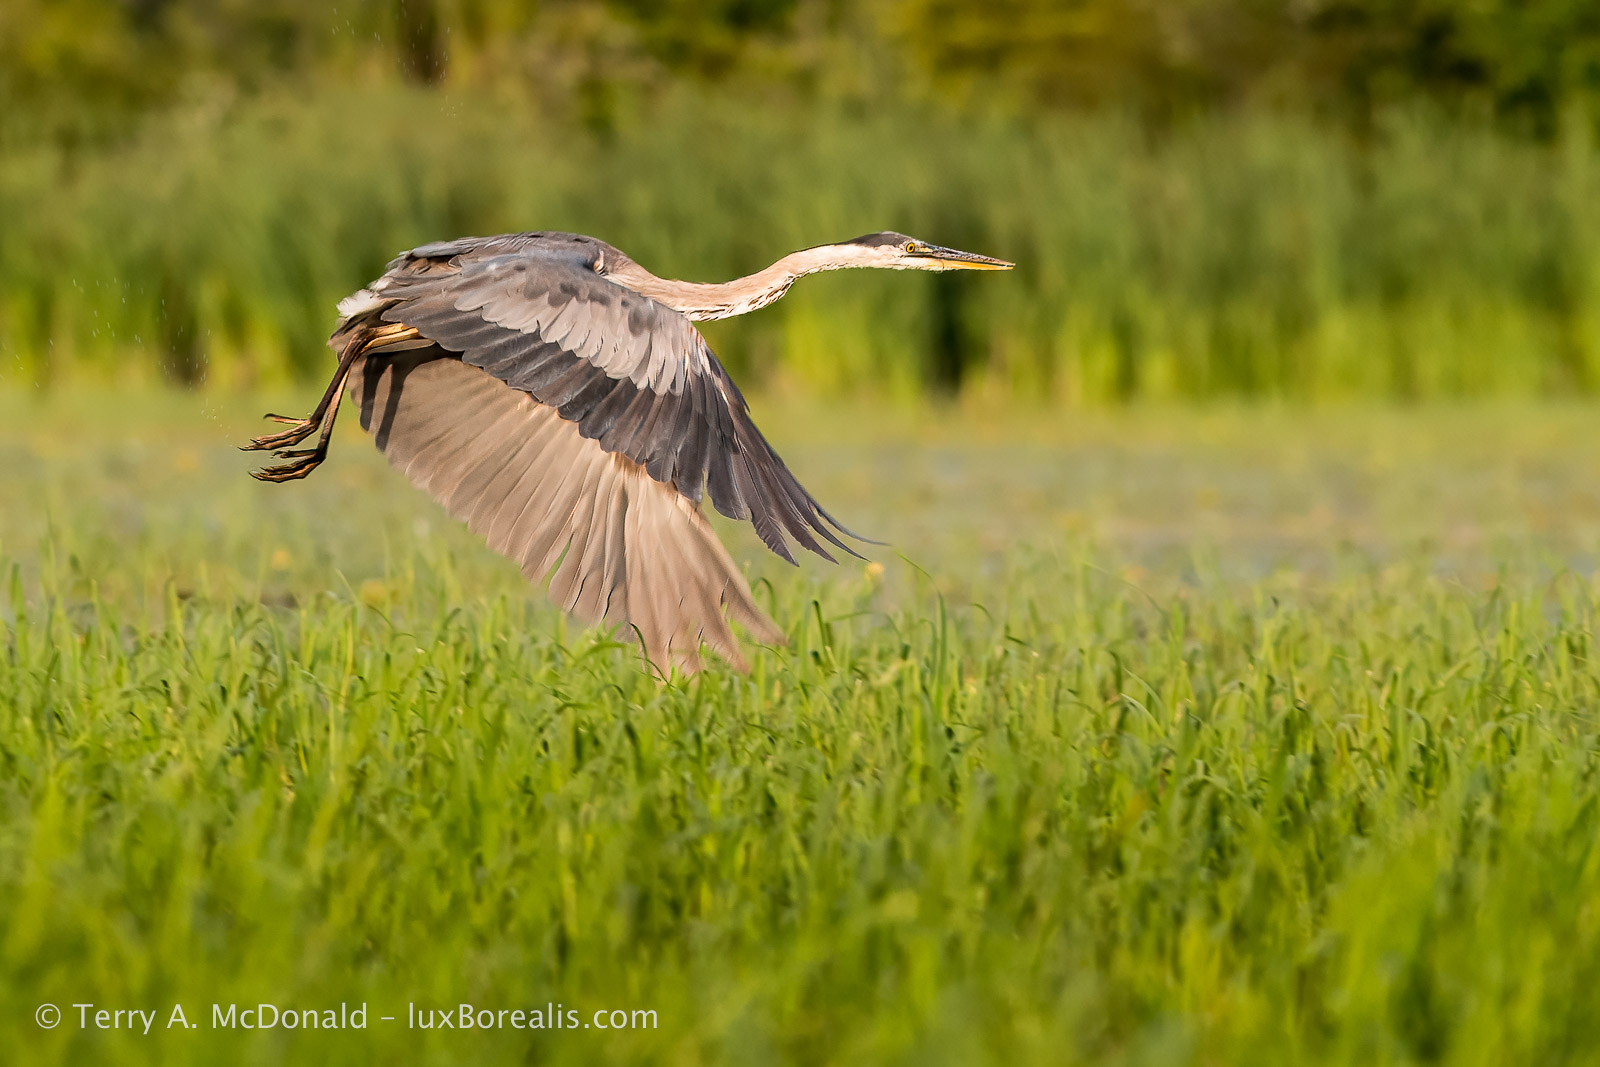
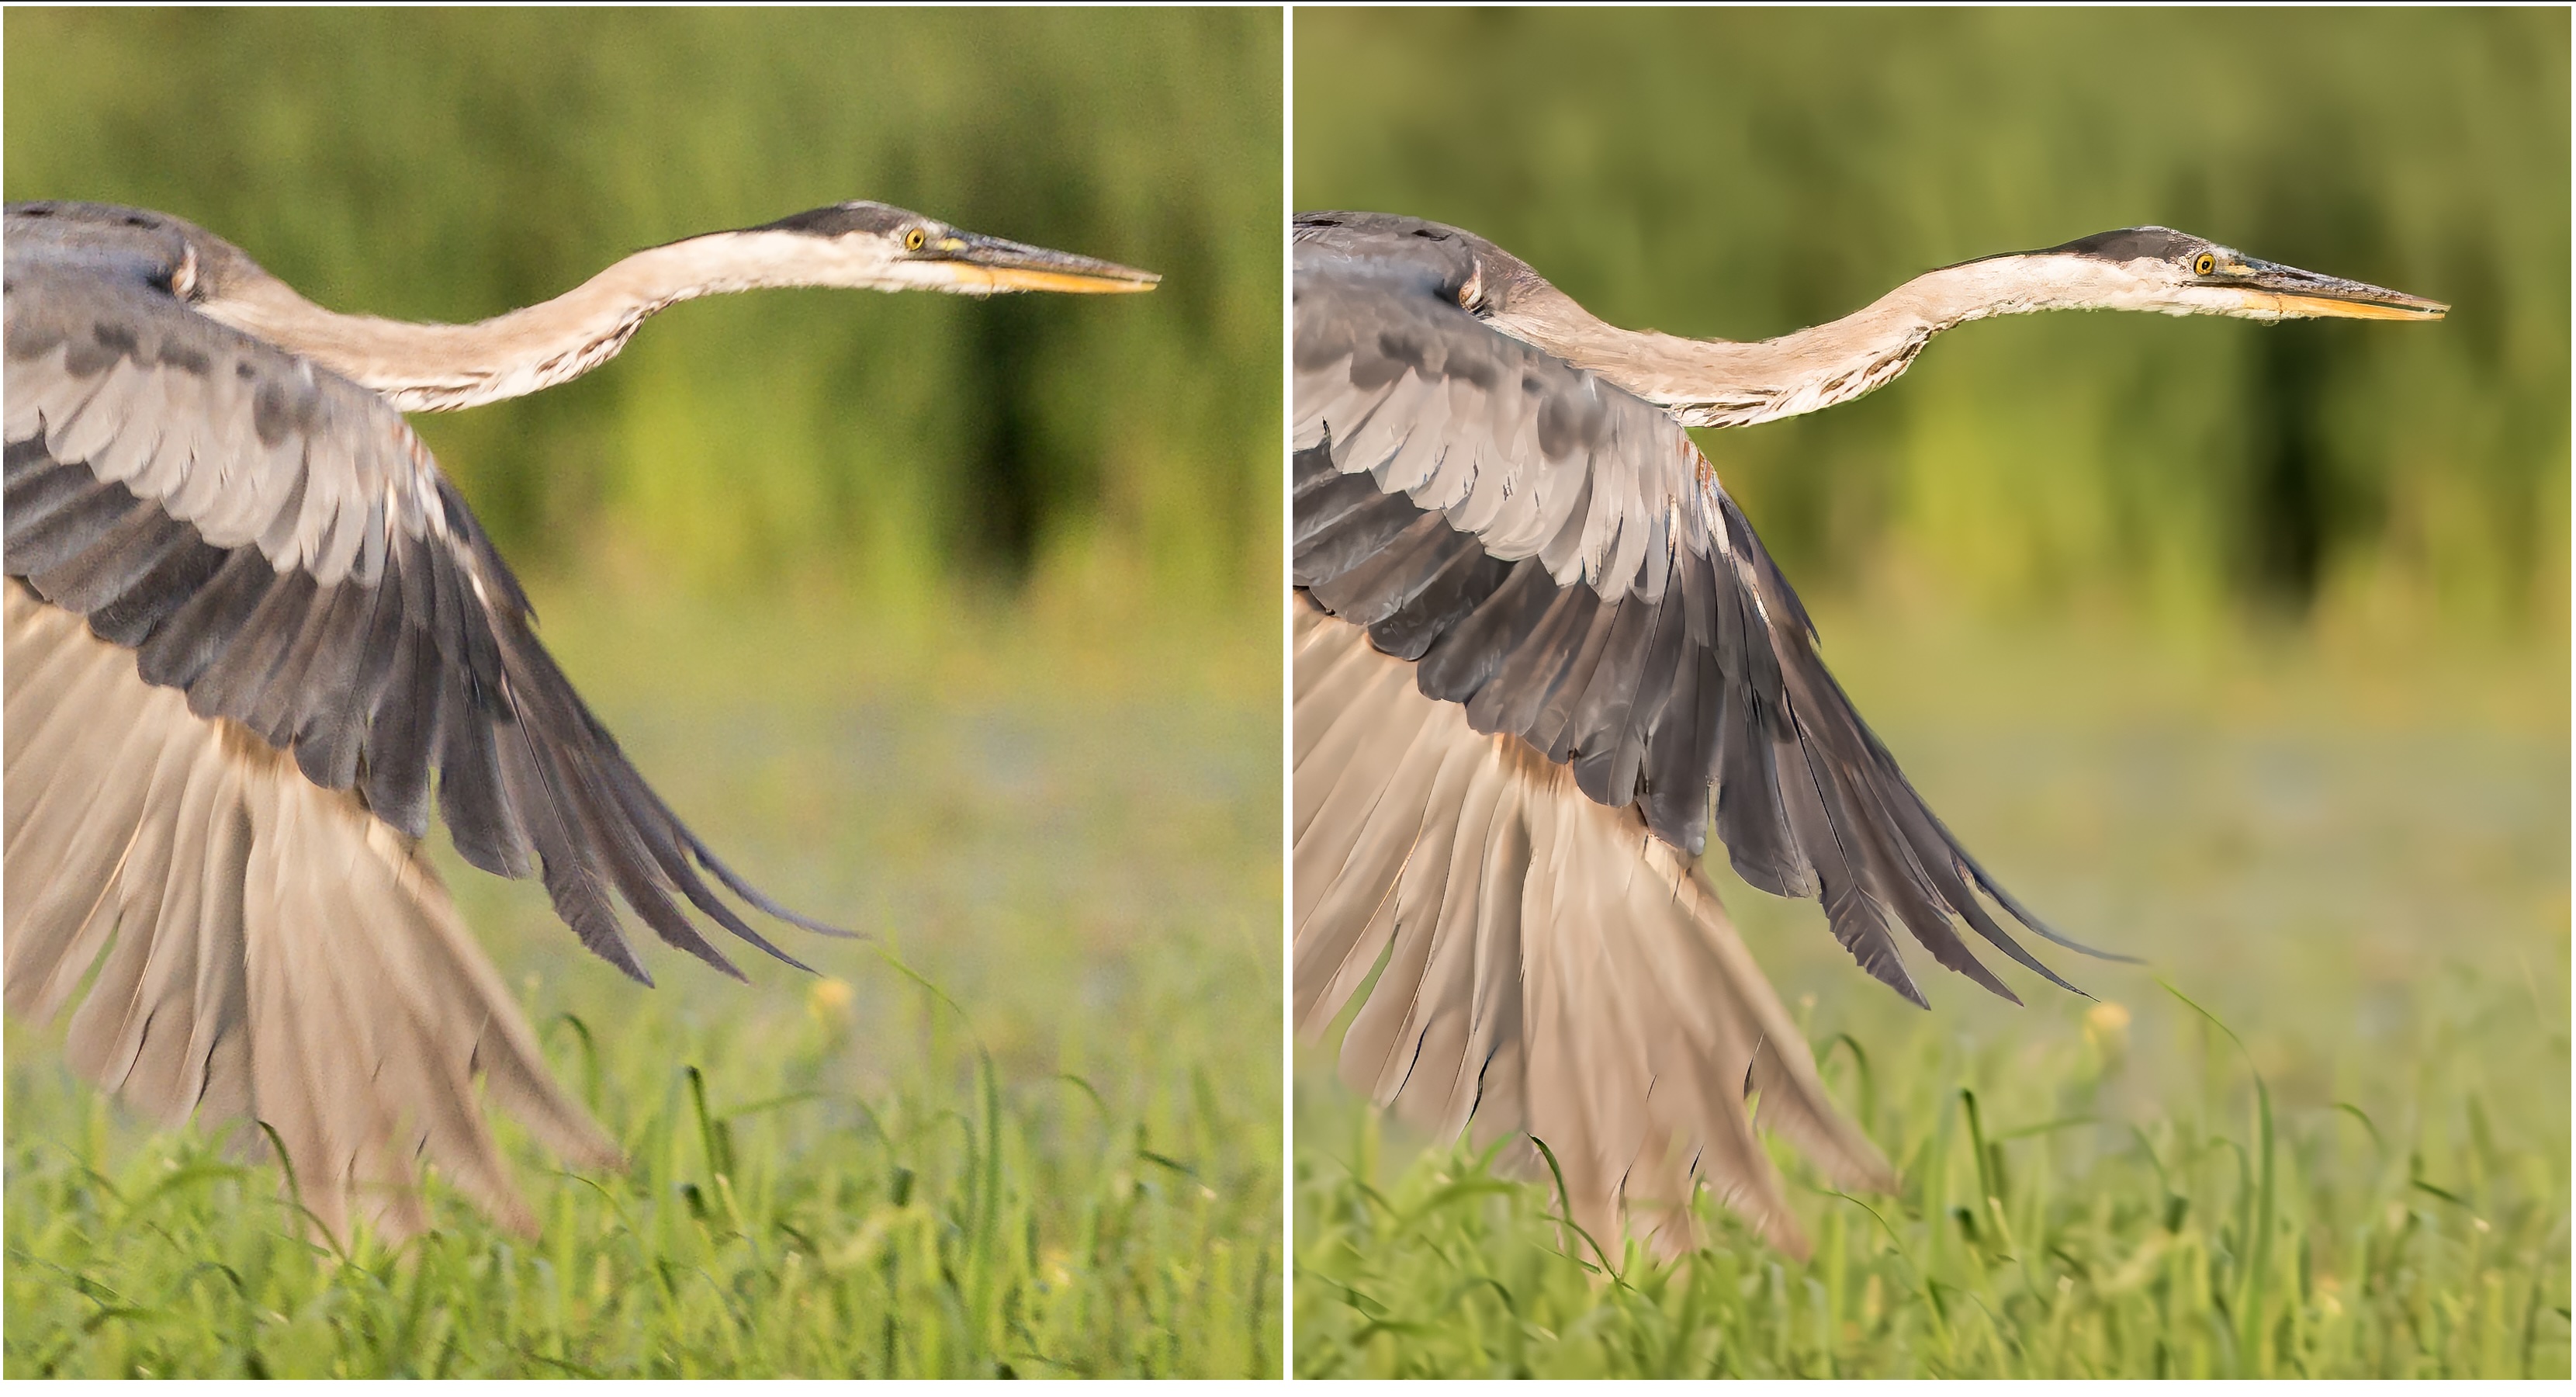
Nikon D800E w/ AF-Nikkor 300mm ƒ4 • ƒ5.6 @ 1/500 • ISO 400 • Topaz Photo + Lightroom
One feature Topaz Photo has that Lightroom and Capture 1 do not is variable and dedicated Upscaling. Yes, Lightroom has Super Resolution, but it’s a one-click-and-done deal; no further refinements are available. Previously, I compared and reported on up-scaling with Topaz PhotoAI, Lightroom, and ON1. I found that Topaz and Lightroom were both excellent, with Topaz having a slight edge. I also learned that upscaling works best on perfect or near-perfect images, as every flaw gets magnified.
The Great Blue Heron photo is a near-perfect image. Cropped from the 36 MP sensor of the D800E, it shows slight motion blur in the head in addition to the significant, intentional blur of the wings. Initial processing of Raw Denoise and Sharpen went smoothly in Topaz Photo. However, I noticed that once Upscaling is invoked, Topaz Photo flattens the previous Sharpen and Raw Denoise layers. This was slightly annoying as the first thing I noticed upon upscaling was that a different sharpening method might produce better results. That meant deleting the Upscale filter, changing the sharpening, then starting fresh again with Upscaling. It’s unfortunate, the Upscale filter cannot be worked into the overall workflow as Super Resolution is with Lightroom. It was minor delay, but one worth pointing out. As It turned out, the different sharpening I chose (Standard) looked worse, so I went back to the original (Wildlife BETA) and upscaled from there.
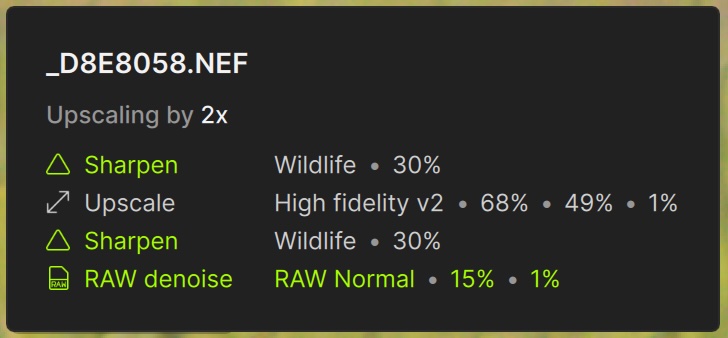
In Upscale, Topaz Photo selected ‘High Fidelity v2’. After trying the others, I could see the app had made the right choice. From there, I noticed a couple of areas that could use additional sharpening and added another layer of sharpening, customizing the mask for the area I wanted. Brilliant!
Once rendered, the file bloomed from 42.4 MB to an 872.3 MB DNG, and took a good few minutes to render. But the results were worth it. Below is a comparison with Lightroom’s Super Resolution, which is an automatic 2x resizing with no additional options. Interestingly, the Lightroom file is still only 42.4 MB, even with Super Resolution invoked.
Wonder BETA
I was curious about Wonder BETA—a one-stop, one-button do-all filter. As you know by now, I don’t like push-button black-box processing, but I thought, what the heck. Let’s see what this baby can do.
I applied Wonder BETA to the same 42 MB Nikon D800E file of the Great Blue Heron. Wonder BETA provides the option of Cloud Processing to speed things up. However, “Cloud Process is only available for images up to 128 MB”. My thinking was the 42 MB image should be fine, but the 128 MB limit must be for the final image size as Cloud Process was greyed out despite having 400 credits in the bank. No worries; I chose computer processing instead. During the first few minutes of processing, the ‘Time Remaining’ gave various predictions of between 102 and 113 minutes. Huh? Seriously? Needless to say, I cancelled that. To my thinking, a 42 MB file is not large these days when working with 35mm sensors. And 110+ minutes of processing? Ya. No. I guess I’ll pass on Wonder BETA.
Conclusion
So where does all this leave us? I get the strong feeling that Topaz Labs have lost the plot. With all the additional filters, it seems Topaz is trying to go head-to-head with full-featured apps such as Lightroom and Capture 1, even DxO PhotoLab 9. They’ve come out aggressively advertising new features, a re-designed GUI, and re-designed packaging with a choice of Topaz Photo or Topaz Suite. But Topaz Photo is not there yet. Not even close. Despite the addition of a greater variety of ‘Filters’ and the ability to create multiple masks, does Topaz Photo meet the processing needs of photographers? Not as a full-featured editing suite. You will always need something else; which brings me back to their pricing decision.
Topaz Photo is class-leading (along with DxO) for Denoise and Sharpen. Having Upscale is helpful for the odd time one might need it. These are its core strengths, especially when paired with masks for subject, background, etc. But this is all it does well. Despite the best attempts of Topaz labs to dress it up, Topaz Photo is nothing more than a glorified Raw Denoise, Sharpen and Upscale plug-in. In trying to be more than it really is, Topaz Photo comes out as a wanna-be.
I think DxO made the right choice in separating out its core competencies of Denoise and Sharpen into PureRAW and providing Photo Lab 9 as an almost-fully-featured editing suite. Topaz Photo isn’t at the same level, despite giving the impression it can ‘do more’. Topaz Photo comes nowhere near replacing full-featured editing suites like Capture 1 or Lightroom, or even DxO Photo Lab 9.
If I did not have Lr or C1, and was choosing between Topaz Photo and DxO PhotoLab 9, I would choose DxO, hands down. It would leave me without Upscale, but PL9 does so much more and it does it very well. PhotoLab 9 is slightly higher in price (USD $240/$120 upgrade), but it is a buy-once cost, not a subscription, and is far more capable, complete with a file browser. You see, that’s the difference—Topaz Photo appears to be full-featured with its array of filters, but when you get down to the nitty-gritty of finesse processing and photo management, it is not.
OM-1 w/100-400mm at 400mm (800mm efov) • POL • ƒ8 @ 1/160 • ISO 3200 • Topaz Photo + Lightroom
I would strongly recommend Topaz Labs drop the façade of Topaz Photo being a full-featured editing app. Topaz Labs should concentrate on what they do best—Raw Denoise, Sharpen, and Upscale—then, recalibrate the pricing of Topaz Photo to match those capabilities.
For me, my current workflow will remain as it was. I will continue using Lightroom for just about everything: exposure, cropping, detail sharpening, masking, library, etc., etc., etc. When I am printing a more difficult file, one that requires better raw denoise due to high ISO or shadow detail, I’ll export the original raw file to DxO PureRAW, have it work its industry-leading raw denoise and sharpening (particularly with lens modules), then re-import the DNG to Lightroom for finessing. As a buy-once, stand alone/plug-in app priced at USD $130 new ($72 upgrade), with no subscription, DxO PureRAW does what I need it to do, in circumstances where Lightroom still struggles a bit.
Do you agree? Disagree? Am I off the rails or on the mark? Add your voice and experiences to the COMMENTS and SHARE this post with other photographers.
This blog is completely free and I do not include commercial affiliate links. To help keep it free, consider buying me a coffee.
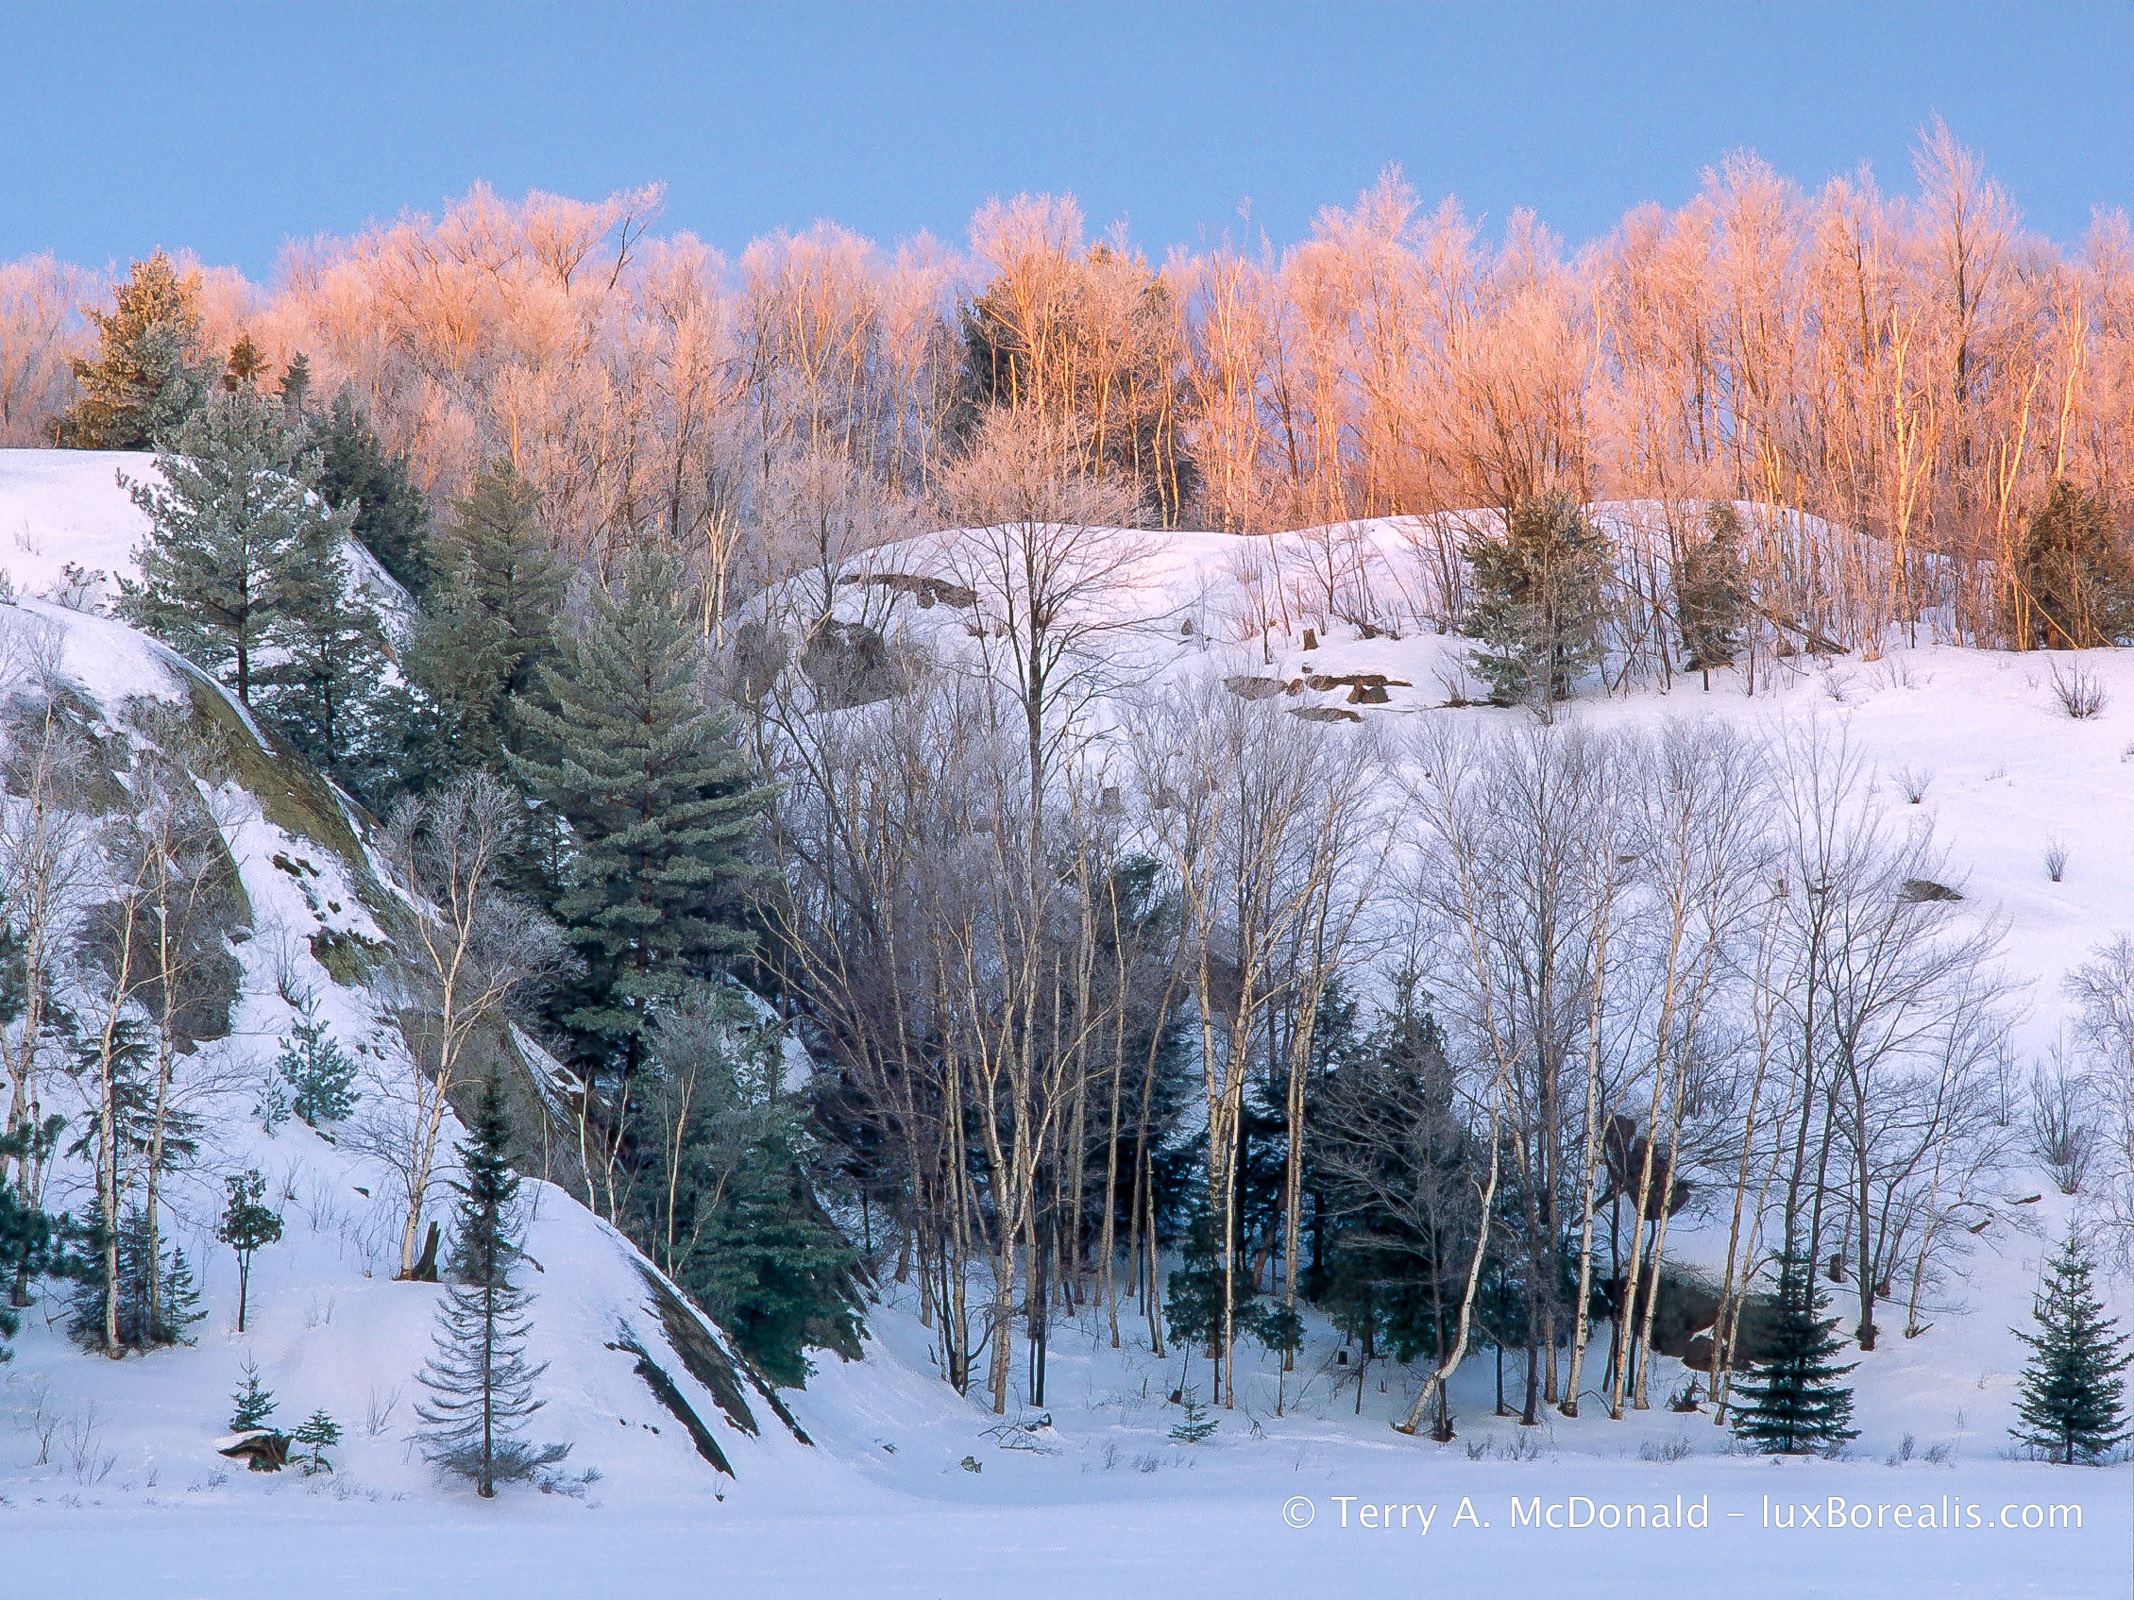
Gearing up for Winter Photography
How to stay warm and dry in the dead of winter
Terry A. McDonald, luxBorealis.com
1922 words; 11 photographs; 10-minute read
Winter is the most satisfying of seasons for photography. A fresh blanket of snow changes everything! Places you’ve visited before appear new again. Low sun angles produce wonderful shadows that linger for hours; and the warm light contrasting with cold shadows crates wonderful colour contrasts—a landscape photographer’s dream.
For those who begrudge mornings, sunrise is later in winter, so you can sleep in a little. And, the great evening light starts in mid-afternoon so you can be finished a day of shooting in time for dinner.
But it’s cold. And it can be very cold. Days with bright sunshine and clear blue skies are the coldest. How do we fight that cold? The answer is as simple as two concepts: layers under windproof.
Sunrise, In February is around 7:20am, a nice change from July, when it’s at 5:45am. Of course, in February, it means crawling out of the tent, getting dressed and skiing out across Lake George. But it’s worth it!
Base Layer
Remember those waffle-cotton white long underwear you may have had as a kid? Forgot them. They were the best we had at the time, but base layers have moved on. Polyester and nylon are the most common for their ability to wick moister away from your skin. Personally, I prefer staying with natural fibres so, over the years, I’ve used both silk and merino wool, though not at the same time.
A silk base layer is simply luxurious. It’s sheer against your skin and anything you pull over it slips on easily. Given its incredibly light weight, silk is also warm. For years, I used silk sock liners, silk long johns and a silk long sleeve top and I was very comfortable. But after about 10 years of sporadic use, it began coming apart at the seams. Literally. It served me well.
As I aged, I began to slow down a bit. This meant a heavier base layer was needed to keep me warm. Enter merino wool. And, no, it is not scratchy! Merino wool is soft and durable and, perhaps more importantly, the best in odour-resistance.
Panasonic FZ1000 • 73mm (200mm efov) • ƒ5.6 @ 1/1250 • ISO 125 • Lightroom
This was made at 9:30am, showing how lovely the mid-morning light is.
Mid-layer
This is where fleece comes into its own. I prefer natural fibres, but for its lighter weight, lower cost and washability, fleece is the way to go, especially for the pants. Wool can be heavy which is why a fleece pullover is ideal for on top.
However, the best top I’ve found for light weight and warmth is an Icelandic sweater made from real, Icelandic sheep’s wool called ‘lopi’. The sweaters are expensive, but they are luxuriously warm and have no weight to them.
I mentioned wearing a cotton turtle neck over the base layer and under the sweater. A good base layer wicks moisture from you skin keeping it dry. The jury is out on using a cotton layer as I do as cotton holds moisture. But I have yet to find anything better. A good sweater or fleece on top . . .

OM-1 • M.Zuiko 8-25mm at 10mm (20mm efov) • ƒ8 @ 1/500 • ISO 200 • 80 MP Tripod High Res • Lightroom
The warm tones are stretched out in the afternoon and contrast beautifully with blue shadows.
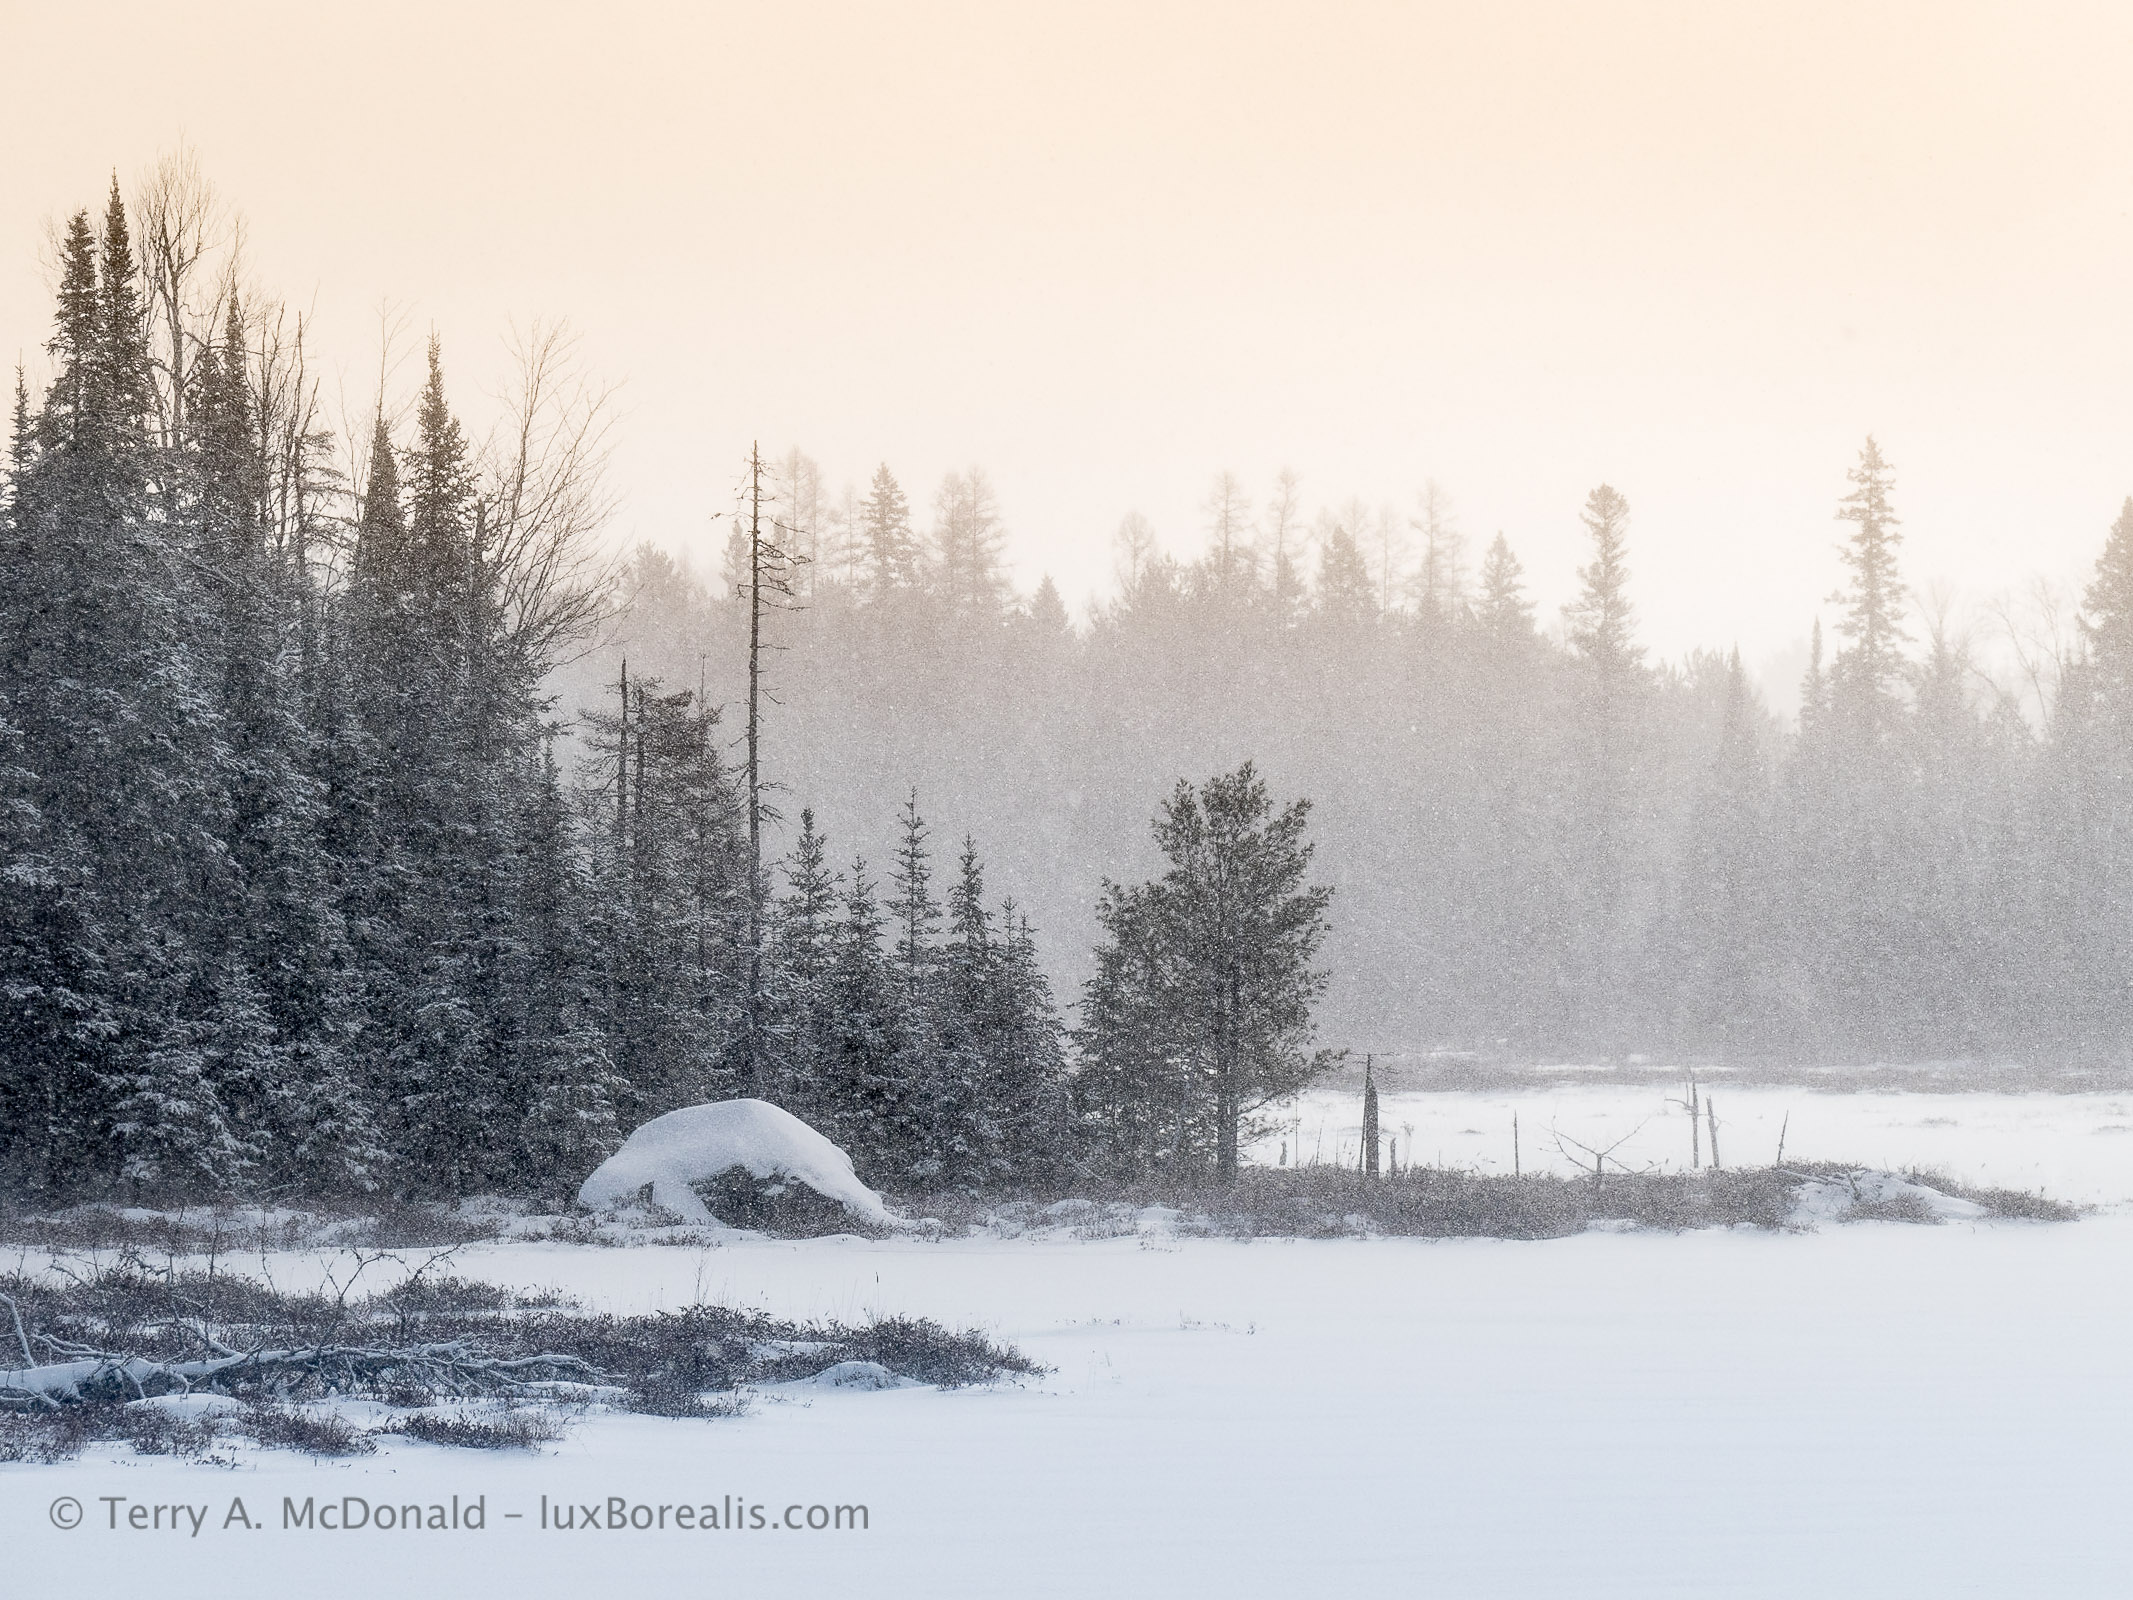
Outer Wear
Here is where the wind proof layer comes in. My outer coat is unlined, uninsulated. Why? To me, stopping the wind is the key to staying insulated against the cold. I also find that when I’m tromping through snow, snowshoeing or Nordic skiing, I’m building up enough warmth without adding more insulation. It’s only when I’m still, while waiting for the light or a cloud to pass, that the cold begins seeping in, but typically, I’m not standing around long enough for it to be a problem.
GoreTex is perhaps the best known name in windproof outer wear and it’s good. But there are many others out there that are equally good. I don’t wear it for its ability to release moisture, but simply as a wind block. The pants are easy enough to find, but the kind of coat I like is more of a challenge.
Nikon D800E • AF-Nikkor 18-35mm at 32mm • ƒ8 @ 4sec. • IOS 100 • Tripod • Lightroom
I’m the odd one out in that I prefer anorak-style, over-the-head outer wear. Coats like these are becoming more and more difficult to find, but to me, they provide better windproofing than a zip-up coat. For photography, I also find the large front ‘kangaroo’ pocket especially helpful for holding stuff, along with the tube-like hand pocket below. With the hood pulled up and all the pulls and cuffs cinched down, I’ve weathered –32°C plus wind, quite well for a morning.
A couple of things to be aware of with the outer layer. Make sure it
- is well and truly wind-proof;
- can be cinched down with Velcro at the cuffs;
- has elastic pulls and toggles around the hood, at the waist, and at the bottom of the coat;
- has a hood adjustment toggle to allow the hood to be pulled forward in a storm or held back off glasses or for when working at the camera
OM-1 • M.Zuiko 100-400mm @ 123mm (246mm efov) • ƒ8 @ 1/250 ISO 200 • Lightroom
Keep an eye out for snow and ice patterns, especially when new ice is forming.
Head
Most of the time, I wear one of those winter headbands that cover the forehead and ears. When the wind blows, I pull up the hood of the outer coat, which keeps me toasty for hours. However, during the really cold days, I wear a wool hat that covers both my head and ears. A beanie may be fashionable, but I’d rather be warm and the bare skin of my ears and forehead is where the cold is felt most acutely.

D800E • 24-85mm at 85mm • ƒ4.5 @ 1/250 • ISO 200 • Lightroom
Hands and Feet
On a cold day, hands and feet are often the weak point in staying warm. For hands, I like a three-layer system of glove liner, glove and GoreTex (or similar) over-mitt. After tromping/snowshoeing/skiing, I remove the over-mitt and work in gloves to set up the tripod if I’m using one and to do general set up.
I keep the gloves on as much as possible, only removing the outer glove when needed. Glove liners stay on for fine-tuning camera settings, but most controls are accessible through the outer glove. If my hands get cold while waiting, I’ll slip on the over-mitts until the action starts again.
OM-1 • M.Zuiko 12-100mm @ 31mm • ƒ10 @ ⅛ • ISO 200 • LiveND • Lightroom
Feet follow the same pattern: sock liner, wool socks then a good set of lightweight but insulated winter boots or Nordic ski boots. Sock liners wick moisture just like the base layer. The sock itself is all-important. I’ve found Icelandic wool socks or Alpaca socks to be the best. While they are more expensive, they are natural fibres and will last a lifetime.
The only additional I make to this is an Alpaca wool boot liner. Any boot liner is better than nothing, but Alpaca hair has extra insulation. The liner sits in the bottom of the boot and provides that extra layer of warmth for when I’m standing around composing or waiting.
OM-1 • 100-400mm at 300mm (600mm efov) • ƒ8 @ 1/125 • ISO 6400 • Lightroom
Brands
I’ll not go into naming any brands because everyone has their preferences. If anything, I’m anti-brand, especially because some of the top brands like North Face, Helly Hanson and Patagonia, while good, are priced high due to the name. I’ve found that the off-brand gear I’ve purchased at Mountain Wearhouse and Marks has worked perfectly well.
I’m often asked if I use chemical hand warmers or battery-warmed gloves or socks. The simple answer is no. I’ve been out in –32°C but limited my time to only a couple of hours. It is just too difficult to work in those conditions with the back of camera icing up with every breath.
OM-1 • 100-400mm at 400mm (800mm efov) • ƒ6.3 @ 1/1250 • ISO 800 • Lightroom
De-Icing
Which brings me to another question I’m often asked: how do I deal with fogging and frost or ice build-up. I wear glasses and have a moustache, so, yes, it’s a pain. Keeping glasses slightly away from your face helps reduce fogging and the moustache, well, there’s not much that can be done when it is really cold, except chip the icicles off! Two other points to make are:
(1) Keep your camera cold. I keep mine in the trunk on cold days, not in the car itself. That way, I can stay warm without my camera getting warm, then fogging or icing when it hits the cold air. Batteries suffer in the cold, so keep your spare in packet where it can stay warm.
(2) Don’t breathe on your camera. As much a possible, breathe through your nose as it directs the moist air downwards, I’ll sometimes wear a scarf around my mouth and nose so that it catches most of the moisture I exhale. Alternatively, I literally hold my breath when the camera is up to my face.

iPhone 11 Pro • 7mm (50mm efov) • ƒ2 @ 1/700 • ISO 20 • Lightroom
Final Thoughts
The idea of dressing in layers means you can remove layers as you get warm, for example when snowshoeing or Nordic skiing though, even tromping through snow will get your heart rate up. The key thing is to avoid sweating as moisture can cool you down.
Instead of removing layers, my first line of defence against excess moisture is to vent. The anorak I wear has a back vent and underarm vents that I open as I heat up. If you pause for a while to compose photos, keep the vents open, at first, to expel excess moisture. You don’t want that moisture to cool you down. However, once your body temperature has stabilized after activity, zip the vents closed to seal in the warmth.
Something to remember: Cold kills! Continually monitor your fingers, toes and core temperature. If you are out alone, then don’t stray far from where ever you started from—your car, home, cottage or base camp. Best practice would be to go out in the cold with someone else or in a group. At the first sign feeling chilled, let the person or people with you know and begin heading back. The worst possible scenario is getting caught out with your core temperature dropping, especially if it’s the afternoon and the sun is setting. If that happens, get out of the wind as much as possible and stay active. Work with the person or people with you and head for home.
Olympus E-1 • Zuiko 14-54mm @ 54mm (108mm efov) • ƒ16 @ 1/50 • ISO 100 • Lightroom
Thanks for reading! Be sure to SHARE this post with other photographers. Continue the discussion! Questions, comments, and suggestions can be added under COMMENTS.
This blog is completely free and I do not include commercial affiliate links. To help keep it free, consider buying me a coffee.
