DxO PureRAW 5 Review: Worth the Upgrade?
Over the last 4 months, I have been working towards improving my raw file optimization. Previous articles showing the results of numerous tests have included:
- Raw File Optimization, where I examined the usefulness of Lightroom Enhanced Noise Reduction compared to DxO PureRAW, OM Workspace, ON1 No Noise, and Topaz PhotoAI;
- How well can Topaz PhotoAI and ON1 No Noise ’rescue’ images with motion blur?
- Up-scaling Raw Files 1: High quality cropped images with Lightroom, ON1 and Topaz
Having tested and compared Lightroom Enhanced Noise Reduction, DxO PureRAW and Topaz PhotoAI, I know I can confidently recommend any one of them to demosaic, denoise, and sharpen raw files, extracting the maximum image quality possible.
But now, DxO has upset the cart by releasing the ‘latest, greatest’ update to PureRAW: PureRAW 5 with Deep Prime 3. Rarely do I have the opportunity to test one version of software against the next, so when DxO announced the new and improved PureRAW 5 was on the way, I was excited and purchased it.
I am not one for superlatives unless they are truly warranted and I am never impressed by advertising weasel words. I want results. Does the product do what it claims, or not? Is it truly an improvement, or not?
You tell me . . .
Here is the same Catbird image I used in my first article comparing the various methods of raw optimization, processed in PureRAW 4 and 5.

Click or tap on the image to view the original file at full size.
And here is the image compared to Lightroom Enhanced Noise Reduction and Topaz PhotoAI.

Maybe DxO has reached a plateau and I’m seeing the results of product maturity, but I sure feel like we’re watching that laundry detergent ad from the 1980s:
”Can you tell the difference?”
”No, I can’t tell the difference. Can you tell the difference?”
Hmm, not really.
The difference between v4 and v5 does not seem to be in the overall demosaic and denoise part of the upgrade. It may be there, but even with further testing—here is Sunset Vigil—I do not see any appreciable difference.
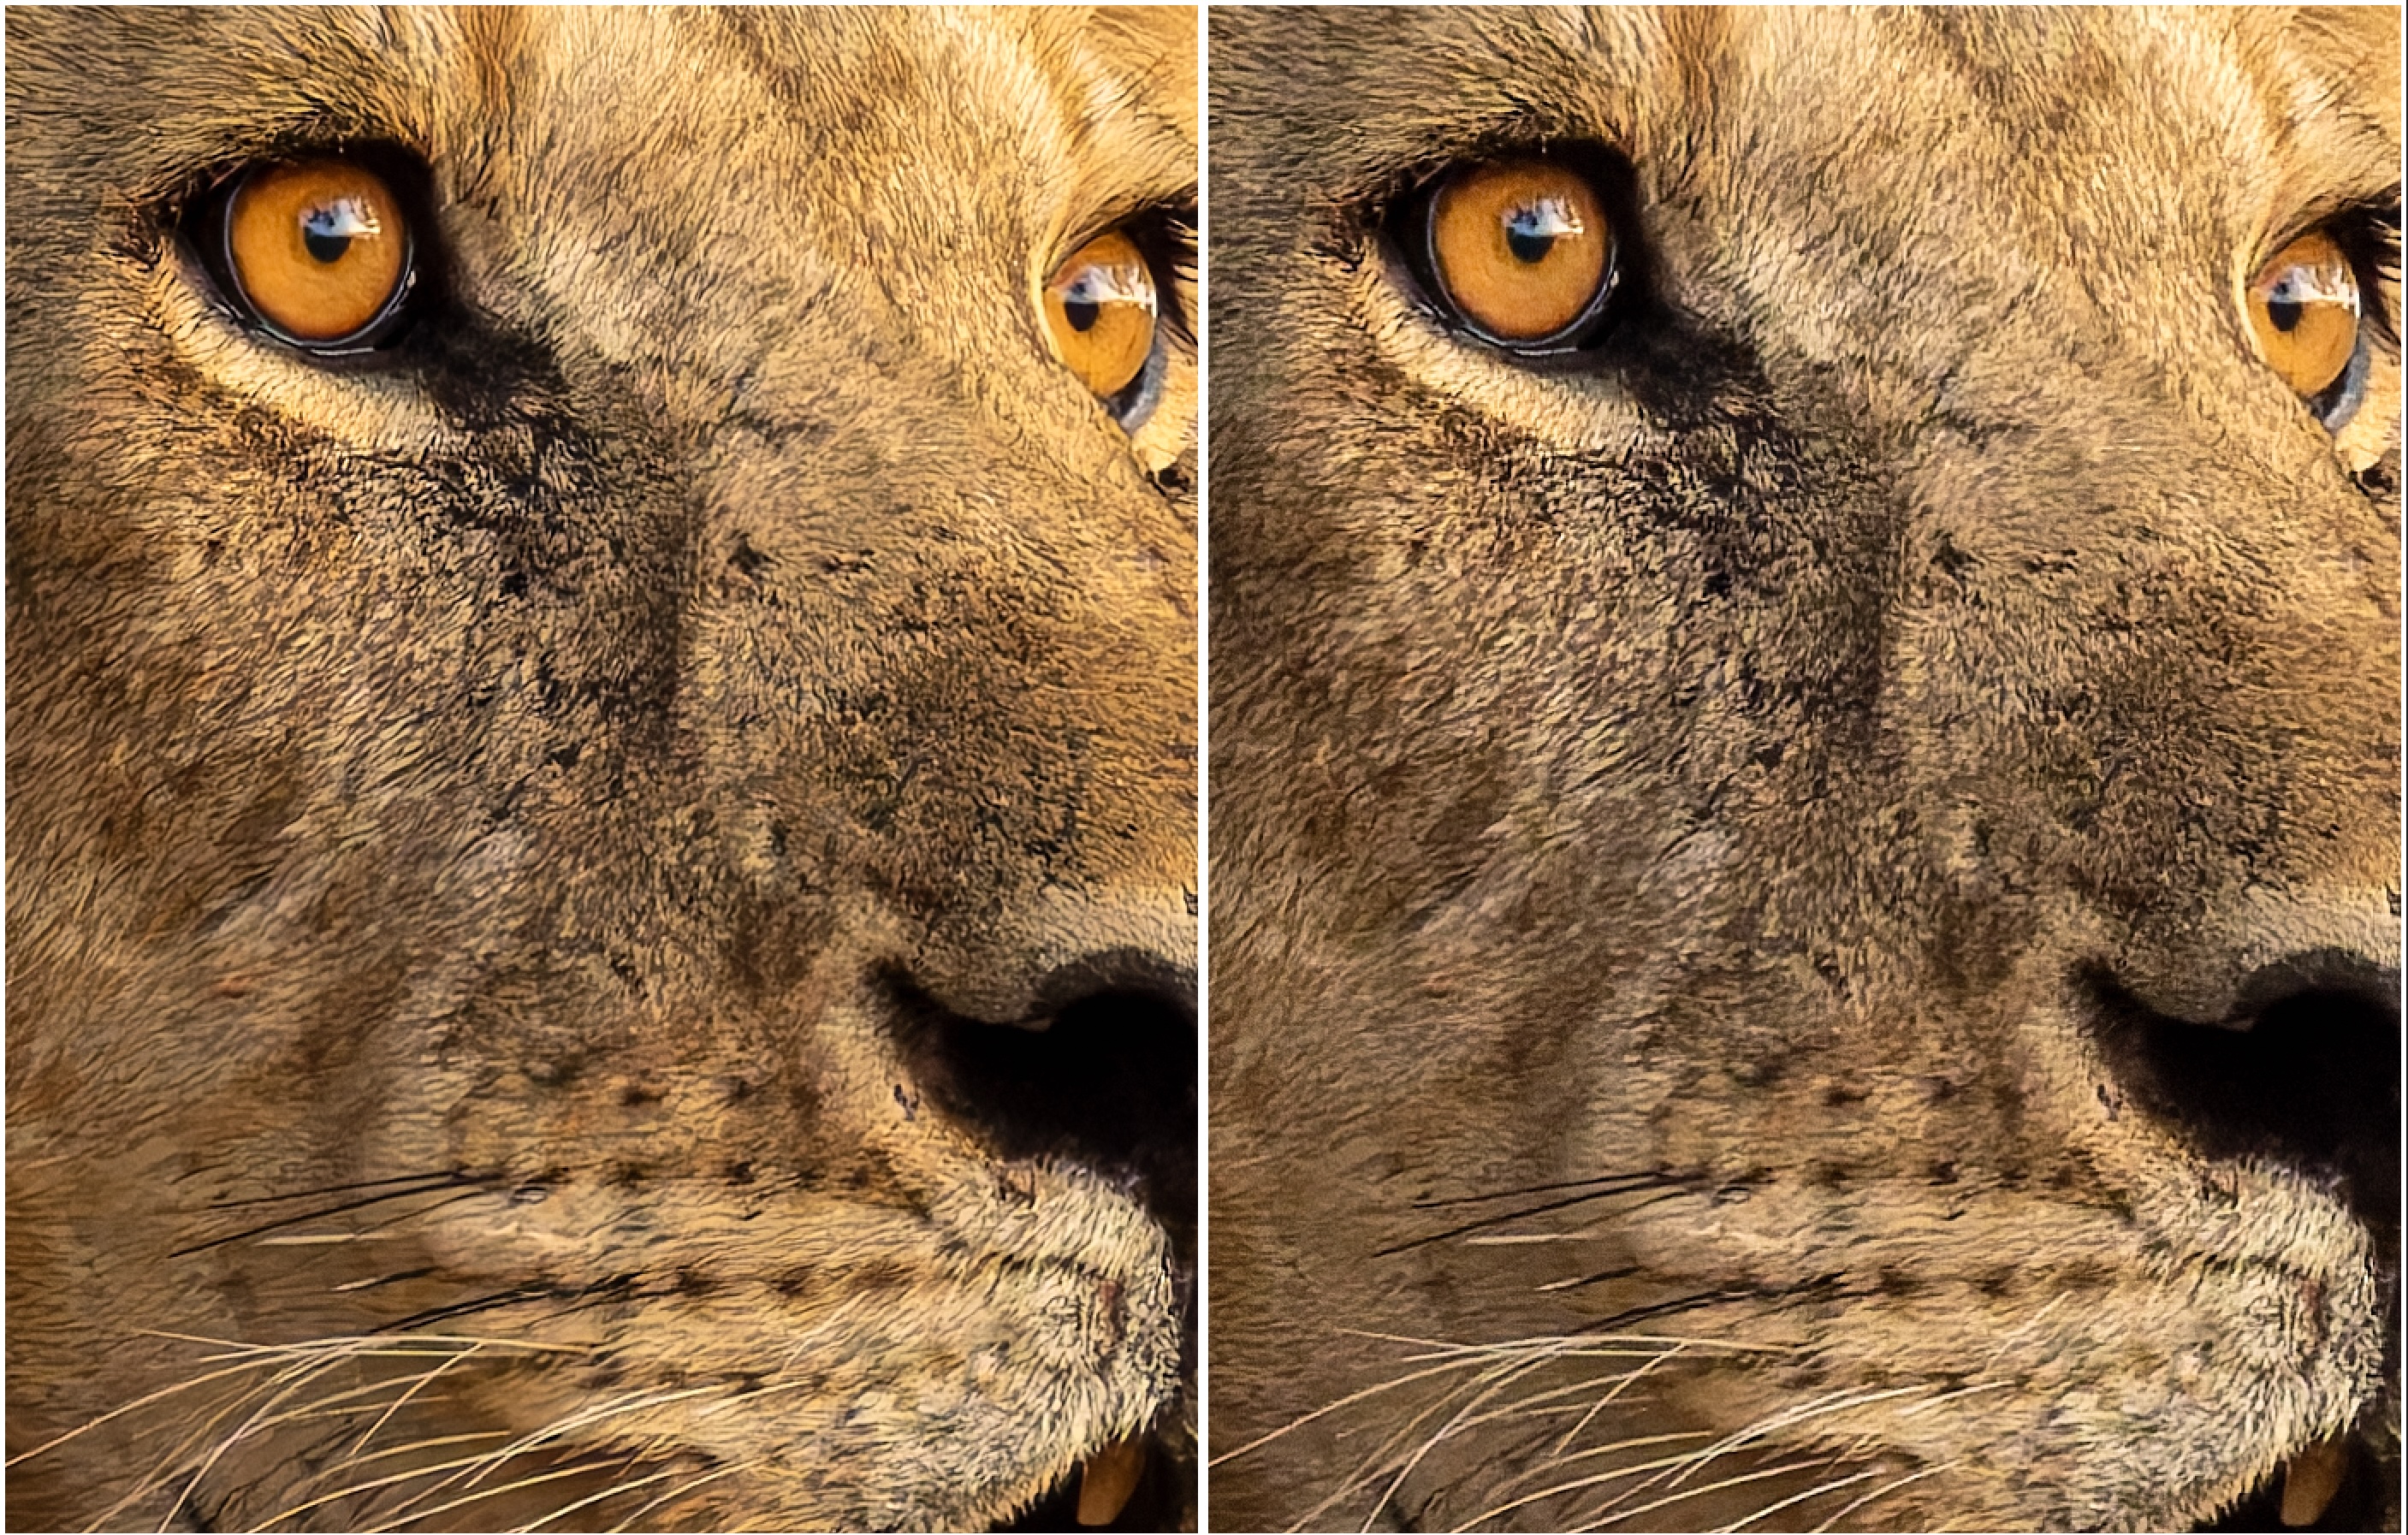
Click or tap on the image to view the original file at full size.
And the 4-up comparison:

According to the DxO website, DxO PureRAW 5 is supposed to deliver ”the ultimate in RAW image quality”. It is supposed to give us, ”sharper, cleaner, more detailed RAW files without upgrading your gear”.
But I’m not seeing that.
The Real Upgrade
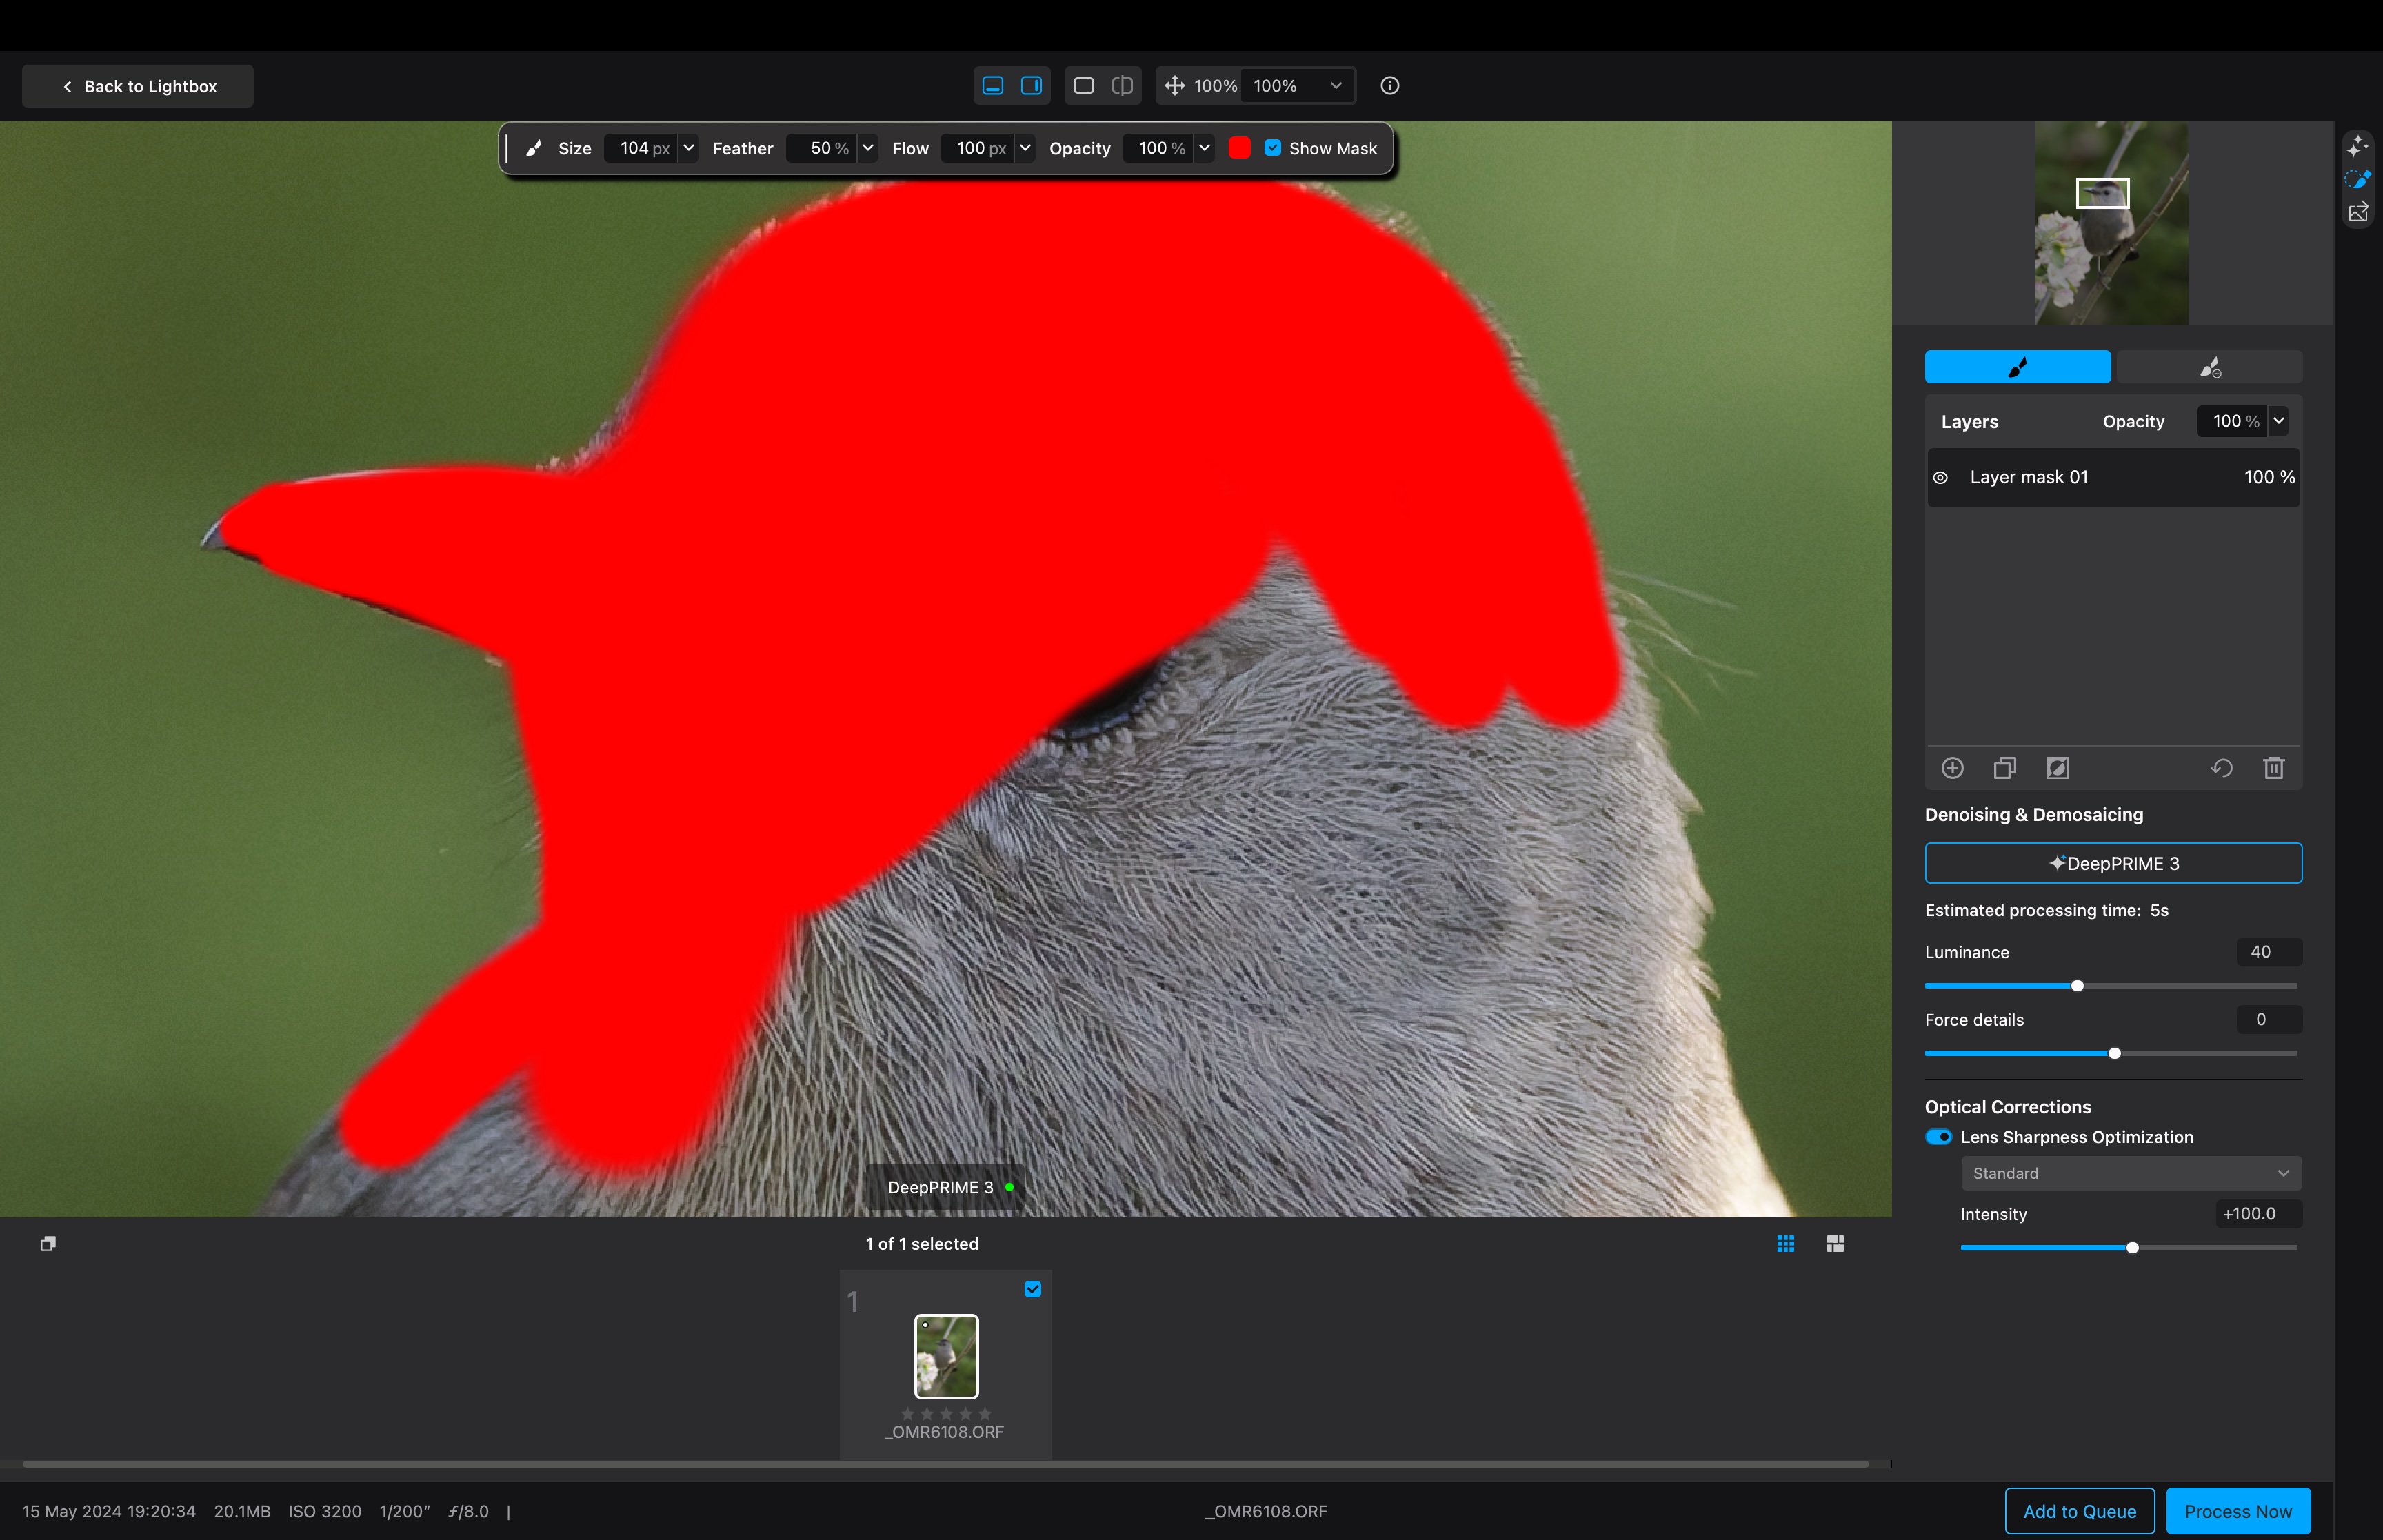
Perhaps of greater relevance is that PureRAW 5 offers ’Local Adjustments’ allowing users to ”make targeted changes when processing challenging RAW files. Simply create masks to fine-tune denoising and focus Lens Sharpness Optimization with a new level of accuracy” the website tells us.
Finally! We can create masks to, for example, sharpen only the subject and not the background. Except, Topaz PhotoAI already has this AND it has a better implementation of it. With Topaz, it automatically selects the subject for you. With all the power of modern AI, why doesn’t DxO have this as an option.
Huh? Did I miss something?
That being said, while Topaz’s subject detection is good and helpful, it’s not perfect. I often need to paint in additional subject details and/or paint out areas not part of the subject. However, it always begins with a pretty close approximation, meaning less work for me. Not in DxO PureRAW. Frankly, in 2025, I find it bizarre. How could a bunch of six-figure software engineers miss this simple AI feature?
The other issue with DxO PureRAW 5 is that, when painting in the mask, you can only set the view to either full or to 100%, nothing in between. I wanted 50%, to see more of the bird as I masked it, but nope, it was all or nothing, at least up on the settings bar at the top. I subsequently discovered I could un-pinch on my trackpad to zoom in. Okay, so other viewing options are available, but why not just have a selection of viewing %s in the top bar, say 25%, 50%, 67%?
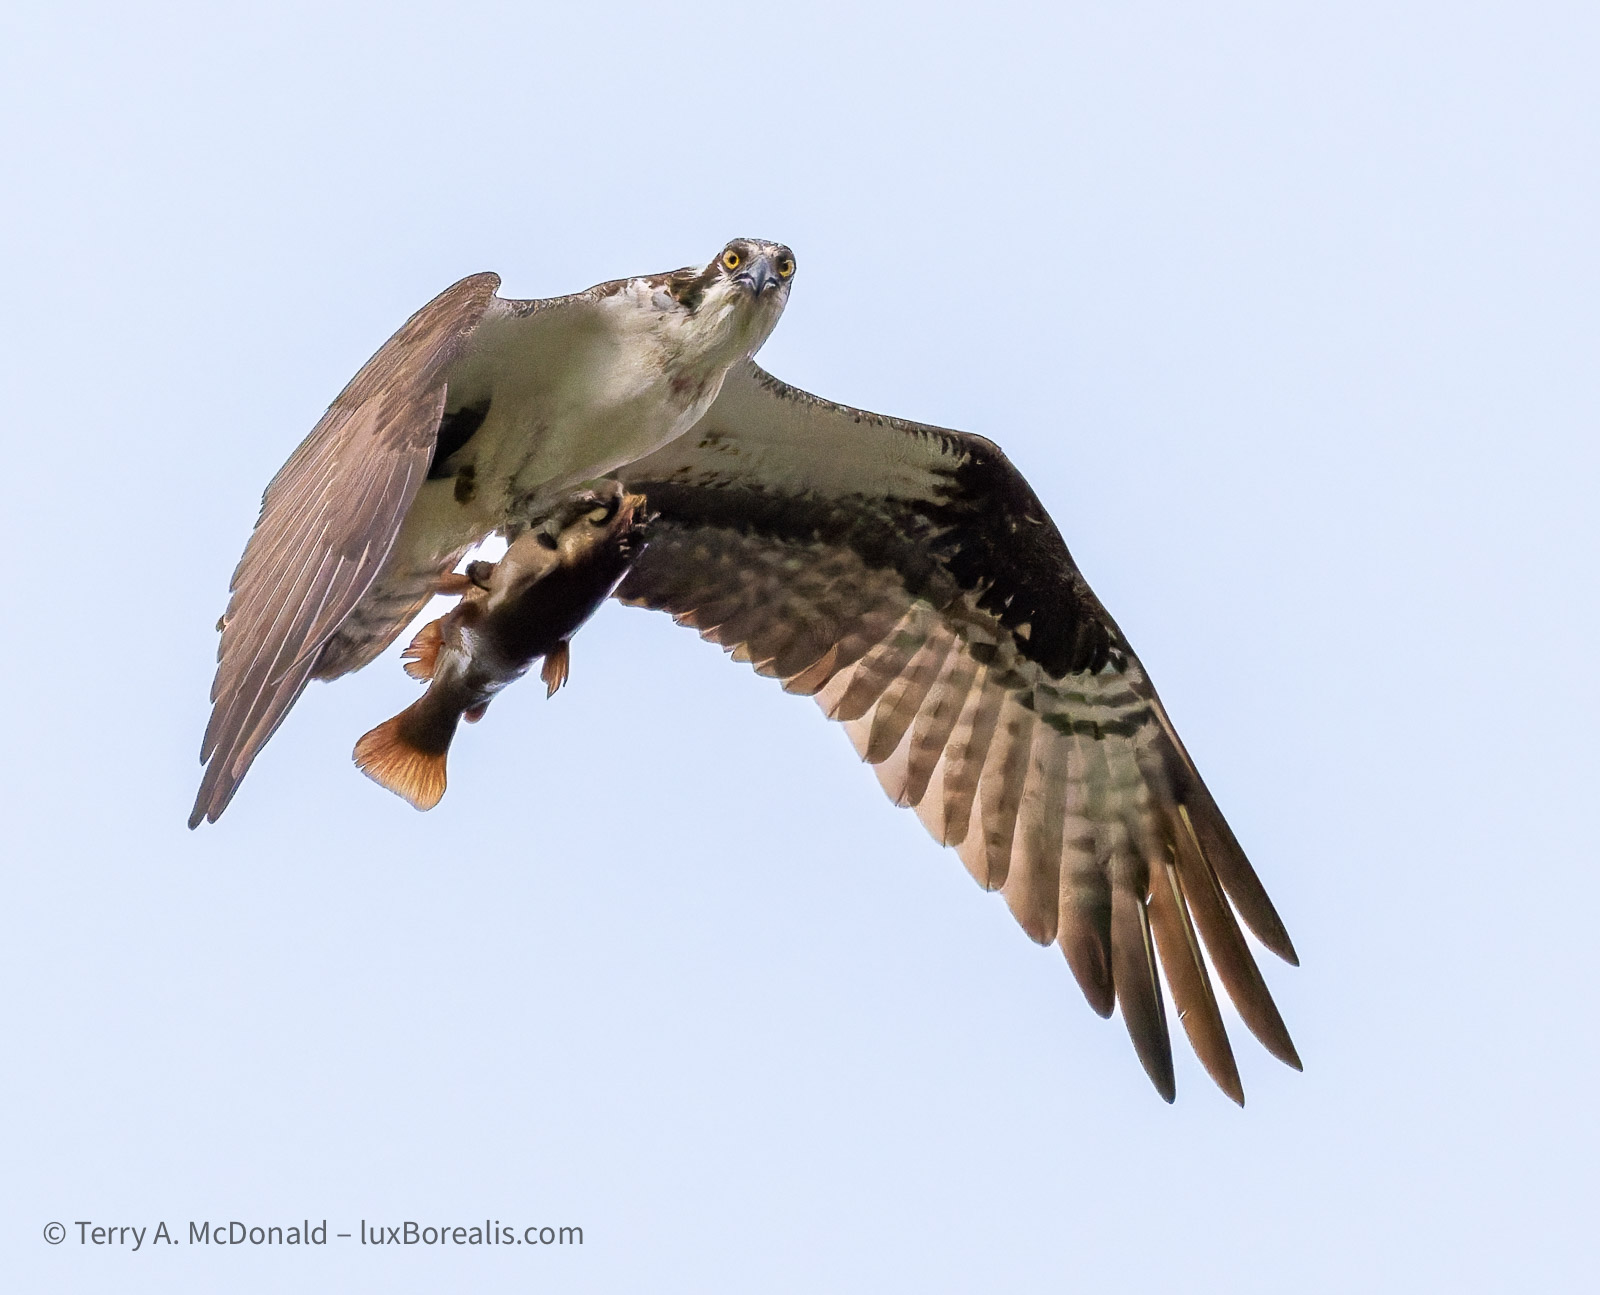
The Big Reveal
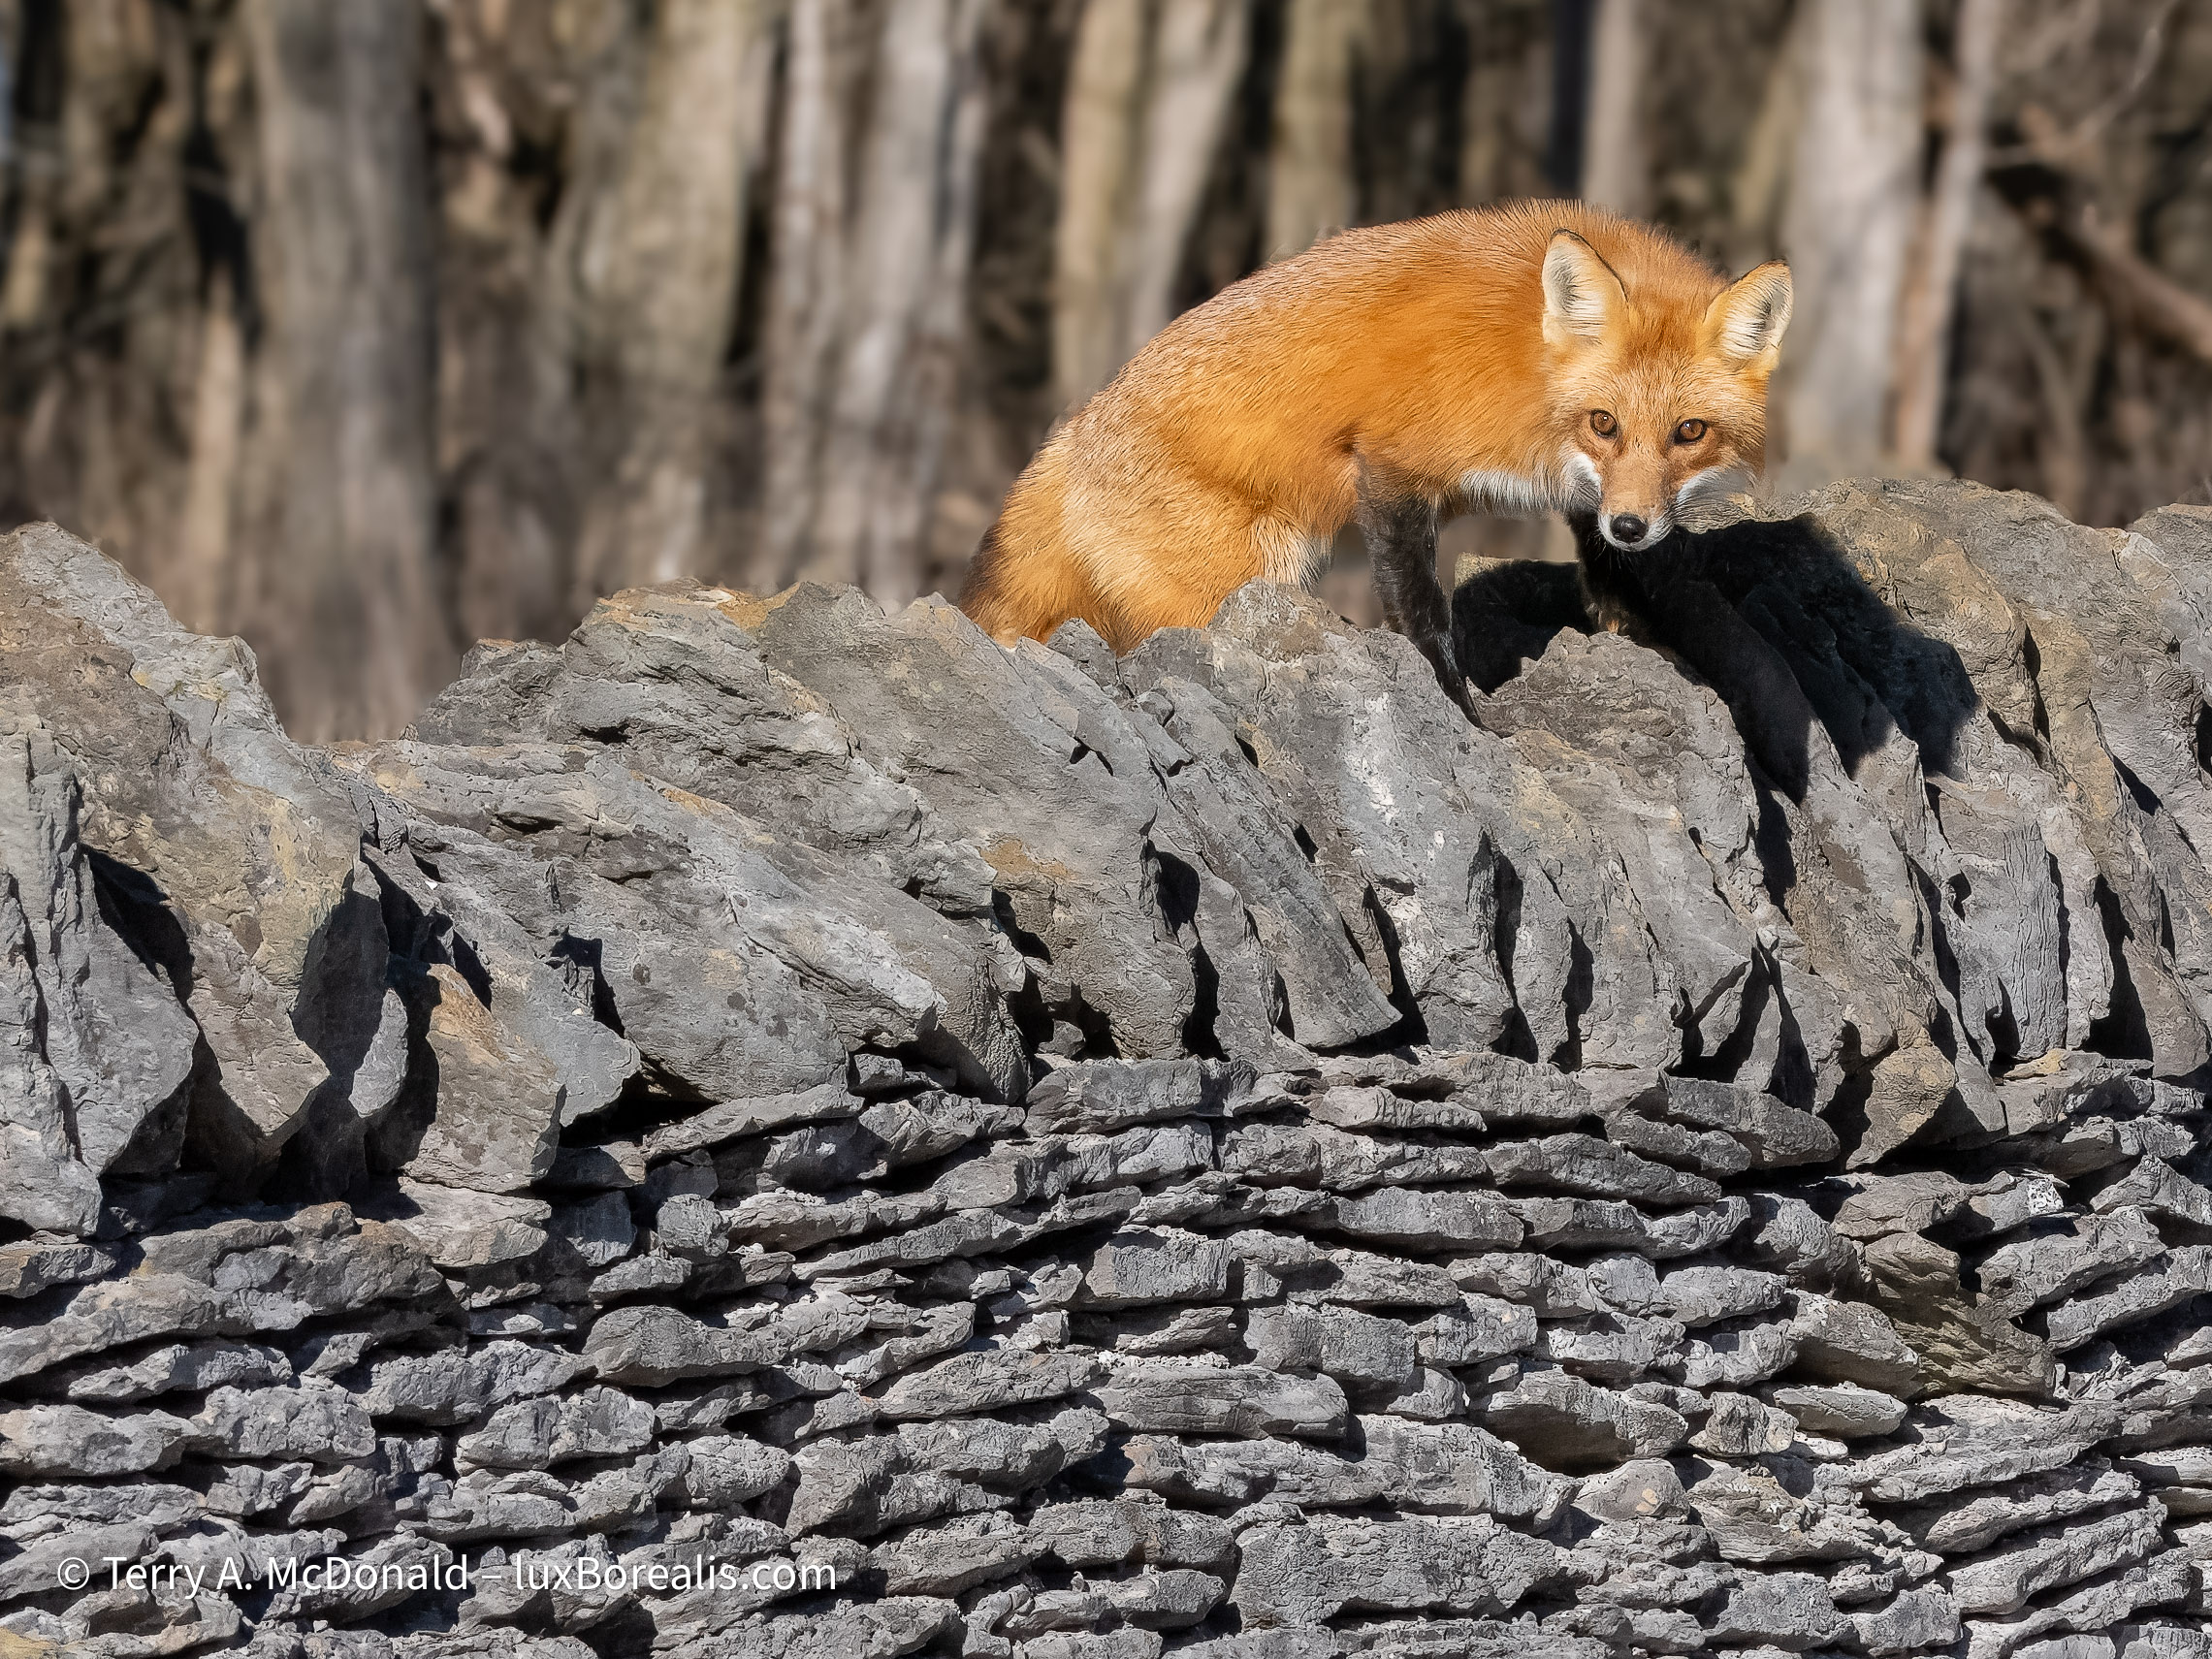
One thing I’ve been clamouring for with Topaz is to have the ability to set the amount of sharpening for different masked areas. In a previous blog, I wanted the Red Fox to be 100%, but the stone wall to be between 50 and 75%. First of all, Topaz only allows one mask, so it’s all or nothing. However, DxO allows multiple masks—and DxO allows users to set the ’Flow’ and ’Opacity’ of the paint brush while masking. Brilliant! The masking brush is almost as intuitive as Lightroom’s, though theDxO brush seems ’blobby’ and has slight delay as you drag it over the image.
I see three areas of improvement here:
- The pixel size of the brush is not actually the pixel size of the brush. If it was, then the paint brush would increase in size as I zoom in. It does not; it remains the same size on screen. However, there may be a silver lining as when I zoom, I tend ot want a smaller brush for details. Hmm—I’ll need to work with this.
- If I paint or unpaint over an edge I didn’t intend to, there is no easy way to correct it. With Lightroom, I just hold down ’Option’ and the brush switches to the opposite. That would be very handy here.
- If I paint something then decide I’ve made an error, the industry-standard ’Undo’ (Cmd/Ctrl+z) is not available. This, too, would be helpful as it is in Lightroom! In both cases, if I need to erase, I must drag the cursor over to the panel and switch to ’Erase’ mode, make my change, then switch back which to me, is an unnecessary series of clicks.
High ISO
Interestingly, when I passed one of my High ISO files through DxO PureRAW 5, I saw a decrease in image quality using the default settings. I used the ISO 6400 Junior Cardinal photo from my Raw File Optimization comparison article.

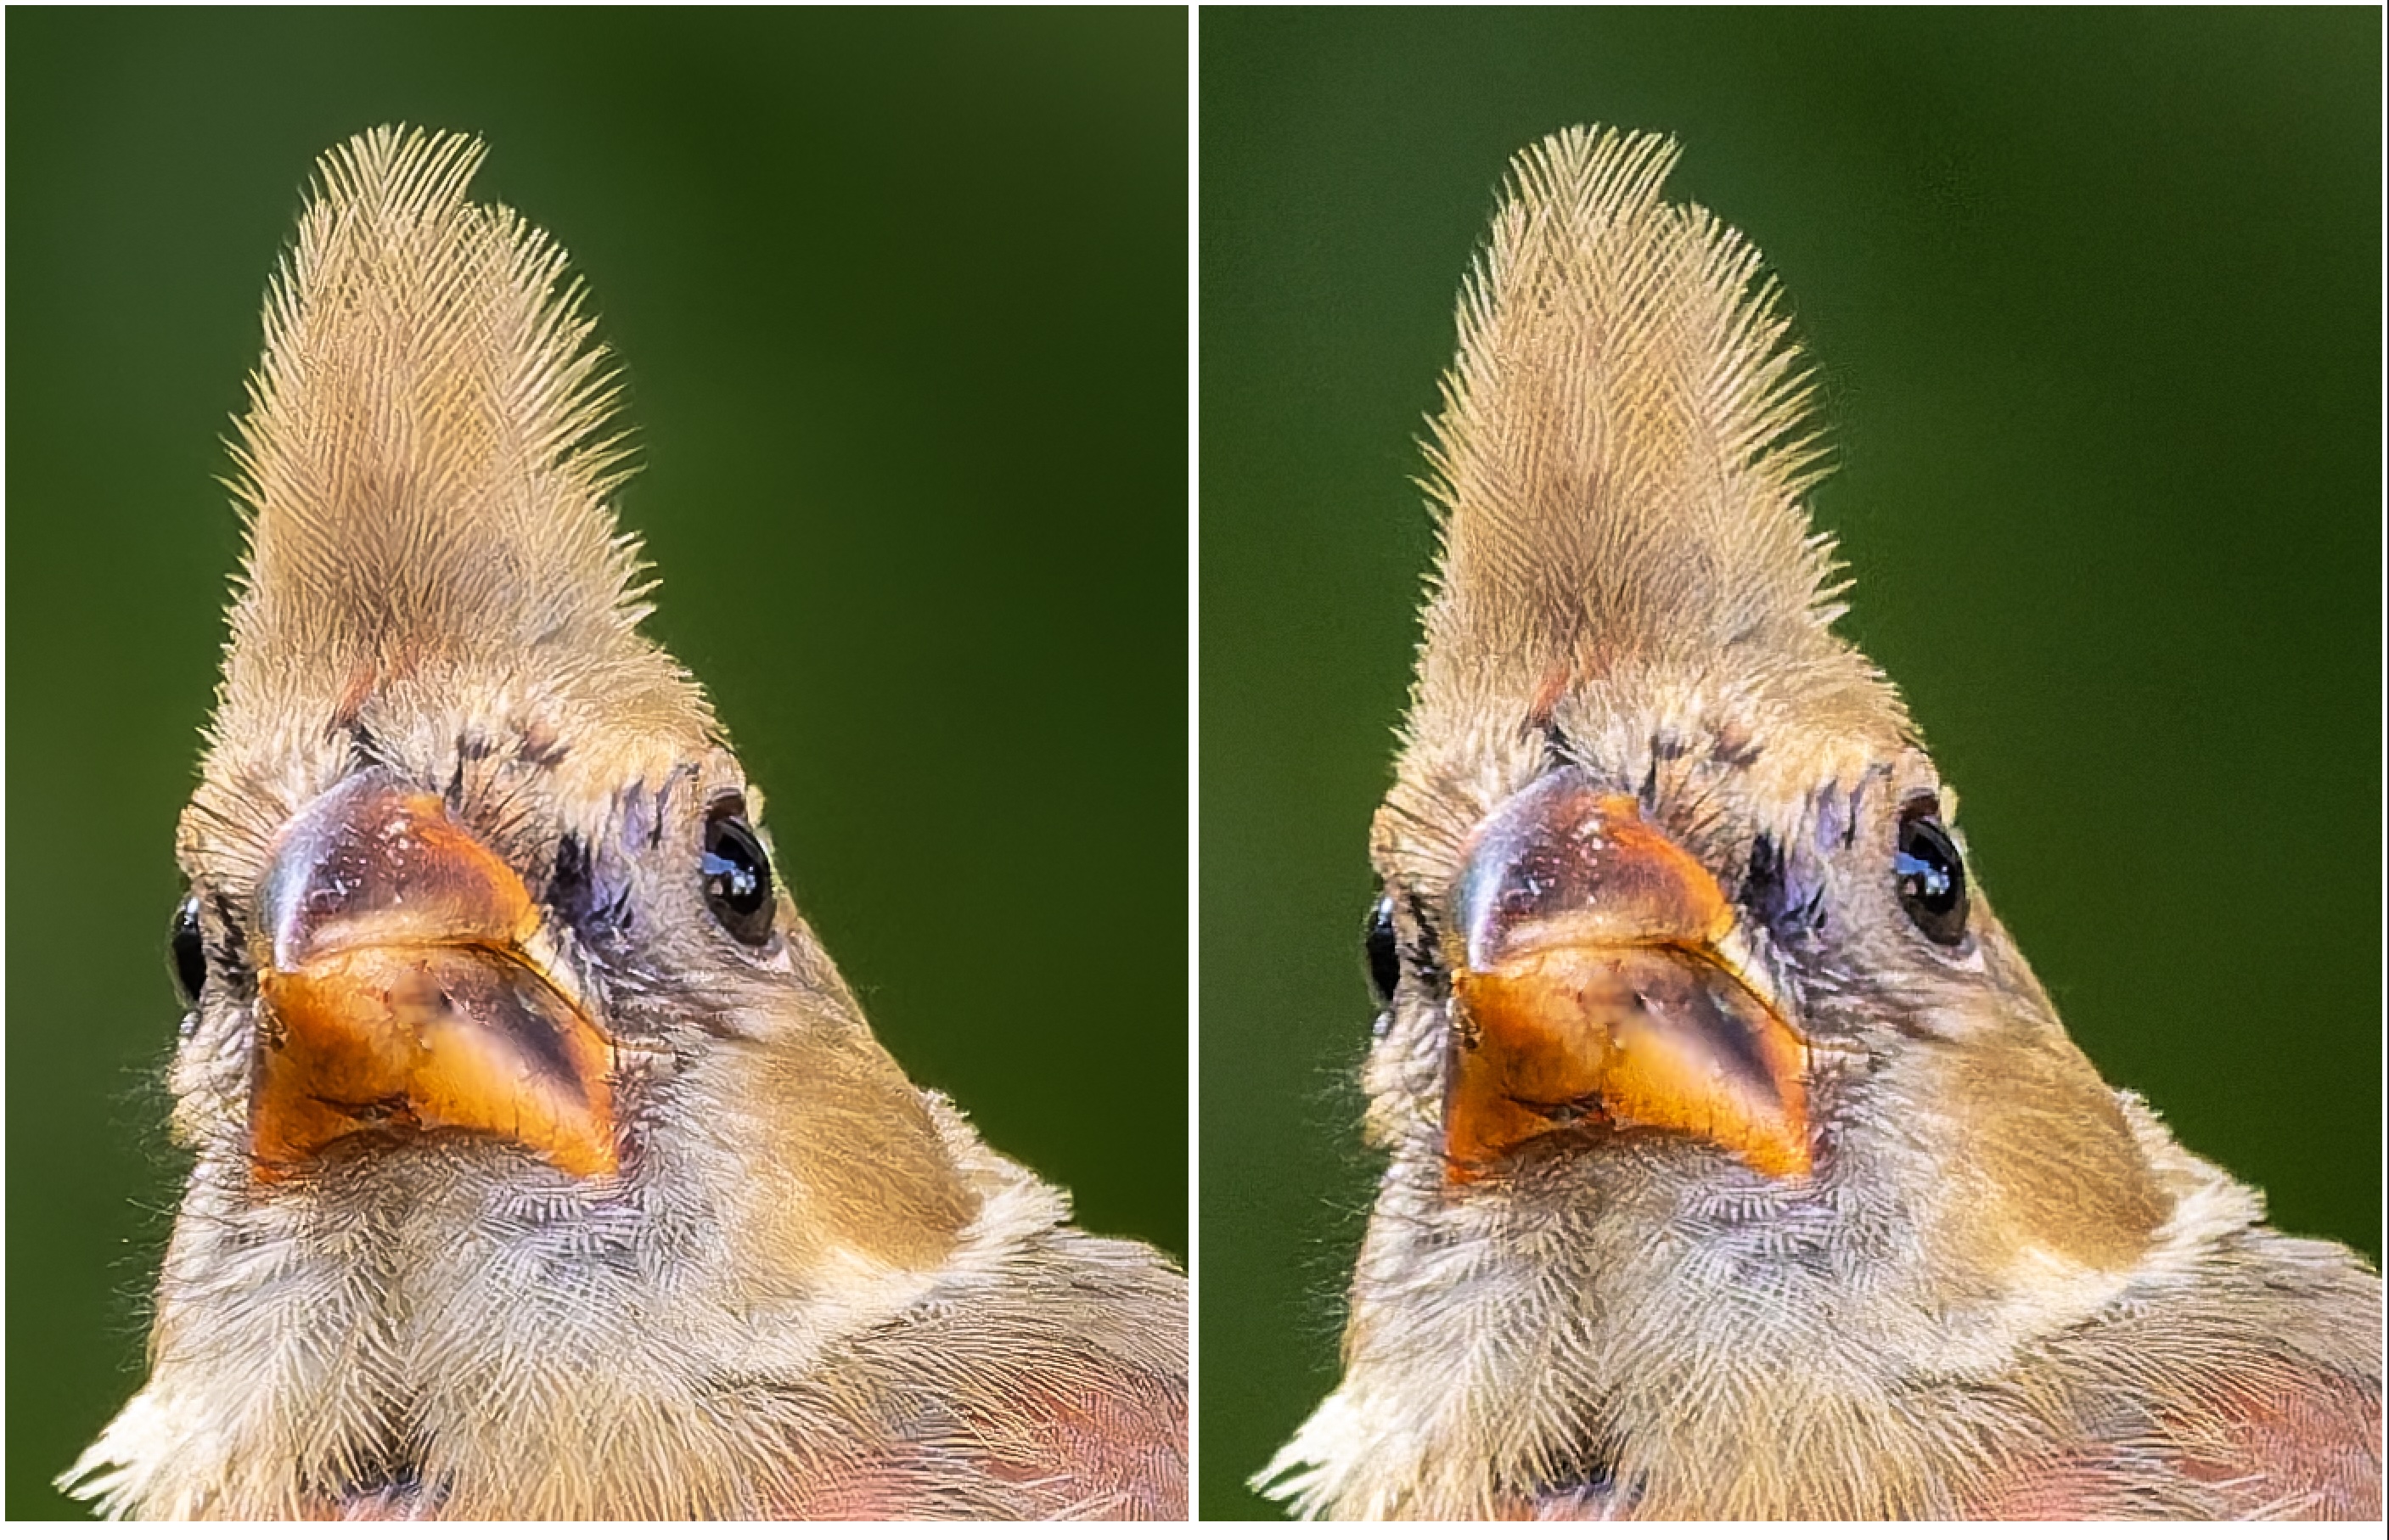
I must admit being dismayed at the High ISO results. I checked and re-checked them and my methods to ensure it wasn’t ’user error’, but time and again, the v5 results did not have the same finesse. I don’t shoot a lot of High ISO, but it is worth investigating. My only guess is that the engineers at DxO made the decision to be less aggressive with the default settings because now users can mask areas for more or less sharpening. So let’s test it out . . .
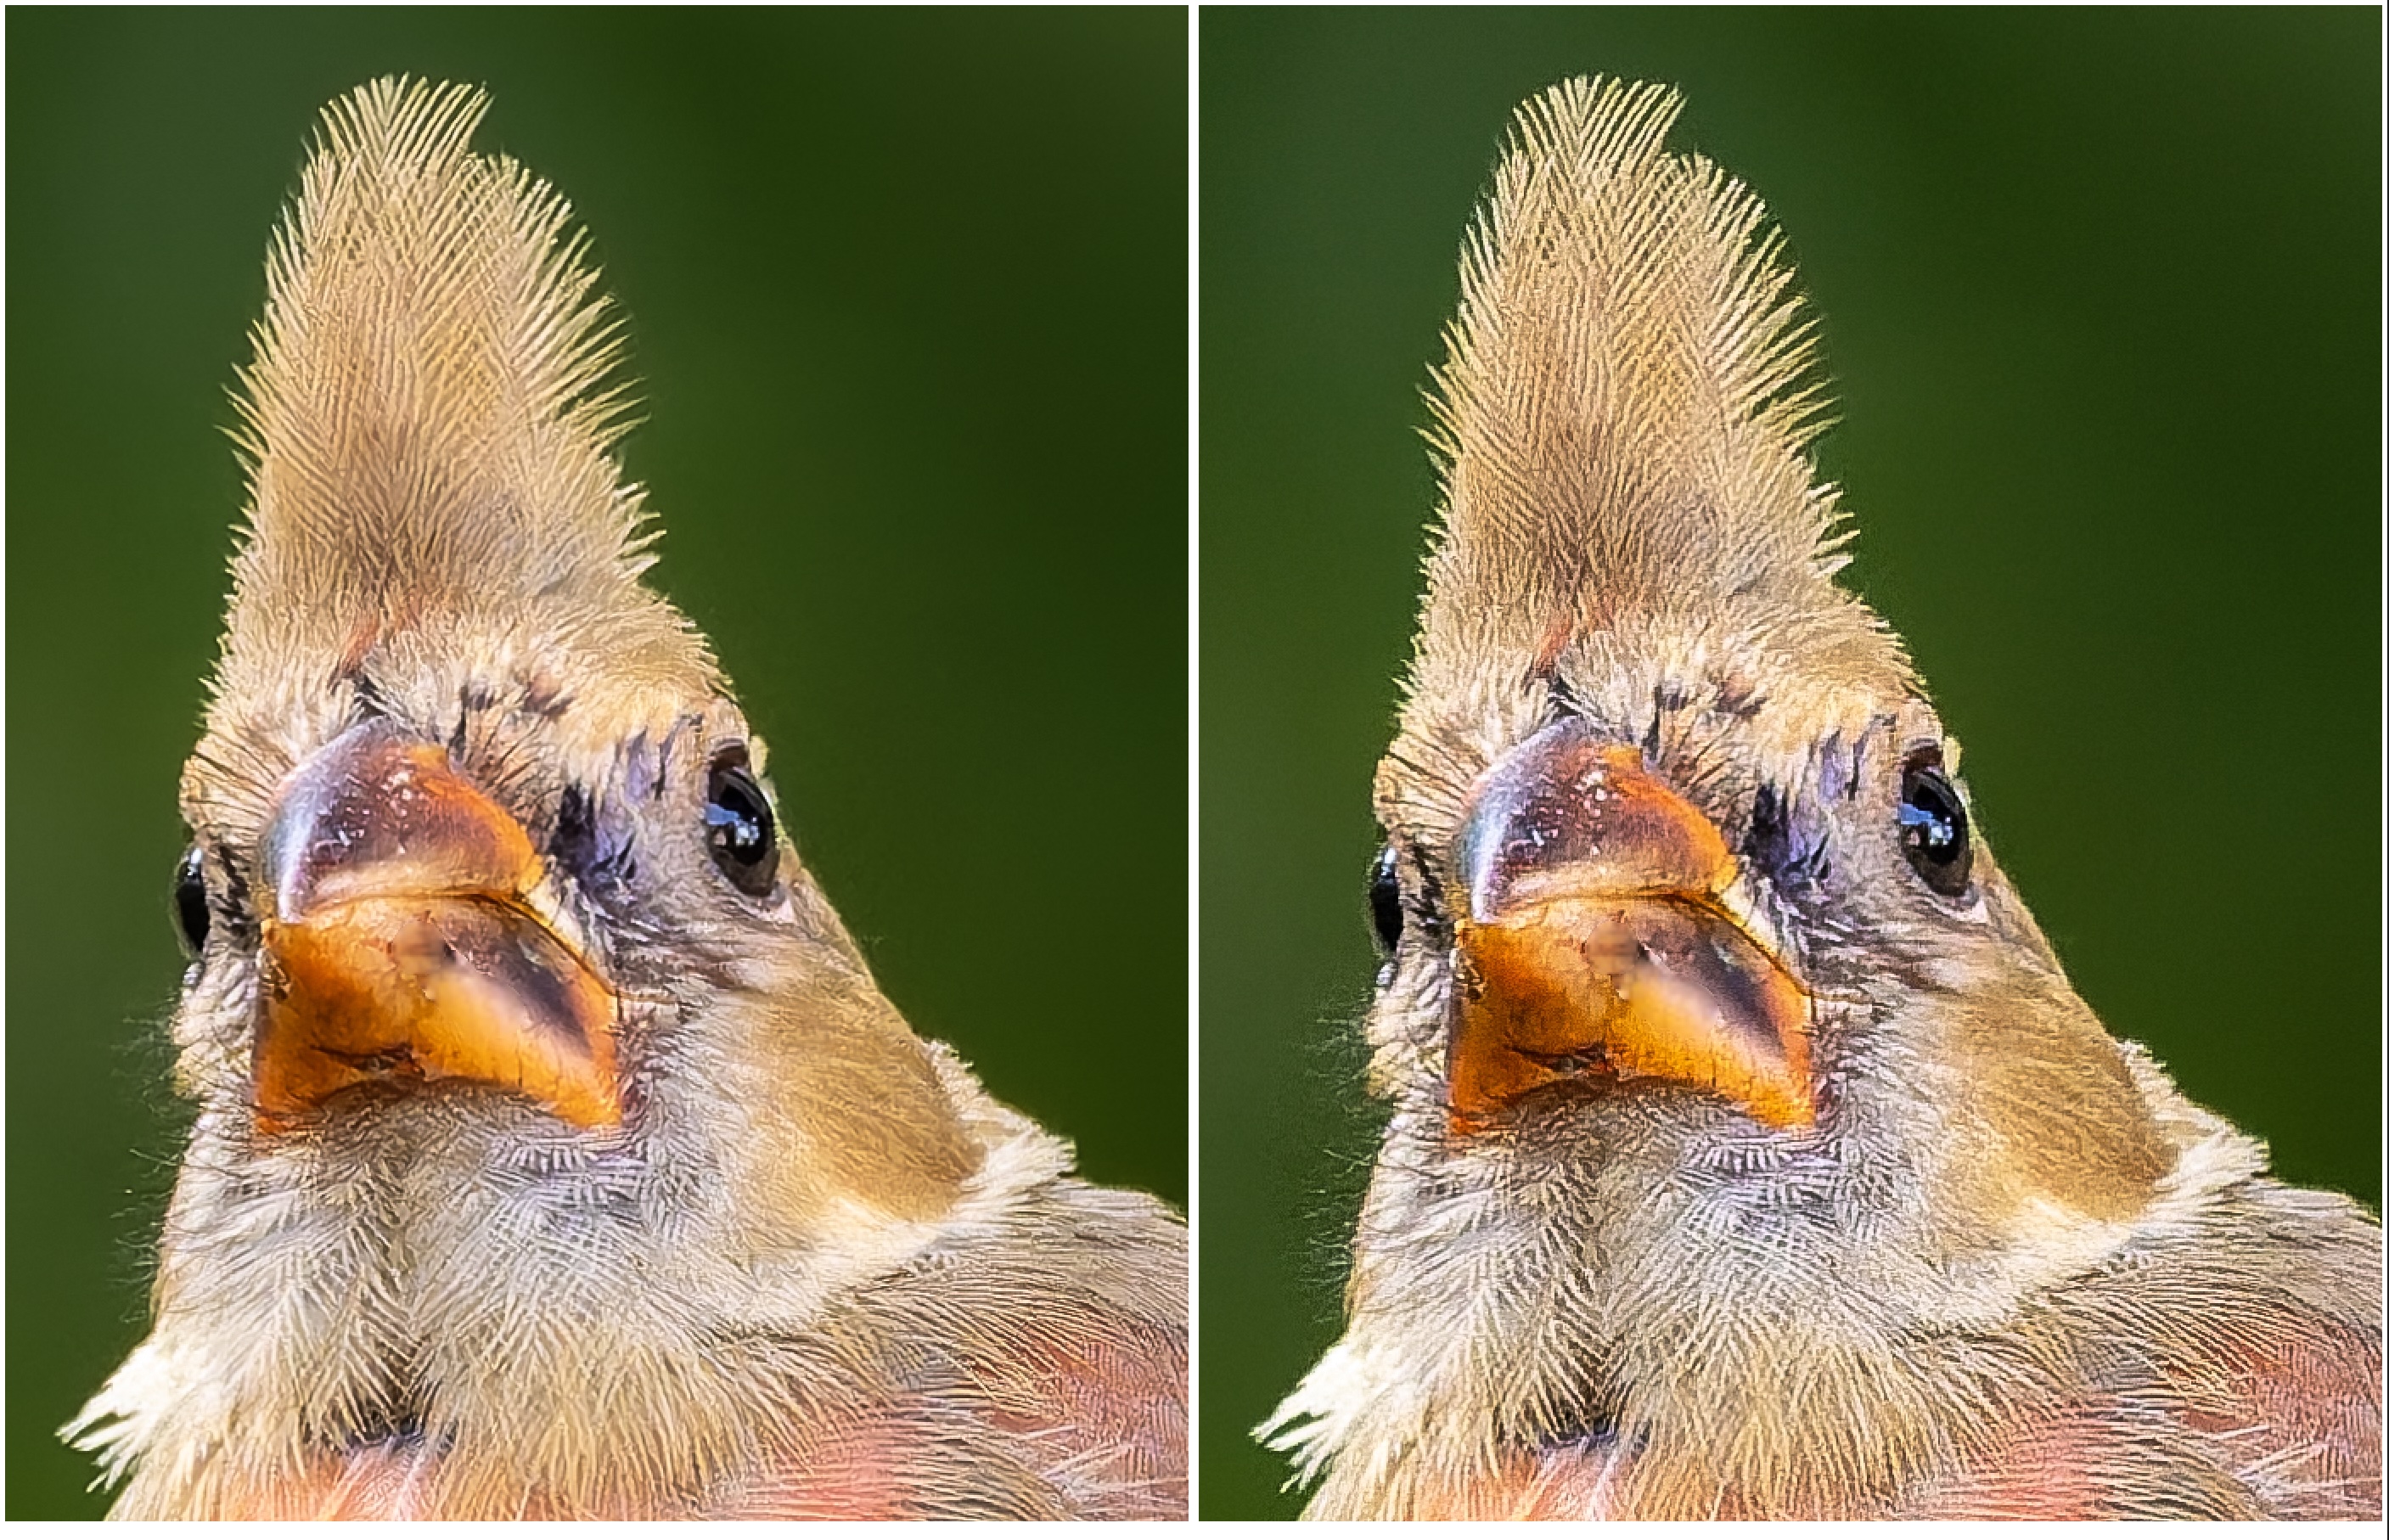
The double masking worked, so, maybe that’s the approach—allow users more control, more finesse by using masks. Though it wasn’t onerous, it took longer—significantly longer than using default settings. To make the subject mask, I set the brush to 50% Feather and painted away. My Kindergarten teacher wouldn’t be pleased as I slightly when outside the lines, in this case to catch feather detail that overlapped with the background. From there, I duplicated then inverted the mask and worked on the settings. Probably 10 minutes in total. The final version is worth it, though the original DxO PureRAW 4 version took only 30 seconds using the default settings!! Interesting. It’s progress, I guess.
Workflow
Something I appreciate about DxO is how easy it is to move from Lightroom to DxO and back again. Note: I never use ’File > Edit In . . .’ from Lightroom as that creates a useless TIF—I prefer DxO has the original raw file to work from, and so does DxO. So I ’Export > Original’ to a folder, right-click the file and select ’Open in > DxO PureRAW 5’. When the processing is complete, DxO applies the changes, saves the file back to the same folder then prompts me to select where I want it opened. I choose Lightroom and voilá, there it is, ready for importing. I can work with that.
Bottom Line
First of all, another small gripe. When I visited the DxO PureRAW 5 Learning and Support page, to look at the tutorials for masking—the great new feature—there weren’t any. And, when I selected the ’What’s new in PureRAW 5’ video, the ’What’s New in PureRAW 4’ video played. Hmm. Someone’s dropping the ball here. I really want to give a positive review, but it’s becoming more difficult.
Will DxO replace Topaz PhotoAI as my go-to raw file processing app?
In a word, no. Lightroom’s own Enhance Noise Reduction already does the job. In fact, I think I have it nailed down: EnhancedNR at 80% followed by aggressive Detail Sharpening of 100 or more, then finishing with Masking. It’s this final step of Masking in the Sharpening panel which eliminates the sharpening of smooth areas. So, Lightroom already allows for great demosaicing, noise reduction and sharpening. Plus it has extensive, intuitive Adjustment Masking with auto selection of ’Background’ and ’Subject’ and any additional Adjustment Masks I might need to increase or decrease Texture, Clarity, and Sharpening.
However, when an image specifically requires masking of subject and background separately for raw file processing, beyond what Lightroom can do for me, then DxO would be the app I turn to. The thing is, as I wrote above, since Lightroom already does an excellent job, I won’t be using DxO too often.
Is it worth upgrading to DxO PureRAW 5? If you use Lightroom, then perhaps not. Check the comparison files above. If you’re using Lightroom properly, then you already have excellent Denoising and Sharpening. However, if you are not a Lightroom user, then yes DxO PureRAW 5 is worth it because now you can mask out the background from any sharpening.
Is it worth switching from Topaz PhotoAI to DxO PureRAW 5? No, not unless you’ve run into cases where you need masking beyond the subject mask offered in Topaz PhotoAI.
Remember, all of this talk around improving raw image processing is really geared to those making significant use of their images. If you’re sharing images on social media or online, then it really doesn’t matter—the images are not large enough for a difference to be noticeable. However, if you’ll be printing your files or entering them into photo contests and competitions, then a case can be made for spending the additional time and money on improving your raw files.
Thanks for reading! In the COMMENTS section below, add your questions, comments, or discussion about raw file optimization, the app(s) used and what you’ve found.
This work is copyright ©2025 Terry A. McDonald and may not be reproduced
in whole or in part without the written consent of the author.
Please SHARE this with other photographers or with your camera club,
and SUBSCRIBE to receive an email notice of new blogs.
Have a look at my work by visiting www.luxBorealis.com and consider booking a presentation or workshop for your Nature or Photo Club or a personal Field & Screen workshop at Workshops.
Discover more from luxBorealis Blog
Subscribe to get the latest posts sent to your email.

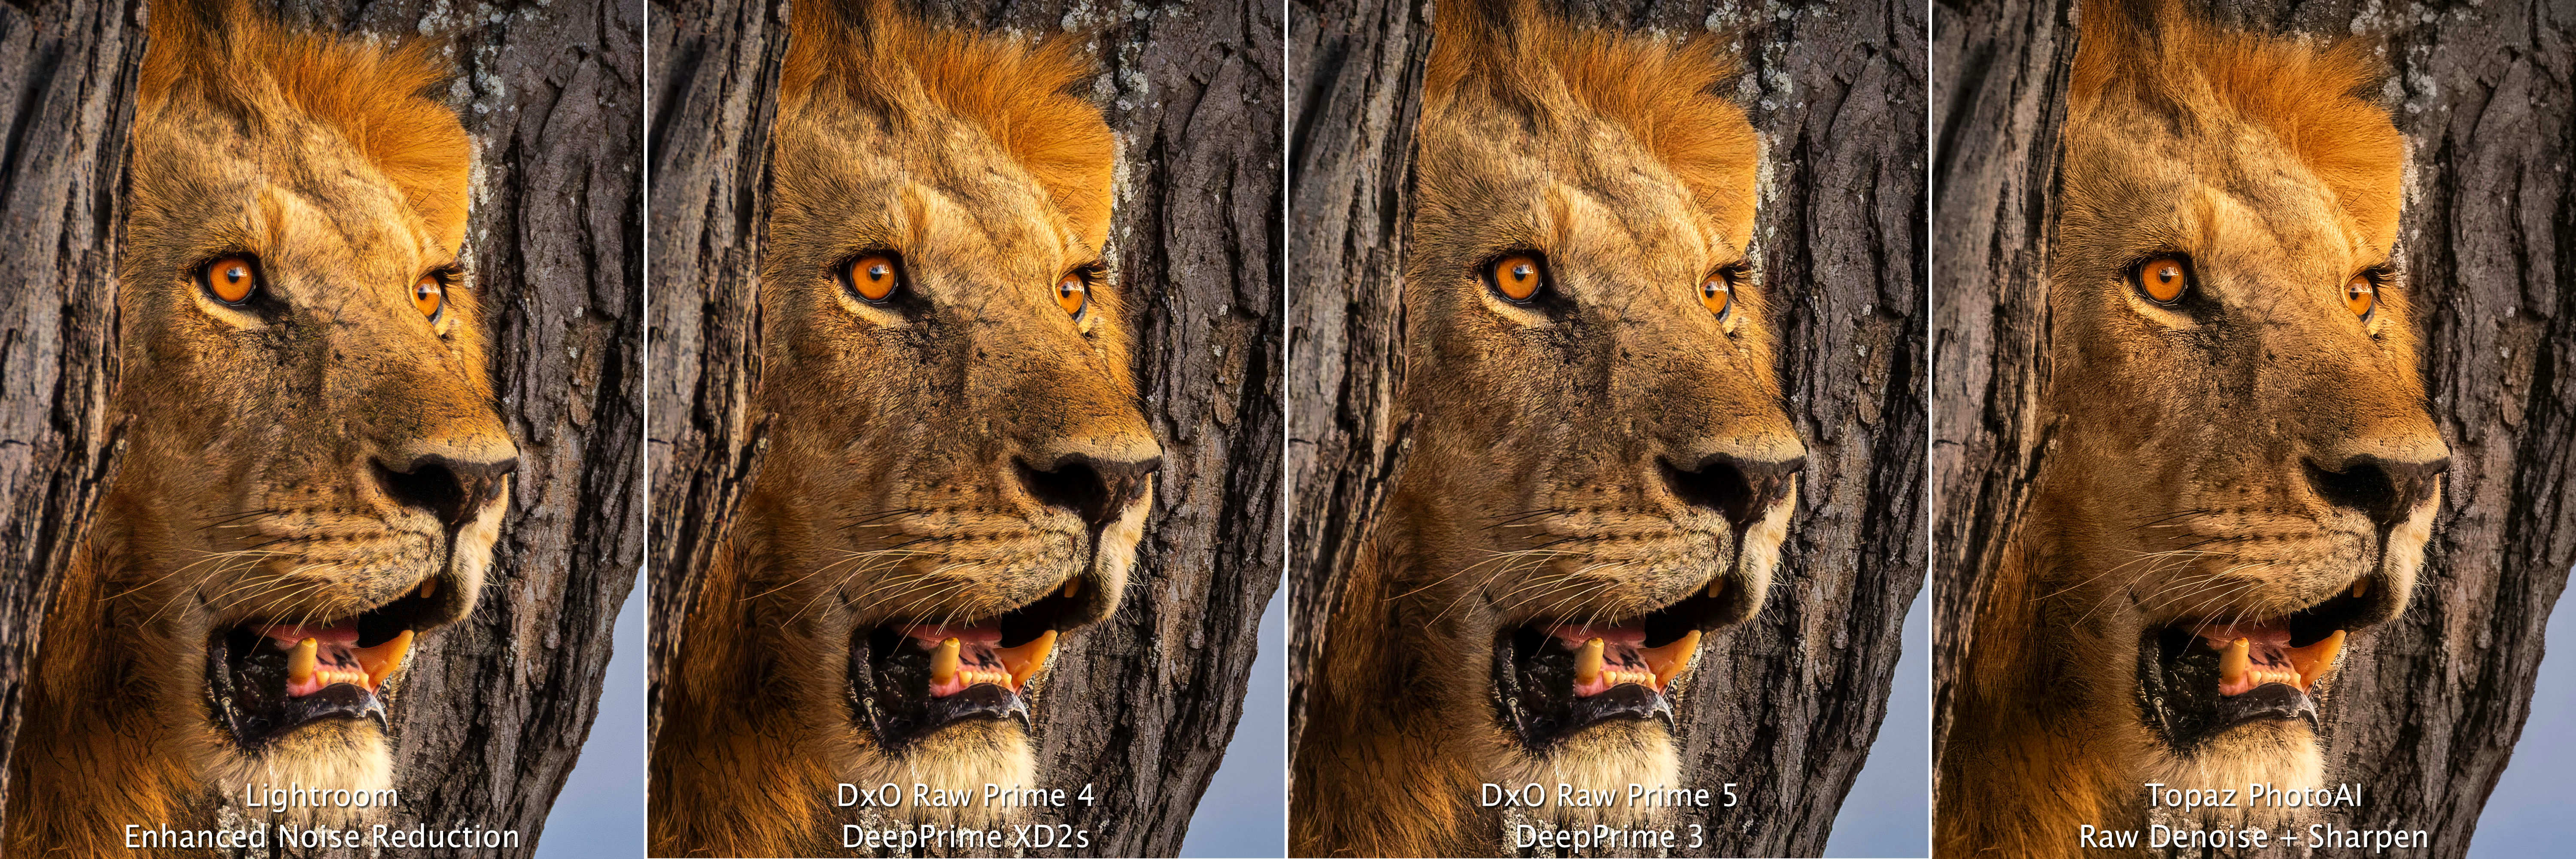
What is going on with the Topaz Photo AI image of the lion between the tress? Topaz has blurred the distant tree’s bark, where the other processes leave it as shot.
Astute observation! In sharpening mode, Topaz PhotoAI automatically selects ‘Subject’ when it detects a subject. The user has the option to accept it or change Sharpening to ‘All’. The user also has the option of changing the masking ton include more or less of the image. Subject sharpening is not a bad thing as more often than not, with single subjects or close-ups of subjects, users want the subject to be distinctly sharp compared to the background
For this image, I was fine with subject sharpening, but it means other areas are not sharpened. Viewers would never know the difference unless they have something to compare it with, as in this case, the bark could easily have been out of focus due to limited depth of field.
Thanks for your observation and question.
Rhetorical, why does Topaz AI feel the need to create a fake blur on the far right (distant) tree bark, compared to the other processes. Was it a setting you selected?
In this image https://blog.luxborealis.com/wp-content/uploads/2025/04/sunsetvigil-4up.jpg it blurs the distant bark that wasn’t blurred in the other processes, and while doing that, it erroneously blurs some of the closer bark that should be in focus. It’s the reason I do not use Photo AI and did not update my subscription last month. The “AI” often makes some weird decisions and alterations to my in and out of focus areas, that are nonsensical, like the case above.
Thank you for your review by the way!
Yes, the far bark is blurred compared to the ‘original’. It is not arbitrary, but a decision the user can accept or not as I describe in the previous comment.
AI does make some weird and arbitrary decisions, particularly about what is and is not ‘subject’ when it automatically applies the subject mask. Through not perfect, it is helpful as a time saver. As always, however, users must be aware and cautious with how they use AI a tool, rather than simply accepting its decisions.
To avoid excessive artifacts, what are the best settings for high ISO in Pure Raw 4 (Luminance, Force Details and Sharpening)? I often make mistakes in images with ISO above 800 and my images end up with too many artifacts. I loved your article, it saved me money,
I was going to migrate to Pure Raw 5, but I won’t anymore.
Hi Andre,
I’m afraid I don’t have any specific recommendations for high ISO settings. For one thing, I rarely shoot at ISOs above 3200. And, for the few I’ve done, the best I can remember is raising Luminance until the background is smooth (by 10 to 20); raising Force Details slightly (by 10 to 25); and leaving Lens Sharpening as is or raising it slightly to 125 to 150. With Sharpening, less is more because I can always improve Detail Sharpening in Lightroom.
Before starting all this, I turn off the comparison slider on DxO. I don’t care what the original raw file looked like—they always look terrible. What I wish they offered was a way to compare two different sets of settings; e.g. default with changes.
I hope this helps!
Terry
In time, I refer to raw files produced on a Nikon ZF 24 Mp. Thanks