Topaz Gigapixel now built into Lightroom

A game-changer, or just another ho-hum upgrade?
6238 words; 19 photographs; 33-minute read
In a surprising move, rival companies competing for your post-processing dollars have joined forces and handed Adobe users what could be a significant upgrade, all at little or no extra cost. Lightroom CC now includes Generative Upscaling at 2x and 4x using Topaz Gigapixel right in the app. This may not mean much for some, especially if you already have Topaz products, but if the version of Gigapixel included in Lightroom works as predicted, it might just be a game-changer for many who have opted not to buy Topaz.
NOTE: From what I understand, Topaz Denoise AI and Sharpen AI have been added to Photoshop. However, in this article, I will exclusively discuss Generative Upscaling in Lightroom. Just over a year ago, I chose to drop Photoshop from my Adobe Plan. Simply put, after three decades of PS use, I was finding it less and less helpful for editing photographs, given Lightroom’s more intuitive and photograph-oriented interface and adjustments. NOTE: That decision may be worth re-visiting now that Topaz Denoise and Sharpen have been added to Photoshop, as adding PS back into to my Adobe Plan (an additional $12/mo) is a lot less expensive than subscribing to an over-priced Topaz Photo at $17/mo.
Backgrounder
Topaz Gigapixel is the industry leader for upscaling images while maintaining amazing detail. It’s available as an app or plugin from Topaz for USD $149/year. Users of Topaz Photo or the older Topaz Photo AI can also access upscaling. So, for those users, many of which also use Lightroom, the addition of Gigapixel to Lightroom is a non-starter. However, for Lightroom users that do not have Topaz, it may be a significant upgrade, especially as it works without the app and does not require a trip out to Topaz and back again. It’s important to note that Generative Upscaling using Gigapixel has only been added to Lightroom CC, not Lightroom Classic.
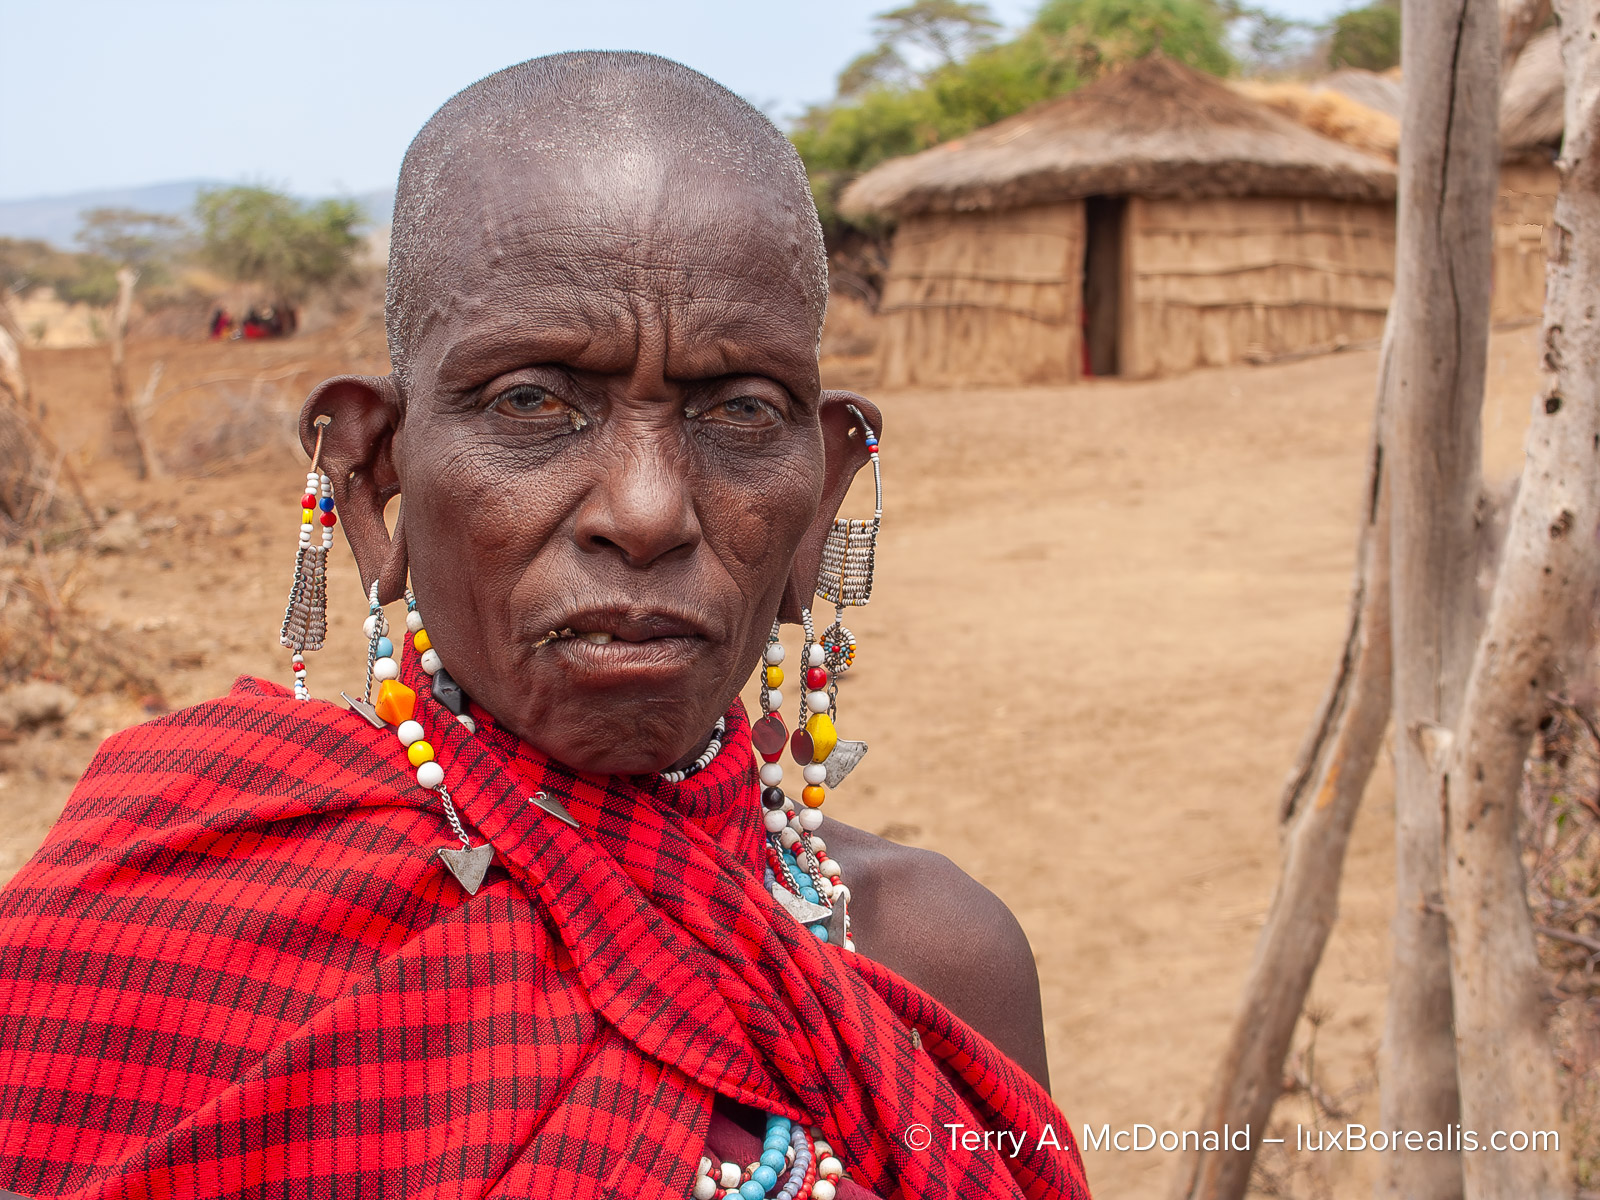
Minolta Dimage 7i at 16mm (62mm efov) • ƒ4 @ 1/750 • ISO 100 • original .MRW raw file processed in Lightroom and upscaled in Photoshop
Beginning life in 2003 as a 5 MP 1920×2560 pixel file, this portrait can be printed directly as a 5×7″ at 300ppi. On my wall at home, I have a 16×20″ that looks great, but it was the product of very laborious upscaling in Photoshop years ago. With Generative Upscaling in Lightroom, I can work right from the original raw file and create 2x and 4x upscales..
Limitations
Generative Upscaling within Lightroom has five limitations that should be understood at the outset:
- Upscaling of any image will also magnify any shortcomings such as focus accuracy, movement, and poor lens optics such as chromatic aberrations. So you need to begin with near-perfect images.
- Upscaling is limited to 2x or 4x, nothing in-between and nothing larger.
- Upscaling limits resolution to 65,000 pixels on the long side of the upscaled image. BTW, that’s a print size of 216″ or 18 feet at 300ppi, so, hardly a serious limitation!
- Upscaling requires the use of Adobe Generative Credits. Each Adobe Lr account is granted 250 credits each month, and are not cumulative, However, upscaling of a 20.4 MP ORF file uses 20 credits, providing up to 12 upscales a month. To me, this isn’t very limiting considering how few upscales I’m ever in need of. Besides if the need arises, additional credits can be purchased; 2,000 credits for one month for $12.99.
- Generative Upscaling is only available in Lightroom CC, the online version that stores files in the Adobe Cloud—not Lightroom Classic. Initially, this seems shocking as LrC is the ‘professional’ version of Lr. However, it makes sense as LrC is not cloud-based. For Generative Upscaling from LrC, files would need to be uploaded to the cloud, scaled, then downloaded again. With cloud-based Lr CC, everything is already in the Adobe Cloud, so upscaling is straightforward.
On the Adobe Generative Upscale with Topaz Gigapixel FAQ page, they state, “At this time, there are no plans to bring Topaz Gigapixel to Lightroom Classic. In Lightroom Classic this year, we are focused on expanding workflows with AI Culling and Firefly integrations for ideation, as well as performance and other enhancements.”
Having gravitated to Lr cloud-based editing over the past few years, not having it in LrC is of little consequence to me. I still use LrC for printing and for adding borders and text using the very helpful plugin LR/Mogrify 2, but neither is part of my typical editing workflow.
What is really of interest to me, as a MFT user, is this:
Can the Gigapixel technology now built into Lightroom extend the value of my MFT sensor, by putting high pixel resolution files within reach with the smaller, lighter innovative gear I so enjoy using? If so, it could be the game-changer many have been looking for.

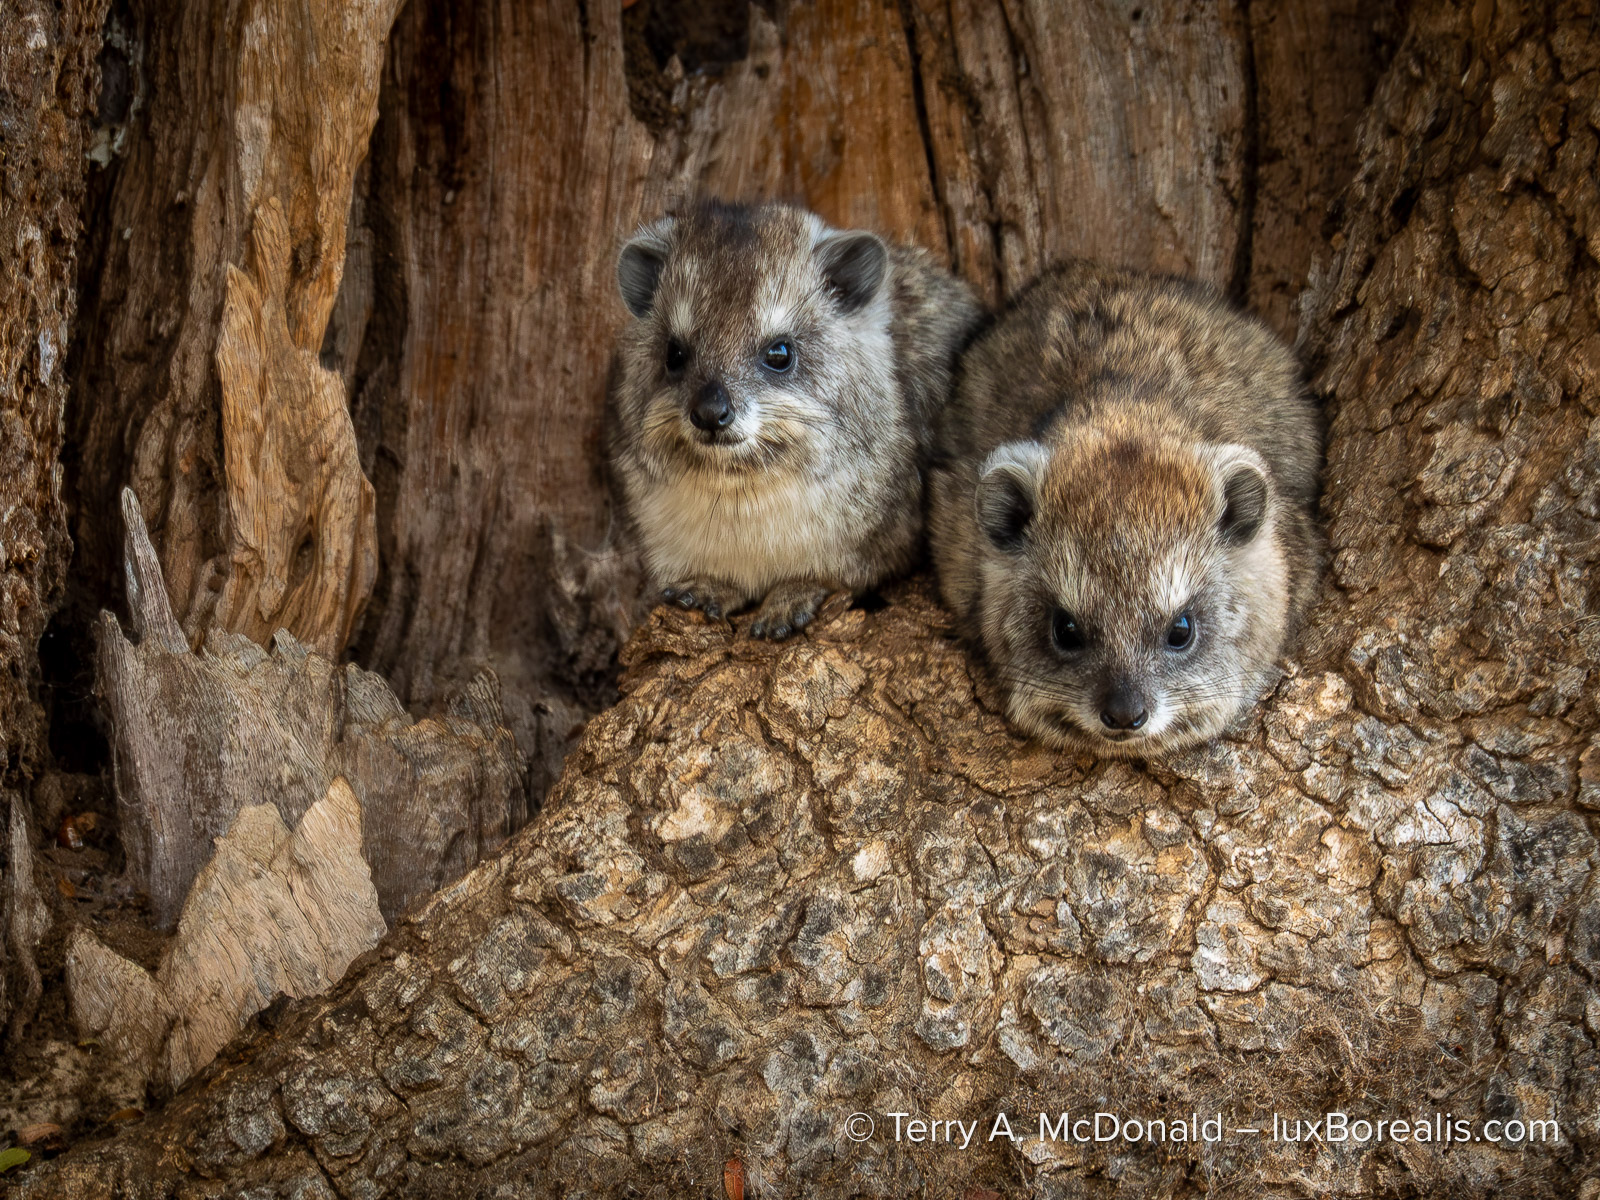
OM-1 w/M.Zuiko 100-400mm at 400mm (800 efov) • ƒ8 @ 1/800 • ISO 1600 • Lightroom
It is critical for wildlife photographers to keep their distance from active nests to avoid disruption. For me, this meant having to crop this file from 3888×5184 to 2250×3000. Though this is still large enough for an exceptional 8×10″ print at 300ppi, with Generative Upscaling, a 16×20″ print is now possible.
MFT: the Sweet Spot
I’ve been arguing for years that 20.4 MP is enough, and that MFT is the sweet spot in modern photography—and it still is. My OM-1 meets or exceeds dynamic range for outdoor landscapes and high ISO performance for dim situations. In addition my OM-1 has truly innovate modes such as Live ND, Live Composite, Focus Stacking, and 50fps raw output with AF and AE, built in to a system with industry-leading optics, IBIS and weather-proofness. No other camera on the market today can boast this. It’s the real deal, which some feel is limited only by sensor size.
Except, even 20.4 MP isn’t limiting. At 3888×5184 pixels, the sensor is plenty large enough for 99% of all end-uses, including online sharing, on-screen viewing, fine prints up to 13×19” at 300ppi (even 16x20s are no sweat), and canvases up to 20×28”.
OM-1 w/12-100 at 57mm (114mm efov) • ƒ5.6 @ 1/50 • ISO 800 • Lightroom
A lusciously detailed image at 3888x5184px, ideal for a 16×20. But, if something larger is needed, Generative Upscale would be helpful.
So, why do I need Generative Upscale?
Even if MFT naysayers can see past the rhetoric around DR and high ISO performance, they always come around to two limitations based on sensor size:
- when significant cropping is involved; and
- when print sizes larger than 16×20” are needed.
In other words, not very often. But first, a word on pixel-peeping.
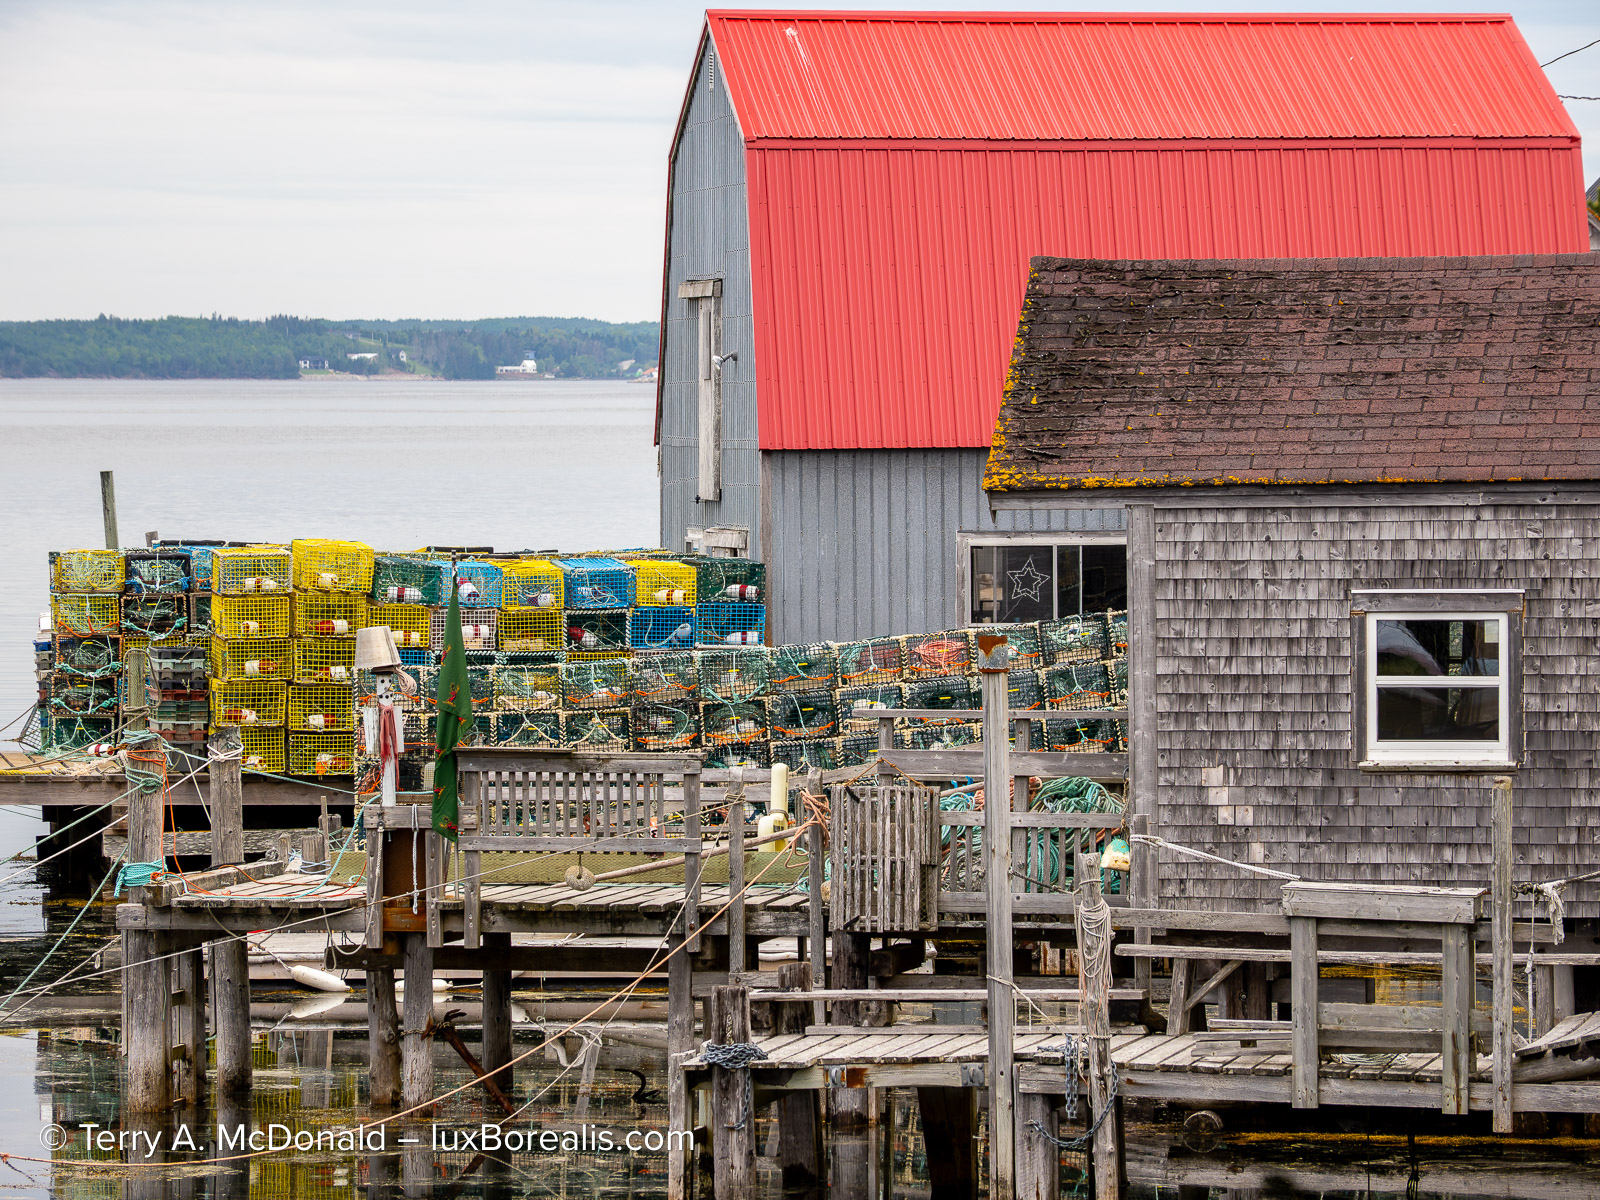
OM-1 w/ M.Zuiko 8-25mm/4 PRO at 10mm (20mm efov) • ƒ8 @ 1/500 • ISO 200 • Lightroom
An ideal candidate for Gigapixel, but I also shot this using HHHR for a 50 MP file and Tripod HR producing an 80 MP file. How well does Generative Upscaling compare to high-res pixel-shift technology?
Pixel-peeping
Let me state up front that I am not a pixel peeper. The blogosphere earns their clicks from pixel-peeping minute differences between this sensor and that sensor, as well as the various apps to denoise and sharpen. To me, a photograph speaks to viewers based on its emotional appeal, especially when it comes to prints on a wall. Other than pedantic pixel-peeping photographers, no one puts their nose to a print (or to a computer screen) to check details.
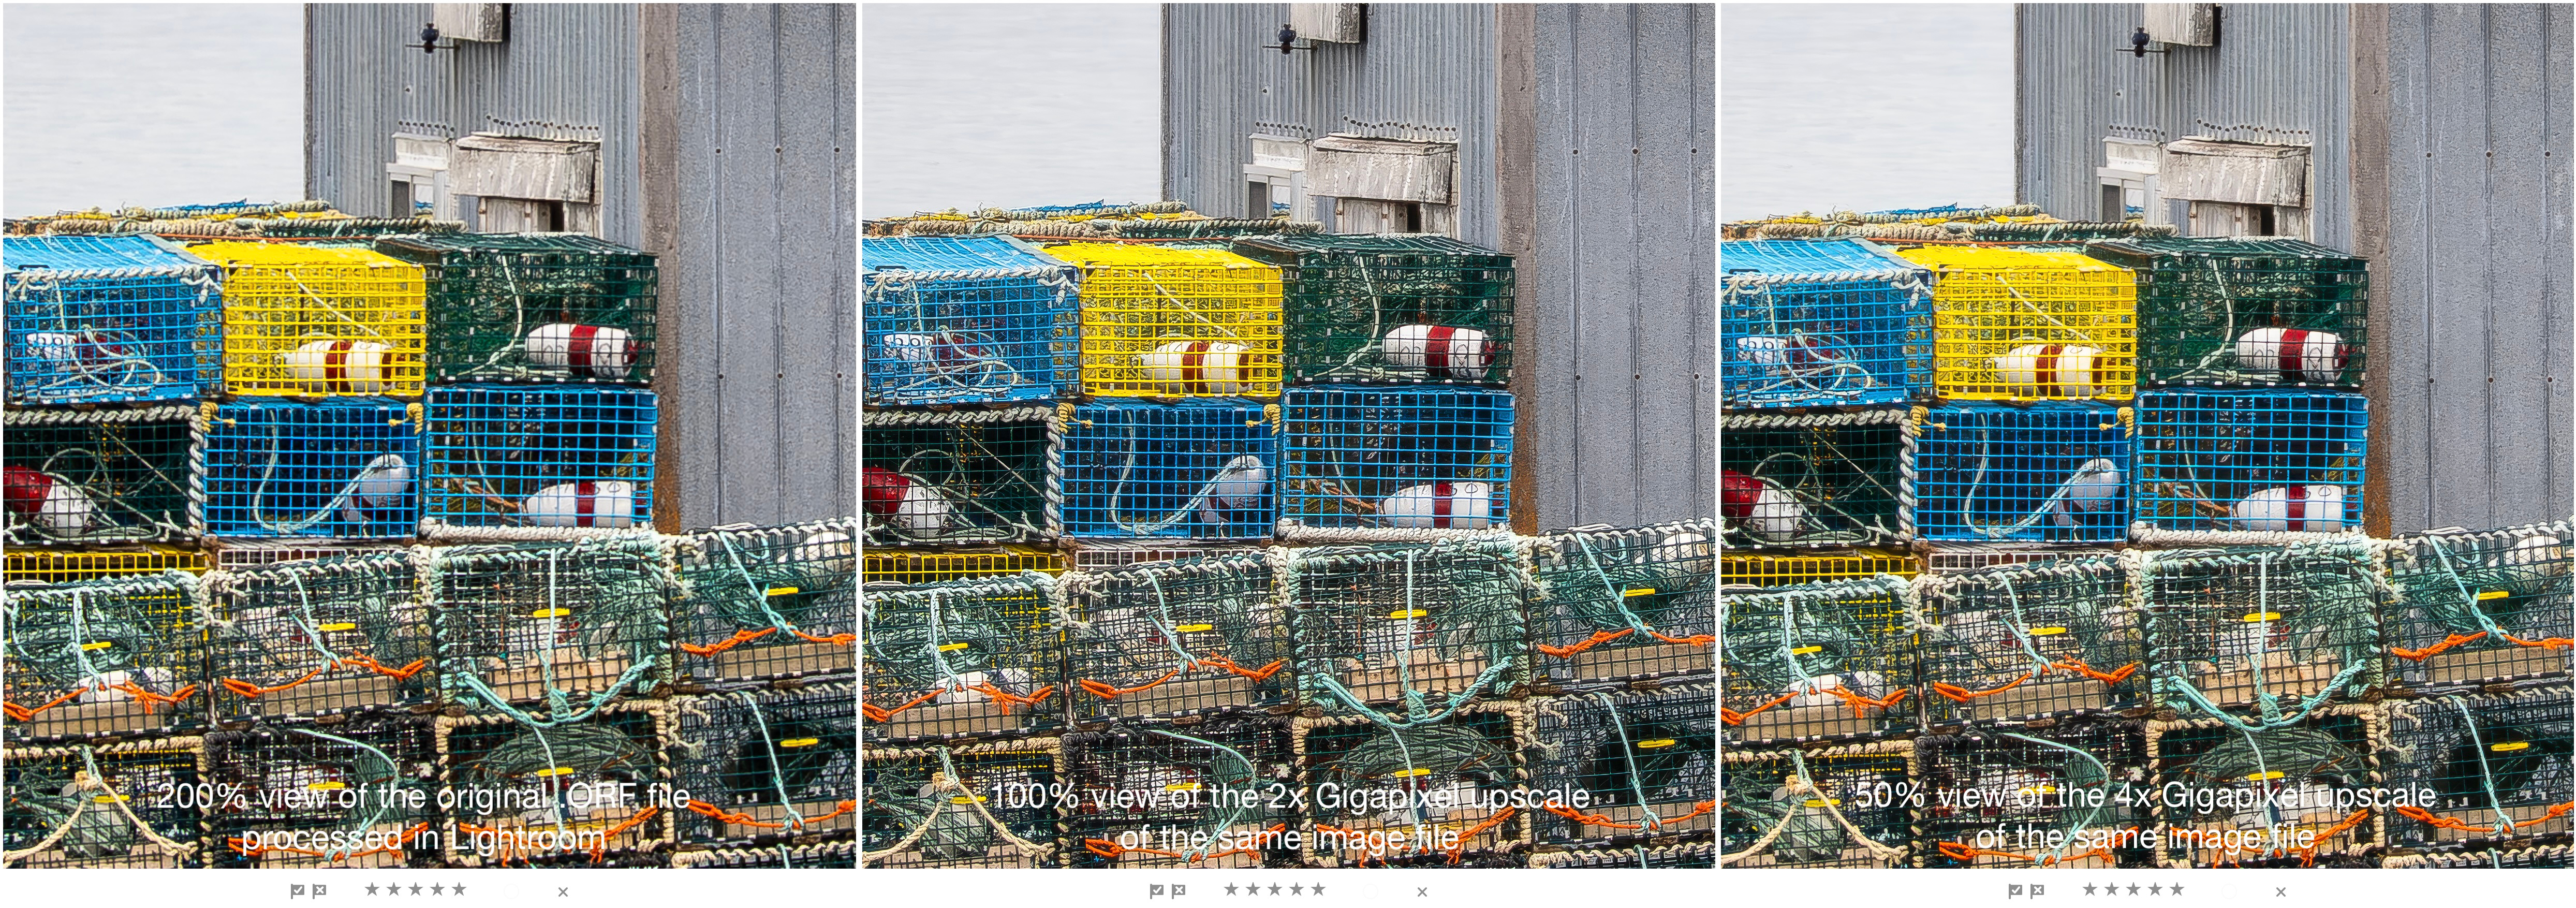
That being said, there is one caveat: I pixel-peep when sharpening files , usually at 200%, thus, many of the comparison images below are at 200%. For larger print sizes, I use 100% because with larger prints, viewers stand further away. With 4x upscales, I’ve chosen to compare them at 50%, to show how the details compare to the same view of the original at 200%.
You see, that’s where the pedantic pixel-peepers lose perspective. They present their findings as if everyone is staring at a computer screen showing one tiny section of a photograph. Surprise! People don’t do this. Viewers stand where they can see the whole photograph. They may take a step closer to see details in one specific portion, but they don’t leave nose prints on the glass like pedantic pixel-peepers do.
Note: Each of the photographs presented here have been re-sized to 1600 pixels on the long side. They may be viewed larger by clicking/tapping on them. The comparison images are larger, so I have linked them to the original image file. Right-click and select “Open in new tab” to see a full 100% view.

OM-1 w/100-400mm at 400mmm (800mm efov) • ƒ8 @ 1/640 • ISO 6400 • Lightroom
When you can’t get physically closer, and you’ve maxed out your zoom, the only thing to do is crop. The original 5184×3888 pixel frame is cropped to 3770×2827 pixels—still large enough for a 9×12″ print at 300ppi. But, what if I need something larger? NOTE: The high ISO of 6400 posed no limitation to the colour fidelity or feather detail of this photograph.
Cropping
Cropping shrinks the pixel resolution of any image. The need for cropping is often a sign of sloppy or lazy technique. Rather than moving closer or putting more effort into seeing and composing, cropping has become an unspoken default, especially, I note, amongst users of large resolution cameras, for whom extra pixels are a luxury they can afford to throw away. I can’t count the number of times I’ve heard comments like, “Oh, I can crop it in post”, even in situations that shouldn’t require cropping.
The Feathers and Fur Crowd
However, for many of us, cropping has become a necessary evil of photographing wildlife. Dedicated wildlife photographers spend a lifetime honing their field craft to get closer either through patience, stealth or by using hides. But for those of us who are opportunists, we haven’t developed those skills to the same degree. Furthermore our technique is not practiced enough for tight zooming with fast-moving wildlife. Either way, we have no choice but to crop.
This is where Topaz Gigapixel comes in. But there’s a catch: upscaling magnifies every weakness in the system including focus and optics. Focus is photographer-controlled, but not optics.

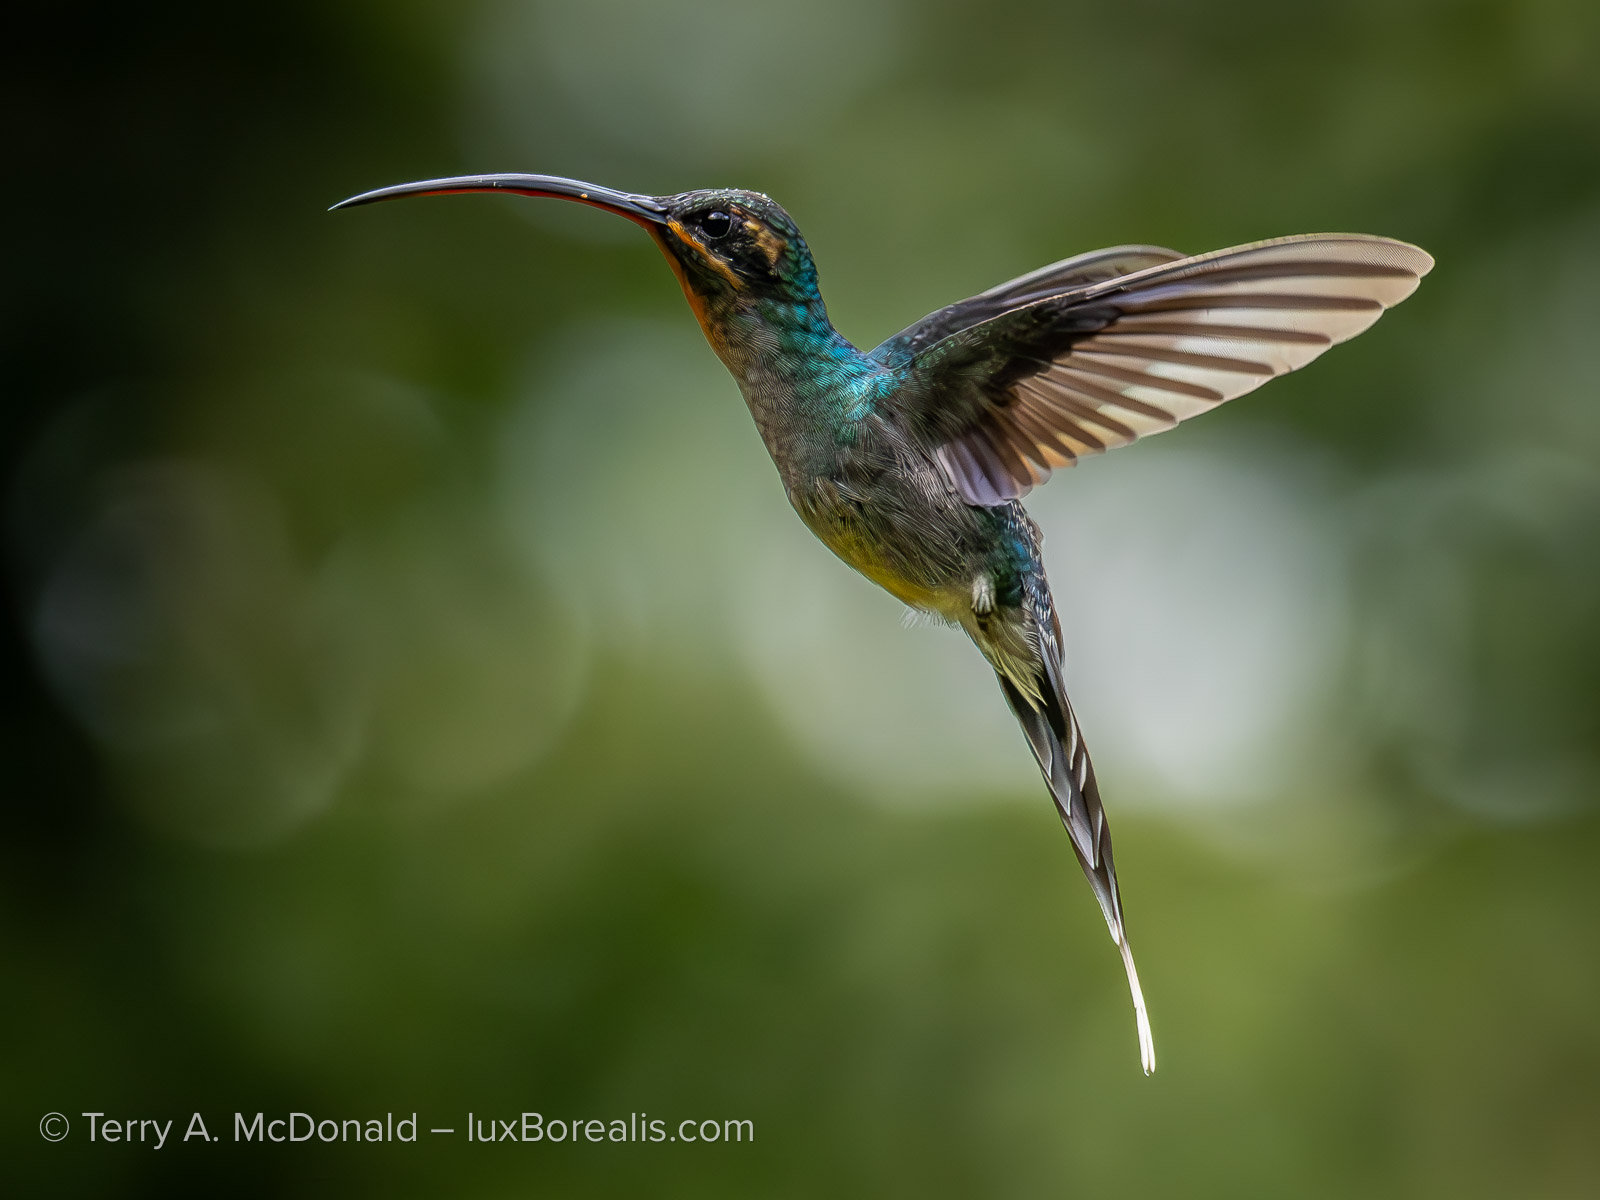
OM-1 w/M. Zuiko 100-400mm at 218mm (436mm efov) • ƒ8 @ 1/2500 • ISO 3200 • Lightroom
Olympus optics have long been regarded as some of the sharpest available in photography. With OM Systems, that industry-leading lens quality continues. Combined with the 2x crop factor and industry-leading weather proofing and stabilization, OM gear is now well-regarded amongst professional wildlife photographers. I know my keeper rate has increased 5x to 10x from when I used my heavier, slower 35mm Nikon.
Red-breasted Nuthatch
Here is a typical use-case. In an ideal world, I would have zoomed in more to fill the frame with this nuthatch. However, being skittish and somewhat unpredictable, I wanted enough space around the bird to accommodate its sudden movements. As a result, I used 218mm instead of 300mm or more. The original 3888 x 3888px square file was cropped to 2871x2871px, still large enough for online and on-screen sharing, and for excellent 9×9″ prints at 300ppi. But what if I want a larger print? Enter Gigapixel.
Can Generative Upscaling using Gigapixel in Lightroom maintain the detail required of fine feathers?
One of the artefacts I look for in upscaling is what I call “grooming” artefacts. In the past, AI has had the bad habit of making feather and fur details of wildlife appear combed or groomed, like a pet might be. But this is nature—animals don’t go to spas or have a fastidious owner. Feather and fur must appear natural to those of us who know how natural feathers and fur should appear. In this case, Generative Upscale has passed, with flying colours.
But one could ask, why not use the easiest method of all — upscale upon Export. From within Lightroom, users can choose Share > Custom Settings, set Dimensions to Custom, then enter a value twice that of the Long Side. You can see the result below. Surprisingly, the quality of the upscale is very good to almost excellent. The advantage of Gigapixel comes in the smoother background and the smoother, cleaner feather details. That being said, Lr is no slouch even with a simple Export to a larger file size.
How big can we go?
Red Fox
This photograph of a red fox is another ideal use-case for Gigapixel in Lightroom.
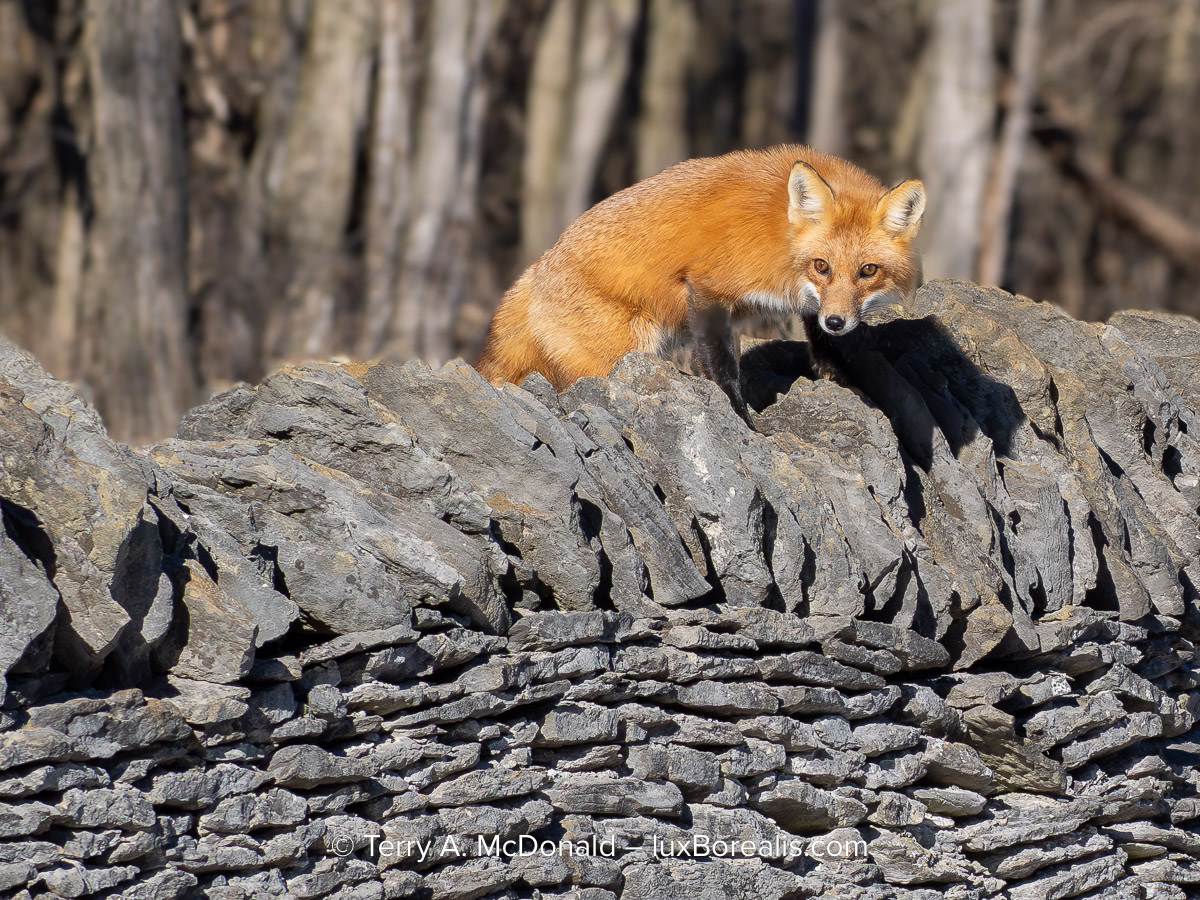
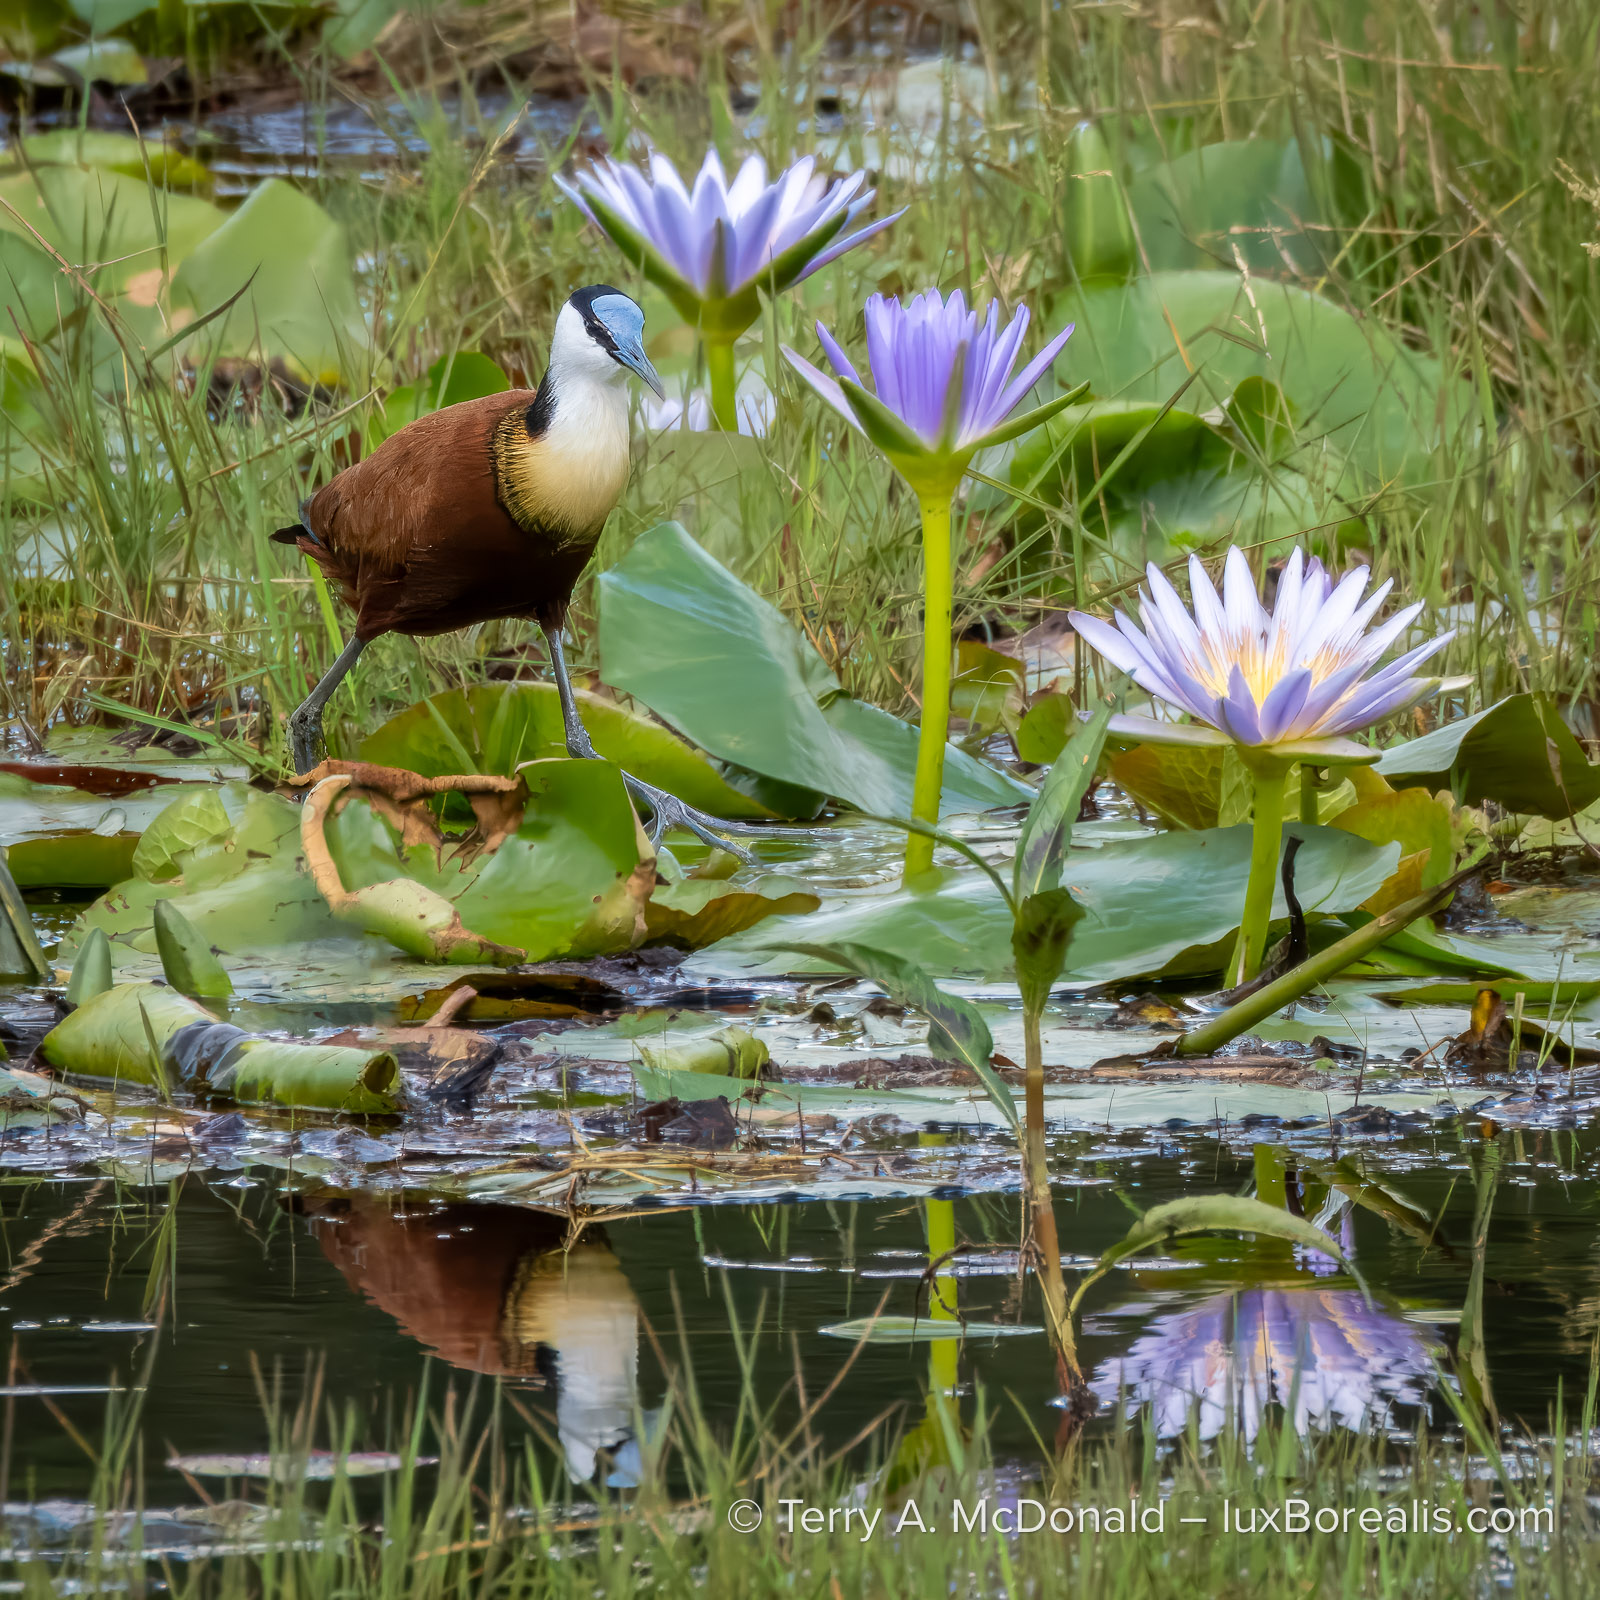
OM-1 w/100-400mm at 100mm (200mm efov) • ƒ8 @ 1/2500 • ISO 800 • Lightroom
This was a grab shot if ever there was one. Shot from the car window, I barely had time to point and compose with no time to zoom before the fox was gone. The final image is a 2281x1711px crop. Amazingly, and this is a credit to the quality of the OM System sensor, at ISO 800, the fur detail is excellent and holds up very well upon close scrutiny.
However, the cropped file is only large enough for a 5×7 at 300ppi — what about something larger?
But is 4462x3422px large enough? It would make an excellent fine print of 11×14″ at 300ppi. What about an over-the-couch print or canvas?
Test 1, enlarging cropped files for larger prints, is declared a success. Now to tackle the other perceived shortcoming — creating prints larger than 16x20s . . .
The test of time
Before we tackle modern files, it’s helpful to look at old files made with digital cameras that had less-than-ideal file sizes. My first digital camera was the fantastic Minolta Dimage 7i. While the file size was only 5 MP (1920×2560 pixels), the quality of the files was and still is excellent. My portrait of Nesaro stands the test of time as now, 23 years later, it enlarges with exceptionally fine detail, thanks to Generative Upscaling in Lightroom.
However, this is also a good time to re-iterate the age-old adage of GIGO: Garbage-In-Garbage-Out. High quality upscales must start from high quality files.
Straight 20.4 MP enlarged
Grand vistas and detailed still-life photographs are an ideal candidate for upscaling for large, over-the-couch prints and canvases. How well will Generative Upscale handle this photograph, one with lots of fine detail?
OM-1 w/ 12-100mm at 100mm • ƒ5.6 @ 1/125 • ISO 200 • Lightroom
It’s important to remember that Generative Upscaling cannot add detail to a file. However, when an image begins with incredibly sharp fine details, Gigapixel preserves that detail and enhances it with subtle sharpening.
Extending the value of OM System Innovations
Where Generative Upscale might be ideal is to extend the value of some of the innovative features built into OM System cameras, specifically Live ND, Focus Stacking, and Live Composite. It might even replace the need for HHHR and/or Tripod HR. Let’s see . . .
Live ND: Look Ma! No Tripod!
One of the fundamental features of OM cameras over all other cameras on the market is having a neutral density filter mode, called Live ND, as one of the computational photography modes. My OM-1 (v1) emulates ND filters of 2x up to 64x. ND 2 halves the light, so makes a difference of –1 EV; ND 4 is ¼ the light, which is –2 EV. Therefore ND 64 is the same as –6 stops. The OM-1 v2 has up to ND 128 as well as Graduated ND — even better!.
Why is this so revolutionary? For two reasons: (1) I no longer need to carry neutral density filters; and (2) a tripod is not longer necessary due to the excellent stabilisation of OM System bodies and lenses.
For photography of moving water, a frequent subject in landscapes, Live ND is, in itself, a game-changer especially because the result is a raw file. Its only drawback is that it cannot be combined with Handheld High Res mode (HHHR), to produce images of 50 MP or Tripod HR for 80 MP files. Enter Generative Upscale . . .
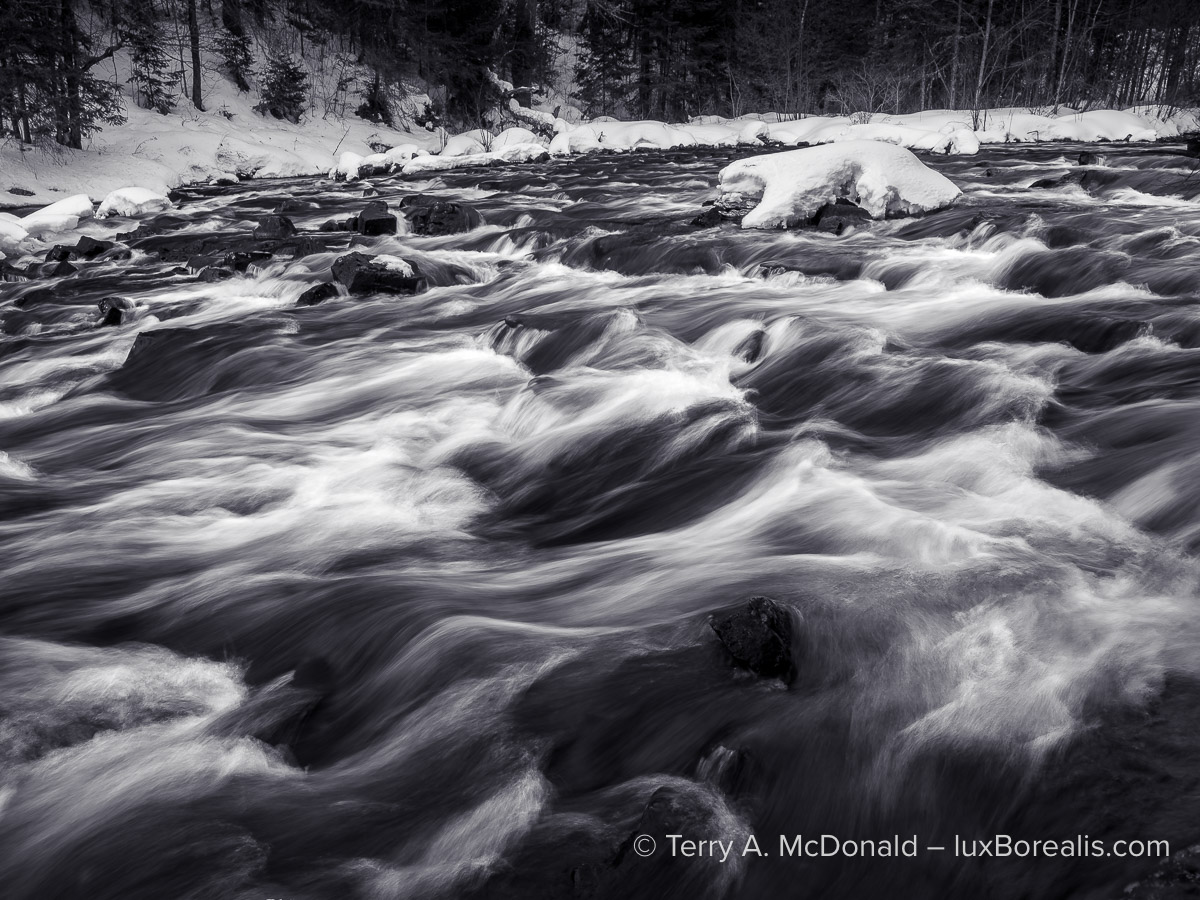
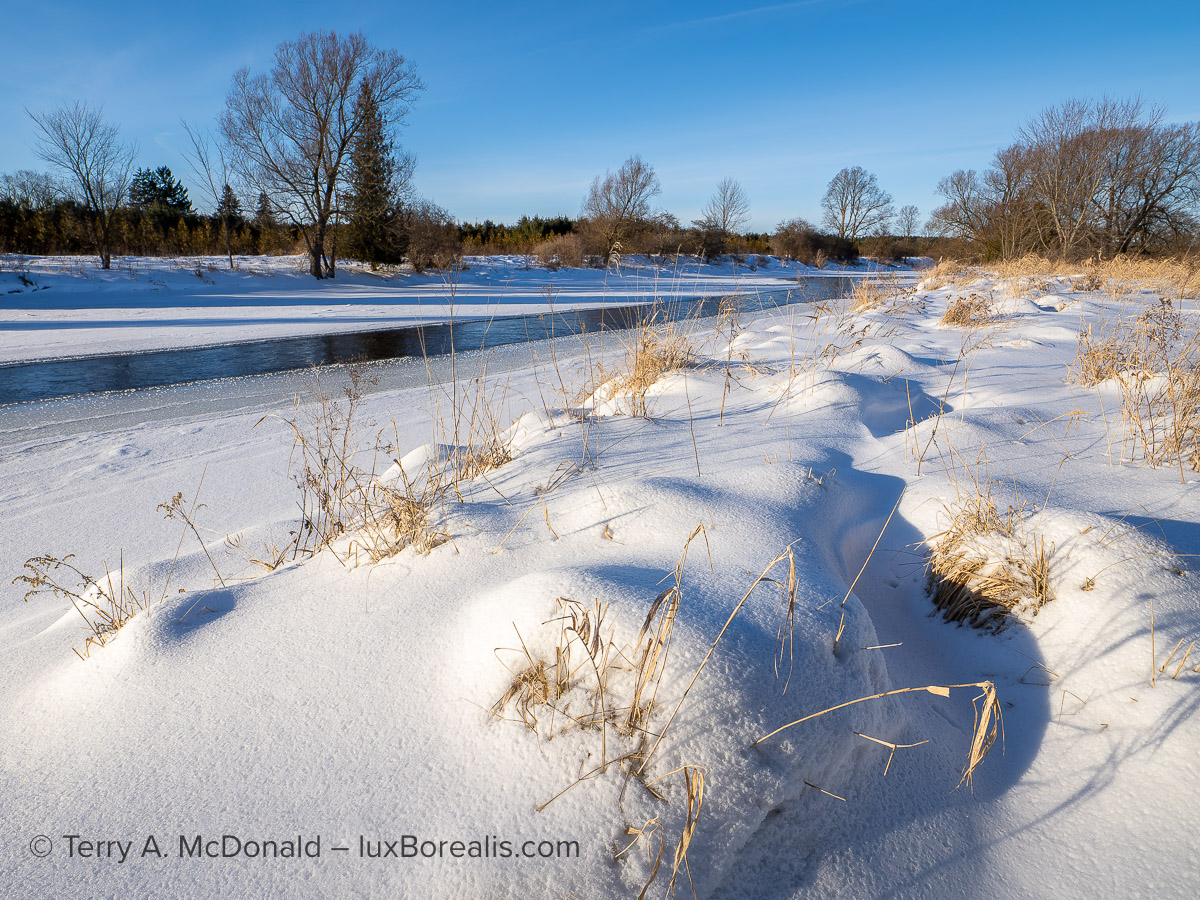
OM-1 w/ M.Zuiko 12-100mm PRO at 14mm (28mm efov) • ƒ13 @ ¼ • ISO 200 • Live ND 16 • Lightroom
This is an image that deserves to be huge. Note: This was made at ¼-second, handheld, and every detail is tack sharp, a necessary requirement for upscaling as every flaw will also be magnified.
Live ND makes this kind of photography straightforward. Gigapixel upscales it for the wall. A 16×20″ fine print of the scene shown above would be great, but it really deserves something much larger. Imagine a 30×40″ with the same detail?
At 9798 x 7348px, the resulting DNG file from a 2x upscale, is large enough for a 24×32″ fine print at 300ppi and will easily make a canvas of 30×40″. Upscaling to 4x provides a print size of 48″x64″.
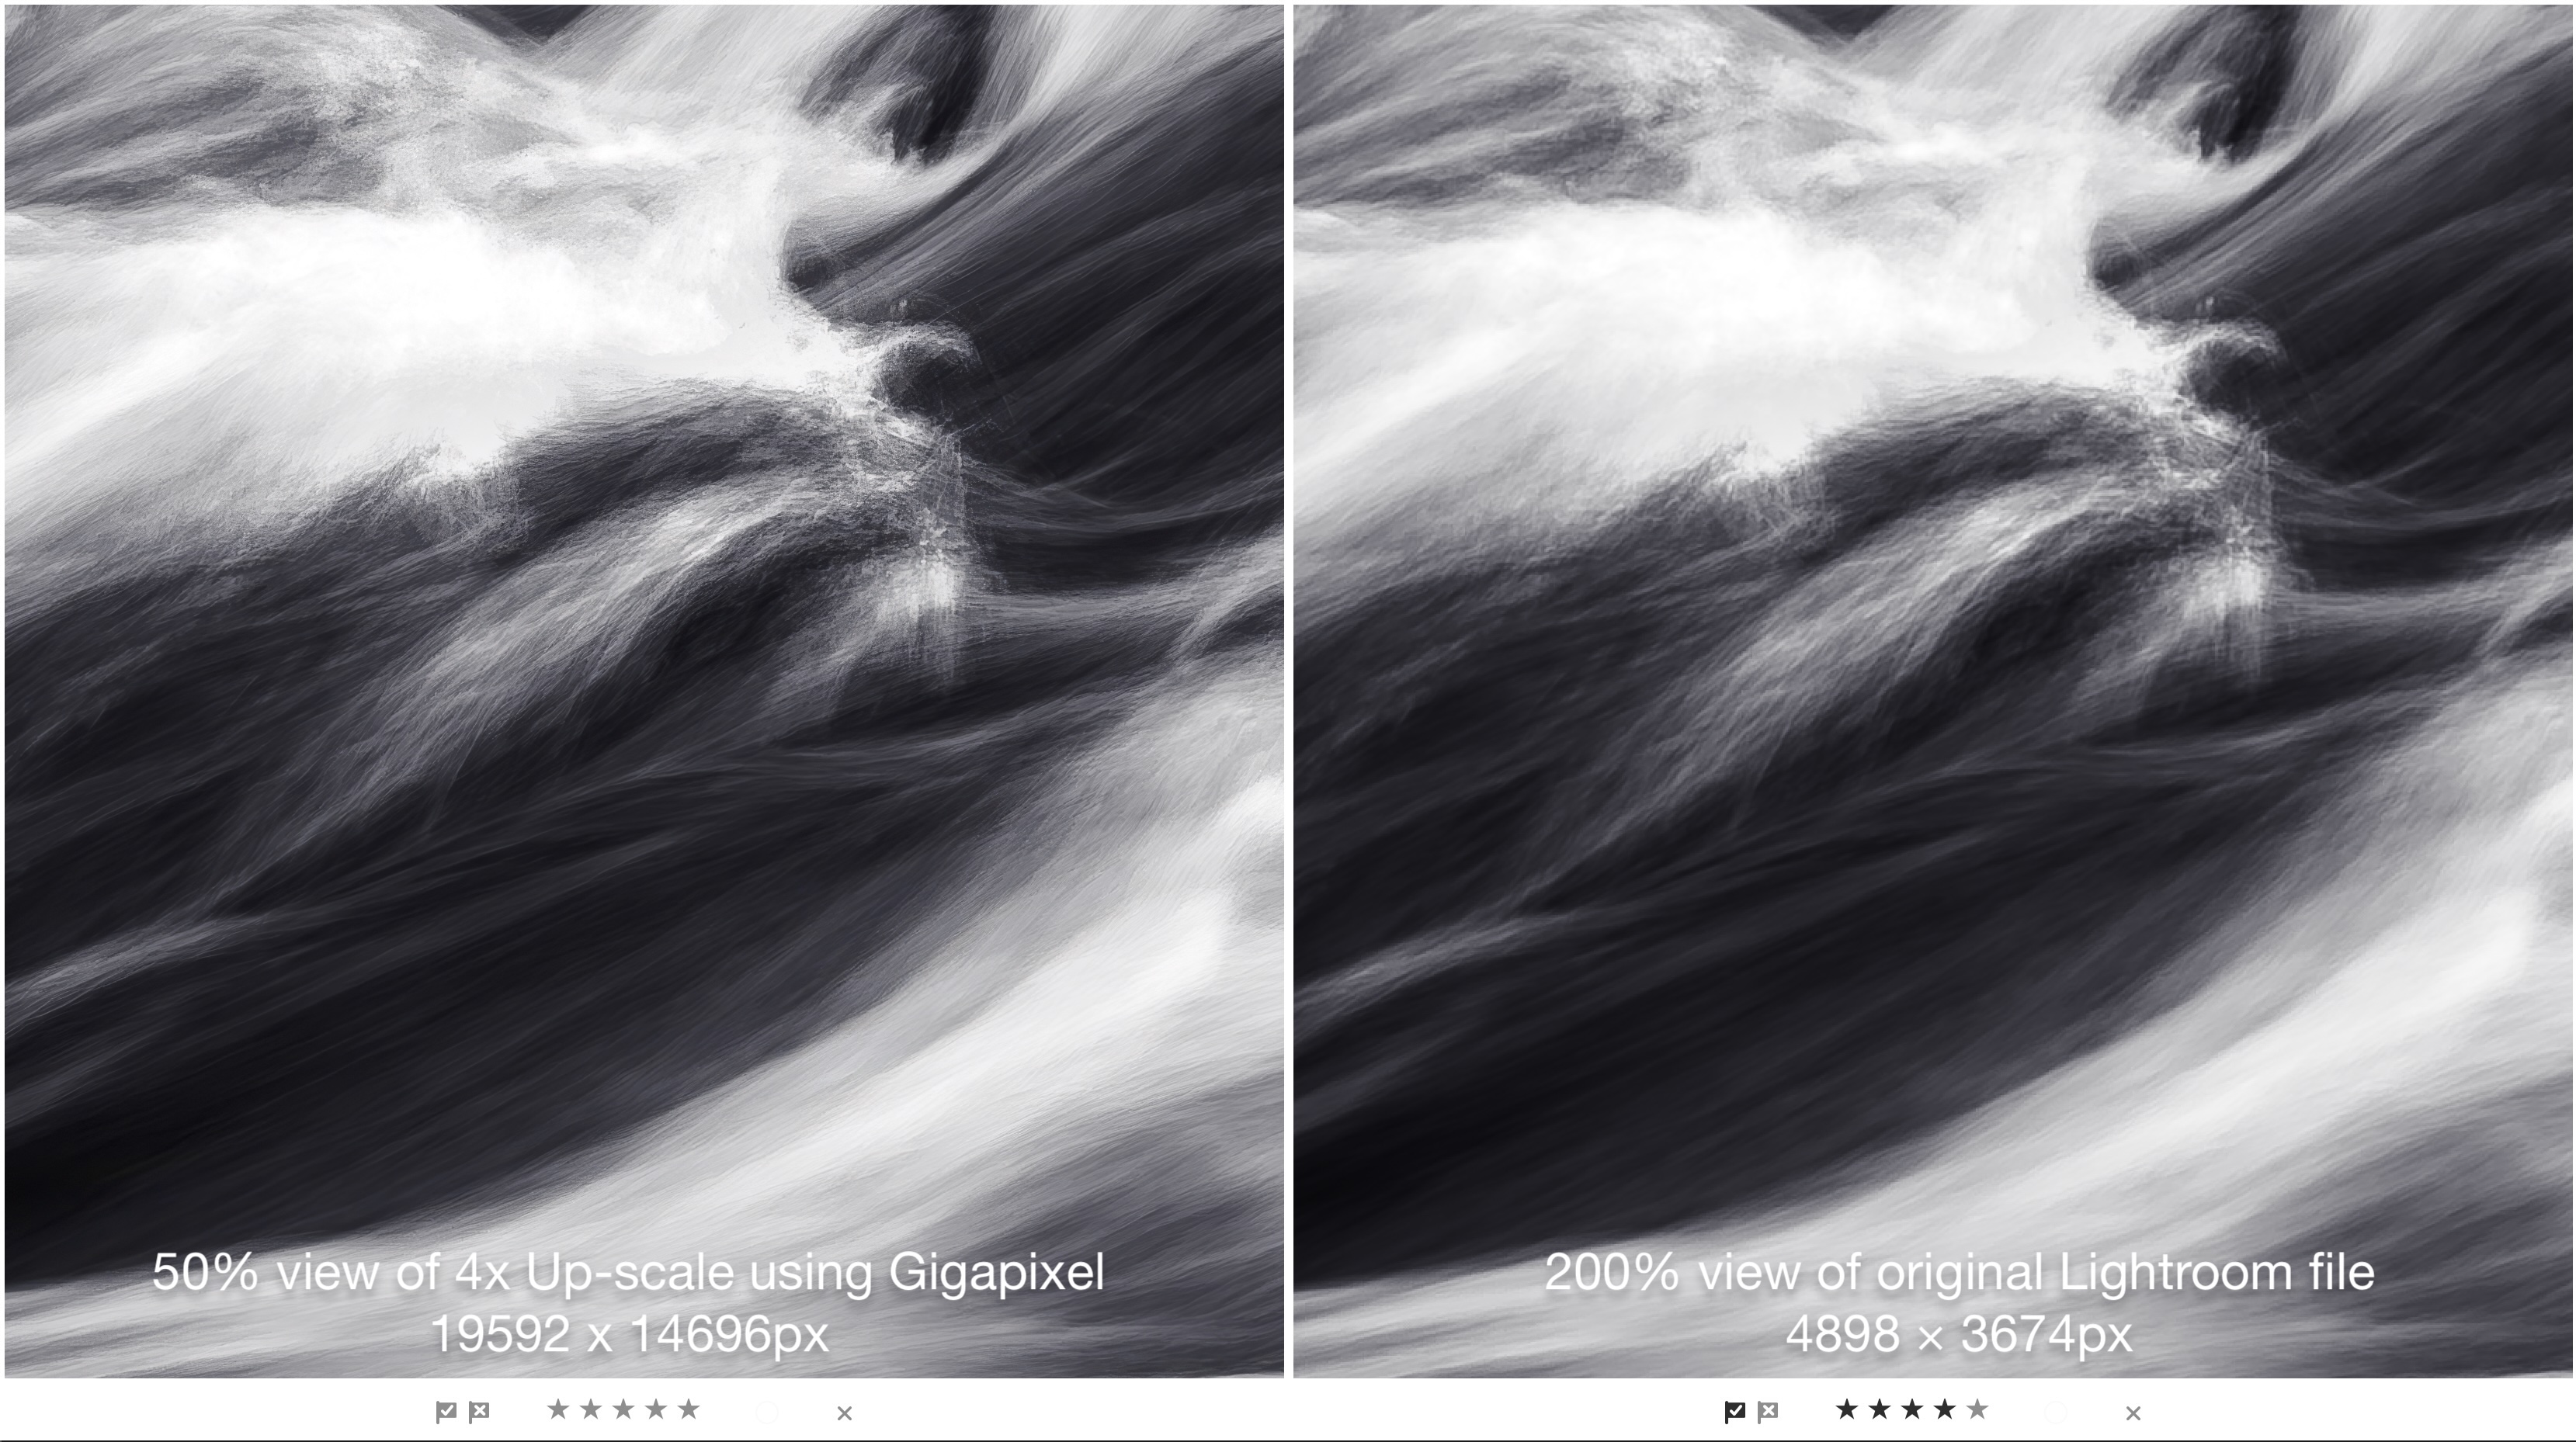
But what about that 30×40″ print? How well do Gigapixel files hold up to downsizing?
The importance of beginning with a high quality image can’t be overemphasized. Micro-contrast plays a huge role in this as well as lens resolution. Both are optimized in Olympus / OM System lenses, even at 20.4 MP, so upscaling from there is a dream. No longer is larger, heavier 35mm sensor gear needed for large prints of grand scenes.
Focus Stacking & Bracketing

OM-1 w/ M.Zuiko ED 60mm Macro • ƒ4 @ 1/60 • ISO 1600 • 12-image in-camera focus stack • Topaz Photo + Lightroom
Focus Stacking and Bracketing have become essential techniques for many macro and landscape photographers. With both being built into OM cameras, they has become even easier to use. The only limiting factor is that the in-camera Focus Stacking results in a JPEG, however, you also have the original raw files that can be stacked using apps like Affinity Photo and Photoshop. Having it in-camera makes life easier. I know Tom Stirr swears by the quality of in-camera stacks and the resulting JPEGs.
When photographing landscapes with great depth-of-field, photographers no longer need small apertures of ƒ16 or 22, which softens details due to diffraction. Shooting a series of frames at ƒ4 at different focus distances, then having them automatically combined in-camera provides unlimited depth-of-field. However, the maximum file size is limited by the 20.4 MP sensor. Enter Generative Upscaling for that over-the-couch, wall-consuming mega-print or canvas.
For macro photographers, it’s unusual to want a larger print of a smaller creature, but even that is now possible, within Lightroom.
I featured this image in The New Topaz Photo: How well does it compare to Lightroom and DxO?. Let’s have another look at upsizing with Gigapixel in Lightroom.
OM System cameras have become the premier choice of serious macro photographers. For one, the optics in the 60mm and 90mm Macro lenses are unparalleled. Secondly, the MFT sensor provides users with greater magnifications more easily than with 35mm sensor cameras and macro lenses.
For better or worse, the output from File Stacking is a JPEG. Fortunately, Gigapixel in Lightroom works on JPEGs as well as raw files, PNGs, and TIFFs. The results from JPEGs actually improves the image. Below is a comparison of a Gigapixel 2x upscale and the original Lightroom file, optimised in Topaz Photo.
Capturing Sky Trails using Live Composite
For photographers trying to capture star trails, Live Composite has been a game-changer. No longer do you need to captures tens or hundreds of files then composite them on the computer. Olympus and OM System have made it as easy as this:
- Set your camera up on a tripod.
- Set the focus using Starry Sky AF.
- Set Live Composite to capture and build frames 1-minute at at time.
- On the rear LCD, watch the progression of each frame being added for minutes to hours.
- Stop the process when you have what you want.
- Upload and process the raw file.
But how do those files look when upscaled? I was especially worried about pixelation of the star trails as they are moving in an arc. Problem solved.
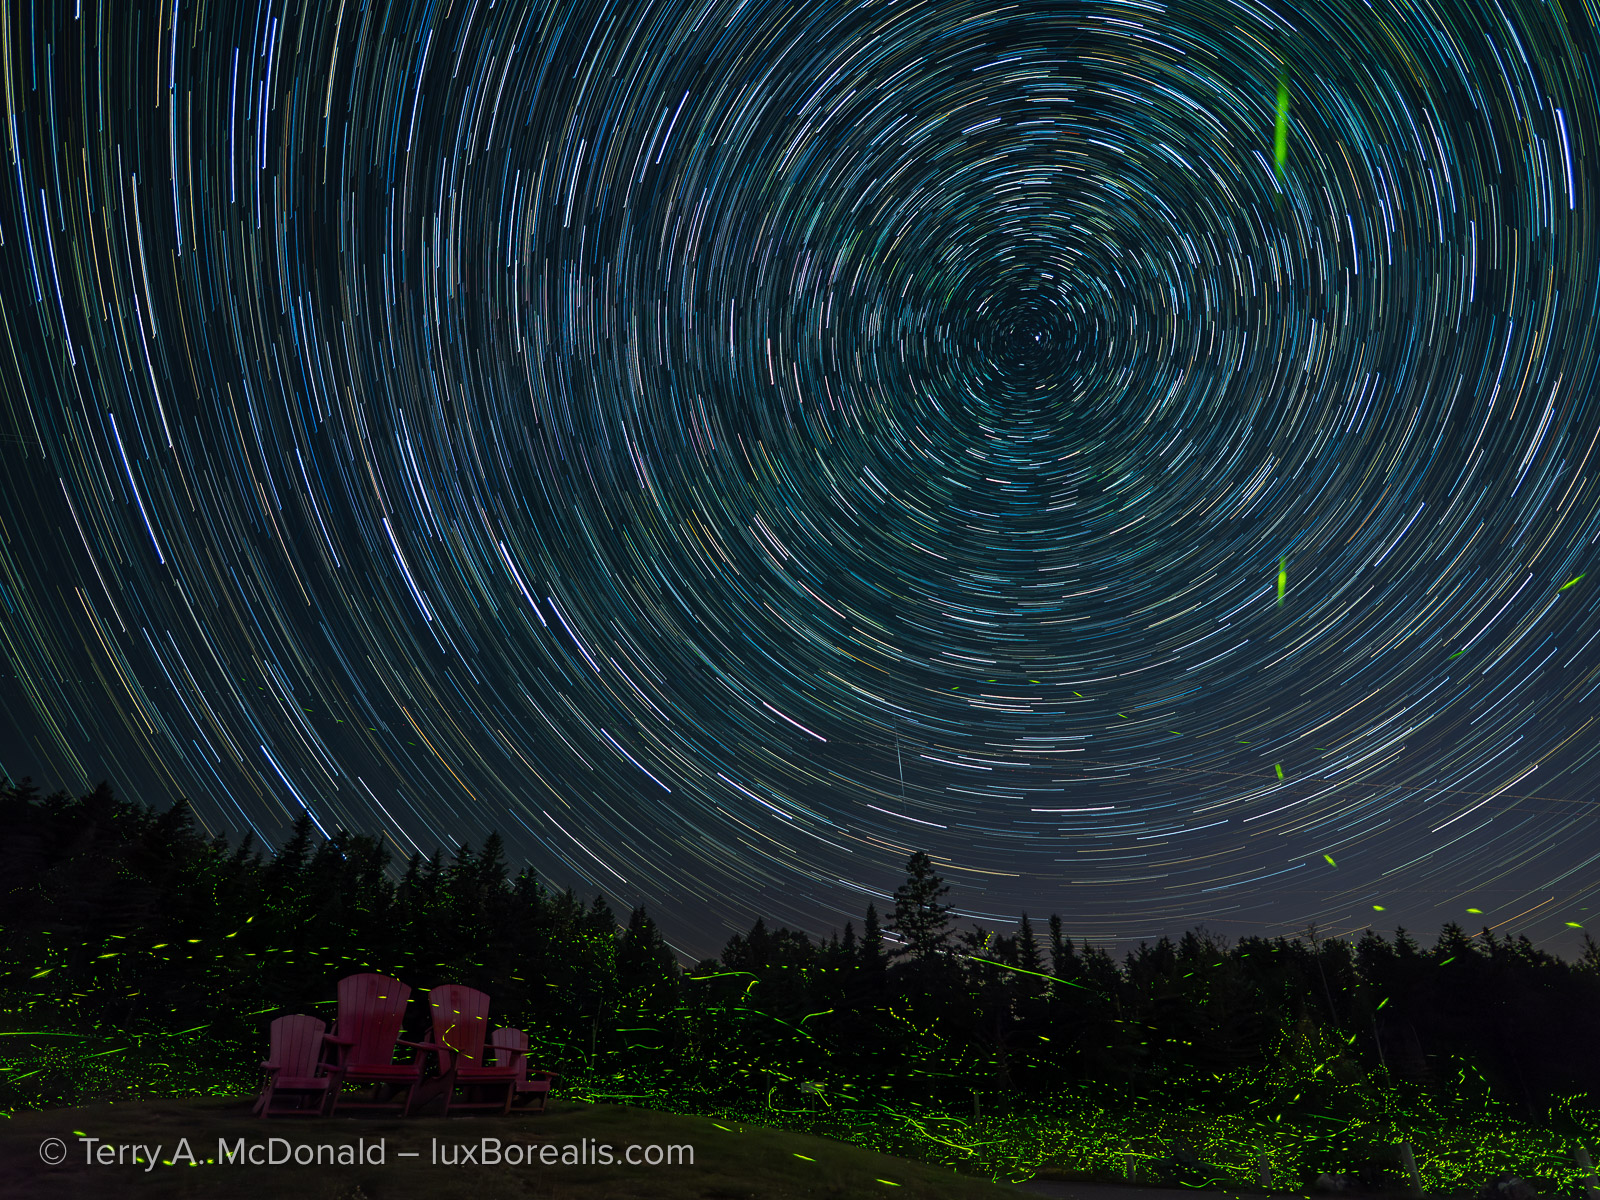
OM-1 w/ Panasonic-Leica 9mm/1.7 • ƒ2 @ 40x60sec exposures using Live Composite • ISO 400 • Lightroom
HHHR and Tripod HR
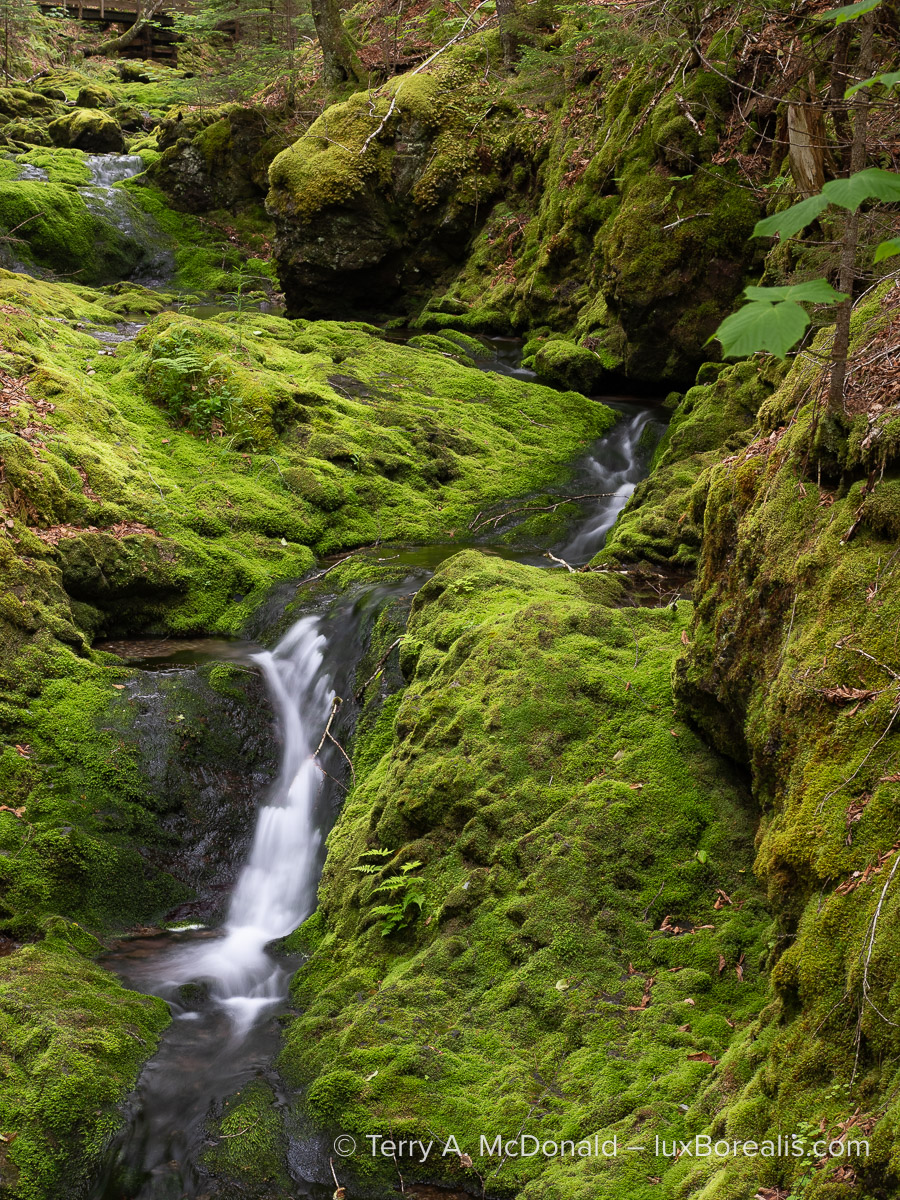
OM-1 w/12-100mm at 31mm (62mm efov) • ƒ5.6 @ 2sec • ISO 200 • Lightroom
Similar to the feather and fur shown previously, the fine detail of the moss is exquisite and must be maintained.
As mentioned previously, one of the features of OM System bodies is they offer 50 MP capture with Handheld High Res and 80 MP files with Tripod High Res. However, the disadvantage of using these technologies is that any movement, from wind or of the subject shows up as either blurs or chatters, making the image unusable. Furthermore, High Res cannot be used with other computational modes such as Live ND, Live Capture and Focus Stacking.
Over the years, I’ve tried a few methods of upscaling and describe them in Maximizing Image Quality: In-Camera Pixel Shift or Software Upscaling? with direct comparisons of my testing results.
The question I want answered is this: Can Lightroom’s Generative Upscale be considered a replacement for HHHR and Tripod HR? Let’s find out.
I shoot HHHR fairly regularly, along side regular 20.4 MP captures, so I have a number of files that can be used as comparison. However, since moving to OM System, I have made little use of my tripod except for astrophotography. This speaks to the efficiency of the OM stabilization.
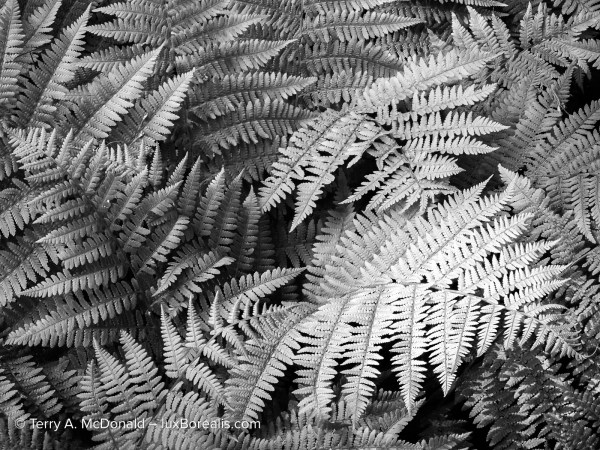
Here is one, made using Tripod HR to compare.
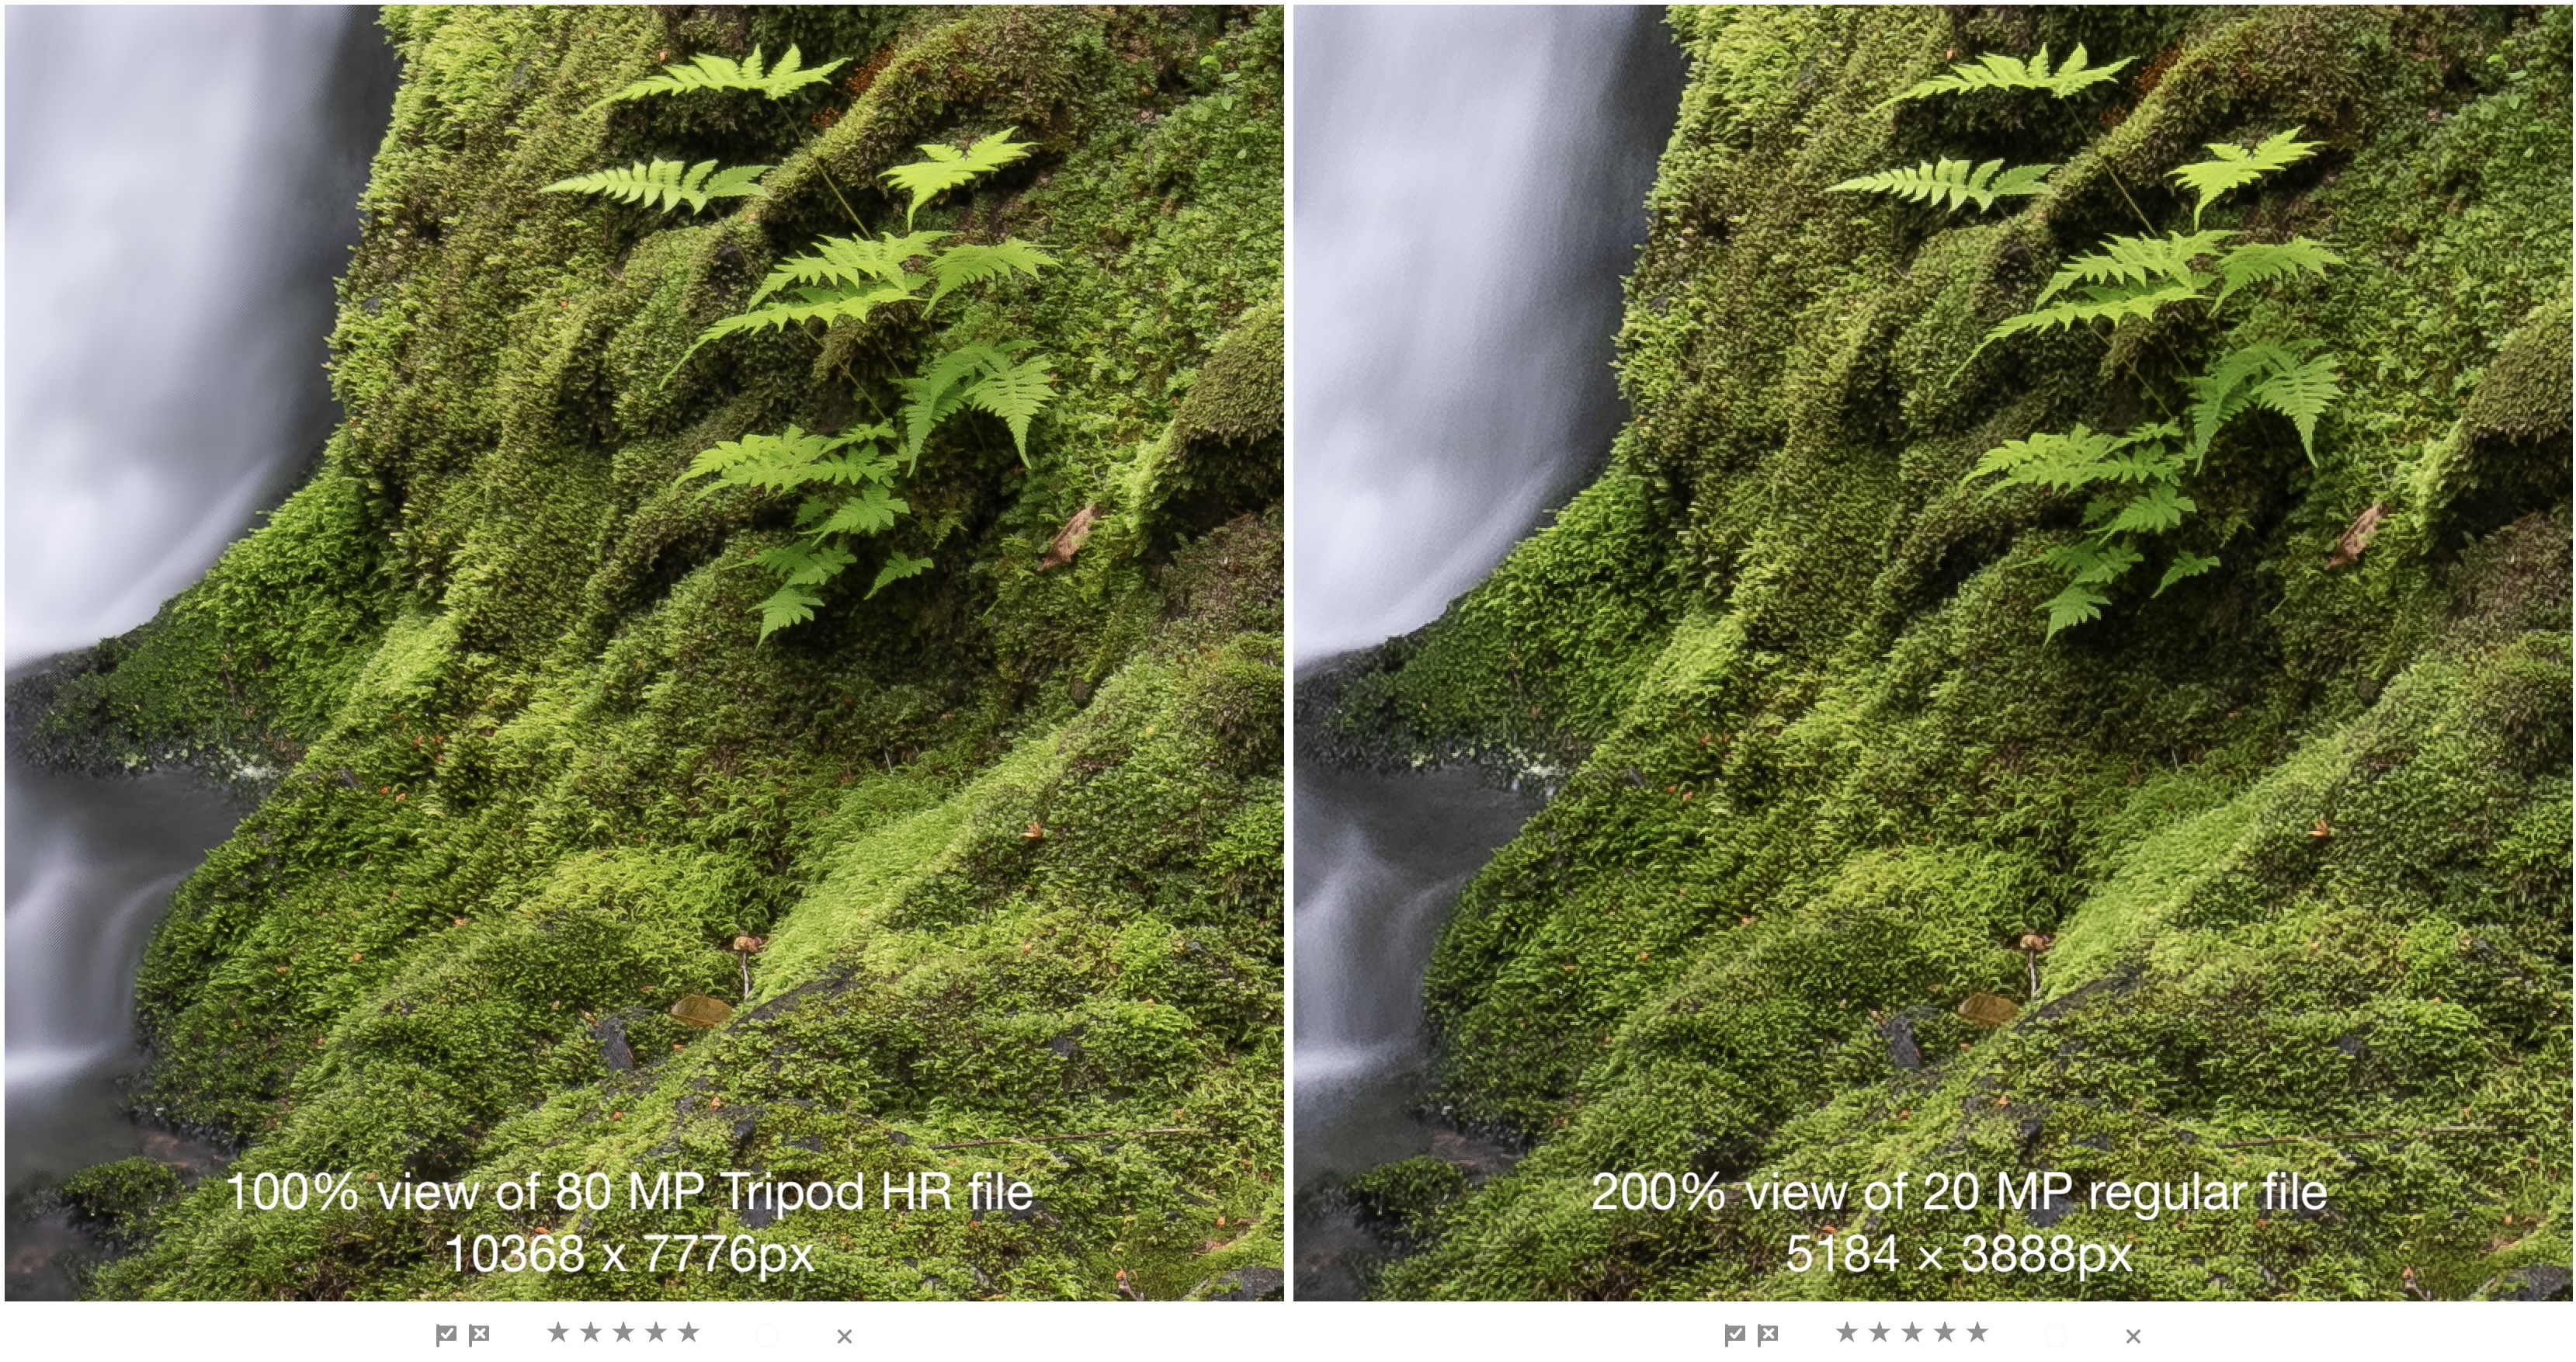
The weakness of shooting with pixel-shift technology usually shows up in the chattering of moving water, but this time it shows in the very slight movement of the ferns, which are not as crisp as they are in the single, 20.4 MP capture.
Now, let’s see how Tripod HR stacks up to Generative Upscale of the 20.4 MP file in Lightroom.
Not yet convinced? Here is the same comparison at 200%:
To me, having Topaz Gigapixel incorporated into Lightroom makes both HHHR and Tripod HR redundant as I can now shoot once, with no pixel-shift and no problems associated with movement, and still get amazingly sharp 80 MP files for large prints. Yes, a game-changer.
However, the only reason this works so well is that the lenses being used have the resolving power to capture the detail needed on sensors with a pixel size measured in microns, 3.32 µm to be exact (according to Digital Camera Database) or about 1/20th the width of a human hair. Bottom Line: If Olympus / OM System had crappy lenses, their poor resolving power would only be magnified by Generative Upscaling and I wouldn’t be showing the kind of detail extracted above.

OM-1 w/12-100 at 44mm (88mm efov) • ƒ8 @ ⅛ • ISO 200 • Lightroom
So what?
If you are using 35mm sensor gear, you might be asking, “So, what’s the big deal?”
It’s all about having options. With innovations such as Live ND, Focus Stacking and Live Composite, photographers are drawn to OM System cameras, but may be scared off by the smaller sensor. Clearly, a small sensor is no longer a limitation.
Furthermore, as people travel more and as people age, they want portability AND high image quality. Having a smaller package of lighter weight professional gear with industry-leading specs is the answer. My kit weighs in at less than 5kg and includes an OM-1, M.Zuiko 8-25mm/4 PRO, 12-100mm/4 PRO, and 100-400mm/5-6.3 zooms, a 60mm/2.8 Macro and a Panasonic-Leica 9mm/1.7. All this fits into a small LowePro 250AW sling bag that counts as my personal bag when flying. To be clear, that’s the equivalent of 16mm to 800mm in 35mm sensor terms, all in a 5kg package.
Furthermore, the innovations in my OM System gear allow me to make photographs that I cannot make with any 35mm sensor camera. And now I have the added option of significantly increasing the final size of my finished images when needed. Why carry around heavier gear all the time when most images are only ever seen online or on-screen? When I need a print larger than 16×20 or I need to increase the size of a cropped image, I now have Generative Upscale.
This is why incorporating Topaz Gigapixel into Lightroom is a game-changer, at least for me.

OM-1 w/100-400mm at 400mm (800mm efov) • ƒ6.3 @ 1/800 • ISO 3200 • Lightroom
But a subscription?
There has been a lot of online discussion regarding the cost of Lightroom. The full-price cost of my 1 TB Lightroom subscription (the one without Photoshop), is CAD $150/year. To put that cost into perspective, that’s less than the price of one decent filter or about the cost of shooting and processing 5 rolls of 36 exposures, back in the day. So, pardon me for shaking my head when photographers complain about the Adobe subscription costs.
Surprisingly, Topaz Photo is actually MORE expensive than Lightroom, yet is severely limited in its processing features. It denoises and sharpens brilliantly, and has up-scaling built in, but it has nothing of the exposure, colour correction, black-and-white processing, extremely capable masking, and other finessing options of Lightroom.
BTW, Gigapixel itself is the same cost as a Lightroom subscription, $150/year, and now the bulk of it is built into Lightroom. Another win-win.
The future of 35mm
Here’s a bold statement: Lightroom has just driven another nail in the coffin of 35mm. It’s not like Gigapixel hasn’t been available before, it’s just that now, it is in the hands of far more users without an additional subscription.
There will always be professional photographers whose job dictates the use of 35mm sensor gear. And, there will always be the non-professionals whose ego tells them they need 35mm sensor gear.
However, from a technical perspective we are in a new era of photography, similar to 100 years ago when the “miniature” Leica was first introduced. It was poo-pooed by the professionals as being too small to get decent image quality. To a large degree, they were correct. 35mm images could not compete with medium and large format image quality, especially in large sizes. As film quality improved and grain became less and less, the portability of 35mm began to outweigh its inferior image quality, and it was adopted more and more.
Lenses also improved and opened up new opportunities, especially with longer, telephoto lenses for wildlife photography. Today, the difference in image quality between 35mm sensor gear and MFT is much smaller than it ever was between medium format and 35mm, and the parallels still stand: high quality photographs in a smaller package.
OM-1 w/12-100mm at 12mm (24mm efov) • ƒ10 @ ⅛ sec • ISO 200 • Live ND • Lightroom
Shot handheld. Using Generative Upscaling in Lightroom, this 20.4 MP file can now be an 80 MP file, ready for a 60″ print or canvas.
Fast forward 100 years and we have a similar perfect storm with MFT: smaller, lighter, more portable gear (just like Leica back then) and very high image quality, IQ that now rivals 35mm sensor cameras. There are niche uses of 35mm sensors where MFT under-performs, but the same is true of medium format. Each has its use. Now that image size is no longer a limiting factor and has joined the mythologies of high ISO noise and limited dynamic range, there is less and less of an attraction to gear that is heavier and less portable. What’s not to like?
The bottom line is, if you want a professional system that is still portable, for travel, street, landscape, macro, event/concert, wildlife and sports photography, MFT now fits the bill. And with Generative Upscaling now built into Lightroom, you can have your cake and blow it up to whatever size you need.
Trade-offs
It’s important to point out that, as with everything in photography, there are trade-offs. After all, you can’t have a smaller aperture without a slower shutter speed or higher ISO—right? But none of the trade-offs involve OM System gear — it’s an AI thing.
Generative AI
The first trade-off is that Generative Upscaling uses AI. I see GenAI as a disadvantage because as a photographer of nature, my goal is to maintain the authenticity of the original scene or subject. The photos I present and share are made using photographic methods —RealWorldPhotography. I do not use, in any shape or form, any presets nor generative AI that changes the original scene or subject; not for skies, not for fills and not for removal.
I am not anti-AI. Assistive AI is very helpful, for example in AF Tracking. But, I do not use it for image analysis such as Quick Actions. Lightroom AI Denoise is acceptable, as it does not change details. This is the bar I set for my use of AI in my personal work: AI cannot erode the integrity of the original scene or subject and it cannot introduce changes to the original file that did not originate with me. Presets and Quick Actions do, so they’re out. Some would find this avoidance of GenAI constraining, but it’s a constraint I’ve chosen to live within. Although Denoise uses a form of generative AI, it does not change the original scene.
OM-1 w/100-400mm at 400mm (800mm efov) • ƒ8 @ 1/2500 • ISO 6400 • Lightroom
This is why I am wary of using generative AI for upscaling. According to Adobe, Gigapixel “preserves existing details”, which is encouraging. In Photoshop, where Topaz Bloom is available alongside Gigapixel, it states that Bloom “adds new, creative detail” — an absolute no-go zone for me. To back this up, the Canadian Association of Photographic Arts (CAPA), a world leader in research around the uses and exclusions of AI for their competitions, allows the use of Gigapixel AI because it does not fundamentally change the original, photographic nature of the scene or subject.
To me, the keys are authenticity and integrity. Both the nuthatch and the fox show very natural looking feathers and fur. In the past, Topaz upscaling has created artefacts, a ‘groomed’ appearance as noted above. This does not seem to be present in Gigapixel upscaling. As well, the details of landscapes are preserved, not changed. To me, this indicates Generative Upscaling is maintaining and enlarging what is there and not fabricating detail that isn’t.
OM-1 w/100-400mm at 400mm (800mm efov) • ƒ11 @ 1/160 • ISO 800 • Lightroom
Availability / Internet Connectivity
Gigapixel is only available in Lightroom Cloud and only on Desktop or Web, not on iPad and not in Lightroom Classic (see above). Since the Lightroom Cloud images are stored in the Adobe Cloud, the service occurs on Adobe computers, not my laptop — no problem, most of the time.
While preparing this article, I made a number of Gigapixel upscales. But then, suddenly, the service was unavailable. This lasted all evening and into the next morning, until suddenly, it was working again. Having submitted the question to Adobe, they confirmed it was a problem at their end. When Gigapixel is used as a plugin, users do not have this problem. It’s important to remember that Generative Upscale is dependent on having an internet connection.
OM-1 w/100-400mm at 400mm (800mm efov) • ƒ11 @ 1/800 • ISO 1600 • Topaz Photo AI + Lightroom
Highly skittish, the best I could do was crop the original to 1712x1712px. It’s fine for online sharing, but is only large enough for a 6″ print. With Generative Upscaling, I can now make 22×22″ prints at 300ppi.
Conclusion
So where does this leave us? If you have Lightroom already, it’s a win-win situation. If you have Topaz, then you’re good to go as well. If you are using DxO, you’ll find its DNGs processed through Generative Upscale in Lightroom are excellent.
As one who uses Lightroom for all my editing, beginning with cataloguing, but really taking advantage of its depth of precise and repeatable adjustments and superior masking, it’s a no-brainer. At times, I use Topaz and DxO for troublesome files, but only for denoising and sharpening, which represents about 5% of my edited files.
Lightroom users now have greater capacity to do more with their photographs. MFT users have the advantage of very high quality upscaling, when needed. OM System users can photograph using Live ND and GND, Focus Stacking, and Live Composite, yet never worry about whether our files will be large enough for very large, high-end prints. In others words, with our 20 MP professional-spec cameras, with all the innovative computational modes at our fingertips, we can easily generate high MP files when needed. Definitely the best of both worlds.
OM-1 w/ 8-25 at 25mm (50mm efov) • ƒ5.6 @ 1/320 • ISO 200 • Lightroom
Thanks for reading. Be sure to continue the discussion by adding your COMMENTS, questions or observations and feel free to SHARE this post with others.
NOTE: This blog is completely free and does not include commercial affiliate links. To help keep it free, consider buying me a coffee . . .

Discover more from luxBorealis Blog
Subscribe to get the latest posts sent to your email.
