Wildlife and Bird Photography—On Safari in Tanzania, Part I: Arusha National Park

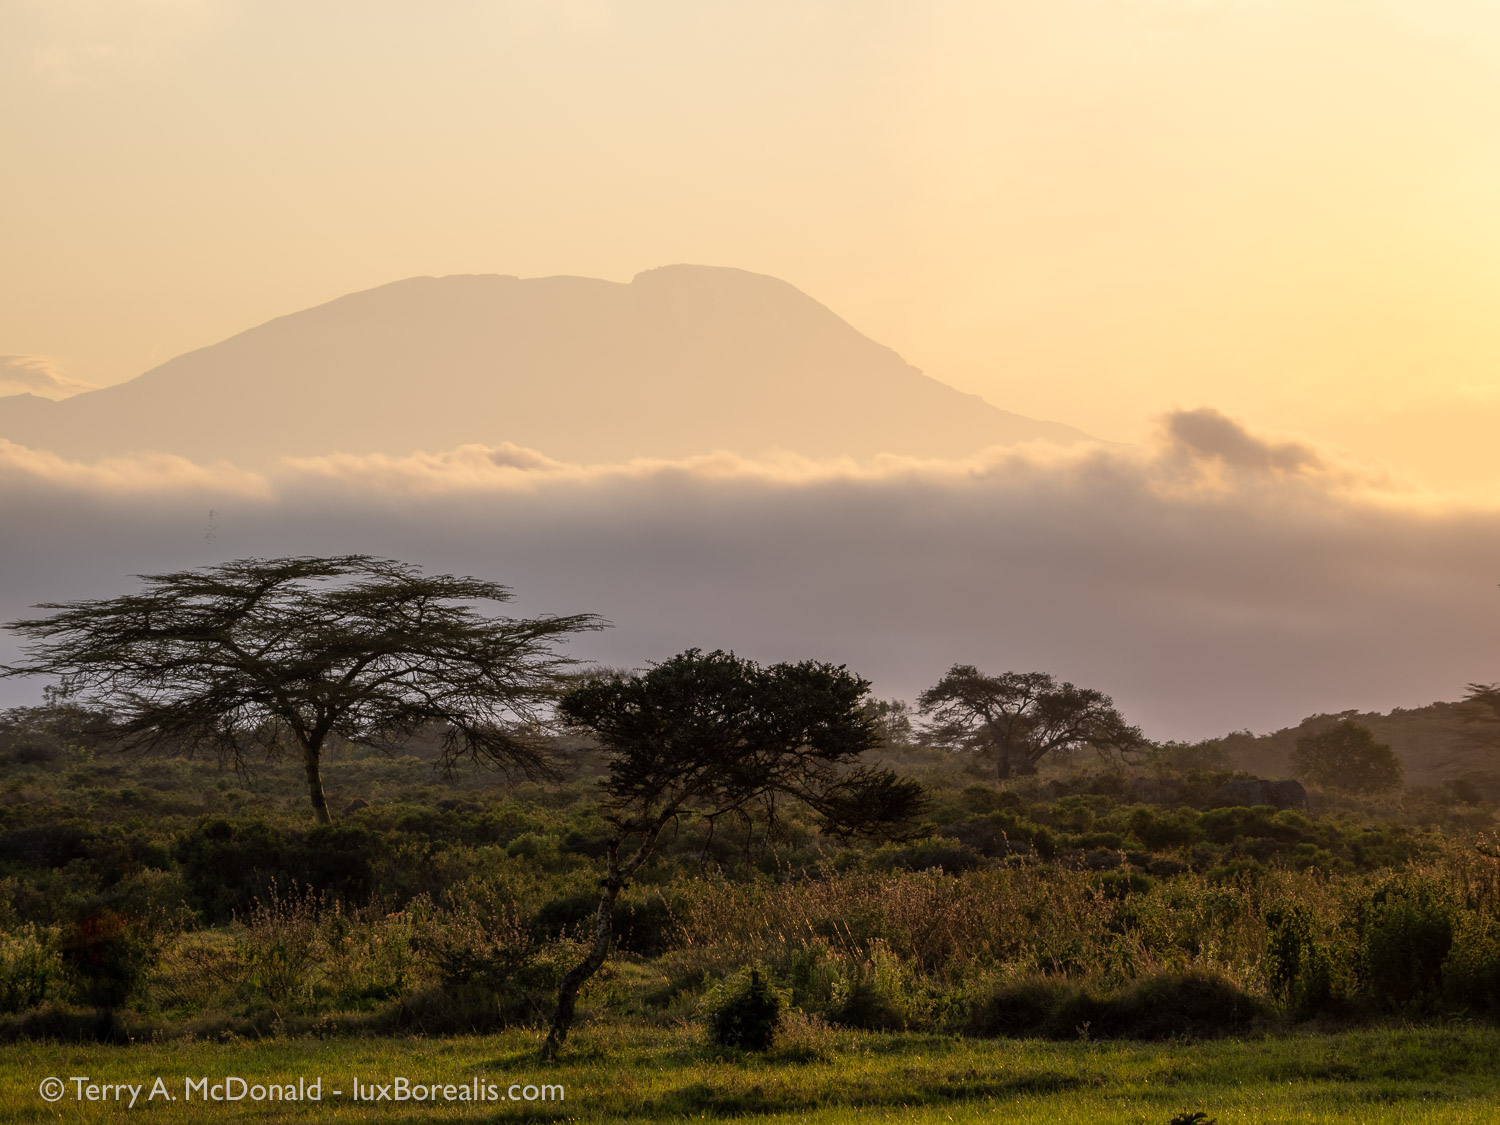
Kilimanjaro. The very word is evocative.
I don’t know about you, but when I see an image of Mount Kilimanjaro, rising high above the surrounding plains, I begin imagining dramatic adventures, exotic cultures and exciting wildlife encounters in the far-off African savanna. (I also begin humming a tune from Toto, “I bless the rains down in Africa . . . “)
Africa never disappoints, and Tanzania is the gem.
Day 3, 6:48am; M. Zuiko Digital ED 12-100mm ISP PRO @ 86mm (172mm efov); ƒ5.6 @ 1/200, ISO 200;
The wait was worth it. Seeing Kilimanjaro towering 5km above the surrounding landscape is a spectacular sight at any time of the day. The golden hours of sunrise make it that much sweeter.
Technical note about the photos: Unless otherwise noted, all photos were made with an Olympus OM-1 with an M.Zuiko Digital ED 100-400/5.0-6.3 IS zoom. Raw files were processed in Lightroom for iPad during the trip, with subsequent tweaking from there. Any alterations from this are stated in the captions.
Viewing photos: Click on a photo to view a larger version, then use the back button to return to the blog. The size of each photo is limited to 1500 pixels on the long size. If it appears full-screen, then the device may be upsizing it, which can lead to slight blurriness.
Background
Twenty-four years ago, my wife and I put our teaching careers in Ontario on hold and moved with our 4-year-old daughter to Arusha, Tanzania to teach in an independent school—St. Constantine’s. We chose SCIS because it was not the ‘high-priced expat school’, yet it offered an international educational experience based on the British system, catering to local Tanzanians and UN families from other parts of Africa. Those years are the most memorable of our lives with each and every day truly bringing one adventure after another.
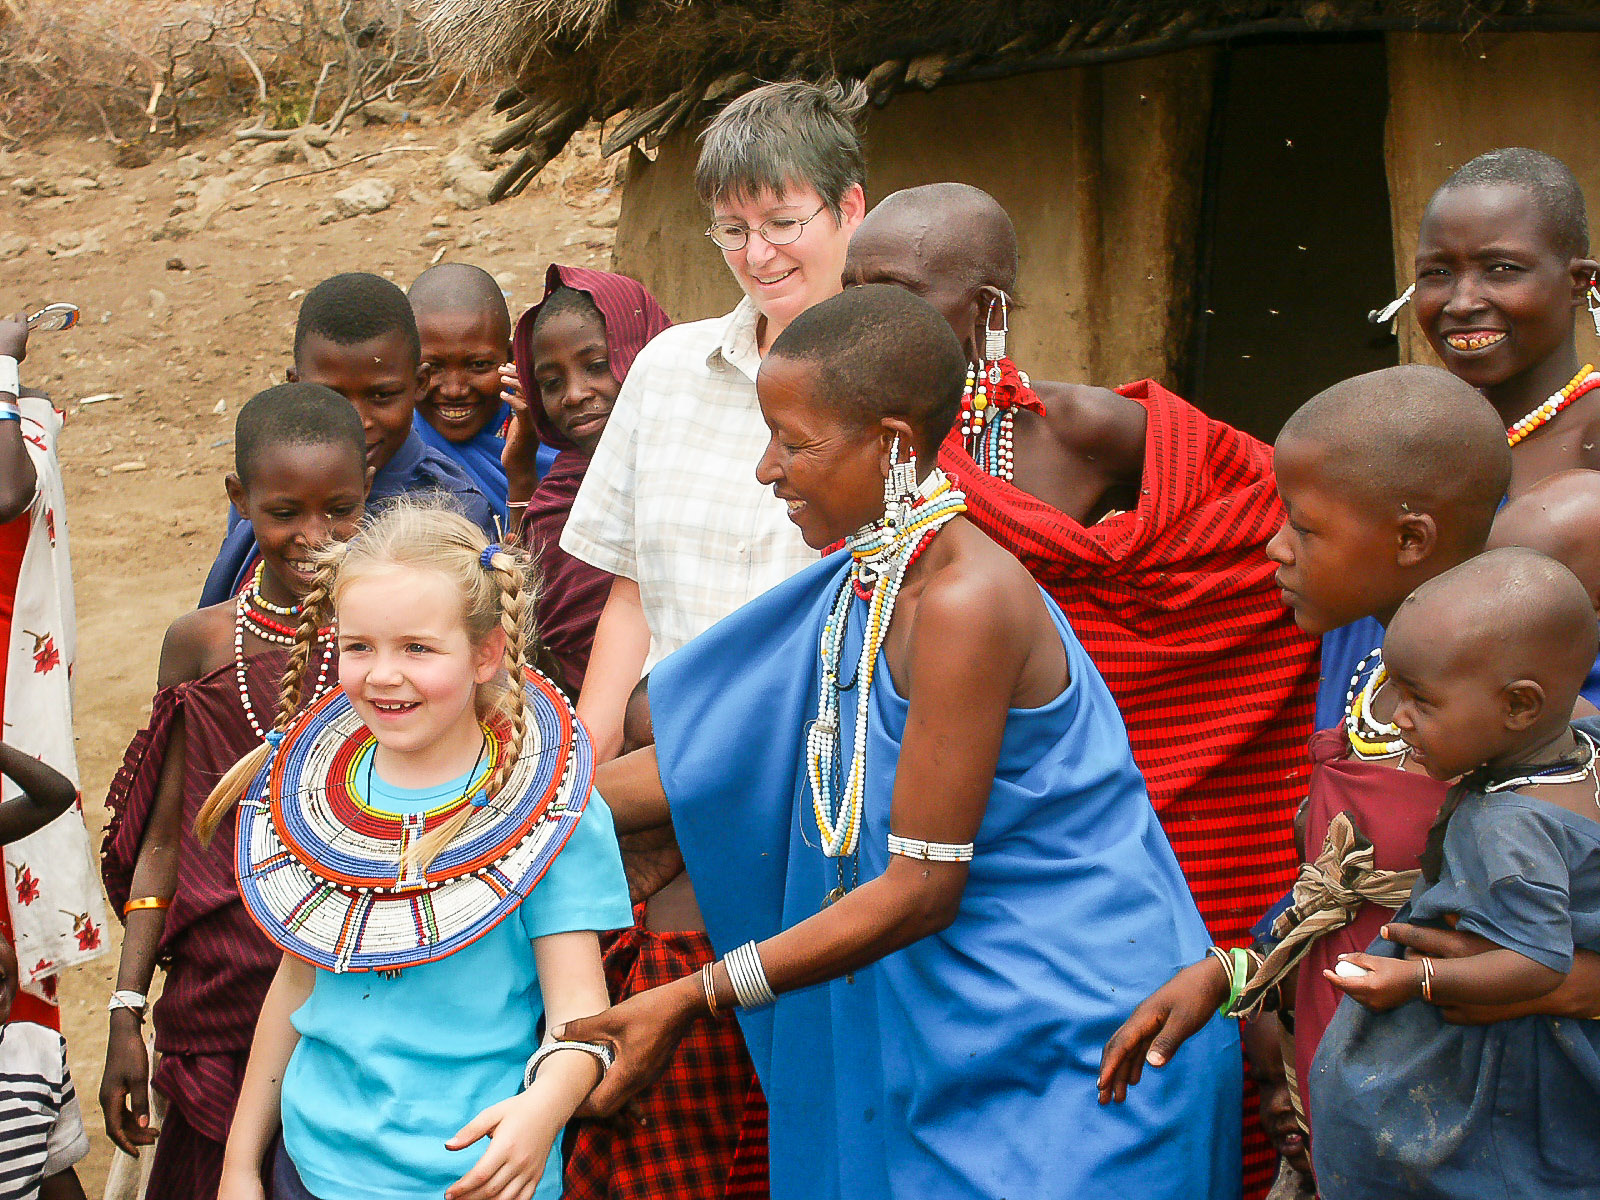
To this day, we are in touch with former students, colleagues and friends, and they were our incentive to return after 20 years. Back in 2007, we had made a short jaunt from England, but this six-week trip would allow us to more fully immerse ourselves back into Tanzanian life and re-connect with the people who meant so much to us. Needless to say, it has been a wonderful homecoming. But I won’t bore you with the human stories and family pics (you can see them on Facebook)—this blog is meant to be about landscape and nature photography.
Minolta DiMage 7i, 80mm (efov), ƒ4 @ 1/1000; jpeg processed in Apple Photos. The Minolta was first digital camera. It offered a 28-200mm lens (efov) and produced excellent 5mp raw files!
Tanzanian National Parks
During our six weeks, we had three trips, ‘safaris’ if you will, to two of our favourite places, Arusha National Park and Tarangire National Park, both of which are close to Arusha. For a few reasons, we decided against going to Ngorongoro Crater and the Serengeti two of the world’s jewels. Having previously visited both, we knew that just about everything we wanted to see could be found in Arusha NP and Tarangire NP, with only one exception, rhinos, but we were okay with that. Furthermore, Ngorongoro Crater itself has a USD $295/day vehicle fee on top of the USD $70/person/day entry permit—over CAD$800 for ONE day! The Serengeti entry fee is USD $70/person/day PLUS the overnight hotel/lodge concession fee of USD $60/person/night, PLUS 18% VAT, PLUS the actual cost of accommodations. Safaris in Tanzania do not come cheaply!! As we were self-driving, our safaris were definitely much less expensive than with a company, but still costly.
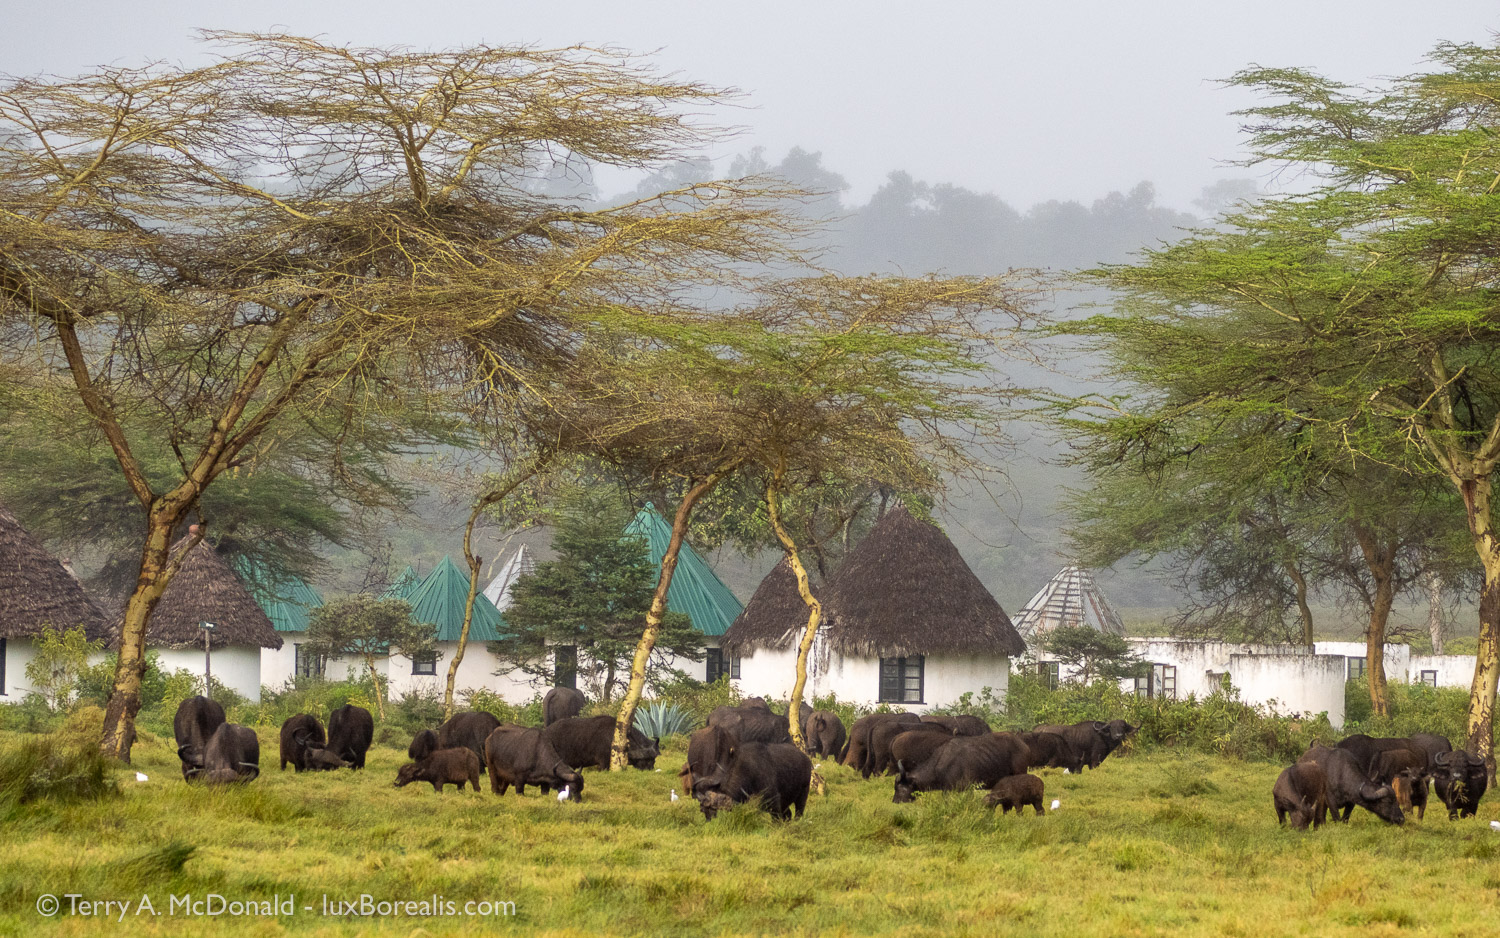
Day 2, 9:02am; 100mm (200mm efov); ƒ5.6 @ 1/5000, ISO 800.
As we returned to the lodge from our morning wildlife drive for breakfast, we were greeted by this herd of Cape buffalo. Needless to say, breakfast had to wait! It is these kinds of opportunities that compel us to stay at accommodations within the National Parks, rather than outside of them.
1/5000 you’re asking? My gear was still set up for birds and distant wildlife—I should have dialled down to ISO 200 as 1/5000 was overkill. Note: I prefer not to use Auto ISO.
BTW, if you’re looking for a safari experience, Tanzania is the destination with four of the world’s most outstanding destinations for landscapes and wildlife: Mt. Kilimanjaro, Ngorongoro Crater, Oldupai Gorge, and the Serengeti, all within a few hours of each other. I can highly recommend three companies:
All are well-run, professional outfits that cater to customized itineraries. If you’re feeling adventurous, Serengeti Select even has a ‘self-drive’ option as well as a beach option at Emayani Lodge on the untouched Indian Ocean coast south of Pangani. Each of the companies can also arrange for tours of the historical and culturally exotic island of Zanzibar and Stone Town. Flights arrive daily to Kilimanjaro International Airport via KLM, Ethiopian Air and Qatar Airways. We chose Ethiopian to reduce costs ($400 cheaper x 2), which was fine, but the leg from Toronto to Addis Ababa is long.

Day 4, 12:10pm; 400mm (800mm efov); ƒ6.3 @ 1/200, ISO 1600; Raw file processed in Lightroom and Topaz Photo AI
The rich cloud forest that wraps around Mount Meru is home to Blue Monkeys and Colobus Monkeys (see below), elephants, Cape buffalo, bushbuck, and a host of other mammal and bird species. Photographing in the deep shade is challenging with shutter speeds slower than ideal when wildlife and the branches they sit on are never still.
Birds and Wildlife
As someone who has studied biology, ecosystems, and geography for most of my life, I am still amazed by the tremendous diversity of plants and animals in East Africa. Where we have a few dozen commonly seen birds in southern Ontario, East Africa has over 100. Tanzania itself boast a bird species list of over 1,000! (Note: Tanzania and Ontario are approximately the same size at about 1 million km2.) While Ontario has a few active predator-prey relationships, the savanna has dozens.
Day 3, 6:56am; 138mm (276mm efov); ƒ5.6 @ 1/640, ISO 800; Hand-held High Res.
I have to credit this one to our driver-guide, Simbo, who stopped the truck on our way out of the lodge and told me to take this shot. Gladly!
The wealth of large and small mammal and herptile species is truly impressive. More importantly for photographers, much of the wildlife is easily accessible—right outside the car window or even right outside the tent or banda, which is why we prefer staying within the parks! The birds are everywhere, their colourful diversity gracing every garden, but to see the large mammals you really must be in the parks. Both Momella Wildlife Lodge in Arusha National Park and where we stayed in Tarangire—Tarangire Safari Lodge—are both renowned for wildlife that is seen right within the lodge grounds.
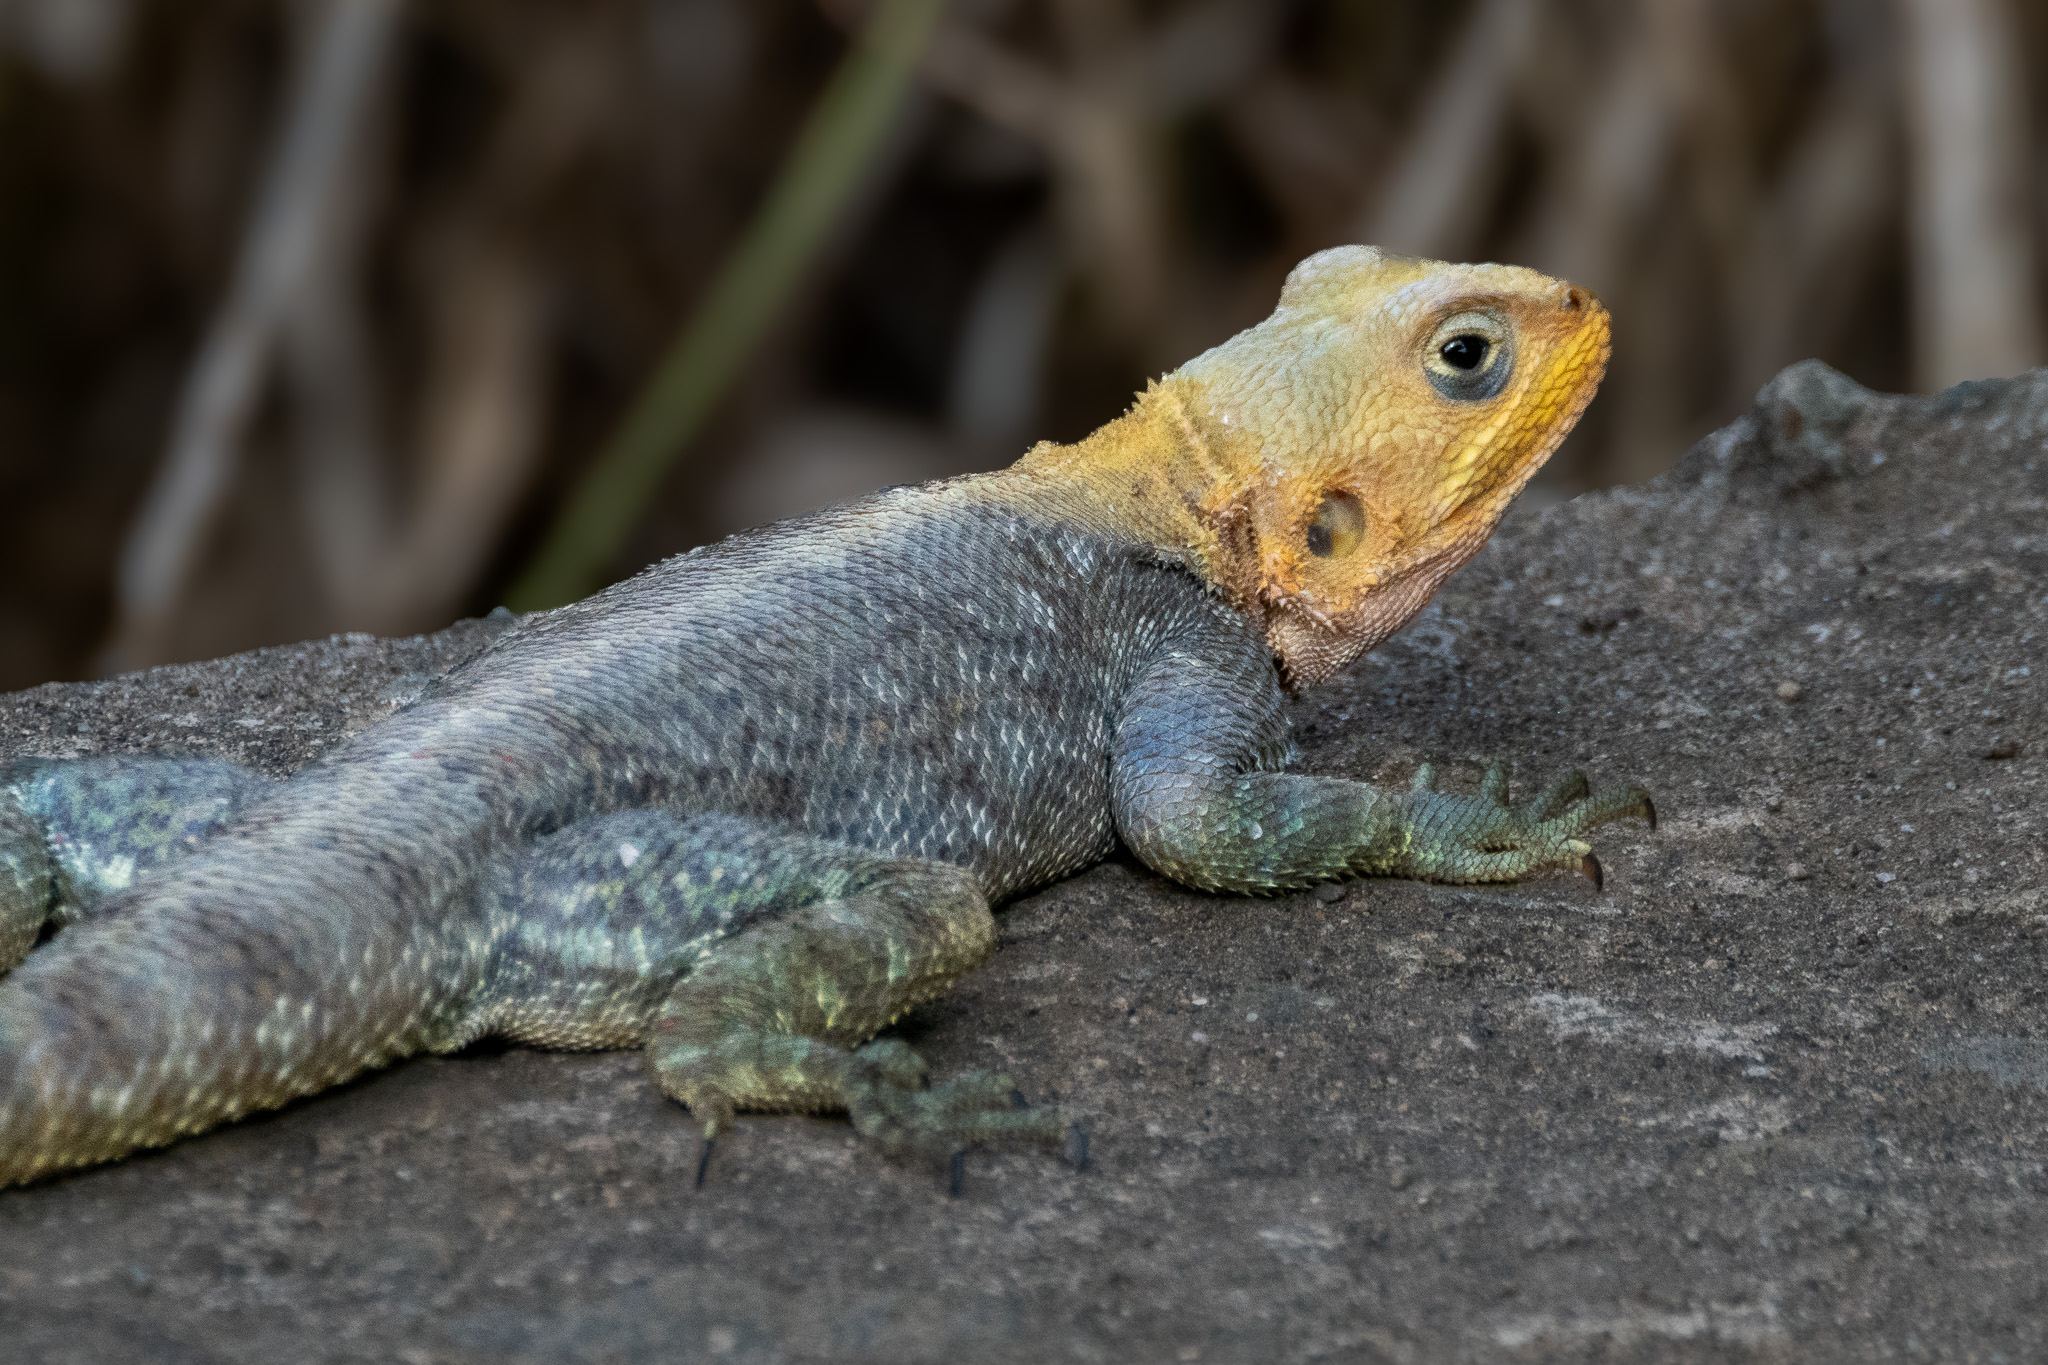
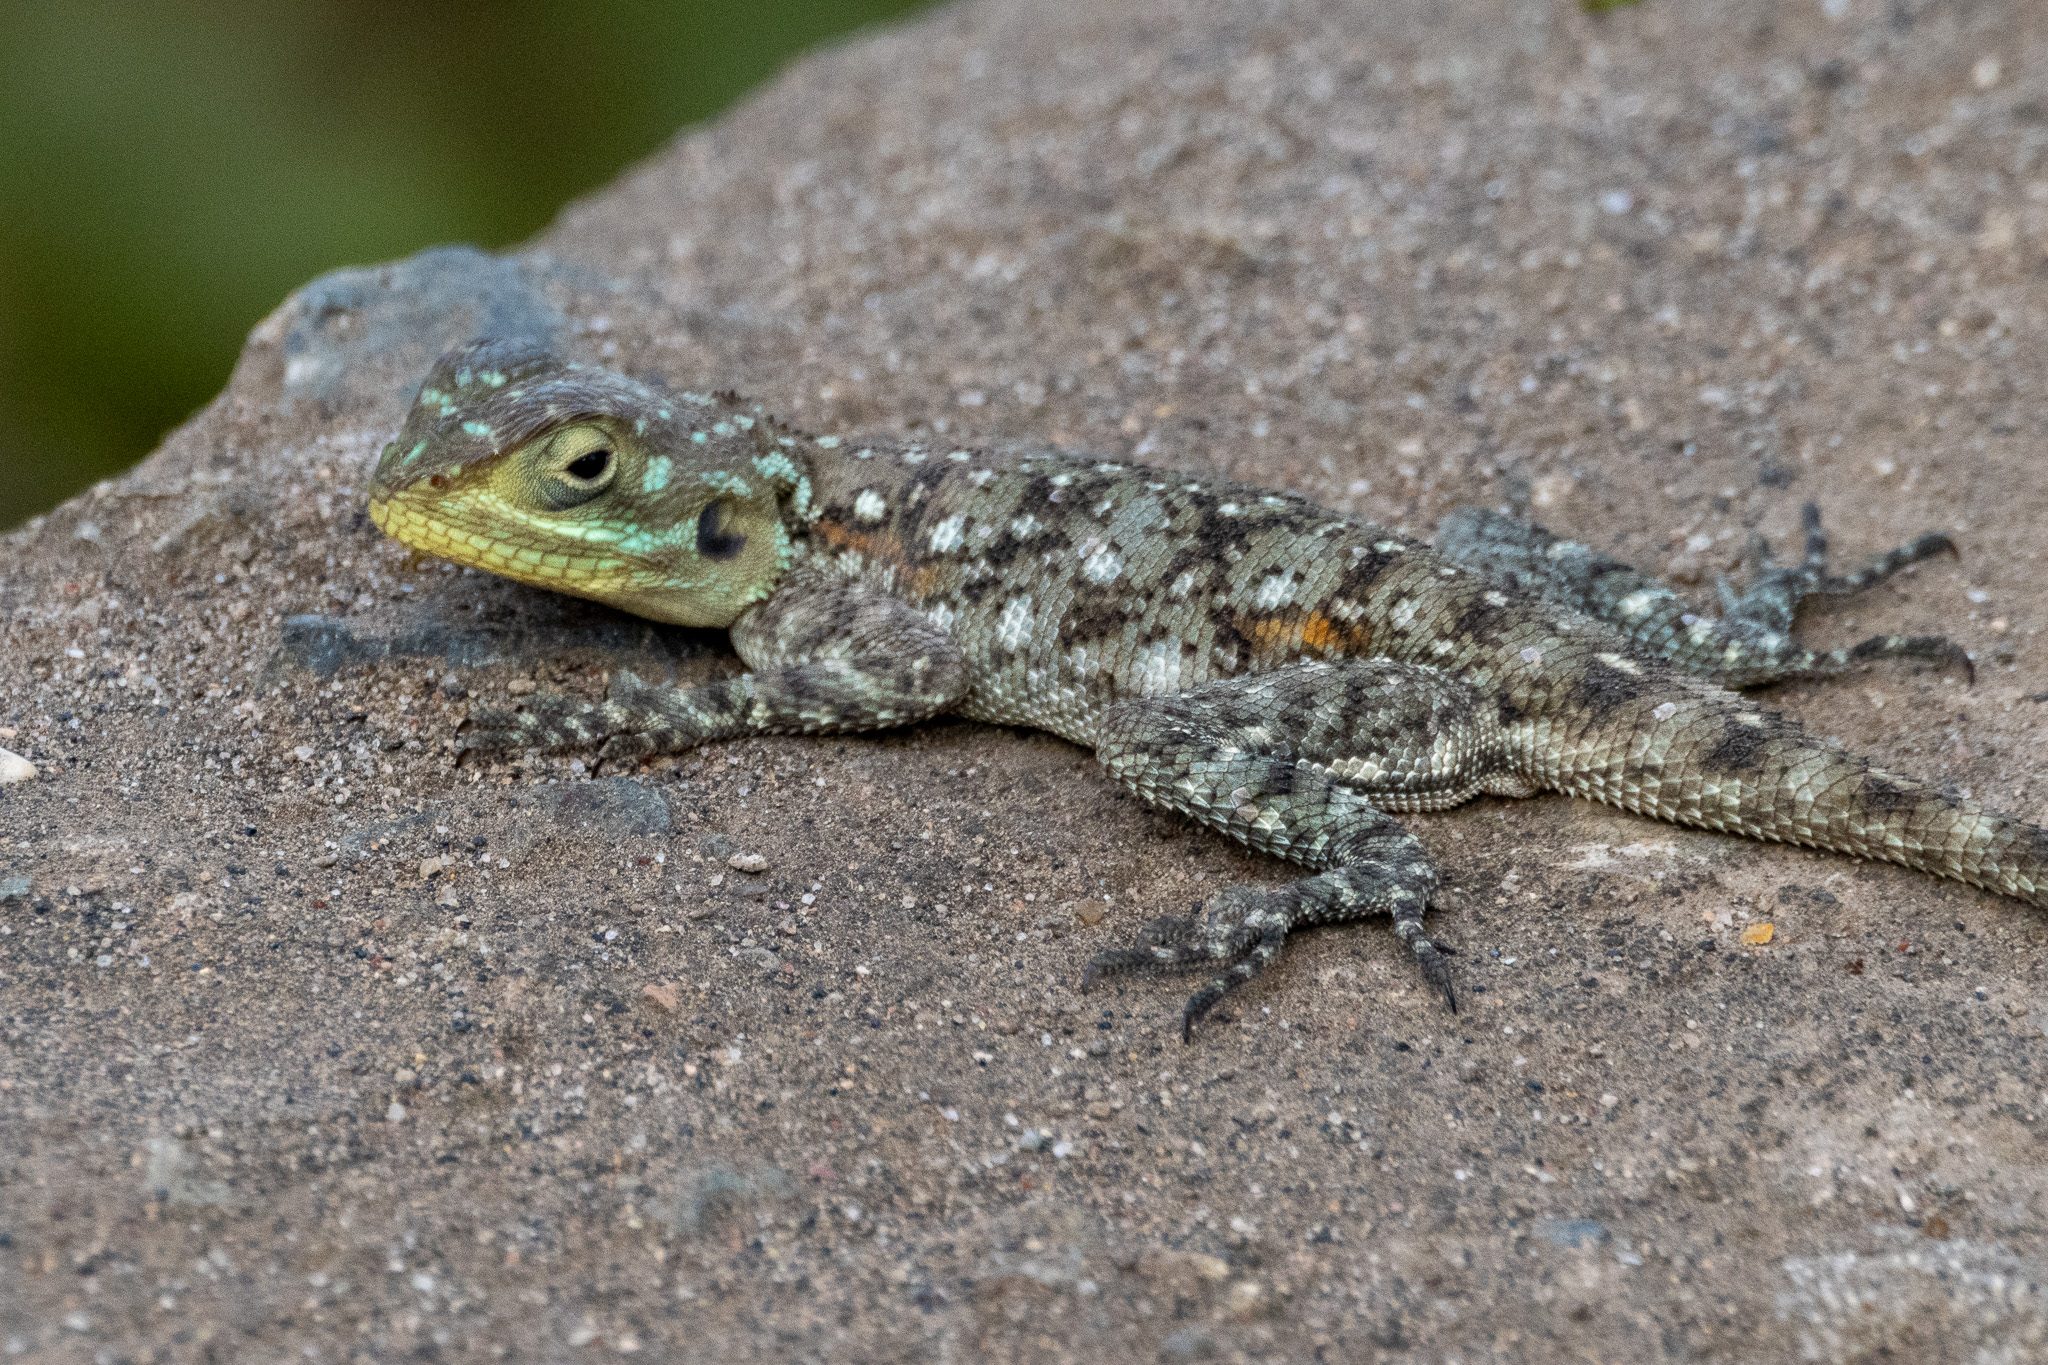
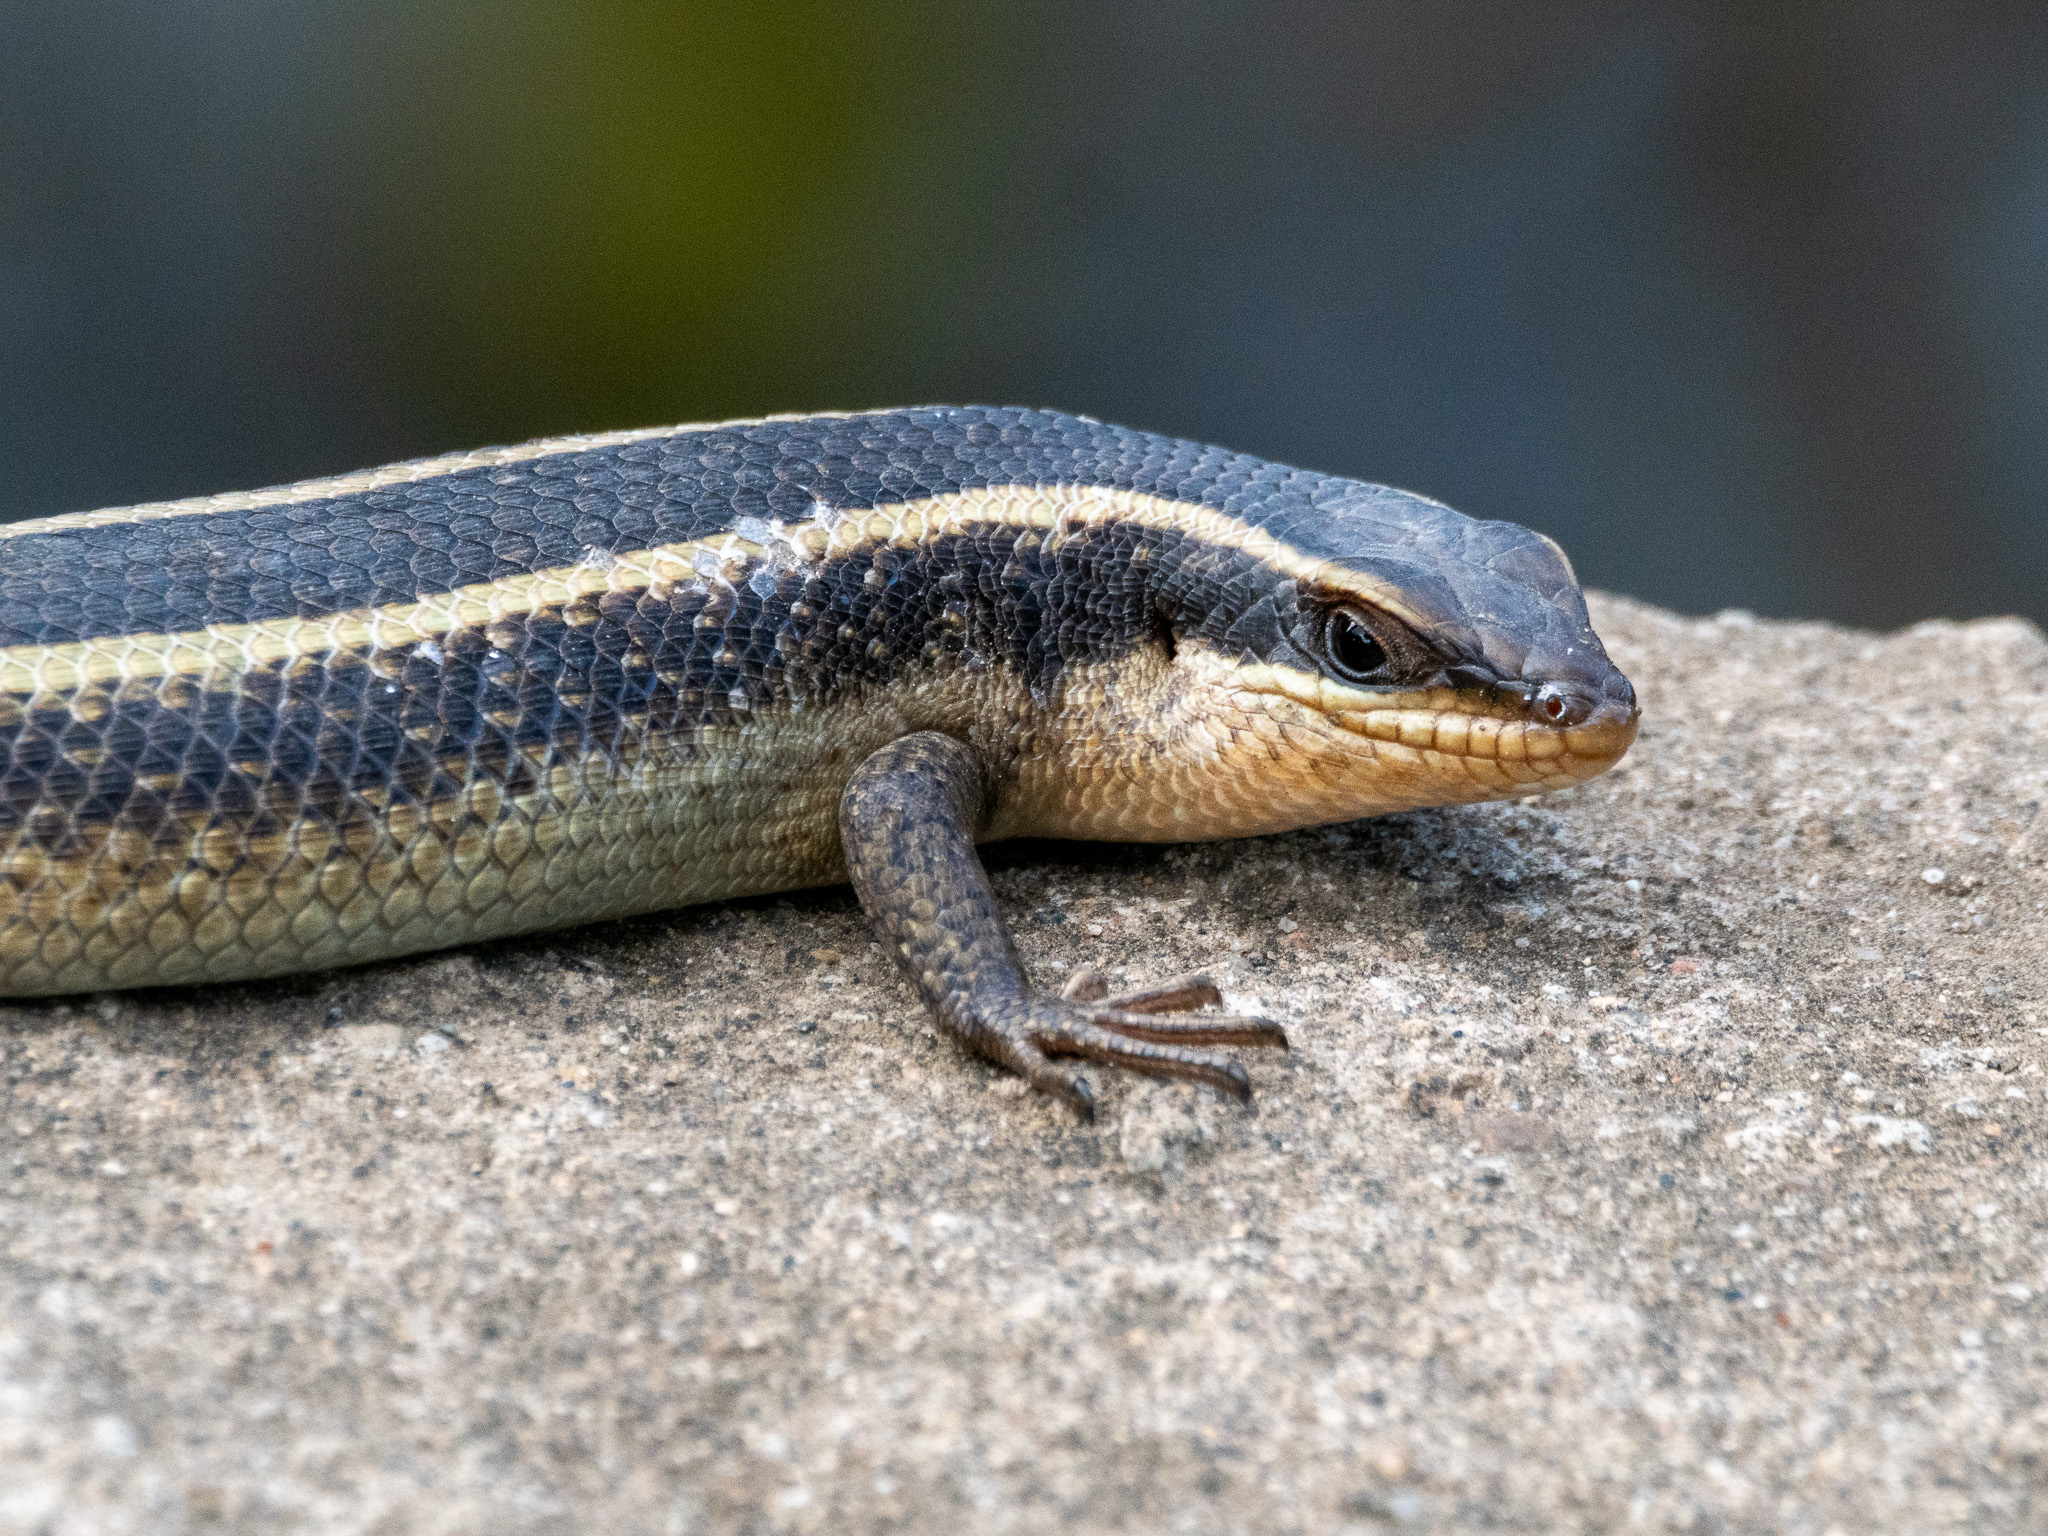
Day 2, 5:02pm; 400mm (800mm efov); ƒ11 @ 1/160, ISO 1600. Shooting distance was about 1.4m; the 100-400 has amazing close-focus capabilities.
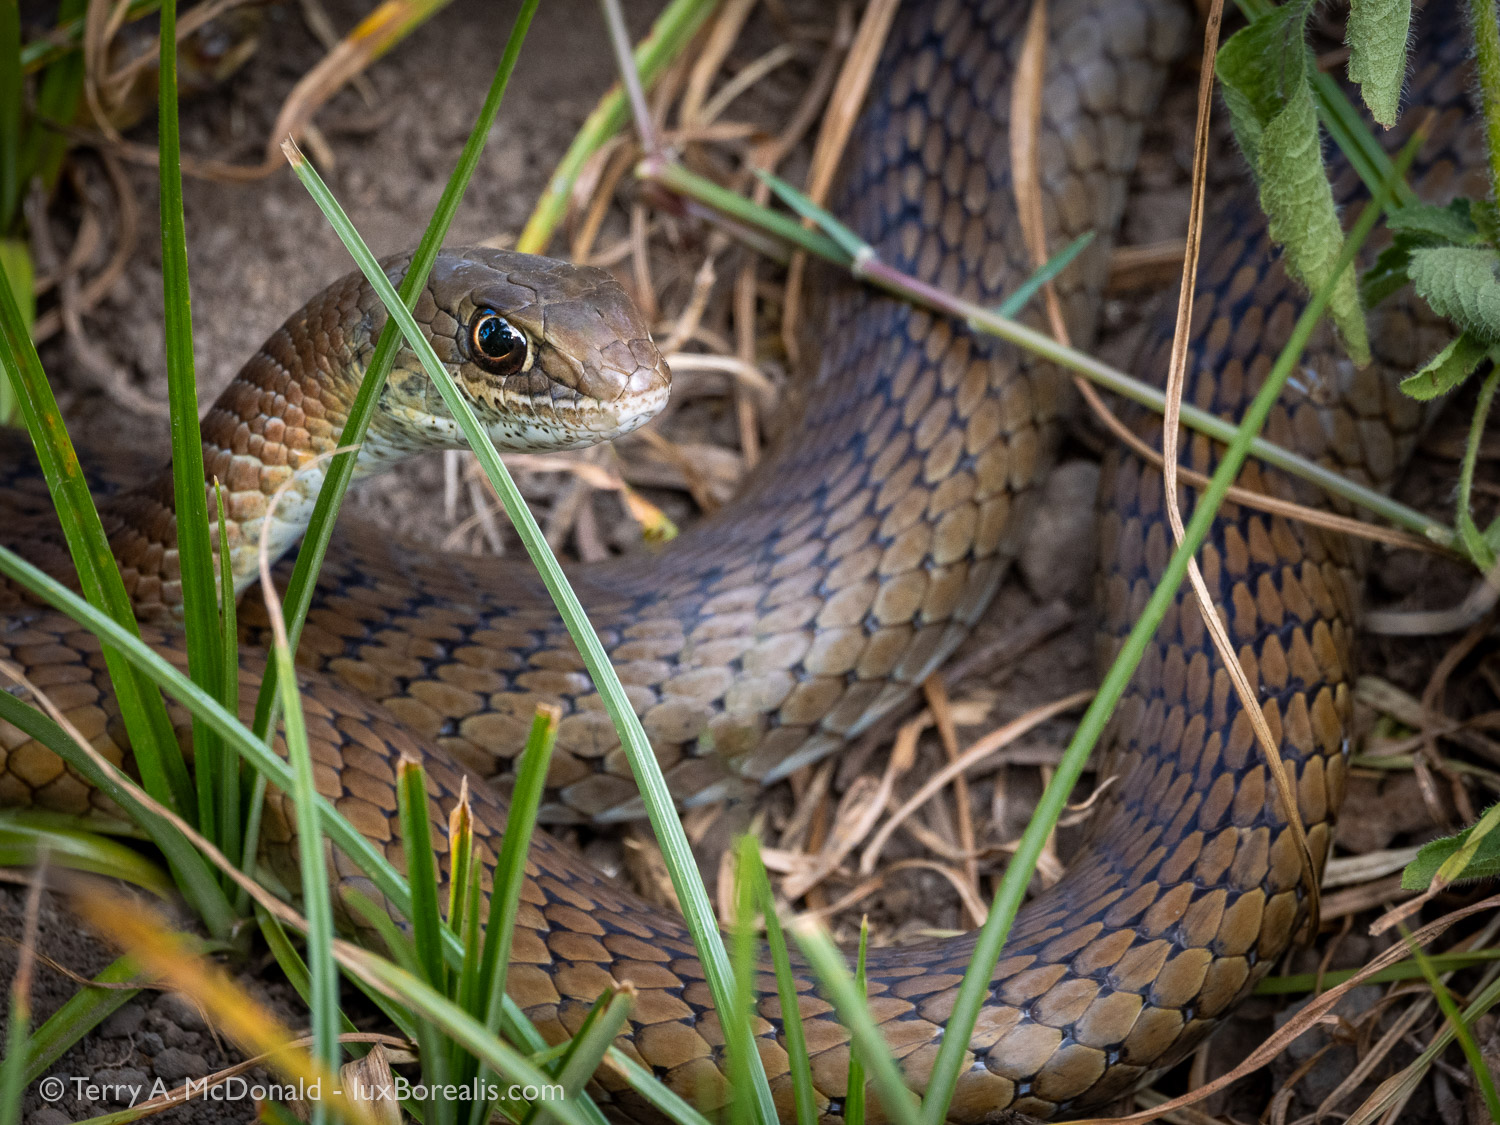
Lizards are fairly common in rocky areas, but to see a snake is uncommon. This one was sunning itself near the road, warming itself in the later afternoon sun. Only a few metres away were two green snakes, which we have yet to identify, actively hunting in the grass.
Bird Photography
Only in the last few years have I developed a keen interest in bird photography, mostly because higher quality, long telephoto lenses have become more affordable. Moving to an Olympus (OMDS OM-1) system last year, along with the M.Zuiko 100-400mmm zoom (200-800mm efov) has made bird photography even more accessible. As I’ve written previously, ergonomics, stabilization, dust/waterproofness, and high ISO quality have been game changers. Paired with the vertical grip with 2nd battery, I was never out of power, even on long days with early morning and evening wildlife drives.

Day 1, 5:32pm; 400mm (800mm efov); ƒ11 @ 1/1000, ISO 1600; Lightroom + Topaz Photo AI. As the original was cropped to 1281×1708 pixels, this photo benefitted from upscaling. Amazingly, feather detail was preserved.
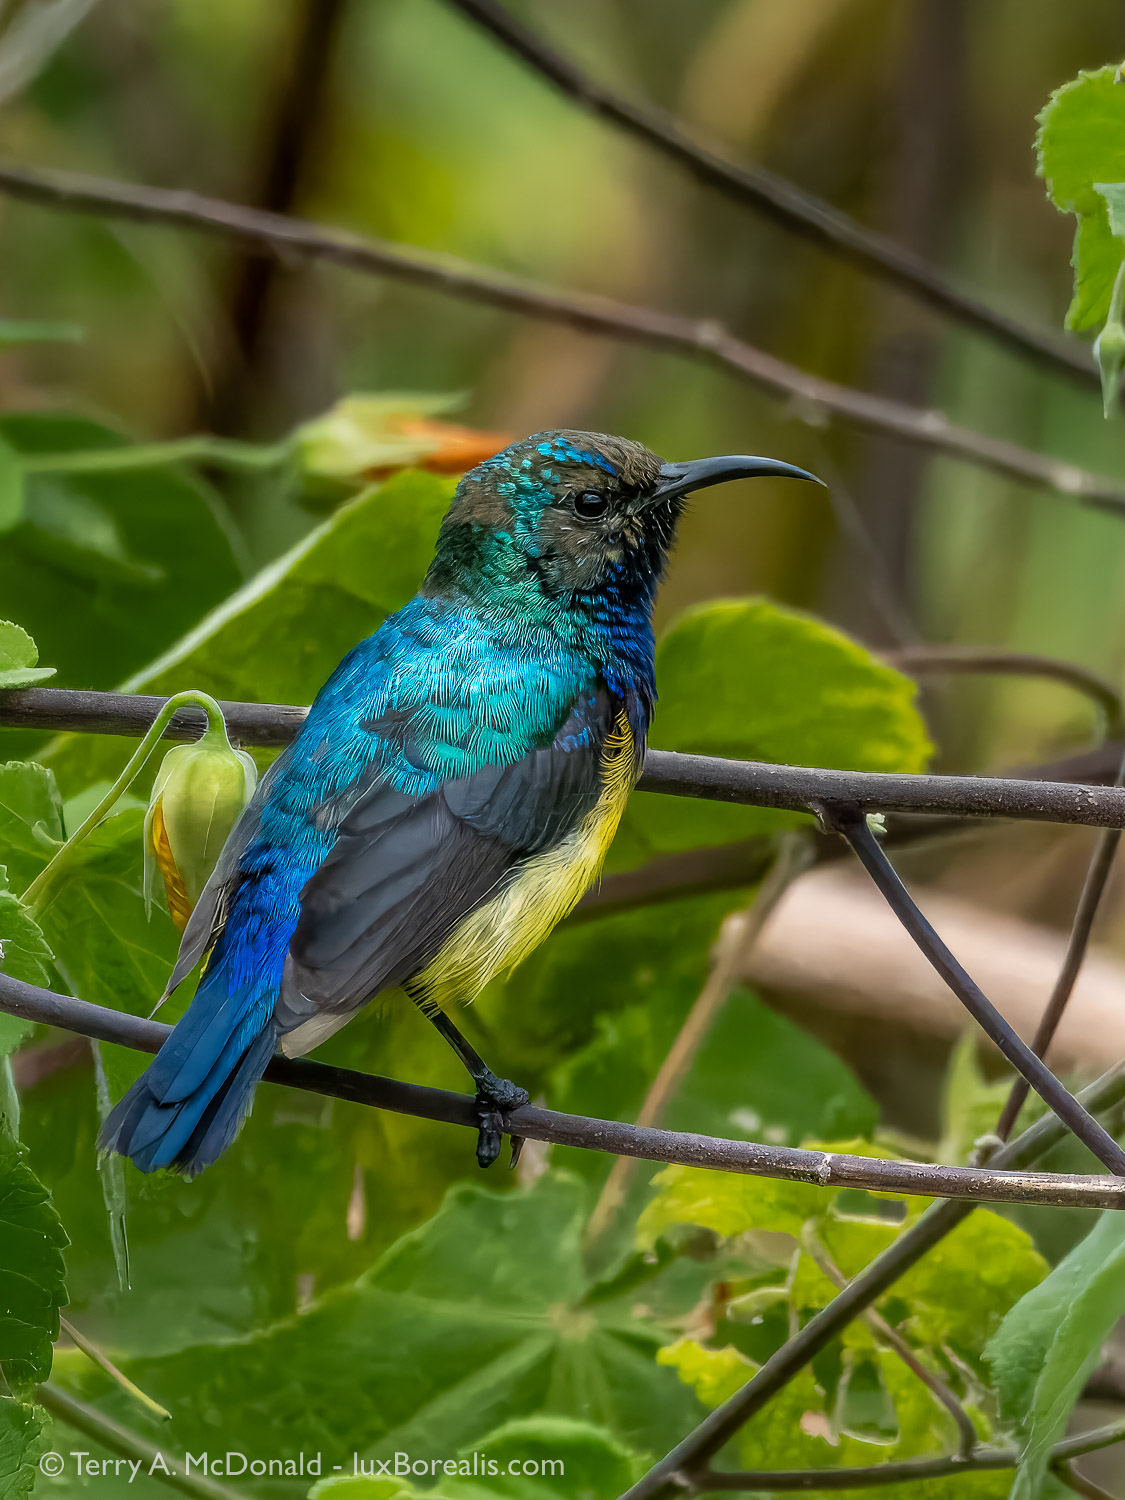
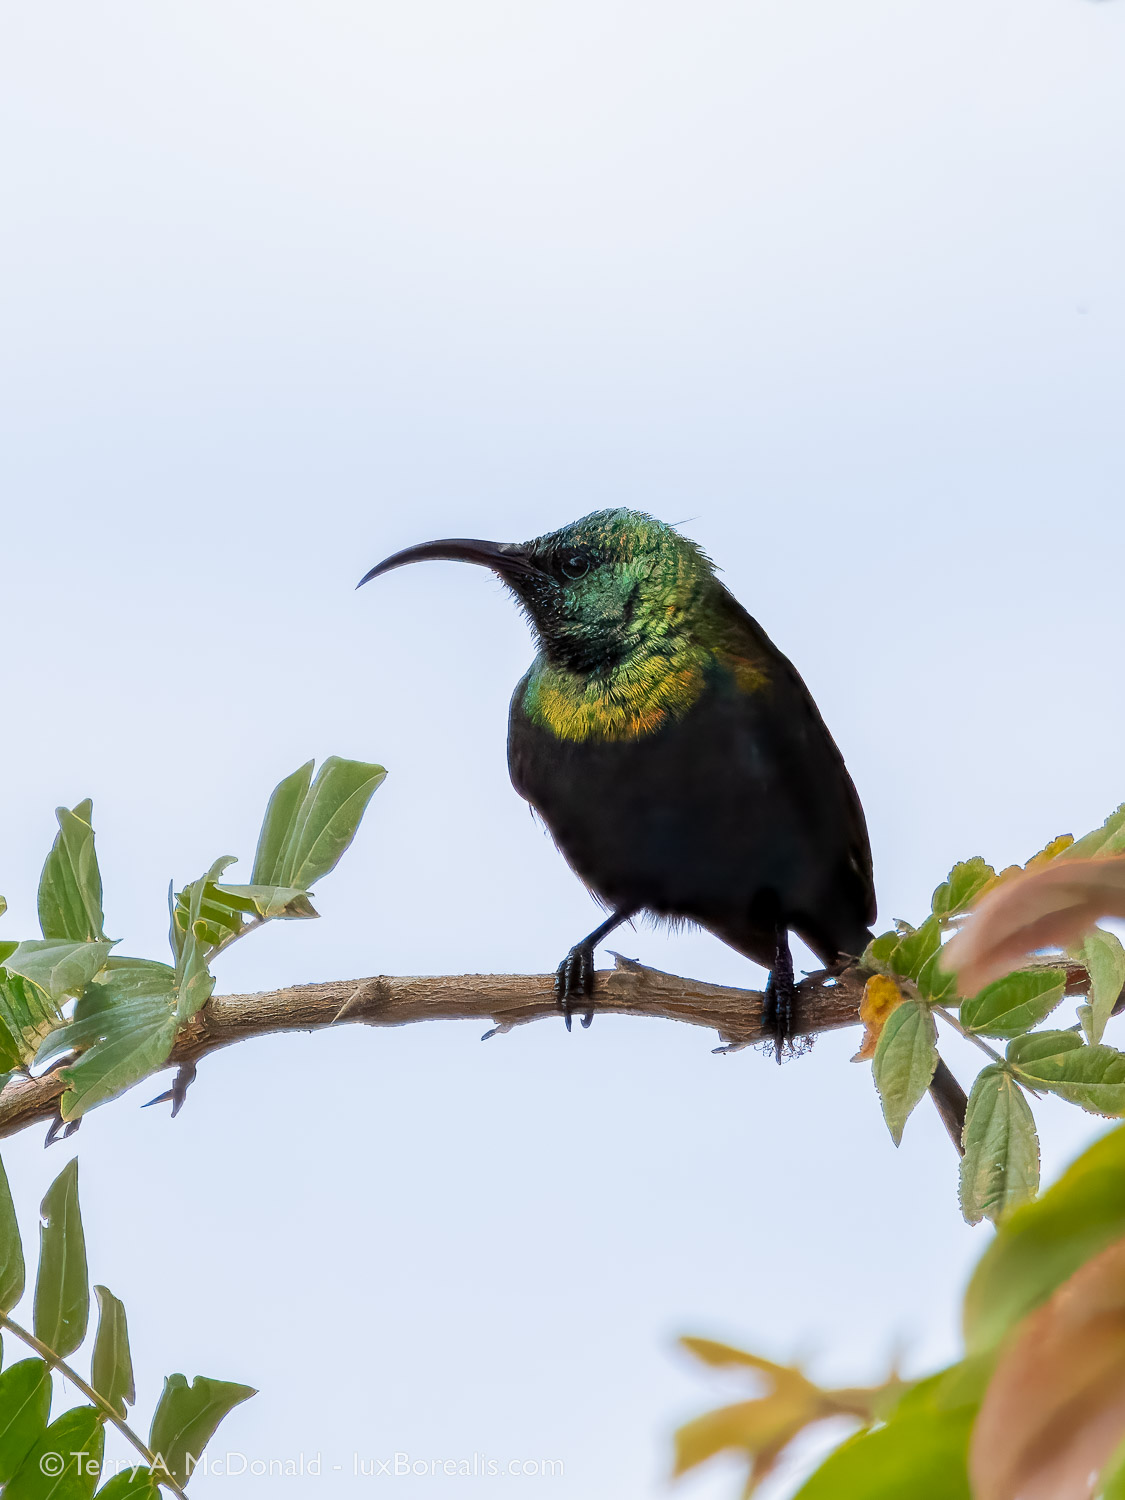
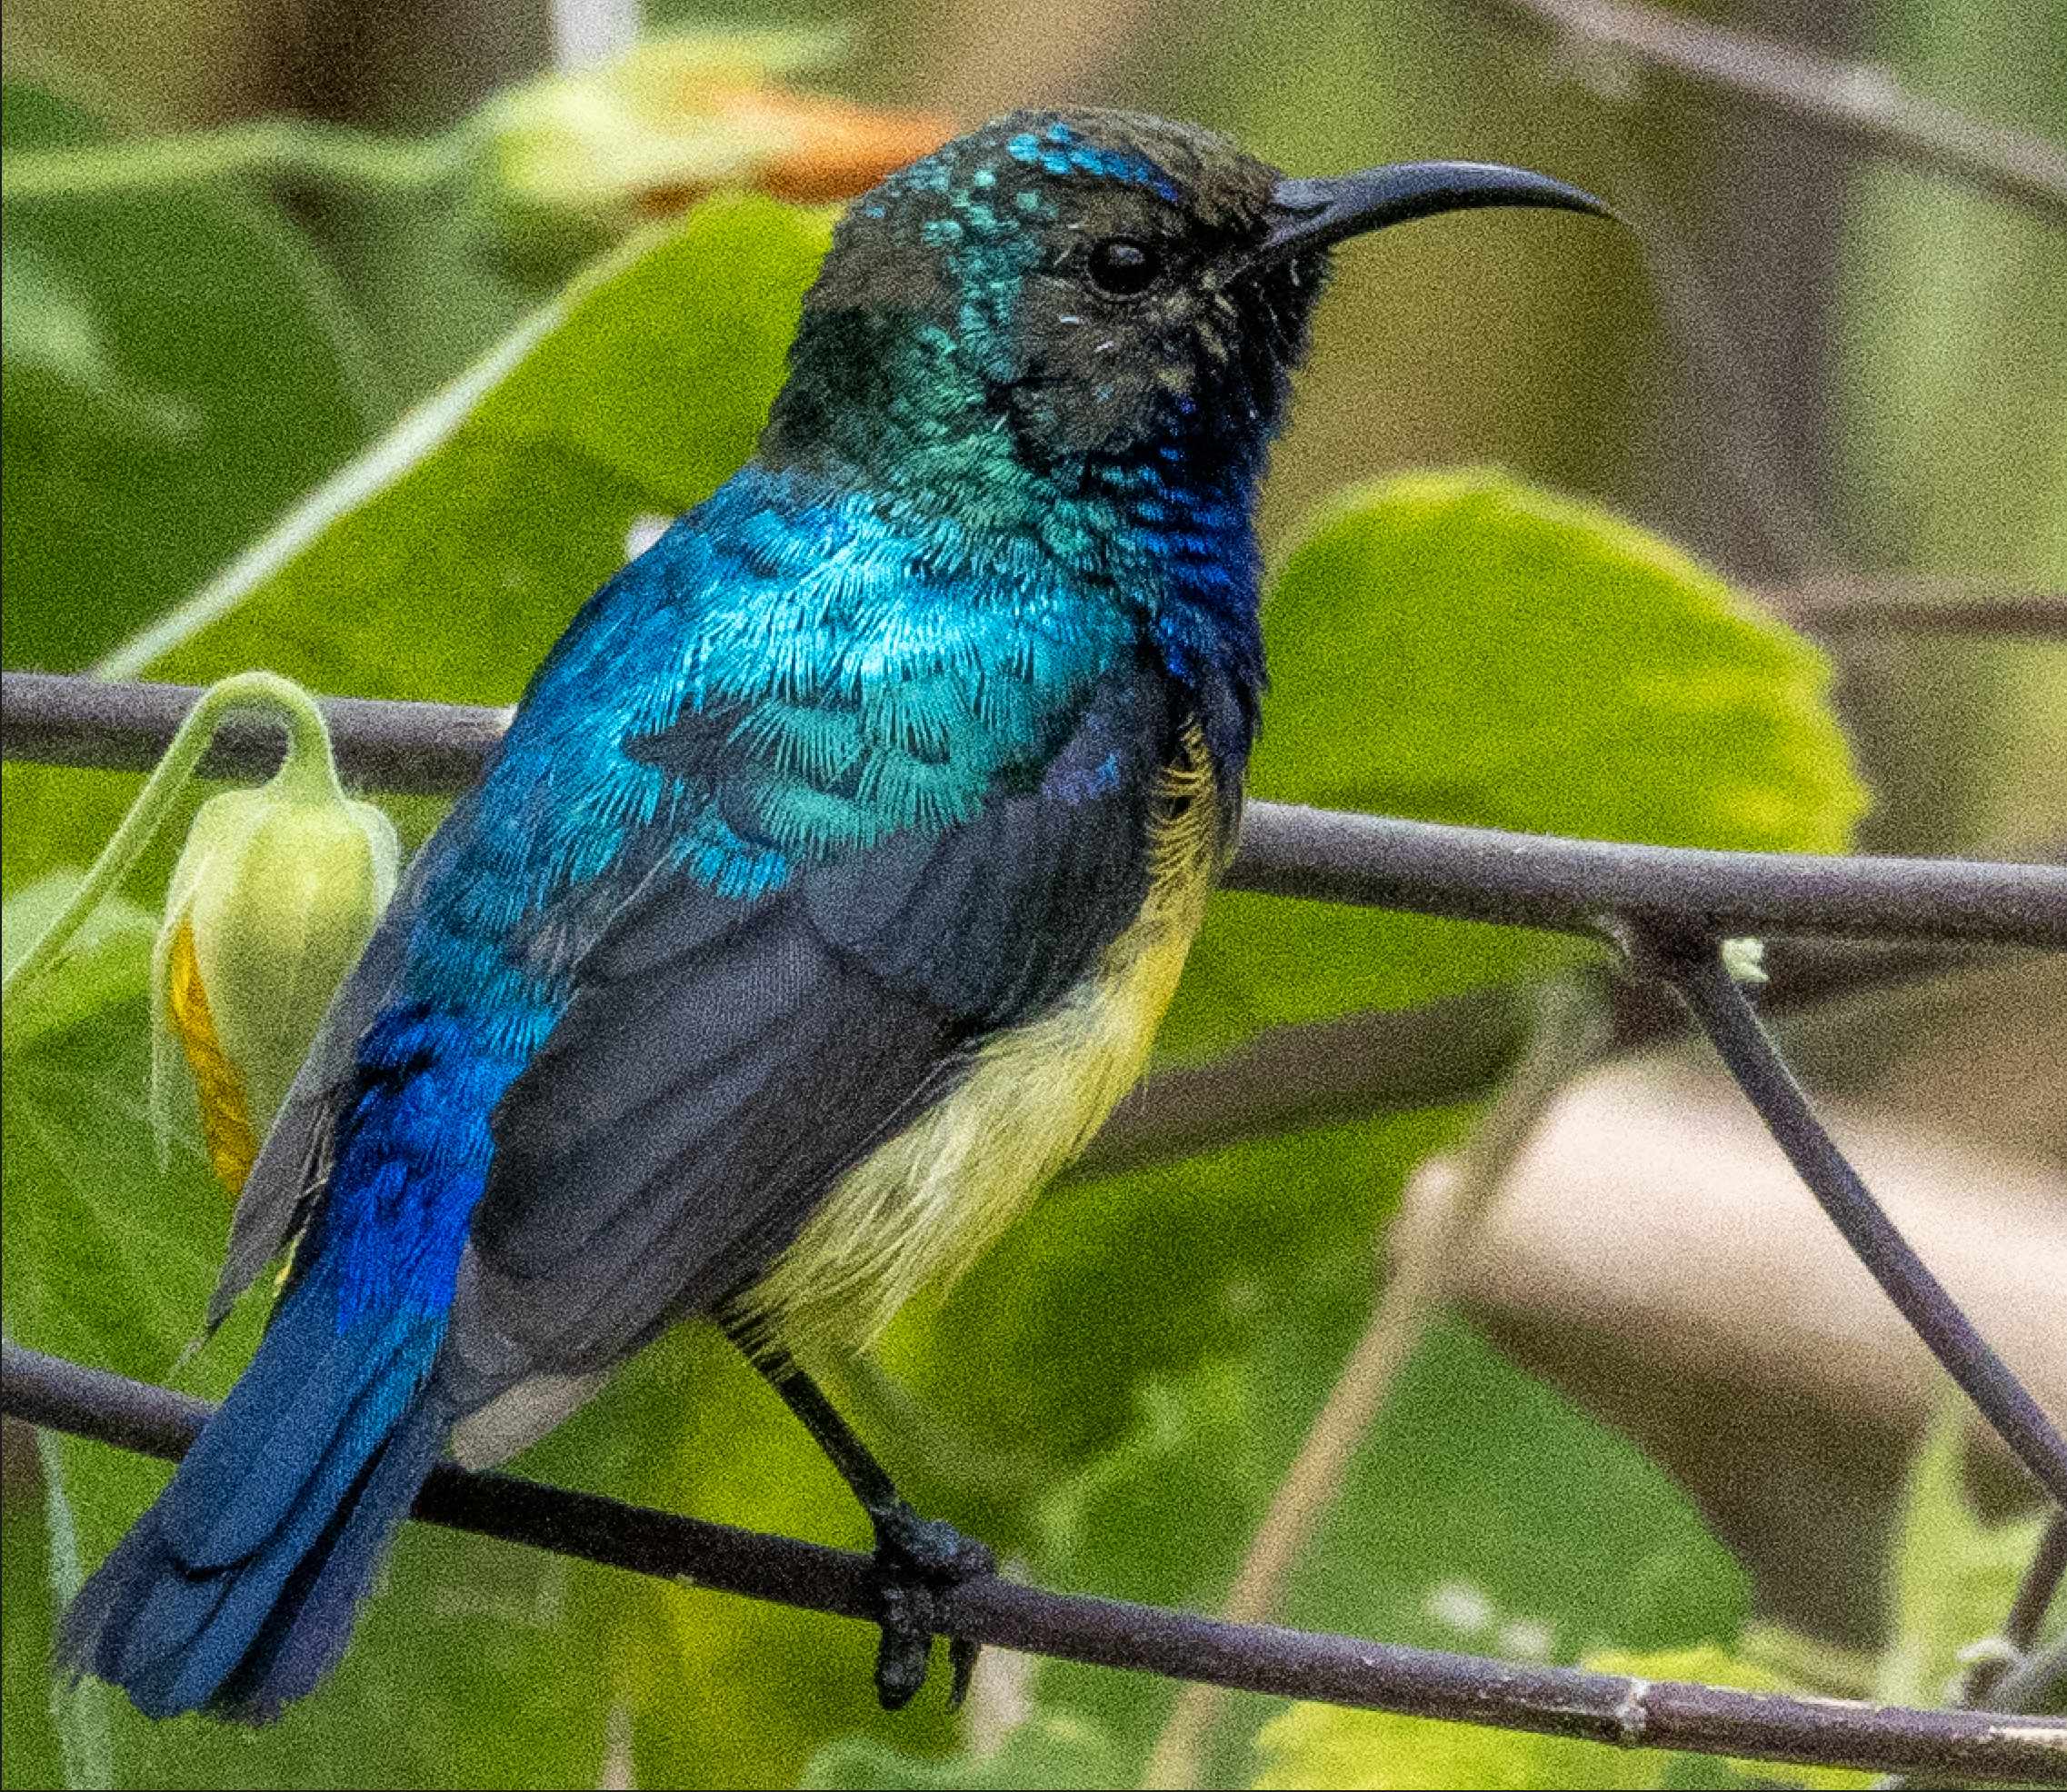
Day 3, 12:54pm; 400mm (800mm efov); ƒ11 @ 1/1000, ISO 3200;Lightroom + Topaz Photo AI.
Sunbirds are beautiful, but they tend to do a lot of flitting about. Cloudy skies and dim light under the forest canopy forced me to use ISO 3200. However, Topaz Photo AI cleaned up the noise to provide a beautifully clean image.
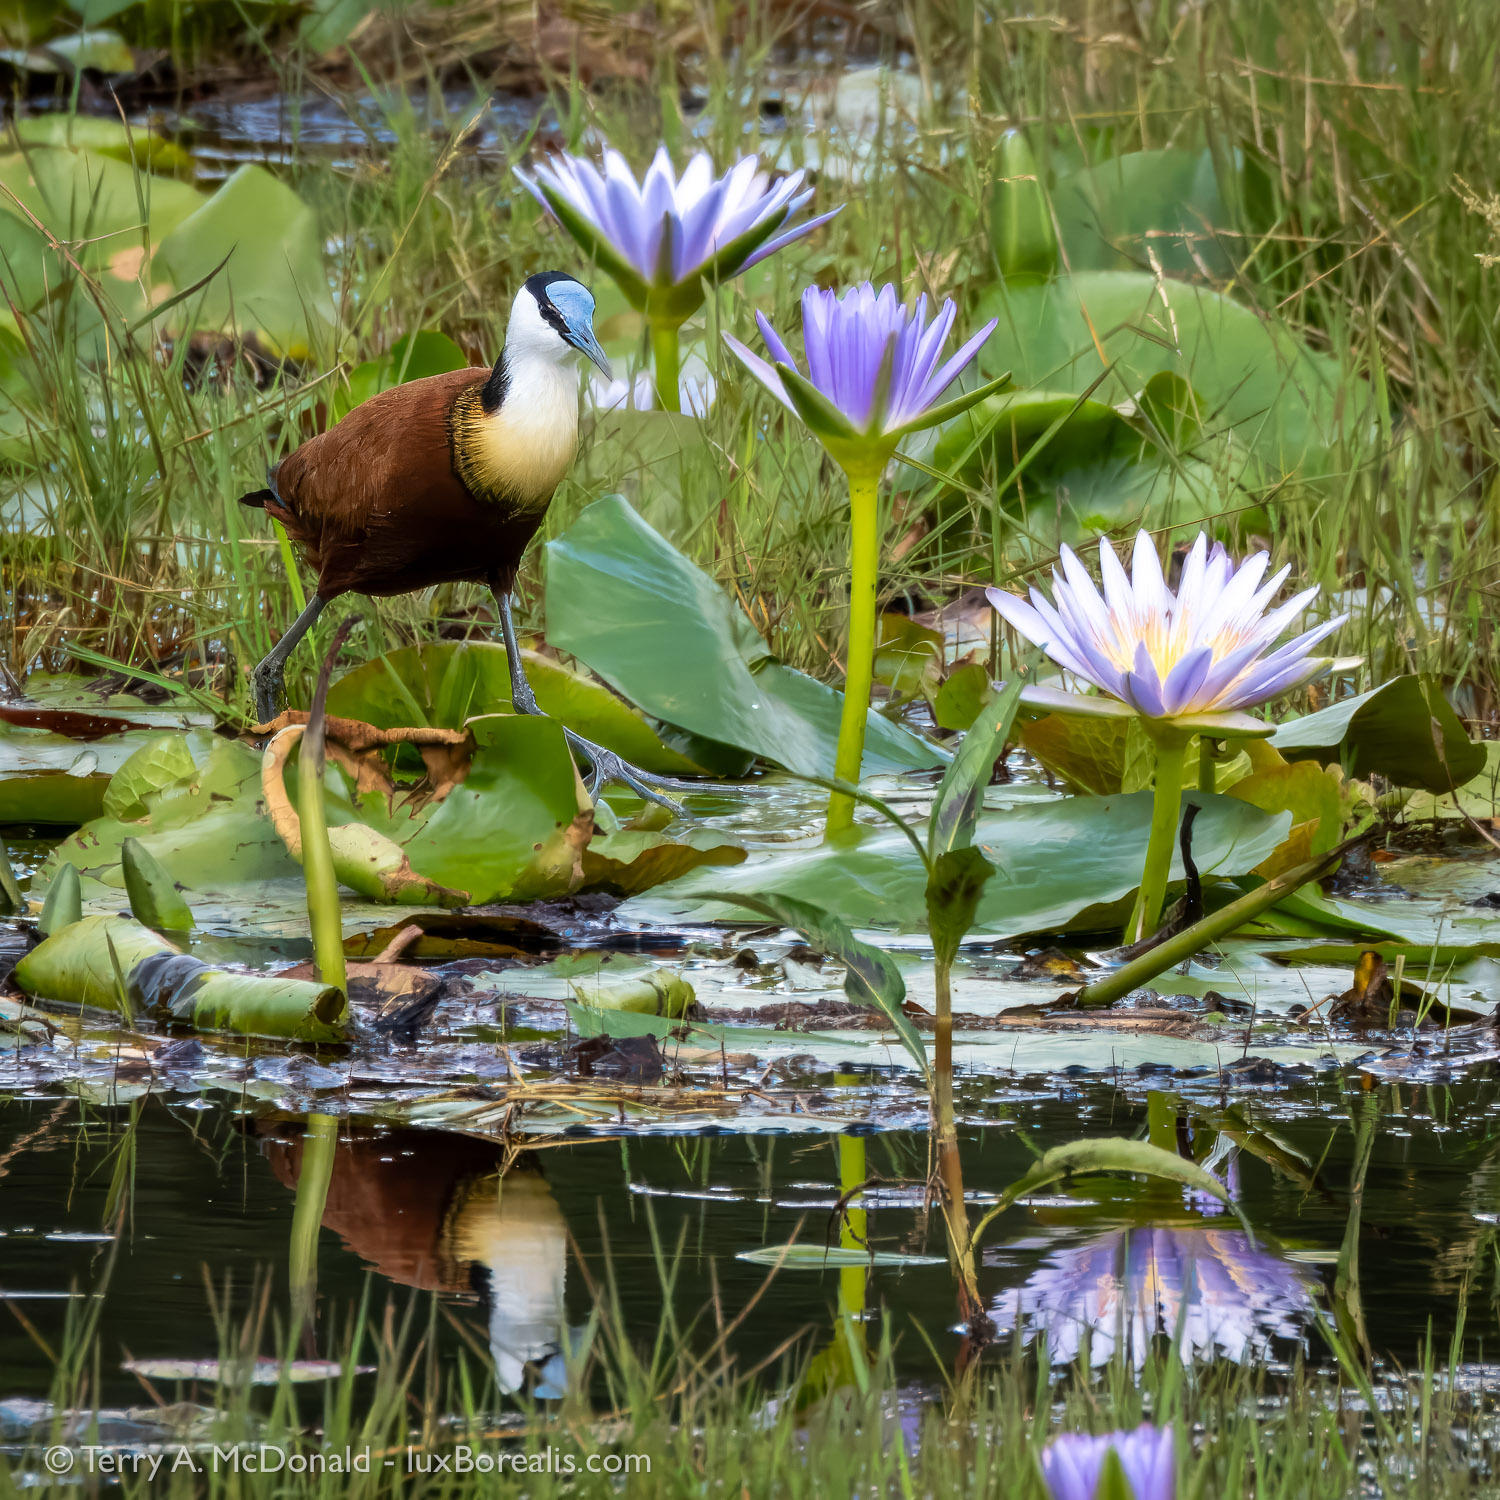
Day 3, 3:04pm; 400mm (800mm efov); ƒ11 @ 1/800, ISO 1600; Lightroom + Topaz Photo AI. The jacana is a beautiful marsh bird with great, long toes to walk on lily pads, but it would not approach closely. This is a file was a perfect candidate for upsizing in Topaz.
I am also fortunate in that Laura, my better half, has been a keen birder for decades and has an ultra-sensitive eye for spotting birds and wildlife that are otherwise invisible to me. So, we make a good pair. On this safari, we hired a truck and driver-guide, Simbo, but typically, Laura is happy to take the wheel of the safari truck, allowing me to concentrate on photography. For the rest of our stay in Tanzania, we had a truck on loan from our friends in Arusha.
Arusha National Park
Arusha NP is an hour from Arusha and wraps around the eastern flank of Mount Meru, the ‘local volcano’ and Tanzania’s second-highest mountain. In East Africa, proximity to a mountain and higher elevation means greater rainfall, so much of ArushaNP is forested with a range of ecosystems gradually gaining in tree density with rising elevation from its ‘Little Serengeti’ grassland, up to full tropical cloud forest complete with vines, epiphytic plants growing on tree limbs, and trees with huge buttress roots. A diversity of ecosystems means a diversity of wildlife and ArushaNP never disappoints.
Day 2, 7:36am; Olympus OM-1 w/ M.Zuiko Digital ED 12-100mm IS PRO @ 35mm (70mm efov); ƒ5.6 @ ⅓, ISO 200.
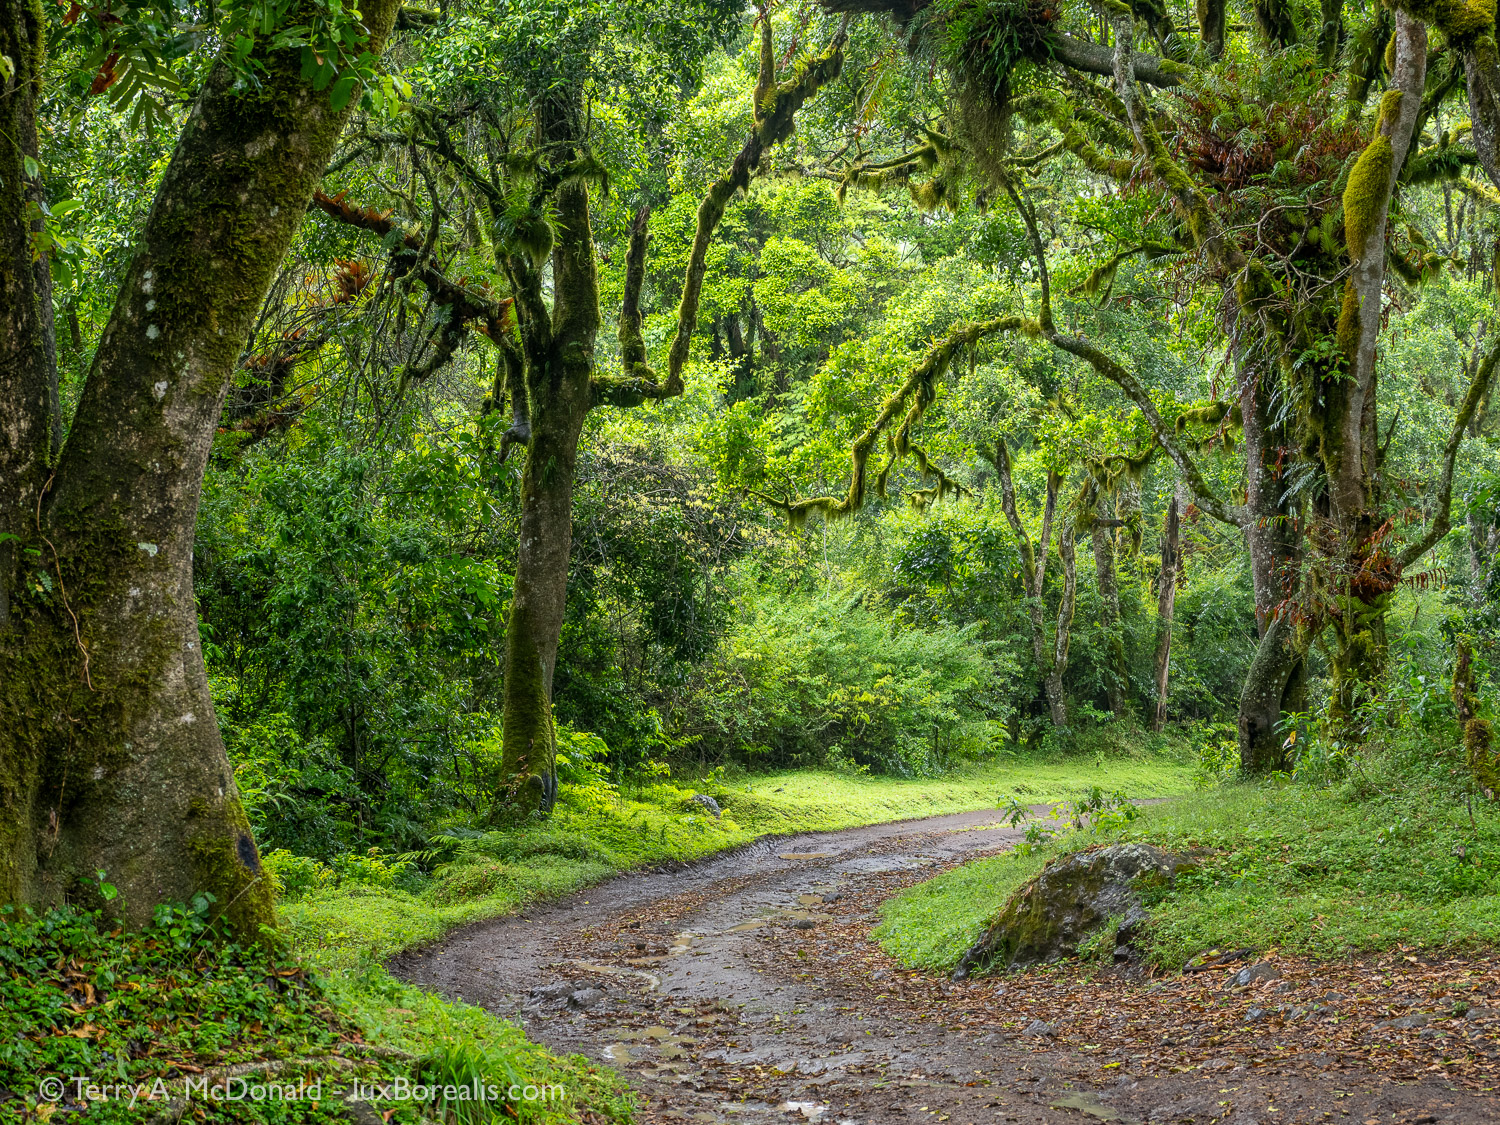
Getting up into the forested area was more difficult than we imagined as the road was in dreadful condition (though it looks smooth here!) Even our driver was upset by the lack of maintenance by park officials. However, it was quiet, very quiet, green (very green), and was dripping with moss, epiphytes and ferns, and a few raindrops as well.
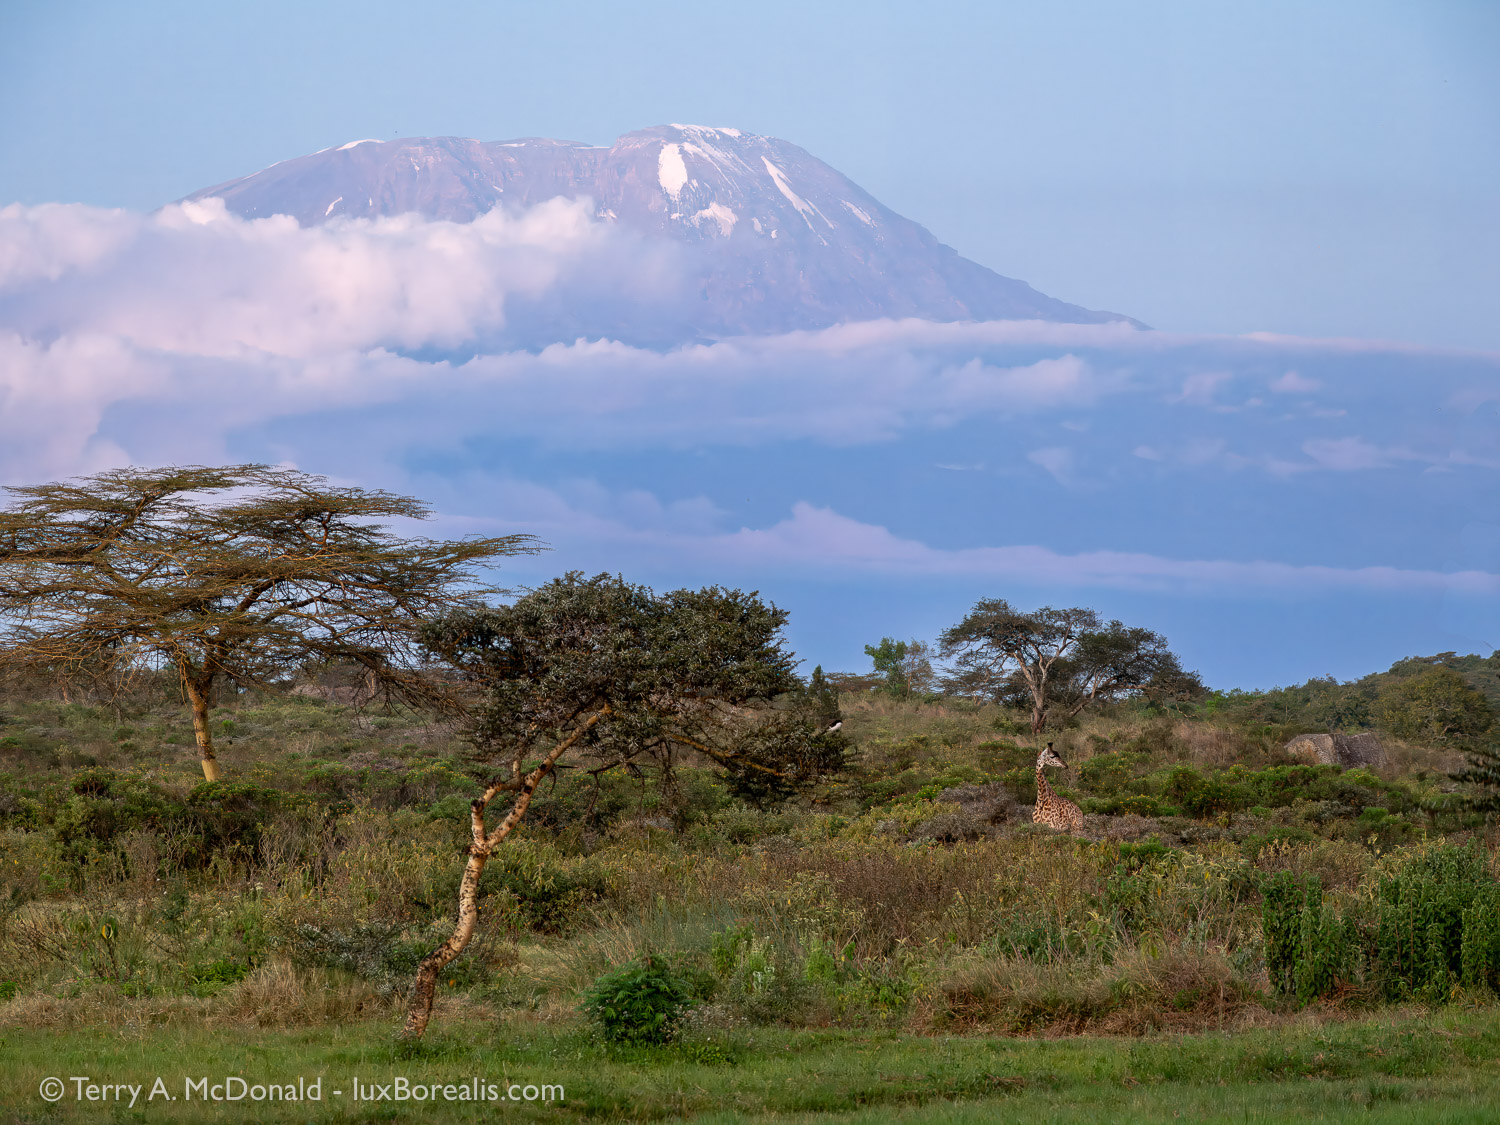
Out of nostalgia, we stayed at Momella Lodge, a tired old place that was first built for the filming of the John Wayne movie ‘Hatari’ back in the early 1960s. But what Momella lacks in updated decor and services, it makes up for in spectacular views of both Kilimanjaro and Meru, that is when the clouds don’t obscure the mountains. For two days we patiently waited, hoping for even a glimpse. When the clouds finally parted to reveal our first view of Kili, even the local workers cheerfully celebrated with a lightening of spirits. ‘Iconic’ is a word that is often overused, but in this case it is true to the mark. Kili, and later Meru, hung around for the rest of our time there, allowing numerous opportunities for photos from dawn through to dusk.
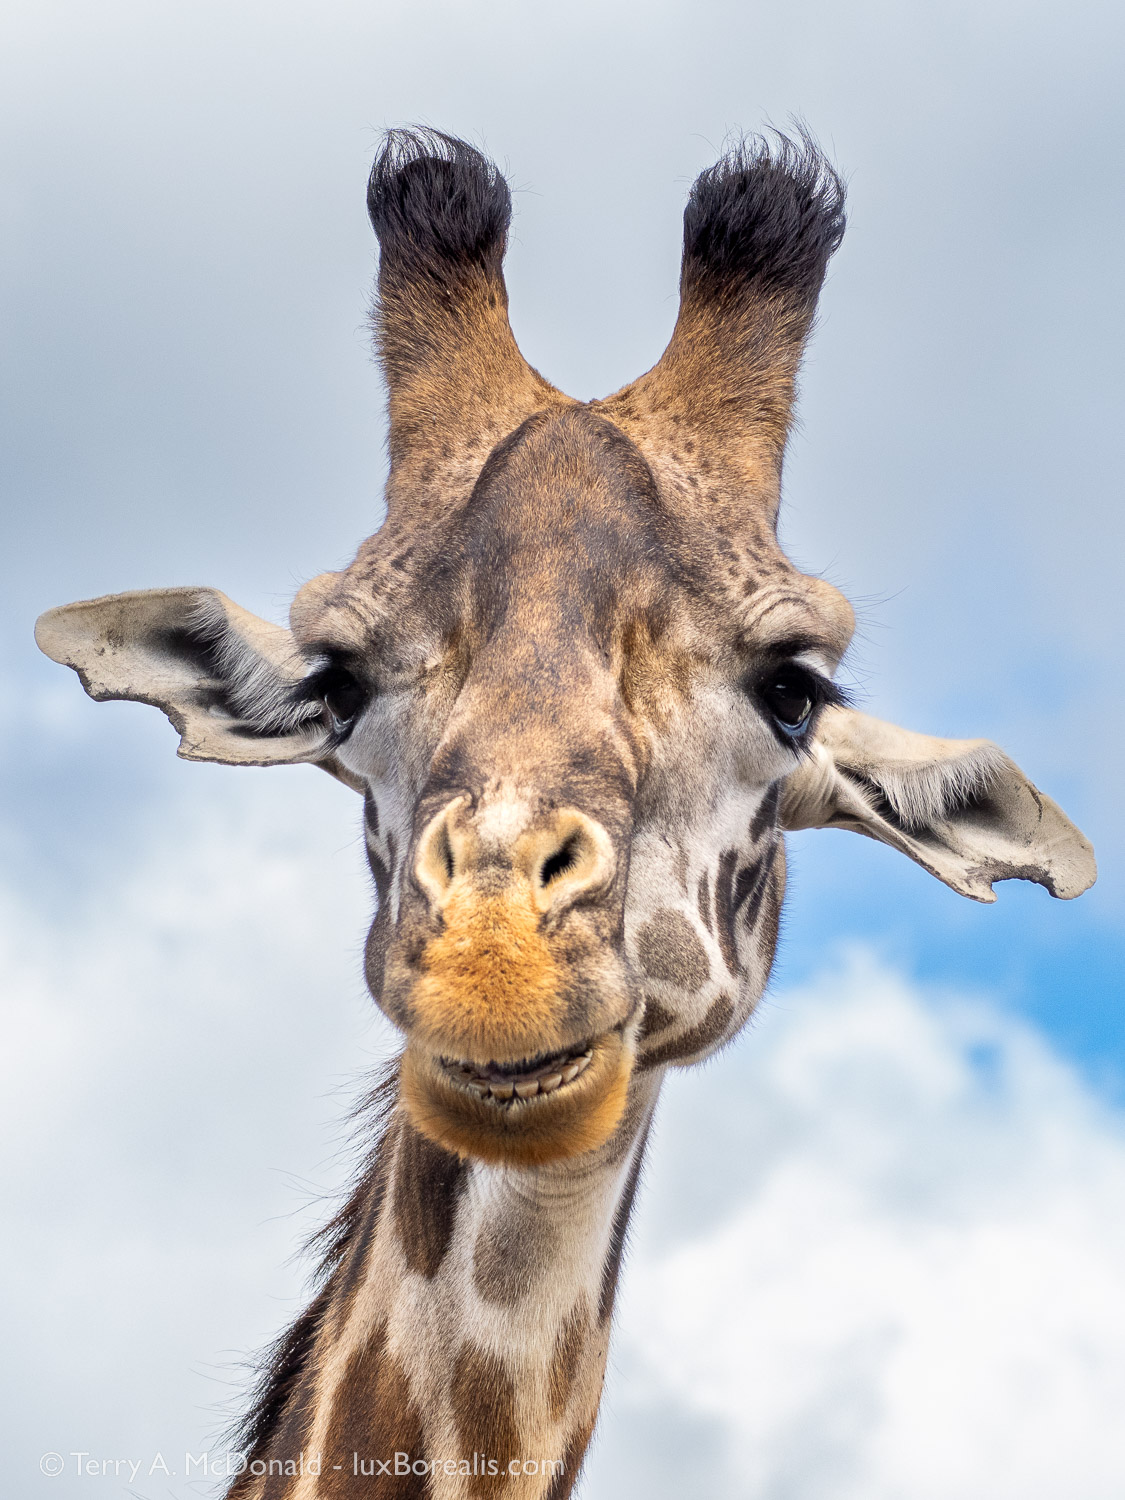
Day 2, 6:47pm (15 minutes after sunset); M.Zuiko 12-100mm PRO at 100mm (200mm efov); ƒ5.6 @ ⅓, ISO 800; raw file processed in Topaz Photo AI and Lightroom.
Creating this photo was a photographic balancing act. I wanted to use Hand-held High Res, but the giraffe would move in the brief time it took to create the file. I could have used a higher ISO, but the shutter speed would still be too low for HHHR. What to do. First and foremost—get the shot, then deal with the processing later. Upscaling 2x in Topaz solved the problem and gave me an 80mp tack sharp image.
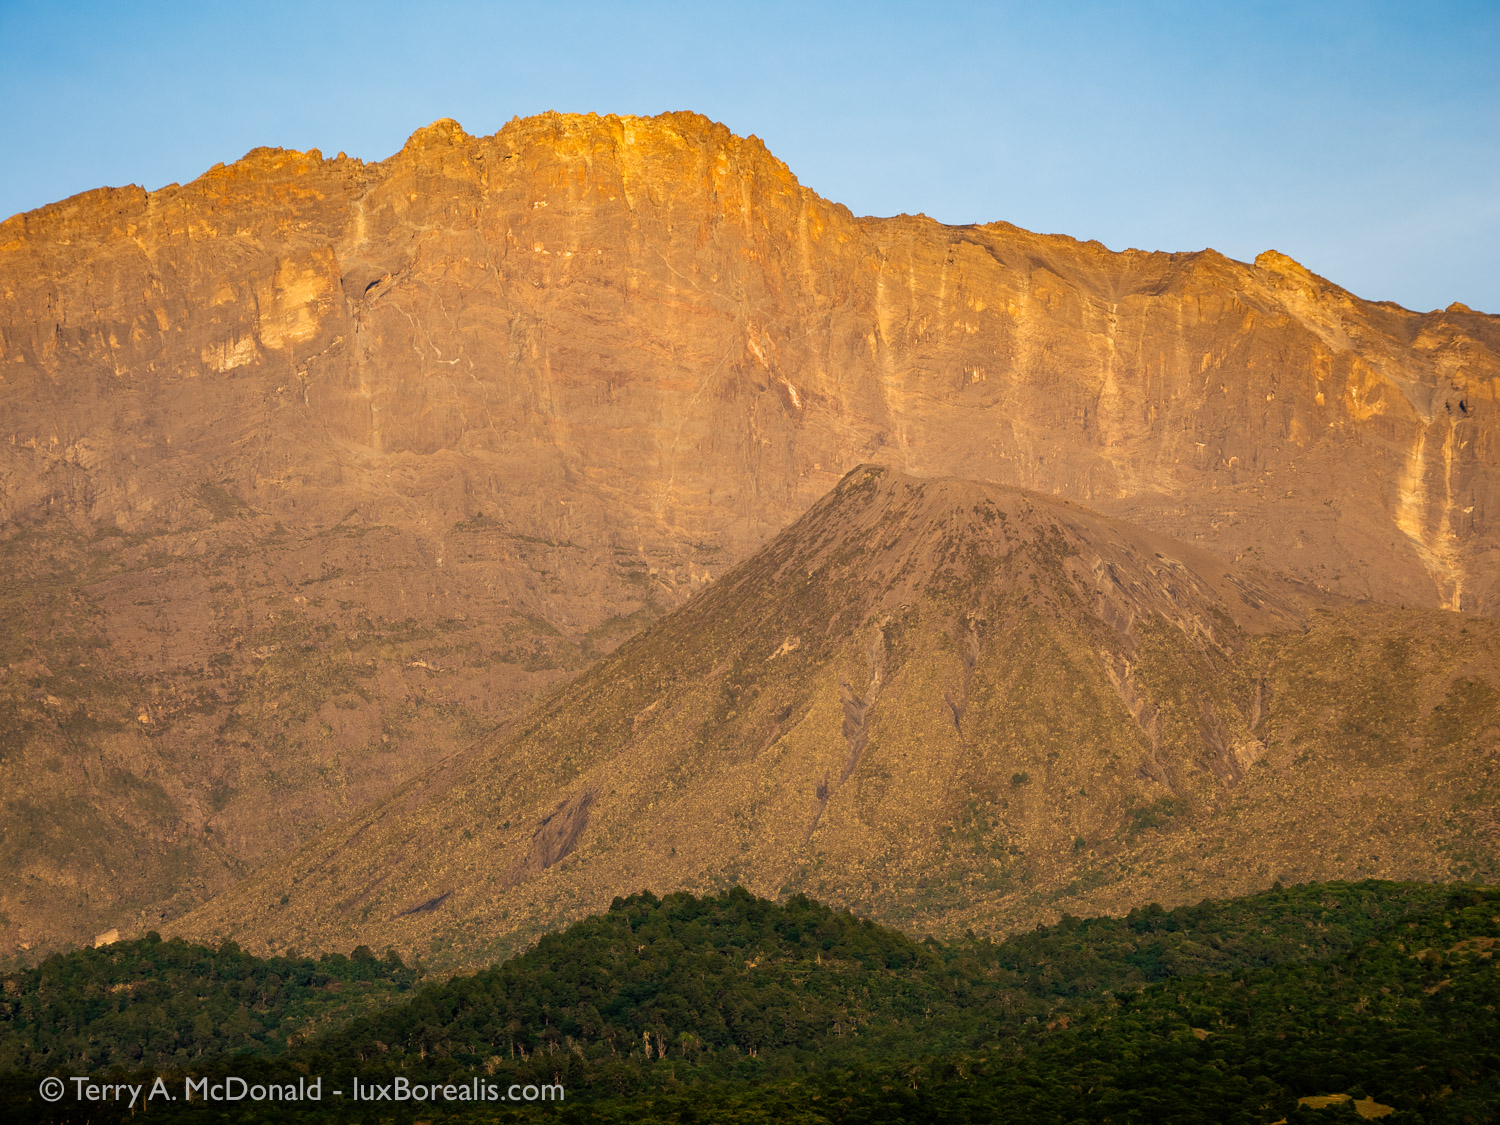
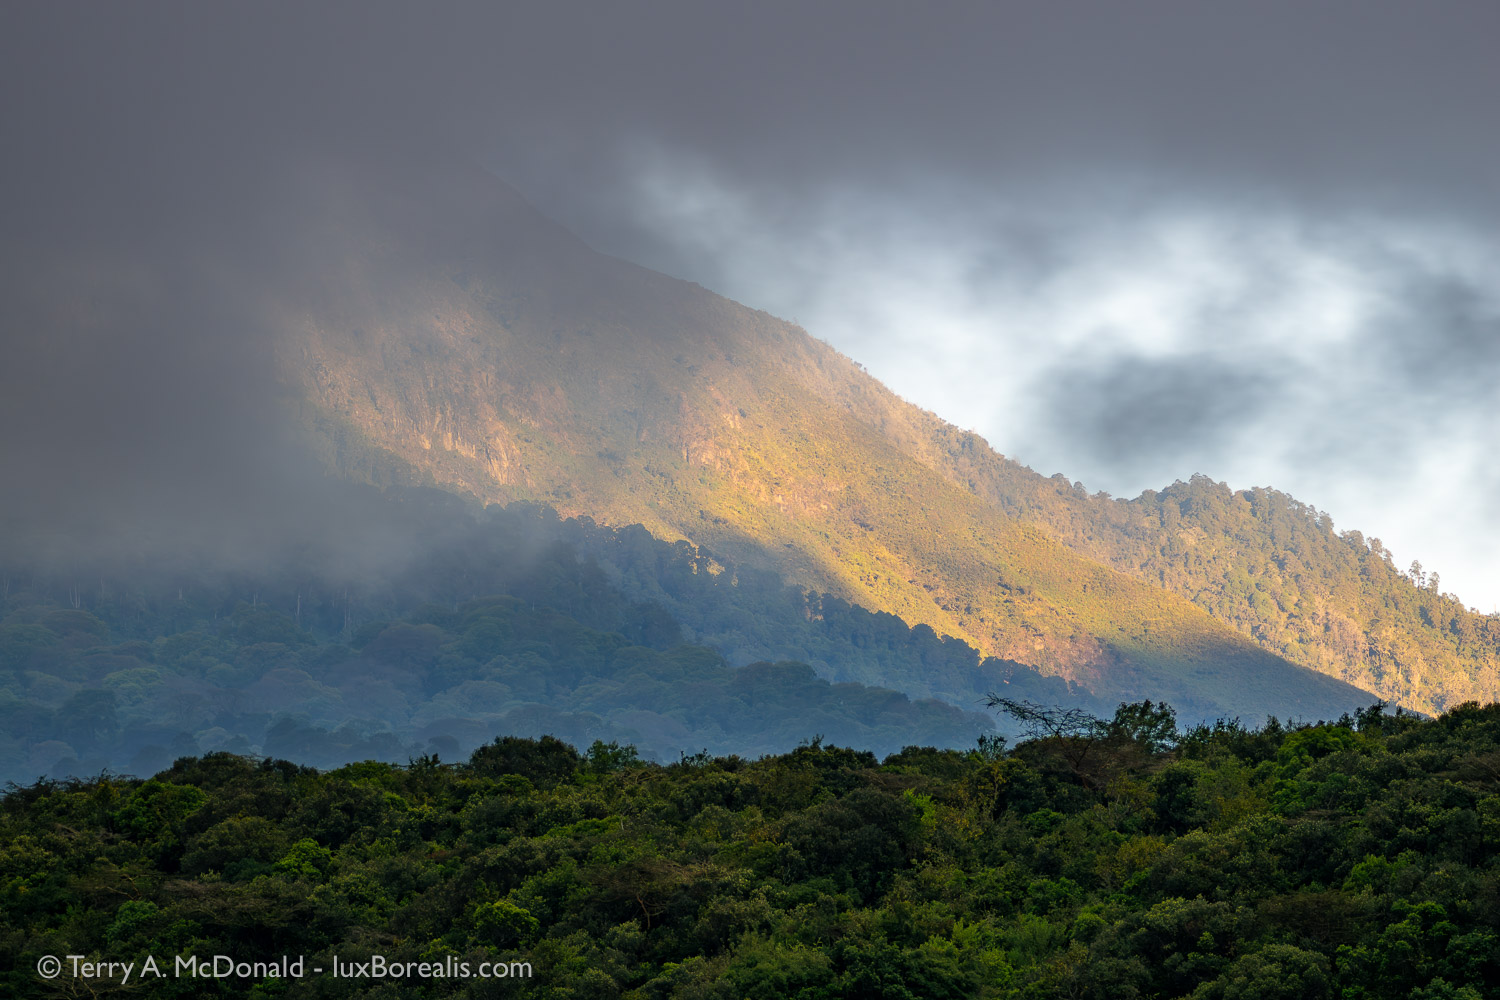
Mount Meru, Tanzania’s second-highest peak, was a once a typical conical volcano. Similar to Mount St. Helens, it blew its eastern side away. Since then a new cone developed, though there hasn’t been any activity for over a hundred years. The ‘wall’ shown here, from the top to the base of the new cone, is one of the highest vertical drops in the world at 1.5km.
Day 4, 6:53am; M. Zuiko 12-100mm @ 86mm (172mm efov); ƒ5.6 @ 1/50, ISO 200; Hand-held High Res.
‘On Safari’
Despite being retired and on vacation, we decided to forgo the casual mornings and head out each morning at dawn for wildlife drives, taking a Thermos of milky Tanzanian tangawizi chai (ginger tea) with us. But one of the best opportunities we had for viewing wildlife was on our way into and through the park on our first afternoon. There is a distinct surge of excitement at the first encounter with giraffe, then zebra and Cape buffalo, and finally monkeys. Big beautiful, black and white Colobus monkeys with their white ‘beards’ and long white, fluffy tails, then Blue monkeys, deep in the shade and more difficult to successfully photograph.
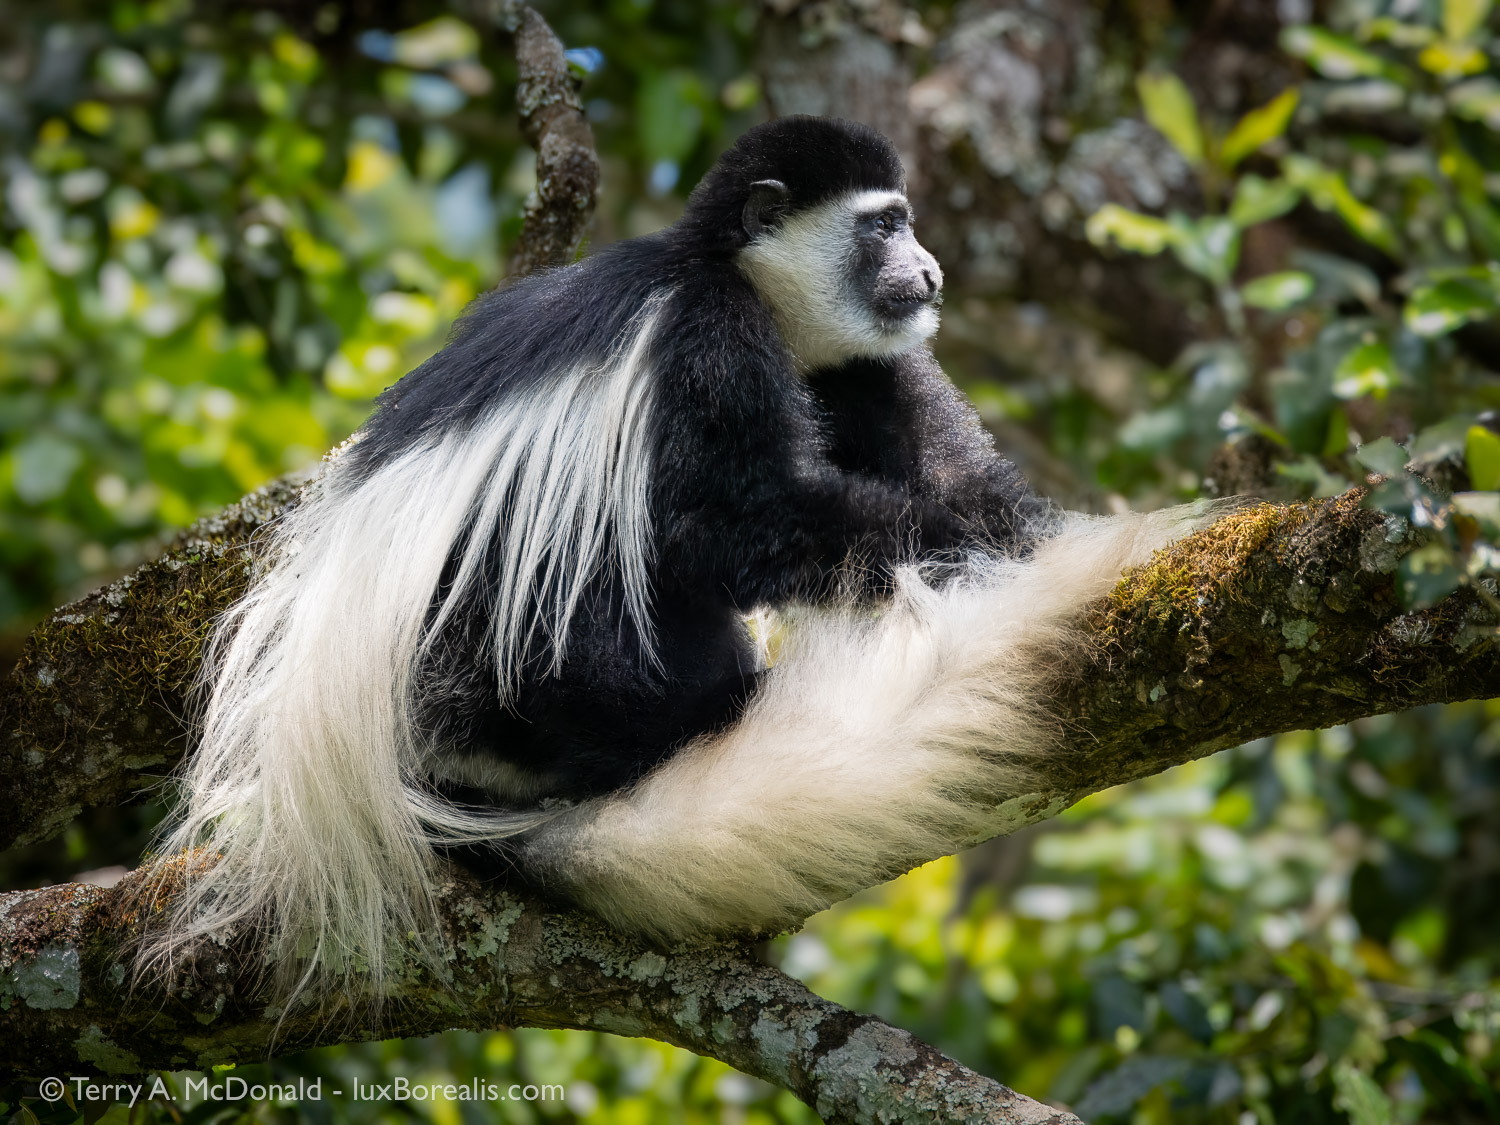
Day 1, 1:33pm; 381mm (762mm efov) w/ MC-14 teleconverter; ƒ11 @ 1/160, ISO 1600; raw file processed in Lightroom and Topaz Photo AI
Less than 30 minutes after entering the park, we had our best views of Colobus Monkeys. At this point, I was hesitant to use ƒ8 as, with long telephotos, depth-of-field is limited to begin with. However with a steady hand, braced on the top of the truck, and a polite request to ‘Stop moving!’ (it really was polite, though perhaps a bit brusque!), the shot was made. This file also benefitted from some nurturing in Topaz to reduce the ever-so-slight movement of the monkey.
The typical safari-goer often doesn’t understand the needs of photographers in having clear sight-lines and enough light to stop even the smallest movements of animals and birds, and to prevent movement in the truck from ruining a great shot. Without other clients in the truck wanting to look-and-move-on, Laura and I had the luxury of patiently waiting and observing wildlife, giving us opportunities to ponder such things as how monkeys keep their fur so clean and soft and glossy-looking in such a dusty place, without using hair products!
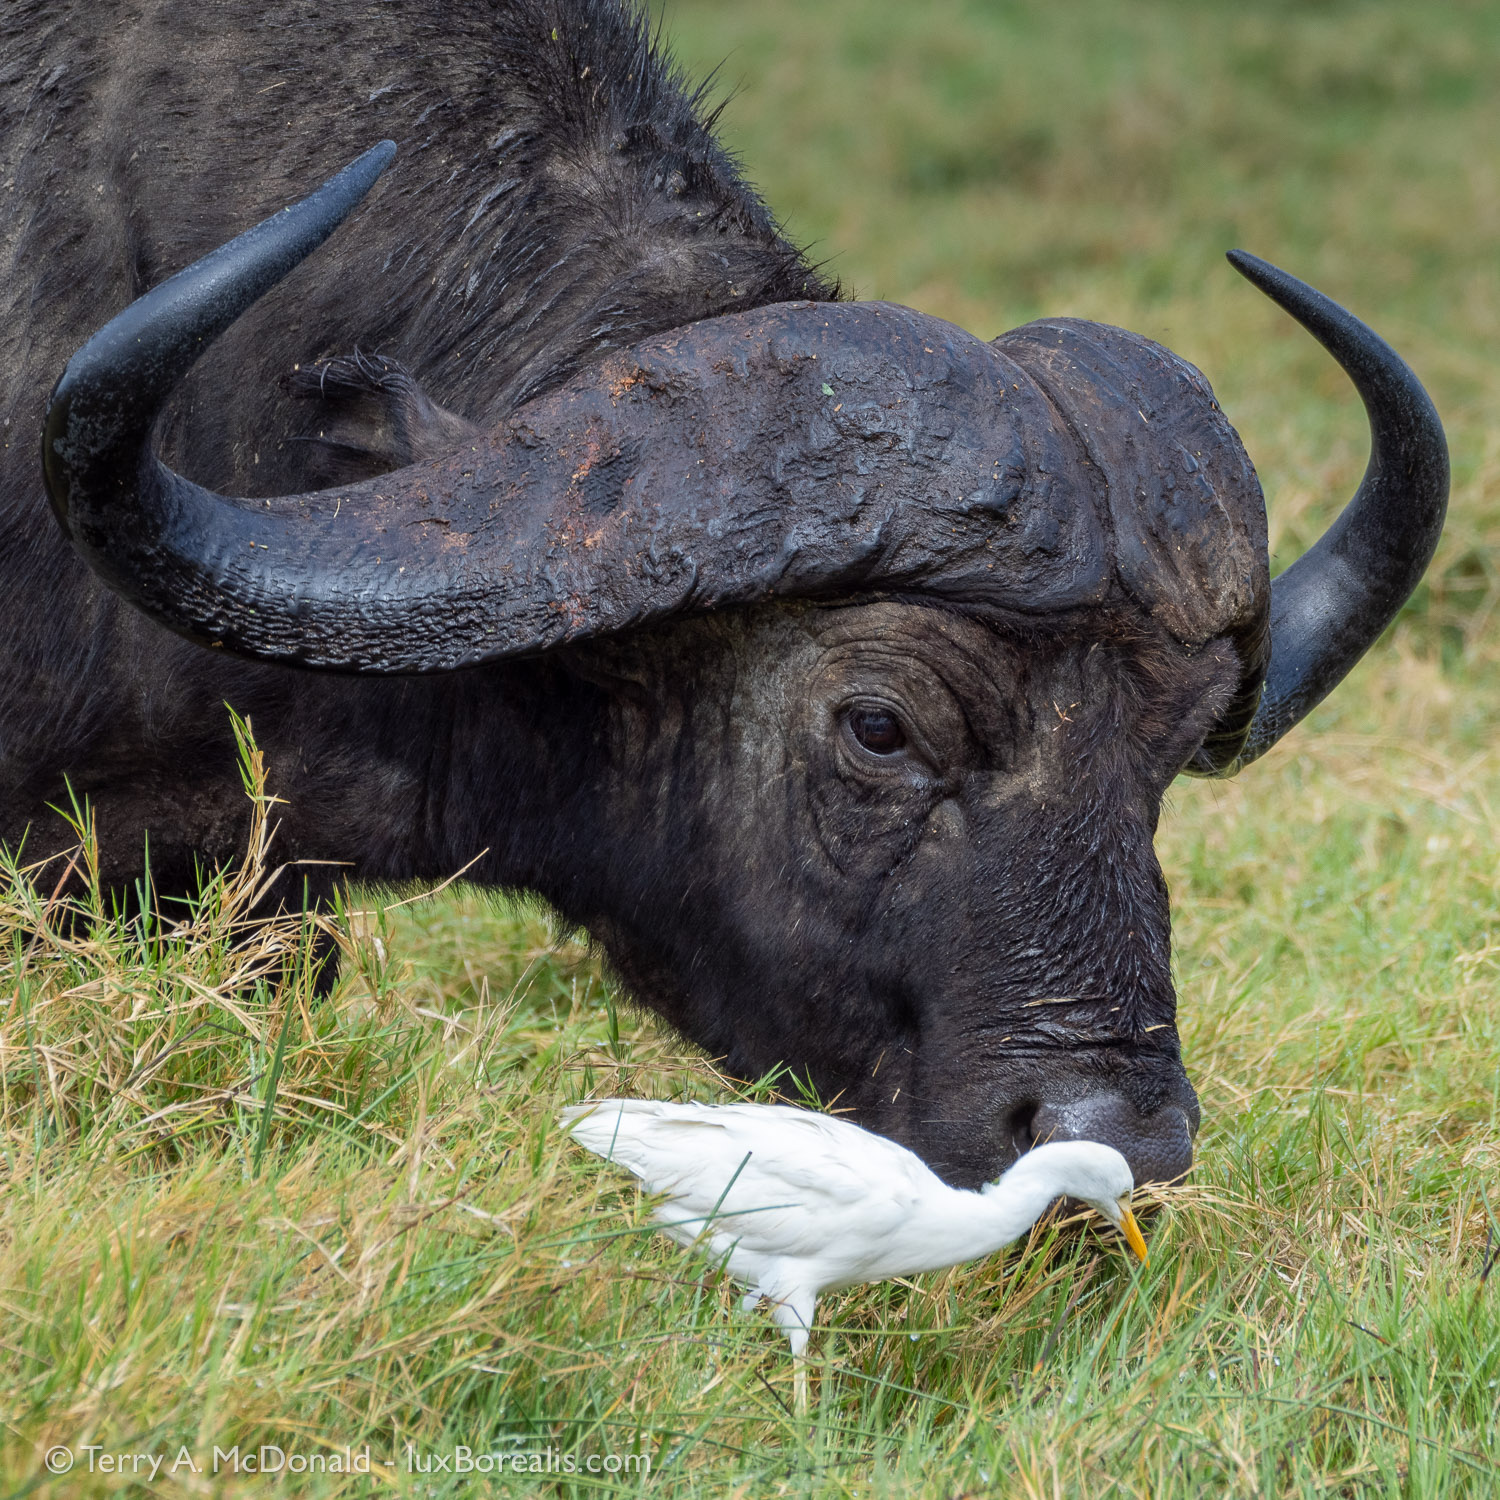
Cape buffalo and Cattle Egret, Arusha National Park
Day 2, 9:11am; Olympus OM-1, 314mm (628mm efov); ƒ8 @ 1/200, ISO 800. The reach of the 100-400 zoom helped to capture full-frame tight crops of these huge ‘beasts’.
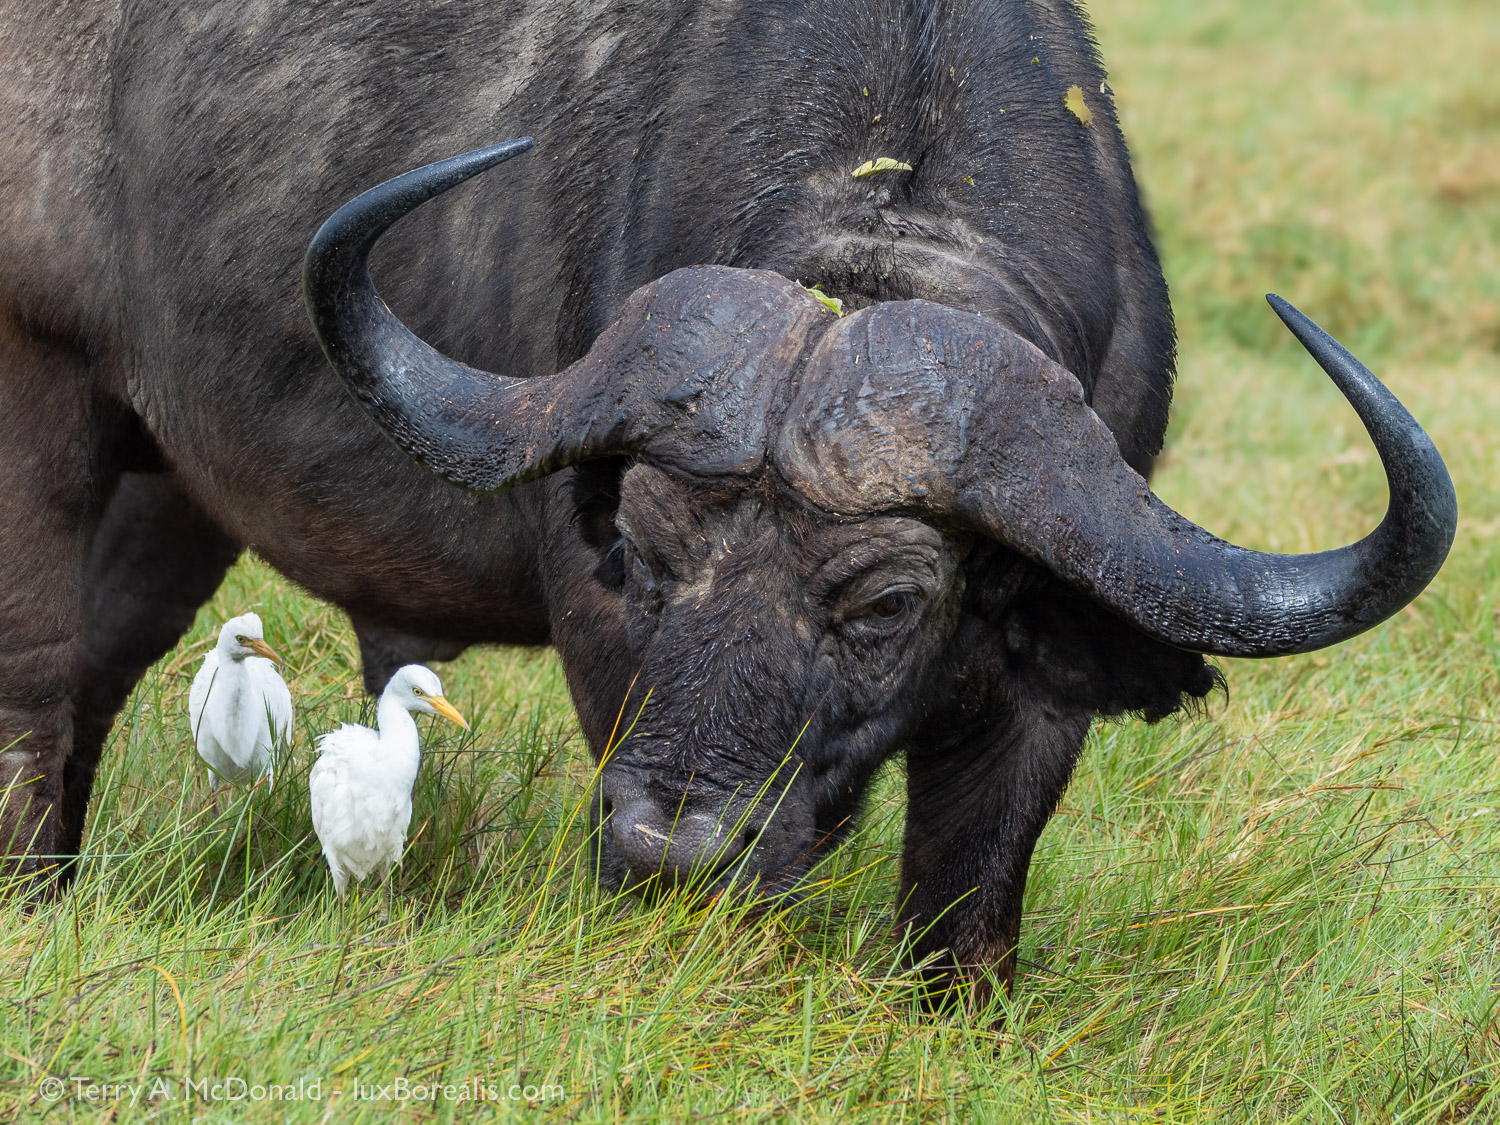
Day 2, 9:11am; Olympus OM-1, 244mm (488mm efov); ƒ8 @ 1/400, ISO 800. Both of these photos were made at the same time as the photo above. We just sat and enjoyed watching the herd as they ambled nearer and nearer to us.
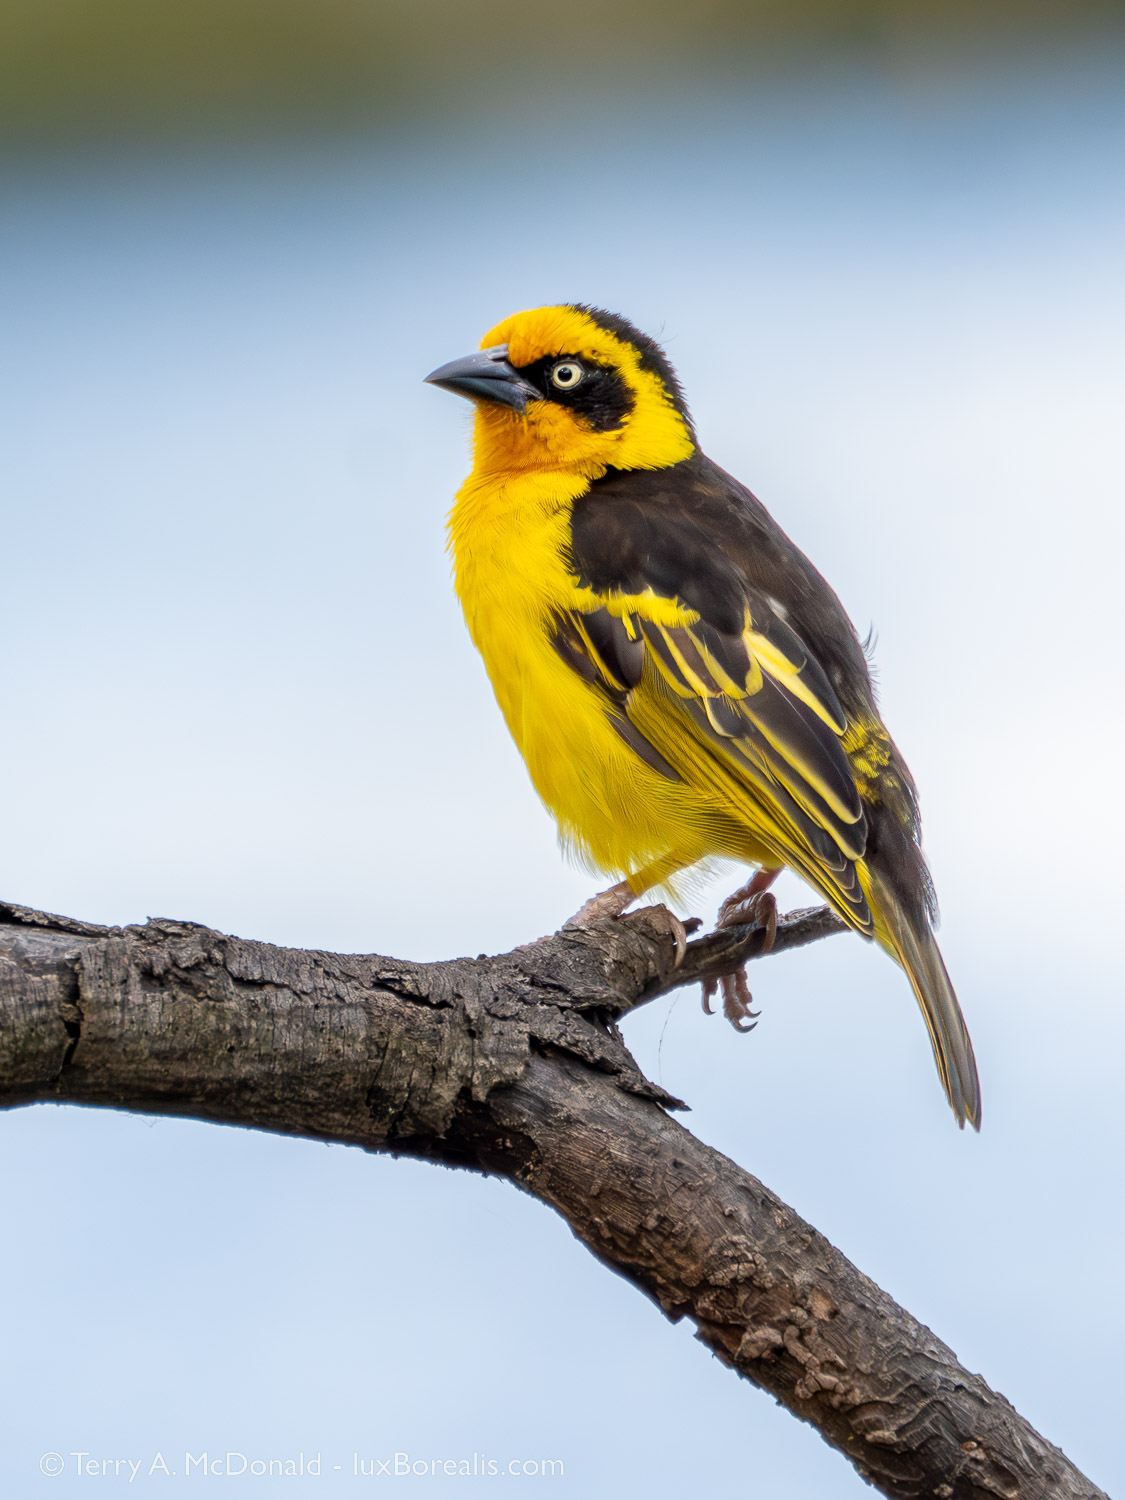
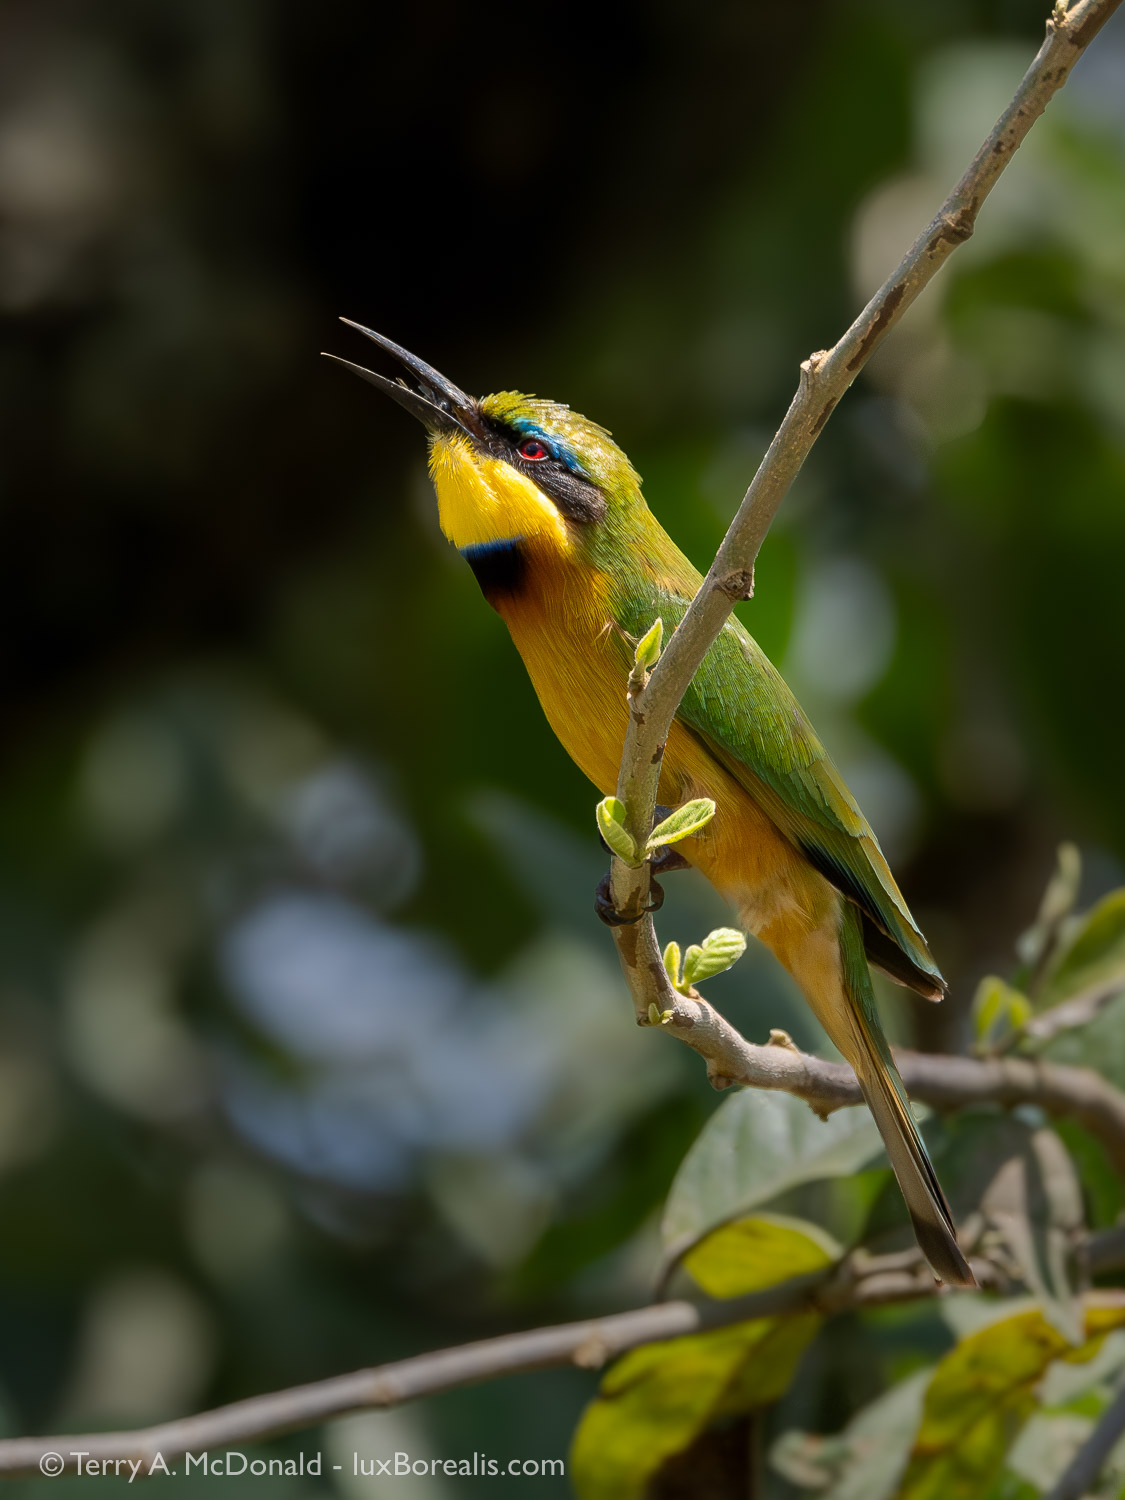
The same excitement accompanies the sighting of each of the many brilliantly-coloured bird species: the green and yellow flashes of little bee-eaters, the bright yellow Northern Yellow White-eye, bronze and variable sunbirds and lilac-breasted rollers. Under the dazzling tropical sun, their iridescence is awesome in the true sense of the word. Capturing their fleeting forms in just the right light with just the right background is the supreme challenge! I am always envious of birders who are ecstatic with an audible confirmation or even a fleeting glimpse. Bird photographers need a whole lot more to realize true success.
Day 2, 1:57pm; 400mm (800mm efov); ƒ8 @ 1/1600, ISO 1600; Lightroom + Topaz Photo AI
Day 2, 4:23pm; w/ MC-14 teleconverter, 560mm (1120mm efov); ƒ11 @ 1/640, ISO 1600

Day 2, 3:46pm; with MC-14 teleconverter, 560mm (1120mm efov); f11 @ 1?3200, ISO 1600; Lightroom + Topaz Phot AI
Day 2, 5:30pm; 400mm (800mm efov); ƒ11 @ 1/400, ISO 400
Again, careful observation of behaviour combined with patience are the keys. We noticed how frequently other safari trucks stopped alongside us then, not immediately seeing any ‘big game’, started up and continued on, missing the birds and wildlife that begin to appear after only a few minutes of quiet, once the dust had settled. It is these observations and photographs that have so enriched our experiences of being ‘on safari’.
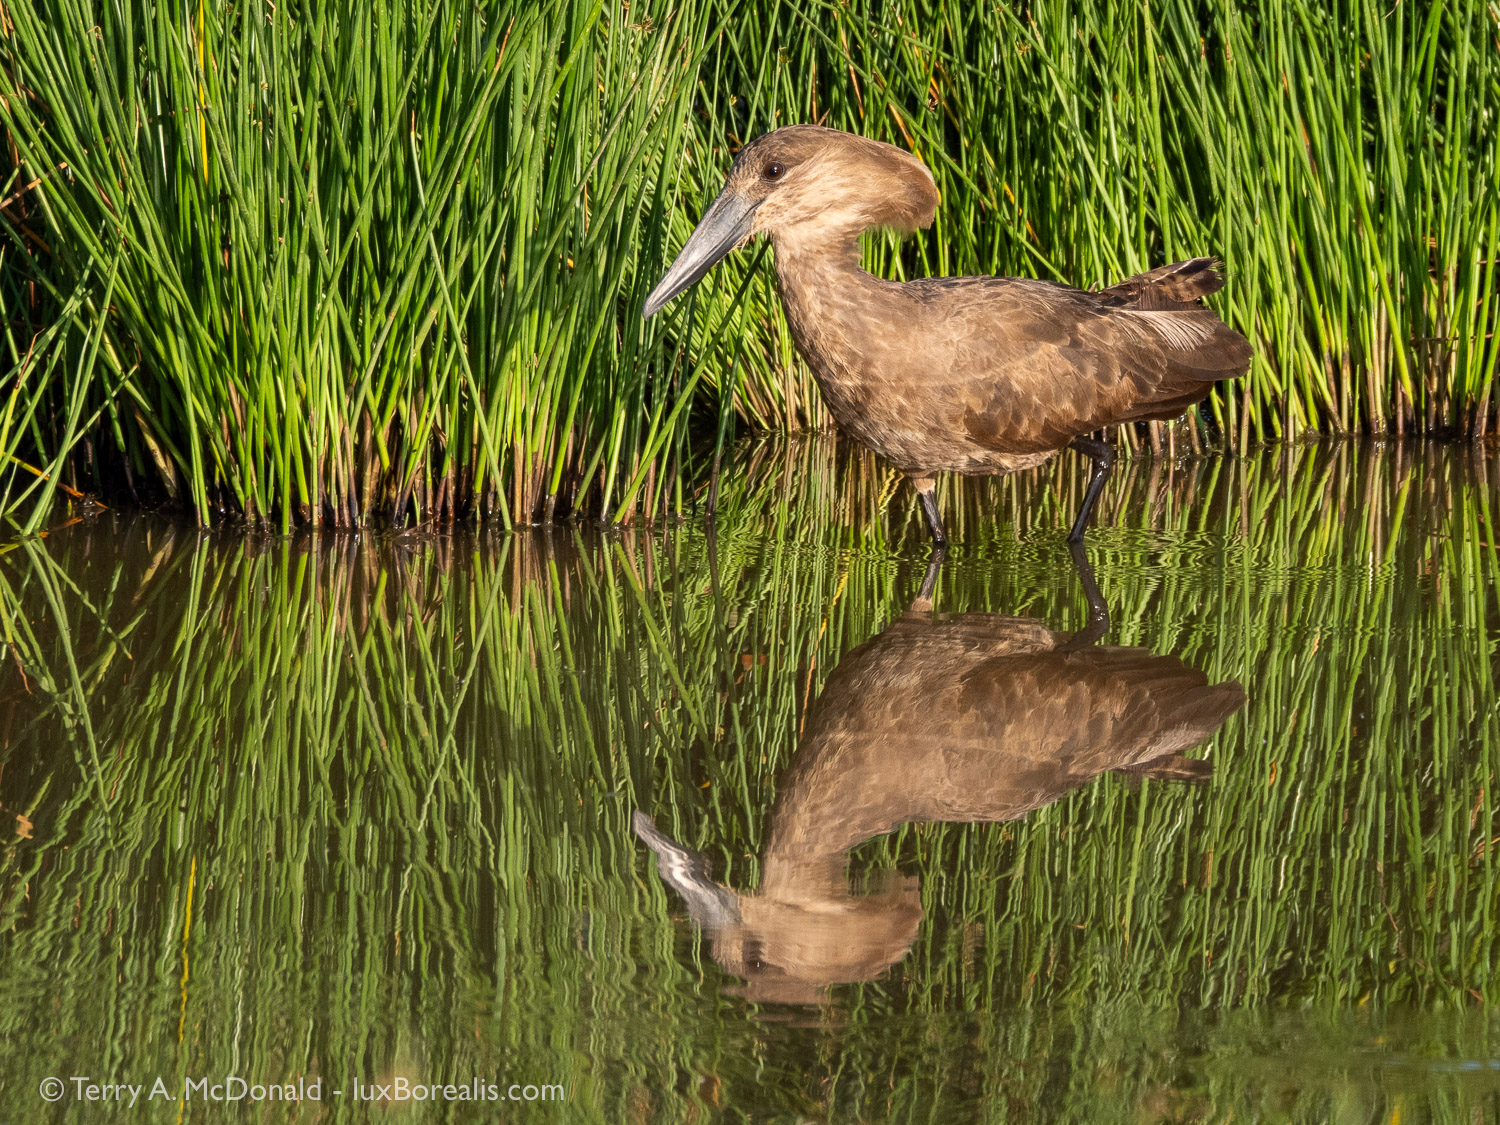
Day 3, 7:54am; 210mm (420mm efov); ƒ6 @ 1/50, ISO 3200 (Yes, it was dark in the understory); Lightroom + Topaz Photo AI
One of the highlights of Arusha National Park is the giraffe, giving the park the informal moniker of ‘Giraffic Park’. Seeing up to a dozen giraffes at a time was thrilling. Such gentle giants. We were sad to learn that during COVID, the giraffe population in ANP was almost wiped out due to the misguided belief that bone marrow from their neck was a ‘cure’ for COVID. This, in a country whose government under President Magafuli rejected any notion of the existence ofCOVID—go figure. Giraffe numbers have since rebounded and they are easily seen roaming around the park, through the lodge grounds, or popping up like periscopes amongst the low shrubs. With a face like theirs, what’s not to love!
Day 2, 2:34pm; 100mm (200mm efov); ƒ6.3 @ 1/1000, ISO 800

Day 2, 2:57pm; 150mm (300mm efov); ƒ8 @ 1/1000, ISO 800
From a photography perspective, the 100-400mm zoom was on the camera 90% of the time. I changed to the 12-100mm zoom (24-200mm efov) only for the landscape views of Kili and Mt. Meru. At times I used the MC-14, 1.4x teleconverter, and had some good success with it (see the Colobus Monkey and Baglafecht Weaver photos), but I also found that at times there was a very slight softening of details (see African Sacred Ibis photo). Even with noise reduction and subject sharpening, it’s not quite ‘there’. The other factor working against use of the teleconverter were the obvious heat waves that were magnified over long distances.
Image Processing
All images were processed in Lightroom on an iPad Pro, usually in the evening of the day they were made. Evenings were ideal because sunset was around 6:30pm followed by dinner and ‘down time’. Despite the shortcomings of Lightroom for iPad, I deliberately left the laptop at home to free-up weight. As well, the OM-1 connects directly and easily to the iPad via the same USB-C to USB-C cord used for charging. I like the intuitiveness of editing on iPad, using the pencil/stylus is ideal for creating adjustment masks. It allows for a lightweight, fast and effective workflow when travelling, even though Adobe continues to handcuff Lightroom for iPad despite having the power of the Apple ‘M’ chip (grumble-grumble-grumble).
Upon returning home, some of the images have also been processed through Topaz Photo AI. It’s the first time I’ve needed to venture away from Lightroom for processing but I found that while Lightroom is ideal for exposure, colour, and masking, Topaz provides superior raw de-noising and sharpening. I also welcomed the fact that the edits I performed in Lightroom while ‘on safari’ can be directly applied to the DNG file I re-import from Topaz into Lightroom—the best of both worlds.
@ 200%
@ 200%
At screen size, the photos are indistinguishable without very close scrutiny. At 100%, the Original raw is fine for small prints, but benefits from Lightroom Denoise + Sharpen. However, as this is a crop of 1712×2283 pixels, the file definitely benefits from the upsizing possible in Topaz to provide a more substantial 3424x4565px size for larger prints. Even at 200%, there is no discernible loss of sharpness. It’s not perfect, but to me, the trade-off is worth it. The only noticeable deterioration is in the slight loss of feather detail in the black primary wing feathers. I’ll post another blog specifically about the benefits and costs of Topaz.
As I continued with my shooting, I began to use ƒ11 less and ƒ8 more. ƒ8 provides more light (= faster shutter speed and/or lower ISO), and the loss of depth-of-field is negligible. I always began each shooting sequence at ISO1600 to ensure a sharp capture at high magnification. Once I get the shot, I begin dialling back to ISO 800, 400 and sometimes 200, when lighting and subject permit. I find I can hand-hold at 400mm (800mm efov!) down to about 1/30th, but that is only when conditions are ideal and the subject co-operates, which is rare when they are always moving whether to swish away the ever-present flies or to avoid predators. Additionally, even the slightest of breezes can set a branch swaying adding yet another challenge to bird photography. And then there’s the challenge of being in a truck with two other people moving around. I’m not complaining, just laying it out there. High magnification bird and wildlife photography in general has its challenges beyond finding your subjects!
Day 4, 1:12pm (on the way out of the park); 400mm (800mm efov); ƒ11 @ 1/1600, ISO 1600. I love this photo, having caught the bee-eater ‘doing its thing’, but I hate the distracting background. I believe in real-world photography which means I do not swap backgrounds, so this one I’ll need to work on a bit more.
Overall, I am truly thrilled with the success rate of my Olympus system. I am not exaggerating when I say I easily had 5 to 10 times the success rate than I when I shot full-frame Nikon. Why? It all comes down to a combination of lighter-weight gear, longer reach, and amazing stabilization. Did I get all the shots I had hoped for? Sadly, no. Some were my fault, mostly from not properly anticipating what the bird or mammal would do next, or I became too stabilization-dependent and didn’t take proper care to be steady. Others shots were missed due to focusing issues, particularly with birds-in-flight, a technique I really need more practice with.
That being said, the OMD/Olympus system is so efficient that I still have far more ‘keepers’ than I know what to do with.
I will follow up this blog with Part 2 with our first safari to Tarangire National Park—lions and elephants and vultures, oh my!
If you have any questions about safaris, gear, processing or the photos, be sure to add a comment.
Sign up to receive an email notice of new blogs.
Use the box below for subscribing. You email will never be shared.
Have a look at my work by visiting www.luxBorealis.com and consider booking a presentation or workshop for your Nature or Photo Club or a personal Field&Screen workshop at Workshops.
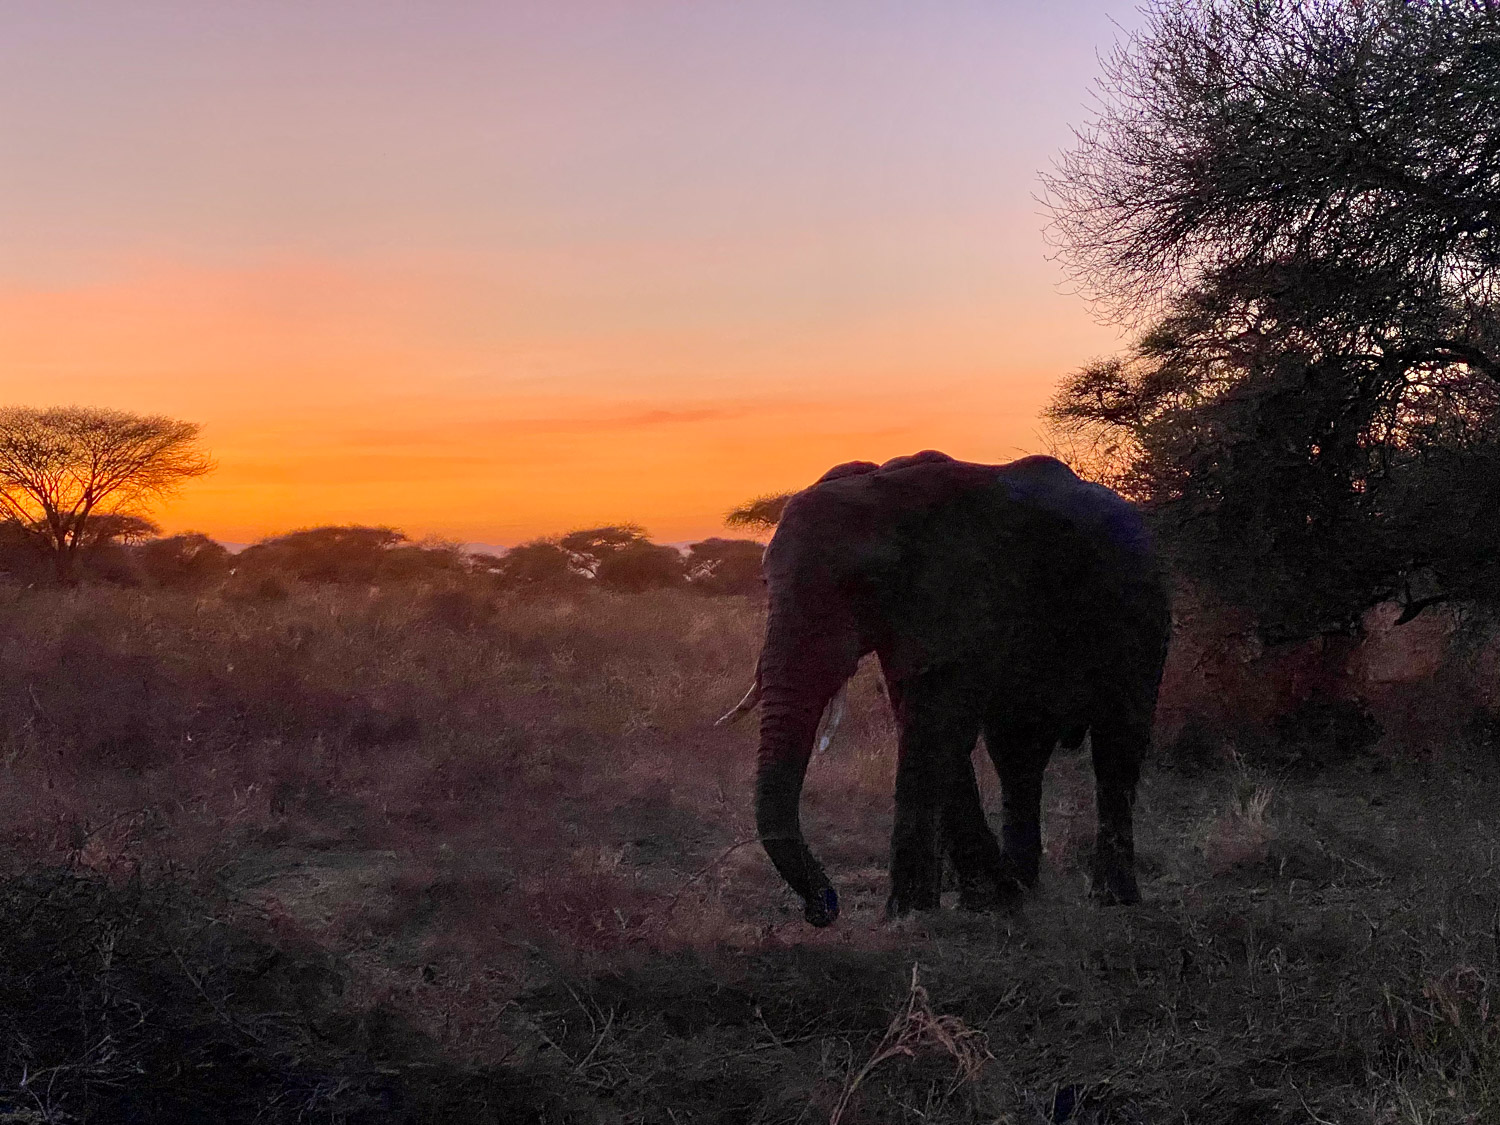
iPhone 11 Pro 2x camera—and, yes, the elephant was that close! But that’s Tarangire for you. (Photo made by Laura as, for once, I was driving!)
Discover more from luxBorealis Blog
Subscribe to get the latest posts sent to your email.

Fantastic blog post, Terry! Interesting back stories to all your fabulous photos. IMHO, the ones of the birds are truly outstanding. It certainly takes a lot of patience to photograph birds. I hope at some point you’ll consider creating a poster, “Birds of Tanzania”, similar to the one you produced earlier this year, “Birds of the Rideau”. Let me know if you do!
Thanks, Cathy. It really was a thrill to have an opportunity to capture so many successful photographs. Yes, I am thinking about a “Birds of Tanzania” poster, but it will need to be twice the size as I have over 100 species photographed to the quality needed for a poster!